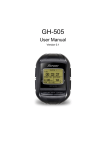
1
SOFTWARE VERSION 2.63 Global Trainer V.2.63 Table of Contents Subject Page Important Safety Instructions and Warnings 1 Software Version 1 Battery Charging 2 Input Personal Information 3 Pairing the Heart Rate Sensor 3 Watch Buttons 4 Display Icons 5 Performance Mode 5 Performance Pacer 11 Multisport Mode 13 Navigate Mode 15 Review Mode 19 Configure Mode 22 PC Sync Mode 32 Care and Maintenance 34 Warranty & Service 35 Important Safety Instructions and Warnings 1.To prevent risk of fire, chemical burn, electrolyte leak and/or injury from the internal Lithium-polymer battery: A.No user-replaceable parts inside. Do not attempt to remove the non-user-replaceable battery. B.Do not leave unit exposed to a heat source or in a high temperature location (such as in the sun or in an unattended vehicle). To prevent damage store it out of direct sunlight. C. Do not puncture or incinerate. D.When storing from an extended time, store within the following temperature range: 32°F to 77°F (0°C to 25°C). E. The Global Trainer™ watch should only be charged within a temperature range of 32°F to 113°F (0°C to 45°C). F.Do not operate the unit outside of the following temperature range: -4°F to 131°F (-20°C to 55°C). G.Contact your waste disposal department to properly recycle/dispose of the unit/battery. 2.Use only the Phihong PSB05R-050Q power adapter supplied with this product. 3.This is not a medical device and is not recommended for use by persons with serious heart conditions. You should always consult your physician before beginning or modifying an exercise program. 4.Consulting the speed+distance system while moving is unsafe and distracting, and could result in accident or collision. Use the memory functions to later review your performance data. See the instructions for details. 5.Interference with the radio signal, poor contact between your skin and the chest strap, and other factors may prevent accurate transmission of heart rate data. Global Trainer Software Version This User Guide reflect the latest instructions for Global Trainer software version 2.63. To determine your watch’s version; press MODE to CONFIGURE, press q to GPS, press q to VERSION and press (8 ). You can update the Global Trainer software through instructions posted on the Timex Device Agent downloadable to your computer desktop. 1 Getting Started Introducing your new workout partner: the Global Trainer™ Bodylink® System Watch. This comprehensive performance monitoring device incorporates GPS technology and ANT+™ sensor integration for multiple sports to provide a powerful tool for getting the most out of your workouts. What’s In the Box •Global Trainer™ Bodylink® System Watch •USB download/charging clip with AC adaptor and prongs •Flex Tech™ heart rate monitor strap — heart rate model only • Handlebar bike mount To Charge Your Global Trainer™ Bodylink® System Watch Before you use the device for the first time, the battery must be charged. A full charge on an empty battery takes approximately 2 1/2 to 3 1/2 hours. To Charge Using the USB Cable 1.Insert the large USB-A plug on the download/charging clip into a USB port on any computer. 2.Attach the download/charging clip to the back of the Global Trainer™ Bodylink® System Watch. Make sure the four contacts on the connector touch the four metal discs on the back of the watch. Match the red dot on the watch with the red dot on the connector for proper orientation. To Charge Using the AC Adaptor 1.Insert large USB-A plug on the download/charging clip into the USB port on the AC adaptor. 2.Plug the AC adaptor into an electrical outlet. 3.Attach the download/charging clip to the back of the Global Trainer™ Bodylink® System Watch. Make sure the four contacts on the connector touch the four metal discs on the back of the watch. Use only the Phihong PSB05R-050Q power adapter supplied with this product. Charging Displays If Power Off Function in configure mode is set to SHOW TIME, the date and time will display during charging whether the device is powered on or off. A blinking battery icon appears in the status bar during charging. A solid battery icon appears when charging is complete. If Power Off Function in configure mode is set to TURN OFF DISPLAY, and the device is powered off, the message BATTERY CHARGING displays above a partially full battery icon when charging. When the battery is full, the message CHARGING COMPLETE displays above a full battery icon. Button labels BACK/PWR (8) – Turn the Global Trainer™ Bodylink® System Watch on and off, or go back to the previous menu. UP (p) – Select the previous item in a list. ENTER (8 ) – Confirm the highlighted selection. DWN/STP/RST (q) – Select the next item in a list. To Turn the Global Trainer™ Bodylink® System Watch On and Off To turn the device on or off, hold the 8 button for 2 seconds until you hear a three-note tone. The tone ascends in pitch when powering on, and descends in pitch when powering off. If Power Off function in Configure mode is set to SHOW TIME, the date and time display when the device is turned off. If Power Off function in Configure mode is set to TURN OFF DISPLAY, the display is blank when the device is turned off. The default setting is SHOW TIME. NOTE: When the device is set to TURN OFF DISPLAY, better standby battery life is obtained. Time of Day The time of day, in hours and minutes, appears in the status bar in each mode. Set the time zone, time format, and other preferences in the Watch menu in Configure mode. NOTE: The time, date, and day of week are set automatically by the GPS and cannot be changed manually, but can be adjusted based on your configure options. 2 To Enter Your Personal Information To accurately measure the performance of your workouts and to assist in calculating your heart rate zones, enter your gender, weight, date of birth, and default activity in the User Info menu in Configure mode. 1.Press MODE until CONFIGURE appears. 2.Press until USER INFO is highlighted. 3.Press 8 screen appears. 4.Press UP or DOWN to select Personal and press ENTER 5.Press p or to choose the setting group to change, then press to open the setting change window. 6.Press p or to highlight a selection in the setting change window, then press 8 tion. to confirm your selec- To Pair the Global Trainer™ Bodylink® System Watch to the Digital 2.4 Heart Rate Sensor Timex recommends that you pair the Digital 2.4 Heart Rate Sensor to your device to minimize the possibility of picking up a signal from another person’s Heart Rate Sensor. 1.Press MODE until CONFIGURE appears. 2.Press to highlight SENSORS, then press . The SENSORS screen appears. 3.Wet the heart rate sensor pads. 4.Fasten the sensor firmly to your chest, just below your sternum 5.Press to highlight NO in the field to the right of HEART RATE, then press to open the setting change screen. 6.Press to highlight, then press to confirm your selection and close the setting change window. The Global Trainer™ Bodylink® System Watch searches for the heart rate strap for up to ten seconds. When the strap is successfully paired, the field next to HEART RATE will read HR. Overview New Features •Performance mode – Keep track of multiple variables during your workout, including speed, distance, elapsed time, pace, and calories burned. •Multisport mode – Incorporate several activities and transition periods into a single workout, and track all of them together. •Customizable screen displays – View up to four workout metrics of your choosing in either Performance or Multisport modes, so your unique workout information is always at your fingertips. •Performance pacer – Test yourself against your saved workouts to track your progress and improvement over time. • GPS – Pinpoint your location and store your favorite workout routes, and save locations as waypoints for later use in workouts. •Track back – Calculate a route from your current position to any stored waypoint. 3 •Computer integration – Download settings from your computer to your Global Trainer™ Bodylink® System Watch for easy customization, and upload your workouts to your computer to track your progress. •ANT+™ sensors – Monitor your heart rate to maintain the level of activity th at matches your personalized workout needs, and pair with speed,cadence, and power sensors for integrating cycling into your workout routine. Buttons INDIGLO® UP () BACK/PWR (8) ENTER ( ) MODE DWN/ST/RST () START/SPLIT INDIGLO® Press the INDIGLO button at any time to activate the INDIGLO night-light for several seconds. Hold the INDIGLO button for 4 seconds to activate Night-Mode. While the Global Trainer™ Bodylink® System Watch is in Night-Mode, any button you press activates the night-light for a few seconds. Night mode remains active for 8 hours, but you can hold the INDIGLO button for 4 seconds to deactivate Night-Mode before 8 hours elapses. BACK / PWR (8) Hold the 8 button for 2 seconds to turn the Global Trainer™ Bodylink® System Watch on or off. Press the 8 button in any mode to go back to the previous menu. MODE Press the MODE button to cycle through the Global Trainer™ Bodylink® System Watch’s operation modes. In any mode, hold the MODE button for 1 second to view the time and date. Release the MODE button to go back to the screen you were viewing. START / SPLIT Press START / SPLIT in Performance or Multisport mode to begin timing a workout. Press it again when the chronograph is running to take a split and time laps individually. DWN / STP / RST () In a menu, press to highlight the item below or to the right of the currently selected one. In Performance or Multisport mode with the chronograph stopped, press to display the next view screen. In Performance mode with the chronograph running, press to stop the chronograph. In Multisport mode with the chronograph running, press to transition to the next sport. Hold to stop the chronograph. ENTER Press to confirm the selected item in a menu. UP () In Performance or Multisport mode with the chronograph stopped, press to display the previous view screen. In a menu, press to highlight the item above or to the left of the currently selected one. Status Bar The status bar appears at the bottom of all screens. It shows the battery charge remaining, the current time, and status icons to give an at-a-glance view of the Global Trainer™ Bodylink® System Watch’s status. 4 Display Icons These icons appear in the status bar: Battery icon Shows the approximate charge of the battery. More dark segments indicates a higher charge. The icon shows the charge remaining while charging, plus the remaining section to charge blinks. Chrono icon Appears when the chronograph is running d Alarm icon Appears when the alarm is set. H Timer icon Appears when the chrono is running and a timer has been enabled. 2:00 PM Time of Day text Current time g Heart icon Solid: Heart rate monitor is communicating properly. linking: Device is pairing or has received no useful data for 15 B seconds. RPM icon Solid: Speed or cadence sensor is communicating properly. Device is pairing or has received no useful data for 15 seconds. Blinking: Power icon Solid: Power meter is communicating properly. Device is pairing or has received no useful data for 15 seconds. Blinking: Satellite icon Solid: GPS Blinking: has a satellite fix. GPS is seeking a satelite fix. None: GPS cannot locate a satellite. Performance Mode Performance Mode tracks data for up to 20 workouts and up to 1000 laps. View workout data during your workout in 5 customizable view screens, each with up to 4 areas for displaying data. Performance Mode Terminology •V iew screen: View screens display performance data in a customized layout. •Chronograph: The chronograph records timed segments for the duration of your workout. • Lap: Lap time records the time or duration of individual segments of your workout. • Split: Split time records the total elapsed time since the beginning of your current workout. • Taking a lap or split: When you take a lap or split, the chronograph records the time for the current segment and automatically begins timing a new one. • Interval: A period of the workout customized for length of time and an optional heart rate intensity. • Repetitions (Reps): A series of intervals which is repeated during a workout. Example of Laps and Splits Lap time is the length of an individual segment of activity. Split time is the time elapsed from the beginning of the workout through the current segment. The graph below represents the lap and split times for a workout in which 4 laps were taken. 5 Performance Mode View Screens There are 5 view screens on the Global Trainer™ Bodylink® System Watch: SWIM, BIKE, RUN, CUSTOM 1, and CUSTOM 2. You can customize the name of the view screen, the number of fields displayed on each view screen, the activity associated with the view screen and the performance data displayed in each field. To Open the Display Menu 1.Press MODE until PERFORMANCE appears, then press . 2. Press to highlight DISPLAY, then press . To Name the View Screen You can rename any of the view screens. Each name may contain up to 8 characters. 1.Open the Display menu. 2.Press to highlight the view screen to customize, then press . 3.Press to highlight the first letter in the Title Name field, then press to open the setting change window. 4.Press or to highlight a character, then press to select the character. 5.Continue selecting characters until the desired name displays. 6.Press 8. To Configure Calorie Expenditure Settings To ensure proper calculation of CALORIES performance data, configure the settings in the Activity Setup menu to reflect the type and intensity of activity you will engage in. 1.Open the Display menu. 2.Press to highlight the view screen to customize, then press . 3.Press to highlight ACTIVITY SETUP, then press . 4.Press to highlight the field to customize, then press . 5.Press to highlight the performance data to include in the field, then press . Setting Group Adjustment Activity Choose the activity to be monitored by this view screen. Choices, in order of lowest to highest calorie expenditure, are: BIKE, WALK, HIKE, SWIM, RUN. Level Choose the level of intensity for this view screen. Choices in order of lowest to highest calorie expenditure are: VERY SLOW, SLOW, MEDIUM, HIGH, VERY HIGH. Extra Weight Enter the amount of extra weight carried during this activity. Press 8 to close the setting change window. More extra weight will result in higher calorie expenditure. Power Efficiency A scaling factor selectable from 0.18 to 0.25. This value can be configured after getting metabolic testing with a power meter. To Choose the Number of Fields and Select Performance Data 1.Open the Display menu. 2.Press to highlight the view screen to customize, then press . 3.Press to highlight Field Layout, then press . 4.Press or to choose the number of fields for the view screen, then press . 5.Press to highlight the field to customize, then press . 6.Press to highlight the performance data to include in the field, then press . 7.Continue selecting fields and selecting performance data until the view screen contains desired data. NOTE: Additional data is tracked during your workout beyond the data in the display screens. Review your workouts in Review Mode to see all tracked data. 6 Performance data options: ALTITUDE your current altitude above sea level ALTI-INZN amount of time spent in your defined altitude zone ALTI-MAX highest altitude reached during this workout ALTI-MIN lowest altitude reached during this workout ASC-TOTAl total ascent during this workout ASC-AVG average ascent over distance traveled CADENCE current RPM of bike crank CAD-AVG average RPM of bike crank CAD-INZN amount of time spent in your defined cadence zone CAD-BEST highest RPM reached during this workout CALORIES calories burned NOTE: To accurately calculate calories burned, configure the view screen using ACTIVITY SETUP on the Display menu. CAL/HOUR average calories burned per hour DSC-TOTAL total descent during this workout DSC-AVG average descent over distance traveled DISTANCE total distance traveled DIS-LEFT total distance remaining when tracking back to a waypoint or to a route HR current heart rate HR-AVG average heart rate over entire workout HR-PEAK highest heart rate reached during this workout HR-INZN amount of time spent in your defined heart rate zone PACE time per mile/km at current speed PACE-AVG average time per mile/km over entire workout PACE-BEST fastest time per mile/km reached in this workout PACE-INZN amount of time spent in your defined pace zone POWER current power output POWER-AVGx average power in watts over entire workout PWR-INZN amount of time spent in your defined power zone POWER-PEAK highest power in watts reached during this workout PACER amount of time ahead or behind selected target set in Performance Pacer SPEED current speed SPD-AVG average speed over entire workout SPD-INZN amount of time spent in your defined speed zone SPEED-MAX fastest speed reached during this workout TIME-LAP time for current lap TIME-LEFT estimated time to reach the next waypoint TIME-STOP total rest time during workout TIME-SPLT total time elapsed since beginning of workout TIME-EVT Total time of event including transition and rest periods TIME DAY current time of day TIMER-1 custom timers which can be set to include multiple repetitions and intervals TIMER-2 TIMER-3 TIMER-4 TIMER-5 7 To Start a Workout 1.Press MODE until PERFORMANCE displays. 2.Press to select a view screen. 3.Press START/SPLIT to start the chronograph and begin your workout. NOTE: If the GPS is not fixed on a satellite, this message displays: Press the buttons to highlight YES or NO, then press to confirm your choice. If you select YES, many GPS related performance data options, such as distance, speed, or altitude will not function. If you select NO, the chronograph will not start. NOTE: The maximum time the chronograph will measure is 19:59:59.99. If this time is reached, you must save or reset the workout. To Stop a Workout 1.While the chronograph is running, press . The CHRONO STOPPED message displays. 2.Hold for 2 seconds. The SAVE WORKOUT AND RESET? Screen displays. 3. Press to highlight YES or NO, then press to confirm your choice. If you select YES, the chronograph will reset and the workout data will appear in Review mode. If you select NO, the chronograph is not reset. Press START/SPLIT again to continue your workout. To Take a Lap or Split Press START/SPLIT when the chronograph is running to take a lap or split. Up to three displays will appear in sequence. NOTE: If sensors are not connected to the Global Trainer™ Bodylink® System Watch, their corresponding data is not shown. •The first displays the lap number, lap time, and split time. 8 •The second displays the lap number, average heart rate, average pace, and average speed for the lap. •The third displays the average cadence and power values from the bike sensor. While the lap data is being displayed, the chrono has begun timing the next lap. To Change Views During a Workout You can change view screens during a workout to see different performance data. 1.Start the workout as described above. 2.Press to change view screens. NOTE: The chronograph will continue to run, as indicated by the chrono icon on the status bar, until you press BACK/STP/RST to stop the workout. To Set Up Timers and Performance Pacer In addition to customizing the view screens to show your specific performance data, you can set up custom timers to help manage repetitions and intensity during your workout. You can also use the Performance Pacer feature to measure your workout against your own saved workouts, or against target times you choose. Timers There are five custom timers you can view in the performance data fields. To open the Timer menu 1.Press MODE until PERFORMANCE displays. 2.Press . The Performance Setup screen displays. 3.Press to highlight TIMER, then press . To customize a timer 1.Open the Timer menu. 2.Press to highlight the timer to customize, then press . 3.Press to highlight EDIT TIMER, then press . The Edit Timer screen displays. 4.Press or to choose the setting group to change, then press to open the setting change window. 5.Press or to highlight a selection in the setting change window, then press to confirm your selection. 9 Setting Group Adjustment Interval Select Yes to activate intervals, or No to edit as a standard timer. Number of Ints Enter the number of intervals for the timer. Press 8 to close the setting change window. Maximum intervals is 20. NOTE: This setting is only available if Interval is set to Yes Action at End Select Stop to end the workout after one interval, or Repeat to repeat for the number of repetitions selected. Reps Enter the number of times to repeat the interval group. Press 8 to close the setting change window. Maximum reps is 100. To change the timer name: 1.Open the Timer menu. 2.Press to highlight the timer to rename, then press . 3.Press to highlight the first letter of the timer name, then press . The setting change window opens. 4.Press to highlight a character. Press to select the character. 5.Continue selecting characters until the desired name displays. Each name can contain up to 8 characters. 6.Press 8 to close the setting change window. To edit a standard timer 1.Open the Timer menu. 2.Press to highlight the timer to customize, then press . 3.Press to highlight EDIT TIMER, then press . 4.Make sure the Intervals setting is set to No. 5.Press to highlight EDIT TIMER, then press . NOTE: This feature is only available if the Interval setting is set to No. 6.Press to highlight an interval to customize, then press . The Edit Timer screen displays. 7.Press or to choose the setting group to change, then press to open the setting change window. 8.Press or to highlight a selection in the setting change window, then press to confirm your selection. Setting Group Adjustment Hours Enter the number of hours for the timer. Press 8 to close the setting change window and move to the next setting. The maximum hours is 2. Minutes Enter the number of minutes for the timer. Press 8 to close the setting change window and move to the next setting. The maximum minutes is 59. Seconds Enter the number of seconds for the timer. Press 8 to close the setting change window and move to the next setting. The maxium seconds is 59 To customize intervals 1.Open the Timer menu. 2.Press to highlight the timer to customize, then press . 3.Press to highlight EDIT TIMER, then press . 4.Make sure the Intervals setting is set to Yes. 5.To edit intervals, press to highlight VIEW INTERVALS, then press . NOTE: This feature is only available if the Interval setting is set to Yes. 10 6.Press to highlight an interval to customize, then press . The Edit Interval screen displays. 7.Press or to choose the setting group to change, then press to open the setting change window. 8.Press or to highlight a selection in the setting change window, then press to confirm your selection. Setting Group Adjustment Hours Enter the number of hours for the timer. Press 8 to close the setting change window and move to the next setting. The maximum hours is 2 Minutes Enter the number of minutes for the timer. Press 8 to close the setting change window and move to the next setting. The maximum minutes is 59 Seconds Enter the number of seconds for the timer. Press 8 to close the setting change window and move to the next setting. The maximum seconds is 59. HR Zone Choose the heart rate zone to maintain for this interval, or choose NONE to use the interval in any zone Repeat this process for each interval in the timer. Example of using intervals You wish to integrate interval running into your training routine. You set up several intervals to help you track both time and heart rate for the workout. Your first week’s intervals might look like this: Interval Time Heart Rate Zone Interval 1 00:05:00 NONE Interval 2 00:10:00 ZONE 2 Interval 3 00:05:00 ZONE 3 Interval 4 00:03:00 ZONE 4 Interval 5 00:05:00 ZONE 3 Interval 6 00:05:00 ZONE 1 You use Interval 1 as a warmup. Intervals 2 through 5 are the core of the workout. Finally, Interval 6 represents a cooldown period. Performance Pacer The Performance Pacer feature lets you measure your progress against a previously saved workout, or a manually entered time and distance. When Performance Pacer is selected as a view screen option, you will see how far you are ahead or behind the time loaded in Performance Pacer. To open the Performance Pacer menu 1.Press MODE until PERFORMANCE displays. 2.Press . The Performance Setup window displays. 11 3.Press to highlight PERFORMANCE PACER, then press . The Performance Pacer screen displays. To open the Course menu 1.Open the Performance Pacer menu. 2.Press to highlight Course:, then press . To add a saved workout to Performance Pacer 1.Open the Course menu. 2.Press to highlight <Create New>, then press . 3.Press to highlight a workout to add, then press . 4.Press to highlight the first letter of the course name. 5.Press to highlight a character. Press to select the character. 6.Continue selecting characters until the desired name displays. 7.Press 8. 8.Press to highlight CONFIRM?, then press . To remove a course from Performance Pacer 1.Open the Course menu. 2.Press to highlight the course to remove, then press . 3.Press to highlight Delete Course, then press . To select a course for the Performance Pacer 1.Open the Course menu. 2.Press to highlight the course to pace against, then press . 3.Press to highlight Select This Course, then press . To set Performance Pacer benchmarks manually 1.Open the Performance Pacer menu. 2.Press to highlight Set Target:Time/Dist, then press . The Set Target screen displays. 3.Press or to choose the setting group to change, then press to open the setting change window. 4.Press or to highlight a selection in the setting change window, then press to confirm your selection. Setting Group Adjustment Distance Enter the distance to compare against. Press 8 to close the setting change window and move to the next setting. The maximum distance is 99.99 Time Enter the time to compare against. Press 8 to close the setting change window and move to the next setting. The maximum time is 10:59:59. To choose to pace against a course or manual benchmarks 1.Open the Performance Pacer menu. 2.Press or to highlight PACER, then press . 3.Press or to highlight Course to pace against the loaded course, or Target to pace against the manual benchmark. 12 To use Performance Pacer during your workout 1.Set up the performance data fields in the view screen you will use Performance Pacer with. 2.In one of the fields, choose PACER as the performance data to display. 3.Start the chronograph and start your workout. 4.The PACER field updates constantly and indicates how far you are ahead or behind pace based on the course or benchmarks you set. Performance Mode Notes & Tips •During a workout, the chronograph continues to run in the background even if the chronograph is not visible in any of the performance view screens. •The Global Trainer™ Bodylink® System Watch tracks more workout data that just the items in the Performance view screens. When your workout is complete, use Review Mode to see all recorded data for your workout. To Lock Performance Mode 1. Press and hold the <enter symbol> for 2 seconds. 2. A <lock symbol> appears in the title bar. 3. To unlock, hold <enter symbol> again for 2 seconds. When locked, the MODE button can not be activated and splits can not be taken. Press STOP/RST/DOWN will stop the chrono and unlock the device. Multisport Mode While Performance mode tracks performance data for one activity, Multisport links up to five sports together, and manages transitions between sports as well. Choose the performance data for each of up to five sports, and use the transition periods in between sports to prepare for the next activity in the Multisport sequence. For example, use the transition period between MULTI-BIKE and MULTI-RUN to change from biking shoes to running shoes. Multisport Mode Terminology •Transition: A period of stoppage in between two activities to prepare for the next sport in sequence, tracked by the TIME-STOP performance data option. Multisport Mode View Screens The titles of the view screens are prefixed by the term MULTI- (for example, RUN is MULTI-RUN in Multisport Mode), but the fields and performance data on the screens are identical to those in Performance Mode. Customize the number of fields and data displayed following the steps in the View Screens section of Performance Mode, above. To Set Up Multisport Mode You can use custom timers, intervals, calorie expenditure settings, and the Performance Pacer feature in Multisport mode by following the steps in the To Set Up Performance Mode section of Performance Mode above. You can also arrange the sequence of activities you want to use in Multisport Mode. To Set Up Activities 1.Press the MODE button until MULTISPORT displays. 2.Press . 3.Press to highlight SELECT SPORTS, then press . 4.Press to highlight the activity to change, then press . 5.Press to highlight the activity to include in the multisport sequence, then press to confirm your choice. You can also select NONE if you wish to use a sequence of less than 5 activities. 6.Repeat steps 4 and 5 until up to 5 activities have been chosen. When you start a workout in Multisport Mode, the activities (with transitions in between) will take place in the order you selected. 13 To Start a Workout 1.Press MODE until MULTISPORT displays. 2.Press START/SPLIT to start the chronograph and begin your workout. A message will prompt you to begin the first activity in the Multisport sequence you have defined. The view will switch to the first sport selected when you set up the workout. NOTE: If the GPS is not fixed on a satellite, this message displays: Press to highlight YES or NO, then press to confirm your choice. If you select YES, many GPS related performance data options, such as distance, speed, or altitude will not function. If you select NO, the chronograph will not start. NOTE: The maximum time the chronograph will measure is 19:59:59.99. If this time is reached, you must save or reset the workout. NOTE: Press to manually switch between view screens. At the beginning of each event, the view will automatically switch to the view screen for the active sport. To Enter Transition 1.While the MULTISPORT chronograph is running, press . All timers but the Stoppage Time (TIME-STOP) timer will cease counting, and the TRANSITION message displays. 2.Prepare for the next activity in the sequence. 3.Press . A message displays prompting you to start the next activity. 4.Begin the next activity. 5.Repeat these steps until your workout is complete. To Pause a Workout You can pause a workout during an activity or end of an activity without entering transition. No time will be kept on the chronograph during this time. 1.While the chronograph is running, press and hold for 1 second. The WORKOUT PAUSED message displays. 2.Press START/SPLIT to resume the chronograph. To Stop a Workout When your workout is complete, you can stop the workout, reset the chronograph, and save the workout data for review. 1.While the chronograph is running, press and hold for 1 second. The WORKOUT PAUSED message displays. 2.Press . The SAVE WORKOUT AND RESET? Screen displays. 14 3.Press to highlight YES or NO, then press to confirm your choice. If you select YES, the chronograph will reset and workout data will appear in Review mode. If you select NO, the chronograph is not reset. Press START/SPLIT again to continue your workout. To Take a Lap or Split Press START/SPLIT when the chronograph is running to take a lap or split. Three displays will appear in sequence: •The first displays the lap number, lap time, and split time. •The second displays the lap number, average heart rate, average pace, and average speed for the lap. •The third displays the average cadence and power values from the bike sensor. The chronograph will begin timing a new lap. NOTE: If sensors are not connected to the Global Trainer™ Bodylink® System Watch, their corresponding data is not shown. All data will be moved up one place in the screens for each reading not shown. If enough data is omitted, only one or two screens will display. To Change Views During a Workout You can change view screens during as workout to view different performance data. 1.Start the workout as described above. 2.Press to change view screens. NOTE: The chronograph will continue to run, even if no timers are visible on the selected view screen, until you press BACK/STP/RST to stop the workout. To Lock Multisport Mode 1. Press and hold the for 2 seconds. 2. A l appears in the title bar. 3. To unlock, hold again for 2 seconds. When locked, the MODE button can not be activated and splits can not be taken. Press STOP/RST/DOWN will stop the chrono and unlock the device. Multisport Mode Notes & Tips •Multisport Mode and Performance Mode use the same custom view screens to display your workout data. Changes you make in either mode will affect the displayed data in the other mode. •To keep track of your transition times, make sure to include TIME-STOP in one of the performance data fields. You can also look at the cumulative stoppage time in Review mode. •Don’t forget that you can use custom timers and the Performance Pacer feature in Multisport Mode just like you can in Performance Mode. Navigate Mode Use Navigate mode to find your position at any time using GPS technology. You can also create a waypoint at any time, saving your current position in the Global Trainer™ Bodylink® System Watch memory. Combine these waypoints in any combination you wish to create workout routes. While you are moving, view the compass feature to find your direction and speed, and view the map to see where you have been during your workout. Navigate Mode Terminology •Waypoint: A GPS marker which can be saved to the Global Trainer™ Bodylink® System Watch memory, indicating the latitude and longitude of your current location. •Route: A collection of waypoints similar to a breadcrumb trail, organized in an order of your choosing, which you can follow as part of your workout routine. •Goto: Navigate from current location to a selected waypoint. • Follow: Navigate to multiple waypoints along a route. •Latitude: Distance north or south of the equator, measured in degrees, minutes, and seconds. •Longitude: Distance east or west of the prime meridian, measured in degrees, minutes, and seconds. Peek to Performance During a workout, you can view your performance data from any screen in Navigate Mode. Press and hold 15 START/SPLIT to view the currently selected performance data screen. Release START/SPLIT to return to Navigate Mode. NOTE: You cannot use Peek to Performance while there is a popup message on the display. Location Find your current position anywhere on the globe with the Location feature. 1.Press the MODE button until NAVIGATE displays. 2.Press to highlight LOCATION, then press . Your current latitude and longitude (in degrees, minutes, and seconds) and altitude (in feet or in meters, based on configure) display. The location will update every 2 seconds for as long as the GPS is fixed on a satellite. NOTE: If the GPS cannot fix on a satellite, this message displays: Waypoints Waypoints are GPS markers you can save to the Global Trainer™ Bodylink® System Watch memory. You can track back to them later, or you can string them together to build routes to follow for your workout. To Open the Waypoints Menu 1.Press the MODE button until NAVIGATE displays. 2.Press to highlight WAYPOINTS, then press . To Save a Waypoint Any location can be saved as a waypoint to the Global Trainer™ Bodylink® System Watch memory. You can save up to 100 waypoints. 1.Open the Waypoints menu. 2.Press to highlight SAVE, then press . Your current position displays. 3.Press or to select YES, then press to save the waypoint and return to the Waypoint List. Select NO, then press to return to the Waypoint List without saving. NOTE: You can edit the latitude and longitude. Press to move to the latitude field. Press to edit the degrees, minutes, seconds or fractional seconds. Press to select Save, then press to save your changes. To View the Waypoint List 1.Open the Waypoints menu. 2.Press to highlight LIST ALL, then press . The Waypoint List displays. 3.Press to highlight a waypoint, then press to view the waypoint details. To Rename a Waypoint 1.Open the Waypoint List. 2.Press to highlight a waypoint, then press to view the waypoint details. 3.Press to highlight RENAME, then press . 4.Press to open the character list. Press to highlight the desired character, then press to confirm your selection. Continue selecting characters to spell the desired waypoint name. The waypoint name can contain up to six characters. Press 8 when the desired name is entered. 16 To Delete a Waypoint 1.Open the Waypoint List. 2.Press to highlight a waypoint, then press to view the waypoint details. 3.Press to highlight DELETE, then press . 4.Press to highlight YES, then press to delete the waypoint and go back to the Waypoints menu. Press or to highlight NO, then press to go back to the waypoint details without deleting the waypoint. To GOTO to a Waypoint Use the GOTO feature to plot a route from your current location to a saved waypoint. 1.Open the Waypoint List. 2.Press to highlight a waypoint, then press to view the waypoint details. 3.Press to highlight GOTO? then press . A pop-up message asks if you would like to store your workout data for this event. The map displays. Your current location is in the center of the map. A line connects your current location to the waypoint. Press to switch to the compass view. The compass arrow indicates the direction to the waypoint. If the chronograph is running in Performance Mode, the chronograph will automatically take a split when you reach a waypoint. A message alerts you that the waypoint has been reached, and the chronograph begins timing a new split. To Delete All Waypoints 1.Open the Waypoints menu. 2.Press to highlight DELETE ALL, then press . 3.Press to highlight YES, then press to delete all stored waypoints and go back to the Waypoints menu. Press to highlight NO, then press to go back to the Waypoints menu without deleting the waypoints Routes Routes are collections of waypoints organized in a sequence of your choosing. You can follow a route during a workout, then save the workout data for later use with the Performance Pacer feature. To Open the Routes Menu 1.Press the MODE button until NAVIGATE appears. 2.Press to highlight ROUTES, then press . To Create a Route Organize waypoints stored in the Global Trainer™ Bodylink® System Watch into routes. You can create and save up to 50 routes. 1.Open the Routes menu. 2.Press to highlight CREATE NEW, then press . 3.Press or to highlight an empty slot in the list, then press to open the Waypoint List. 4.Press or to highlight a waypoint to add, then press to add the waypoint to the route. 5.Repeat steps 4 and 5 until the route is complete. 6.Press 8 to save the route and return to the Routes menu. To View the Route List 1.Open the Routes menu. 2.Press to highlight LIST ALL, then press . The list of routes displays. To Follow a Route Use the Follow feature to travel through each waypoint in a stored route. You can start at either the first or the last waypoint in the route sequence. The Global Trainer™ Bodylink® System Watch plots a course from your current location to either the first or last waypoint in the sequence (based on your selection), and directs you through the waypoints in the route. 1.Open the Routes List. 17 2.Press to highlight the route to follow, then press . 3.Press to highlight FOLLOW?, then press . 4.Press to highlight the first or the last waypoint, then press to confirm your selection. The map screen displays. Your current location is in the center of the map, and the line indicates the route to the next waypoint in the sequence. Press to toggle between the map and the compass view, which shows a directional arrow pointing toward the next waypoint. Press to decrease the map resolution and zoom out. Press to increase the resolution and zoom in. NOTE: You must be at the location of the first waypoint within the route to track back. If you don’t know how to get to the beginning of the route, use the Waypoint function to navigate to the first waypoint. Once there, you can track back along the selected route. To Delete a Selected Route 1.Open the Routes List. 2.Press to highlight the route to delete, then press . 3.Press to highlight DELETE?, then press . The route is removed from the list. To Delete All Routes 1.Open the Routes menu. 2.Press to highlight DELETE ALL, then press . 3.Press to highlight YES, then press to delete all routes and return to the Routes screen, or highlight NO, then press to return to the Routes screen without deleting. Compass Use the Compass feature to determine your current speed and the direction you are heading. The Global Trainer™ Bodylink® System Watch must have a GPS fix to use this feature, and direction and speed are only reported while you are in motion. To Navigate Using the Compass 1.Press the MODE button until NAVIGATE appears. 2.Press to highlight COMPASS, then press . An arrow points to the 12 o’clock position while the compass ring spins around indicating the direction you are moving. Your current speed and your current heading (in direction and degrees) are listed to the right of the compass. If the Global Trainer™ Bodylink® System Watch has no GPS fix, an alert message will indicate this. Map The Map feature shows your current location in relation to the waypoints you have stored in the Global Trainer™ Bodylink® System Watch. To Navigate Using the Map 1.Press the MODE button until NAVIGATE appears. 2.Press to highlight MAP, then press . 18 Your current position appears in the center of the map. Icons representing stored waypoints appear on the map relative to your current position. These symbols appear on the map: Compass rose points North Human figure your current position (when stopped and/or there is no GPS signal) Arrow direction you are currently heading Scale indicator indicates the current resolution of the map Flag icon Shows where you are currently positioned relative to the route Beginning tag the first waypoint in the workout End tag the last waypoint in the workout To Change Map Resolution 1.Press the MODE button until NAVIGATE appears. 2.Press to highlight MAP, then press . 3.Press to increase the scale and zoom out. Press to decrease the scale and zoom in. The Map feature supports resolution settings in various increments from 20 ft (5 m) — 100 miles (200 km). Navigate Mode Notes & Tips • A battery save feature turns off the watch after 30 minutes of inactivity. To navigate without the watch turning off, go to Performance mode and activate the chronograph. •If you delete a waypoint, routes including that waypoint are deleted as well. •For more accurate positioning, but with a slower refresh rate, turn the WAAS/EGNOS setting to ON in Configure Mode. For more frequent GPS updates, but with a wider margin of error, turn the WAAS/EGNOS setting OFF. •The compass displays your heading and speed only when you are moving, never while stationary. Review Mode Use Review Mode to inspect the details of your workouts. While Performance Mode allows you to monitor at most four workout statistics, additional data is recorded during your workouts, and you can view all of this data in Review Mode. You can also view the data for individual laps. You can view the course of the workout plotted on the map as well, and track back along the workout route to repeat the workout or to find your way back to your starting point. Review Mode Terminology •Workout summary: A list of all data recorded for the entire workout. •Lap summary: A list of all data recorded for individual laps within a workout. •Track back: Follow a saved workout either forward or backward. To View the Workout List Press the MODE button until REVIEW appears. The list of workouts displays. Each line on the list indicates the date of the workout, the time of the workout, and the number of laps in the workout. The Memory Used bar at the bottom of the screen indicates how much of the workout memory is used. You can store up to 20 workouts on the Global Trainer™ Bodylink® System Watch, and the total number of laps in these workouts cannot exceed 1000. 19 To Select a Workout to View 1.Press the MODE button until REVIEW appears. 2.Press or to highlight the workout to view, then press . To View a Workout Summary 1.Select a workout to view. 2.Press to highlight WORKOUT SUMMARY, then press . 3.Press or to scroll through the four data screens. To View Lap Data 1.Select a workout to view. 2.Press to highlight VIEW LAPS, then press . The Laps List appears. 3.Press to highlight the lap to view, then press . 4.Press or to scroll through the four data screens. The lap number appears at the top of the screen. This data appears in the workout and lap summary (items marked * will only display data if the necessary sensors were connected during the workout): Data Description In Workout Summary In Lap Summary Total Time total time elapsed since beginning of workout w Distance total distance traveled Split Time total time elapsed since beginning of workout Lap Time time for this lap only Avg Speed average speed over entire workout Avg Pace estimate of time per mile/km over entire workout Avg HR* average heart rate over entire workout Stop Time total rest time during workout Max Speed fastest speed reached during this workout Best Pace fastest estimate of time per mile/km reached during this workout Peak HR* highest heart rate reached during this workout Min HR* lowest heart rate reached during this workout In Zone* amount of time spent in your defined heart rate zone Zone Range* Range of heart rates achieved during the workout Calories calories burned over entire workout Cal/Hr average calories burned per hour Rotation total number of times the bicycle crank was turned during the workout Max Cad* highest RPM reached during this workout Avg Cad* average RPM of bike crank Max Alti highest altitude reached during this workout Min Alti lowest altitude reached during this workout Avg Asc average RPM of bike crank Avg Desc average descent over distance traveled Avg Power* average power in watts over entire workout Peak Power average power in watts over entire workout 20 To View a Workout on the Map You can view the workout route on the map. Nearby waypoints will also display on the map. 1.Select a workout to view. 2.Press to highlight View On Map, then press . Your current position appears in the center of the map. Icons representing stored waypoints appear on the map relative to your current position. These symbols appear on the map: Compass rose points North Human figure your current position Scale indicator indicates the current resolution of the map Waypoint icons customized icons assigned to waypoints when you created them Beginning tag the first waypoint in the workout End tag the last workout in the workout Press to decrease the resolution and zoom out. Press to increase the resolution and zoom in. The Map feature supports resolution settings in various increments from 20 ft (5 m) — 100 miles (200 km). To Track Back Along a Workout Route Use the Track Back feature to follow the route of a stored workout. You can follow a route from beginning to end or in reverse. 1.Select a workout to view. 2.Press to highlight TRACK BACK, then press . 3.Press to highlight BACKWARD or FORWARD, then press . Choose Forward to follow the workout route from beginning to end, or choose Backward to follow the workout route in reverse. The map screen displays. Your current location is in the center of the map, and the line indicates the route to the next waypoint in the sequence. Press to toggle between the map and the compass view, which shows a directional arrow pointing toward the next waypoint. Press to decrease the map resolution and zoom out. Press to increase the resolution and zoom in. To Delete a Selected Workout 1.Press the MODE button until REVIEW displays. 2.Press or to highlight the workout to delete, then press . 3.Press to highlight DELETE, them press . 4.Press to highlight YES, then press to delete the workout and return to the Workout List, or highlight NO, then press to keep the stored workout. To Delete All Workouts 1.Press the MODE button until REVIEW displays. 2.Press to highlight DELETE ALL, then press . 3.Press to highlight YES, then press to delete all workouts and return and return to the Workout List, or highlight NO, then press to return to the Workout List without deleting. Review Mode Notes & Tips •While Performance Mode only displays up to four workout metrics, Review Mode gives you more details about a workout by recording all available workout metrics. •Use the workouts saved in Review Mode as benchmarks for the Performance Pacer feature in Performance or Multisport mode. •The Track Back feature is useful for repeating a favorite workout or for finding your way back to your starting location. 21 Configure Mode Use Configure Mode to customize all of the settings on the Global Trainer™ Bodylink® System Watch, from time settings to sensor pairing to GPS settings. Hands Free Hands Free settings control automatic starting, stopping, and splits on the chronograph. To Configure Hands Free Setting 1.Press MODE until CONFIGURE displays. 2.Press to highlight HANDS FREE, then press . 3.Press to highlight a submenu, then press . The selected configure screen opens. 4.Press or to highlight the setting to change, then press to open the setting change window. 5.Press or to highlight a selection in the setting change window, then press to confirm your selection. Settings on each Hands Free submenu are detailed below. Auto Start/Resume Setting Group Adjustment Auto Start Select ON to start the chronograph automatically when you move at or above the speed threshold. Select OFF to disable auto start. Auto Resume Select ON to restart the chronograph automatically after you stop and then begin moving again at or above the speed threshold. Select OFF to disable auto resume. Speed Threshold Enter the speed at which the chronograph will automatically start. Press 8 to close the setting change window. The minimum is 0.10. The maximum is 99.99. Auto Stop Setting Group Adjustment Auto Stop Select ON to stop the chronograph automatically when you go below the speed threshold. Select OFF to disable auto stop. Speed Threshold Enter the speed at which the chronograph will automatically stop. Press 8 to close the setting change window. The minimum is 0.1. The maximum is 99.99. 22 Auto Split Setting Group Adjustment Auto Split Select DISTANCE to automatically take a split when you reach a multiple of the selected distance. Select BY TIME to automatically take a split each time the selected time interval elapses. Select OFF to disable auto split. Distance Enter the distance at which to automatically take a split. Press 8 to close the setting change window. The minimum is 0.10. The maximum is 99.99. NOTE: This setting is only available if the Auto Split setting is set to DISTANCE. Time Enter the elapsed time at which to automatically take a split. Press 8 to close the setting change window. The minimum is 00:00:01. The maximum time is 9:59:59. NOTE: Time settings are only available if the Auto Split setting is set to BY TIME. Alerts Use the Alerts menu to set up visual and audible alerts in response to several conditions, including speed and heart rate. You can set minimum and maximum values for speed, heart rate, cadence, and power. These values define the target zone for the setting. If the watch detects a value outside of this zone, the alert is triggered. To Configure Alert Type (Visual Only or Visual and Audible) 1.Press MODE until CONFIGURE displays. 2.Press to highlight ALERTS, then press . 3.Press to highlight TYPE, then press . Select VISUAL ONLY or AUDIBLE AND VISUAL 4.Press to confirm your selection. The audible alert tone will sound once every 30 seconds for as long as the reading is outside the target zone. The visual alert will display a message on top of the display for 2 seconds. It will indicate which data (speed, heart rate, cadence, or power) is outside the target zone, and whether the reading is low or high. If more than one reading is outside its target zone, each reading will be listed in the same alert message. The alert message will display once every 30 seconds for as long as the reading is outside the target zone. To Configure Alerts Settings 1.Press MODE until CONFIGURE displays. 2.Press to highlight ALERTS, then press . 3.Press to highlight a submenu, then press . The selected configure screen opens. 4.Press or to highlight the setting to change, then press to open the setting change window. 5.Press or to highlight a selection in the setting change window, then press to confirm your selection. 23 Settings on each Alerts submenu are detailed below. Distance Alert Setting Group Adjustment Distance Alert Select ON to alert you once when the Alert At: distance is reached, REPEAT to alert you each time the Alert At: distance is traveled, or OFF to disable the distance alert. Alert At: Enter the distance at which to sound the alert. Press 8 to close the setting change window. The minimum is 0.01. The maximum is 99.99. Speed / Pace Zone Setting Group Adjustment Speed / Pace Zone Select SPEED to alert you when you move faster or slower than the selected speed zone, PACE to alert you when you move faster or slower than the selected pace, or OFF to disable the speed/pace zone alert. Speed: Below Enter the minimum speed threshold. If you go below this speed, the alert sounds. Press 8 to close the setting change window. The minimum is 0.00. The maximum is 999.99. Speed: Above Enter the maximum speed threshold. If you go above this speed, the alert sounds. Press 8 to close the setting change window. The minimum is 0.00. The maximum is 99.99. Pace: Below Enter the minimum pace threshold. If you go below this pace, the alert sounds. Press 8 to close the setting change window. The minimum is 0:00. The maximum is 59:59. Pace: Above Enter the maximum pace threshold. If you go above this pace, the alert sounds. Press 8 to close the setting change window. The minimum is 0:00. The maximum is 59:59. Altitude Setting Group Adjustment Altitude Select ON to alert you when you ascend above or descend below the selected altitude zone, or OFF to disable the altitude alert. Below Enter the minimum altitude threshold. If you go below this altitude, the alert sounds. Press 8 to close the setting change window. The range is -2000 to 60000. Above Enter the maximum altitude threshold. If you go above this altitude, the alert sounds. Press 8 to close the setting change window. The range is -2000 to 60000. 24 Heart Rate Zone Setting Group Adjustment Heart Rate Zone Select ON to alert you when your heart rate is outside the Low or High settings, or OFF to disable the heart rate zone alert. Target Zone Select CUSTOM to enter Low and High values manually, or Zones 1 through 5 to use high and low values based on your user info. Low Enter the minimum heart rate threshold. If your heart rate goes below this threshold, the alert sounds. Press 8 to close the setting change window. The range is 30 to 240. High Enter the maximum heart rate threshold. If your heart rate goes above this threshold, the alert sounds. Press 8 to close the setting change window. The range is 30 to 240. NOTE: If the Low value is set above the High value, the High value is automatically set to 5 beats higher than the Low value. If the High value is set below the Low value, the Low value is automatically set to 5 beats lower than the High value. If either value is set outside the acceptable range, the previous settings are retained. Cadence Zone Setting Group Adjustment Cadence Zone Select ON to alert you when your bike crank rpm is outside the Below or Above settings, or OFF to disable the cadence zone alert. Below Enter the minimum rpm threshold. If you go below this cadence, the alert sounds. Press 8 to close the setting change window. The range is 0 to 200. Above Enter the maximum rpm threshold. If you go above this cadence, the alert sounds. Press 8 to close the setting change window. The range is 0 to 200. Power Zone Setting Group Adjustment Power Zone Select ON to alert you when generating fewer or more watts than the Below or Above settings, or OFF to disable the power zone alert. Below Enter the minimum power threshold. If you generate less power than this, the alert sounds. Press 8 to close the setting change window. The range is 0 to 999. Above Enter the maximum power threshold. If you generate more power than this, the alert sounds. Press 8 to close the setting change window. The range is 0 to 999 Sensors Use the Sensors menu to search for, pair, and manage ANT+™ sensor devices such as heart rate monitors, cadence and speed sensors, and power meters. See pages ?? and ?? for information on pairing and using specific sensors. 25 To Configure Sensor Settings 1.Press MODE until CONFIGURE displays. 2.Press to highlight SENSORS, then press . 3.Press or to highlight the setting to change, then press to open the setting change window. 4.Press or to highlight a selection in the setting change window, then press to confirm your selection. Select NO to prevent the Global Trainer™ Bodylink® System Watch from searching for the selected sensor or to disconnect a sensor. Select SCAN to search for and connect a sensor. When the sensor is successfully paired, an abbreviation appears in the field to the right of the sensor name: Sensor Abbreviation Heart Rate HR Speed SPD Cadence CAD Speed / Cadence SPC Power Meter PWR You can connect only up to four ANT+™ sensor devices at one time. If you try to connect a fifth, the last device connected is disconnected. User Info Input your personal information into the Global Trainer™ Bodylink® System Watch to assist in determining heart rate zones, calorie expenditure, and default screens in Performance Mode. Performance Mode: To Configure Personal Settings 1.Press MODE until CONFIGURE displays. 2.Press to highlight USER INFO, then press . 3.Press or to highlight the setting to change, then press to open the setting change window. 4.Press or to highlight a selection in the setting change window, then press ENTER to confirm your selection. Setting Group Adjustment Gender Select MALE or FEMALE Weight Enter your weight, then press 8 to close the setting change window. The minimum is 50. The maximum is 400. Date of Birth: Month Select your month of birth. Height Enter your height, then press BACK/PWR to close the setting change window. The minimum is 10 and the max is 999. Date of Birth: Day Enter your day of birth. Press 8 to close the setting change window Date of Birth: Year Enter the year you were born. Press 8 to close the setting change window. 26 Watch Adjust settings for the time of day function, including time zone, date format, and whether or not to adjust for daylight savings time. To Configure Watch Settings 1.Press MODE until CONFIGURE displays. 2.Press to highlight WATCH, then press . 3.Press or to highlight the setting to change, then press to open the setting change window. 4.Press or to highlight a selection in the setting change window, then press tion. Setting Group to confirm your selec- Adjustment Button Beep Select ON to enable a tone which sounds every time you press a button, or select OFF to disable the tone. Hourly Chime Select ON to enable a tone which sounds on the hour, or select OFF to disable the tone. Time Format Select 12 HOUR or 24 HOUR. For example, 3:00pm will display as 3:00PM in 12hour format, and as 15:00 in 24-hour format. Time Zone Select your local time zone. Daylight Saving Select ON to use daylight savings time, or OFF to keep standard time Date Format Select the date format to display. You can choose mm/dd/yyyy, dd.mm.yyyy, or yyyy/mm/dd. Alarm Set an alarm which will sound at the selected times and days. The alarm will sound even when the watch is powered down, so long as the Power Off function is set to SHOW TIME. When the alarm sounds, a message displays indicating the time and days the alarm is set to sound. To Configure Alarm Settings 1.Press MODE until CONFIGURE displays. 2.Press to highlight ALARM, then press . 3.Press or to highlight the setting to change, then press to open the setting change window. 4.Press or to highlight a selection in the setting change window, then press to confirm your selection. Setting Group Adjustment Alarm Select ON to sound an alarm at the selected frequency, or select OFF to disable the alarm. Time Enter the time at which the alarm will sound. Press 8 to close the setting change window 27 Time: AM or PM Select AM or PM. NOTE: This setting is only available if the time format is set to 12-hour in the Watch menu. Frequency Select the frequency at which the alarm will sound. You can choose a specific day of the week, weekends only, weekdays only, or daily. Heart Rate Set up how the Global Trainer™ Bodylink® System Watch calculates and displays heart rate zones. Initially, maximum heart rate is automatically calculated as 220 minus you age, but this can be changed manually. To Configure Heart Rate Settings 1.Press MODE until CONFIGURE displays. 2.Press to highlight HEART RATE, then press . 3.Press or to highlight the setting to change, then press to open the setting change window. 4.Press or to highlight a selection in the setting change window, then press to confirm your selection. Setting Group Adjustment Max HR Enter a value for the maximum heart rate in beats per minute. The range is 30 – 240 Zones Select CUSTOM to manually enter values for each zone, or select USE MAX to calculate all zones by maximum heart rate. View Select bpm to display zone values as beats per minute, or select % to display zone values as a percentage of your maximum heart rate. Minimum / Maximum bpm for zones 1 through 5 Enter the minimum and maximum values for each zone. Press 8 to close the setting change window. The maximum is 240. Bike Manage profiles for up to five bikes. The Global Trainer™ Bodylink® System Watch uses the settings in these profiles to calculate speed, cadence, and calorie use. To Configure Bike Settings 1.Press MODE until CONFIGURE displays. 2.Press to highlight BIKE, then press . 3.Press or to highlight the setting to change, then press to open the setting change window. 4.Press or to highlight a selection in the setting change window, then press tion. Setting Group to confirm your selec- Adjustment Bike Selection Select the bike number you wish to edit, then press to confirm your selection. Name Enter a name for the bike. The bike name can contain up to 8 characters. Press 8 when the desired name is entered. Weight Enter the bike weight. Press 8 to close the setting change window. The range is 1 – 999 28 Wheel Size Enter the bike wheel circumference. Press 8 to close the setting change window. The range is 59 – 98 inches (1500 – 2500 mm). To Calculate Bike Wheel Circumference The table below indicates the circumference of some common sizes of bike wheels for standard adult bicycles. Tire Size Approx. Circumfrence (mm) 700 X 56 2325 700 X 50 2293 700 X 44 2224 700 X 38 2224 700 X 35 2168 700 X 32 2155 700 X 28 2136 700 X 25 2105 700 X 23 2097 700 X 20 2086 27 X 1 3/8 2169 27 X 1 1/4 2161 27 X 1 1/8 2155 27 X 1 2145 26 X 2.125 2070 26 X 1.9 2055 26 X 1.5 1985 26 X 1.25 1953 26 X 1.0 1913 26 X 1/650 C 1952 26 X 1 3/8 2068 You can also use the “roll-out” method to measure your wheel circumference. 1.Place your front wheel on the ground with the valve stem in the 6 o’clock position. 2.Mark the position of the valve stem on the floor. 3.Roll the bike forward, keeping pressure on the handlebars, until the valve stem is again at the 6 o’clock position. 4.Mark the position of the valve stem on the floor. 5.Measure the distance between the two marks. Power Meter Set up how the Global Trainer™ Bodylink® System Watch calculates and displays power meter zones. To Configure Power Meter Settings 1.Press MODE until CONFIGURE displays. 29 2.Press to highlight POWER METER, then press . 3.Press or to highlight the setting to change, then press to open the setting change window. 4.Press or to highlight a selection in the setting change window, then press selection. Setting Group to confirm your Adjustment Threshold Power Enter the threshold power in watts. The range is 0 to 600 View Select watts or % of threshold Zones Select CUSTOM to enter watt ranges for each zone manually, or select USE MAX to automatically calculate values. Minimum / Maximum watts for zones 1 through 6 Enter the minimum and maximum values for each zone. Press 8 to close the setting change window. The minimum is 1. The maximum is 999. NOTE: You can only change the zone values if Zones is set to CUSTOM. GPS Configure options for the GPS, view device version information, and view satellites. You can also reset the watch and update the firmware from this menu. To Configure GPS Settings 1.Press MODE until CONFIGURE displays. 2.Press to highlight GPS, then press . 3.Press or to highlight the setting to change, then press to open the.setting change window. 4.Press or to highlight a selection in the setting change window, then press to confirm your selection. Setting Group Adjustment GPS Select OFF to turn the GPS system off. Select ON to turn the GPS system on. Setting to off will increase battery life but workouts will not have positional or GPS speed information. WAAS / EGNOS Select OFF to use standard GPS positioning, which updates more quickly. Select ON to enable WAAS/EGNOS, which is more accurate. Speed / Pace Smooth Select OFF to update speed and pace data more quickly. Select ON to apply a filter to get more stable speed and pace data. NOTE: Smoothing reduces large variations in data due to GPS fluctuation. Altitude Smooth Select OFF to update altitude data more quickly. Select ON to apply an averaging filter to get more manageable altitude data Version Press to highlight VERSION, then press to view the firmware version. To upgrade the firmware: 1.While viewing the version screen, hold START/SPLIT for 2 seconds. 2.Press to highlight YES or NO, then press to confirm your selection. Select YES to upgrade the firmware, or select NO to return to the version screen without upgrading. 3.When prompted, insert the large USB-A plug of the download/charging clip into a USB port on any computer, then connect the download/charging clip to the back of the Global Trainer™ Bodylink® System Watch. 4. To back out of the firmware upgrade process, press ENTER and START/SPLIT at the same time. This will power off the device. 30 To reset the Global Trainer™ Bodylink® System Watch: 1.While viewing the version screen, hold for 2 seconds. 2.Press to highlight YES or NO, then press to confirm your selection. Select YES to reset, or select NO to return to the version screen without resetting. When reset is complete, the watch is powered off. Satellite View Press to highlight SATELLITE VIEW, then press to view a graphical representation of the satellites the Global Trainer™ Bodylink® System Watch is fixed upon. Each number indicates a satellite, and the highlighted bars represent the signal strength for each satellite. A message to the right of the graphic indicates the overall strength of the GPS fix. When the Global Trainer™ Bodylink® System Watch is read, 3D FIX will be shown. Units Configure the type of units the Global Trainer™ Bodylink® System Watch uses when tracking performance data. You can choose from English, Metric, and Nautical units. To Configure Units Settings 1.Press MODE until CONFIGURE displays. 2.Press to highlight UNITS, then press . 3.Press or to highlight the setting to change, then press to open the setting change window. 4.Press or to highlight a selection in the setting change window, then press to confirm your selection. Setting Group Adjustment Global Select ENGLISH, METRIC, or NAUTICAL. This globally changes all units listed below. Units for specific measurements can be changed individually, but changing the global setting overrides all specific changes to individual units mentioned below. Distance Units Select miles to report distance in miles, km to report in kilometers, or nm to report in nautical miles. Speed Units Select mph to report speeds in miles per hour, kpm to report in kilometers per hour, or kn to report in knots. Pace Units Select min/mi to report pace in minutes per mile, min/km to report in minutes per kilometer, or min/nm to report in minutes per nautical mile. Altitude Units Select ft to report altitude in feet, or m to report in meters. Ascent Units Select m/min to report ascent in meters per minute, m/sec to report in meters per second, ft/min to report in feet per minute, or ft/sec to report in feet per second. 31 All measurement data in Performance, Multisport, or Review modes will be expressed using the units you selected. Modes Activate or deactivate Navigate mode and associated functions, and configure power off behavior. To Configure Mode Settings 1.Press MODE until CONFIGURE displays. 2.Press to highlight MODES, then press . 3.Press or to highlight the setting to change, then press to open the setting change window. 4.Press or to highlight a selection in the setting change window, then press to confirm your selection. Setting Group Adjustment Navigate mode Select ENABLE to make Navigate mode and the Track Back feature available, or select DISABLE to turn off these features. Power off function Select SHOW TIME to display the date and time when the Global Trainer™ Bodylink® System Watch is powered off, or select TURN OFF DISPLAY to make the display blank. Computer Sync Mode Use Computer Sync mode to make setting changes to the Global Trainer™ Bodylink® System Watch from your computer (PC or Mac). All Global Trainer™ Bodylink® System Watch settings can be changed from the device agent and uploaded to the watch. You can also upload workout data from the Global Trainer™ Bodylink® System Watch to your computer for long-term tracking, and use this data with your Timex Trainer powered by TrainingPeaks account to optimize your workout program. Computer Sync Mode Terminology •Device Agent: The PC or Mac software enabling communication between the Global Trainer™ Bodylink® System Watch and the computer. •Timex Trainer powered by TrainingPeaks: The online tool used to store and track your uploaded workout data. To Install the Device Agent To Create a Timex Trainer account 1. In your web browser, navigate to http://timextrainer.trainingpeaks.com/. 2. Click on Create a new account link (if you are a already have a TrainingPeaks account, skip to installing the Device Agent). 3. Fill out your personal information and click Submit Create Timex Trainer account To Install the Device Agent for Windows 1. In your web browser, navigate to http://timextrainer.trainingpeaks.com/. 2. Click on Log In 3. Select Download Device Agent for Global Trainer Bodylink System. 4. Save the file to your desktop. 5. Close your browser. 6. Double-click on the file just downloaded and follow the on screen instructions. To Download Settings from a computer to the Global Trainer™ Bodylink® System Watch 1.Insert the large USB-A plug on the download/charging clip into a USB port on the computer. 2.Attach the download/charging clip to the back of the Global Trainer™ Bodylink® System Watch. 3.Press MODE button until COMPUTER SYNC displays. “WAITING FOR PC . . .” displays on the Global Trainer™ Bodylink® System Watch. 4.Open the device agent on the computer. 5.Click on Configure button to change settings on the Global Trainer Bodylink System watch. Change your watch preferences and click on Save to send the settings to the Global Trainer Bodylink System watch. “Communication in progress” displays on the Global Trainer™ Bodylink® System Watch. 32 6.When settings finish uploading, “Transfer complete” displays on the Global Trainer™ Bodylink® System Watch. 7.Close the device agent on the computer. 8.Remove the USB cables from the Global Trainer™ Bodylink® System Watch. To Upload Workout Data from the Global Trainer™ Bodylink® System Watch to a computer 1.Insert the large USB-A plug on the download/charging clip into a USB port on the computer. 2.Attach the download/charging clip to the back of the Global Trainer™ Bodylink® System Watch. 3.Press MODE button until COMPUTER SYNC displays. “WAITING FOR PC . . .” displays on the Global Trainer™ Bodylink® System Watch. 4.Open the device agent on the computer. 5.Click on Download from Device button in the device agent. “Communication in progress” displays on the Global Trainer™ Bodylink® System Watch. 6.When workout data finishes uploading, “Transfer complete” displays on the Global Trainer™ Bodylink® System Watch. 7.Close the device agent on the computer. 8.Remove the USB cables from the Global Trainer™ Bodylink® System Watch. To Use the Digital 2.4 Heart Rate Sensor 1.Set up view screen in Performance or Multisport mode. To get real time heart rate data, include at least one field for heart rate data, such as HR or HR – INZN. 2.Wet the heart rate sensor pads. 3.Fasten the sensor firmly to your chest, just below your sternum. 4.Press START/SPLIT to begin your workout. 5.When your workout is complete, press (in Performance mode) or hold (in Multisport mode) to stop the chronograph. 6.Remove the heart rate strap from your chest to stop recording heart rate data. 7.View complete heart rate data in Review mode. Bike Sensors Several types of bike sensors can be used with the Global Trainer™ Bodylink® System Watch: Timex speed sensor •Timex cadence sensor •Timex combined speed/cadence sensor •SRM power meter •Quarq power meter •iBike power meter Installation of bike sensors varies by the manufacturer and model. Consult the owner’s manual for the sensor for instructions on installing them on your bike. These sensors must be paired with the Global Trainer™ Bodylink® System Watch before bike speed, cadence, and power data can be tracked and saved. NOTE: If a speed sensor as paired and the GPS is operating, distance will be calculated using the GPS, while speed is calculated using the speed sensor. If the GPS is off or cannot locate a satellite, distance will also be calculated using the speed sensor. To Pair Bike Sensors Use the Sensors menu to pair all types of bike speed, cadence, and speed/cadence sensors and power meters. Follow the steps in Sensors on page ??. To Record Bike Sensor Data During a Workout Set up view screen in Performance or Multisport mode. To get real time bike sensor data, include at least one field for bike sensor data, such as CADENCE, POWER, or SPEED. Press START/SPLIT to begin your workout. 33 When your workout is complete, press (in Performance mode) or hold (in Multisport mode) to stop the chronograph. View complete heart rate data in Review mode. Care and Maintenance Watch INDIGLO® Night-light Press the INDIGLO® button to activate the night light. This electroluminescent technology illuminates the watch display at night and in low-light conditions. Water Resistance •The Global Trainer™ Bodylink® System Watch is Water Resistant to a depth of 50 meters and to a pressure of 86 p.s.i. This is equivalent to 164 feet below sea level. •Water resistance is only maintained while the lens, pushbuttons, and case are intact. •Rinse the Global Trainer™ Bodylink® System Watch with fresh water after any exposure to salt water. CAUTION: TO MAINTAIN WATER RESISTANCE, DO NOT PRESS ANY BUTTONS UNDER WATER. Heart Rate Monitor Heart Rate Monitor Strap Maintenance After use, rinse the heart rate strap in fresh water to avoid buildup of materials that interfere with heart rate measurement. Transmitter Battery Life The battery on the Digital 2.4 Heart Rate Sensor should last more than two years if the sensor is used an average of one hour each day. More frequent or longer use will decrease the battery life. Replace the sensor transmitter battery if either of these conditions arise: •When the sensor is properly placed on your chest, the Global Trainer™ Bodylink® System Watch cannot read heart rate data. •Heart rate error messages (such as SEARCHING FOR HEART RATE . . . ) appear more frequently. To Replace the Transmitter Battery 1.Use a coin to open the battery compartment cover on the back of the sensor. 2.Insert a new CR2032 battery (or equivalent) with the positive (+) facing you. 3.Use a toothpick or straightened paper clip to press the reset button next to the battery. 4.Reinstall the battery compartment cover. To Test the Sensor After Battery Replacement 1.Move away from sources of radio or electromagnetic interference, such as other heart monitors or bike sensors. 2.Wet the heart rate sensor pads. 3.Fasten the sensor firmly to your chest, just below your sternum. Turn on the Global Trainer™ Bodylink® System Watch. Make sure the Global Trainer™ Bodylink® System Watch is set to scan for a heart rate sensor. See Sensors on page ?? for information about scanning for sensors. If the heart rate sensor is functioning correctly, a solid heart icon appears in the status bar, and a flashing heart icon appears in the HR field on the performance view screen. If these icons do not appear: •Open the battery compartment cover, press the reset switch, and test again. -OR•Reinstall the battery, and test again. -OR•Re-pair the Digital 2.4 Heart Rate Sensor to the Global Trainer™ Bodylink® System Watch. 34 Water Resistance The Digital 2.4 Heart Rate Sensor is Water Resistant to a depth of 50 meters and to a pressure of 86 p.s.i. This is equivalent to 164 feet below sea level. NOTE: Heart rate data may not display when the sensor is immersed in water. Warranty & Service Timex International Warranty (U.S. Limited Warranty) Your Timex® Heart Rate Monitor is warranted against manufacturing defects by Timex for a period of ONE YEAR from the original purchase date. Timex Group USA, Inc. and its worldwide affiliates will honor this International Warranty. Please note that Timex® may, at its option, repair your Heart Rate Monitor by installing new or thoroughly reconditioned and inspected components or replace it with an identical or similar model. IMPORTANT: PLEASE NOTE THAT THIS WARRANTY DOES NOT COVER DEFECTS OR DAMAGES TO YOUR HEART RATE MONITOR: 1.after the warranty period expires; 2.if the Heart Rate Monitor was not originally purchased from an authorized Timex retailer; 3.from repair services not performed by Timex; 4.from accidents, tampering or abuse; and 5.lens or crystal, strap or band, Heart Rate Monitor case, attachments or battery. Timex may charge you for replacing any of these parts. THIS WARRANTY AND THE REMEDIES CONTAINED HEREIN ARE EXCLUSIVE AND IN LIEU OF ALL OTHER WARRANTIES, EXPRESS OR IMPLIED, INCLUDING ANY IMPLIED WARRANTY OF MERCHANTABILITY OR FITNESS FOR PARTICULAR PURPOSE. TIMEX IS NOT LIABLE FOR ANY SPECIAL, INCIDENTAL OR CONSEQUENTIAL DAMAGES. Some countries and states do not allow limitations on implied warranties and do not allow exclusions or limitations on damages, so these limitations may not apply to you. This warranty gives you specific legal rights and you may also have other rights which vary from country to country and state to state. To obtain warranty service, please return your Heart Rate Monitor to Timex, one of its affiliates or the Timex retailer where the Heart Rate Monitor was purchased, together with a completed original Repair Coupon or, in the U.S. and Canada only, the completed original Repair Coupon or a written statement identifying your name, address, telephone number and date and place of purchase. Please include the following with your Heart Rate Monitor to cover postage and handling (this is not a repair charge): a US$ 8.00 check or money order in the U.S.; a CAN$7.00 cheque or money order in Canada; and a UK£2.50 cheque or money order in the U.K. In other countries, Timex will charge you for postage and handling. NEVER INCLUDE ANY ARTICLE OF PERSONAL VALUE IN YOUR SHIPMENT. For the U.S., please call 1-800-328-2677 for additional warranty information. For Canada, call 1-800-263-0981. For Brazil, call +55 (11) 5572 9733. For Mexico, call 01-800-01-060-00. For Central America, the Caribbean, Bermuda and the Bahamas, call (501) 370-5775 (U.S.). For Asia, call 852-28150091. For the U.K., call 44 208 687 9620. For Portugal, call 351 212 946 017. For France, call 33 3 81 63 42 00. Germany/Austria: +43 662 88921 30. For the Middle East and Africa, call 971-4-310850. For other areas, please contact your local Timex retailer or Timex distributor for warranty information. In Canada, the U.S. and in certain other locations, participating Timex retailers can provide you with a postage-paid, pre-addressed Heart Rate Monitor Repair Mailer for your convenience in obtaining factory service. TIMEX INTERNATIONAL WARRANTY REPAIR COUPON Original Purchase Date:________________________________________________ (attach a copy of sales receipt, if available) Purchased by: _______________________________________________________ (name, address, telephone number) Place of Purchase:____________________________________________________ (name and address) Reason for Return:____________________________________________________ __________________________________________________________________ 35 Declaration of Conformity Manufacturers Name: Timex Group USA, Inc. 555 Christian Road Middlebury, CT 06762 United States of America declares that the product: Product Name: Timex ® Global Trainer GPS//Speed+Distance Model Numbers: M229 conforms to the following specifications: R&TTE: 1999/05/EC Standards: ETSI EN 300 330-1 - V1.3.1 (EMC) & (ERM) ETSI EN 300 330-2 - V1.1.1 (EMC) & (ERM) LVD: 73/23/EEC Standards: CENELEC EN 60950-1 EMC: 89/336/EEC Standards: CENELEC EN 55022:1998 CENELEC EN 55024-1998 EN 61000-4-2 - ESD EN 61000-4-3 - RF Radiated Immunity EN 61000-4-8 - Magnetics Supplemental Information: The product herewith complies with the requirements of the Radio & Telecommunications Terminal Equipment Directive 1999/05/EC, the Low Voltage Directive 73/23/EEC, and the EMC Directive 89/336/EEC and carries the 7 marking accordingly. Agent: Brian J. Hudson Director, New Products Engineering Date: 03 July, 2008, Middlebury, Connecticut, U.S.A 36