1
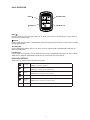
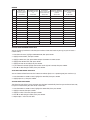
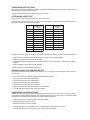
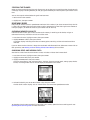
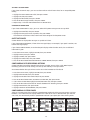
Cycle Trainer ™ 2.0 GPS USER MANUAL Table of Contents Introducing Your Cycle Trainer 2.0.........................................................................................4 Features.....................................................................................................................................4 Charging the Cycle Trainer.........................................................................................................4 Basic Operation..........................................................................................................................5 Icon Descriptions........................................................................................................................5 Getting Started..........................................................................................................................6 Installing the Cycle Trainer.........................................................................................................6 Turning the Cycle Trainer On and Off.........................................................................................6 Setting the Time.........................................................................................................................6 Setting Display Units..................................................................................................................6 Setting Up the User Profile.........................................................................................................6 Setting Up the Heart Rate Sensor..............................................................................................7 Configuring Bike Settings...........................................................................................................9 Configuring Calorie Settings.......................................................................................................9 Calibrating the Compass..........................................................................................................10 Using the Speedometer.........................................................................................................10 Starting, Stopping, and Saving a Ride..................................................................................... 11 Taking Splits............................................................................................................................. 11 Viewing Data During a Ride .................................................................................................... 11 Using the Trainer....................................................................................................................12 Starting the Trainer...................................................................................................................12 Responding to Trainer Alerts....................................................................................................12 Stopping the Trainer.................................................................................................................13 Reviewing Rides.....................................................................................................................13 Checking Memory Capacity.....................................................................................................13 Choosing Rides and Viewing Data...........................................................................................13 Using the Details Screen..........................................................................................................14 Deleting All Rides from Memory...............................................................................................14 Navigating with the Cycle Trainer.........................................................................................14 Navigating with the Map...........................................................................................................14 Navigating with the Compass...................................................................................................16 Setting the Alarm....................................................................................................................17 Configuring Settings..............................................................................................................17 Configuring Hands-Free Features............................................................................................17 Configuring Alerts.....................................................................................................................18 Configuring Data Recording Options........................................................................................20 Configuring Custom Pages......................................................................................................20 Setting System Preferences.....................................................................................................22 Configuring Sensors.................................................................................................................23 Configuring the GPS................................................................................................................24 Configuring the Map.................................................................................................................25 Resetting the Cycle Trainer......................................................................................................25 Connecting to a Computer....................................................................................................25 Creating a Timex Trainer Account............................................................................................25 Installing the Device Agent.......................................................................................................25 Upgrading the Firmware...........................................................................................................25 Downloading Settings to the Cycle Trainer..............................................................................26 Uploading Rides to Training Peaks..........................................................................................26 Troubleshooting.....................................................................................................................27 Problems with the Heart Rate Sensor......................................................................................27 Problems Connecting to a Computer.......................................................................................27 Water Resistance....................................................................................................................27 Warranty and Service.............................................................................................................27 Declaration of Conformity.....................................................................................................28 3 Introducing Your Cycle Trainer 2.0 Congratulations on your purchase of the Timex® Cycle Trainer 2.0™ GPS bike computer. This powerful tool for cycle training can help you achieve your goals at any level. If you are a competitive cyclist, you can utilize heart rate, speed, cadence, and power sensors to focus on the specific attributes you want to improve, whether speed, threshold, or endurance. If you’re riding for health and recreation, you’ll enjoy how quickly and easily you can set up your heart rate sensor and start recording your rides. The Cycle Trainer 2.0™ uses WAAS/EGNOS technology to find your position anywhere on the globe with pinpoint accuracy. You can track and save your rides so you can follow your favorite routes again and again, and compare your statistics between each ride to see how you are improving. You can even race against your earlier times with the Trainer feature to achieve a new personal best. Features • G PS – WAAS/EGNOS technology ensures accuracy in navigation. Create waypoints and build routes to follow from them. Track back to your starting point from the end of a route. • H eart rate sensor – Pair to the Cycle Trainer 2.0™ easily. Set up custom heart rate zones with audible alerts so you always know how hard you’re riding. • T rainer – Set distance, time, and pace goals to train against, or ride a saved route again for an improved time. • Map – Choose the map orientation and zoom features that are right for you. • C ompass – Find the direction to your next waypoint and set a bearing to follow. Adjust for declination automatically. • Barometer – Get accurate altitude measurements from air pressure. • S ensors – Heart rate sensor included. Connect optional speed, cadence, speed/cadence, and power sensors. • H ands-free features – Automatically stop the timer when your speed drops below a certain threshold, and automatically take a split at a time or distance you specify. Charging the Cycle Trainer Before you use the Cycle Trainer for the first time, charge the battery for at least 4 hours. Plug the large end of the USB cable into a powered USB port on your computer, and plug the small end into the port on the back of the device. 4 Basic Operation /START/STOP BACK/ /ENTER LAP/RESET/ BACK/ Hold for 2 seconds to turn the Cycle Trainer 2.0™ on or off. Press to turn on the night-light. In menus, press to go back to the previous page. /ENTER Press to cycle through screens in Speedometer mode. Hold to enter the main menus. In menus, press to select the highlighted choice. /START/STOP Press to highlight the previous item in a list. Press to start or stop the timer in Speedometer mode. Press to zoom out in Map mode. LAP/RESET/ Press to highlight the next item in a list. While timer is running in Speedometer mode, press to start a new lap. While timer is stopped in Speedometer mode, press to save the ride and clear the timer. Icon Descriptions These icons can appear on the Time and menu screens. GPS status Timer Solid: GPS has a satellite fix. More bars indicate a stronger signal. Blinking: GPS is seeking a satellite fix. Solid: Timer is running. Blinking: Timer is stopped, but has not been reset. Cadence sensor Solid: Device is receiving data from a cadence sensor. Alarm An alarm is set and will sound at the specified time. Heart rate sensor Solid: Device is receiving data from a heart rate sensor. Battery Indicates the remaining battery power. More lit segments indicate a higher charge. Blinking: Device is searching for a cadence sensor. Blinking: Device is searching for a heart rate sensor. 5 Getting Started Installing the Cycle Trainer Use the two zip ties to attach the mounting bracket to your bike, and then slide the device into the mounting bracket. Press back on the release tab to remove the device from the bracket. Turning the Cycle Trainer On and Off Hold for about 2 seconds to turn the device on or off. Setting the Time The time is set by the GPS, but you choose the time format, time zone, and daylight saving on or off. 1. From the main menu, highlight CONFIGURATION, then press ENTER. 2. Highlight SET SYSTEM, then press ENTER. 3. Highlight TIME SETTINGS, then press ENTER. 4. Highlight the setting to change, then press ENTER. 5. Highlight a time format, time zone, or daylight saving setting, then press ENTER. Setting Display Units Choose the system of measurement in which your user, ride, and navigation data will display. You can display distance and weight units in ENGLISH, METRIC, or NAUTICAL measurements. You can display map coordinates as DEFAULT (degrees and minutes), GOOGLE (degrees, minutes, and seconds), or UTM (x- and y- values of the Universal Transverse Mercator system). 1. From the main menu, highlight CONFIGURATION, then press ENTER. 2. Highlight SET SYSTEM, then press ENTER. 3. Highlight DISPLAY, then press ENTER. 4. Highlight UNITS, then press ENTER. 5. Highlight the UNIT or COORDINATION field, then press ENTER. 6. Highlight the units to display, then press ENTER. Setting Up the User Profile Configure your personal information to ensure accurate heart rate zone and calorie calculations. Enter your name, gender, birth date, height, and weight. 1. From the main menu, highlight CONFIGURATION, then press ENTER. 2. Highlight USER PROFILE, then press ENTER. 3. Highlight the setting to change, then press ENTER. 4. Highlight a letter, number, gender, or month, then press ENTER. 6 Setting Up the Heart Rate Sensor Fitting the Sensor Strap • Wet the heart rate sensor pads, and fasten the sensor firmly to your chest, just below your sternum. Pairing the Heart Rate Sensor Prompt the Cycle Trainer 2.0™ to search for a heart rate sensor and begin receiving data. 1. Make sure you are at least 30 feet away from other heart rate sensors. 2. Turn on the heart rate sensor. 3. From the main menu, highlight CONFIGURATION, then press ENTER. 4. Highlight ACCESSORIES, then press ENTER. 5. Highlight SENSORS, then press ENTER. 6. Highlight HEART RATE, then press ENTER. 7. Highlight SCAN, then press ENTER. SEARCHING... message appears and the A from the sensor. blinks. When the stops blinking, the device is receiving data Setting Up Heart Rate Zones Obtaining accurate heart rate data is crucial to efficient training. Different heart rates provide different health benefits, and knowing your heart rate at a given time helps you know when to intensify or relax your efforts to focus your training. WHAT IS YOUR OPTIMAL HEART RATE? Your fitness goals determine what your optimal heart rate should be; the heart rate zone you want to target for burning fat is different from the zone you should target for endurance training. Use the charts below to estimate your optimal heart rate zone based on your gender, age, and goals. Riding at the Aerobic Base level of intensity (in the middle of the charts) will help you burn fat and build aerobic endurance. However, you can also use the Cycle Trainer to tailor your target heart rate zone for more specific values appropriate to your current fitness level and your goals. NOTE: Values on these charts are based on a percentage of your maximum heart rate (MHR). Consult your doctor before beginning an exercise program and to confirm the heart rate zone that is right for you. MEN Age Light Exercise Weight Management Aerobic Base Optimal Conditioning Elite Athletic Training Maintain a healthy heart and get fit Lose weight and burn fat Increase stamina and aerobic endurance Sustain excellent fitness condition Achieve superb athletic condition 50-60% MHR 60-70% MHR 70-80% MHR 80-90% MHR 90-100% MHR 15 103—123 123—144 144—164 164—185 185—205 20 100—120 120—140 140—160 160—180 180—200 25 98—117 117—137 137—156 156—176 176—195 30 95—114 114—133 133—152 152—171 171—190 35 93—111 111—130 130—148 148—167 167—185 40 90—108 108—126 126—144 144—162 162—180 45 88—105 105—123 123—140 140—158 158—175 50 85—102 102—119 119—136 136—153 153—170 55 83—99 99—116 116—132 132—149 149—165 60 80—96 96—112 112—128 128—144 144—160 65 78—93 93—109 109—124 124—140 140—155 70 75—90 90—105 105—120 120—135 135—150 75 73—87 87—102 102—116 116—131 131—145 80 70—84 84—98 98—112 112—126 126—140 NOTE: MHR is calculated as (220-Age), in Beats per Minute (BPM), for men. 7 WOMEN Age Light Exercise Weight Management Aerobic Base Optimal Conditioning Elite Athletic Training Maintain a healthy heart and get fit Lose weight and burn fat Increase stamina and aerobic endurance Sustain excellent fitness condition Achieve superb athletic condition 50-60% MHR 60-70% MHR 70-80% MHR 80-90% MHR 90-100% MHR 15 106—127 127—148 148—169 169—190 190—211 20 103—124 124—144 144—165 165—185 185—206 25 101—121 121—141 141—161 161—181 181—201 30 98—118 118—137 137—157 157—176 176—196 35 96—115 115—134 134—153 153—172 172—191 40 93—112 112—130 130—149 149—167 167—186 45 91—109 109—127 127—145 145—163 163—181 50 88—106 106—123 123—141 141—158 158—176 55 86—103 103—120 120—137 137—154 154—171 60 83—100 100—116 116—133 133—149 149—166 65 81—97 97—113 113—129 129—145 145—161 70 78—94 94—109 109—125 125—140 140—156 75 76—91 91—106 106—121 121—136 136—151 80 73—88 88—102 102—117 117—131 131—146 NOTE: MHR is calculated as (226-Age), in Beats per Minute (BPM), for women. SETTING YOUR MAXIMUM HEART RATE You can set the Cycle Trainer to calculate your maximum heart rate based on your age, or you can enter a custom setting. 1. From the main menu, highlight CONFIGURATION, then press ENTER. 2. Highlight ACCESSORIES, then press ENTER. 3. Highlight CARDIO SET, then press ENTER to open the HEART RT SETING screen. 4. Highlight the HR MAX field, then press ENTER. 5. Highlight BY AGE or CUSTOM, then press ENTER. 6. If you selected CUSTOM, highlight the numbers to the right of CUSTOM, then press ENTER. 7.Press or to change numbers, then press ENTER. SELECTING YOUR HEART RATE VIEW You can choose to view heart rate data in Beats Per Minute (bpm) or as a percentage of your maximum (%). 1. From the HEART RT SETING screen, highlight the VIEW field, then press ENTER. 2. Highlight bpm or %, then press ENTER. SETTING HEART RATE ZONES The values for each of the 5 heart rate zones are calculated automatically based on your maximum heart rate, but you can instead enter your own values in each zone. 1. From the HEART RT SETING screen, highlight the ZONES field, then press ENTER. 2. Highlight CUSTOM, then press ENTER. 3. Highlight a value in the zone, then press ENTER. 4. Press or to change numbers, then press ENTER. 5. Repeat steps 3 and 4 for each zone. 8 Configuring Bike Settings Bike settings ensure accurate speed, cadence, and power calculations when using optional sensors, and are also used for calculating calories burned. You can configure the weight and wheel size for up to 5 bikes. Determining Wheel Size There are two methods for determining your wheel size setting. If you know your bike’s tire size, you can consult the chart below to see the approximate wheel size. This is the easiest method, but can be less accurate. Tire Size Tire Size Approximate Circumference (mm) Approximate Circumference (mm) 700 X 56 2325 27 X 1 1/4 2161 700 X 50 2293 27 X 1 1/8 2155 700 X 44 2224 27 X 1 2145 700 X 38 2224 26 X 2.125 2070 700 X 35 2168 26 X 1.9 2055 700 X 32 2155 26 X 1.5 1985 700 X 28 2136 26 X 1.25 1953 700 X 25 2105 26 X 1.0 1913 700 X 23 2097 26 X 1/650 C 1952 700 X 20 2086 26 X 1 3/8 2068 27 X 1 3/8 2169 You can also use the “roll-out” method to get a more accurate measurement of your wheel circumference. 1. Place your front wheel on the ground with the valve stem in the 6 o’clock position. 2. Mark the position of the valve stem on the floor. 3. Roll the bike forward, keeping pressure on the handlebars, until the valve stem is again at the 6 o’clock position. 4. Mark the position of the valve stem on the floor. 5. Measure the distance between the two marks. Entering Wheel Size and Bike Weight Once you have determined the wheel size of your bike, you can enter the size and weight settings into the Cycle Trainer. 1. From the main menu, highlight CONFIGURATION, then press ENTER. 2. Highlight ACCESSORIES, then press ENTER. 3. Highlight BIKE SETTING, then press ENTER. 4. Highlight the BIKE field, then press ENTER. 5. Highlight a bike number, then press ENTER. 6. Highlight the WEIGHT or WHEEL SIZE field, then press ENTER. 7.Press or to change numbers, then press ENTER. Configuring Calorie Settings In order to make accurate calculations of calories burned, configure your activity (such as biking or hiking), training level (a relative level of intensity), and any extra weight you are carrying (such as a backpack). Higher training levels and extra weight values result in higher calorie calculations. 1. From the main menu, highlight ACTIVITY, then press ENTER. 2. Highlight SETTING, then press ENTER. 3. Highlight CALORIES, then press ENTER. 4. Highlight the SPORT TYPE, TRAINING LEVEL, or EXTRA WEIGHT fields, then press ENTER. 5.Press or q to change activity, intensity, or number, then press ENTER. 9 Calibrating the Compass To ensure you get the most accurate navigation data from the GPS, you should calibrate the compass before using the device. You need a satellite fix to calibrate the compass. 1. Take the Cycle Trainer outside, away from tall trees and buildings. 2. Wait for the GPS to get a satellite fix. 3. From the main menu, highlight CONFIGURATION, then press ENTER. 4. Highlight ACCESSORIES, then press ENTER. 5. Highlight SET COMPASS, then press ENTER. 6. Highlight CALIBRATION, then press ENTER. 7. Slowly rotate the Cycle Trainer. When calibration is complete, the compass displays. Setting the Compass Declination Depending on your latitude, the position of magnetic North shifts relative to geographic North. This difference in position is called declination. It is strongly recommended that you set the Cycle Trainer to automatically account for declination using the GPS. It is possible to set a declination value manually, however. 1. From the SET COMPASS screen, highlight DECLINATION, then press ENTER. 2. Highlight the DECLINATION field, then press ENTER. 3.Press or to choose AUTO or MANUAL, then press ENTER. 4. If you select MANUAL, press to highlight the Deg field, then press ENTER. 5.Press or to change numbers, then press ENTER. NOTE: To ensure accuracy in navigation, only use manual declination if you can obtain up-to-date declination information from a reliable source, such as a government geographic agency. Using the Speedometer Use the Speedometer to time rides, to display real-time data about a ride in progress, and to save ride data for review. When the Speedometer timer is running, several types of information are recorded, and you can view this recorded data after resetting the timer and saving a ride including: • Date of ride • Fastest pace • Start time • Fastest heart rate • Total distance • Fastest cadence (if a cadence sensor is paired) • Calories burned • Time for each lap • Time of ride • Distance for each lap • Average speed • Average speed for each lap • Average pace • Average pace for each lap • Average heart rate • Calories burned for each lap • Average cadence (if a cadence sensor is paired) • Average heart rate for each lap • Fastest speed • Ride route NOTE: More data can be viewed while the ride is in progress, but is not saved for review. See Configuring Custom Pages for a list. Once you have saved a ride, you can follow the route again and compare your new data with the previous ones. See Training Against A Previous Ride for more information. 10 Starting, Stopping, and Saving a Ride Starting a Ride • From Speedometer mode, press START. If the GPS does not have a satellite fix, a message indicates this and asks if you want to start the timer anyway. To do so, press to highlight YES, and press ENTER. The timer begins, but only time data and data from paired sensors is recorded. Stopping a Ride 1. While the timer is running, press STOP to pause the timer. 2. If the timer is stopped, but has not been reset, press START to resume timing. Saving and Resetting a Ride 1. While the timer is paused, press RESET to save the ride and reset the timer. 2. Highlight YES, and press ENTER. All collected data is saved. See Reviewing Rides for instructions on viewing saved data. Taking Splits What Are Lap and Split Times? Lap time is the length of an individual segment of your ride. Split time is the time elapsed from the beginning of your ride through the current segment. When you “take a split”, you have completed timing one segment (such as one lap) of the ride and are now timing the next segment. The graph below represents the lap and split times for a ride in which 4 laps were taken. LAP 1 7:11 MIN 7:11 MIN SPLIT 1 LAP 2 7:50 MIN LAP 3 7:08 MIN LAP 4 7:30 MIN 15:01 MIN SPLIT 2 22:09 MIN SPLIT 3 29:39 MIN SPLIT 4 Taking a Split • While the timer is running, press LAP to take a split. Data for the lap you just completed is displayed, and the Cycle Trainer begins timing the new lap. Once you stop and save the ride, you can review route and ride data for each lap, as well as for the ride as a whole. Viewing Data During a Ride There are several screens you can view during a ride to see real-time data. • Press to cycle through the display screens. The screens display in this order: • Time of Day • Map (if activated) • Compass (if activated) • Custom Page 1 • Custom Page 2 • Custom Page 3 • Custom Page 4 The four custom screens can be configured to show many different types of data. See Configuring Custom Pages for data that can appear in custom screens and configuration instructions. 11 Using the Trainer The Trainer feature on the Cycle Trainer lets you set goals for your rides, and compares your actual results against the goals your set to help you evaluate your performance. While using the trainer, an alert will sound to let you know when you are ahead of or behind the goals you have set, and indicate the difference so you can gauge how much to speed up or slow down. You can set goals for 5 different metrics: • DIST/TIME – Set a distance you want to cover and the amount of time in which you want to finish • DIST/SPEED – Set a distance you want to cover and the speed you want to maintain over that distance • SPEED/TIME – Set a speed you want to maintain and the length of time you want to keep it up • PACE/DIST – Set a pace you want to maintain and the distance over which you want to maintain it • YOURSELF – Select a ride you have saved and count down the distance and time to complete it Starting the Trainer Training Against Set Goals 1. From the main menu, highlight ACTIVITY, then press ENTER. 2. Highlight TRAINER, then press ENTER. 3. Highlight the trainer type, then press ENTER. 4. Highlight a field to change, then press ENTER. 5. Highlight a number, then press ENTER. 6. Repeat steps 4 and 5 until both fields are set. 7. Highlight START, then press ENTER. 8. The ENABLE ALERT? screen displays. Press or to choose YES or NO, then press ENTER. 9. The DO YOU WANT TO RECORD RUNNING DATA? screen displays. Highlight YES (if you want to save the ride when you are finished) or NO (if you do not want to save), then press ENTER. The Trainer begins timing your ride. Training Against A Previous Ride 1. From the main menu, highlight ACTIVITY, then press ENTER. 2. Highlight TRAINER, then press ENTER. 3. Highlight YOURSELF, then press ENTER. 4. Highlight a ride to time against, then press ENTER. The distance and time of the previous ride display. 5. Highlight START, then press ENTER. 6. The ENABLE ALERT? screen displays. Press or to choose YES or NO, then press ENTER. 7. The DO YOU WANT TO RECORD RUNNING DATA? screen displays. Highlight YES (if you want to save the ride when you are finished) or NO (if you do not want to save), then press ENTER. The Trainer begins timing your ride. Responding to Trainer Alerts When you have enabled alerts and the Trainer running, an audible alert will sound periodically along with a message telling you how far ahead of or behind your goal you are. Use the distance in the message as a guide to how much you should speed up or slow down. Change your speed by a larger margin for higher distances. 12 Stopping the Trainer When you have reached the goal time and distance you set up when your started the Trainer, the Trainer ends. A message displays indicating whether you met your goal or whether you need to speed up to achieve it next time. You can also stop the Trainer before the goals have been met. 1. Hold STOP for a few seconds. 2. Highlight YES, then press ENTER. Reviewing Rides Every time you reset the timer in Speedometer mode (and in the Trainer, if you chose to record data), the ride is saved. You can view it from the ACTIVITY INFO screens. Compare these saved rides against one another to track your progress, or follow the routes of your favorite rides on the map. Checking Memory Capacity From the ACTIVITY screen, you can find out how much memory is remaining on the device, and get an estimate of how many more hours of rides can still be saved. 1. From the main menu, highlight ACTIVITY, then press ENTER. 2. Highlight MEMORY STATUS, then press ENTER. A message displays indicating the number of memory points remaining and the estimated record time available. If you are about to take a ride that is longer than estimated available record time, delete one or more rides to free up memory. See Deleting a Ride or Deleting All Rides from Memory for instructions. Choosing Rides and Viewing Data View the list of rides from the ACTIVITY INFO screen, and select a ride to view in more detail. 1. From the main menu, highlight ACTIVITY, then press ENTER. 2. Highlight ACTIVITY INFO, then press ENTER. 3. Highlight TRAINING INFO, then press ENTER. The list of saved rides by date and time displays. The time, distance, average speed, average pace, calories burned, and average heart rate for the ride display at the bottom of the screen. 4. To view ride details, press or to choose a ride, then press ENTER. The ride details screen displays. You can view all of the data saved from Speedometer mode. To view other data that was recorded, but not visible in this screen, upload the data to Training Peaks. See Uploading Rides to Training Peaks for more information. 13 Using the Details Screen In addition to viewing ride data, there are several other tasks you can perform on the details screen. Viewing the Ride Route You can see the ride route on the map. 1. From the ride details screen, highlight VIEW?, then press ENTER. The map displays indicating the route. Press to zoom out, or to zoom in. Hold ENTER to return to the ride list. Viewing Laps View time, distance, average speed, average pace, average heart rate, and route for individual laps. 1. From the ride details screen, highlight LAPS?, then press ENTER. A list of laps in the ride displays. Lap data appears at the bottom of the screen. 2. To view the lap route, highlight the lap, then press ENTER. The map displays, indicating the route. Press to zoom out, or to zoom in. Hold ENTER to return to the lap list. Following the Ride Route You can follow the route again either from beginning to end or from end to beginning. 1. From the ride details screen, highlight TRACK BACK, then press ENTER. 2. Highlight BACKWARD (to follow from end point to start point) or FORWARD (to follow from start point to end point), then press ENTER. The map displays with the route indicated. The compass arrow indicates the direction to go to follow the route. See Following Routes for more information. Deleting a Ride Remove a ride from memory if you no longer need it or to free up memory space. 1. From the ride details screen, highlight DELETE?, then press ENTER. 2. Highlight YES, then press ENTER. Deleting All Rides from Memory Instead of deleting rides individually, you can delete all rides at the same time. 1. From the main menu, highlight ACTIVITY, then press ENTER. 2. Highlight ACTIVITY INFO, then press ENTER. 3. Highlight DELETE ALL, then press ENTER. 4. Highlight YES, then press ENTER. Navigating with the Cycle Trainer The GPS on the Cycle Trainer powers both the map and the compass features to help you navigate during rides. You can follow routes you have already recorded in Speedometer mode, or you can create waypoints and build routes of your own from them. You can follow routes from the beginning, or from the end to get back to your starting point. Navigating with the Map The map shows your current position, waypoints in a route, a line indicating the route, a compass indicating the direction to the next waypoint, and the distance to the next waypoint. The map is used to follow the route of a previous ride. You can also construct custom routes. Turning the Map On and Off When the map is enabled, it appears in Speedometer mode between the Time screen and Custom screen 1. 1. From the main menu, highlight NAVIGATION, then press ENTER. 2. Highlight ADD MAP MODE (to turn on) or REMOVE MAP (to turn off), then press ENTER. 14 Using Waypoints Waypoints are a specific point on the map with unique coordinates. When you build a route, you indicate a series of waypoints to which you will navigate. CREATING A WAYPOINT 1. Go to the physical location of the waypoint. 2. From the NAVIGATION menu, highlight SAVE WAYPOINT, then press ENTER. Your current coordinates display. 3. Highlight a field to edit, then press ENTER. You can edit the name, coordinates, and elevation. 4. Press or to change letters or numbers, then press ENTER. 5. Highlight CONFIRM?, then press ENTER. The waypoint appears in the waypoint list. NAVIGATE TO A WAYPOINT 1. From the NAVIGATION menu, highlight FIND WAYPOINT, then press ENTER. 2. Highlight LIST ALL, then press ENTER. 3. Highlight the waypoint to which you want to navigate, then press ENTER. 4. Highlight GOTO?, then press ENTER. The map displays with the route to the waypoint indicated. The compass arrow indicates the direction to go to reach the waypoint. DELETING WAYPOINTS You can delete all of your saved waypoints, or delete one at a time. 1. From the NAVIGATION menu, highlight FIND WAYPOINT, then press ENTER. 2. To delete all waypoints, highlight DELETE ALL, then press ENTER. Highlight YES, then press ENTER. 3. To delete one waypoint, highlight LIST ALL, then press ENTER. 4. Highlight the waypoint to delete, then press ENTER. 5. Highlight DELETE?, then press ENTER. The waypoint is immediately deleted. Creating and Deleting Custom Routes A custom route is a sequence of waypoints. You choose which of your saved waypoints to which you will navigate, and in what order. CREATING A CUSTOM ROUTE 1. From the NAVIGATION menu, highlight ROUTES, then press ENTER. 2. Highlight CREATE NEW, then press ENTER. 3. Highlight a waypoint slot, then press ENTER. 4. Highlight the waypoint to include, then press ENTER. The waypoint displays in the list. 5. Repeat steps 3 and 4 until all waypoints are included. DELETING CUSTOM ROUTES You can delete all of your custom routes, or delete one at a time. 1. From the NAVIGATION menu, highlight ROUTES, then press ENTER. 2. To delete all custom routes, highlight DELETE ALL, then press ENTER. Highlight YES, then press ENTER. 3. To delete one custom route, highlight LIST ALL, then press ENTER. 4. Highlight the custom route to delete, then press ENTER. 5. Highlight DELETE?, then press ENTER. The custom route is immediately deleted. 15 Following Routes You can follow any of your custom routes on the map. You can follow the route from the start point to the end point, or from the end point to the start. When you are viewing the map, lines appear between each waypoint, and the compass points in the direction of the next waypoint in the sequence. The distance to the next waypoint appears in the lower right corner of the map. STARTING A ROUTE 1. From the NAVIGATION menu, highlight ROUTES, then press ENTER. 2. Highlight LIST ALL, then press ENTER. 3. Highlight the route to follow, then press ENTER. 4. Highlight FOLLOW?, then press ENTER. 5. Highlight the point to which you want to navigate (the first or last waypoint in the route), then press ENTER. The map displays with the selected route. CHANGING THE MAP VIEW You can view the map at resolutions between 20 feet and 100 miles. • Press to zoom out. • Press to zoom in. NOTE: If you have enabled auto-zoom (see Configuring the Map), you can still zoom manually. However, the resolution will change automatically based on how close you are to a waypoint. STOPPING A ROUTE You can remove the route from the map before you have completed it. 1. From the MAP screen, hold to enter the main menu. 2. Highlight NAVIGATION, then press ENTER. 3. Highlight STOP ROUTE, then press ENTER. Navigating with the Compass The Cycle Trainer compass is similar to a magnetic compass, but rather than using magnetism to help you navigate, it instead finds direction based on a GPS satellite fix. The compass will always point to the North, and you can also set a bearing to follow. Turning the Compass On and Off When the compass is enabled, it appears in Speedometer mode between the Time screen and Custom screen 1. 1. From the main menu, highlight NAVIGATION, then press ENTER. 2. Highlight ADD E-COMPASS (to turn on) or REMOVE COMPASS (to turn off), then press ENTER. 16 Following a Bearing When you set a bearing, you indicate a line of travel to follow that deviates from North. Degrees are counted clockwise, so a bearing of 90 degrees directs you to the East, while a bearing of 270 degrees directs you to the West. When you set a bearing, the compass still points North, but an arrow is overlaid on the compass to indicate the bearing you want to follow. 1. From the main menu, highlight CONFIGURATION, then press ENTER. 2. Highlight ACCESSORIES, then press ENTER. 3. Highlight SET COMPASS, then press ENTER. 4. Highlight FOLLOW BEARING, then press ENTER. 5. Highlight the numeric field, then press ENTER. 6.Press or to change the bearing, then press ENTER. 7 Highlight the BEAR field, then press ENTER. 8. Highlight YES, then press ENTER. The compass displays with the bearing arrow on top of it. Follow the direction of the arrow to follow the bearing. Setting the Alarm The Cycle Trainer has one alarm that will sound at the specified time at a frequency you choose. The alarm can be set to sound at the specified time on a specific day of the week, on weekdays only, on weekends only, or every day. 1. From the main menu, highlight CONFIGURATION, then press ENTER. 2. Highlight SET SYSTEM, them press ENTER. 3. Highlight ALARM, then press ENTER. 4. Highlight the FREQUENCY field, then press ENTER. 5.Press or to change the alarm frequency, then press ENTER. 6. Highlight the hours field, then press ENTER. 7.Press or to change time setting, then press ENTER. 8. Repeat step 7 for minutes and AM/PM field. Configuring Settings The settings changes described in this section are not required, but you can use these settings to get the most out of the Cycle Trainer. Configuring Hands-Free Features Enable Auto-Hold to automatically pause the timer when your speed drops below a specified threshold. Enable Auto-Lap to automatically take a split at a specified time or distance. Auto-Hold 1. From the ACTIVITY menu, highlight SETTING, then press ENTER. 2. Highlight AUTO HOLD, then press ENTER. 3. Press ENTER, then highlight WHEN STOPPED (to pause the timer when you are not moving) or CUSTOM SPEED (to pause the timer when your speed gets too low) and press ENTER. 4. If you chose CUSTOM SPEED, highlight the PAUSE WHEN BELOW field, then press ENTER. 5.Press or to change numbers, then press ENTER. Auto-Lap 1. From the ACTIVITY menu, highlight SETTING, then press ENTER. 2. Highlight LAP SETTING, then press ENTER. 3. Press ENTER, then highlight DISTANCE (to take a split after the specified distance) or BY TIME (to take a split when the specified time has elapsed) and press ENTER. 4. Highlight the DISTANCE or TIME field, then press ENTER. 5.Press or to change numbers, then press ENTER. 17 Configuring Alerts Set up alerts to let you know when your ride statistics fall outside a specified range. For example, to train for endurance at a 15 mph, set the Speed Alert to sound when you go more than 17 or less than 13 mph. Time Alerts Set the Time Alert to notify you when a period of time has passed. 1. From the ACTIVITY menu, highlight SETTING, then press ENTER. 2. Highlight ALERTS, then press ENTER. 3. Highlight TIME/DIST, then press ENTER. 4. Highlight the TIME ALERT field, then press ENTER. 5. Highlight ONCE (to alert you when the time period first passes) or REPEAT (to alert you each time the period passes), then press ENTER. 6. Highlight the ALERT AT field, then press ENTER. 7.Press or to change numbers, then press ENTER. Distance Alerts Set the Distance Alert to let you know when you have traveled the specified distance. 1. From the ACTIVITY menu, highlight SETTING, then press ENTER. 2. Highlight ALERTS, then press ENTER. 3. Highlight TIME/DIST, then press ENTER. 4. Highlight the DISTANCE ALERT field, then press ENTER. 5. Highlight ONCE (to alert you when you reach the distance the first time) or REPEAT (to alert you each time you travel that distance), then press ENTER. 6. Highlight the ALERT AT field, then press ENTER. 7.Press or to change numbers, then press ENTER. Speed Alerts Set the Speed Alert to help you train for a specific speed. The Alert sounds when you exceed the FAST setting or fall short of the SLOW setting. 1. From the ACTIVITY menu, highlight SETTING, then press ENTER. 2. Highlight ALERTS, then press ENTER. 3. Highlight SPEED/PACE, then press ENTER. 4. Highlight the ALERTS field, then press ENTER. 5. Highlight SPEED, then press ENTER. 6. Highlight the FAST SPEED ALERT field, then press ENTER. 7. Highlight ON, then press ENTER. 8. Highlight the ABOVE field, then press ENTER. 9. Press or to change numbers, then press ENTER. 10. Repeat steps 6-9 for the SLOW SPEED ALERT and BELOW fields. Pace Alerts Set the Pace Alert to help you train for a specific number of minutes per mile. The Alert sounds when your pace is lower than the FAST setting or higher than the SLOW setting. 1. From the ACTIVITY menu, highlight SETTING, then press ENTER. 2. Highlight ALERTS, then press ENTER. 3. Highlight SPEED/PACE, then press ENTER. 4. Highlight the ALERTS field, then press ENTER. 5. Highlight PACE, then press ENTER. 6. Highlight the FAST PACE ALERT field, then press ENTER. 7. Highlight ON, then press ENTER. 8. Highlight the BELOW field, then press ENTER. 9. Press or to change numbers, then press ENTER. 10. Repeat steps 6-9 for the SLOW PACE ALERT and ABOVE fields. 18 Heart Rate Alerts Set the Heart Rate Alert to help maintain your ride intensity within a specific range (like general fitness or aerobic base building. The Alert sounds when your heart rate falls outside of the zone you specify. 1. From the ACTIVITY menu, highlight SETTING, then press ENTER. 2. Highlight ALERTS, then press ENTER. 3. Highlight HEART RATE, then press ENTER. 4. Highlight the ALERT field, then press ENTER. 5. Highlight CUSTOM (to enter custom zone values) or HR ZONE (to use a zone already set up for the heart rate sensor), then press ENTER. 6. Proceed to the task below that matches the setting you chose in step 5. SETTING A CUSTOM ZONE If you chose CUSTOM in step 5, you must set the maximum and minimum values for an acceptable heart rate reading. 1. Highlight the MAX HR ALERT field, then press ENTER. 2. Highlight ON, then press ENTER. 3. Highlight the ABOVE field, then press ENTER. 4. Press or to change numbers, then press ENTER. 5. Repeat steps 1-4 for the MIN HR ALERT and BELOW fields. CHOOSING A HEART RATE ZONE If you chose HR ZONE in step 5, you must select which heart rate zone you want to stay within. 1. Highlight the ZONE field, then press ENTER. 2. Highlight the zone you want to stay within, then press ENTER. The maximum and minimum values now match those created when you set up the heart rate sensor. Cadence Alerts Set the Cadence Alert to help you maintain a constant number of pedal revolutions per minute. The Alert sounds when your cadence is higher than the HIGH setting or lower than the LOW setting. 1. From the ACTIVITY menu, highlight SETTING, then press ENTER. 2. Highlight ALERTS, then press ENTER. 3. Highlight CADENCE, then press ENTER. 4. Highlight the HIGH CAD ALERT field, then press ENTER. 5. Highlight ON, then press ENTER. 6. Highlight the ABOVE field, then press ENTER. 7.Press or to change numbers, then press ENTER. 8. Repeat steps 4-7 for the LOW CAD ALERT and BELOW fields. Power Alerts Set the Power Alert to help you maintain a constant power output. The Alert sounds when your power output falls outside of the zone you specify. 1. From the ACTIVITY menu, highlight SETTING, then press ENTER. 2. Highlight ALERTS, then press ENTER. 3. Highlight POWER, then press ENTER. 4. Highlight the ALERT field, then press ENTER. 5. Highlight CUSTOM (to enter custom zone values) or POWER ZONE (to use a zone already set up for the power sensor), then press ENTER. 6. Proceed to the task below that matches the setting you chose in step 5. 19 SETTING A CUSTOM ZONE If you chose CUSTOM in step 5, you must set the maximum and minimum values for an acceptable power reading. 1. Highlight the HIGH POWER ALERT field, then press ENTER. 2. Highlight ON, then press ENTER. 3. Highlight the ABOVE field, then press ENTER. 4. Press or to change numbers, then press ENTER. 5. Repeat steps 1-4 for the LOW POWER ALERT and BELOW fields. CHOOSING A POWER ZONE If you chose POWER ZONE in step 5, you must select which power zone you want to stay within. 1. Highlight the ZONE field, then press ENTER. 2. Highlight the zone you want to stay within, then press ENTER. The maximum and minimum values now match those configured for the power sensor. Alert Messages Choose whether to display Alert messages as symbols or full text. If you choose MESSAGE/BEEPER, full text of the message displays. For example, if you speed is too low, a GO FASTER! message displays. If you choose SYMBOL/BEEPER, an exclamation point displays when the Alert sounds, but no additional information is given. 1. From the ACTIVITY menu, highlight SETTING, then press ENTER. 2. Highlight ALERTS, then press ENTER. 3. Highlight SETTING, then press ENTER. 4. Highlight the ALERTS field, then press ENTER. 5.Press or to choose MESSAGE/BEEPER or SYMBOL/BEEPER, then press ENTER. Configuring Data Recording Options Choose how often data will be recorded from the GPS and other sensors during a ride. More frequent recordings give more accurate readings, but take up more memory in the Cycle Trainer. Also choose whether the Cycle Trainer uses the GPS or the barometer to find altitude. 1. From the ACTIVITY menu, highlight SETTING, then press ENTER. 2. Highlight DATA RECORD, then press ENTER. 3. Highlight the RECORD DATA POINTS field, then press ENTER. 4. Press or to choose EVERY SECOND or CUSTOM TIME, then press ENTER. 5. If you chose CUSTOM TIME, highlight the RECORD EVERY field, then press ENTER. 6.Press or to select the number of seconds between each recording, then press ENTER. 7. Highlight ALTITUDE SET, then press ENTER. 8. Highlight FROM GPS or BAROMETER, then press ENTER. Configuring Custom Pages There are 4 custom pages that can display in Speedometer mode. Each of these custom screens can have between 2 and 6 fields that each display different data. Some of this data is recorded when you reset and save a ride, but some are only visible in Speedometer mode or if you upload your ride to Training Peaks. 20 To set up the custom pages: 1. From the main menu, highlight CONFIGURATION, then press ENTER. 2. Highlight PAGE SETTING, then press ENTER. 3. Highlight the custom page you want to configure, then press ENTER. 4. Press or to select the number of fields to display on the custom page, then press ENTER. 5.Press or to highlight a field, then press ENTER. 6.Press or to highlight the data to display in that field, then press ENTER. 7. Repeat steps 5 and 6 for each field. This table describes the data that can display on custom screens. Data Description Data Description ALTI MAX highest altitude reached during this ride LAPS number of laps in this ride ALTI MIN lowest altitude reached during this ride PACE current time per mile ALTITUDE your current altitude above sea level PACE AVG average time per mile averaged over the entire ride Asc SPEED rate at which you are gaining altitude PACE BEST fastest pace achieved during this ride CAD AVG average RPM of bike crank PACE INZN amount of time spent in your pace zone CAD INZN amount of time spent in your cadence zone PACER amount of time ahead or behind your target CADENCE current RPM of the bike crank PACER E time ahead or behind the trainer Trainer distance CAL RATE number of calories burned per hour PACER T time ahead or behind the trainer time CALORIES calories burned POWER current power output CUMULATE+ total gain in altitude POWER AVG average power in watts averaged over the entire ride CUMULATE- total loss in altitude POWER MAX highest power in watts reached during this ride DISTANCE total distance traveled PWR ZONE amount of time spent in your power zone HR current heart rate PRESSURE barometric pressure at your current location HR% current heart rate as a percentage of maximum REST DIST distance to travel to achieve your goal HR AVG average heart rate over the entire ride SLOPE steepness of current path (positive indicates uphill, negative indicates downhill) HR INZN amount of time spent in your heart rate zone SPD INZN amount of time spent in your defined speed zone HR MAX highest heart rate achieved during this ride SPEED current speed LAP DIST distance you have traveled during this lap SPEED AVG average speed averaged over the entire ride LAP PACE average pace for this lap SPEED MAX fastest speed achieved during this ride LAP SPEED average speed for this lap TEMP current temperature LAP TIME time of this lap TIME time of day Configuring the Lap Screen You can also configure the data that displays in the message screen that displays when you take a split. There are always two data fields in the lap screen, but you set the data that displays in these fields. 1. From the main menu, highlight CONFIGURATION, then press ENTER. 2. Highlight PAGE SETTING, then press ENTER. 3. Highlight SET LAP PAGE, then press ENTER. 4. Highlight one of the fields, then press ENTER. 5.Press or to highlight the data to display in that field, then press ENTER. 6. Repeat steps 4 and 5 for the second field. This table describes the data that can display in the lap screen. Data Description Data Description LAP TIME time of this lap LAP PACE average time per mile for this lap LAP SPLIT total time of all laps in this ride LP AVG HR average heart rate for this lap LAP DIST distance you have traveled during this lap POWER AVG average power in watts for the lap LAP SPEED average speed for this lap 21 Setting System Preferences Set Cycle Trainer sounds, time standby, and display settings. Setting Up Sounds Configure settings for when the Cycle Trainer emits sounds. You can turn sounds OFF, choose MESSAGE ONLY (the device will beep only when a message displays), or KEY AND MESSAGE (the device will beep when messages display and when you press a button. 1. From the main menu, highlight CONFIGURATION, then press ENTER. 2. Highlight SET SYSTEM, then press ENTER. 3. Highlight the BEEPER field, then press ENTER. 4. Highlight a sound setting, then press ENTER. Setting Time-of-Day Standby Time-of-day Standby is the period of time the Cycle Trainer is idle before it automatically returns to the Time screen. You can turn this feature OFF, or set the standby time to 5 or 10 minutes. 1. From the main menu, highlight CONFIGURATION, then press ENTER. 2. Highlight SET SYSTEM, then press ENTER. 3. Highlight TOD MODE, then press ENTER twice. 4. Highlight a standby setting, then press ENTER. Setting Up the Display Configure how long you want the night-light to stay on when it is activated, the language in which screens display, and whether the screen is read vertically or horizontally. NIGHT-LIGHT You can set the night-light to STAYS ON (you must press BACK to turn off the night-light once it is activated), or set the period it stays on to 15 seconds, 30 seconds, 1 minute, or 2 minutes. 1. From the main menu, highlight CONFIGURATION, then press ENTER. 2. Highlight SET SYSTEM, then press ENTER. 3. Highlight DISPLAY, then press ENTER. 4. Highlight the BACKLIGHT field, then press ENTER. 5. Highlight a night-light setting, then press ENTER. LANGUAGE The screens can display in English, Spanish, Italian, French, German, or Simplified Chinese. 1. From the main menu, highlight CONFIGURATION, then press ENTER. 2. Highlight SET SYSTEM, then press ENTER. 3. Highlight DISPLAY, then press ENTER. 4. Highlight the LANGUAGE field, then press ENTER. 5. Highlight a language, then press ENTER. ORIENTATION Set the screens to display with either VERTICAL (portrait) or HORIZONTAL (landscape) orientation. 1. From the main menu, highlight CONFIGURATION, then press ENTER. 2. Highlight SET SYSTEM, then press ENTER. 3. Highlight DISPLAY, then press ENTER. 4. Highlight the ORIENTATION field, then press ENTER. 5. Highlight an orientation, then press ENTER. 22 Configuring Sensors In addition to the heart rate sensor included with the Cycle Trainer, you can connect optional speed, cadence, combined speed/cadence and power sensors to the device to help you train. You can also calibrate the integral barometer. Connecting Sensors If you connect a speed or speed/cadence sensor, that sensor will be used to collect speed data instead of the GPS. Connecting a cadence or speed/cadence sensor is the only way to collect cadence data during your ride. Install physical sensors according to the manufacturer’s instructions, then follow these steps to connect the sensor to the Cycle Trainer. 1. Make sure you are at least 30 feet away from other sensors. 2. Turn on the sensor. 3. From the main menu, highlight CONFIGURATION, then press ENTER. 4. Highlight ACCESSORIES, then press ENTER. 5. Highlight SENSORS, then press ENTER. 6. Highlight the field for the sensor you want to connect, then press ENTER. 7. Highlight SCAN, then press ENTER. A SEARCHING... message appears. When field changes from SCAN to ON, the Cycle Trainer is receiving data from the sensor. Configuring a Power Meter A power meter is a device, usually attached to the bike crank or part of the rear wheel, that measures the amount of force or “work” your feet are applying to the pedals as you ride. This work is measured in watts. An important term used when discussing training with power meters is “threshold”. Threshold is the maximum power output you can sustain for one hour, and is used as an indicator of general muscular endurance; the higher your threshold, the longer your muscles can work without fatiguing. For more information about threshold and how to train for it, visit the Training Peaks website. When you connect a power meter, you can configure the threshold and 6 power zones to help you train for a specific level of power. SETTING YOUR THRESHOLD Enter your threshold as a starting point for calculating power zones. 1. From the main menu, highlight CONFIGURATION, then press ENTER. 2. Highlight ACCESSORIES, then press ENTER. 3. Highlight POWER SETTING, then press ENTER to open the POWER SETTING screen. 4. Highlight the THRESHOLD field, then press ENTER. 5.Press or to change numbers, then press ENTER. SELECTING YOUR POWER VIEW You can choose to view power data in Watts (W) or as a percentage of your threshold (%). 1. From the POWER SETTING screen, highlight the VIEW field, then press ENTER. 2. Highlight W or %, then press ENTER. SETTING POWER ZONES The values for each of the 6 power zones are calculated automatically based on your threshold, but you can instead enter your own values in each zone. 1. From the POWER SETTING screen, highlight the ZONES field, then press ENTER. 2. Highlight CUSTOM, then press ENTER. 3. Highlight a value in the zone, then press ENTER. 4. Press or to change numbers, then press ENTER. 5. Repeat steps 3 and 4 for each zone. 23 Calibrating the Barometer The barometer can be used instead of the GPS to calculate your elevation based on air pressure. By default, the barometer calibrates automatically, but you can calibrate it manually by entering the sea level pressure for your location. Obtain the sea level pressure from your governmental weather bureau or another reliable source. 1. From the main menu, highlight CONFIGURATION, then press ENTER. 2. Highlight ACCESSORIES, then press ENTER. 3. Highlight BARO SETTING, then press ENTER. 4. Highlight the CALIBRATION field, then press ENTER. 5. Highlight MANUAL, then press ENTER. 6. Highlight the S.L. PRESSURE field, then press ENTER. 7.Press or to change numbers, then press ENTER. Your current altitude, based on the sea level pressure you entered, displays. Configuring the GPS WAAS/EGNOS is a network of ground stations that monitor satellite data to augment the accuracy of navigation data. The GPS on the Cycle Trainer uses WAAS/EGNOS technology to provide navigational pinpointing within about 3 meters, while a standard satellite fix (without WAAS/EGNOS) is accurate within about 15 meters. Getting a satellite fix can take longer when WAAS/EGNOS is enabled. You can turn the WAAS/EGNOS feature off to shorten the time required to acquire satellite fixes, but at a potential reduction of accuracy. You can also turn off the GPS entirely. You may want to do this to conserve battery life during periods when you are not recording rides. 1. From the main menu, highlight CONFIGURATION, then press ENTER. 2. Highlight GPS SETTING, then press ENTER. 3. Highlight the WAAS/EGNOS field, then press ENTER. 4. Highlight ON or OFF, then press ENTER. 5. Highlight the GPS field, then press ENTER. 6. Highlight ON or OFF, then press ENTER. Viewing GPS Information You can view the strength of the GPS satellite fix. The more solid bars appear on the left side, the stronger the fix. There is also a message at the top of the screen that summarizes the strength of the fix: • 3D FIXED: The GPS can accurately report map coordinates and elevation. • 2D FIXED: The GPS can accurately report map coordinates, but not elevation. • WEAK SIGNL: The GPS has a fix, but the accuracy is not reliable. • RECEIVING: The GPS is attempting to acquire a fix. To view the GPS signal information: 1. From the main menu, highlight CONFIGURATION, then press ENTER. 2. Highlight GPS SETTING, then press ENTER. 3. Highlight GPS INFO, then press ENTER. 24 Configuring the Map Set the view and the zoom options for the map. There are two view options: If you select DIRECT TO NORTH, the top of the map always points to the North. If you select BIRD EYE VIEW, the map rotates so that the top of the map points in the direction you are traveling. There are also two zoom options. AUTO zoom changes the focus of the map based on how close you are to a waypoint. MANUAL zoom lets you change the focus of the map freely by pressing to zoom out and to zoom in. 1. From the main menu, highlight CONFIGURATION, then press ENTER. 2. Highlight MAP MODE SET, then press ENTER. 3. Highlight the view field, then press ENTER. 4. Highlight BIRD EYE VIEW or DIRECT TO NORTH, then press ENTER. 5. Highlight ZOOM IN/OUT, then press ENTER. 6. Highlight AUTO or MANUAL, then press ENTER. Resetting the Cycle Trainer You can reset the Cycle Trainer to the factory settings. All saved rides, waypoints, routes, and user profile data are deleted. 1. From the main menu, highlight CONFIGURATION, then press ENTER. 2. Highlight FACTORY RESET, then press ENTER. 3. Highlight YES, then press ENTER. Connecting to a Computer You can connect the Cycle Trainer to a computer to upgrade firmware, change settings on the Cycle Trainer from the computer, and upload ride data into a Timex Trainer account. Before you connect to a computer, create a Timex Trainer account and download the Device Agent software for the Cycle Trainer. Creating a Timex Trainer Account A Timex Trainer provides useful tools for saving and viewing ride data and organizing your training schedule based on your goals. 1. In a Web browser, navigate to https://timextrainer.trainingpeaks.com. 2.Click Create a new account. 3. Enter your information and click Submit. Installing the Device Agent The Device Agent is software that runs on your computer. It allows you to connect the Cycle Trainer to your computer so you can upgrade firmware and transfer data and settings between the computer and the device. 1. In a Web browser, navigate to www.timexironman.com/deviceagent. 2. Click the download link for the Cycle Trainer 2.0™. 3. Follow the prompts to install the Device Agent. Upgrading the Firmware New firmware for the Cycle Trainer is released periodically to improve functionality of the device. The newest firmware is available online; obtain it with the Device Agent software. Determining the Current Firmware Version 1. From the main menu, highlight CONFIGURATION, then press ENTER. 2. Highlight ABOUT PRODUCT, then press ENTER. The current firmware version displays. 25 Connecting the Cycle Trainer 1. Insert the large USB plug into a USB port on the computer. 2. Insert the small USB plug into the port on the back of the Cycle Trainer. 3. Turn on the Cycle Trainer. 4. When the CONNECT TO PC? message displays, highlight YES, then press ENTER. 5. Open the Device Agent. Downloading the Latest Firmware 1. In the Device Agent, click Settings. The Device Agent checks for new firmware versions. 2. If new firmware is available, click Download Now. The new firmware download link displays. 3. Click the download link and save the file to your computer. Saving Cycle Trainer Settings When you upgrade the firmware, your configuration settings are erased from the device. To preserve them, save the settings so you can restore them once the firmware is upgraded. 1. In the Device Agent, click Configure, then click GPS. 2.Click Export. 3. Name the settings file and save it to your computer. Applying new Firmware to the Cycle Trainer 1. On the Cycle Trainer, hold to enter the main menu. 2. Highlight CONFIGURATION, then press ENTER. 3. Highlight SYSTEM UPGRAD, then press ENTER. 4. In the Device Agent, click File, then click Update Device. 5. When prompted, select the firmware file you saved to your computer. A progress bar displays on the Cycle Trainer. IMPORTANT: Do not disconnect the Cycle Trainer from the computer or interrupt the upgrade process before it is completed. The Cycle Trainer will shut down when the upgrade is complete. Restoring saved Settings 1. Turn on the Cycle Trainer. 2. When the CONNECT TO PC? message displays, highlight YES, then press ENTER. 3. In the Device Agent, click Settings. 4. Click Configure, then click GPS. 5.Click Import. 6. Select the settings file you saved to your computer, then click Save. Downloading Settings to the Cycle Trainer Make changes to Cycle Trainer settings from the Device Agent, and then download those settings to the device. 1. Connect the Cycle Trainer to the computer as described in Connecting the Cycle Trainer. 2. In the Device Agent, click Configure. 3. In the Device Agent, change settings, then click Save. 4. When the setting transfer is complete, close the Device Agent and unplug the Cycle Trainer from the computer. Uploading Rides to Training Peaks Upload ride data to Training Peaks to help you analyze and plan your training regimen. 1. Connect the Cycle Trainer to the computer as described in Connecting the Cycle Trainer. 2. In the Device Agent, click Download from Device. 3.When ride data transfer is complete, close the Device Agent and unplug the Cycle Trainer from the computer. 26 Troubleshooting Follow these steps to solve problems that may arise when using the Cycle Trainer. Problems with the Heart Rate Sensor If the Cycle Trainer is not receiving a signal from the heart rate sensor, or the reading is inconsistent: 1. Make sure the heart rate sensor is fitted correctly. See Fitting the Sensor Strap for more information. 2. Make sure that the heart rate sensor is paired to the Cycle Trainer. See Pairing the Heart Rate Sensor for more information. 3. Check the battery on the heart rate sensor. Problems Connecting to a Computer If you cannot download settings or upload ride data: 1. Make sure the USB cable is connected to both the computer and the Cycle Trainer. 2. Make sure the Cycle Trainer is turned on. 3. Make sure the Device Agent is open on the computer. 4. Make sure you have selected CONNECT TO PC on the Cycle Trainer. 5. In the Device Agent, make sure you have selected the Cycle Trainer from the Device drop down menu. Water Resistance The Cycle Trainer is resistant to rain, splashes, and other casual contact with water, but should never be submerged in any liquid. Warranty and Service Timex International Warranty (U.S. Limited Warranty) Your Timex® GPS watch is warranted against manufacturing defects by Timex for a period of ONE YEAR from the original purchase date. Timex Group USA, Inc. and its worldwide affiliates will honor this International Warranty. Please note that Timex may, at its option, repair your Timex® product by installing new or thoroughly reconditioned and inspected components or replace it with an identical or similar model. IMPORTANT: PLEASE NOTE THAT THIS WARRANTY DOES NOT COVER DEFECTS OR DAMAGES TO YOUR PRODUCT: 1. after the warranty period expires; 2. if the product was not originally purchased from an authorized Timex retailer; 3. from repair services not performed by Timex; 4. from accidents, tampering or abuse; and 5.lens or crystal, strap or band, sensor case, attachments or battery. Timex may charge you for replacing any of these parts. THIS WARRANTY AND THE REMEDIES CONTAINED HEREIN ARE EXCLUSIVE AND IN LIEU OF ALL OTHER WARRANTIES, EXPRESS OR IMPLIED, INCLUDING ANY IMPLIED WARRANTY OF MERCHANTABILITY OR FITNESS FOR PARTICULAR PURPOSE. TIMEX IS NOT LIABLE FOR ANY SPECIAL, INCIDENTAL OR CONSEQUENTIAL DAMAGES. Some countries and states do not allow limitations on implied warranties and do not allow exclusions or limitations on damages, so these limitations may not apply to you. This warranty gives you specific legal rights and you may also have other rights which vary from country to country and state to state. To obtain warranty service, please return your GPS watch to Timex, one of its affiliates or the Timex retailer where the GPS watch was purchased, together with a completed original Repair Coupon or, in the U.S. and Canada only, the completed original Repair Coupon or a written statement identifying your name, address, telephone number and date and place of purchase. Please include the following with your GPS watch to cover postage and handling (this is not a repair charge): a US$ 8.00 check or money order in the U.S.; a CAN$7.00 cheque or money order in Canada; and a UK£2.50 cheque or money order in the U.K. In other countries, Timex will charge you for postage and handling. NEVER INCLUDE ANY ARTICLE OF PERSONAL VALUE IN YOUR SHIPMENT. For the U.S., please call 1-800-328-2677 for additional warranty information. For Canada, call 1-800-263-0981. For Brazil, call +55 (11) 5572 9733. For Mexico, call 01-800-01-060-00. For Central America, the Caribbean, Bermuda and the Bahamas, call (501) 370-5775 (U.S.). For Asia, call 852-2815-0091. For the U.K., call 44 208 687 9620. For Portugal, call 351 212 946 017. For France, call 33 3 81 63 42 00. Germany/Austria: +43 662 88921 30. For the Middle East and Africa, call 971-4-310850. For other areas, please contact your local Timex retailer or Timex distributor for warranty information. In Canada, the U.S. and in certain other locations, participating 27 Timex retailers can provide you with a postage-paid, Repair Mailer for your convenience in obtaining factory service. TIMEX INTERNATIONAL WARRANTY REPAIR COUPON Original Purchase Date:_________________________________________________ (attach a copy of sales receipt, if available) Purchased by: _______________________________________________________ (name, address, telephone number) Place of Purchase:____________________________________________________ (name and address) Reason for Return:____________________________________________________ __________________________________________________________________ Declaration of Conformity Manufacturers Name: Timex Group USA, Inc. Manufacturers Address: 555 Christian Road Middlebury, CT. 06762 United States of America Declares that the product: Product Name: Timex Cycle Trainer 2.0 GPS Model Number: M242 Conforms to the following specifications: R&TTE: 1999/05/EC Standards: EN 300 440-1 V1. 6.1 (2010-08) EN 300 440-2 V1. 4.1 (2010-08) EN 301 489-1 V1. 8.1 (2008-04) EN 301 489-3 V1. 4.1 (2002-08) EN 55022: 2006+A1: 2007, Class B EN 61000-4-2: 2009 EN 61000-4-3: 2006+A1: 2008+A2: 2010 Digital Device Emissions Standards FCC Part 15, Subpart B, Class B CISPR 22: 1997, Class B ANSI C63.4: 2003 Immunity Standards EN 55022: 2006+A1: 2007, Class B EN 55024: 1998+A1: 2001+A2: 2003 IEC 61000-4-2: 2008 ED. 2.0 IEC 61000-4-3: 2006+A1: 2007 ED. 3.0 IEC 61000-4-8: 2009 ED. 2.0 LVD: 2006/95/EC Standards: EN 60950-1: 2006 + A11: 2009 + A1: 2010 Supplemental Information: The product herewith carries the CE marking accordingly. . .©2011 Timex Group USA, Inc. TIMEX, TRIATHLON, RUN TRAINER, NIGHT-MODE and INDIGLO are trademarks of Timex Group B.V. and its subsidiaries. IRONMAN and M-DOT are registered trademarks of World Triathlon Corporation. Used here by permission. SiRF and the SiRF logo are registered trademarks of CSR. SiRFstarIV is a trademark of CSR. ANT+ and the ANT+ Logo are trademarks of Dynastream Innovations, Inc. 28