1
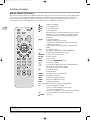
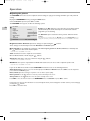
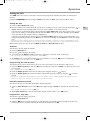
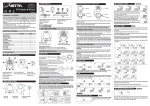
06-EFC030-EN.qxd
15/06/05
13:40
Page 1
Contents
Chapter 1: Getting started
Chapter 4: Other information
Important information ....................................................................2
Safety ....................................................................................................2
LCD panel............................................................................................2
Care ....................................................................................................2
Switching on ......................................................................................3
Remote control TV functions ..........................................................4
O Using the remote control for other equipment........................5
Programming the remote control..................................................5
Sockets ............................................................................................15
Connecting headphones ................................................................15
Connecting a video recorder ........................................................15
EN
Chapter 2: Channel set-up
Initial set-up ......................................................................................6
Organiser ..........................................................................................6
Arranging channels in order............................................................6
Deleting channels ..............................................................................6
Naming or renaming channels ........................................................7
Manual channel set-up......................................................................7
Chapter 3: Operation
General operation ............................................................................8
Switching the television set on or to standby ............................8
Volume..................................................................................................8
Displaying status information ..........................................................8
Accessing channels ............................................................................8
Accessing AV programmes ..............................................................8
Zoom ....................................................................................................8
O Adjusting the sound ......................................................................9
Graphic equaliser ..............................................................................9
Adjusting the picture......................................................................10
Setting the time ..............................................................................11
Setting the time................................................................................11
Calendar ............................................................................................11
Programming the wake-up timer ................................................11
Schedule automatic shut-off..........................................................11
Programme a sleep time ................................................................11
Parental control ..............................................................................12
Locking a channel or AV programme ........................................12
Locking the appliance’s buttons ..................................................12
Modifying your personal code ......................................................12
Operation (TV mode) ....................................................................12
Teletext ............................................................................................13
Accessing Teletext............................................................................13
Navigation bar ..................................................................................13
Changing the character set temporarily ....................................13
Other Teletext functions ................................................................14
Newsflash ..........................................................................................14
Subtitles..............................................................................................14
Direct access to subpages ............................................................14
Alarm page ........................................................................................14
Fastext................................................................................................14
This manual applies to several TV set models. Some features may not be available on the model you purchased. Refer to
the feature table provided with this manual to find out the main features of the relevant model.
Optional functions are indicated by the following symbol: O
The model number of your TV set is on a label at the back of the set and on the cover of this manual.
This publication is printed on recycled paper.
1
06-EFC030-EN.qxd
15/06/05
13:40
Page 2
Chapter 1
Getting started
Important information
EN
Safety
LCD panel
Ensure that your domestic mains supply voltage matches the
voltage indicated on the identification sticker located at the back of
your set.
The LCD panel used in this product is made of glass.Therefore, it
can break when the product is dropped or impacted upon by other
objects.
The screen of your LCD TV is protected by a glass shield. Under
certain conditions (changes of temperature and humidity) moisture
may form between the glass and the screen. If this relatively rare
condition arises, it is only necessary to switch on the LCD TV for
around twenty minutes, to make it disappear.
The TV set's components are sensitive to heat.The maximum
ambient temperature should not exceed 35° Celsius. Do not
cover the vents at the back or sides of the TV set. Leave sufficient
space around it to allow adequate ventilation. Install the appliance
away from any source of heat (fireplace, ...) or appliances creating
strong magnetic or electric fields.
The LCD panel is a very high technology product, giving you finely
detailed pictures. Occasionally, a few non-active pixels may appear
on the screen as a fixed point of blue, green or red.This does not
affect the performance of your product.
Moisture in rooms where the set is installed should not exceed
85% humidity. If you have to use the TV set outdoors, do not
expose it to rain or splashing water.Therefore be careful not
to place any object containing a liquid (vase, glass, bottle,...) on or
near your appliance. Moving the set from a cold place to a warm
one can cause condensation on the screen (and on some
components inside the TV set). Let the condensation evaporate
before switching the TV set on again.
In order to ensure long performance of your set and reduce the
risk of screen burning, please observe the following precautions.
- Do not display still images (still computer and video game images,
logos, pictures, text and images displayed in 4:3) for extended
periods of time;
- Use a screen saver when using a computer;
Care
If you intend to be away for a long period, switch the TV set off
at the on/standby switch B. Even when off, some components
remain in contact with the mains electricity supply.To completely
isolate the set you must remove the plug from the mains supply
socket.
Use a glass-cleaning product to clean the screen and a soft cloth
and mild detergent to clean the rest of the set.
Important: Using strong detergents, alcohol-based and abrasive
products may damage the screen.
Dust the vents at the back and sides regularly. Using solvents,
abrasive or alcohol-based products could damage the TV set.
During thunderstorms, we recommend that you disconnect the
TV set from the mains and aerial so that it is not affected by
electrical or electromagnetic surges that could damage it. For this
reason, keep the mains and aerial sockets accessible so they
can be disconnected, if necessary.
Never open the appliance yourself since this may put you at risk or
damage the appliance.
THOMSON disclaims any liability if the TV set is not used
in accordance with this manual.
Unplug the TV set immediately if you notice it giving off a smell
of burning or smoke.You must never, under any circumstances,
open the TV set yourself, as you run the risk of an electric shock
in doing so.
Before setting up your television set, make sure that the surface you want to put the set on can support its
weight (see the list of specifications provided with the booklet).
Don’t place the set on an unstable surface (e.g. moving shelf, very edge of a unit) and make sure that the
front of the television set does not overhang the surface it is sitting on.
HELPLINE
You can contact THOMSON by dialling: 0871 712 1312
(for United Kingdom, £0.10/mn inc VAT)
www.thomson-europe.com
In the interest of improving the quality of our products, we reserve the right to modify their features. The information in this manual is, therefore, subject
to change and does not represent any kind of contract.
2
06-EFC030-EN.qxd
15/06/05
13:40
Page 3
Getting started
Switching on
Follow the instructions on this page on how to switch on your TV set and the remote control before going on to following
pages describing how to use the remote control and the channel set-up procedure.
1. Insert two LR03 or AAA batteries in the remote control.
Precautions on using batteries:
- Only use the battery types specified.
- Make sure you use the correct polarity.
- Do not mix new and used batteries.
- Do not use rechargeable batteries.
- Do not expose batteries to excessive heat, throw them in a fire, recharge them or
try to open them, as this could cause them to leak or explode.
- Remove the batteries from the remote control if you are not using it for a long
period of time (several weeks).
2. Plug the female socket on the mains lead into the mains adapter.
Audio in
3. Connect the mains adapter to the power socket on the back of the
TV set (towards the left).
Mains socket in
continental Europe
4. Plug the male plug on the mains lead into a 220 - 240V ~ AC 50Hz
220 - 240 V ~ 50 Hz
mains outlet.
5A
Mains socket for
UK and Ireland
This supplies electricity to the TV set, which must be powered exclusively by a 12V or
24V DC supply (depending on the model).
Equipment for the UK and Ireland is supplied with a mains cable fitted with a
moulded plug.
This plug contains safety components and must not be replaced by one sold by
general retailers. It is fitted with a fuse that protects your television. If your set has
stopped working, the fuse may have blown. If it has, replace it with an identical ASTA
or BSI certified (BS1362) 5-amp fuse.
5. Connect the outside aerial or cable network to the g socket at the
back of the TV set.
The aerial socket (75 Ohms - VHF / UHF / cable) can be used for connecting an
external aerial or other equipment fitted with a modulator (video recorder, satellite
receiver, etc.).
We recommend that you do not connect other equipment (video recorder, satellite
receiver, etc.) to your TV set to begin with, so as not to complicate the set-up
procedure with the additional steps involved. Connect them when you have finished
setting up the channels by referring to page 14 of this manual.
6. Switch the TV on by pressing the on/standby button B on the front.
You will find a description of how to use the remote control on page 4.
Then go to page 6 for information on the initial set-up, or to page 7 for
information on manual set-up (if the channels have already been set up
on your TV).
Please respect the environment and the relevant regulations. Before you
dispose of batteries (or accumulators), ask your dealer whether they require
special recycling and if he is able to take them back.
3
EN
06-EFC030-EN.qxd
15/06/05
13:40
Page 4
Getting started
Remote control TV functions
Most of your television’s functions are available via the menus that appear on the screen.The remote control supplied with
your set can be used to navigate through the menus and to configure all the general settings.The remote control and its
functions may vary depending on the model of television.The rest of this page contains the description of the most
comprehensive remote control. Optional remote control features are indicated by the symbol O.
B
EN
Standby / quit standby.
O DVD
To access DVD mode.
O VCR
To access VCR mode.
O TV
To access TV mode.
Press this button to control the television. If you do not have
this button on your remote control, it means that you can
access the TV functions directly, without pressing a button
beforehand.
O light
To provide information:
- it lights up when you press a button,
- it indicates the status when the remote control is being
programmed (see page 5),
- if the batteries are run down, it flashes when you press a
button.
+/To control the volume.
This function is also available in VCR and DVD modes.
To switch the sound off and back on again.
RETURN
To return to the previous menu.
PR+/PRTo change channels.
EXIT
To close a menu.
MENU
To access the OVERVIEW menu.
To select menu options.
To set functions, change values, enable and disable functions.
4/3 models: to select the picture format
16/9 models: to select the zoom function.
OK
To confirm a selection.
Coloured buttons:
PRESETS
(red button) image and sound presets.
Zzz/LIST
(green button) sleep timer.
INFO
(yellow button) status information.
GUIDE
(blue button) disabled in TV mode.
TEXT
(purple button) Teletext.
The coloured buttons can also be used for operating Teletext.
0-9
To select a channel by its number.
In the case of channel numbers with two digits:
- press the two digits quickly, or
- press 0 twice to display “--”, then enter the channel number.
AV
To select an appliance connected to an AV socket.
O RADIO
Not active.
Important:
If the batteries in your remote control are run down, you can use the buttons on the front of your set, as they have the same functions as those
on the remote control.
4
06-EFC030-EN.qxd
15/06/05
13:40
Page 5
Getting started
O Using the remote control for other equipment
The remote control supplied with your television may vary depending on the model you have chosen. Some remote
controls can be used for other equipment, such as video recorders or DVD players.This page provides information
concerning the remote control’s use with some of these other types of equipment.
VCR
DVD
B
MENU
OK
EXIT
0-9
PR+/PRAV
REV
PLAY
FWD
STOP
PAUSE
REC
VCR
Press the VCR button
DVD
Press the DVD button
On/Standby
To display the main menu
Vertical scrolling in menus
Horizontal scrolling in menus
To confirm an action
To close a menu
To enter numeric values or select options
in menus
On/Standby
To display the main menu
Vertical scrolling in menus
Horizontal scrolling in menus
To confirm an action
To close a menu
To directly access channels or enter
numeric values
To change channels
To select av input
Rewind
Play
Fast forward
Stop
Pause picture
Record
Rewind
Play
Fast forward
Stop
Pause picture
Programming the remote control
Automatic code search
This method can be used to automatically find the most appropriate code for your appliance.
1. Switch on the appliance you wish to use the remote control with.
2. Press the relevant button for this appliance on the remote control, and while holding this button down, press the B
standby button until the remote control light comes on. Release the two buttons.
3. Point the remote control at the appliance and press PLAY.Wait until the light stops flashing. If the appliance has not gone
into standby mode after five seconds, press the PLAY button again to continue the search for the next set of codes.
Repeat this operation until the appliance goes into standby mode.There are 20 sets of codes.
4. When the appliance goes into standby mode, press the standby B button on the front to switch it on again.Then press
the
REV
button to put it back in standby mode, and if necessary, keep pressing until the appliance goes into standby.
5. Press the STOP button and hold it down until the remote control light goes off.
Note: you can cancel the programming operation at any time by pressing the
EXIT
button.
Manual programming
This method involves carrying out a manual search for the codes to be used for controlling your other appliances.
1. Switch on the appliance you wish to use the remote control with.
2. Press the relevant button for this appliance on the remote control, and while holding this button down, enter one of the
four-digit codes relevant to your make of appliance (there is a list of codes at the end of this manual). If the remote
control light flashes you have entered the wrong code or it is not possible to program the remote control.
3. Point the remote control at the appliance and press the relevant button (VCR or DVD). Press the B standby button. If
the appliance does not go into standby mode, try another code.
Depending on the year of manufacture and the type of appliance, some functions may not be available.
Certain codes may cover more functions than others.Test the functions you can control and, if appropriate, try other codes.
Note here the code(s) which work best.
VCR
DVD/LD
When you change the remote control’s batteries, remember to reprogram it.
5
EN
06-EFC030-EN.qxd
15/06/05
13:40
Page 6
Chapter 2
Channel set-up
Initial set-up
Initial set-up involves selecting all the settings required to be able to
search for and store all the channels you can receive.
AUTO. INSTALLATION
Return
Standard
Start
Frequency
PR
UK...
Running...
150.75 MHz
05
Make sure that the television is switched on and follow all the steps in
turn specified on this page.
EN
1. When you first switch the TV set on, the INSTALLATION menu appears and the Language option is selected.
Choose which language you want the menus to appear in using the
applied to the menus immediately.
2. Select the Auto. Instal. option using the
button and press
OK
buttons.When you select a language it is
to confirm.
3. A list of countries appears, over two pages. Select the relevant country using the
Press
OK
and
buttons.
to confirm.
Note: This is the country you are in, or the country whose channels you want to receive if you live near its borders.
4. The relevant menu appears with the Standard option selected. Select a suitable standard using the
buttons.
Note: the following standards are available to choose from: UK for the UK and Ireland, FR for France and Luxembourg, DK for Eastern Europe,
the Middle East and Asia, EURO for Western Europe, Australia and New Zealand.
5. Then select the Start option using the
button and press OK to start the search. During this time the message
“Running” appears next to the Start option and the Frequency and PR options appear, informing you of the
installation procedure’s progress.
If you press the EXIT button before the end of the search the channels already found are stored.
Once the search has ended the ORGANISER menu appears (see below).
You may subsequently return to AUTO. INSTALLATION menu.
Display the OVERVIEW menu by pressing the MENU button.
Select the Installation option and press OK to confirm.
Select the Automatic Installation option from the INSTALLATION menu and press OK to confirm.
/ and press OK.
Select the relevant country using the
Organiser
ORGANISER
Return
Select PR
Swap with PR
PR name
Delete PR
01.
- -.
T.....
01
Using this menu you can change the order the channels have been
arranged in during automatic set-up, name and rename channels and
delete duplicate channels or those with poor reception quality.
Follow the help messages at the bottom of the screen and refer to a TV
programme guide to help identify the channels.
Start: RIGHT key
Scroll up/down: UP/DOWN keys
Validate name: OK
Arranging channels in order
The Select PR line is selected.
Display the channel number to be changed using the PR+/PR- buttons or the 0-9 keys.
Select the option Swap with PR.
Enter the new programme number using the 0-9 keys.
Press OK to confirm.
When you successfully finish the swap, the bottom help line will show “The programmes have been swapped“
message.
Follow the same procedure for the other channels.
Deleting channels
The Select PR line is selected.
Display the channel number to be changed using the PR+/PR- buttons or the 0-9 keys.
Select the Delete PR option and press the OK button to delete the channel.
Once this channel has been deleted the bottom help line will show “ The programme has been deleted“ message.
6
06-EFC030-EN.qxd
15/06/05
13:40
Page 7
Channel set-up
Naming or renaming channels
The Select PR line is selected.
Display the number of the channel whose name you want to change using the PR+/PR- buttons.
The relevant channel appears. Select the PR name option and press the
button to place the cursor on the first
character.
Using the
buttons, select a character from the list, which includes letters from the alphabet, numbers between 0 and
9, the characters +,. and space.
Go on to the next character or back to the previous character using the
buttons and start the procedure again.
Press OK to confirm. Names can have a maximum of six characters.
EN
Press EXIT to close the menu.
Note:You may subsequently return to ORGANISER menu:
Display the OVERVIEW menu by pressing the MENU button.
Select the Installation option and press OK to confirm.
Select the Organiser option from the INSTALLATION menu and press OK to confirm.
To carry out the automatic set-up procedure again, put the set in standby mode, then press the VOL- button on the front of
the set and the MENU button on the remote control at the same time for five seconds.The set comes on and the
installation menu appears.
Manual channel set-up
Follow the procedure given on this page if you find that some channels have not been stored during the initial set-up.This
can happen if you are setting up cable network channels. Setting up channels manually requires every setting for a particular
channel to be entered, one at a time.
MANUAL INSTALLATION
Return
Standard
Frequency
Fine tuning
PR
Decoder
Character set
Display the OVERVIEW menu by pressing the MENU button. Select the
Installation option and press OK to confirm. Select the Manual
instal. option from the INSTALLATION menu and press OK to
confirm.
UK...
150.75 MHz
05
1...
1. Select the Standard option and then the relevant standard for your country using the
buttons.
Note: the following standards are available to choose from: UK for the UK and Ireland, FR for France and Luxembourg, DK for Eastern Europe,
the Middle East and Asia, EURO for Western Europe, Australia and New Zealand.
2. Select the Frequency option. Use the
or
button to start the search in descending or ascending order.When a
channel is found pictures appear.
3. If the picture is not clear you can adjust the setting.You do this by selecting the option Fine tuning and adjusting it
with the
buttons.
4. If the channel is encrypted and you want to connect a decoder, select the Decoder option and check the box by
pressing the
OK
button.
5. Then select the Character set option and choose the character set that will be used for Teletext on this channel using
the
buttons.The following character sets are available:
1 :Western Europe
2 : Eastern Europe
3 : Russian and Bulgarian
4 : Greek
5 : Arabic
6 : Ukrainian
7 : Belarussian
The character set selected determines how characters are displayed on Teletext screens.
6. Select the PR option to assign a number to the channel. Enter the number using the numeric buttons. Press the OK
button to confirm.
Important: as soon as you change a setting in the MANUAL INSTALLATION menu the channel number starts flashing under the PR
option. To confirm your change you must select the PR option and press OK. If you do not confirm the change it will be cancelled when you
change channel or put the television into standby mode.
Repeat this procedure to find other channels.
7
06-EFC030-EN.qxd
15/06/05
13:40
Page 8
Chapter 3
Operation
General operation
Switching the television set on or to standby
To switch the TV set on, press the B button located on the front of the set.
Standby mode
Press the B button on the remote control or on the appliance.The TV set remains powered up, but with low energy
consumption.
Quitting standby mode
EN
-
press the B or any numeric button on the remote control,
press the TV or OK, buttons to switch the television on at the last channel you were watching,
press PR+/PR- buttons to display the follow channel or precedent the last channel loocking.
press the AV button to switch the television on at the last AV programme you were watching.
Volume
Volume control: use the VOL+/VOL- buttons on the front of the TV set or press the relevant buttons on the remote control
to increase or decrease the volume.
Sound mute: press the
button to temporarily mute the sound. Press this button again or the
VOL+
button to restore it.
Displaying status information
In TV mode, press the yellow button (INFO) on the remote control handset to display the channel number and name, the
date, the time, the type of sound, and the type of format or zoom.
When you switch on the television or change channels, the number and name of the channel are displayed if you entered its
name under the ORGANISER menu.
Accessing channels
Using the numeric buttons:
- for channels 1 to 9, press the corresponding button.
- for channels 10 to 99,
- press the tens digit for a few seconds to display “x-” on the screen, then press the units digit, or
- press the 0 button to display “--”, then enter the two digits.
Using the PR+/PR- buttons: scroll through the channels. Av programmes are not included in the cycle unless you use the
buttons on the front of the TV set.
Accessing AV programmes
Press the AV button to display the last selected audio-visual programmes and scan through the other audio-visual programmes.
AV selection loop: AV1, AV1-S, AV2 (depending on the model), AV2-S (depending on the model), CMP,VGA.
Zoom
In TV mode, you have the option of changing the display format and using the zoom function via the
formats and zoom functions vary according to the screen format.
buttons.The
16/9 sets have the following formats and zoom functions available:
4/3 format - picture in 4x3 format
14/9 zoom - picture in 14/9 letterbox format
16/9 zoom - picture in 16/9 letterbox format
16/9 zoom up - picture in 16/9 letterbox format with subtitles
O Cinerama - picture in widescreen 4x3 format
16/9 format - picture in 16/9 format
4/3 sets have two formats available: 4/3 format and 16/9 format.
When you change channels the format is not retained. However, if you used the zoom function, the setting will still apply. In
VGA mode you can only switch to 16/9 format with a VGA video signal.
N.B.: you can enable the Auto. format function in the INSTALLATION, menu; this will apply the correct image format provided the
channel or appliance connected to the SCART socket sends an appropriate signal:
Call up the OVERVIEW screen by pressing the MENU button. Select the Installation line and press OK to continue.
In the INSTALLATION menu, go to the Auto. format line and tick the OK box.
8
06-EFC030-EN.qxd
15/06/05
13:40
Page 9
Operation
O Adjusting the sound
Display the OVERVIEW menu by pressing the
button. Select the Sound option and press
OK
to confirm.
The SOUND menu appears with the following options:
SOUND
Return
Equaliser
Sound type
Balance
Auto Vol Level
MENU
Equaliser: this option gives access to the graphic equaliser (see below).
Sound type: this option is used to select the appropriate sound type.
Note: the options available depend on the programme you are watching.
Stereo...
The table on this page indicates the sound types available for each type of
broadcast.
Balance: use this setting to balance the sound between the right and left
speakers.
Auto Vol Level: this function softens loud sound effects. It is particularly useful when you are watching television late at
night, for instance.
Check the box to enable this setting by pressing OK.
Press EXIT to close the menu. Select the option Return and press OK to return to the OVERVIEW menu.
Broadcast
Mono
Nicam mono
Nicam / IRT stereo
Bilingual Nicam
Bilingual IRT
AV
Options
Auto, Mono
Nicam, Mono
Stereo, Stereo+, Mono, Mono+
S1, S2, S3
S1, S2
Stereo, S1, S2
Stereo+ : Enhanced stereo
Mono+ : pseudo-stereo
Graphic equaliser
Select Equaliser from the SOUND menu and press OK to display the menu.
This menu is used to select a preset parameter and define your own settings
using the graphic equaliser.
GRAPHIC EQUALISER
Return
Preset
Freq. range
Personal
8 kHz
It offers the following options:
Preset: use the
buttons to select the appropriate setting for the
programme you are watching.
The Personal setting stores your graphic equaliser settings.
You can access the list of preset sound settings directly by pressing the PRESETS button (red) on the remote control, selecting the
Preset option and choosing one of the preset parameters from the list.Your selection is applied to all channels and AV programmes.
Freq. range: the graphic equaliser has five frequency bands. Select each band in turn using the
adjustments using the
buttons and make the necessary
buttons. Press OK to confirm.
Note: When you are setting the graphical equaliser, Personal appears under the Preset option.
Press EXIT to close the menu.To return to the SOUND menu, select Return and press OK to confirm.
9
EN
06-EFC030-EN.qxd
15/06/05
13:40
Page 10
Operation
Adjusting the picture
The PICTURE menu can be used to adjust the current settings, to apply preset settings and define your own preferred
settings.
Display the OVERVIEW menu by pressing the
Select the Picture option and press
OK
MENU
button.
to confirm.
The PICTURE menu appears. It offers the following options:
PICTURE
EN
Return
Preset
Brightness
Colour
Contrast
Black expand
Tone
Sharpness
NTSC Tint
Standard...
High
Warm
Preset: use the
buttons to select from the preset settings offered
(Standard, Film, Sport, Studio, Personal) the one which suits best the
programme you are watching.
The Personal option contains the values you have defined for all the
settings.
Note: whenever you modify a value, the Preset option displays Personal and your
settings are stored as your new personal settings. This line is not available in PC mode.
Brightness, Colour, Contrast: adjust these settings as required using the
These settings are automatically stored under Personal in the Preset option.
buttons.
Black expand: lets you adjust the contrast to suit ambient lighting (Maximum, Medium, Minimum, or Inactive). Use
the
buttons to choose the desired option.
Note: This line is not available in PC mode.
Tone: this function is used to adjust the colour balance.
Choose Warm, Neutral, or Cold using the
buttons.
Sharpness: adjust this to suit your preferences using the
buttons.
Note: This line is not available in PC mode.
NTSC Tint: this option is only available for NTSC audio-visual sources. It can be used to adjust the picture’s tint.
Note: This line is not available in PC mode.
If you use the LCD TV set in PC mode, the PICTURE menu allows access to the following functions:
Auto-adjustment: this function is used to automatically adjust the Phase and Clock functions. Press OK to start the adjustment
process and wait until Done appears.
Phase, Clock: adjust these settings as required in order to enhance picture quality.
Horiz. position: use the
buttons to move the picture horizontally on the screen.
Vert. position: use the
buttons to move the picture vertically on the screen.
Press EXIT to close the menu.To return to the OVERVIEW menu, select Return and press OK to confirm.
In TV mode you can press the red button to access directly the list of preset settings.You can then select a preset setting by
pressing the
buttons.
Press
EXIT
to close the menu.
10
06-EFC030-EN.qxd
15/06/05
13:40
Page 11
Operation
Setting the time
The TIME menu can be used to set the time on the TV set and program the automatic sleep timer or wake-up timer
functions.
Display the OVERVIEW menu by pressing the
MENU
button. Select the Time option and press
OK
to confirm.
Setting the time
1. Select the Time & Date ref. option.
2. Enter the number of the channel which the time will use as a reference point, or select it from the list using the
PR+/PR-
or
buttons.The time is displayed after a few seconds if it is available on the selected channel.
If the time is not provided by the channel selected under the Time & Date ref. option, this means the time is not set.
In this case, the setting -- is automatically selected under the Time option. To set the time manually, select the Time
option and enter the time using the numeric or
buttons.
If the date is not supplied by the channel selected on the Time & Date ref. line, the date is not adjusted.The --/--/-setting is automatically preselected on the Date line.To enter a date manually, select the Date line and use the number
keys.
Note: if the power supply is disrupted (i.e. the set is switched off using the on/off button or unplugged, or there is an electrical fault), the time will
disappear if it has been entered manually.You must reset it. We therefore recommend you find the time on a channel and check that it is correct.
Once you have set the time, you can use the Wake up timer and Turn off timer functions.
Calendar
This function is used to display the calendar.
1. Select the Calendar line.
2. Press the button to bring up the calendar.
3. Successively select the Month and Year lines and use the
buttons to select the current month and year.
Please note: you can set the calendar to any year between 1880 and 2099.
4. The Today line lets you bring back the display to the current month.To do so press the
buttons or the OK button.
This line is only active if the date has been set in the TIME menu.
Programming the wake-up timer
This function can be used to set the time for the set to come on, for instance, for the television to wake you up.
1. Select the Wake up timer line and select Once to be woken-up a single time or Daily to be woken up at the same
time every day.
Note: to deactivate wake-up, select the Off option.
2. Under the Wake up time option enter the wake-up time using the numeric or
buttons.
3. Under the Wake up PR option enter the number of the channel you want to wake you using the
or numeric
buttons.
Note: if you have programmed a wake-up and are not there when the appliance comes on, it will automatically switch off after two hours if no
activity using the buttons on the front of the set or the remote control has been detected.
Schedule automatic shut-off
This function lets you set a time when the appliance will switch itself off.
1. Select the Turn off timer line then select Once for a single stoppage or Daily for shut-off at the same time every
day.
Note: to deactivate automatic shut-off, select the Off option.
2. On the Turn off time line, enter the shut-off time using the number buttons or the
buttons.
Programme a sleep time
This function is used for setting a sleep timer.
1. Select the Sleep timer line.
2. Using the
buttons, set how long the TV set must wait before automatically going into standby mode (from 0:15
hours to 4:00 hours in 15 minute intervals).To deactivate this function, set it to Off.
11
EN
06-EFC030-EN.qxd
15/06/05
13:40
Page 12
Operation
Parental control
The parental control functions allow you to limit your children’s access to the television.You can do this by locking the buttons on your
TV set, thereby barring access to certain channels and/or AV programmes (except CMP and VGA).These functions are protected using a
PIN code.
EN
Display the OVERVIEW by pressing the MENU button. Select the Parental Control line and confirm this by pressing
the OK button.
If no access restriction function has been activated and a Personal code has been defined, the PARENTAL CONTROL
menu comes up.
PIN CODE
If this is not the case, the PIN CODE menu comes up:
Return
PIN code
1. Enter a 4-figure code.
Note: choose a code you can remember easily.
Define PIN code.
2. Type your code in a second time to confirm it and the PARENTAL
CONTROL menu will come up.
Locking a channel or AV programme
1. In the PARENTAL CONTROL menu, select the Select PR line,
PARENTAL CONTROL
Return
Select PR
Lock PR
Lock fr. panel
New PIN code
¨
01 TF1
þ
þ
----
This programme is under parental control.
Change programme or press OK to
enter PIN code and temporarily deactivate
the parental control.
use the
buttons, numeric or PR+/PR- buttons to select the channel
to be locked. Use the
buttons or press the AV button to access the
AV programmes.
2. On the Lock PR line, activate the tick box using the OK button.
To unlock the channel or AV programme, call up the PARENTAL
CONTROL menu by entering your code, select the Lock PR line, and
unselect the tick box with the ok button. Quit the menu with EXIT.
Locking the appliance's buttons
1. In the PARENTAL CONTROL menu, select the Lock fr. panel line and activate the tick box by pressing the OK
button.
2. The buttons on the front panel are immediately locked along with the INSTALLATION and TIME menus.
The remote control handset is now needed in order to use the TV set.
To cancel locking, go to the PARENTAL CONTROL menu by entering your code, select the Lock fr. panel line, and
unselect the tick box by pressing the OK button. Quit the menu with EXIT.
Modifying your personal code
1. In the PARENTAL CONTROL menu, select the New PIN code line and enter a new 4-figure code using the
number buttons on the remote control handset.
2. Type the code a second time to confirm it.
To go back to the OVERVIEW, select Return and confirm with OK.To quit the menu, press EXIT.
Operation (TV mode)
As soon as an access restriction function is activated, you will need to enter your personal code:
- to access the PARENTAL CONTROL menu,
- to access the TIME menu,
- to access the INSTALLATION menu.
To unlock the TIME and INSTALLATION menus, you will need to deactivate the two access restriction functions.
To watch a locked channel or AV programme, try to access it normally then follow the procedure that comes up on the
screen. Locking will be reactivated when you place the TV set in standby mode.
Note: if you have forgotten your PIN code you can cancel it.You do this by putting the TV set into standby mode, then pressing the EXIT button on
the remote control and the VOL- button on the front of the set at the same time for five seconds. The TV set will then come on. If just one of the
functions limiting access is active you will be requested to set a new password.
This procedure is possible, even if you have locked the buttons on the front of the TV set.
12
06-EFC030-EN.qxd
15/06/05
13:40
Page 13
Operation
Teletext
The Teletext service is available in many countries under a variety of names (TOP Text, Fastext, FLOF text,Videotext). It is
provided as a free service by television broadcasters.This service provides a real wealth of information, available at any time,
on weather, sports results, news, games, etc.The information is presented in pages or organised in topics specified in colour
on the screen and you can access this information by simply pressing the buttons of the relevant colour on the remote
control.
Accessing Teletext
Press the TEXT button on the remote control.Teletext will display the last page selected, or if you have changed channel,
the index page (usually 100).
To display a page, enter its 3-digit number or use the
PR+/PR-
buttons.The page appears after a few moments.
Navigation bar
The navigation bar, located at the bottom of the screen, provides access to the next three pages and the previous page by
pressing the relevant colour button on the remote control.
Press the
MENU
button to display the navigation bar and access the following functions:
STOP: this function is used to stop pages from following on in succession. Press the red button to select this function.The
word STOP appears in place of the page number.
Press the red button again to allow the pages to follow on again.
??? (hidden answers): press the green button to reveal a hidden answer (for example, in games). Press the green button again
to hide the answer.
ZOOM: press the yellow button: once to zoom in on the top part of the screen, a second time to zoom in on the bottom
part of the screen and a third time to return to normal display.
MIX (mixed display): press the blue button to display Teletext against a transparent background. Press this button again to
return to normal display.
Changing the character set temporarily
You can change the character set used for Teletext, if the existing one is not suitable for the channel you are watching.You
do this by pressing the MENU button to display the navigation bar.Then press OK to display the number of the character set
currently being used in place of ???. Use the green button to select another character set.
The character est selected in the INSTALLATION menu is restored when the TV set is switched off or enters standby
mode, or when you change channels.
In Teletext mode the volume control and sound mute functions are still available.
Press the purple, EXIT or
RETURN
button to quit the Teletext function.
TEXT+ : In some cases this function will improve the teletext display.
If the teletext you are watching seems to have any of the following faults:
- teletext subtitles are not displayed or are frozen.
- certain lines of a teletext page are not displayed.
Call up the OVERVIEW screen by pressing the MENU button. Select the Installation line and press OK to continue.
In the INSTALLATION menu, go to the TEXT+ line and tick or untick the OK box as appropriate.
The box is ticked by default.
Then go back to the page on which you noticed the faults.
13
EN
06-EFC030-EN.qxd
15/06/05
13:40
Page 14
Operation
Other Teletext functions
Newsflash
When a newsflash is detected, MIX is replaced by N in the navigation bar. Press the blue button to display the newsflash. In
the case of an update, the Teletext function is enabled and displays the new information.
This function is disabled if the TV set enters standby mode or is switched off.
Press the
EXIT
or
RETURN
button to quit the Teletext function.
EN
Subtitles
Some channels provide subtitles for some of their programmes.The number of the relevant pages is specified on the
Teletext index page.
To display subtitles, enable the Teletext function, find the number of the page displaying the subtitles and enter it. Once the
relevant page is found, the subtitles appear in the TV picture.The navigation bar disappears after a couple of seconds.To
display the top bar, press the purple (TEXT) button.
Press the
EXIT
or
RETURN
button to quit the Teletext function.
Direct access to subpages
Some information is spread across more than one page.To access subpages, press the
the page number. Enter the subpage number using the numeric buttons.
To exit this mode allowing direct access to subpages, display a new page, press the
or
or
button. “---” appears beside
button, or change channels.
Alarm page
In some countries (Spain, Benelux, etc.), you can set a time to display certain Teletext pages (alarm pages).
To do this, display the relevant alarm page and enter subpage mode. Enter the time instead of the subpage number (e.g.
1705 for 17:05) and press EXIT.The page will disappear and will appear again at the set time, as long as you do not change
channels or switch off the TV beforehand.
Fastext
If Fastext is available, direct access to previous and subsequent pages is replaced by coloured bars (red, green, yellow and
blue), which provide links to the topics you can access by pressing the relevant colour button. Other topics accessible in the
same way can also be displayed. Press the MENU button to go from these links to the navigation bar.
14
06-EFC030-EN.qxd
15/06/05
13:40
Page 15
Chapter 4
Other information
Sockets
AV1 peritel socket (input-output) on back of TV set (towards the right).
Use this to connect up a VCR or camcorder (VHS, S-VHS, 8mm, or Hi 8), a decoder,
a satellite receiver, a DVD player, a videogame console, or any appliance providing a
RGB signal.
To see pictures from the connected appliance, select AV1 using the
the remote control handset.
For appliances with an S-VHS or Hi 8 format, select AV1-S.
AV
button on
For certain appliances, this selection is automatic.
S
O Audio and AV2 video CINCH sockets (input) on back of TV set
(towards the right).
These are mainly used to connect camcorders (VHS or 8 mm).To see images from
the connected appliance, select AV2 using the AV button on the remote control
handset.
VIDEO
L.
AUDIO
R.
O S-video (O
O) socket and audio (O
O) (input) AV2-S (input) CINCH
sockets on back of TV set (towards the right).
These are mainly used to connect camcorders (S-VHS or Hi 8).To see images from
the connected appliance, select AV2-S using the AV button on the remote control
handset.
Note: The sockets may be named differently depending on the TV model.
Audio in
VGA socket on back of TV set (towards the left).
For connecting up a computer.
Connect up the stereo sound input jack socket (located under the VGA socket)
with the computer audio output
To see the computer's image output, select VGA using the av button on the remote
control handset.
Component CINCH sockets and audio (input) CINCH sockets on back
of TV set (towards the left) (CMP).
These are used for connecting a DVD player.The component signal sockets
automatically detect whether the type of component signal received is interlaced
(YPrPb) or progressive (YCrCb).To see images from the connected appliance,
select CMP using the AV button on the remote control handset.
Connecting headphones
Connect headphones or stereo earphones to the corresponding socket (n) on the
back of the TV set (towards the right).
Connecting a video recorder
To obtain optimum picture quality, use a SCART cable. However, you can also connect a video recorder to the television
using the aerial socket.
Refer to the diagram on the inside cover at the end of the manual, which illustrates how this is done.
If you connect a video recorder only via the aerial socket (without using the SCART socket), switch it on and play a tape.
Then search for the video recorder’s relevant channel (refer to the relevant section).
If you connect a video recorder via the aerial socket, you should assign channel 99 to it in order to improve the picture
quality when tapes are being played and in pause mode. However, we recommend you connect your video recorder via the
SCART socket, as it provides better picture and sound quality.
15
EN