1
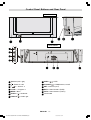
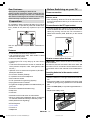
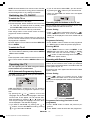
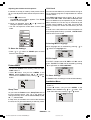
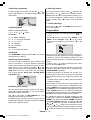
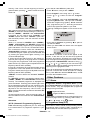
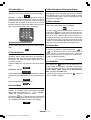
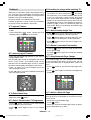
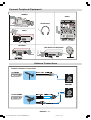
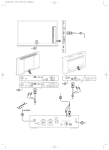
OWNER'S MANUAL IMPORTANT! WARRANTY INFORMATION INSIDE. PLEASE READ FOR INQUIRIES CALL 1800 656 700 OR WWW.TEAC.COM.AU EU2845ST&2845W-MAV-1541-ENG-STEREO-AK45.p65 1 09.09.2003, 10:54 WARRANTY REGISTRATION Please read this warranty card. Keep your purchase receipt to enable you to proceed quickly in the event of a Warranty Service. Warranty Terms & Conditions 1. TEAC warrants to the original retail purchaser only, that this product is free from defects in material and workmanship under normal domestic use and authorises free service during the warranty period at any TEAC Authorised Centre only. TEAC warranty only applies to products purchased, used and serviced in Australia. 2. Subject to the terms herein, this warranty effectively covers the equipment as specified in the Warranty Periods Table from the date of purchase. 3. All parts, except the external cabinet, are warranted as specified in Warranty Periods Table, and will be repaired or replaced at the sole judgement of TEAC. 4. Normal customer maintenance as described in the owner's manual is not covered by this warranty (such as cleaning VCR heads etc.) 5. This warranty does not apply to equipment showing abuse, damage or that it may have been tampered with, altered or repaired outside any TEAC Authorised Service Centre. If so, the warranty will be void. *Your nearest Authorised TEAC Service Centre is listed in your Owners Manual 6. In the event that this unit or any defective parts must be returned to TEAC Service Centres, a copy of this warranty certificate and of your purchase receipt must be enclosed to be a valid warranty. Such equipment or parts must be sent to the nearest authorised TEAC Service Centre. After the repair, the unit will be available for collection by the owner or it will be returned to the owner. The warranty does not cover freight or insurance. In all cases of in-transit damages or loss, a claim must be filed against the carrier by the purchaser. 7. In home service will only be provided as part of this warranty if all the following conditions are met; a) The product is a Colour Television of 59cm screen size or over. b) The product is within the warranty period. c) The product is located within the normal service area of the local TEAC Service Provider. In any other situation or circumstance, where an in home service call is made, a service fee will be charged by the Service Provider. TEAC Total Care in home service and installation is available at competitive rates. 8. No one is authorised to assume any liability on behalf of TEAC or impose any obligation on it, in connection with the sale of any equipment other than as stated in this warranty and outlined above. 9. In no event will TEAC be responsible or liable for indirect or consequential damages from interrupted operations or other causes. 10. Warranty is not transferable to any subsequent purchaser if the product is sold during the warranty period, 7($&352'8&7 7HOHYLVLRQV 7HOHYLVLRQV:LGHVFUHHQ[ 7HOHYLVLRQVFPDQGDERYH 'LJLWDO6HW7RS%R[HV 9&5 '9' $XGLR6\VWHPV EU2845ST&2845W-MAV-1541-ENG-STEREO-AK45.p65 2 :$55$17<3(5,2' <HDU <HDUV,Q+RPH6HUYLFH,QFOXGHG <HDU,Q+RPH6HUYLFH,QFOXGHG <HDU <HDU <HDU <HDU 09.09.2003, 10:54 Keep this warranty information and your purchase receipt Your proof of purchase (receipts) will enable fast and efficient service in the event of repair. WARRANTY PROCEDURES Please keep this information for your own records. Please refer to the owner's manual to ensure that you have followed the correct installation and operating procedures. 1. Read owner's manual carefully 2. If you require Warranty Service, please contact the TEAC Service Centre 3. Please have your purchase receipt as your proof of purchase and the following details completed for a valid Warranty. Owner's Name Owner's Address Postcode Model Name/No. Serial No. Dealer's Name Dealer's Address Postcode 4. Please ensure that your product is packed appropriately upon return to the service centre. If you have any other queries regarding service or warranty please contact the TEAC Service below: TEAC Total Care Ph: 1800 656 700 [email protected] EU2845ST&2845W-MAV-1541-ENG-STEREO-AK45.p65 3 09.09.2003, 10:54 Contents Remote Control .............................................. 5 Teletext ......................................................... 18 Control Panel Buttons and Rear Panel ....... 6 1) To operate Teletext .......................................... 2) To select a page of Teletext ............................. 3) To Select Index Page ...................................... 4) To Select Teletext with a TV Programme ......... 5) Searching for a page while watching TV .......... 6) To Select Double Height Text .......................... 7) To Reveal concealed Information ................... 8) To Stop Automatic Page Change ..................... 9) To Select a Subcode Page .............................. 10 To exit Teletext ............................................... 11) To Display the Time ....................................... 12) Fastext ......................................................... Safety and Precautions ................................. 7 Attention: .............................................................. 7 Preparation ..................................................... 8 Features ............................................................... 8 Before Switching on your TV ....................... 8 Power connection.................................................. Connections to the RF input socket ...................... How to connect other devices ................................ Inserting batteries in the remote control handset ... 8 8 8 8 Switching the TV ON/OFF ............................. 9 To switch the TV on ............................................... 9 To switch the TV off ............................................... 9 Operating the TV ........................................... 9 A.P.S. (Automatic Programming System) ............. 9 Operating with the buttons on the TV set .............. 9 Operating with Remote Control .............................. 9 Menu System ................................................ 10 Sound Menu ........................................................ Picture Menu ...................................................... Feature Menu ...................................................... Installation Menu ................................................. Program Menu .................................................... 10 12 14 14 15 Other Features ............................................. 16 1) TV Status ........................................................ 2) Programme Swap (P<P) ................................. 3) Double-digit (- -) .............................................. 4) Personal Preferences (PP) .............................. 5) Sound Indicator ............................................... 6) Picture Mode .................................................. 7) Blue Background During No-Signal.................. 8) Mute Indicator ................................................. 9) Volume Bar ..................................................... 10) AV Modes ..................................................... 16 16 17 17 17 17 17 17 17 17 Connect Peripheral Equipment .................. 19 1) Via the Euroconnector ..................................... 19 2) YCbCr Mode ................................................... 19 3) Via Ant Input ................................................... 19 4) Decoder .......................................................... 19 5) TV and Video Recorder ................................... 19 6) Playback NTSC .............................................. 20 7) Copy Facility ................................................... 20 8) Search for and store the test signal of the video recorder ............................................................... 20 9) Camera and Camcorder .................................. 20 10) Connect the decoder to the video recorder ..... 20 11) Connecting Headphones ................................ 20 Antenna Connections .................................. 21 Tips ................................................................ 22 Care of the Screen .............................................. Poor Picture ........................................................ No Picture ........................................................... Sound ................................................................. Remote Control ................................................... No solution .......................................................... 22 22 22 22 22 22 Specifications ............................................... 22 ENGLISH - 4 EU2845ST&2845W-MAV-1541-ENG-STEREO-AK45.p65 4 18 18 18 18 18 18 18 18 18 19 19 19 09.09.2003, 10:54 Remote Control = Stand By = Cursor Up = Cursor Right OK = No function = Info (Program Menu) 0 - 9 = Direct Program -/-- = Double Digit P<P =Previous Programme P/CH + = Programme Up + = Volume + = TV / Quit Menu = External Source (EXT-1, RGB, YCbCr and F-AV) Yellow (FEATURE) = Feature Menu Blue (INSTALL) = Installation Menu = Hold = Update / Picture Mode Change *** = Index Page = Reveal = Expand = Mix = Teletext = Time Red (SOUND) = Sound Menu Green (PICTURE) = Picture Menu = Mute I-II = Mono/Stereo - Dual I-II - = Volume - - P/CH = Programme Down PP = Personal Preference M = Menu = Cursor Down = Cursor Left = Picture Mode Change *** (AUTO, 4:3, 16:9, CINEMA, SUBTITLE, ZOOM) ENGLISH - 5 - EU2845ST&2845W-MAV-1541-ENG-STEREO-AK45.p65 5 09.09.2003, 10:54 Control Panel Buttons and Rear Panel FRONT PANEL REAR PANEL Speakers (left + right) = Power On / Off - + = Volume -/+ VIDEO ( H-PHONE ( )= VCR ) = Headphone 3,6 mm Ø ANT = Antenna (75 W) - P/CH + = Program -/+ EXT.1 = Scart Socket 1 (RGB) MENU = Menu EXT.2 = Scart Socket 2 (YCbCr) AUDIO L ( ) = Audio left Power Cable AUDIO R ( ) = Audio right ENGLISH - 6 EU2845ST&2845W-MAV-1541-ENG-STEREO-AK45.p65 6 09.09.2003, 10:54 Safety and Precautions To ensure safe and reliable operation of the TV set, please observe the following precautions in installation, operation and maintenance. Attention: 1. Pay attention to the power supply cord before installing the TV set. Do not hang anything on the cord, and avoid treading on the cord. 2. The slots on the housing back are designed for ventilation to ensure reliable operation of the TV set and prevent overheating. They must never be covered or blocked. The TV set must not be placed near a heat source or it might be damaged. 3. The outdoor antenna must not be erected close to HV lines or other power supply lines. Use extreme care when erecting the antenna and not to touch living wires or injury may occur. 4. This TV set can only use the supply voltage and frequency indicated on the back of the housing. If your power supply does not comply with them, please consult with the service personnel. 5. Do not let any object fall into the ventilation openings of the TV set housing, nor let any liquid flow into the machine via the openings. 6. Do not subject the TV set to rain, or use it in a damp environment. When cleaning dust, be sure to remove the power supply plug from its socket first. Do not clean the housing directly with liquid detergent, use a damp cloth. Be sure to remove the power supply plug from its socket and remove the antenna plug during a thunderstorm or when it will not be used for long time, to avoid components being damaged by lightning. 7. If you use an indoor antenna, do not let it touch any electrical appliance, or normal reception of TV programs may be affected. Safety: 1. Do not remove the back of housing by yourself, as high voltages inside the unit are dangerous. If it is necessary to open the back, ask a technician with specialized service experience. 2. Remove the power supply plug from its socket in case of the following conditions, and consult with service personnel. (1) The power cord or plug are damaged or shows cracking. (2) Any object has fallen into or liquid flown into the TV set. (3) The performance of TV set has deteriorated significantly or there is damage on the housing. (4) The TV set will not operate normally according to the instructions. 3. Please remove the power supply plug from its socket when the TV set will not be used for a long period of time. Instructions for waste disposal: Packaging and packaging aids are recyclable and should principally be recycled. Packaging materials, such as foil bag, must be kept away from children. Batteries, including those which are heavy metalfree, should not be disposed of with household waste. Please dispose of used batteries in an environmentally sound manner. Find out about the legal regulations which apply in your area. DO NOT LEAVE YOUR TV AT STAND-BY OR OPERATING WHEN YOU LEAVE YOUR HOUSE ENGLISH - 7 EU2845ST&2845W-MAV-1541-ENG-STEREO-AK45.p65 7 09.09.2003, 10:54 Dear Customer: Before Switching on your TV Thank you for purchasing our latest TV set. Please read this instruction manual carefully first before operation so that you can use it in a safe and reliable manner and bring all its functions into full play. Please also keep it properly for future reference. Preparation For ventilation, leave a space of at least 10 cm free all around the set. To prevent any fault and unsafe situations, please do not place any objects on top of the set. Power connection IMPORTANT: The TV set is designed to operate on 240V AC, 50 Hz. After unpacking, allow the TV set to reach the ambient room temperature before you connect the set to the mains. Connections to the RF input socket Connect the aerial or cable TV plug to the RF input socket located at the back of the TV and connect the cable plug coming out from the TV out socket located at the devices (VCR, DVB etc.) to this socket as well. Use this apparatus in tropical and/or moderate climates. Features It is a remote controlled colour television. 100 programmes from VHF, UHF bands or cable channels can be preset. It can tune cable channels. Controlling the TV is very easy by its menu driven system. It has three Euroconnector socket for external devices (such as computer, video, video games, audio set, etc.) Optional mono or stereo sound systems (German + Nicam) are available. Full function Teletext (Fastext). It is possible to connect headphone. Direct channel access. A.P.S. (Automatic Programming System). All programmes can be named. Programme swapping between last watched two programmes. Forward or backward automatic tuning. Sleep timer. Child Lock. Automatic sound mute when no transmission. When no valid signal is detected, after 5 minutes the TV switches itself automatically to stand-by mode. WSS (Wide Screen Signaling). NTSC Playback. YCbCr Mode. Front AV in. Headphone. How to connect other devices IMPORTANT: Switch off the TV before connecting any external device. Sockets for external connections are at the back and front of the TV. For connection of other devices via Euroconnector refer to the manuals of the related devices. Inserting batteries in the remote control handset Place the batteries in the right directions as seen below. Remove the battery cover located on the back of the handset by gently pulling upwards from the indicated part. Insert two AAA (R03) or equivalent type batteries inside. Replace the battery cover. ENGLISH - 8 EU2845ST&2845W-MAV-1541-ENG-STEREO-AK45.p65 8 09.09.2003, 10:54 NOTE: Remove batteries from remote control handset when it is not to be used for a long period. Otherwise it can be damaged due to any leakage of batteries. Switching the TV ON/OFF If you do not want to start A.P.S., you can cancel it by pressing the 79 button on your remote control. When you start A.P.S. the below menu will appear on the screen. To switch the TV on Your TV will switch on in two steps: 1- Press the power button located on the front of the TV. Then the TV switches itself to standby mode and the RED LED located below the TV turns on. 2- To switch on the TV from stand-by mode either: Press a digit button on the remote control so that a programme number is selected, or, Press Programme Up or Down buttons on the front of the TV or on the remote control, so that last switched off programme is selected. By either ways the TV will switch on and the RED LED will turn GREEN. Operating with the buttons on the TV set Volume setting and programme selection can be made using the buttons on the front of the TV. Volume Setting Press button to decrease volume or + button to increase volume, so a volume level scale (slider) will be displayed in the lower middle side of the screen. Programme Selecting Press P/CH+ button to select the next programme or -P/CH button to select the previous programme. To switch the TV off Entering MENU Press the stand-by button on the remote control, so the TV will switch to stand-by mode and the GREEN LED will become RED, or, Press the power button located on the front of the TV, so the TV will switch off and the GREEN LED will turn off. Press MENU button to enter the MENU. In the MENU select sub-menu using -P/CH or P/CH+ button and enter the sub-menu using or + button. To learn the usage of the menus, refer to the Menu System section. Operating the TV You can operate your TV both using the remote control handset and onset buttons. A.P.S. (Automatic Programming System) The A.P.S. menu will appear when you first switch on your TV for the first time. Operating with Remote Control The remote control handset of your TV is designed to control all the functions of the model you selected. The functions will be described in accordance with the menu system of your TV. Functions of the menu system are described in Menu System section. Volume Setting Press + button to increase volume. Press button to decrease volume. A volume level scale (slider) will be displayed at the middle of the bottom on the screen. A.P.S. automatically programmes your TV, according to the transmission of programme systems in your area. By pressing the or buttons, come to the Language item and select the language in which the menus of the TV will appear. You can see the available languages by pressing or button. As soon as you change the language, the menu items will be displayed in the selected language. Programme Selecting (Previous or next programme) If you want to start A.P.S., by pressing the or buttons, come to the Start item and by pressing or button start the A.P.S.. Press -P/CH button to select the previous programme. Press P/CH+ button to select the next programme. ENGLISH - 9 EU2845ST&2845W-MAV-1541-ENG-STEREO-AK45.p65 9 09.09.2003, 10:54 Programme Selecting (direct access) MENU Press digit buttons on the remote control handset to select programmes between 0 and 9. TV will switch to the selected programme. To select programmes between 10 - 99, you must use the double digit button "- / - -". The menu system is described below. The short way in order to enter the menus, press : M Button, Menu. Red Button, Sound Menu. Green Button, Picture Menu. Yellow Button, Feature Menu. Blue Button, Install Menu. Info Button, Program Menu. Menu button has two functions; first is opening or closing the M, and the second is closing the submenu and then opening its parent menu. Sound Menu this OSD is displayed at the left hand upper on the screen. After then, press the digit buttons consecutively which programme you want to select (eg. for programme 27, first press 2 and then 7). When it is late to press any digit button this function will be ignored and the display will be erased. In the same way it must not be late to press any digit button after entering the first digit. The limit of the delay time is 3 seconds. Press directly the programme number to reselect single digit programmes. Programme Swapping Press "P<P" (programme swap) button to select the last selected programme. This button provides swapping between last two selected programmes. For example, select programme 8, then select programme 2. Now, if you press "P<P" button, programme 8 will be selected. If you press the same button again, programme 2 will be selected and so on. To change sound settings Enter the Sound Menu directly, pressing the Red button or, As you enter the MENU, sound will be the first selected option. In the MENU, select SOUND using or button, then enter the sound menu pressing or button. Setting Volume As you enter the sound menu, Volume will be the first selected option. Press button to increase volume. Press button to decrease volume. Or you can directly change the volume settings using + (to increase) or (to decrease) button. Menu System Your TV has been designed with a menu system, to provide an easy manipulation of a multi-function system. The TV is controlled by choosing the commands, which are displayed on the screen. Press the M button. The MENU will be displayed in the middle on the screen. All the selected items in this menu system is indicated with HIGHLIGHTED characters and with an arrow on the leftside of items. 6281' Setting Balance It allows adjusting the distribution between the left and right speakers. Using or button select Balance. Press button to change balance rightward. Press button to change balance leftward. When balance control is in mid position, the cursor is displayed with the two reciprocal arrows. 3,&785( )($785( ,167$// 352*5$0 To select a sub-menu use or button, and press or button. Each option can also be selected with the coloured button and " " button on the remote control. ENGLISH - 10 EU2845ST&2845W-MAV-1541-ENG-STEREO-AK45.p65 10 09.09.2003, 10:54 Selecting Sound Mode Using or button select Mode. Press or button to change Mode. You can select MONO, STEREO, DUAL-I or DUAL-II mode, only if the selected channel supports that mode. You can also change sound mode directly pressing III button on your remote control. Pressing or button will change the current sound mode. (e.g.: If the current sound mode is stereo, it will be stereo or visa versa). In case of bilingual broadcast, you can select original or dubbed language again using mode menu. So when somebody listens to the original language from the loudspeakers, somebody else can listen to the dubbed language from headphone. To Store the Headphone Settings Using or button select Store. Press or button to store current headphone volume and balance. The stored values will be valid for all the programmes. Equalizer Setting Effect You can use this feature to switch ON and OFF sound effect. Pressing or button will turn on or off this feature. If the current sound system is Mono and the sound effect is set ON, then the sound will be heard as if it is Stereo. If the current sound system is Stereo, switching this effect on will make the sound deeper. Switching it off will make no change in Mono and Stereo. To enter Equalizer sub-menu, select Equalizer using or button, then enter Equalizer menu pressing or button. +] +] .+] .+] .+] 02 '( 3(56 21$/ 6725 ( In case of bilingual broadcast (Dual Sound), you can select original or dubbed language using mode option. To Change Headphone Sound Settings Pressing or button on Headphone, enter the Headphone menu. This is a sub-menu of Sound menu, and all options in this menu are working as the same in the Sound menu. In Mode item there are four predefined and one user defined options. These are PERSONAL, MUSIC, SPEECH, JAZZ and FLAT. The predefined options can not be changed by the user. The Personal option may be adjusted by the user. The 5 items below the Mode are available to adjust the sound settings in 5 frequency values: 120 Hz, 500 Hz, 1.5 kHz, 5 kHz and 10 kHz. To change the values of 5 frequency options, select one of the options by or button, and then press to increase the value, or to decrease the value. To store the Equalizer settings, press or button on Store option. Setting Headphone Volume Setting Avl As you enter the Headphone sound menu, Volume will be the first selected option. Automatic Volume Limiting (AVL) function normalizes sound to obtain fixed output level between programs, having different sound levels. Pressing or button will turn ON and OFF this feature. Press button to increase volume. Press button to decrease volume. 92/8 0( 6281'0 2'( 02 12 6725 ( Setting Headphone Sound Mode Using or button select Mode. ENGLISH - 11 - EU2845ST&2845W-MAV-1541-ENG-STEREO-AK45.p65 11 09.09.2003, 10:54 To Store the Settings Using Press or button on STORE option to store Sound menu settings. Press button to increase colour level. or button select Colour. Press button to decrease colour level. %5,*+71( 66 &21 75$67 &2/2 85 6+$5 31(66 7,/7 3,&785(02' ( 0$ 18$/ &2/2 857(03 125 0$/ Picture Menu Setting Sharpness To enter the Picture menu directly, press the GREEN button, or Press M button, now you are in MENU. In the MENU, select PICTURE using or button, then enter the Picture menu pressing or button. Using or button select Sharpness. Press button to increase peaking level. Press button to decrease peaking level. %5,*+71( 66 &21 75$67 &2/2 85 6+$5 31(66 7,/7 6281' 3,&785( 3,&785(02' ( 0$ 18$/ &2/2 857(03 125 0$/ )($785( Setting Tilt ,167$// 352*5$0 Note: When Picture Mode is not MANUAL, BRIGHTNESS, CONTRAST and COLOUR options can not be reached by or buttons. Using or button select Tilt. Press button to increase tilt level. Press button to decrease tilt level. Setting Brightness %5,*+71( 66 You can change Brightness only when Picture Mode is selected MANUAL. As you enter the picture menu, Brightness will be the first selected option. &21 75$67 &2/2 85 6+$5 31(66 7,/7 3,&785(02' ( 0$ 18$/ &2/2 857(03 125 0$/ Press button to increase brightness. Setting Hue Press button to decrease brightness. (During Playback NTSC system, this will appear in AV mode only when NTSC video source is applied. Otherwise, HUE option is invisible in Picture menu.): Using or button select Hue. Press button to increase hue level. Setting Contrast You can change Contrast only when Picture Mode is selected MANUAL. Using or Press button to decrease hue level. Center value is indicated with the two reciprocal arrows. %5,*+71( 66 button select Contrast. &21 75$67 &2/2 85 Press button to increase contrast level. 6+$5 31(66 7,/7 +8( Press button to decrease contrast level. 3,&785(02' ( 0$ 18$/ Setting VCR Mode %5,*+71( 66 Using or button select VCR Mode. When you watch a picture from your VCR and the picture is unstable, you may improve it by changing the "VCR MODE" setting from "ON" to "OFF". &2175$67 &2/2 85 6+$5 31(66 7,/7 3,&785(02' ( 0$ 18$/ &2/2 857(03 125 0$/ Setting Colour You can change Colour only when Picture Mode is selected MANUAL. ENGLISH - 12 EU2845ST&2845W-MAV-1541-ENG-STEREO-AK45.p65 12 09.09.2003, 10:54 %5,*+71( 66 &2175$67 &2/2 85 6+$5 31(66 7,/7 9&502 '( 2)) 3,&785(02' ( 0$ 18$/ 16:9 Setting Picture Mode This item is used to change the picture mode. By pressing or button you may select one of these options: BRIGHT, STANDARD, SOFT, MANUAL. This mode restores the correct proportions of pictures transmitted in 16:9 using full screen display. Note: If you display a 4:3 picture in thid mode, it will be enlarged horizontally. %5,*+71( 66 CINEMA &2175$67 &2/2 85 6+$5 31(66 7,/7 3,&785(02' ( 0$ 18$/ &2/2 857(03 125 0$/ Setting Colour Temp This item is used to change the Colour Temperature. By pressing or button you may select one of these options: COOL, WARM, NORMAL. Note: Colour Temperatures transitions are become slowly. The picture is enlarged to CINEMA format, a thin black band remains on both sides of the picture.The or buttons allow you to compress and move the image vertically to view the top or bottom of the picture (subtitles). SUBTITLE %5,*+71( 66 This mode is used to display 4:3 pictures using the full surface of the screen leaving the sub-titles visible. Use the or buttons to increase or decrease the compression at the bottom of the screen. &2175$67 &2/2 85 6+$5 31(66 7,/7 3,&785(02' ( 0$ 18$/ &2/2 857(03 125 0$/ Setting Zoom You can change the screen size according to the picture aspect ratio. Select the optimum one from the following ZOOM modes. AUTO: When a WSS (Wide Screen Signalling) signal, which shows the aspect ratio of the picture, is included in the broadcast signal or the signal from an external device, the TV automatically changes the ZOOM mode to 16:9 mode or 4:3 mode according to the WSS signal. When the AUTO mode does not function correctly due to poor WSS signal quality or when you want to change the ZOOM mode, change to another ZOOM mode manually. ZOOM The picture is enlarged to 16:9 format.This mode is recommended when displaying pictures which have black bands at the top and bottom (letterbox format). Use the or buttons if you wish to compress and move the image vertically to view the top or bottom of the picture. Using the different screen formats Select the ZOOM mode: Press the or button to select the different modes: 4:3, 16:9, CINEMA, SUBTITLE and ZOOM. Press the or button to select a ZOOM mode. You can also access these settings with button. &21 75$67 &2/2 85 4:3 6+$5 31(66 7,/7 The picture is reproduced in 4:3 format and a black band is displayed on either side of the picture.The picture may be progressively enlarged using the or buttons. 3,&785(02' ( 0$ 18$/ &2/2 857(03 125 0$/ =22 0 $872 ENGLISH - 13 EU2845ST&2845W-MAV-1541-ENG-STEREO-AK45.p65 13 09.09.2003, 10:54 Adjusting the visible area of the picture: Child Lock If subtitles or the top (or bottom) of the picture are cut off, you can adjust the visible area of the picture manually. You can use this feature to prevent children turning on TV or changing programs or adjustments etc. without remote control. 1. Press button once. The ZOOM mode indicator appears. The ZOOM mode will not be changed. The Child Lock feature can be set by or button to either ON or OFF. When OFF is selected, there will be no difference in the operation of your TV. When ON is selected, the TV can only be controlled by the remote control handset. In this case, the front panel buttons (except the Power On/Off button) will not work. If Child Lock is ON, when one of the front panel buttons (except power button) is pressed, CHILD LOCK OSD is seen on the screen. 2. While it is displayed, press or buttons to change the position of the picture. You can not adjust the visible area in 4:3 or 16:9 mode. Selecting Menu Language Menu language can be selected by pressing or button on Language item. To Store the Settings Press or button on STORE option to store Picture menu settings. &2/2 85 EXT-2 Output 6+$5 31(66 7,/7 3,&785(02' ( 0$ 18$/ &2/2 857(03 125 0$/ =220 $872 From EXT-2 Output, either TV, EXT-1 or F-AV can be given. TV, EXT-1 or F-AV can be selected by pressing or button on EXT-2 OUTPUT. 6725 ( Feature Menu To enter the Feature menu directly, press the YELLOW button, or Press "M" button, now you are in MENU. In the MENU, select Feature using or button. Then enter the Feature menu pressing or button. To Store Settings In Feature menu all settings are stored automatically. Installation Menu 6281' 3,&785( )($785( ,167$// 352*5$0 Sleep Timer As you enter the Feature menu, Sleep Timer will be the first selected option. Use or button to change the Sleep Timer values between OFF, 10, 20, 30, ......, 110 and 120. If sleep timer is activated, at the end of the selected the time, the TV goes automatically to stand-by mode. To enter the Install menu directly, press the BLUE button, or Press M button, now you are in MENU. In the MENU, select Install using or button. Then enter the Install menu pressing or button. 6281' 3,&785( )($785( ,167$// 352*5$0 ENGLISH - 14 EU2845ST&2845W-MAV-1541-ENG-STEREO-AK45.p65 14 09.09.2003, 10:54 1.Selecting Programme 6.Selecting Search To select programme number, you can use or button, Digit Buttons or The Double Digit button with digit buttons. To start the search process, press button for forward search or button for backward search. Search item bar blinks during search process, up to the process is stopped or signal is found. To stop the search process or button must be pressed again. 7.To Store Settings 2.Selecting Band Press or button on STORE option to store Install menu settings. BAND, can be selected either, Program Menu C or S by or button. For band C, 01 - 83, WEST EUROPE. 01 - 12, 21 - 69, EAST EUROPE . 01 - 17, 21 - 73, UK. 01 - 76, FRANCE. 04 - 09, FRANCE 2. For band S, 01 - 41, for all channel tables. To enter Program menu directly, press the " " button, or Press M button, now you are in MENU. In the MENU, select Program using or button. Then enter the Program menu pressing or button. 6281' 3,&785( )($785( ,167$// 3.Standard 352*5$0 The STANDARD setting is fixed to B/G. You cannot change this item's setting. 4.Selecting Colour System This item is used to change the colour system. If the picture is not clear or no colour appears, select the correct colour system to display the picture normally. When the TV is in TV mode; by pressing or button you may select one of these options: PAL, SECAM. When the TV is in AV mode; you may select one of these options: AUTO, PAL, SECAM, NTSC 3.58, NTSC 4.43. 5.Selecting Fine Tuning You can use the Fine Tuning process for fine adjustment (after coarse adjustment), if you are not happy about the image on the screen. Use or button on FINE TUNING item, until getting the best image on the screen. In Channel option, normally the Fine Tuning cursor is placed at the middle on the slider, and this is indicated with the two reciprocal arrows. Moving cursor to four direction you can reach 30 programmes in the same page. By scrolling the pages up or down by pressing the navigation buttons you can select all the programmes in TV mode (except the AV mode). In menus, or buttons are working like "Direction Up" and "Direction Down". By cursor action, programme selection is done automatically. Selected programme is displayed with HIGHLIGHTED characters. Programme Number is between 00 and 99. Programme Name has a name string with 4 characters. After autostore process the Programme Names are set to: Channel search "C01" or "S01" (band and channel number), as default. At the bottom of the menu there is a programme sort functions section. Each function is activated by color button. NAME allows changing the programme name. By DELETE you can delete programmes that you decided. INSERT section is for inserting programmes into another programme spaces. By selecting AUTOSTORE section, Autostore menu will be available. To change the name of a decided programme, that programme is selected and pressed to the RED button (NAME). First letter of the selected NAME is displayed with HIGHLIGHTED character. To change that letter or button can be used, and to select the other letters, or button can be used. If the cursor is at the last letter of the Programme Name, pressing button moves the cursor at the beginning. On the ENGLISH - 15 EU2845ST&2845W-MAV-1541-ENG-STEREO-AK45.p65 15 09.09.2003, 10:54 contrary, if the cursor is at the beginning of the Programme Name, pressing button moves the cursor at the end. & & & & & & 1$0 ( ,1 6(57 '(/(7( $872 6725( After changing the name by pressing the RED button (STORE) it is stored. After activating the name process the INSERT, DELETE and AUTOSTORE processes will be inactive and "CANCEL" and STORE options are invalid. "CANCEL" option cancels the name process, if the new name do not want to be stored. When it is pressed to GREEN button (INSERT), "NAME", "AUTOSTORE" and "DELETE" functions are erased, the selected programme (A) is displayed with green characters. From now on, the automatic selection is canceled. Cursors moves are indicated with HIGHLIGHTED characters. With navigation buttons, the decided program space (B) can be selected and by pressing the green button again inserting is occurred to that space (B). It should be thought that Prog-00 is the lowest programme (like Prog-100). If any programme is inserted to Prog-00, the programmes under that programme space shift one up, and Prog-99 is adjusted to the first frequency value of VHF1 (40 MHz). If Prog-00 is inserted to any programme space, all the programmes under that space shift one down and Prog-99 is erased, and Prog-00 is adjusted to the first frequency value of VHF1 (40 MHz). "CANCEL" function cancels the activated "INSERT" process. For "DELETE" process it is pressed to yellow button, (NAME, INSERT and AUTOSTORE functions are inactive). The selected programme is displayed with yellow characters. Pressing yellow button again erases the selected programme from the programme list, and the programmes below shift one up. Prog-00 is adjusted to the first frequency value of VHF1 (40 MHz). Pressing blue button cancels the activated DELETE process. To enter Autostore menu, press to the blue button. To learn the features of this function see "AUTOSTORE" below. If you want to make A.P.S. any other time: Press M button, now you are in MENU. Select Program menu using or button. Press or button to enter the Program menu. In the Program menu enter AUTOSTORE menu by pressing BLUE button. Here you can run A.P.S. ( Automatic Programming System). A.P.S. automatically programmes your TV , according to the transmission of programme systems in your area. A warning message will appear on the screen as below : If you want to Continue, by pressing or button start the A.P.S.. When you start A.P.S. the below menu will appear on the screen. After A.P.S. is finalized, a rank list will appear on the screen. In the rank list you will see the programme numbers and names, assigned to the programmes. First the programme with programme number 1 will be displayed with HIGHLIGHTED characters. Using or or or buttons you can move the highlighted number and then display the programme corresponding to the highlighted number. If you do not accept the correspondence between programme numbers and names and want to change them, press M button and then BLUE button, so that you enter the Installation menu. Other Features 1) TV Status Programme Number, Programme Name (or AV) and Sound Indicator are displayed on the upper left of the screen. They are displayed after programme change during 3 seconds. 3 Programme Number 35 Programme Name (4 characters) These OSDs are displayed when a new programme is entered by digit button, by pressing P<P button, or button, or by 79 button. Autostore by (A.P.S. (Automatic Programming System)) 2) Programme Swap (P<P) A.P.S. automatically programmes your TV, according to the transmission of programme systems in your area. This button is used to reenter to the preceding entered programme again. Pressing P<P consecutively allows to swap into two last entered programmes. or ENGLISH - 16 EU2845ST&2845W-MAV-1541-ENG-STEREO-AK45.p65 16 09.09.2003, 10:54 3) Double-digit (- -) 7) Blue Background During No-Signal This OSD is displayed when the "Double-Digit" button pressed in place of the programme number indicator. In case, no valid signal is detected (in TV or AV mode) Blue Background is activated. During search process Blue Background is not active. But instead of it there is another feature given; the semi-transparent menu background is made blue. After then, in order to enter a programme it must be pressed to two digit consecutively. When it is late to press any digit button this function will be ignored and the display will be erased. In the same way it must not be late to press any digit button after entering the first digit. The limit of the delay time is 3 seconds. 8) Mute Indicator It is placed in the upper middle of the screen when enabled, and it stays there until it is disabled. To cancel mute, there is two alternative; the first one is pressing to " " button, thus volume is set to the preceding value, and the second one is increasing the volume level, thus it starts at the minimum level to increase. By decreasing the volume level in mute state, mute will not be ignored, only the volume level will decrease. If mute canceled after decreasing the volume level, the volume will valid with the decreased level. 4) Personal Preferences (PP) All the preset values will be restored, when pressing "PP". 5) Sound Indicator This is a stereo option. The alternatives of the indicator are Mono, Stereo, Dual-I and Dual-II. This indicator is displayed under the programme number indicator on the screen. "I-II" button is used to select Mono, Stereo, Dual-I or Dual-II. In Mono broadcast or in forced-mono (for stereo broadcast). In Stereo broadcast. If dual broadcast detected. Dual-I is selected in default and also can be selected after Dual-II by Remote Control. '8$/, If Dual-II selected by Remote Control. 9) Volume Bar It is displayed in the lower middle of the screen. When a volume command is received (pressing or + by Remote Control or Front panel) and no menu is active, it stays on the screen for 3 seconds, after the last volume command or until another command is received in between. 10) AV Modes By pressing the $9 button you can switch your TV to AV modes (except being in Teletext). Pressing this button will switch the TV in one of the optional AV modes: EXT-1, RGB, YCbCr and F-AV (Front AV). EXT-1 supports the RGB mode. In order to quit the AV mode press the tons or -P/CH or P/CH+. 6) Picture Mode The picture mode OSD is displayed below the sound indicator, by TV Status OSDs. According to the WSS data, inside of the OSD box 4:3 , 16:9, CINEMA, SUBTITLE, ZOOM or AUTO is written. By pressing (TXT_UPDATE) button (if Teletext is not active) the picture mode can be switched into 4:3, 16:9, CINEMA, SUBTITLE, ZOOM or AUTO Mode. ENGLISH - 17 EU2845ST&2845W-MAV-1541-ENG-STEREO-AK45.p65 17 09.09.2003, 10:54 79 , digit but- 5) Searching for a page while watching TV Teletext Teletext is an information system that displays text on your TV screen. Using the Teletext information system you can view a page of information on a subject that is available in the list of contents (index). On screen display is not available in text mode. Contrast, brightness or colour control is not available, but volume control is available in text mode. 1) To operate Teletext Select a TV station on which Teletext is being transmitted. Press (TELETEXT) button. Usually the list of contents (index) is displayed on the screen. While Teletext Mode is on, pressing will change the mode to TV, one more press to will change the mode from TV to the latest Teletext page we left. In the TV mode enter a page number using digit keys. As you enter digits first line of teletext page will appear on top screen and will remain there until the requested page is found. Then teletext line will be replaced by page number to indicate that page has been found. Now you can display this teletext page pressing button. 6) To Select Double Height Text Press button for the upper half of the information page to be displayed in double height text. Press button again for the lower half of the information page to be displayed in double height text. Press button once more for the full page of normal height text. 7) To Reveal concealed Information Pressing button once will reveal answers on a quiz or games page. Pressing answers. 2) To select a page of Teletext button again will conceal the revealed Press the appropriate digit buttons for the required Teletext page number. The selected page number is displayed at the top left corner of the screen. The Teletext page counter searches until the selected page number is located, so that the desired page is displayed on the screen. 8) To Stop Automatic Page Change Press button to move the Teletext screen forward one page at a time. Press ge. Press button to move the Teletext screen backward one page at a time. Press button again to allow the next page to be displayed. button to stop the automatic page chan- 9) To Select a Subcode Page 3) To Select Index Page To select the page number of the index (generally page 100), press button. 4) To Select Teletext with a TV Programme Press button. The text is now superimposed over the programme on the screen. Press page. The teletext page you have selected may contain more information than what is on the screen; the rest of the information will be displayed after a period of time. button again to return to the Teletext Subcode pages are subsections of long Teletext pages that can only be displayed on the screen one section at a time. Select the required Teletext page. Press button. Select the required subcode page number by pressing four digit buttons (e.g. 0001). ENGLISH - 18 EU2845ST&2845W-MAV-1541-ENG-STEREO-AK45.p65 18 09.09.2003, 10:54 If the selected subcode page is not displayed in a short time, press button. TV programme will be displayed on the screen. Teletext page number will be displayed on the upper left corner of the screen when the selected page is found. Press page. button to display the selected Teletext 10 To exit Teletext Press mode. button. The screen will switch to TV 11) To Display the Time While watching a TV programme with Teletext transmission press button. The current time information, captured from Teletext will be displayed at the upper right of the screen. If the programme being watched does not have Teletext transmission, no iformation will be displayed. 12) Fastext Your CTV supports the 7 page Teletext system. When the page number of any of the 7 pages in memory is entered, the system will not search for the requested page; instead it will display the page automatically. Connect Peripheral Equipment There is a wide range of audio and video equipment that can be connected to your TV. The following connection diagrams show you where the different equipment should be connected at the back or the front side of the TV. 1) Via the Euroconnector Your TV set has two Euroconnector sockets. If you want to connect peripherals (e.g. video, decoder, etc.) which have Euroconnectors to your TV, use optional EXT.1 or EXT.2 inputs. If an external device is connected via EXT.1 Euroconnector socket TV is switched to AV mode automatically. If the signal is RGB then the RGB OSD indicator is displayed on the screen. 2) YCbCr Mode This mode is only used for the equipment which have YCbCr signal at their output. You can watch only YCbCr signal at this mode. RGB, Y/C or CVBS signals can not be watched. 3) Via Ant Input Press button to move the Teletext screen backward one page at a time. If you want to connect to your TV, peripherals like video recorders or decoders, but the device you want to connect does not have Euroconnector, you should connect it to the ANT input of your TV set. If the VCR is connected via antenna input it is suggested to use the Programme 0. For Fastext 4) Decoder Press button to move the Teletext screen forward one page at a time. The subject-heading for the information may have a particular colour. Press an appropriate RED, GREEN, YELLOW or BLUE button in order to reach the relevant page quickly. Cable TV offers you a wide choice of programs. Most of them are free, others are to be paid for by the viewer. This means that you will need to subscribe to the broadcasting organisation whose programmes you wish to receive. This organisation will supply you a corresponding decoder unit to allow the programmes to be unscrambled. For further information ask your dealer. See also the booklet supplied with your decoder. a) Connect a decoder with an aerial socket to the TV Connect the aerial cable. b) Connect a decoder without an aerial socket to the TV Connect the decoder to your TV with a eurocable to EXT.1. When your decoder has a Euroconnector you can obtain better picture quality if you connect a eurocable to EXTERNAL. 5) TV and Video Recorder Connect the aerial cables. Better picture quality can be obtained if you also connect a eurocable to EXTERNAL sockets. ENGLISH - 19 EU2845ST&2845W-MAV-1541-ENG-STEREO-AK45.p65 19 09.09.2003, 10:54 6) Playback NTSC 11) Connecting Headphones Connect NTSC VCR player to Euroconnector at the back of the TV. Connect NTSC VCR player to RCA Jack at the front of the TV. Use the stereo headphone socket on the lower right side of your TV, to connect headphones. Then, press $9 button to select (EXT-1, RGB, YCbCr and F-AV). 7) Copy Facility Source selection for VCR recording. Select Features Menu in the MENU. Select EXT-2 OUTPUT source pressing or button. 8) Search for and store the test signal of the video recorder Unplug the aerial cable from the aerial socket ANT of your video recorder. Switch on your TV and put the video recorder on the test signal. (See the handbook for your video recorder.) Enter the Tuning menu via the Install menu. Search for the test signal of your video recorder in the same way as you searched for and stored the TV signals. See Tuning, Search and Store TV channels. Store the test signal under programme number 0. Replace the aerial cable in the aerial socket ANT of your video recorder once you have stored the test signal. 9) Camera and Camcorder To connect to Front-AV input (F-AV): Connect your camera or camcorder at the front side of your TV. Connect your equipment to the TV via VIDEO (yellow), AUDIO R (red) and AUDIO L (white) inputs. You should connect the jacks to the input in the same colour. 10) Connect the decoder to the video recorder Some video recorders have a special euroconnector for decoder. Connect a eurocable to the euroconnector of your decoder and to the special euroconnector of your video recorder. See also the handbook of your video recorder. To connect your video recorder to the TV, see TV and Video Recorder section. If you want to connect more equipment to your TV, consult your dealer. ENGLISH - 20 EU2845ST&2845W-MAV-1541-ENG-STEREO-AK45.p65 20 09.09.2003, 10:54 Connect Peripheral Equipment CAMERA AUDIO HEADPHONE VIDEO DECODER FOR SATELLITE RECEIVER Antenna Connections 2XWGRRU$QWHQQD&RQQHFWLRQV 9+)DQWHQQD 5RXQGRKPFRD[LDOFDEOH W 9+)8+) 5HDURI79 W 9+)8+)DQWHQQD )ODWRKPWZLQOHDGFDEOH 9+)8+) 5HDURI79 5RXQGRKPFRD[LDOFDEOH ENGLISH - 21 EU2845ST&2845W-MAV-1541-ENG-STEREO-AK45.p65 21 09.09.2003, 10:54 Specifications Tips Care of the Screen Clean the screen with a slightly damp, soft cloth. Do not use abrasive solvents as they may damage the TV screen coating layer. Poor Picture Have you selected the correct TV system? Is your TV set or house aerial located too close to the loudspeakers, non-earthed audio equipment or neon lights, etc.? Mountains or high buildings can cause double pictures or ghost images. Sometimes you can improve the picture quality by changing the direction of the aerial. Is the picture or Teletext unrecognizable? Check if you have entered the correct frequency. The picture quality may degrade when two peripherals are connected to the TV at the same time. In such a case, disconnect one of the peripherals. No Picture Is the aerial connected properly? Are the plugs connected tightly to the aerial socket? Is the aerial cable damaged? Are suitable plugs used to connect the aerial? If you are in doubt, consult your dealer. No Picture means that your TV is not receiving any transmission. Have you pressed the correct buttons on the remote control? Try once more. Sound You can not hear any sound. Did you perhaps interrupt the sound, pressing button? Are external speakers connected to the TV? Sound is coming from only one of the speakers. Is the balance set to one direction extreme? See SOUND menu. Remote Control Your TV no longer responds to the remote control. Press the 79 button on the remote control once more. Perhaps the batteries are exhausted. If so you can still use the local buttons at the front of your TV. Have you selected the wrong menu? Press button to return to TV mode or press M button to return to the previous menu. TV BROADCASTING PAL B/G RECEIVING CHANNELS VHF (BANDI/III) UHF (BAND U) Hyperband CABLE-TV (S1-S20 / S21-41) NUMBER OF PRESET CHANNELS 100 CHANNEL INDICATOR OSD (ON SCREEN DISPLAY) RF AERIAL INPUT 75 Ohm Unbalanced OPERATING VOLTAGE 240V AC, 50 Hz. POWER CONSUMPTION (W) (max) 140 Watt AUDIO OUTPUT German + Nicam Stereo PICTURE TUBE 28 16:9 DIMENSIONS (DxLxH) (mm) ',0(16,216 ' / + : H LJKWNJ No solution Switch your TV set off and on. If this does not work, call the service personnel; never attempt to repair it yourself. ENGLISH - 22 EU2845ST&2845W-MAV-1541-ENG-STEREO-AK45.p65 22 09.09.2003, 10:54 EU2845ST&2845W-MAV-1541-ENG-STEREO-AK45.p65 23 09.09.2003, 10:54