1
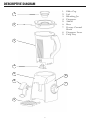
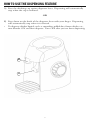
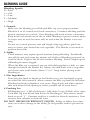
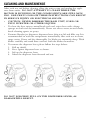
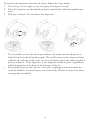
by
Blender &
Smoothie Dispenser
Instruction Manual
Item # AB-1000-BL 120V ~ 60Hz 500W
Thank you for your purchase of The Biggest Loser™ Blender & Smoothie Dispenser.
Please READ this instruction manual carefully before use.
SAVE THESE INSTRUCTIONS
TABLE OF CONTENTS
Important Safeguards . . . . . . . . . . . . . . . . . . . . . . . . . . . . .3
Special Instructions . . . . . . . . . . . . . . . . . . . . . . . . . . . . . . .4
Introduction . . . . . . . . . . . . . . . . . . . . . . . . . . . . . . . . . . . .4
Descriptive Diagram . . . . . . . . . . . . . . . . . . . . . . . . . . . . . .5
Using your Blender & Smoothie Dispenser . . . . . . . . . . . . . . .6
How to Use your Blender & Smoothie Dispenser . . . . . . . . . .6
How to Use the Dispensing feature . . . . . . . . . . . . . . . . . . . .7
Blending Guide . . . . . . . . . . . . . . . . . . . . . . . . . . . . . . . . . .8
Cleaning and Maintenance . . . . . . . . . . . . . . . . . . . . . . . . . .9
Troubleshooting . . . . . . . . . . . . . . . . . . . . . . . . . . . . . . . .11
Warranty . . . . . . . . . . . . . . . . . . . . . . . . . . . . . . . . . . . . .12
2
IMPORTANT SAFEGUARDS
When using electrical appliances, basic safety precautions should always be followed, including the following:
1. READ ALL INSTRUCTIONS COMPLETELY BEFORE USING.
2. To protect against electrical shock do not immerse or rinse cord, plugs or this appliance in water or any other liquid.
3. Close supervision is necessary when any appliance is used by or near children.
4. Unplug from outlet when not in use, before putting on or taking off parts and before
cleaning.
5. Avoid all contact with moving parts. Keep hands and utensils out of the container
while blending to reduce the risk of severe injury to persons or damage to the
blender. A scraper may be used, but must be used only when the blender is not running.
6. Do not operate any appliance with a damaged cord or plug or after the appliance malfunctions, or is dropped or has been damaged in any manner. Return the appliance to
Taylor® (see warranty) for examination, repair or adjustment.
7. Do not use attachments that are not supplied for this appliance from Taylor®. The use
of attachments, including canning jars, is not recommended by Taylor and may cause a
risk of injury to persons, or permanently damage this product.
8. Do not use outdoors.
9. Do not let cord hang over edge of table or counter, or touch hot surfaces including
the stove.
10. Blades are sharp; handle very carefully especially when cleaning inside the blending
jar.
11. Always operate the blender with the cover in place. Do not attempt to remove the
cover until blades have come to a complete stop.
12. When blending hot liquids, remove the center piece, (Filler Cap) of the two-piece
cover.
13. Do not feed food into the running blender by hand; use a utensil.
14. Make sure the motor stops completely and the electrical cord is unplugged before disassembling or cleaning.
15. Ensure the unit is completely assembled before using.
16. To disconnect, be sure the unit is off, then remove the plug from the wall outlet by
grasping the plug and pulling. Never unplug the appliance by pulling on the cord.
17. When using this appliance, provide adequate air space above and on all sides for air
circulation.
18. Do not place this appliance near a hot gas or electric burner or in an oven.
19. Do not leave the appliance unattended during use.
20. Do not use this appliance for other than its intended use.
21. Do not attempt to defeat the cover’s interlock mechanism as serious injury may result.
22. Do not use a broken, chipped or cracked blending jar or cutting blade.
23. Do not place the blending jar in the freezer filled with food or liquid. It will freeze
and can result in damage to the blades, jar, and blender unit and possibly result in personal injury.
SAVE THESE INSTRUCTIONS
3
SPECIAL INSTRUCTIONS
This appliance is for HOUSEHOLD USE ONLY.
• This appliance has a polarized plug (one blade is wider than the other). To reduce the risk of electrical shock, this plug will fit in a polarized outlet only
one way. If the plug does not fit fully in the outlet, reverse the plug. If it still
does not fit, contact a qualified electrician. Do not modify the plug in any
way.
• Make sure the voltage in your outlet is the same as the voltage indicated on
the appliance. For 120 –Volt AC electrical outlet only.
• The length of the cord used on this appliance was selected to reduce the hazards of becoming tangled in, or tripping over a long cord. For safety, it is not
recommended to use an electrical extension cord with this appliance.
• Do not immerse or rinse base of unit, plug or cord in water or other liquids.
• Use with wall receptacle only.
• Do not attempt to service this unit yourself.
SAFETY SYSTEM
This appliance is provided with a safety system which disables the mechanism if
the jar or the lid is not properly fitted even if the rotary control knob is at the ON
position.
Note: Do not use the jar or the lid to switch the appliance on and off.
If the cutting blades lock and do not move, it will damage the motor. Do not use,
call Customer Service for information.
INTRODUCTION
Now you can learn how to prepare and enjoy great tasting, healthy meals and
snacks in minutes using your The Biggest Loser™ Blender & Smoothie Dispenser
by Taylor®. You will learn how to make the delicious and easy recipes that cut out
calories, but leave in all the taste. The appliance and recipes are great tools to get
you on track. There are over 125 more healthy and delicious recipes that you can
find in the Biggest Loser Cookbook. When you start eating right, you may feel
better, have more energy and feel empowered. For more information on NBC’s
The Biggest Loser, or to join The Biggest Loser Club, please visit the official
Biggest Loser web site at www.nbc.com/The_Biggest_Loser.com or
www.biggestloserclub.com
4
DESCRIPTIVE DIAGRAM
1.
2.
3.
4.
5.
6.
7.
Filler Cap
Lid
Blending Jar
Dispenser
Shield
Base
Rotary Control
Knob
8. Dispenser Lever
9. Drip Tray
1
2
3
4
5
6
8
7
9
5
USING YOUR BLENDER & SMOOTHIE DISPENSER
BEFORE FIRST USE
• Make sure the voltage in your outlet is the same as the voltage indicated on
the appliance. This product is for 120 –Volt AC electrical outlet only.
• The Blender & Smoothie Dispenser is equipped with a safety locking system
to increase security during operation. The blending function will not work if
the jar, blades and cover are not properly locked in place.
• Remove any bags, labels or stickers from the appliance.
• Clean the base unit with a damp soft cloth.
• Wash all of the removable parts – jar, lid, filler cap, dispenser, dispenser lever
and drip tray using a sponge, warm water and mild dish detergent. Rinse and
dry carefully.
• NOTE: do not immerse the base unit in water when cleaning.
HOW TO USE YOUR BLENDER & SMOOTHIE DISPENSER
•
•
•
•
•
•
•
•
•
•
•
•
•
Place the unit on a flat, dry, sturdy surface. This appliance is not for use in
convection, or conventional ovens, microwaves, or on stovetop.
Wash and dry all components thoroughly as stated above.
Assemble blender components. Always be sure that the appliance is properly
assembled before using. Blades are extremely sharp; never touch the cutting
edge of blades.
Make sure the rotary control knob is at the “0” position. Plug the cord into
AC wall outlet.
Pull the drip tray to the extended position.
Place jar onto the base.
Add ingredients to the jar as directed by your recipe.
Add ingredients to the blender a little at a time to ensure proper blending and
to prevent overflow. Never fill container more than ¾ full; the action of the
blade will cause ingredients to rise in the container. Make larger recipes in
multiple batches.
Unless the recipe states differently, pour liquid ingredients into the blender before solid ingredients. Adding the liquid first will reduce blending time.
Always add 1 cup of liquid before processing ice.
Place the lid with the filler cap in position onto the jar. Remember; always
hold the handle during blending.
Turn the rotary control knob to the desired speed for blending.
After finished blending, turn off by turning the rotary control knob to the “0”
position.
Always turn blender off and wait until blades have stopped
rotating before removing jar.
6
HOW TO USE THE DISPENSING FEATURE
A) Press the drinking cup against dispenser lever. Dispensing will automatically
stop when the cup is removed.
OR
B) Press down on the knob of the dispenser lever with your finger. Dispensing
will automatically stop when it is released.
• To dispense thicker liquids, such as smoothies, milkshakes, frozen drinks, etc.,
turn blender ON and then dispense. Turn OFF after you are done dispensing.
B
A
7
BLENDING GUIDE
Blending Speeds:
P= Pulse
0 = Off
1 = Low
2 = Medium
3 = High
1. General:
- Make sure the blending jar and lid with filler cap are in proper position.
Blend for 5 to 30 seconds and check consistency. Continue blending until the
desired consistency is reached. Over-blending will result in loose consistency.
- Keep hands and utensils out of the jar while blending to prevent serious injury.
A scraper may be used, but must only be used when the blender is not running.
- Do not try to mash potatoes, mix stiff dough, whip egg whites, grind raw
meat or extract juice from fruits and vegetables. This blender is not made to
perform these tasks.
2. Solids:
- Thick mixtures may require special attention during blending. Periodically
turn off the unit and scrape the mixture off of sides of blending jar inward toward the blade. Replace the lid and continue blending. Select a higher speed
if blending becomes sluggish.
- When the filler cap is removed, you can add solid ingredients a little at a time
through the hole in the blender lid. Always cut solid foods such as vegetables
and cheeses into small chunks (about ¾” to 1” long) before placing in the
blending jar.
3. Hot Ingredients:
- Processing hot foods or liquids in the blender may cause hot liquid to spurt
out when the lid is removed. Always remove the filler cap from the lid before
blending hot foods or liquids to vent steam. Keep hands and other exposed
skin away from the lid opening to reduce possible risk of steam burns.
4.Crushing Ice:
- Fill blending jar 1/3 full of cold water. Add about 2 cups (500ml) of ice cubes.
Lock filler cap into lid and lock lid on the blending jar. Turn rotary control
knob to speed “3”. Continue until ice is crushed to desired consistency. Pour
contents into colander to drain off water.
DO NOT CRUSH ICE WITHOUT LIQUID. Failure to follow these directions can result in damage to the blades, jar and possibly result in personal injury.
8
CLEANING AND MAINTAINENCE
After each use and before cleaning, allow the unit to stop and unplug the appliance from outlet. DO NOT ATTEMPT TO CLEAN WHILE THE
MOTOR IS RUNNING OR THE COMPONENTS ARE STILL MOVING. FAILURE TO FOLLOW THESE INSTRUCTIONS CAN RESULT
IN SERIOUS INJURY OR ELECTRICAL SHOCK.
• CAUTION: NEVER IMMERSE THE BASE UNIT, CORD OR
PLUG IN WATER OR OTHER LIQUIDS.
• To clean the base, rotary control knob and cord, wipe clean with a damp
sponge or cloth and dry immediately. Never use excess water, treated cloths,
harsh cleaning agents, or sprays.
• Remove blender jar, dispenser, dispenser lever, drip tray, lid and filler cap. It is
recommended to wash the components immediately after each use in warm,
soapy water. Rinse and dry thoroughly. Jar blades are extremely sharp. Wash
blades carefully and avoid direct contact with the blades themselves.
• To remove the dispenser lever, please follow the steps below:
1. Pull up shield.
2. Press against dispenser lever as shown.
3. Lift up the dispenser lever.
4. Move the dispenser lever forward and out.
1
2
3
4
DO NOT FORCIBLY PULL ON THE DISPENSER LEVER, AS
DAMAGE WILL RESULT.
9
To remove the dispenser from the jar, please follow the steps below:
1. Turn the jar on an angle so you can grasp the dispenser easily.
2. Turn the dispenser to the unlock position (toward the unlocked padlock picture).
3. Pull out as shown. Do not force the dispenser.
1
2
•
•
To reassemble, reverse the above procedures and make sure the dispenser is
locked in place before blending again.The small arrow on the dispenser front
will line up with the small arrow on the jar bottom where the locked padlock
picture is shown. If the dispenser is not properly locked in place, ingredients
will leak from the drain hole in the bottom of the jar.
Reassemble all parts and store in a dry place, unplugged and away from the
reach of children. Personal injury can result if the blender is turned on when
not properly assembled.
10
TROUBLESHOOTING
The Blender & Smoothie Dispenser will not operate.
• Has a household fuse blown, or has a circuit breaker tripped?
• Is the power supply cord properly seated in the unit and the outlet?
• Is the inter-locking jar and lid secured properly?
• Has the cord been damaged in some way? If so, DO NOT USE THE APPLIANCE. Contact Customer Service for replacement information.
• Has the safety shut off feature activated due to improper lid closure?
Blender & Smoothie Dispenser is vibrating.
• Are the components securely positioned in the base? If not, turn off the unit
and reposition the components onto the unit base.
• Has the appliance been overloaded? Attempting to blend large quantities or
large pieces of food may cause vibration. See section titled “How to use your
Blender & Smoothie Dispenser” or BLENDING GUIDE.
The lid will not seat properly.
• Is the product assembled properly?
• Is there food blocking the lid? If so, the jar is overloaded. Remove half of the
ingredients and blend in two smaller batches.
Blended result is too watery.
• The food or beverage is over processed. Use brief pulses, use a lower speed or
blend for less time.
Food is collecting on the sides of the jar.
• You may be blending too much ingredients at one time. Turn machine off.
When the blade stops completely, remove cover and clean with a spatula, turning ingredients inward toward the blade. Add additional liquid if necessary. If
there is still a problem, remove half of the ingredients and blend in two smaller
batches.
11
WARRANTY
Taylor® warrants this product to be free from defects in material or workmanship
for one (1) year for the original purchaser from date of retail purchase. It does not
cover damages or wear resulting from accident, misuse, abuse, commercial use, or
unauthorized adjustment and/or repair. If service is required, do not return to retailer. Should this product require service (or replacement at our option), please
contact Taylor Customer Service at 1-800-289-0944.
There are no expressed warranties except as listed above.This warranty gives you
specific legal rights, and you may have other rights which vary from state to state.
If you need replacement parts:
• Use only Taylor specified parts. These specified parts will fit right and work
right because they are made with the same precision used to build every new
Taylor appliance.
Keep this book and your sales receipt together for future reference. You must provide proof of purchase for warranty purposes.
For additional product information, or warranty information in Canada or elsewhere outside the USA, please contact us through www.taylorusa.com
Taylor® is a registered trademark of Taylor Precision Products and its affiliated
companies.All rights reserved.
Made to our exact specifications in China.
www.taylorusa.com
© 2008 The Biggest Loser is a registered trademark and copyright of NBC Studios, Inc. & Reveille LLC.All Rights Reserved.
AB-1000-BL 9.08
12