1
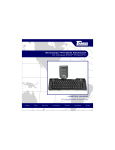
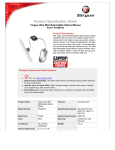
Wireless 5-Button Scroller
Optical Mini Mouse
Making Your Mobile Life Easier.
USER’S GUIDE
Visit our Web site at: www.targus.com
Making Your Mobile Life Easier.
Features and specifications are subject to change without notice. © 2002 Targus Corp.
400-0086-001A
BRUSSELS HANNOVER BARCELONA TOKYO
MILANO AMSTERDAM SINGAPORE
LONDON PARIS NEW YORK LOS ANGELES TORONTO HONG KONG SYDNEY
Wireless 5-Button Scroller Optical
Mini Mouse
Introduction
Congratulations on your purchase of the Targus Wireless 5-Button
Scroller Optical Mini Mouse. This ergonomically designed mouse
uses a radio frequency (RF) link that enables you to use the mouse
anywhere within 4.5 feet of its receiver. No line-of-sight between
the mouse and its receiver is required.
The optical mouse also provides a scrolling wheel and three
user-programmable buttons for multimedia use.
In addition to this user’s guide, this package contains:
• Wireless 5-Button Scroller Optical Mini Mouse
• Receiver
• 1 AA NiMH rechargeable battery
• Three-inch USB extension cable
• Charger base
• AC power adapter
• Device driver software CD-ROM
System Requirements
To use the optical mouse, your computer must meet the following
hardware requirements and run one of the operating systems listed
below.
Hardware
Operating System
Pentium®
• PC with a
processor or
equivalent and a hard disk drive
• USB version 1.1 interface
3
• Windows® 95/98/Me/2000/
XP and Windows NT® 4.0
Connecting the Mouse Receiver
To connect the mouse receiver:
1 Turn off your computer.
2 Plug the standard USB end of the cable into an available USB
port on your computer.
You are now ready to install the device drivers for your operating
system.
Installing the Device Drivers
NOTE: You must install the supplied device drivers to use the
fourth and fifth buttons. Otherwise, the mouse will function as
a standard, three-button mouse.
To install the supplied device driver:
1 Turn on your computer.
2 Insert the driver software CD into your computer’s CD-ROM
drive.
3 Click Start, Run, then enter D:\Setup.exe (where D: is the path
of your CD-ROM drive) and then click OK.
The Welcome screen appears.
4 Click Next.
5 Select Typical or Custom installation and then click Next.
6 Click Yes.
7 Click Finish to complete the driver installation and restart your
computer.
Once your computer restarts, the mouse icon appears in the
system tray.
You are now ready to install the battery in the mouse, set the
radio frequency channel, and establish a communications link
between the mouse and its receiver. See “Establishing a
Communications Link” on page 6.
4
Using the RF Mouse
Installing the Battery
1 Remove the battery cover from the bottom of the mouse by
pressing the battery cover tab and siding it off.
2 Insert the supplied battery, making sure that the positive (+)
and negative (-) end of the battery match the polarity indicators
inside the battery housing.
3 Slide the battery cover back into position until it “clicks”
firmly into place.
The optical sensor, located on the bottom of the mouse, glows
red.
WARNINGS: When replacing the battery, if you are using the
mouse with the charger base, you must use heavy-duty NiMH
rechargeable batteries to avoid possible damage to the mouse
and charger.
If you are using the mouse without the charger base, you may
use alkaline or other heavy-duty NiMH batteries.
Setting the Radio Frequency Channel
Before you establish a link between the optical mouse and its
receiver, you must set the radio frequency channel. To do this,
slide the channel switch to A or B on both the mouse and the
receiver. For the mouse, the switch is located inside the battery
compartment. For the receiver, the switch is located directly
opposite the USB connector.
NOTE: The optical mouse and its receiver must be set to the
same channel to function properly.
5
Establishing a Communications Link
The optical mouse has 256 identification codes that allow the
mouse and its receiver to operate without interference from other
radio frequency devices.
To set the identification code and establish a radio link between
the mouse and the receiver:
1 Press and release the link button, located on the bottom of the
optical mouse.
2 Press and release the link button on the receiver.
The receiver’s status light flashes while it scans the
identification codes for the mouse. Once a code is selected, the
status light stops flashing.
3 Press and release the screen scroller (middle) button.
You are now ready to use the optical mouse.
NOTE: You must reestablish the communications link every
time you change the batteries.
Personalizing the Mouse Features
You can assign functions to the third, fourth and fifth mouse
buttons and control cursor movement by personalizing the mouse
features from the Mouse Properties screen. To do this:
1 Click Start, Settings and Control Panel.
2 Double-click the Mouse icon.
The Mouse Properties screen appears.
This screen has six tabs with options for selecting and controlling
mouse features.
6
Buttons Tab
The Button configuration feature allows you to assign the primary
mouse button for right- or left-handed use.
The Files and Folders option allows you to assign the number of
clicks that are required to open an item.
The Double-click speed option adjusts how fast you have to click
the mouse button to register a double-click.
Pointers Tab
This tab allows you to choose how the mouse pointer looks on the
screen.
Motion Tab
The Speed option adjusts the speed at which the pointer moves
across the screen.
The Acceleration option adjusts the acceleration rate for the
pointer.
The Snap to default feature allows you to assign the pointer to
jump to default buttons in dialog boxes.
Hardware Tab
Selecting the Hardware tab displays general information about the
Wireless 5-Button Scroller Optical Mini Mouse.
Wheel Tab
The Scrolling Mode option allows you to choose between the
Intelli Mouse Compatible Mode and the Enhanced Scroll Mode.
• Intelli Mouse Compatible Mode – enabling this mode
simulates Microsoft® IntelliMouse® and supports features used
with Microsoft® applications, such as zoom, scrolling and
Auto-scrolling.
7
• Enhanced Scroll Mode – this mode supports all applications
that use scroll bars, with zoom, Auto-panning and scrolling
functions.
The Scrolling Settings option allows you to adjust how many lines
of text will scroll and the direction of the scroll movement.
Button Assignment Tab
Mouse Properties screen - Button Assignment tab
The Button Assignment feature allows you to assign
frequently-used mouse and keyboard functions, such as Auto
Scroll, Page Back and Page Forward, to the third, fourth and fifth
mouse buttons. To do this:
1 Click the drop-down arrow next to the button number you want
to assign.
The functions list appears.
2 Select the function you want to associate with the selected
button.
3 Click Apply.
Repeat for each button you want to assign a function to.
8
Operating Hints
For optimal performance and RF reception:
• Place the receiver at least 8 inches (20 cm) away from all
electrical devices, such as your monitor, speakers or external
storage devices.
• Avoid using the optical mouse on a metal surface. Metals, such
as iron, aluminum or copper, shield the radio frequency
transmission and may slow down the mouse’s response time or
cause the mouse to fail temporarily.
• The optical mouse will enter a suspend mode at the same time
your computer does. To wake the mouse, press and release the
screen scroller (middle) button.
• If your computer has a metal case that contains aluminum or
magnesium, use the optical mouse to the side. The display
panel may interfere with the radio frequency signal if you use
the mouse directly in front of the computer.
• Never use the optical mouse on a glass or mirrored surface as
these surfaces will cause the mouse to fail temporarily.
• To maximize battery life, use the optical mouse on a white, or
light colored surface. Dark surfaces cause the mouse’s light
emitter diode (LED) light to glow brighter, which causes the
battery to discharge more rapidly.
Comfortable Usage
Research suggests that physical discomfort and injury to nerves,
tendons, and muscles may be related to repetitive motion, an
improperly set up work area, incorrect body posture, and poor
work habits.
9
To reduce the risk of injury, follow these precautions:
• Stand, stretch, and move around several times every hour.
• Switch hands while performing tasks. Use shortcut keys to
avoid repetitive or awkward mouse movements.
• Relax your shoulders and keep your elbows at your sides.
Adjust the keyboard’s position so that you don’t have to stretch
to reach it.
• Adjust your position so that you don’t have to bend your wrists
to type; avoid placing your wrists on a sharp edge.
If you feel discomfort or numbness in your hands, wrists, arms,
shoulders, neck, or back while typing, consult a qualified medical
professional.
Specifications
Mouse Carrier Frequency
27 MHz
Dimensions
Mouse:
Receiver:
4.8 x 2.64 x 1.6 inches
(122 x 67 x 40 mm)
2.48 x 0.86 x 0.66 inches
(63 x 22 x 17 mm)
NOTE: Receiver dimensions do not include the extended USB
connector.
Weight
Mouse:
Receiver:
4.1 ounces (without battery)
(116 grams)
.98 ounces
(28 grams)
10
Receiver Interface
USB version 1.1
Operating Voltage
Mouse:
1.2V DC (powered by a battery)
Receiver:
5V DC (powered by the USB port)
Battery
1 AA NiMH rechargeable
Electromagnetic Characteristics (EMC)
CE - Type acceptance: ETS 300 220 short range devices
Distance Between Mouse and Receiver
Up to 3 feet (1 m)
Operating Current
Mouse:
35~45 mA (maximum)
Receiver:
30 mA typically (100 mA maximum)
Mouse Standby Current
10 mA or lower
Mouse Sleep Mode Current
Below 5 uA
Modulation Type
FSK
Transmission Rate
4 Kbps
Error Detection
8-bit CRC
11
Troubleshooting
What do I do if the optical mouse does not work?
• Check that the channel setting on both the mouse and the
receiver are the same.
• Make sure that the polarity of the battery is correct. The
positive (+) and negative (-) ends of the battery must match the
positive (+) and negative (-) connections in the battery
housing.
• The battery may need recharging. Connect the mouse to the
charger base.
• Check that the receiver’s USB connector is firmly attached to
the USB port on your computer.
• Verify that the device drivers are installed.
• Make sure you have established a radio link between the
mouse and its receiver. See “Establishing a Communications
Link” on page 6.
When I use the optical mouse, other wireless devices work
more slowly or fail temporarily – what should I do?
The mouse may cause interference with any cordless,
radio-based device that operates at 27 MHz, such as a telephone,
baby monitor, or toy. To reduce interference, move the mouse’s
receiver and the base unit of the affected device as far away from
each other as possible.
What do I do if the response time of the optical mouse is slow
or the mouse intermittently stops working?
• Increase the distance between the mouse’s receiver and the rest
of your computer equipment. Use the USB extension cable if
necessary.
12
• Increase the distance between the mouse’s receiver and the
base units of other wireless devices.
• Turn off any wireless devices and their base units that are near
the mouse’s receiver.
• If you are using the optical mouse on a metal surface, move it
and the receiver to a non-metal surface. Metals, such as iron,
aluminum or copper, shield the radio frequency transmission
and may slow down the mouse’s response time or cause the
mouse to fail temporarily.
I can’t use the optical mouse while another RF mouse is in use
– what should I do?
Change the channel selection (A/B) on both the mouse and its
receiver. If this does not work, reset the identification code. See
“Establishing a Communications Link” on page 6.
Technical Support
In the unlikely event that you encounter a problem with your
Targus accessory, please contact our technical support team at:
Email: [email protected]
Internet: http://www.targus.com/support.asp
Our knowledgeable staff is also available to answer your questions
through one of the following telephone numbers.
US
Monday through Friday, 8:00 a.m. (08:00) to 8:00 p.m. (20:00)
Eastern time: 800-283-6325
Canada
Monday through Friday, 9:00 a.m. (09:00) to 5:00 p.m. (17:00)
Eastern time: 888-827-4877
13
Europe
Belgium
+32 0 02-717-2451
Denmark
+45 0 35-25-8751
France
Germany
+33 0 1-64-53-9151
+49 0 21-16-579-1151
Italy
+39 0 24-827-1151
Netherlands
+31 0 53-484-9470
Spain
Sweden
Switzerland
United Kingdom
Eastern Europe & others
+34 0 91-745-6221
+46 0 8-751-4058
+41 0 1-212-0007
+44 0 20-7744-0330
+31 0 53-484-9479
Product Registration
For more efficient customer service and to activate the product’s
warranty, Targus recommends that you register your Targus accessory
shortly after purchasing it.
To register your Targus accessory, go to:
http://www.targus.com/registration.asp
You will need to provide your full name, email address, phone number,
and company information (if applicable).
Warranty
Targus warrants this product to be free from defects in materials and
workmanship for one year. If your Targus accessory is found to be
defective within that time, we will promptly repair or replace it. This
warranty does not cover accidental damage, wear and tear, or
consequential or incidental loss. Under no conditions is Targus liable for
loss of, or damage to a computer; nor loss of, or damage to, programs,
records, or data; nor any consequential or incidental damages, even if
Targus has been informed of their possibility. This warranty does not
affect your statutory rights.
14
Warranty Registration at:
http://www.targus.com/registration.asp
Regulatory Compliance
This device complies with Part 15 of the FCC Rules. Operation is
subject to the following two conditions: (1) This device may not cause
harmful interference, and (2) This device must accept any interference
received, including interference that may cause undesired operation.
FCC Statement
Tested to Comply
This equipment has been tested and found to comply with the limits of a
Class B digital device, pursuant to Part 15 of the FCC Rules. These
limits are designed to provide reasonable protection against harmful
interference in a residential installation. This equipment generates, uses,
and can radiate radio frequency energy and if not installed and used in
accordance with the instructions, may cause harmful interference to
radio communications. However, there is no guarantee that interference
will not occur in a particular installation.
If this equipment does cause harmful interference to radio or television
reception, which can be determined by turning the equipment off and
on, the user is encouraged to try to correct the interference by one or
more of the following measures:
• Reorient or relocate the receiving antenna
• Increase the separation between the equipment and receiver
• Move the computer away from the receiver
• Connect the equipment into an outlet on a circuit different from that
to which the receiver is connected.
Microsoft, IntelliMouse, Windows and Windows NT are registered trademarks of Microsoft
Corporation. All other trademarks are the property of their respective owners.
15