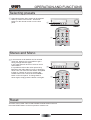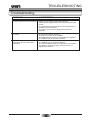
1
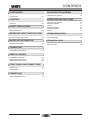
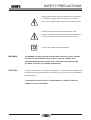
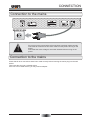
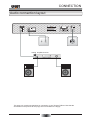
Instruction manual
TNR-50 FM/AM tuner
ACCESSORIES
Accessories
TUNING
POWER
FM/AM
1 x TNR-50
1 x Remote control
2 x Batteries (Optional)
1 x FM Antenna (Optional)
1 x Operation Manual
AUTOTUNE
MEMORY
-
PRESET
+
ST/MONO
RESET
AM
+
TUNE
PRESET
TNR-50
+
RDS
ST/MO
+
MEMO
FM
AUTO TUNE
POWER
TNR-50 FM/AM TUNER
MANUAL
This operation manual supplies all the information that you need to have about your Tangent TNR-50.
Please read this operation manual carefully before you start using the unit!
01
CONTENTS
ACCESSORIES
Accessories
ADJUSTING THE ANTENNA
Adjusting the antenna
01
OPERATION AND FUNCTIONS
CONTENTS
Contents
ON, OFF and standby
RDS and FM/AM
Tuning
Selecting presets
Stereo and mono
Reset
02
SAFETY PRECAUTIONS
Safety precautions
03
IMPORTANT SAFETY INSTRUCTIONS
Important safety instructions
04
Troubleshooting
06
Technical data
07
REMOTE CONTROL
Installation of batteries
Using the remote control
Remote control functions
08
08
09
FRONT PANEL AND CONNECTIONS
Front panel
Connections
10
11
CONNECTION
Audio connection layout
17
TECHNICAL DATA
CONNECTION
Connection to the mains
14
14
15
16
16
16
TROUBLESHOOTING
IMPORTANT INFORMATION
Important information
13
12
02
18
SAFETY PRECAUTIONS
A triangle with a lightning symbol draws the user's attention
to "dangerous voltage" without insulation in the cabinet
which may be high enough to entail a risk of electric shock.
A triangle with an exclamation mark draws the user's
attention to important instructions for use and maintenance
in the accompanying manual, which should be studied.
A symbol for CLASS II (double insulation)
WARNING:
TO MINIMISE THE RISK OF FIRE OR ELECTRICAL SHOCK, DO NOT EXPOSE
THE UNIT TO RAIN OR MOISTURE. DO NOT OPEN THE CABINET AS IT
CONTAINS DANGEROUS VOLTAGE. ONLY QUALIFIED TECHNICIANS ARE
ALLOWED TO CARRY OUT REPAIR AND SERVICE.
CAUTION:
If the plug of the power cord needs to be replaced, it is important that the replacement
is identical to the plug to be replaced, or that the new plug has been recommended by
the manufacturer
TO AVOID ELECTRICAL SHOCK, IT IS IMPORTANT TO INSERT THE PLUG
CORRECTLY INTO THE SOCKET.
03
IMPORTANT SAFETY INSTRUCTIONS
WARNING: IT IS IMPORTANT THAT YOU READ AND OBSERVE BOTH THE INSTRUCTIONS IN THIS MANUAL AND
THE INSTRUCTIONS ON THE UNIT. KEEP THIS MANUAL FOR FUTURE REFERENCE.
This unit was designed and manufactured with a view to providing maximum safety for the user. Incorrect use of
the unit may cause electrical shock or fire. The protection devices built into this unit will protect the user if the
procedures below are observed in connection with installation, use and repair. This unit is fully electronic and
contains no parts that can be repaired by the user.
DO NOT REMOVE THE CABINET. RISK OF DANGEROUS VOLTAGE. ONLY QUALIFIED TECHNICIANS ARE
ALLOWED TO REPAIR THE UNIT.
Heat
Do not place the unit near
sources of heat such as radiators,
heat registers, ovens or other
units that produce heat.
Read the manual
Upon unpacking the unit,
please read the manual
carefully and observe all the
instructions given.
Power supply
Only the power supply indicated on the
rating plate must be used for this unit.
If you are not sure which power supply
you have, please contact the distributor
or the local electricity supplier.
Water and moisture
The unit must not be placed
close to water, such as bathtub,
wash basin, kitchen sink or
laundry tub, in a damp cellar or
close to a swimming pool, etc.
Cleaning
Unplug the unit before cleaning.
Do not use liquid detergents and
aerosol cleaning agents. Use a
dry cloth.
Earthing or polarisation
If the plug cannot be inserted properly into the
socket, or if the plug does not fit, the unit must not
be used in your country.
Power cords
Wiring must be organised to
prevent people from stepping on
the cables and to avoid pinching
by objects placed on or beside
them. Take special care around
sockets and plug boxes and
where the power cords leave the
unit.
Ventilation
The cabinet is provided with slots and
openings to ensure ventilation and reliable
operation and to protect the unit against
overheating. Do not block or cover these
openings. The openings must never be
blocked, for instance by placing the unit on
a bed, a sofa, a carpet or similar surface.
Overloading
Make sure that wall sockets,
extension cords and plug
boxes are not overloaded as
this may lead to fire or
electrical shock.
04
IMPORTANT SAFETY INSTRUCTIONS
Lightning
Unplug the unit for additional
protection during thunder or when
the unit is not used for prolonged
periods. This will prevent damage
to the unit from lightning and
power surges.
Penetration of objects and liquid
Never push any foreign objects
through the openings into the unit,
as they may touch dangerous
voltage points or short-circuit parts
and thus cause fire or electric
shock. Do not spill liquid on the
unit.
Accessories
Do not place the unit on unstable surfaces such as a
trolley, stand, tripod, shelf or table. The unit
may fall and injure children or adults or
be seriously damaged. Use only trolley,
stand, tripod, shelf or table that is very
stable or provided with the unit. The unit
must be installed in accordance with the
manufacturer's instructions and by means of
installation equipment recommended by the
manufacturer.
If the unit is placed on a trolley, the trolley must be
moved very carefully. Sudden stops, unnecessary
force and uneven surfaces may cause the trolley to
turn over.
Loads
Do not place heavy loads on the
unit and do not step on it. The load
may fall and cause serious injury to
persons or damage to the unit.
Damage
Unplug the unit and contact qualified technicians in
the following cases:
A) If the power cord or the plug is damaged.
B) If liquid has been spilled on the unit or objects
have fallen into the unit.
C) If the unit has been exposed to rain or water.
D) If the unit does not work properly after adhering to
the instructions in the operation manual. Only the
settings described in the operation manual must be
made as incorrect setting may result in damage and
often will make it difficult for a qualified technician to
make the unit work properly again.
E) If the unit has been dropped or damaged in any
other way.
F) When the operation of the unit changes
drastically, the unit requires service.
Service
Do not attempt to carry out any
service work yourself. By opening or
removing the cabinet, you will be
exposed to dangerous voltage or
other hazards. Any service work
should be carried out by qualified
technicians.
Spare parts
If spare parts are required, make sure that the
service technician uses spare parts specified by the
manufacturer or spare parts with the same
characteristics as the original. Unauthorised spare
parts may cause fire, electrical shock, etc.
Safety check
After service or repairs on the unit,
ask the service technician to carry
out a safety check to ensure that
the unit is ready for use.
05
IMPORTANT INFORMATION
Handling instructions
Condensation
Condensation may occur in the following cases:
The top and back panel of the unit may become
warm after prolonged use. This is not due to a
defect.
When the unit is moved directly from a cold to a
warm place.
Turn off the power when the unit is not used.
When the unit is used in a room where the
radiator has just been switched on or a place
where the cold air from the air-conditioning
system is directed at the unit.
Protect the power cord
If the unit is used in the summer in a warm and
humid room just after it has been moved from an
air-conditioned room.
Follow the instructions below to prevent
abnormal operation, electrical shock, fire or
personal injury:
Hold the plug firmly when inserting it into the
socket.
Avoid heat-producing devices.
Do not place objects on the power cord.
Do not carry out service work on or change the
power cord.
If there is steam or a high level of humidity in the
room.
In case of condensation, the unit will not work
properly. Turn off the unit. Unplug the unit and leave
it for 2-3 hours. The unit will then have adapted to
the environment and any condensation will have
disappeared.
Positioning
Do not place the unit in any of the fol. places:
In sunlight, close to heat-producing devices or in
an enclosed rack.
In places with high temperatures (40C or more)
or high relative humidity (90% or more).
In dirty places as some internal parts may be
damaged.
Do not put your fingers or any
other objects into the unit
Touching the internal parts is dangerous and
may cause injury or damage. Do not open the
cabinet.
Do not place any foreign matter in the unit.
Interference
Placing the unit near a television set, radio or
video player may cause poor picture and sound
quality. In that case, move the unit further away
from the television set, radio or video player.
06
CONNECTION
Connection to the mains
TNR
FM
ANTENNA
AM
Do not turn on the power before all connections have been made correctly.
Check that all connections have been made correctly before turning on the
power.
Check that the mains voltage is 230-240V AC50Hz before turning on the
power.
Connection to the mains
Check that all other connections have been made correctly before inserting the mains plug into the wall
socket.
Then insert the plug into a suitable socket.
If the unit is to be used abroad, you may need an adapter.
07
REMOTE CONTROL
Installation of batteries
Remove the cover as illustrated.
Replace the cover.
Position two batteries of the type
AAA/R03/UM4 in the battery
compartment. Make sure that the
orientation of the batteries is correct (see
drawing at bottom).
Do not mix new and old batteries and do not use different types of batteries.
If the remote control is not used for prolonged periods, remove the batteries from the remote control
to avoid corrosion.
Using the remote control
TUNING
Direct the remote control at the sensor on the front
panel of the unit. When the remote control signal is
received, the unit reacts accordingly. The remote
control works within a range of 6 metres.
POWER
FM/AM
AUTOTUNE
MEMORY
-
PRESET
+
ST/MONO
RESET
TNR-50 FM/AM TUNER
InfraredSensor
TNR-50
RDS
ST/MO
POWER
AM
+
+
PRESET
TUNE
FM
AUTO TUNE
MEMO
+
Sometimes the remote control does not work well in strong light. You may have to move the unit if it is a
problem.
Malfunction may occur if other remote controls are used near the unit.
Do not place any objects on the remote control, as the batteries may become flat if a key is depressed
constantly.
Make sure that there are no obstacles between remote control and unit.
Do not position the unit behind tinted glass as it may reduce the maximum range of the remote control.
08
REMOTE CONTROL
Remote control functions
TNR-50
RDS
POWER
ST/MO
AM
+
+
PRESET
TUNE
FM
AUTO TUNE
MEMO
+
TNR-50 FUNCTIONS:
RDS: Switches between RDS information of
the selected channel.
St/Mono: Switches between MONO and
STEREO on the FM band.
Preset +/-: Changes up or down between
stored stations.
Power: Sets the TNR-50 in standby mode.
AM and FM: Press these buttons to change
between FM and AM.
Autotune: (Auto Preset Search) Press this
button once and the tuner will auto tune and
store all available stations.
Tune +/-: Press these buttons to manually
search up or down in frequency.
Memo: After Manually searching with the
Tune +/- button, press the Memo button and
the frequency will be stored on the current
preset.
CDP-50 FUNCTIONS:
Eject: Opens the CD tray.
Program: Allows playback of the music
tracks on a CD in a certain order.
Stop: Stops playback.
Previous: Selects the previous track.
Depress button to rewind.
Play/Pause: Starts and pauses playback.
Repeat: Repeats a single track or all tracks
on a CD.
Power: Sets the CDP-50 in standby mode.
Next: Selects the next track. Depress
button for fast forward.
Random: All tracks are played in random
order.
AMP-50 FUNCTIONS
Input buttons: Selects input of amplifier.
Treble: Adjusts treble level by means of
VOL + and -.
Bass: Adjusts bass level by means of VOL
+ and -.
Power: Sets the AMP-50 in standby mode.
Volume+/-: Adjusts the master volume.
Some of the functions of the unit can only be performed by means of the remote control. Some functions are
connected with the selected signal input source. Some buttons on the remote control may therefore not be
available if the corresponding signal input source has not been selected.
09
FRONT PANEL AND CONNECTIONS
Front panel
TUNING
POWER
FM/AM
AUTOTUNE
MEMORY
-
3
4
5
6
PRESET
+
ST/MONO
RESET
7
8
9
TNR-50 FM/AM TUNER
1
2
10
1 Mains switch: Used to interrupt the mains voltage.
2 LED indicator: Lights green when the unit is turned on. Lights red when the unit is in
standby mode or in operation.
3 FM/AM: Switches between FM and AM.
4 Autotune: Press this button once and the tuner will start to automatically tune and
store all available stations.
5 Memory: After manually tuning in station, press this button once and the tuned in
6
7
8
9
10
channel will be stored on the current preset.
Preset -: Changes down in presets.
Preset +: Changes up in presets.
St/Mono: Changes between stereo and mono on the FM band.
Reset: Resets the tuner.
Tuning: Turn this button clockwise to tune up in frequency, and counter clockwice to
tune down in frequency.
10
FRONT PANEL AND CONNECTIONS
Connections
TNR
FM
1
ANTENNA
AM
2
3
1 Stereo Output: Analogue stereo output. For connection to stereo amplifier or receiver
with analogue input.
2 Antenna: For connection of FM or AM antenna or for the communal antenna system.
3 AC input: For connection of mains voltage. Make sure that the plug has been correctly
inserted, and that the voltage corresponds to the text printed on the back panel of the
cabinet.
11
CONNECTION
Audio connection layout
TNR
FM
ANTENNA
AM
Analog amplifier/receiver
VOLUME
POWER
HEADPHONE
PHONO
TUNER
DVD
CD
AUX 1
AUX 2
FUNCTION
AMP-50 AMPLIFIER
This page only contains suggestions for connection of your Tangent TNR-50. Note that the
accessories in the pictures on this page are not included in the supply.
12
ADJUSTING THE ANTENNA
Adjusting the antenna
As it applies to all other radios, the sound quality depends on the signal strength of the antenna inputs.
The position of the radio in relation to the transmitter thus directly influences the quality of the signal
received. For an optimal result it is therefore very important that you make sure that the radio receives the
best possible antenna signal.
The FM antenna must be adjusted for
the best possible result.
A good tip is to let the antenna end point
in a vertical direction and fix it on a wall.
FM
ANTENNA
AM
FM
ANTENNA
AM
FM
ANTENNA
AM
For an optimal result it is recommended
to install a FM antenna on the roof or on
the loft.
For receiving AM station an AM loop
antenna must be installed. Adjust the
antenna for the best possible reception.
13
OPERATION AND FUNCTIONS
On, Off and standby
1 Turn on the unit by pressing the mains switch.
2 Press the standby button on the remote control to switch to standby
mode. The display will turn off and all functions will be reduced to a
minimum to make sure that the unit uses minimal power. When in standby
mode the unit only reacts to the standby button of the remote control.
3 If you wish to turn off the unit to avoid any power consumption, you must
press the mains switch.
2
TNR-50
RDS
POWER
1
3
PHON
POWER
ST/MO
AM
+
+
PRESET
TUNE
TNR-50 FM/AM TUNER
FM
AUTO TUNE
MEMO
Protect the environment and turn off the unit after use.
RDS and FM/AM
1 As this tuner can receive both normal FM radio
and AM, it features a function that can switch
between the two reception types. To switch
between FM and AM, you must either press the
FM/AM button on the front panel or the FM or AM
buttons on the remote control.
TUNING
FM/AM
2 This tuner features information possibilities on FM
called RDS. To activate this information, you must
press the RDS button on the remote control. The
display will show information about for name of
station, PTY information, Radio text, etc.
AUTOTUNE
MEMORY
-
PRESET
+
ST/MONO
RESET
1
TNR-50
RDS
ST/MO
POWER
AM
+
+
PRESET
TUNE
2
AUTO TUNE
MEMO
14
1
FM
OPERATION AND FUNCTIONS
Tuning
When the unit is turned on for the first time, all settings will be default settings. The settings can be changed
according to your preference. When the unit is turned off the next time, these settings will naturally be saved
as the new default settings. This also applies if you unplug the unit.
TUNING
When the unit has been turned on, channels must be
saved. This is done by means of the autotune
function.
1 To use the autotune function through the front
panel controls, press the AUTOTUNE button. All
available channels on the current tuner band will
be saved.
2 You can also press the AUTOTUNE button on the
remote control.
FM/AM
AUTOTUNE
-
MEMORY
PRESET
+
ST/MONO
RESET
1
TNR-50
RDS
2
POWER
ST/MO
AM
+
+
PRESET
TUNE
FM
AUTO TUNE
MEMO
1 If you want to manual tune a channel, you must
press the tune + or - button on the remote control,
or turn the tuning knob on the front panel. For
every push on the button, the frequency will
change 0,05MHz on FM and 9 Khz on AM.
TUNING
1
FM/AM
2 To store the manually tuned channel, simply press
the Memory button on the front panel or the Memo
button on the remote. The channel will then be
stored on the current preset.
-
MEMORY
PRESET
+
ST/MONO
RESET
TNR-50
RDS
1
2
15
AUTOTUNE
2
POWER
ST/MO
AM
+
+
PRESET
TUNE
FM
AUTO TUNE
MEMO
OPERATION AND FUNCTIONS
Selecting presets
1 Channels that have been saved can be selected
either by means of the Preset + and Preset buttons on the remote control or on the front
panel.
TUNING
1
FM/AM
AUTOTUNE
-
MEMORY
PRESET
+
ST/MONO
RESET
TNR-50
RDS
1
POWER
ST/MO
AM
+
+
PRESET
TUNE
FM
AUTO TUNE
MEMO
Stereo and Mono
1 In some areas not all stations can be recieved
noise free, because it is not possible to get a
strong enough antenna signal.
In this case there will be a lot of noise on some
radio stations.
It is possible to reduce the noise quite a bit by
listening to the radio station in mono in stead of in
stereo. This can make the radio station acceptable
to listen to. Change to mono by pressing the
ST/MO button on the remote or the ST/MONO
button on the front panel. To change back to
stereo again, simply press the button once again.
TUNING
1
FM/AM
AUTOTUNE
-
MEMORY
PRESET
+
ST/MONO
RESET
TNR-50
RDS
POWER
1
ST/MO
AM
+
+
PRESET
TUNE
FM
AUTO TUNE
MEMO
Reset
This tuner can be reset. This is used to delete channel stored in the unit.
Press the RESET button on the front panel to reset the unit.
16
TROUBLESHOOTING
Troubleshooting
PROBLEM
CAUSE/REMEDY
No power when the unit is turned on. - Switch on the electric current at the socket.
- Check that the plug has been correctly inserted into the
socket.
- The internal fuse has blown and must be replaced by a
qualified service technician.
- The power cord has been damaged and must be
replaced.
No sound.
- The unit has not been turned on.
- Incorrect connection to the amplifier.
- No loudspeakers have been connected to the amplifier.
- The TNR-50 has not found any stations.
The display does not show RDS
information.
- The TNR-50 has not found any stations.
- The selected station does not broadcast any information.
- The antenna signal is too poor. See the section on
adjusting the antenna.
17
TECHNICAL DATA
Technical data
RF section:
Tuner bands
FM
AM
87.5-108.0MHz
522-1620KHz
-96dBm type
Sensitivity
Display:
2 lines of 16 characters
LED backlight
Presets
40
Audio outputs
Stereo, 2.5Vpp
48kHz sample rate
16 bit sample resolution
Voltage and power consumption
See back panel
Dimensions (WxDxH)
430 x 290 x 75mm
Weight
4.5 kg
We reserve the right to change the technical data and the design of the product without notice as a result of
further development.
18
Service hotline +45 9641 1599
For further information please visit our website:
www.tangent-audio.com
Item no. 40427