1
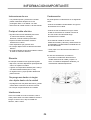
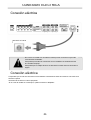
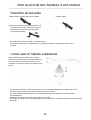
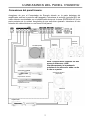
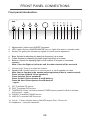
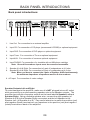
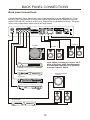
ÍNDICE
ÍNDICE
02
INSTRUCCIONES DE SEGURIDAD
03
CONEXIONES DEL PANEL FRONTAL
08
INFORMACIÓN IMPORTANTE
04
ENTRADAS DEL PANEL TRASERO
09
CONEXIÓN ELÉCTRICA
05
CONEXIONES DEL PANEL TRASERO
10
INSTALACIÓN DEL MANDO A DISTANCIA
06
RESOLUCIÓN DE PROBLEMAS
11
FUNCIONAMIENTO DEL MANDO A DISTANCIA
07
FICHA TÉCNICA
12
02
Instrucciones de seguridad
Un triángulo con el símbolo del rayo avisa al usuario de
que el "voltaje peligroso" sin aislamiento de la carcasa
supone un riesgo de descarga eléctrica.
Un triángulo con el símbolo de exclamación aconseja al
usuario que estudie las instrucciones importantes sobre
el uso y mantenimiento de la unidad que aparecen en el
manual suministrado junto a ésta.
Símbolo para CLASS II (aislamiento doble).
ADVERTENCIA:
PARA REDUCIR EL RIESGO DE INCENDIO O DESCARGA ELÉCTRICA, NO
EXPONGA ESTE EQUIPO A LA LLUVIA NI A LA HUMEDAD. NO ABRA LA
CARCASA YA QUE SU VOLTAJE ES PELIGROSO. SÓLO EL PERSONAL
CUALIFICADO ESTÁ AUTORIZADO PARA DESEMPEÑAR LABORES DE
REPARACIÓN Y SERVICIO.
PRECAUCIÓN:
Si el enchufe del cable de suministro tiene que ser sustituido, es importante que el
nuevo sea idéntico al anterior, o que éste haya sido recomendado por el fabricante.
PARA EVITAR DESCARGAS ELÉCTRICAS, ES IMPORTANTE QUE
INTRODUZCA CORRECTAMENTE EL ENCHUFE EN LA TOMA.
03
INFORMACIÓN IMPORTANTE
Instrucciones de uso
Condensación
- Los paneles superior y trasero de la unidad
pueden calentarse después de un uso
prolongado. Esto no es debido a un fallo.
- Desconecte la unidad cuando no la esté usando.
Se puede producir condensación en los siguientes
casos:
- Cuando se traslada la unidad desde un lugar frío
directamente a uno cálido.
- Cuando se usa la unidad en un lugar donde
acaba de encenderse un radiador o donde el
aire frío del aire acondicionado llega
directamente a la unidad.
Proteja el cable eléctrico
- Siga las instrucciones facilitadas para evitar
un mal funcionamiento, descargas
eléctricas, incendio o daños personales:
- Sujete el enchufe firmemente cuando lo
introduzca en la toma.
- Evite dispositivos que generen calor.
- No coloque objetos sobre el cable de suministro
eléctrico.
- No realice trabajos encima de la unidad ni cambie
el cable de suministro eléctrico.
- Si se utiliza la unidad en verano en una
habitación húmeda y calurosa y anteriormente se
ha trasladado la unidad desde una habitación con
aire acondicionado.
- Si hay vapor o un alto nivel de humedad en la
habitación.
En caso de condensación, la unidad no
funcionará correctamente. Desconecte la
unidad. Desenchufe la unidad y espere 2-3
horas. La unidad se adaptará al ambiente y la
condensación habrá desaparecido.
Situación
No coloque la unidad en los siguientes lugares:
- Bajo el sol, cerca de dispositivos que desprendan
calor o en espacios cerrados.
- Lugares con temperatura elevada (40C o más) o
con alta humedad relativa (90% o más).
- En lugares sucios, ya que pueden dañarse las
partes internas.
No ponga sus dedos ni ningún
otro objeto dentro de la unidad
- Es peligroso tocar las partes del interior y puede
causar daños o lesiones. No abra la carcasa.
- No coloque cuerpos extraños en la unidad.
Interferencia
Colocar la unidad cerca de un televisor, radio o
vídeo puede causar una mala calidad de sonido e
imagen. Si esto ocurre, aleje la unidad del
televisor, radio o vídeo.
04
CONEXIÓN ELÉCTRICA
Conexión eléctrica
220-240V AC~50Hz
No conecte la unidad a la red eléctrica hasta que las conexiones hayan sido
correctamente realizadas.
Compruebe que todas las conexiones se han realizado correctamente antes
de encender el equipo.
Compruebe que el voltaje eléctrico es 220-240V CA 50Hz antes de encender el
equipo.
Conexión eléctrica
Compruebe que el resto de conexiones se ha realizado correctamente antes de introducir el enchufe en la
toma de la pared.
Introduzca el enchufe en la toma apropiada.
Si va a usar la unidad en el extranjero, quizás necesite un adaptador.
05
INSTALACIÓN DEL MANDO A DISTANCIA
Inserción de las pilas
1 Retire la tapa conforme aparece en el dibujo.
3 Retire la tapa.
2 Coloque dos pilas del tipo AAA/R03/UM4 en el
compartimento de pilas. Asegúrese de que la
orientación de las mismas es la adecuada
(vea la imagen debajo).
- No mezcle pilas nuevas y usadas, ni de diferente tipo.
- Si el mando a distancia no se utiliza durante un periodo prolongado, retire las pilas para evitar su
corrosión.
Cómo usar el mando a distancia
Máximo 6m
Dirija el mando al sensor que está en el panel
frontal de la unidad. Cuando se reciba la señal del
mando a distancia, la unidad ejecuta la función
solicitada. El mando funciona a una distancia de 6
metros.
- En ocasiones el mando no funciona cuando hay mucha luz. Deberá desplazar la unidad si esto ocurre.
- El mando puede funcionar mal cuando se utiliza cerca de la unidad.
- No coloque objetos sobre el mando, ya que las baterías pueden descargarse si se pulsa una tecla
prolongadamente.
- Asegúrese de que no hay objetos entre el mando y la unidad.
- No coloque la unidad tras un cristal polarizado ya que puede reducir la distancia máxima de funcionamiento
del mando.
06
FUNCIONAMIENTO DEL MANDO A DISTANCIA
Funciones del mando a distancia
Para HCD30B:
1.
Power (botón de encendido): activa en standby las unidades
HCD30B, HAM50B/HAM75B.
2. Eject (botón de expulsión): abre y cierra la bandeja del disco del
CDP-100
Botones numerados (0,1,2...9~+10): selecciona las pistas en el
HCD30B.
Nota: <la tecla +10 puede ser pulsada mediante 10+(ej. 10,
pulse botón +10 y botón 0; ej. 15, pulse botón +10 ybotón 5
para seleccionar la pista 15), y 10x (ej. 25, pulse dos veces +10
y el botón 5.)
4. Fast forward (Avance rápido): avance rápido en la reproducción del
HCD30B
5. PLAY/PAUSE (Reproducción/pausa): inicia e interrumpe la
reproducción.
6. Skip (Saltar) (>>I) / Next (Siguiente): selecciona la pista siguiente
7. Skip (Saltar) (I<<) / Previous (Anterior): selecciona la pista anterior.
8. REPEAT (Repetición): repite una o todas las pistas de un CD o
USB.
9. Random (Modo aleatorio): las pistas se reproducen en orden
aleatorio.
10. Fast reverse (retroceso rápido): rebobinado durante la reproducción
del HCD30B.
11. TIME (tiempo): pulsando este botón, aparece
- actual track (pista actual): elapsed time
(tiempo transcurrido)
- actual track remaining time (tiempo restante
de la pista actual)
- actual track (pista actual): elapsed time of full disk (tiempo
transcurrido del disco completo)
- actual track (pista actual): remaining time of full disc (tiempo
restante del disco completo)
12. STOP (Parada): detiene la reproducción
3.
Para HAM50B/HAM75B:
13. CD/USB: para activar las unidades HCD30B y HAM50B/HAM75B,
y, cambie del modo de reproductor de CD a reproductor de
USB; posición opuesta.
14. DVD: activa el DVD.
15. SINTONIZADOR: activa el sintonizador.
16. AUX: activa la fuente de Phono.
17. Phono: activa la fuente de Phono.
18. Line In (Entrada de línea): Para activar la entrada de línea (conector
de 3,5 mm en el panel frontal)
19. SPKRS A/B (Altavoces A/B): selector de altavoz, para elegir los
altavoces par-A o par-B.
Nota: existen 4 modos en el botón de selección de altavoz
(también en el mando a distancia):
Pulsar 1ª vez (configuración predeterminada): Control del
altavoz A;
Pulsar 2ª vez: Control del altavoz B;
Pulsar 3ª vez: Control de altavoz A y B, conecta ambos;
Pulsar 4ª vez: Control de altavoz A y B, desconecta ambos.
...repetir...
20. MUTE (Silencio): modo de silencio.
21. Function (Función): ejecuta el menú de HAM50B/HAM75B, para
ajustar el bajo, el agudo y el balance
22. Disminución de volumen: disminuye el volumen
23. Aumento de volumen: aumenta el volumen
Ciertas funciones sólo pueden realizarse mediante el mando a distancia. Ciertas funciones están conectadas a
la fuente de entrada de la señal elegida. Debido a ello puede que algunos botones del mando a distancia no
estén disponibles si no se selecciona la correspondiente fuente de entrada de señal.
07
CONEXIONES DEL PANEL FRONTAL
Entrada del panel frontal:
1.
Conmutador de energía: enciende y apaga la unidad.
2.
LED: la luz se apaga cuando se enciende el HAM50B/HAM75B; en el modo standby se
enciende una luz azul.
3. Sensor: recibe la señal del rayo infrarrojo cuando se opera el mando a distancia.
4. BASS (Bajos): aumenta o disminuye los bajos (baja frecuencia).
5. TREBLE (Agudos): aumenta o disminuye los agudos (alta frecuencia).
6. Balance: selecciona el canal Right (derecho) o Left (izquierdo) de un par de altavoces
conectados.
Nota: si gira el botón hasta su tope izquierdo o derecho, el otro canal no tendrá sonido.
7. Mando del Volumen Aumenta o disminuye el volumen.
8. Speaker A/B (Altavoz A/B): selector de altavoz, para elegir los altavoces par-A o par-B.
Nota: existen 4 modos en el botón de selección de altavoz (también en el mando a distancia):
Pulsar 1ª vez (configuración predeterminada): Control del altavoz A;
Pulsar 2ª vez: Control del altavoz B;
Pulsar 3ª vez: Control de altavoz A y B, conecta ambos;
Pulsar 4ª vez: Control de altavoz A y B, desconecta ambos.
...repetir...
9. CD: activa el DVD.
10. DVD: activa el DVD.
11. TUNER/AUX (Sintonizador/Aux): pulse una vez para activar el SINTONIZADOR; pulse una 2ª
vez para activar la fuente de AUX; ...repetir...
12. PHONO (Fono): activa la fuente de PHONO.
13. Line In (Entrada de línea): activa la fuente de Entrada de Línea.
14. Line In (Entrada de línea): fuente de miniconector de 3,5mm, como reproductor de MPS,
iPod, iPhone, etc.
15. Auriculares: conector de clavija de 6mm.
08
ENTRADAS DEL PANEL TRASERO
Entradas del panel trasero:
1.
Salida de Línea: para conectar un amplificador externo
2.
Entrada de CD: para conectar un reproductor de CD (se recomienda el modelo HCD30B)
o un equipo opcional.
3.
Entrada de DVD: para conectar un reproductor de DVD o un equipo opcional.
4.
Entrada de Sintonizador: para conectar un Sintonizador o un equipo opcional.
5.
Entrada Auxiliar: para conectar el equipo opcional de terceros
6.
Entrada de PHONO: para conectar un plato con un cartucho phono MM
Nota: Las entradas superiores del Tornillo de Tierra deben estar conectadas mientras tanto.
7.
Altavoz A Izquierdo & Derecho: para conectar el par A de altavoces a 4-8 ohm.
8.
Altavoz B Izquierdo & Derecho: para conectar el par B de altavoces a 4-8 ohm.
Nota: Cuando quiera conectar los dos pares de Altavoces. A&B simultáneamente, la
impedancia máxima de los altavoces debe ser de 8 ohm o superior.
9. Entrada CA: para conexión de voltaje del suministro.
Salidas de Altavoz Izquierdo y Derecho
Para no dañar el amplificador, compruebe que NO está conectado a una salida CA cuando
conecte o desconecte el cable del altavoz a las salidas del altavoz. El amplificador tiene dos
pares de salidas de altavoz en la parte posterior, con las indicaciones Speaker Left (Altavoz
Izquierdo) y Speaker Right (Altavoz Derecho). Utilice el cable de altavoz apropiado y
conecte el altavoz derecho (del Altavoz A o B) a los conectores del Altavoz Derecho y el
altavoz izquierdo a los conectores del Altavoz Izquierdo (del Altavoz A o B). Es importante
que los terminales negativo (negro) y positivo (rojo) de sus altavoces coincidan con los
terminales positivo (rojo) y negativo (negro) del amplificador.
09
CONEXIONES DEL PANEL TRASERO
Conexiones del panel trasero:
Asegúrese de que el Conmutador de Energía situado en la parte delantera del
amplificador está en la posición off (apagado). Introduzca el enchufe (enchufe IEC) del
cable eléctrico suministrado con el amplificador dentro de la toma (ENTRADA AC) en la
parte posterior de la unidad. Asegúrese de que está bien ajustado. Introduzca el otro
extremo del cable eléctrico en una toma CA de pared.
Speaker B
(Altavoz B)
Speaker A
(Altavoz A)
Turntable (Plato)
R
R
L
Nota: Cuando desee conectar los dos
pares de Altavoces. A&B
simultáneamente, la impedancia
máxima de los altavoces debe ser de
8 ohm o superior.
VCR
Sintonizador DAB/FM
Subwoofer eléctrico
(Opcional)
Reproductor de DVD
Reproductor de CD
Altavoces
Amplificador
10
L
RESOLUCIÓN DE PROBLEMAS
PROBLEMA
CAUSA/SOLUCIÓN
El amplificador está encendido
pero no tiene energía.
- Conecte la unidad a la toma de corriente eléctrica.
- Compruebe que el enchufe se ha introducido
correctamente en la toma.
- El fusible interno se ha fundido y un técnico de
servicio autorizado debe sustituirlo.
No hay sonido.
- El cable de electricidad está dañado y debe ser
sustituido.
- El amplificador no ha sido encendido.
-El control de volumen está en el mínimo.
- Los cables del altavoz no han sido conectados
correctamente.
- Ha seleccionado la fuente de entrada equivocada.
- No ha conectado la fuente de entrada.
Sólo hay sonido en un canal.
- Los cables del altavoz o de entrada de audio
están dañados o han sido conectados de modo
incorrecto.
- La fuente de entrada está defectuosa.
- Los altavoces están defectuosos.
Zumbido fuerte.
- Los cables de entrada de audio están dañados o
han sido conectados de modo incorrecto.
- El cable de tierra del tocadiscos no ha sido
conectado.
- El brazo del tocadiscos está defectuoso.
Baja intensidad de bajos y
mala calidad del efecto
estéreo
- La conexión del altavoz está fuera de fase.
Compruebe que los polos negativo y positivo han sido
conectados correctamente, tanto en la parte
posterior del amplificador como en la parte posterior
del altavoz.
Sonido distorsionado
- Algún cable conductor del cable del altavoz está en
contacto con otro, lo que produce la distorsión del
sonido.
- El volumen está demasiado alto.
La unidad no cambia
entre modos de entrada
- El amplificador está defectuoso y debe repararlo un
técnico cualificado.
11
FICHA TÉCNICA
Para HAM50B:
Para HAM75B:
Entrada de PHONO:
Impedancia de entrada
Sensibilidad de entrada
47 KOhm
10.0 mV
Entrada de Phono:
Impedancia de entrada
Sensibilidad de entrada
47 KOhm
10.0 mV
Entradas de nivel de línea
Impedancia de entrada
Sensibilidad de entrada
47 Kohm
400 mV
Entradas de nivel de línea
Impedancia de entrada
Sensibilidad de entrada
47 Kohm
500 mV
Salidas de nivel de línea
Salida de línea de impedancia de salida
Auriculares
10 KOhm
32 Ohm
Salidas de nivel de línea
Salida de línea de impedancia de salida
Auriculares
10 KOhm
32 Ohm
Nivel máximo de salida de salida de línea
Auriculares
250 mV
2.0 V
Nivel máximo de salida de salida de línea
Auriculares
Control de tono
250 mV
2.0 V
Control de tonalidad
Agudos:
+/- 14dB
Agudos:
+/- 14dB
Bajos
+/- 14dB
Bajos
+/- 14dB
Potencia de salida
2 x 30 W en 4 Ohm
Respuesta de frecuencia:
10Hz a 80KHz (-3dB)
Distorsión
Respuesta de frecuencia:
<0,2%
Relación señal-ruido>
Dimensiones:
Potencia de salida
10Hz a 80KHz (-3dB)
Distorsión
80dB
<0,2%
Relación señal-ruido>
H70 x W430 x D285 mm
Peso neto:
2 x 50 W en 4 Ohm
Dimensiones:
5,7kg
80dB
H70 x W430 x D285 mm
Peso Neto:
Accesorios suministrados:
1. Manual de usuario
2. Distribución Eléctrica
3. Mando a distancia
Nos reservamos el derecho a modificar la ficha técnica y el diseño del producto sin previo aviso como
consecuencia de futuras mejoras del producto.
12
6,3 kg
CONTENTS
CONTENTS
02
SAFETY PRECAUTIONS
03
FRONT PANEL CONNECTIONS
08
IMPORTANT INFORMATION
04
BACK PANEL INTRODUCTIONS
09
CONNECTION TO THE MAINS
05
BACK PANEL CONNECTIONS
10
REMOTE CONTROL INSTALLATION
06
TROUBLESHOOTING
11
REMOTE CONTROL OPERATIONS
07
TECHNICAL DATA
12
02
SAFETY PRECAUTIONS
A triangle with a lightning symbol draws the user's
attention to "dangerous voltage" without insulation in the
cabinet which may be high enough to entail a risk of
electric shock.
A triangle with an exclamation mark draws the user's
attention to important instructions for use and
maintenance in the accompanying manual, which should
be studied.
A symbol for CLASS II (double insulation)
WARNING:
TO MINIMISE THE RISK OF FIRE OR ELECTRICAL SHOCK, DO NOT EXPOSE
THE UNIT TO RAIN OR MOISTURE. DO NOT OPEN THE CABINET AS IT
CONTAINS DANGEROUS VOLTAGE. ONLY QUALIFIED TECHNICIANS ARE
ALLOWED TO CARRY OUT REPAIR AND SERVICE.
CAUTION:
if the plug of the power cord needs to be replaced, it is important that the
replacement is identical to the plug to be replaced, or that the new plug has been
recommended by the manufacturer
TO AVOID ELECTRICAL SHOCK, IT IS IMPORTANT TO INSERT THE PLUG
CORRECTLY INTO THE SOCKET.
03
IMPORTANT INFORMATION
Handling instructions
Condensation
- The top and back panel of the unit may become
warm after prolonged use. This is not due to a
defect.
- Turn off the power when the unit is not used.
Condensation may occur in the following cases:
- When the unit is moved directly from a cold to a
warm place.
- When the unit is used in a room where the
radiator has just been switched on or a place
where the cold air from the air-conditioning
system is directed at the unit.
Protect the power cord
- Follow the instructions below to prevent
abnormal operation, electrical shock, fire or
personal injury:
- Hold the plug firmly when inserting it into the
socket.
- Avoid heat-producing devices.
- Do not place objects on the power cord.
- Do not carry out service work on or change the
power cord.
- If the unit is used in the summer in a warm and
humid room just after it has been moved from an
air-conditioned room.
- If there is steam or a high level of humidity in the
room.
In case of condensation, the unit will not work
properly. Turn off the unit. Unplug the unit and
leave it for 2-3 hours. The unit will then have
adapted to the environment and any
condensation will have disappeared.
Positioning
Do not place the unit in any of the fol. places:
- In sunlight, close to heat-producing devices or in
an enclosed rack.
- In places with high temperatures (40C or more)
or high relative humidity (90% or more).
- In dirty places as some internal parts may be
damaged.
Do not put your fingers or any
other objects into the unit
- Touching the internal parts is dangerous and
may cause injury or damage. Do not open the
cabinet.
- Do not place any foreign matter in the unit.
Interference
Placing the unit near a television set, radio or video
player may cause poor picture and sound quality.
In that case, move the unit further away from the
television set, radio or video player.
04
CONNECTION TO THE MAINS
Connection to the mains
HAM75B
150W
USE ONLY WITH 250V FUSE
FUSE:T2A L 250V
220-240V AC~50Hz
Do not turn on the power before all connections have been made correctly.
Check that all connections have been made correctly before turning on the
power.
Check that the mains voltage is 220-240V AC50Hz before turning on the power.
Connection to the mains
Check that all other connections have been made correctly before inserting the mains plug into the wall
socket.
Then insert the plug into a suitable socket.
If the unit is to be used abroad, you may need an adapter.
05
REMOTE CONTROL INSTALLATION
Installation of batteries
1 Remove the cover as illustrated.
3 Replace the cover.
2 Position two batteries of the type AAA/R03/UM4
in the battery compartment. Make sure that the
orientation of the batteries is correct (see
drawing at bottom).
- Do not mix new and old batteries and do not use different types of batteries.
- If the remote control is not used for prolonged periods, remove the batteries from the remote control to
avoid corrosion.
Using the remote control
Direct the remote control at the sensor on the front
panel of the unit. When the remote control signal is
received, the unit reacts accordingly. The remote
control works within a range of 6 metres.
HA M7 5B
HE AD PH ON E
- Sometimes the remote control does not work well in strong light. You may have to move the unit if it is a
problem.
- Malfunction may occur if other remote controls are used near the unit.
- Do not place any objects on the remote control, as the batteries may become flat if a key is depressed
constantly.
- Make sure that there are no obstacles between remote control and unit.
- Do not position the unit behind tinted glass as it may reduce the maximum range of the remote control.
06
REMOTE CONTROL OPERATIONS
Remote control functions
For HCD30B operations:
2
1
Note: +10 key could be pressed by 10+(e.g.10, press +10,
button and 0 button; e.g.15, press +10 button
and 5 button to select track 15), and 10x (e.g.25, by 2 times
pressing +10 and 5 button.)
3
4
0
5
7
RANDOM
9
TIME
STOP
11
6
8
10
12
CD/USB
14
13
15
16
PHONO
4. Fast forward: Fast forwards in playback on HCD30B
5. Play/Pause:Starts and pause playback.
6. Skip (>>I) / Next: Selects the next track
7. Skip (I<<) / Previous: Select the previous track.
8. Repeat: Repeat a single or all tracks on CD disc or USB.
9. Random: All tracks are played in random order.
10. Fast reverse: Rewinds in playback on HCD30B.
11. TIME: Press the key by times, shows
- actual track : elapsed time
- actual track : remaining time
- actual track : elapsed time of full disk
- actual track : remaining time of full disc
12. Stop: Stop playback
LINE IN
17
18
19
20
-----------------------------------------------------------------------------------
For HAM50B/HAM75B operations:
21
22
1. Power: Set HCD30B, HAM50B/HAM75B into standby.
2. Eject: Open and close the disc tray on CDP-100
3. Number buttons (0,1,2...9 ~+10): selects tracks on
HCD30B.
23
13. CD/USB: To activate HCD30B and HAM50B/HAM75B, and,
switch the CD playback to USB playback; oppositely switch.
14. DVD: To activate DVD source.
15. TUNER: To activate Tuner source.
16. AUX: To activate Phono source.
17. PHONO: To activate Phono source.
18. LINE IN: To activate line in source (3.5mm jack in front panel)
19. SPKRS A/B: Speaker selector, to choose pair-A or
pair-B speakers to listen.
Note: there's 4 modes in the speaker selecting button (either in
remote control):
Press 1st time (Default): Drive speaker A;
Press 2nd time: Drive speaker B;
Press 3rd time: Drive speaker A and B both on;
Press 4th time: Drive speaker A and B both off.
...again...
20. Mute: Mutes the sound.
21. Function: Enters the menu on HAM50B/HAM75B, where it
is possible to adjust bass, treble and balance.
22. Volume decrease: Turns down the volume.
23. Volume increase: Turns up the volume.
Some of the functions of the unit can only be performed by means of the remote control. Some functions are
connected with the selected signal input source. Some buttons on the remote control may therefore not be
available if the corresponding signal input source has not been selected.
07
FRONT PANEL CONNECTIONS
Front panel introduction:
HAM75B
HEADPHONE
1 2
3
4
5
6
7
8
9
10
10
11 12
13 14
1.
2.
3.
Mains switch: Used to turn ON/OFF the power.
LED: Lights off when HAM50B/HAM75B turns on, lights blue when in standby mode.
Sensor: For getting the infrared ray signals of remote control operations.
4.
5.
6.
Bass: Selects for adjusting the bass (low frequency) up or down.
Treble: Selects for adjusting the treble (high frequency) up or down.
Balance: Selects for adjusting Right or Left channel of one pair of connected
speakers.
Note: if turn the Right or Left to the end, the other channel will be no sound.
7.
8.
Volume knob: Turns up or down the volume..
Speaker A/B: Speaker selector, to choose pair-A or pair-B speakers to listen.
Note: there's 4 modes in the speaker selecting button (either in remote control):
Press 1st time (Default): Driver speaker A;
Press 2nd time: Driver speaker B;
Press 3rd time: Driver speaker A and B both on;
Press 4th time: Driver speaker A and B both off.
...again...
9. CD: To activate CD source.
10. DVD: To activate DVD source.
11. TUNER/AUX: Press 1st time to activate TUNER source; press 2nd time to activate
AUX source; ...again...
12. PHONO: To activate PHONO source.
13. LINE IN: To activate LINE IN source.
14. Line in: 3.5mm mini jack source, like MP3 player, iPod, iPhone, etc.
15. Headphone: 6mm jack connector.
08
BACK PANEL INTRODUCTIONS
Back panel introductions:
HAM75B
150W
USE ONLY WITH 250V FUSE
FUSE:T2A L 250V
1
4
2
3
5
7
6
8
9
1.
Line Out: For connection to an external amplifier
2.
Input CD: For connection of CD player (recommend HCD30B) or optional equipment.
3.
Input DVD: For connection of DVD player or optional equipment.
4.
Input Tuner: For connection of Tuner or optional equipment
5.
Input AUX: For connection of someone optional equipment
6.
Input PHONO: For connection of a turntable with an MM phono cartridge
Note: Ground Screw above inputs must be connected meanwhile.
7.
8.
Speaker.A Left & Right: For connection to A pair of loudspeakers at 4-8 ohm.
Speaker.B Left & Right: For connection to B pair of loudspeakers at 4-8 ohm.
Note: When you want to connect the 2 pairs of Speaker. A&B simultaneously,
the maximum impedance of speakers must be 8 ohm or above.
9. AC Input: For connection of mains voltage.
Speaker Outputs Left and Right
To avoid damage to the amplifier, make sure it is NOT plugged into an AC outlet
while connecting up or disconnecting speaker wire to the speaker outputs. The
amplifier has two pair of speaker outputs on the back labeled Speaker Left and
Speaker Right. Using a suitable speaker wire, connect the right speaker (of
Speaker A or B) to the Speaker Right connectors and the left speaker to the
Speaker Left (of Speaker A or B) . Pay careful attention to match the positive (red)
and negative (black) terminals on your speakers to the positive (red) and negative
(black) terminals on back of the amplifier.
09
BACK PANEL CONNECTIONS
Back panel connections:
Check that the Power Switch on front of the amplifier is in the off position. Push
the plug (IEC line socket) of the power cable supplied with the amplifier into the
socket (AC INPUT) on back of the unit. Make sure it is pressed in firmly. Plug the
other end of the power cable into an AC wall outlet.
HAM75B
150W
US E ON LY W IT H 25 0V F US E
FUSE:T2A L 250V
Speaker B
Turntable
Speaker A
R
R
L
L
Note: When you want to connect the 2
pairs of Speaker. A&B simultaneously,
the maximum impedance of speakers
must be 8 ohm or above.
VCR
DAB/FM Tuner
Powered subwoofer
(Optional)
PO WE R
DVD Player
CD Player
HC D3 0B
Speakers
Slave amplifier
PO WE R
10
TROUBLESHOOTING
PROBLEM
No power when the amplifier is
turned on.
No sound.
There is sound in one channel
only.
High buzzing.
Weak bass and poor stereo
perspective
Distortion of sound
The unit does not switch
between input modes
CAUSE/REMEDY
-Switch on the electric current at the socket.
-Check that the plug has been correctly inserted into
the socket.
-The internal fuse has blown and must be replaced
by a qualified service technician.
-The power cord has been damaged and must be
replaced
-The amplifier has not been turned on.
-The volume control is set at a minimum.
-The speaker cables have not been correctly
connected.
-A wrong input source has been selected.
-No input source has been connected.
-The audio input cables or speaker cables
have been incorrectly connected or damaged.
-The input source is defective.
-The speakers are defective.
-The audio input cables have been incorrectly
connected or damaged.
-The ground cable for the record player has not been
connected.
-The record player pick-up is defective.
-The speaker connection is out of phase. Check that
the positive and negative poles have been correctly
connected, both at the back of the amplifier and at
the back of the speaker.
-Some of the conductor wires of the speaker cable
are in contact with each other which causes
distortion.
-The volume is set too high.
- The amplifier is defective and should be serviced by
a qualified technician.
11
TECHNICAL DATA
For HAM75B:
For HAM50B:
Phono input
Input impedance
Input sensitivity
47 KOhm
10.0 mV
Phono input
Input impedance
Input sensitivity
47 KOhm
10.0 mV
Line level inputs
Input impedance
Input sensitivity
47 Kohm
400mV
Line level inputs
Input impedance
Input sensitivity
47 Kohm
500mV
Line level outputs
Output impedance Line out
Headphones
Maximum output level Line out
Headphones
Tone control
Treble
Bass
Line level outputs
Output impedance Line out
Headphones
10 KOhm
32 Ohm
250mV
2.0 V
Maximum output level Line out
Headphones
Tone control
Treble
Bass
+/- 14dB
+/- 14dB
Output power
2 x 30 Watt at 4 Ohm
Output power
10 KOhm
32 Ohm
250mV
2.0 V
+/- 14dB
+/- 14dB
2 x 50 Watt at 4 Ohm
Frequency response: 10Hz to 80KHz (-3dB)
Frequency response: 10Hz to 80KHz (-3dB)
Distortion:
<0.2%
Distortion:
<0.2%
Signal/noise ratio:
>80dB
Signal/noise ratio:
>80dB
Dimensions:
H70 x W430 x D285 mm
Dimensions:
H70 x W430 x D285 mm
Net Weight:
5.7kg
Net Weight:
6.3 kg
Supplied Accessories:
1. User manual;
2. Mains Lead;
3. Remote Control.
We reserve the right to change the technical data and the design of the product without notice as a result of
further development.
12