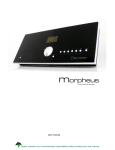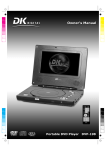
1
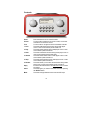
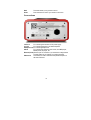
1
UK - USER MANUAL
Contents
Internet Radio Quickstart Guide
7
What you need before you can use your Internet radio
Controls
Connections
Steps for connecting your radio to your wireless network
Step 1 - Power up the radio
Step 2 - Scan for a wireless network connection
Step 3 - Connect to the wireless network
Steps for connecting your radio to your wired network
Choosing a radio station to listen to
<Location>
<Genre>
<Search>
Using your radio for tuning into FM stations
Changing the volume
Returning to the menu while a station is playing
Storing a radio station in a preset
Playing a preset radio station
Requesting a station that is currently unavailable
Stations which enable you to choose what you listen to
Setting the clock
Setting the alarm
Setting the sleep timer
7
8
9
10
10
10
11
12
13
13
14
14
15
15
15
16
16
16
16
17
18
20
Media Player Quickstart Guide
21
Set up your Windows PC to allow the radio to access your audio files via
Windows Shares
Locate the shared audio files using the radio
Listening to a single shared track
Listening to a complete shared album
Queuing up tracks for playback later
Queuing up albums for playback later
Controlling playback
21
21
22
22
22
22
23
5
Browsing the list of tracks currently queued up for playback
23
Removing tracks from the queue
23
Playing tracks in random order
23
Playing tracks in the queue repeatedly
24
Set up a Windows PC to allow the radio to access your audio files via a UPnP
server
24
Locating and playing media files using the radio and UPnP
26
Browsing the list of tracks currently queued up for playback
27
Queuing up UPnP tracks for playback later
27
Queuing up albums for playback later
27
Controlling playback
27
Removing tracks from the queue
28
Playing tracks in random order
28
Playing tracks in the queue repeatedly
28
Configure menu
29
Choosing the option you want from the Configure menu
<Network Config>
<Version>
<Upgrade Firmware>
<Language>
<Factory Reset>
<Register>
<Clock setup>
<Backlight>
<Wifi Strength>
29
29
29
29
30
30
30
30
30
30
Configuring ‘My Stuff’
31
Registering an account on Reciva’s website
Configuring ‘My Stations’
Configuring ‘My Streams’
31
31
32
Troubleshooting
33
Software licence information
34
Specifications
35
6
Internet Radio Quickstart Guide
What you need before you can use your Internet
radio
Before you can use your Internet radio, you need the following:
• A broadband Internet connection.
• A wireless access point (Wi-Fi) connected to your broadband Internet,
preferably via a router.
• If your wireless network is configured to use Wired Equivalent Privacy
(WEP) or Wi-Fi Protected Access (WPA) data encryption then you
need to know the WEP or WPA code so you can get the Internet radio
to communicate with the network.
The Internet radio should work anywhere within up to 30 metres of the wireless
access point depending on the wireless router.
Before you continue, make sure that your wireless access point is powered up
and connected to your broadband Internet. To get this part of the system
working you must read the instructions supplied with the wireless access point.
7
Controls
Power
Volume
Tune
1 / Prev
2 / Play
3 / Next
4 / Shuffle
5 / Stop
6 / Browse
Reply
Alarm
Mode
Press this button to turn on and off the radio
Turn this button clockwise to turn up the volume, and counter
clockwise to turn down the volume.
Turn this button to navigate in menus and between channels.
This button selects the previous track during media player
mode. In radio mode it selects preset number one.
This button starts playback during mediaplayer mode. In radio
mode it selects preset number two.
This button selects the next track during media player mode. In
radio mode it selects preset number three.
This button starts shuffle mode in media player mode. In radio
mode it selects preset number four.
This button stops playback during media player mode. In radio
mode it selects preset number five.
This button allows you to browse the shared files during media
player mode. In radio mode it selects preset number six.
For future interactive features. See www.reciva.com for further
information.
This button gives you access to the alarm menu after pressing
the SELECT button.
This button changes between radio mode and AUX input.
8
Back
Select
This button allows you to go back in menus.
Press this button to confirm your choices in menus etc.
Connections
12V DC in
Line out
Headphone out
AUX in
For connecting the included 12V DC power supply.
For connecting the radio to an external amplifier.
For connecting headphones.
For connecting an external sound source, like a MP3 player,
Mobile phone, CD player, etc.
Ethernet (RJ-45) Use the input for connection if you would like to intergrade the
Tangent Quattro to your network via a wired connection.
FM antenna
This antenna is used to obtain the best possible reception on
the built in FM tuner.
9
Steps for connecting your radio to your wireless
network
Step 1 - Power up the radio
Plug the cable from the mains adapter into the socket labelled 12V DC on the
back of the radio.
CAUTION: Use only the mains adapter supplied with the radio. Connecting a
power supply with a different rating will cause permanent damage to the radio
and may be hazardous.
The display on the front of the radio will light up and say:
Tangent
Quattro
Reciva enabled
ARM powered
After a few seconds, this will change to show:
< Scan for networks
>
Step 2 - Scan for a wireless network connection
When the display says <Scan for networks>, press the SELECT button.
(Note: if you make a mistake at any point, press the BACK button to go back to
the previous screen.)
The radio will now scan for all available wireless networks and will display:
Scanning
IIIIIIIIIIIIIIIIII
If it can’t find one then the display will say:
No Wireless
Networks Found
If this happens then you will have to get your wireless access point working - see
the instructions supplied with it.
When the radio finds your wireless network, it displays the ESSID for the access
point on the screen - this is a name that is allocated to the access point by the
person who set up the network - for example:
10
<
My Home Network
>
It is possible, and in some locations highly likely, that your radio will find more
than one wireless access point, in which case you can choose which one you
want to connect to. Turn the TUNE knob on the radio to see the ESSID for each
access point the radio has found.
Step 3 - Connect to the wireless network
When the ESSID for the access point you want to connect to is displayed on the
screen, press the SELECT button.
If your network is not configured to need an encryption code, the screen should
say:
Connecting to
network
Then:
Network OK
If the screen displays either:
Enter WEP key
Or:
Enter WPA key
Then the network is using one of the encryption systems: Wired Equivalent
Privacy (WEP) or Wi-Fi Protected Access (WPA). You therefore need to enter
the correct WEP or WPA code into the radio to get it to communicate with your
network.
Only the person who set up the network in the first place knows this code; if that
person is not you then you need to find out what it is.
After 3 seconds, the display goes into the code entry mode. To enter the code,
use the TUNE knob to select each character of the code in turn, pressing the
11
SELECT button after each character. Note that WEP and WPA codes are
sensitive to upper and lower case characters so you must enter them exactly.
After the final character, use the TUNE knob to select the END character and
press the SELECT button.
The radio should now be able to connect to the network.
Steps for connecting your radio to your wired
network
For connection via a wired network, simply plug in the Ethernet cable from your
switch or hub before you connect the radio to power. The radio will always
prioritize a wired network in front of a wireless network if it is available.
The RJ-45 connecter has two LEDs near the port that shows the status of the
connection. The Green LED indicates if a live connection is present. The yellow
LED indicates if thare are any on going traffic on the wired connection.
If you wish to make sure the radio only will attempt to connect to either a wired or
a wireless network, you can lock it to use only a wired or wireless connection.
1. Press the SELECT button to return to the top-level menu.
(Note: if you make a mistake at any point, press the BACK button to
go back to the previous screen.)
<
2.
<
3.
<
Stations
>
Turn the TUNE button until the display says < Configure > and press
SELECT to confirm.
Configure
>
Turn the TUNE button until the display says < Network Config > and
press SELECT to confirm.
Network Config
>
12
4.
<
Turn the TUNE button until the display says < Wired/Wireless > and
press SELECT to confirm.
Wired/Wireless
5.
>
Now it is possible to choose between Auto, Wired Only and Wireless
Only.
Choosing a radio station to listen to
1.
<
2.
3.
4.
5.
Press the SELECT button to return to the top-level menu.
(Note: if you make a mistake at any point, press the BACK button to
go back to the previous screen.)
Stations
>
If the screen does not say < Stations > as shown above, turn the
TUNE knob until it does.
Press the SELECT button.
Turn the knob to choose from <Location> , <Genre> or <Search>.
<Location> enables you to choose from the radio stations provided by
any country which you choose from a list.
<Genre> enables you to choose radio stations according to their
content, for example Classic Rock, Sport, News, etc.
<Search> enables you to enter a name or parts of a name of a station,
and the radio will then find the station for you.
Press the SELECT button to choose the option you want.
<Location>
1. Turn the TUNE knob until the display shows the region you want,
2. Press the SELECT button.
3. Turn the TUNE knob until the display shows the country you want.
4. Press the SELECT button.
5. Turn the TUNE knob to choose between [All Stations] or [By Genre]
6. Press the SELECT button.
7. Turn the TUNE knob until the display shows the station you want to
listen to.
13
8.
Press the SELECT button and wait until the radio connects to that
station.
Note that some radio stations do not broadcast 24 hours per day, and some
stations are not always on-line.
If this station has on-demand content (that is, it gives the option of listening to
programmes which have already been broadcast), see “Stations which enable
you to choose what you listen to”.
<Genre>
1. Turn the TUNE knob until the display shows the type of content you
want, then press the SELECT button.
2. Turn the TUNE knob to choose between [All Stations] or [By Location]
3. Press the SELECT button.
4. Turn the TUNE knob until the display shows the station you want to
listen to.
5. Press the SELECT button and wait until the radio connects to that
station.
Note that some radio stations do not broadcast 24 hours per day, and some
stations are not always on-line.
If this station has on-demand content (that is, it gives the option of listening to
programmes which have already been broadcast), see “Stations which enable
you to choose what you listen to”.
<Search>
1. Turn the TUNE knob until the display shows <Search>, then press the
SELECT button.
2. Turn the TUNE knob to enter the name of the station you would like to
find. Confirm each letter with the SELECT button.
3. Select END and press the SELECT button.
4. The radio will find the stations that matches your search criterias.
5. Turn the TUNE button to select your preferred station.
6. Press the SELECT button and wait until the radio connects to that
station.
Note that some radio stations do not broadcast 24 hours per day, and some
stations are not always on-line.
If this station has on-demand content (that is, it gives the option of listening to
programmes which have already been broadcast), see “Stations which enable
you to choose what you listen to”.
14
Using your radio for tuning into FM stations
Your radio supports an FM tuner with RDS, so you will be able to access
standard FM stations from it.
1.
You can access the radio’s FM tuner by pressing the ‘Mode’ button
twice (pressing the button once will cause the radio to play audio from
its auxiliary input). Pressing the ‘Mode’ button a third time will cause
the radio to leave its FM tuner state and become and Internet radio
again.
You can also access the FM tuner by selecting the ‘Tuner’ menu item
from the radio’s main menu.
2.
Whilst the radio is in its FM tuner state, it will display what FM
frequency it is currently tuned into. Turning the rotary encoder
clockwise will increase the FM frequency the radio is tuned into and
turning it anticlockwise will decrease the frequency.
3.
Press and hold down the SELECT button to allow the radio to search
for working FM frequencies that it can detect. The radio will continue to
scan through all its available FM frequencies until it finds one that is
used by a working station.
4.
To save an FM frequency to the radio’s memory, press and hold down
a preset button in the same way that you would save an Internet
station to a preset.
5.
To access a saved FM frequency, simply press the preset button
assigned to the saved frequency.
Changing the volume
Whilst a radio station is playing and is displayed on the radio’s screen, you can
change the volume simply by turning the VOLUME knob. This button will be
active at all times.
Returning to the menu while a station is playing
When the Internet radio is playing a radio station it will display the station’s name
and bit rate. You can return to the radio’s menu section at any time by either
pressing the SELECT button – which will take you to the ‘Stations’ menu - or the
BACK button to return to the previous menu item.
15
Storing a radio station in a preset
Whilst a radio station is playing, hold down one of the preset buttons (numbered
1 to 6) until the screen says
Assigned to
Preset #
Where # is the number of the button you held down.
Playing a preset radio station
When a radio station is playing, briefly press one of the preset buttons, 1 to 5, for
the station you want. (Note: do not hold the button down - if you do then the
station currently playing will overwrite the one stored in the preset; be careful).
Requesting a station that is currently unavailable
If you want to listen to a particular radio station which is currently not available
online, you can visit the Reciva website at http://www.reciva.com/ and put in a
request to add the station to the list.
Stations which enable you to choose what you
listen to
Some radio stations can provide a number of options associated with their
station; for example, some stations enable you to listen to programmes that have
already been broadcast. When you select a radio station that has this facility, the
station does not start playing immediately, but instead the display shows:
<
Live
>
1.
2.
Turn the TUNE knob to choose <Live> or <On Demand>, then press
the SELECT button.
If you choose <Live> then the radio plays the current output from this
station as normal.
If you choose <On Demand> then more screens are displayed where
you choose what you want to listen to.
What is displayed will depend on the station you have chosen - the
following steps are only a guide.
When you choose <On Demand>, the display shows the names of the
programmes. Turn the TUNE knob to choose the program you want,
then press the SELECT button.
16
3.
4.
5.
6.
When you have chosen the programme you want to listen to, either it
will just start playing, or the display may show a list of days for you to
choose from - use the TUNE knob to set the day the programme was
broadcast, then press the SELECT button.
After you have chosen the day, you may be able to choose the Start
Time. Set the Start Time using the TUNE knob and press the SELECT
button.
Programmes which enable you to choose the time also enable you to
fast-forward and rewind to the part you want while the radio is playing.
When you press the 1 / PREV or 3 / NEXT button, the elapsed time
that the programme has been playing is displayed. You can now turn
the TUNE knob to change this time. You can also use the 1 / PREV or
3 / NEXT buttons to adjust the time. When you press the SELECT
button again, the programme will play from that point.
Once the Internet radio is playing a programme that allows you to
choose its start time, the radio’s preset buttons become playbackcontrol buttons for the stream; e.g. you can press 2 / PLAY at any time
to pause the stream, and then press PLAY to resume playing.
Setting the clock
1.
2.
<
Press the SELECT button. (Note: if you make a mistake at any point,
press the BACK button to go back to the previous screen.)
Turn the TUNE knob until the display says <Configure>.
Configure
>
3.
4.
Press the SELECT button.
Turn the TUNE knob until the display says <Clock setup>.
Clock Setup
>
5.
Turn the TUNE knob until the display says <Clock Format>.
Clock format
>
6.
Press the SELECT button. Choose between 24 hour format and 12
(AM/PM) format. Confirm your selection by pressing the SELECT
button.
Clock Format
24 12
Turn the TUNE knob until the display says <Set Time>.
<
<
7.
17
<
Set Time / Date
>
8.
Press the SELECT button.
Set Time
14:03
9. Turn the TUNE knob until the hour setting is correct, then press the
SELECT button.
Set Time
15:03
10. Turn the knob until the minute setting is correct, then press the
SELECT button.
Time Set:
15:06
The display says Time Set with the new time shown beneath for 3 seconds, then
returns to the radio station display.
Setting the alarm
1.
2.
<
Press the ALARM button. (Note: if you make a mistake at any point,
press the BACK button to go back to the previous screen.)
Turn the TUNE knob until the display says <Set Alarms>.
Set Alarms
>
3. Press the SELECT button.
<1 OFF 00:00 Sunday>
4.
5.
6.
Turn the knob to swap between <1>,<2>,<3>,<4>,<5> and <Disable
all> and press the SELECT button. If you choose <Disable all> then
the alarms will be turned off. The display says All Alarms disabled for 3
seconds, then returns to the radio station display.
All Alarms
disabled
If you choose one of the numbers between 1 and 5 then the display
enables you to set the time for the alarm.
Set Alarm
15:06
Turn the TUNE knob until the hour setting is correct, then press the
SELECT button.
18
Set Alarm
07:06
7. Turn the TUNE knob until the minute setting is correct, then press the
SELECT button.
Alarm Set:
07:45
8. Turn the TUNE knob to choose between ONCE, EVERY DAY,
WEEKLY, WEEKDAYS and WEEKENDS.
• If you choose ONCE, you must choose which weekday you want the
alarm to be active. Confirm your choice by pressing SELECT. Then
you must choose if you want the alarm to be a buzzer, the radio station
that you are currently listening or a radio station assigned to a preset.
Confirm your choice by pressing SELECT. The display will show
<Alarm set>
<
Once
>
If you choose EVERY DAY the alarm will start all days of the week on
the selected time. Confirm your choice by pressing SELECT. Then you
must choose if you want the alarm to be a buzzer, the radio station that
you are currently listening or a radio station assigned to a preset.
Confirm your choice by pressing SELECT. The display will show
<Alarm set>
• If you choose WEEKLY the alarm will start every week on the day you
will select after woods. Confirm your choice by pressing SELECT.
Then you must choose if you want the alarm to be a buzzer, the radio
station that you are currently listening or a radio station assigned to a
preset. Confirm your choice by pressing SELECT. The display will
show <Alarm set>
<
Weekly
>
•
•
If you choose WEEKDAYS the alarm will start Monday through Friday
every week on the selected time. Confirm your choice by pressing
SELECT. Then you must choose if you want the alarm to be a buzzer,
the radio station that you are currently listening or a radio station
assigned to a preset. Confirm your choice by pressing SELECT. The
display will show <Alarm set>
19
<
Weekdays
>
If you choose WEEKENDS the alarm will start every Saturday and
Sunday of the week on the selected time. Confirm your choice by
pressing SELECT. Then you must choose if you want the alarm to be
a buzzer, the radio station that you are currently listening or a radio
station assigned to a preset. Confirm your choice by pressing
SELECT. The display will show <Alarm set>
Weekends
>
•
<
The display says Alarm Set with the time of the alarm shown beneath for 3
seconds and then returns to the radio station display. Note: When the alarm
goes of, you can press SNOOZE on top of the unit to delay the alarm for 5
minutes.
Setting the sleep timer
1.
2.
<
Press the ALARM button. (Note: if you make a mistake at any point,
press the BACK button to go back to the previous screen.)
Turn the TUNE knob until the display says <Sleep Timer>.
Sleep Timer
>
3.
4.
Press the SELECT button.
The display will show <Sleep timeout> and then 00:00:00. Use the
TUNE knob to adjust the time. If you set the time to 01:30:00, the radio
will be set to turn off in one and a half hour. Confirm your choice by
pressing SELECT.
Sleep Timeout
<
00:00:00
>
20
Media Player Quickstart Guide
The Media Player allows you to play audio files (AAC, AIFF, AU, MP3, RM, WAV
and WMA) and playlists (M3U) stored on a networked PC. It has been verified to
work on Windows 2000 and Windows XP.
Set up your Windows PC to allow the radio to
access your audio files via Windows Shares
1.
2.
3.
4.
5.
Please ensure that your PC is available on the network for your
Internet radio, then, using Windows Explorer, locate the folder where
your audio files are stored.
Right click on the folder.
Select ‘Properties’.
Click on ‘Sharing’.
Select ‘Share this folder on the network’ and ‘Allow network users to
change my files’. Please note, do not try to make your ‘My Documents’
or any of its sub-folders (e.g. ‘My Music’) shareable.
Locate the shared audio files using the radio
1.
2.
3.
4.
5.
6.
7.
8.
9.
Power up the radio.
Wait for ‘Stations’ to be displayed on the radio, or press the BACK
button repeatedly until ‘Stations’ is displayed.
Turn the knob until the radio display shows 'Media Player'.
Press the SELECT button and turn the TUNE knob until ‘Windows
Shares’ is displayed.
Press the SELECT button, turn the TUNE knob until ‘Scan for PCs’ is
displayed and press SELECT again.
The radio will now display ‘Finding PCs’. Once the radio has finished,
turn the TUNE knob to highlight the correct PC.
Press the SELECT button. The radio will search for shared folders.
Turn the TUNE knob to highlight the correct shared folder and press
SELECT.
The radio will display 'File Scan…' as it scans through the media files
in the shared folder. Text on the bottom row of the display will change
to indicate that the file scan is in progress. If you have a large number
of audio files this could take several minutes to complete.
21
10. Once the radio has finished scanning, it will display 'By Album'. You
can now browse through the scanned media files, which will now be
organised ‘By Album’, ‘By Artist’ and ‘Playlists’ – if available.
Note that the first time the file scan is done a file called ‘.reciva_media_cache’ is
written to the folder where the audio files are stored. This is in order to speed up
subsequent file scans.
Note: You may be required to enter the user name and password of the
computer containing the shared files.
Listening to a single shared track
1.
2.
3.
4.
5.
6.
7.
8.
Turn the TUNE knob until ‘By Artist’ is displayed.
Press the SELECT button.
Turn the TUNE knob until the required artist is displayed.
Press the SELECT button.
Turn the TUNE knob until the required album name is displayed.
Press the SELECT button. ‘[Add to Queue]’ will be displayed.
Turn the TUNE knob until the required track is displayed.
Press the SELECT button. The track will begin playing.
Listening to a complete shared album
1.
2.
3.
4.
5.
6.
7.
Turn the TUNE knob until ‘By Artist’ is displayed.
Press the SELECT button.
Turn the TUNE knob until the required artist is displayed.
Press the SELECT button.
Turn the TUNE knob until the required album name is displayed.
Press the SELECT button. ‘[Add to Queue]’ will be displayed.
Press the SELECT button. The album will begin playing.
Queuing up tracks for playback later
1.
2.
Highlight the required track.
Press the SELECT button. ‘Track Added To Queue’ will be displayed.
Queuing up albums for playback later
1.
2.
3.
4.
Highlight the required album.
Press the SELECT button.
Turn the TUNE knob until ‘[Add To Queue]’ is displayed.
Press the SELECT button. ‘Tracks Added to Queue’ will be displayed.
22
Controlling playback
1.
2.
3.
4.
Use the 5 / STOP button to stop playback.
Use the 2 / PLAY button to either pause a currently playing track or to
restart a currently paused track or to restart a stopped track.
Use the 1 / PREV button to start playback of the previous track in the
queue.
Use the 3 / NEXT button to start playback of the next track in the
queue.
Browsing the list of tracks currently queued up for
playback
1.
2.
3.
Press the 6 / BROWSE button. The currently playing track name will
be displayed.
Turn the TUNE knob to see which tracks are queued up for playback.
If you want to jump to a particular place in the queue then press the
SELECT button when the required track is displayed.
Removing tracks from the queue
1.
2.
3.
4.
5.
6.
7.
Press the 6 / BROWSE button. The currently playing track name will
be displayed.
Turn the TUNE knob to select the track you want to remove from the
queue.
Press and hold the 5 / STOP button for 2 seconds and the radio will
display: ‘Delete Track?’
Turn the TUNE knob to highlight ‘Yes’ or ‘No’.
Press SELECT to confirm whether you actually want to delete the
track from the queue.
If ‘Yes’ was selected then ‘Removed From Queue’ will be displayed.
To remove all tracks from the queue, keep pressing BACK until the
‘Media Player’ menu item is selected, press SELECT and then turn the
TUNE knob to select ‘Clear Queue’ and press SELECT again.
Playing tracks in random order
1.
2.
3.
Select the individual tracks as described previously.
Navigate to top-level menu item 'Media Player' using the SELECT and
BACK buttons.
Press the SELECT button.
23
4.
5.
6.
7.
8.
Turn the TUNE knob until 'Playback Mode' is displayed.
Press the SELECT button.
Turn the TUNE knob until 'Shuffle' is displayed.
Press the SELECT button.
Turn the TUNE knob to select YES/NO to confirm that shuffle mode
should be enabled.
Playing tracks in the queue repeatedly
1.
2.
3.
4.
5.
6.
7.
8.
Select the individual tracks as described previously.
Navigate to top-level menu item 'Media Player' using the SELECT and
BACK buttons.
Press the SELECT button.
Turn the TUNE knob until 'Playback Mode' is displayed.
Press the SELECT button.
Turn the TUNE knob until 'Repeat' is displayed.
Press the SELECT button.
Turn the TUNE knob to select YES/NO to confirm that repeat mode
should be enabled.
Set up a Windows PC to allow the radio to access
your audio files via a UPnP server
1.
2.
3.
If your PC is running Microsoft Windows XP, then you can use
Windows Media Player 11 (WMP11) to act as your UPnP (Universal
Plug and Play) media server 1.0. Windows Media Player 11 may be
downloaded from Microsoft’s website and installed by following the
instructions detailed in its installation wizard.
Once installed, Windows Media Player 11 will create a library from all
the media files available to it on your PC. To add new media files to
the library, select ‘File > Add to Library… > Advanced Options’, click
‘Add’ and choose the files you wish to add and click ‘OK’.
You will now need to connect your Internet radio to Windows Media
Player 11 and configure it to allow the radio to access your media
library. In order to this, you will need to do the following:
• Keep pressing BACK to get to the radio’s top-level menu
and then turn the TUNE knob to select ‘Media Player’.
• Press SELECT and then turn the TUNE knob to highlight
‘UPNP Servers’.
24
Press SELECT and the radio will scan for all available UPnP
servers. Note, this may take a few seconds for the radio to
complete its scan and before the scan has completed, the
radio will display ‘[Empty]’. The radio will continue to display
‘[Empty]’ if no UPnP servers are found.
• After a successful scan, select your UPnP server, by rotating
the knob if there is more than one UPnP server, and then
press SELECT (note, your radio will display ‘Access Denied’
at this stage).
Your PC will now prompt you that a device has attempted to connect to
your UPnP server. In order to allow the radio to have access to the
media files, you will need to click the ‘Library’ tab from Windows Media
Player 11 and select the ‘Media Sharing…’ item to open the ‘Media
Sharing’ window.
•
4.
Selecting ‘Media Sharing…’ for Windows Media Player 11:
5.
From the ‘Media Sharing’ window, the radio will be listed as an
unknown device. Click on the unknown device listed, then click the
‘Allow’ button and then click ‘OK’.
25
Allowing the Radio to Connect:
Locating and playing media files using the radio
and UPnP
1.
2.
3.
4.
5.
6.
Once the UPnP server is configured to share media files with the
Internet radio, you can play the files by doing the following on the
radio.
Keep pressing BACK to get to the radio’s top-level menu and then turn
the knob to select ‘Media Player’.
Press SELECT and then turn the TUNE knob to highlight ‘UPNP
Servers’.
Press SELECT and the radio will scan for all available UPnP servers.
Note, this may take a few seconds for the radio to complete its scan
and before the scan has completed, the radio will display ‘[Empty]’.
The radio will continue to display ‘[Empty]’ if no UPnP servers are
found.
After a successful scan, select your UPnP server, by rotating the knob
if there is more than one UPnP server, and then press SELECT.
The radio will now list the media categories available from the UPnP
server, e.g. ‘Music’, ‘Playlists’ etc. Turn the TUNE knob to select which
category you wish to browse, press SELECT and turn the TUNE knob
26
7.
8.
to highlight a sub category and press SELECT again. For example,
you could select ‘Music’ and then ‘Album’.
Turn the TUNE knob to highlight the media files that you wish to play
and press SELECT.
The radio will display ‘[Add to Queue]’, press SELECT and the radio
will add the tracks to its queue and begin playing them automatically.
Browsing the list of tracks currently queued up for
playback
1.
2.
3.
4.
Press the BROWSE button. The currently playing track name will be
displayed.
Turn the TUNE knob to see which tracks are queued up for playback.
If you want to jump to a particular place in the queue then press the
SELECT button when the required track is displayed.
It is important to note here that media files scanned from the radio’s
‘Windows Shares’ function can also be added to the radio’s queue.
Queuing up UPnP tracks for playback later
1.
2.
Highlight the required track.
Press the SELECT button. ‘Track Added To Queue’ will be displayed.
Queuing up albums for playback later
1.
2.
3.
4.
Highlight the required album.
Press the SELECT button.
Turn the TUNE knob until ‘[Add To Queue]’ is displayed.
Press the SELECT button. ‘Tracks Added to Queue’ will be displayed.
Controlling playback
1.
2.
3.
4.
Use the STOP button to stop playback.
Use the PLAY button to either pause a currently playing track or to
restart a currently paused track or to restart a stopped track.
Use the 1 / PREV button to start playback of the previous track in the
queue.
Use the 3 / NEXT button to start playback of the next track in the
queue.
27
Removing tracks from the queue
1.
2.
3.
4.
5.
6.
7.
Press the BROWSE button. The currently playing track name will be
displayed.
Turn the TUNE knob to select the track you want to remove from the
queue.
Press and hold the STOP button for 2 seconds.
Turn the TUNE knob to highlight ‘Yes’ or ‘No’.
Press SELECT to confirm whether you actually want to delete the
track from the queue.
If ‘Yes’ was selected then ‘Removed From Queue’ will be displayed.
To remove all tracks from the queue, keep pressing BACK until the
‘Media Player’ menu item is selected, press SELECT and then turn the
TUNE knob to select ‘Clear Queue’ and press SELECT again.
Playing tracks in random order
1.
2.
3.
4.
5.
6.
7.
8.
Select the individual tracks as described previously.
Navigate to top-level menu item 'Media Player' using the SELECT and
BACK buttons.
Press the SELECT button.
Turn the TUNE knob until 'Playback Mode' is displayed.
Press the SELECT button.
Turn the TUNE knob until 'Shuffle' is displayed.
Press the SELECT button.
Turn the TUNE knob to select YES/NO to confirm that shuffle mode
should be enabled.
Playing tracks in the queue repeatedly
1.
2.
3.
4.
5.
6.
7.
8.
Select the individual tracks as described previously.
Navigate to top-level menu item 'Media Player' using the SELECT and
BACK buttons.
Press the SELECT button.
Turn the TUNE knob until 'Playback Mode' is displayed.
Press the SELECT button.
Turn the TUNE knob until 'Repeat' is displayed.
Press the SELECT button.
Turn the TUNE knob to select YES/NO to confirm that repeat mode
should be enabled.
28
Configure menu
Choosing the option you want from the Configure
menu
1.
2.
3.
4.
5.
Press the SELECT button.
Note: if you make a mistake at any point, press the BACK button to go
back to the previous screen.
Turn the TUNE knob until ‘Configure’ is displayed
Press the SELECT button.
Turn the TUNE knob until the display shows the option you want.
Press the SELECT button to choose the option shown on the display.
The options are explained below.
<Network Config>
Enables you to scan again for connection to another wireless network, or to
manually configure the network parameters. Use this if you take the Internet
radio to another building where you want to use it
The Network Config menu also allows you to choose whether or not the
Internet radio displays a warning message when its network signal strength
is low. You can enable this feature by selecting ‘Signal Warning’ and then
selecting ‘Yes’.
<Version>
Displays the versions numbers of the various parts of software and
hardware on your Internet radio.
<Upgrade Firmware>
Use this option to download new firmware for the radio from the Reciva
portal on the Internet. If there is new firmware available, then the radio will
prompt you if you want to download it or not. Note, at this stage, you can
press the radio’s BACK button to cancel the radio beginning a firmware
upgrade. A Firmware upgrade may take several minutes, so do NOT switch
off the power to the radio until the operation is complete otherwise the radio
may become permanently damaged.
29
<Language>
Allows you to change the display language.
<Factory Reset>
Puts all the settings back to their defaults as they were when they left the
factory. If you perform a factory reset on your radio you will lose all your
presets and your wireless network connection.
<Register>
This will display a key that can be used to register the radio on the Reciva
Customer portal: http://www.reciva.com/
<Clock setup>
Use this option to set the time, to set an alarm and to view the current alarm
setting, see “Setting the clock”, “Setting the alarm”.
<Backlight>
Selecting this option will alter the Internet radio’s backlight values.
1. After selecting the ‘Backlight’ menu item, the radio will display its list of
three menu modes: ‘Inactive’, ‘Active’ and ‘Standby’. These three
states are explained below:
• The radio gets into its ‘inactive’ state when there is no user
activity for 30 seconds.
• The ‘active’ state is when there is user activity.
• ‘Standby’ is the state when the radio has been turned off.
2. Rotate the TUNE knob to highlight the desired menu mode and press
SELECT.
3. The radio will now display the current backlight value for this menu
mode. You can alter this value by rotating the knob to increase or
decrease it.
<Wifi Strength>
Use this option to see the signal strength between your Quattro radio and
your wireless access point.
30
Configuring ‘My Stuff’
Registering an account on Reciva’s website
1.
2.
3.
4.
Open the website, http://www.reciva.com, from your Internet browser.
Click on the ‘My Account’ link and follow the on-screen instructions to
register an account. Please note, during the registration process, a
validation code will be sent to you via email. Please enter this code
when prompted to do so.
After logging into your account, you will be able to edit your information
for ‘My Stations’, ‘My Streams’, ‘My Details’ and ‘My Radios’ from the
‘My Account’ section.
You can now add your Internet Radio to your account on the website
by accessing the ‘My Radios’ link. From the ‘My Radios’ section, you
will need to enter in your radio’s eight-digit serial number, which can be
found from the ‘Configure > Version’ menu on the radio, and you will
also need to enter in your radio’s registration code - which can be
found from the ‘Configure > Register’ menu on the radio.
Configuring ‘My Stations’
1.
2.
3.
It is possible to search for radio stations that are available in Reciva’s
stations’ database from Reciva’s website. Whenever stations are
searched for on the website, they will be displayed in a list of search
results together with a link to ‘Add to My Stations’.
Clicking on the ‘Add to My Stations’ link, will add the station to your
account’s ‘My Stations’ list. This list can be edited by clicking on ‘My
Stations’ under the ‘My Account’ section on the website.
Once you have Internet stations available in your ‘My Stations’ list, you
may play these stations from your Internet Radio. These stations will
be available on your radio from the menu item: ‘Stations > My Stuff >
My Stations’. Please note, the stations will only be available to your
radio once your radio has downloaded a new stations’ list. To cause
the radio to download a new stations’ list immediately, please remove
and reconnect the power to your radio.
31
Configuring ‘My Streams’
1.
2.
3.
Once logged into your Reciva website account, you can add your own
Internet radio streams to the ‘My Streams’ section, which is listed
under the ‘My Account’ section
Clicking on ‘My Streams’ will prompt you to enter the station’s name
and its media stream URL. The media stream URL should be a link to
a website’s actual audio stream. If you have any doubt about locating
the media stream URL from a webpage, then please refer to the FAQs
section on Reciva’s website, http://www.reciva.com.
Once you have Internet radio streams available in your ‘My Streams’
list, you may play these stations from your Internet Radio. These
stations will be available on your radio from the menu item: ‘Stations >
My Stuff > My Streams’. Please note, the streams will only be available
to your radio once your radio has downloaded a new stations’ list. To
cause the radio to download a new stations’ list immediately, please
remove and reconnect the power to your radio.
32
Troubleshooting
If you experience any trouble with your wireless Internet radio, then you may find
it useful to visit the help section on our webpage: http://www.reciva.com
If you have trouble connecting the radio to your wireless network, these steps
may help to resolve the problem:
1. Confirm that a Wi-Fi connected PC can access the Internet (i.e. can
browse the web) using the same network.
2. Check that a DHCP server is available, or that you have configured a
static IP address on the radio. You can configure a static IP address
on the radio using the menu item ‘Configure -> Network Config -> Edit
Config’, and then select ‘No’ for ‘Auto (DHCP)’.
3. Check that your network’s firewall is not blocking any outgoing ports.
As a minimum, the radio needs access to UDP and TCP ports 80, 554,
1755, 5000 and 7070.
4. Check your access point does not restrict connections to particular
MAC addresses. You can view the radio’s MAC address using the
menu item ‘Configure -> Network Config -> View Config -> MAC
address’.
5. If you have an encrypted network, check that you have entered the
correct key or passphrase into the radio. Remember that text-format
keys are case sensitive. If, when attempting to connect to an encrypted
network, your radio displays: ‘Wireless error’ followed by a 5-digit
number, then please ensure that you enter the correct passphrase for
the network. If the problem persists, then you may need to consult your
network configuration.
If your radio can connect to the network successfully, but is unable to play
particular stations, it may be due to one of the following causes:
1. The station is not broadcasting at this time of the day (remember it
may be located in a different time zone).
2. The station has reached the maximum allowed number of
simultaneous listeners.
3. The station is not broadcasting anymore.
4. The link on the radio is out of date.
5. The Internet connection between the server (often located in a different
country) and you is slow.
Try using a PC to play back the stream via the broadcaster’s web site.
33
If you can play back the station with a PC, use the form at
http://www.reciva.com/ to notify us so that we can change the station data that is
used by the radio.
Software licence information
This product contains software licensed under version 2 of the GNU Public
License and version 2.1 of the GNU Lesser Public License, The source code for
this software is available from:
http://www.reciva.com/gpl/
This product includes technology owned by Microsoft Corporation and under a
licence from Microsoft Licensing GP. Use or distribution of such technology
outside of this product is prohibited without a license from Microsoft Corporation
and/or Microsoft Licensing, GP as applicable.
34
Specifications
Connection:
Security:
File formats:
Controls:
Speaker:
System Output:
Connections:
Power:
Frequency range:
Dimensions:
Weight:
802.11b/g
WEP, WPA1 (TKIP) and WPA2 (TKIP)
Real audio, MP3, Windows media streams, OGG
vorbis, AAC, WAV, AIFF and AU
Power button, Volume knob, Tuning knob, Alarm
button, Mode button, Back button, 6 / Browse button, 5 /
Stop button, Reply button, 4 / Shuffle button, 3 / Next
button, 2 / Play button, 1 / Prev button and Snooze
button
Full range dynamic speaker (3”)
5 Watt RMS
3,5mm jack for stereo analog audio headphone output
3,5mm jack for stereo analog audio AUX input
3,5mm jack for stereo analog audio Line output
RJ-45 connecter for wired LAN connection
12 V DC input
DC 12 V
80 – 20.000Hz
210 x 111 x 145mm (W x H x D)
2,40Kg (Power supply and radio)
35
Item no.: 40510.02
332