1
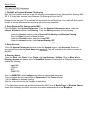
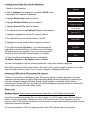
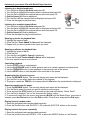
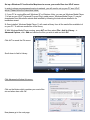
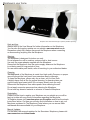
user manual
Please consider your environmental responsibility before printing this user manual.
Contents:
Introducing the Morpheus:
Front Panel Controls...........................................................................................................3
Rear Panel Connections.....................................................................................................3
Side Connections................................................................................................................4
Positioning the Morpheus....................................................................... ............................4
The Remote Control............................................................................................................5
Connection diagram............................................................................................................6
Internet Radio Section
What you need before you can use your Internet radio........................................................ 7
Controls ............................................................................................................................... 7
Display Icons ........................................................................................................................7
Connecting your Morpheus to the internet............................................................................ 8
Internet radio channel search ..............................................................................................10
Stations with Live and On demand services.........................................................................11
Changing the volume............................................................................................................11
Returning to the menu while a station is playing .................................................................11
Storing and playing a radio station in a preset ....................................................................11
Media Player User Guide
Setting up your computer to allow access your audio files via Windows
Shares..................................................................................................................................12
Locate the shared audio files using the Morpheus ..............................................................14
Listen to USB stick or SD card memory source...................................................................14
Listen to your music files with Media Player function...........................................................15
Listening to a single shared track .......................................................................................15
Listening to a complete shared album................................................................................ 15
Queuing up tracks for playback later ................................................................................. 15
Queuing up albums for playback later ................................................................................15
Controlling playback ...........................................................................................................15
Browsing the list of tracks currently queued up for playback...............................................15
Removing tracks from the queue.........................................................................................15
Playing tracks in random order ...........................................................................................15
Playing tracks in the queue repeatedly............................................................................... 15
Set up a Windows PC to allow the radio to access your audio files via a UPnP server .... 16
Configuration Menu ............................................................................................................22
Configuring the Morpheus to use a static IP address......................................................... 22
Configuring the Morpheus to only use a wired Ethernet or only Wi-Fi connection .............22
Advanced features...............................................................................................................23
Morpheus at home: Hints and tips, registration etc..............................................................24
Things we have to say(legal stuff)........................................................................................25
Contents
Morpheus User Manual
The Sonneteer Morpheus high-end music centre is the result of over 2 years of research and
development in order to create an easy to use, feature packed music centre capable of bringing out
the best from your music collection whether in analogue or digital formats. At the same time not
forgetting the importance of usability and styling, where both are kept simple and elegant.
Front Panel Control:
On the front of the Morpheus you will find the following controls:
8
7
standby
back
1
9
2
1
2
3
4
5
shift
stop
play
previous
next
shuffle
browse
3
4
source
5
6
1. Standby -Turns the unit on or to stand by mode.
2. Main Dial - Controls volume when listening and navigation when in Menu mode.
3. Back button - To go back when in Menu mode.
4. Preset Radio Stations / Media Player Controls. - To store Radio Stations or Operate Media Player.
5. Shift / Browse - Shift for Radio Presets 6-10. Browse will access Music queued in Media Player.
6. Source - To select other audio sources connected to the Morpheus e.g. CD player etc.
7. Infra-Red remote sensor
8. OLED information display
9. Motion sensor for display and front panel lighting control
Rear Panel Connections
Amp Control
Speaker Right
Speaker Left
Analogue Inputs
CD Aux1 Aux2
PreOut
Ethernet
Expansion Slot
Power in 22V MAX!
Note:
Power in - Connect your Morpheus Power block here.
speaker sockets - RED is Positive and BLACK is Negative for each speaker
Analogue Inputs - Connect your conventional analogue system components here like CD players etc.
Pre-Out - Connect your optional power amplifier here like the Morpuheus Power Amplifier
Amp Control - To switch the optional Morpheus Power Amplifier ON or OFF.
Ethernet - If you are using a cabled network, connect your Ethernet cable here to your router.
Expansion slot - Optional components will be available for the Morpheus in near future!
The Morpheus
Introducing the Morpheus
Side Connections:
On the Left side of the Morpheus you will find a 3.5mm Stereo Input socket for easy connection with a
MP-3 player (please note when this socket is used AUX2 input will be disabled).
On the Right side of the Morpheus you will find a USB socket. You can play music files from a USB
memory stick, USB hard drive*, or use this to recharge your Morpheus remote handset!
On the Front Side of the Morpheus you will find a SD memory card (Secure Digital Memory Card) slot
where you can expand the memory of the Morpheus to store music files locally on the Morpheus.
standby
back
Mounting Options:
1
2
3
4
5
shift
stop
play
previous
next
shuffle
browse
source
SD
The Morpheus can be located in your home in a number of ways:
Top Mount
Legs x2
VESA 100 mount
Bottom Mount
The simplest way to position the Morpheus is to use the legs provided
in your accessory pack and you can position the Morpheus in the following
example:
wall
Screw the legs provided into the Top Mount holes for more
horizontal stance - Typical for side-board positioning.
OR:
Screw the legs into Bottom Mount holes for a more vertical stance Typical for a shelf location:
shelf
For wall mounting:
You can use any commercially available VESA100 compatible
mount with sufficient cable clearence using both the Top and
Bottom mounting holes (Warning: Maximum screw penetration 5mm!)
side board
Morpheus Remote Control:
The Morpheus remote control was developed from scratch to offer you unrivalled build quality and a
chance for us to do our bit for the environment. Unlike conventional remote handsets, you will notice
the Morpheus remote has no battery compartment! Contained inside the slim body is a modern
rechargeable battery with built-in auto charger, and you can easily charge the handset from the USB
port on the Morpheus (or any PC/Laptop)!
Charge time is around 4 hours from flat to full charge and it is fully automatic so you don't have to
worry if you leave it on charge for longer periods or giving it an occasional top-up! Under normal
usage we estimate a full charge could last up to a year if you don't over use the torch function! With
typical battery life of over 200 full charge and discharge cycles, we will let you work out how long
before you need to replace the internal battery*!
Did we just say torch? Yes, we have also provided a torch on the remote so you have one handy
whenever you may need one.
Remote functions:
1
2
3
1. Mute- Mutes the audio on the Morpheus when pressed.
2. Standby -Turns the unit on or to stand by mode.
3. Preset buttons-To store Radio Stations.
4. Volume control and menu mode navigation buttons.
5. Menu takes you to the main menu,
Browse will access Music queued in Media Player,
Source - To select other audio sources connected to the Morpheus
e.g. CD player.
6. Media player controls as on main unit.
7. Light - to use your handset as a mini torch.
8. Back button - To go back when in Menu mode.
Reply - used for interactive features.
4
8
5
6
6
7
Handset rear
Charge light to indicate
battery charging mode on.
Mini USB charging socket
Used to charge the handset’s
internal battery. Using cable
provided, any USB port can
be used including one on the
Morpheus.
* By then UK alone would have thrown away 120,000,000,000 domestic batteries.
Connection Diagram:
The diagram shows a typical installation for the Morpheus:
Warning:
Always switch the unit to standby before un-pluging the Morpheus from the mains power supply
before the connection or disconnection of anything from the Morpheus.
Disconnecting the Morpheus from its power supply while the Morpheus is playing may produce a
“pop” noise, this is normal.
A typical connection, diagram:
Speaker Right
Speaker Left
4mm Banana Plug to Speaker Sockets
(Please note polarity!)
12V Switch
Speaker Right
_
+
Speaker
Left
_
+
CD Aux1 Aux2 Preout
Right channel
RCA (Phono) Plugs
If you have a CD playe
or any other audio sources
connect them here.
Left channel
Ethernet
Expansion Slot
Power +20V d.c. max!
2.5mm DC power plug
RJ-45 (Ethernet Cable)
CD Player
Mains Plug
Outputs
R
L
To Modem
Router
Telephone Line
To Telephone Socket
Power Adapter
RJ-45
Elthernet / LAN
Modem Router
(If not using Wi-fi)
Internet Radio Feature:
Before you can use your Internet radio feature (or play music via your network), you will need the
following available at your home:
C A broadband Internet connection.
C A wireless access point (Wi-Fi) connected to your broadband Internet, preferably via a router.
OR
C A standard cable model router using Ethernet cable.
Note for Wi-Fi connection:
If your wireless network is configured to use Wired Equivalent Privacy (WEP) or Wi-Fi Protected
Access (WPA) data encryption then you need to know the WEP or WPA code so you can get the
Internet radio to communicate with the network.
The Internet radio should work anywhere within 100 metres of the wireless access point.
Before you continue, make sure that your wireless access point is powered up and connected to your
broadband Internet. To get this part of the system working you must read the instructions supplied
with the wireless access point.
Before we start, let’s familiarise ourselves with the controls and the display of the Morpheus:
All the controls for setting up and normal usage are accessed via the main dial and the back button:
Then Main Dial and Back button:
In Play mode rotating this dial will alter the volume.
Press this dial to enter the Menu system. During setup,
pressing the dial again will conform setting parameters.
To exit the Menu system or cancel an operation, simply
press the Back button.
(That’s about it!)
The Display:
Display Information: Shows Radio / Media player information and also the Menu system during setup.
The Icon area will display a range of icons indicating the following information:
Wi-Fi signal strength indicator
Internet Radio STREAMING MODE (LiVE)
Media Player Mode
Display information
Streaming On-Demand content
Shift (e.g. to access presets 6-10)
Repeat mode (Repeat the track or tracks)
Shuffle mode (shuffle the tracks queued)
Mute
Icon area
Connecting to the Internet:
For Wi-Fi Setup:
Telephone socket
Wireless Modem Router
Morpheus
Quick Start Guide
To receive internet radio stations, the Morhpeus must be connected to the internet via Wi-fi router or
modem router, here are 2 examples:
Navigation Controls:
The Morpheus utilises a very simple but effective
navigation control where all settings can be done
using the main dial and the back button.
First time installation:
Power ON:
Plug in your Morpheus to your mains
power supply, after a few seconds the
Morpheus will switch on automatically.
The unit will then begin to scan for Wi-Fi
networks, followed by displaying a list
SCANNING
of Wi-Fi network found.
MY NETWORK
OTHER NETWORK
Rotate the dial to highlight your network
and press to select it. If the screen
displays either Enter WPA or WEP key,
it will then request your password after a
Enter WEP/WPA
few seconds (Else the Morpheus will
3 seconds connect
key
automatically).
To enter the password, rotate the dial to
select each character of the password.
Pressing theEND
dial willAB
confirm
each
C DEFGH
character. Once you have
entered the
ACC
complete password, Scroll to the word
“END” and press the main dial. Press
the BACK button to undo any error.
Please note the password is£$%^
case END AB C
sensitive!
BCC Radio1
The radio should now automatically
connect to the your network and display
STATIONS on the screen (Main menu). Stations
For information on how to tune in your
Media Player
stations please see overleaf.
AX
=a!
For station tuning and searching instructions please see overleaf!
For more information on WEP or WPA security, refer to main manual.
For Wi-Fi Setup:
Telephone socket
Wireless Modem Router
Morpheus
Note: The Morpheus will need to be withing 50-100 meters from the signal, depending on the Wi-Fi
modem/router.
Navigation Controls:
The Morpheus utilises a very simple but effective
navigation control where all user functions can be
Accessed using the main dial and the back button,
as shown opposite.
First time installation:
Power ON:
SCANNING
MY NETWORK
OTHER NETWORK
3 seconds
Plug in your Morpheus to your mains power supply, after a few
seconds the Morpheus will switch on automatically.
The unit will then begin to scan for Wi-Fi networks, followed by
displaying a list of Wi-Fi network found.
Rotate the dial to highlight your own network and press down
to select it. If the screen displays either Enter WPA or WEP key,
it will then request you enter your wireless network key after a
few seconds, else see below:
Enter WEP/WPA
key
A message “Enter WEP or WPA” will show for about 3 seconds.
If the message “NO WIRELESS NETWORKS FOUND” is
displayed, please refer to the manual supplied with your Wi-Fi
modem/router.
END AB C DEFGH
ACC
To enter the key, rotate the dial to select each character of the
key. Pressing the dial will confirm each character. Once you
have entered the complete password, Scroll to the word “END”
and press the main dial. Press the BACK button to undo any
error.
£$%^ END AB C
PASSWORD
Stations
Media Player
Please note the password is
case sensitive!
AX
=a!
The radio should now automatically connect to the your
network and display STATIONS on the screen (Main menu).
For information on how to tune in your stations please see
overleaf.
For station tuning and searching instructions please see Channel Search section.
For more information on WEP or WPA security setup, refer to your Wi-fi router manual.
Connecting to the Internet (cont.):
It you are connecting your Morpheus to your cable modem router:
Telephone socket
Wireless Modem Router
Morpheus
For Cable Network Setup:
Quick Start Guide
For Wi-Fi Setup:
Navigation Controls:
The Morpheus utilises a very simple but effective
navigation control where all settings can be done
using the main dial and the back button.
First time installation:
Power ON:
Plug in your Morpheus to your mains
power supply, after a few seconds the
Morpheus will switch on automatically.
The unit will then begin to scan for Wi-Fi
networks, followed by displaying a list
SCANNING
of Wi-Fi network found.
MY NETWORK
OTHER NETWORK
Rotate the dial to highlight your network
and press to select it. If the screen
displays either Enter WPA or WEP key,
it will then request your password after a
Enter WEP/WPA
few seconds (Else the Morpheus will
3 seconds connect
key
automatically).
To enter the password, rotate the dial to
select each character of the password.
Pressing theEND
dial willAB
confirm
each
C DEFGH
character. Once you have entered the
ACC
complete password, Scroll to the word
“END” and press the main dial. Press
the BACK button to undo any error.
Please note the password is£$%^
case END AB C
sensitive!
BCC Radio1
The radio should now automatically
connect to the your network and display
STATIONS on the screen (Main menu). Stations
For information on how to tune in your
Media Player
stations please see overleaf.
AX
=a!
For station tuning and searching instructions please see overleaf!
For more information on WEP or WPA security, refer to main manual.
Telephone socket
Power ON:
Modem router
Morpheus
Connecting to
Network
Plug in your Morpheus to your mains power supply, after a few
seconds the Morpheus will switch on automatically.
Stations
Media Player
After a few seconds the unit will display “Connecting to
Network” and then it should display the Main menu.
This is where you can begin Searching for your channels,
please refer to the channel searching guide in the next section
Trouble shooting for Connection Error Messages:
Wi-Fi:
If the message “No Wireless Networks Found” possible causes are:
Your Wi-Fi or Wireless Access Point is not switched on or enabled.
Please refer to the user manual that came with the unit. It could also be possible that your ESSID
(Wireless Access Point/Router name) is set to be invisible, please refer to your manual on how to
correct this.
You could be out of range.
The Morpheus has a built in Wi-Fi antenna inside the unit behind the front panel. Please try again with
the Morpheus closer to your Wi-Fi modem/router. For greater distance coverage, consider your Wi-Fi
modem positioning or using a range booster or you can try to switch your Wi-Fi modem/router to
operate in B mode. Please refer to your user manual for the unit.
Regarding WEP or WPA passwords:
If you are being asked for a WEP or WPA password, please enter them exactly in the correct case
(upper or lower case). If you cannot remember or don’t know your password, please refer to your WiFi modem/router manual. Normally you will need to connect your Wi-Fi modem/router to your PC via
a Ethernet cable to find out what the password is set in your Wireless Modem/Router, please refer to
your user manual. Else contact the person who installed your Wireless Network at your home.
Cable Installation:
If the message “No Wireless Networks Found”:
Please check your Ethernet cable connections or try another port on your router.
To restart the network connection, unplug the Morpheus from mains and reconnect after 30 seconds.
Internet Radio Channel Search:
With the Morpheus you have access to over 14,000 stations plus many more on demand stations
world-wide. At anytime press the Dial or the Back button to access the Main menu to select Stations
and you can search by Location, Genre, and even Name search!
After setting your wireless or wired network connection, you will see the display showing the main
menu. Pressing OK with “Stations” highlighted will give you 4 ways to find your desired channels:
Country:
Press OK on Country will display a list of countries with stations available. Rotate the dial and select
the country and press OK will display the stations available from that country. Then again rotate the
dial to scroll through the station list to find your channel, press OK to listen.
Genre:
Press OK on Genre will display a list of Genre listed on the database. Rotate the dial and select the
Genre and press OK will display any stations under that Genre. Then again rotate the dial to scroll
through the station list to find your channel, press OK to listen.
Search:
Press OK on Search and you will be asked to enter a Channel name (or part off). Once you have
finished entering the name, highlight END and press OK. You will then be shown a list of channels
containing your search word. Then again rotate the dial to scroll through the station list to find your
channel, press OK to listen.
Stations
Media Player
Afghanistan
Albania
Algeria
Contemporary
Country
Dance
Location
Genre
Search
END AB C DEFGH
ACC
Storing your channels in PRESETS 1-10:
The Morpheus comes with 10 Presets where you can store your
favourite channels.
Swiss Classic
128kbs Mp3
Real Enabled
To save a channel to your presets, simply hold down one of the
preset buttons for 5 seconds while listening to that channel. To save
the channel onto Preset 6-10, press the SHIFT button first and then
1-5 and it will save that channel to preset 6-10. You can save over as
many times as you like.
Accessing them is by simply pressing Presets 1-5 or SHIFT 1-5 for
Presets 6-10 momentarily (not 5 seconds!)
Changing your volume:
5 seconds
Assigned to
Preset 1
Volume
To adjust the volume, simply rotate the main dial.
Returning to the Main Menu:
To return to the Main menu for further setting up, press the Main dial.
Menu
Stations with Live or On Demand services:
Some radio stations may have On Demand facilities so you can listen to previously broadcasted
programmes. When you have selected a radio station that has this facility, the station does not start
playing immediately, but instead displays the following:
LIVE
On Demand
Live - Play the current station in real time.
On Demand - A list of available prerecorded programmes will be displayed.
Now simply highlight the programme you want and press the Main Dial to
start playback.
Breakfast show
Lunch Time Talk
Drive Time
Note: The list of available On Demand options may vary from station to station:
When you have chosen the programme you want to listen to, it will either
start playing immediately, or display a list of days for you to choose from.
Use the Main Dial to highlight the day the programme was broadcast, then
press it to start playing that day’s programme.
Monday
Tuesday
Wednesday
Depending on the broadcaster, you may see a list of Start Time. Use the Main Dial to set the start
time and press it to begin playing. You may also be able to choose the time to enable you to fastforward and rewind to the part you want while the radio is playing.
When the Morpheus is playing a Station that allows you to choose the start time, you will notice the
Media Control legends below the preset buttons lit, indication that they will now work as playbackcontrol for On Demand programmes. Now you can press PLAY/PAUSE at any time to interrupt the
stream. When you press the PREVIOUS or NEXT button, the elapsed time of that the programme is
displayed. You can also turn the Main dial or use the PREVIOUS or NEXT buttons to adjust the time.
When you press the Main Dial again, the programme will play from that point.
Note:
It is only possible to store this type of channels to Presets 6-10!
Media Player:
The Media Player allows you to play audio files (AAC, AIFF, AU, MP3, RM, WAV, FLAC and WMA)
and playlists (M3U) stored on a networked PC, USB and SD Memory devices. It has been verified to
work on Windows 2000, Windows XP and Windows Vista. You can access your computer stored
music using either Windows shares or UPnP (Universal Plug and Play). UPnP is the way to access
uncompressed(high quality music) files. Please refer to the section on page 16.
Setting up your computer to allow the Morpheus to access your audio files via Windows
Shares:
For Windows XP
1. Please ensure that your PC is available on the network for the Morpheus.
2. Using Windows Explorer, locate the folder where your audio files are stored (My Music Folder) .
3. Right click on the folder.
4. Select ‘Properties’.
5. Click on ‘Sharing’.
6. Select ‘Share this folder on the network’ and ‘Allow network users to change my files’.
Note: Do not try to make your ‘My Documents’ or any of its sub-folders (e.g. ‘My Music’) shareable.
For Windows Vista
1. Please ensure that your PC is available on the network for the Morpheus.
2. Open the ‘Network and Sharing Center’ windows from Start menu > Control Panel > Network and
Sharing Cente’.
3. From the ‘Network and Sharing Center’, under the ‘Sharing and Discovery’ heading, ensure that
the following parameters are set:
- Network discovery ON.
- File sharing ON.
- Public folder sharing ON.
- Password protected sharing ON.
4. Open Windows Explore’ by right clicking on the Start menu and selecting ‘Explore’. Create a new
directory in the ‘Public’ directory and move your media files into this new directory.
5. Right click on the directory just created and select ‘Share…’. Ensure that the directory is listed as
being shared, if not, click on the ‘Share’ button.
6. Right click on the directory just created and select ‘Properties’. From the ‘Properties’ window, click
the ‘Sharing’ tab and then click the ‘Advanced Sharing…’ button. From the ‘Advanced Sharing…’
window, click to check the ‘Share this folder’ option.
Typical Wireless Network Setup:
Morpheus
Telephone socket
Wireless Modem Router
Media Player:
FOR MACINTOSH Computers:
1. The MAC will require Windows File Sharing.
MAC OS 9 and earlier versions of the OS will need extra software to use Windows File Sharing. MAC
OS X 10.2 and later versions have Windows File Sharing built into the OS.
Please ensure that your PC is available on the network for the Morpheus. Your radio will also need to
be able to access directories that require a user name and password.
2. Setup Windows File Sharing on the MAC:
From the Dock, click System Preferences. From the System Preferences window, under the
Internet & Network section, click Sharing. From the Sharing window, do the following:
- Under the Services section, enable Personal File Sharing and Windows Sharing.
Also, click Start for each of these services.
- Under the Firewall section, keep the firewall OFF.
- Under the Internet section, keep Internet Sharing OFF.
3. Setup Account:
From the System Preferences window, under the System section, click Accounts. Select an
account and remember its Short Name and password. This will be used for the radio to connect to
the MAC.
4. Directory Setup:
From the Dock, click Finder. From Finder, click Applications > Utilities. Click on More Info for
Directory Access and ensure that it is Read/Write enabled. Double-click on ‘Directory Access’ and
enable the following:
- AppleTalk
- LDAPv3
- SLP
- SMB/CIFS
Also, for SMB/CIFS, click Configure and select an appropriate workgroup.
Copy and paste the mp3 media files to Documents in the Finder window.
Turn on AirPort (or wireless sharing).
Wait for a few minutes for the changes to take place.
5. The Morpheus should now be able to access the MAC from its Media Player > Windows Shares
menu after entering in the MAC account’s short name and password on the Morpheus.
Locating shared audio files with the Morpheus:
1. Switch on the Morpheus.
2. Wait for Stations to be displayed, or press the BACK button
repeatedly until ‘Stations’ is displayed.
3. Highlight Media Player, press to select it.
Stations
Media Player
Stations
Media Player
4. Highlight Windows Shares, press to select it.
5. Highlight Scan for PCs, press to select it.
6. The display will now show Finding PCs (wait a few seconds).
7. Highlight to highlight the correct PC, press to select it.
8. The radio will search for shared folders on the PC.
Windows Shares
UPnP
Local Media
Scan for PCs
Rescan Folder
Folder Name
9. Highlight the correct shared folder and press to select it.
9. The radio will display File Scan… as it scans through the
media files in the shared folder. The bottom row of the display
will display scanning in progress. If you have a large number
of audio files this could take several minutes to complete.
10. Once the radio has finished scanning, it will display
By Album, By Artist, or By Playlists -where available.
By Album
By Artist
Title1
Title 2
...
You can now browse through the scanned media files, under each selected categories
Note that the first time the file scan is done a file called ‘.reciva_media_cache’ is written to the folder
where the audio files are stored. This is in order to speed up subsequent file scans.
Listening to USB stick or SD memory card sources:
To listen to sources from USB Memory Stick, SD memory card and optional hard drive, the basic
operation is almost exactly the same. After highlighting Media Centre and selecting by pressing the
main dial, instead of selecting Windoes Shares, simply highlight Local Media which includes
searching bith SD and USB slots for media. After file scanning the remaining operation is exactly the
same as with using the Windows Share facility.
Please note:
Windows Shares cannot stream uncompressed audio files for Hi-Fi sound quality sound.
If you have uncompressed audio files, you can only play it via UPnP option under Windows Shares
option, or using good quality USB memory stick or SD memory card. This is important as not all
memory sticks or SD card can handle the very bit rate that uncompressed files demands and you may
experience interrupted playback.
For more information on UPnP set up please refer to the UPnP section later in the manual.
Listening to your music files with Media Player function:
Listening to a single shared track
1. Turn the Dial to highlight By Artist and press OK.
2. Turn the Dial to highlight the required artist is displayed and press OK.
3. Turn the Dial to highlight the required album name and press OK.
4. [Add to Queue] will now be displayed.
5. Turn the Dial until the required track is displayed and press OK.
6. Press the dial again to play that track.
Listening to a complete shared album
1. Turn the Dial to highlight By Artist and press OK.
2. Turn the dial to highlight the required artist is displayed and press OK.
4. Turn the Dial to highlight the required album name and press OK.
5. [Add to Queue] will now be displayed.
6. Press the dial again to play the whole album.
Remember!
Queuing up tracks for playback later:
1. Highlight the required track.
2. Press the Dial. Track Added To Queue will be displayed.
3. Repeat until you have queued all the tracks you want.
Queuing up albums for playback later:
1. Highlight the required album.
2. Press the Dial.
3. Turn the Dial until [Add To Queue] is displayed.
4. Press the Dial and Tracks Added to Queue will be displayed.
5. You may repeat to queue more albums.
Controlling playback
1. Use the STOP button to stop playback.
2. Use the PLAY/PAUSE button to either pause a track or to restart a paused or stopped track.
3. Use the PREVIOUS button to start playback of the previous track in the queue.
4. Use the NEXT button to start playback of the next track in the queue.
Browsing the list of tracks in queue
1. Press the BROWSE button. The currently playing track name will be displayed.
2. Turn the Dial to see which tracks are queued up for playback.
3. To jump to a particular TRACK in the queue press the Dial when the requiredtrack is displayed.
Removing tracks from the queue
1. Press the BROWSE button. The currently playing track name will be displayed.
2. Turn the Dial to select the track you want to remove from the queue.
3. Press and hold the STOP button for 2 seconds and the radio will display: ‘Delete Track?’
4. Turn the Dial to highlight ‘Yes’ or ‘No’ and press the Dial to confirm.
5. To remove all tracks from the queue, keep pressing BACK until the ‘Media Player’ menu item is
selected, press the Dial and then turn the Dial to select ‘Clear Queue’ and press the Dial again.
Playing tracks in random order
1. Select the individual tracks as described previously.
2. Press the Shuffle button until SHUFFLE = ON, press the SHUFFLE button on the remote.
Playing tracks in the queue repeatedly
1. Select the individual tracks as described previously.
2. Press the shuffle button until REPEAT = ON, or press the REPEAT button on the Remote.
Set up a Windows PC to allow the Morpheus to access your audio files via a UPnP server.
In order to stream uncompressed music via network, you will need to set up your PC as a UPnP
server. Please follow the instructions below:
1. If your PC is running Microsoft Windows XP or Windows Vista, you can use Windows Media Player
11 to act as your UPnP (Universal Plug and Play) media server. Windows Media Player 11 may be
downloaded from Microsoft’s website and installed by following the instructions detailed in its
installation wizard.
2. Once installed, Windows Media Player 11 will create a library from all the media files available to it
on your PC. To add new media files to the library.
3. With Windows Media Player running, press ALT and then select File > Add to Library… >
Advanced Options, click Add and choose the files you wish to add and click OK.
Click ALT to reveal the File menu:
Scroll down to Add to Library:
Click Advanced will show this menu:
Click on the folders which contains your music files
etc and when done click OK.
Now please go to the next page.
Set up a Windows PC to allow the Morpheus to access your audio files via a UPnP server.
(Continued...)
4. You will now need to connect your Morpheus to Windows Media Player 11 and configure it to allow
it to access your media library. In order to this, you will need to do the following:
a. Keep pressing BACK to get to Morpheus’ Main menu and then turn the Dial and select
Media Player and press OK.
b. Turn the main dial to highlight UPNP Servers and press OK.
c. The Morpheus will scan for all available UPnP servers. Note, this may take a few seconds
to complete the scan. Until the scan has completed, the radio will display [Empty], and will
continue to display [Empty] if no UPnP servers are found.
d. After a successful scan, select your UPnP server, by rotating the Dial if there is more than
one, and then press OK (Note: the display Access Denied at this stage).
5. Your PC will now prompt you that a device has attempted to connect to your UPnP server. In order
to allow the Morpheus to have access to your media files, you will need to click the Library tab from
Windows Media Player 11 and select the Media Sharing… item to open the Media Sharing window.
6. From the Media Sharing window, you will see Morpheus listed with our hoop logo or under the
name, Morpheus. Click on the device listed, then click the ‘Allow’ button and then click ‘OK. Your
Morpheus should now be able to connect to your Windows Media Player under UPnP configuration. ’
You may rename your Morpheus afterwards using the Menue system on your Morpheus music
centre.
Now, to play your music files with UPnP
is exactly the same as with Windows Shares
as explained in previous sections.
You can also control the music playback, add
to queues etc exactly the way as explained
in the Media Player section.
Set up a Windows PC to allow the Morpheus to access your audio files via a UPnP server.
(Continued...)
As an alternative to the standard Windows Media (UPnP sever) Player 11 we also recommend Twonky
media which has been tested to work with the Morpheus. Versions are available to work with PC, MAC
and Linux and is compatible with a wide range of formats including music files ripped using iTunes
(note, DRM files not supported).
Please use the following links online for more:
Learn about Twonky: http://www.twonkymedia.com/
Download Twonky: http://www.twonkymedia.com/installs.html
Support: http://www.twonkyforum.com/
Please go to the next page for more.
Configuring ‘My Stuff’
Registering an account on Reciva’s website:
To access the My Stuff feature on your Morpheus you will need to register it with Reciva, the provider
of the internet radio and on demand services on our music centre.
1. Open the website, https://www.reciva.com from your Internet browser.
2. Click on the ‘Register’ link and follow the on-screen instructions to register an account. Please note,
during the registration process, a validation email will be sent to you. Please follow this email’s
instructions. If you do not appear to have received this email then please check your email filter
settings.
3. After logging into your account, you will be able to edit your information for ‘My Profile’, ‘My
Stations’, ‘My Streams’, ‘My Radios’ and ‘My Podcasts’ from the left-hand side of the website.
4. You can now add your Morpheus music centre to your account on the website by accessing the ‘My Radios’
link. From the ‘My Radios’ section, you will need to enter in your Morpheus’s eight digit serial number,
which can be found from the ‘Configure > Version’ menu on the radio, and you will also need to enter
in your radio’s seven digit registration code, which can be found from the ‘Configure > Register’ menu
on the Morphues.
Configuring ‘My Profile’
Once logged into you Reciva account, you can edit your account’s details from your ‘My Profile’
section.
Click on the ‘My Profile’ link to view your account’s current information. This information will
include various details such as your address, user name, password etc. Edit your details and then click
on the ‘Update’ button to save them.
Configuring ‘My Stations’
1. It is possible to search for radio stations that are available in Reciva’s stations’ database from Reciva’s
website. Whenever stations are searched for on the website, they will be displayed in a list of search
results together with a link to ‘Add to My Stations’.
2. Clicking on the ‘Add to My Stations’ link, will add the station to your account’s ‘My Stations’ list.
Clicking on ‘My Stations’ and then selecting the station will allow you to edit this list.
3. Once you have Internet stations available in your ‘My Stations’ list, you may play these stations from
your Morpheus. These stations will be available on your music centre from the menu item: ‘Stations > My
Stuff > My Stations’. Please note, the stations will only be available to your Morpheus once your it has
downloaded a new stations’ list. To cause the Morpheus music centre to download a new stations’ list
immediately,
please remove and reconnect the power to your Morpheus.
Configuring ‘My Streams’
1. Once logged into your Reciva website account, you can add your own Internet radio streams to your
‘My Streams’.
2. Clicking on ‘My Streams’ will prompt you to enter the station’s name and its media stream URL. The
media stream URL should be a link to a website’s actual audio stream. If you have any doubt about
locating the media stream URL from a webpage, then please refer to the FAQs section on Reciva’s
website, https://www.reciva.com.
3. Once you have Internet radio streams available in your ‘My Streams’ list, you may play these stations
from your Morpheus. These stations will be available on your Morpheus from the menu item: ‘Stations
> My Stuff > My Streams’. Please note, the streams will only be available to your Morpheus once your
it has downloaded a new stations’ list. To cause the Morpheus to download a new stations’ list
immediately, please remove and reconnect the power to your Morpheus.
Configuring ‘My Podcasts’
1. It is possible to add audio podcasts (RSS feeds) to your Reciva account that can be accessed on your
Internet radio. To add a podcast, simply login to your account and then click on the ‘My Podcasts’ link.
2. From your ‘My Podcasts’ section, you can add your chosen podcast by entering in the podcast’s name
and its URL as prompted by the website. Please note, the podcast URL will have to be a direct RSS
feed which will end with the ‘.xml’ extension e.g. http://someurl.com/podcast.xml
3. Once you have podcasts available in your ‘My Podcasts’ list, you may access these feeds from your
Internet Radio. These podcasts will be available on your radio from the menu item: ‘Stations > My
Stuff > My Podcasts’. Please note, the podcasts will only be available to your radio once your radio has
downloaded a new stations’ list. To cause the radio to download a new stations’ list immediately,
please remove and reconnect the power to your radio.
Playing music from a USB hard drives
As USB powered hard drives are getting more and more popular, it gives the Morpheus an
opportunity to have extremely large storage without any reliance on a PC. Not all commercial USB
hard drives will work straight away with the Morpheus because they are formatted under the NTFS
File System and the Morpheus uses the FATS Files System. However you can reformat your USB
hard drive back to FATS File System so that your USB hard drive will work with both your PC and
Morpheus!
First, let’s find out if you need to reformat your File System from NTFS to FATS:
To find out the type of File System used in your USB hard drive, double click on My Computer, then
Right Click on your USB hard drive icon and select properties. In that panel you will see your File
System indicating whether it is NTFS or FATS. If it shows FAT or FAT32, YOU DON NOT NEED TO
REFORMAT YOUR USB HARD DRIVE! Your Morpheus should be able to recognise it under Main
Menu > Media Player > Local Media.
If it shows NTFS, then proceed with the following:
Below is a simple method which will allow you to format your USB hard drive to FATS Files System.
Please note your PC can still use that hard drive without any problem so your hard drive can still be
used for data etc.
WARNING: Any formatting will erase all your data on your hard drive. So please back up all
your files before changing your formatting from NTFS to FATS. The following information is at
the user’s own risks. Sonneteer cannot be held responsible for any data loss due to the use of
the third party software.
Software you will need:
- Go to www.compuapps.com and go to the download section and look for a free a program called
SWISSKNIFE Version 3 or higher.
- Install SwissKnife V3 as per the programs instruction and then Run SwissKnife (see diagram below).
- Now connect the USB hard drive to your PC and let it install itself.
- SwissKnife should recognise the USB drive and your USB hard drive should be listed under the
USB Host Adapter 1 (or another number).
- Follow the instructions of SwissKnife and format your USB drive to FATS format.
When done you can drag all your music files from your PC to your USB hard drive and then you can
connect your USB hard drive to the Morpheus. You should then be able to find your music files under
Main Menu, Media Player, Local Media.
Click on File System pull down menu and
select FAT32. Enter a Volume Label (Hard
drive name). Click Start when ready!
Warning! YOU WILL LOSE ALL YOUR
FILES PREVIOUSLY STORED ON YOUR
HARD DRIVE!
Configuration Menu:
Press the Main dial and scroll to Configure and you will have access to the following options:
Advanced User Information
Network Config
This menu enables you to configure your radio’s network settings, scan again for a connection to
another wireless network, or to manually configure the network parameters. This is useful if you take
your Morpheus to another building where you want to use it.
Configuring the Morpheus to use a static IP address.
In order for your radio to use a static IP address on your network, you will need to do the following:
1. Select the ‘Configure > Network config > Edit Config menu and then press OK.
2. Morpheus will now display Auto (DHCP)? YES / NO. Turn the dial to select NO and then press OK.
3. You will now be able to enter the IP address you wish to give your Morpheus by using the Main dial
to select the desired numbers followed by pressing OK to end inputting the address.
4. The Morpheus will now prompt you to enter the required network mask for the network. You will be
able to enter this in the same way as before for entering the IP address.
5. You will now need to enter the default gateway’s IP address used by the Morpheus on the network.
6. Finally, you will need to enter the DNS IP address. On some networks, you may need to enter your
ISP’s DNS IP address, which should be available on your ISP’s support page on their website.
7. After entering the above information, Morpheus will now connect successfully to your network.
Inorder to make the radio use DHCP again (to automatically get its network information when it
attempts to connect to a network), you will need to select Configure > Network config > Edit
Config and then set ‘Auto (DHCP)? YES / NO’ to ‘YES’
Configuring the Morpheus to only use a wired Ethernet connection
From the radio’s Network config menu, select Wired/Wireless. This menu will present you with
three options: Wireless Only, Wired and Auto:
Wireless Only will cause the Morpheus to reboot and then only use its Wi-Fi connection to
communicate with the network. This will also disable its Ethernet connection.
Wired Only will cause the Morpheus to reboot and then only use its Ethernet connection to
communicate with the network. This will also disable its wireless network capabilities.
Auto will cause the Morpheus to reboot and then attempt to establish an Ethernet connection, if it is
available, to communicate with the network. Otherwise, the Morpheus will attempt to establish a Wi-Fi
connection to the network. Once the Morpheus has established a certain type of connection to the
network, then this type of connection will remain in use while the unit is on.
The Network Config menu also allows you to choose whether or not to display a warning message
when network signal strength is low. You can enable this feature by selecting Signal Warning
and then selecting YES.
Configuration Menu:
(Continued...)
Network Config
Version: Displays the versions numbers of the software and hardware on your Morpheus
Upgrade Firmware: Use this option to download new firmware for the Morpheus from the Internet. If
there is new firmware available, then the unit will prompt you if you whether to download it or not.
Note, at this stage, you can press the radio’s BACK button to cancel the Morpheus beginning a
firmware upgrade. A Firmware upgrade may take several minutes, so do not switch off the power to
the radio until the operation is complete otherwise the unit may become permanently damaged.
Language: Allows you to change the display language.
Factory Reset: Resets the Morpheus back to the default settings as they were when they left the
factory. If you perform a factory reset you will lose all your presets and your wireless network
connection.
Register: This will display a key that can be used to register the Morpheus on the Reciva Customer
portal:
https://www.reciva.com/
Clock: Use this option to set the time, to set an alarm and to view the current alarm setting, see
Setting the clock, Setting the alarm.
Sleep Timer: Selecting this option will enable the Morpheus to switch itself off after a set period.
1. After selecting the Sleep Timer menu item, the radio will display: Sleep Timeout and the sleep
timer value in the form ‘00:00:00’ (hours:minutes:seconds).
2. Rotate the Dial to change to sleep timer value and then press OK to begin the sleep timer.
3. The unit will continue to play and will only go into standby mode after the sleep timer has expired.
4. To turn the radio back on again, simply press the ON / OFF button.
Backlight: This option will alter the Morpheus’ backlight settings.
1. After selecting the ‘Backlight’ menu item, the radio will display its list of three menu modes:
Inactive, Active and Standby. These three states are explained below:
· The radio gets into its inactive state when there is no user activity for 30 seconds.
· The active state is when there is user activity.
· Standby is the state when the unit is in standby mode.
2. Rotate the Dial to highlight the desired backlight mode and press OK.
3. The display will now show the current backlight value for the selected mode.
4. You can alter this value 0-31 by rotating the dial to increase or decrease it.
5. Press OK to store the new value.
Morpheus in your home
Morpheus shown with Penaudio Rogue 6 speakers (available separately).
Hints and tips:
Always refer to the User Manual for further information on the Morpheus.
You can also find regular updates on our website: www.sonneteer.co.uk
Remember safety first: Always disconnect the Morpheus when connecting
or disconnecting anything from the Morpheus.
Warning:
The Morpheus is designed for indoor use only.
Do not expose the unit to moisture, extreme cold or heat source.
Use only the power adapter supplied with the Morpheus.
Disconnect the Morpheus from the mains supply whenever the Morpheus
is not being used for long periods of time.
No user serviceable parts inside, refer all servicing to your authorised dealer.
Cleaning:
The front panel of the Morpheus is made from high quality Perspex, so proper
care will prevent the front panel from premature wear or damage..
To clean the Morpheus, please only use a clean, soft, lint free cloth.
A slightly damp cloth is fine for general cleaning, for heavier stains use
a good quality wax based polish (Do not spray directly onto the unit).
Disconnect the Morpheus from mains power when cleaning the unit.
Do not apply excessive pressure when cleaning the Morpheus.
Do not use any abrasive material or solvents to clean the Morpheus.
Registration:
Please find the time to register your Morpheus on our website so you will be
kept up to date with any priority information regarding the Morpheus.
To Register please visit: www.sonneteer.co.uk/register and follow the simple
Instructions online. On there you will also find information on how to get your
Morpheus registered to The Morpheus Portal where you can access other
web based services available for your Morpheus.
Manual Updates:
For the latest user manual updates for the Sonneteer Morpheus, please visit
www.sonneteer.co.uk/downloads
Things we have to say:
Software licence information
This product contains software licensed under version
2 of the GNU Public License and version 2.1 of the
GNU Lesser Public License, The source code for this
software is available from:
Http://www.reciva.com/gpl/
This product includes technology owned by
Microsoft Corporation and under a licence from
Microsoft Licensing GP. Use or distribution of such
technology outside of this product is prohibited
without a license from Microsoft Corporation and/or
Microsoft Licensing, GP as applicable.
For all other consumer license related information please go to: www.sonneteer.co.uk/morpheus