1
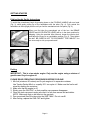
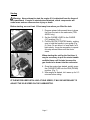
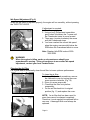
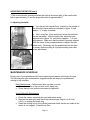
PREMIUM PERSONAL TRANSPORTATION VEHICLES TPB-350GX TPB-400GX Gas Powerboards Owners Manual PLEASE BE SAFE WHEN RIDING: ALWAYS WEAR A HELMET AND OBEY ALL LAWS! Tanaka America 1028 4th St. S.W. Auburn, WA 98001 Phone: (253) 333-1200 Fax: (253) 333-1212 Email: [email protected] www.tanaka-usa.com Page 1 IMPORTANT PLEASE READ THIS BEFORE USING THIS PRODUCT READ THIS FIRST! WARNING This product does not conform to Federal Motor Vehicle Standards and is not intended for operation on public streets, roads, or highways. Serious injury or death can result from the unsafe operation of this product. Operator can minimize these risks by using certain safety equipment such as: safety helmet, goggles, gloves, elbow and kneepads, and appropriate footwear. DO NOT operate this product in traffic, on wet, frozen, oily or unpaved surfaces or under the influence of drugs and/or alcohol. Avoid uneven surfaces, potholes, surface cracks, and obstacles. This product is recommended for riders 16 YEARS OF AGE and older. SAFETY Persons without excellent vision, balance, coordination, reflexes, muscle and bone strength and good decision-making capabilities should not use this product. Pregnant persons should not use this product. Operator only! This product is not designed to carry passengers. Doing so will create a hazardous situation and will damage unit. Never attempt to tow or pull anything with this product. Any individual should never operate this product until they have completely read and understood the contents of the owner’s manual. High speeds, jumps and trick manoeuvres are dangerous and could result in loss of control and accidents. Use caution when exiting driveways or from between parked cars. Stop at all signs, or controlled intersections. Page 2 SAFETY (Cont.) Never ride on pedestrian sidewalks. Being seen is very important. Brightly colored clothing and safety gear can increase visibility. Familiarize yourself with the powerboard. Take turns slowly and provide plenty of stopping distance. Ride very cautiously until you become familiar with the handling of the powerboard. Stand firm but relaxed. Keep weight between the wheels. Don’t stand too close to the front or lean too far back. Shift your weight to the rear when applying brakes, and lean toward the front when accelerating. Keep feet apart for more stability. Learn to adjust your center of gravity to maintain stability. Practice this at a safe, slow speed until you are comfortable with this action. Be aware of everything around you when you ride. Hazards vary by area. Ride in areas that you know well until you are comfortable with operation. Consider noise while you are riding, as it may dilute your ability to hear hazards, such as automobiles. Do not wear headphones while operating a powerboard. Minors should not use this product without adult supervision. Persons unwilling or unable to take responsibility for their own actions should not use this product. The user of this product assumes ALL risks associated with its use. To minimize these RISKS, the user must wear safety helmet, goggles, gloves, elbow and kneepads and appropriate footwear. This product is not intended for extreme or off-road use. Do not jump or abuse this product. Failure to follow these instructions may cause serious injury and will void warranty coverage. Never attempt to disassemble the front fork / suspension assembly as it contains a high-tension spring that can cause serious injury when released. Page 3 Table of Contents Getting to Know Your Tanaka Powerboard……………………………………………..5 Getting Started………………………………………………………………………………..6 Fueling……………………………………………………………………….6 Folding Handle Set-Up Instructions………………………………………6 Starting………………………………………………………………………7 Idle Adjustment……………………………………………………………………………….8 Cleaning the Air Filter………………………………………………………………………..8 Riding…………………………………………………………………………………………...9 Folding & Storage…………………………………………………………………………….9 Recommended Tools………………………………………………………………………..9 Braking System……………………………………………………………………………9-10 Adjusting the Brakes………………………………………………………10 Squeaky Brakes……………………………………………………………10 Tires and Wheels…………………………………………………………………………….10 Tire Pressure……………………………………………………………….10 Adjusting the Head Unit…………………………………………………………………….11 Adjusting the Belts………………………………………………………………………11-12 Maintenance Schedule……………………………………………………………………..12 Warranty Information……………………………………………………………………13-14 Page 4 Getting to Know your Tanaka Powerboard Before operating your Tanaka Powerboard, please get acquainted with all of the features: Powerboard Features 1. Throttle Lever 2. Brake Lever 3. Disc Brake 4. 2-Stroke Engine 5. Folding Handle 6. Kickstand 7. Head Unit 8. Deck 9. Brake Calliper 10. Rear Friction Foot Brake 11. Kill Switch 12. Belt Pulley 13. Belt Cover 14. Handle Bar Tube Engine Features 1. Recoil Starter 2. Gas Tank 3. Gas Cap 4. Choke Lever 5. Carburetor 6. Carburetor Cover 7. Muffler 8. Muffler Cover 9. Spark Plug 10. Primer Bulb (TPB-400GX only) Page 5 GETTING STARTED Folding Handle Set-Up Instructions To unfold the powerboard, begin by pressing down on the FOLDING HANDLE with one hand (Fig. 3), while gently pulling up on the handlebars with the other (Fig. 4). Fully extend the handlebars to their upright position until you feel the mechanism lock into place (Fig. 5). When you first take the powerboard out of the box, the BRAKE LEVER and ACCELERATOR LEVER will be in the down position for shipping. Using the provided Allen Wrench, loosen the tension bolt, and adjust the levers to a comfortable position (Fig. 6). Then tighten the bolt. BE CAREFUL NOT TO DISCONNECT THE CABLES! You are now ready to ride your powerboard! Fueling IMPORTANT: This is a two-stroke engine. Only run the engine using a mixture of gasoline and 2-cycle engine oil. PLEASE READ OPERATING PROCEDURES BEFORE FUELING! 1. Mix fuel (minimum 90 octane) and 2-cycle engine oil in separate container. Use Tanaka Perfect Mix or a quality 50:1 two-cycle oil. Make sure the fuel is well mixed by shaking the container. 2. Make sure that the engine is off. 3. Slowly open the GAS CAP, so that possible over-pressure disappears. 4. Clean the tank cap area to make sure that it is free from excess dirt and debris. NOTE: Make sure that no dirt falls into the gas tank. 5. Pour pre-mixed Gas/Oil mixture into the GAS TANK. Do not overfill. 6. After fueling, replace the GAS CAP and tighten. Page 6 Starting Warning: Never attempt to start the engine if it is detached from the frame of the powerboard. If engine is started when detached, clutch components will come loose and can cause serious injury or death. Before starting, move at least 10 feet away from where you filled the tank. 1. Depress primer bulb several times to draw fuel from the tank to the carburetor (TPB400GX only). 2. Set the CHOKE LEVER to the CHOKE (UP) position (Fig. 7). 3. Pull the RECOIL STARTER briskly, making sure to hold the handle in your grasp (Fig. 8). Note: Do not allow it to snap back, let it back slowly. It may be necessary to repeat this step several times until the motor starts. When starting the unit for the first time, it may be necessary to pull the starter handle multiple times until it starts because the gas needs to be drawn into the carburetor. 4. Once the engine has started, quickly move the CHOKE LEVER into the RUN (DOWN) position. (Fig. 7) 5. After engine is started, let it warm up for 2-3 minutes before riding. IF THE MOTOR KEEPS STALLING AT IDLE SPEED, IT MAY BE NECESSARY TO ADJUST THE IDLE SPEED ON THE CARBURETOR. Page 7 Idle Speed Adjustment (Fig. 9) When the idle speed is adjusted properly, the engine will run smoothly, without pressing the THROTTLE LEVER. If adjustment is required: 1. Start the engine. 2. Using a long, Philips head screwdriver gently close (clockwise) the T-screw until the Powerboard starts to move forward. 3. Then open (counter-clockwise) the screw until the Powerboard stops. 4. You have reached the correct idle speed when the engine runs smoothly below the RPM when the Powerboard starts to move. Note: Standard idle RPM is about 25003000 RPM. WARNING! When the engine is idling, under no circumstances should your powerboard be moving. If the unit continues to move after idle speed adjustment, contact your local Tanaka Dealer. Cleaning the Air Filter It is a good idea to occasionally clean the air filter to insure optimum performance. To clean the air filter: 1. Using a Philips head screwdriver, remove the carburetor cover by turning the cover screw counter clockwise. (Fig. 10) 2. Rinse it in warm soap suds. 3. Check that the filter is dry before reassembly. 4. Put the air filter back into its original position (fig. 11) and replace the cover. NOTE: An air filter that has been used for some time cannot be cleaned completely. Therefore, it must regularly be replaced with a new one. A damaged filter must always be replaced. Page 8 Riding Make sure that all of the bolts and screws are tightened. Put one foot on the deck of the powerboard. While pushing off with the other foot, gently squeeze the ACCELERATOR LEVER on the right side of the handlebars. The powerboard will begin to move on its own power. Control your speed by pressing and releasing the accelerator lever. To stop, release the accelerator handle and depress the BRAKE LEVER (on the left side of the handlebars). FOLDING AND STORAGE When you are done riding the Powerboard you can fold it down for compact storage, carrying and transportation. To fold down the Powerboard, use one hand to push down on the FOLDING HANDLE, while using the other to gently push down on the handlebars. BE CAREFUL NOT TO HIT YOUR HEAD WITH THE HANDLEBAR. Push down until you feel the mechanism lock into place. You can now carry the Powerboard by the handlebar tube. RECOMMENDED TOOLS To adjust and maintain the Tanaka Powerboard you will need the following tools: Allen Keys: 3/4/5/6mm. Wrenches: 10/13/16 mm Open and ring combination. Large Adjustable Crescent Wrench Philips Head Screwdriver Oil, Grease or Lubricant (such as WD-40) BRAKING SYSTEM The Powerboard uses a front wheel disc/calliper system activated by a hand lever (on the left side of the handlebar). The brake is activated by squeezing the BRAKE LEVER with your left hand. The powerboard also has a rear-wheel friction brake that is activated by stepping on the pedal located at the rear of the deck. Practice braking on a smooth, dry surface to get used to the feel of the braking system. Braking distance is affected by wet conditions and loose or uneven riding surfaces. Always be aware of the surface you are riding on and provide plenty of distance for stopping. Page 9 Adjusting the Brakes The Brakes on the Powerboard should come fully adjusted from the factory. However, it may be necessary to adjust the brake from time to time. To adjust the brakes: 1. Loosen the tension screw on the Brake Lever by rotating it counter-clockwise until the wheel spins freely (fig. 12). For further adjustment: 2. With one hand, depress the brake calliper using your thumb and forefinger. (Fig. 13) 3. With the other hand, adjust the tension screw on the brake line. a. Turn the tension screw clockwise to loosen the brake. b. Turn the tension screw counter-clockwise to tighten the brake. Squeaky Brakes The brakes may squeak before they are broken in. This is normal and will not affect the function or performance of the brakes. With continued use, the squeak should go away. TIRES AND WHEELS The Tanaka Powerboard uses an identical rim and tire assembly on the front and rear wheels, which means that the tires can be rotated. The wheels are actually two wheel halves (split rim) bolted together to make it easier to remove and replace the tire. The rear wheel is fitted with a special spacer to accommodate the sprockets, while the front wheel has a bracket for the disc brake. Tire wear will differ based on rider weight, riding conditions and care. Tire Pressure The tire must be inflated to a maximum of 60 P.S.I. It is also recommended to use a tube additive which is obtainable from any motorcycle shop, to avoid inconvenient punctures. Caution: Completely deflate tire prior to disassembly of wheel as the split rim is under considerable pressure while tire is inflated. Page 10 ADJUSTING THE HEAD UNIT The head unit will should come adjusted from the factory. However, riding on rough terrain and general use may cause the head unit to become loose over time. It may be necessary to adjust the head unit from time to time. To adjust the head unit: 1. Rotate the handle bar as far right as it will go to expose the HEAD UNIT. 2. The head unit bearings are held in place by two 40mm nuts on the underside. These nuts are separated by a spacer. The top nut provides the adjustment, while the lower nut is a jamb-nut intended to hold the adjustment nut in place. 3. Loosen the lower nut 3-4 turns (fig. 14) 4. Tighten the top adjuster nut to the desired amount, and then re-tighten the lower jamb-nut. DO NOT over tighten as it will make it difficult to steer and may damage the bearings. ADJUSTING THE BELTS The belts will come adjusted from the factory. However, it may be necessary to adjust the pulleys from time to time. The belts must be well aligned onto the pulleys otherwise they may start to rub and chafe, which will result in shortened belt life. How tight should the belt be? If the belt is skipping or jumping on the pulley teeth, this is too loose and may be harmful. If the belt is making a humming sound when the wheel is turning, this is too tight and may cause the belt to snap. (continued on next page.) Page 11 ADJUSTING THE BELTS (con’t) 1.The correct tension is achieved when the total up and down play of the small clutch belt is approximately ½” and the larger drive belt is approximately 1”. 2. Adjusting the belts: a. Turn the two belt tension bolts, located on the outside of the drive belt frame plates as indicated in figure 15 until approx. ½” of play is present. b. Next, using two 17mm wrenches, loosen the axle bolt on the rear wheel. With the axle loose, adjust the rear adjuster bolts (figure 16), until there is approx. 1” of total play present. Make sure that the wheel is properly aligned with the frame of the powerboard and re-tighten the rear wheel axle. Cautiously ride the powerboard the first time to ensure that everything is in proper working order after every adjustment. MAINTENANCE SCHEDULE Proper care of your powerboard will insure optimal performance and longer life span. The following are a few maintenance suggestions that will keep your powerboard running in top condition: Daily Maintenance - Perform each time you ride your unit. Clean the exterior of the unit with a soft, damp rag. Check that all nuts and bolts are securely tightened. Weekly/Monthly Maintenance Check the starter, especially the cord and return spring. Remove the spark plug and check the electrode gap. Adjust it to 0.6 mm (.024”), or change the spark plug. Clean the cooling fins on the cylinder head and check that the air intake at the starter is not clogged. Clean the air filter. Page 12 Tanaka Limited Warranty Info Engines Tanaka Kogyo Co., Ltd (“Tanaka”) hereby warrants products manufactured by it or sold by it to be free from defects in material or workmanship for a period of 180 days after delivery to the first consumer end user in a non commercial application. All components on PureFire engines related to the emission control system will carry a 2 YEAR warranty. In the case that the product is used for “commercial” or “rental” purposes, the warranty period shall be VOID. In the event that the engines are used on products for “competition” purposes, the warranty shall be VOID. All Tanaka supplied accessories, attachments, and replacement parts will carry a 90 DAYS part replacement warranty. Frame/Chassis Components Non gas engine components are warranted for a period of 90 days from the date of purchase. If this product is found to be defective, Tanaka will repair the product at no charge. To obtain warranty service, you must take the product to an authorized Tanaka dealer. This warranty is limited to repair or replacement, by Tanaka or at the premises of Tanaka Authorized Service Dealers, of such parts as appear to Tanaka, upon inspection, to be defective in material and/or workmanship. The above warranties are extended to the first end user, and no warranty is made, nor authorized to be made assignable, on resale by the first end user. Tanaka makes no warranty with respect to trade accessories not manufactured by Tanaka or sold by it. Such trade accessories are subject to the warranty policy of their respective manufacturers. For the name and address of your nearest Authorized Tanaka Service Dealer, call or write Tanaka c/o International Sales & Marketing Inc. at 1028 4th Street S.W., Suite B, Auburn, WA 98001 (253) 333-1200 or visit their website: www.tanaka-usa.com To obtain performance of any obligation under this warranty for failure during the applicable warranty period, deliver the Tanaka product, shipping prepaid, to Tanaka c/o International Sales & Marketing Inc., or to the nearest Tanaka Authorized Service Dealer. Tanaka reserves the right to inspect the claimed defective part(s) to determine if the malfunction is the result of a defect covered by this warranty. This warranty will cover only defects arising under normal usage, and shall not apply, nor will Tanaka assume any responsibility, if the failure was cause by the following: 1. Operation of product with incorrect fuel to oil ratio. 2. Misuse or abuse. 3. Negligence. 4. Accident or physical damage. 5. Repairs made by unauthorized parties and/or with unauthorized parts. 6. Improper set up or altered products. 7. Improper adjustments i.e. carburetor, etc. 8. Operation of engine speeds above Tanaka recommendations. 9. Failures due to contaminated fuel. 10. Failure to operate the unit in the manner specified by the “owner’s manual”. 11. Use of non-approved accessories or attachments. 12. Cosmetic damage 13. Damage due to acts of God Page 13 14. Commercial use 15. Improper charging of batteries 16. Attempted repairs made by non-authorized dealers. 17. Wear items, including belts, tires, tubes, cleaner elements, and spark plugs are not covered under warranty. Normal maintenance of the fuel system, spark plug or spark arrester, adjustments to the carburettor are not considered the responsibility of Tanaka under this warranty. THIS LIMITED WARRANTY IS IN LIEU OF ALL OTHER EXPRESS WARRANTIES, OBLIGATIONS, OR LIABILITIES. ANY IMPLIED WARRANTIES, OBLIGATIONS, OR LIABILITIES INCLUDING, BUT NOT LIMITED TO, ANY IMPLIED WARRANTY OF MERCHANTABILITY SHALL BE LIMITED IN DURATION TO THE APPLICABLE WARRANTY PERIOD (AS STATED PREVIOUSLY). ANY ACTION FOR BREACH OF ANY WARRANTY HEREUNDER INCLUDING, BUT NOT LIMITED TO, ANY IMPLIED WARRANTY OF MERCHANTABILITY MUST BE BROUGHT WITHIN A PERIOD OF SIX MONTHS FROM THE END OF THE APPLICABLE WARRANTY PERIOD. Some states do not allow limitations on how long an implied warranty lasts, so the previously stated limitations may not apply to you. No agent, representative, dealer, or employee of Tanaka or International Sales & Marketing Inc. has the authority to increase or alter the obligations of this warranty. IF THE PRODUCT IS USED IN A COMMERCIAL OR COMPETITIVE ENDEAVOR, TANAKA WILL NOT BE LIABLE FOR GENERAL DAMAGES INCLUDING BODILY INJURIES, EXCEPT AS SET FORTH ABOVE, OR FOR INCIDENTAL OR CONSEQUENTIAL DAMAGES INCLUDING, BUT NOT LIMITED TO, LOSS OF USE, LOSS OF PROFITS, LOSS OF PRODUCTION, EXPENSE OF SUBSTITUTE EQUIPMENT OR OTHER COMMERCIAL LOSS OR DAMAGE. THE SAME LIMITATIONS SHALL APPLY TO A PRODUCT USED FOR CONSUMER PURPOSES WITH RESPECT TO ALL NON-PERSONAL INJURY, GENERAL INCIDENTAL AND CONSEQUENTIAL DAMAGES. Some states do not allow the exclusion or limitation of incidental of consequential damages, so the above limitation or exclusion may not apply to you. This warranty gives you specific legal rights, and you may also have other rights which vary from state to state. Page 14