1
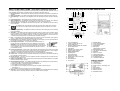
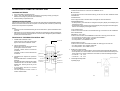
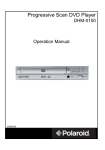
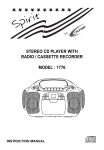
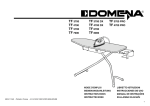
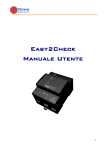
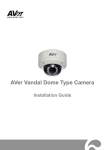
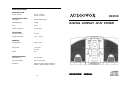
SPECIFICATIONS RADIO SECTION Frequency Range FM: 88 ~ 108 MHz AM: 530 ~ 1700 KHz CE510S CASSETTE SECTION Track system Compact cassette stereo Recording System AC Bias Tape Normal Frequency Response 100 – 8000 Hz DIGITAL COMPACT HI-FI SYSTEM CD SECTION Sampling Frequency 44.1 KHz Frequency Response 20 Hz - 20 KHz GENERAL Woofer Speaker 100mm, 8 ohm Output Power ( 10% THD ) 2W x 2W Weight 4 Kg. POWER SOURCES Mains Operation AC 120V/ 60Hz Power Consumption 20W in AC operation Dimensions Main Unit: 214(W) x 380(H) x 186(D)mm Speaker : 188(W) x 366(H) x 157(D)mm 14 OPERATION MANUAL SAFETY INSTRUCTIONS - Read before operating equipment LOCATION OF CONTROLS AND INDICATORS This product was designed and manufactured to meet strict quality and safety standards. There are, however, some installation and operation precautions which you should be particularly aware of. 1. Read Instructions – All the safety and operating instructions should be read before the appliance is operated. 2. Retain Instructions – The safety and operating instructions should be retained for future reference. 3. Heed Warnings – All warnings on the appliance and in the operating instructions should be adhered to. 4. Follow Instructions – All operating and use instructions should be followed. 5. Water and Moisture – The appliance should not be used near water — for example, near a bathtub, washbowl, kitchen sink, laundry tub,RISK in aOF wet basement, or near a swimming pool, etc. ELECTRIC SHOCK 6. Carts and Stands – The appliance should be used only with a cart or stand that is recommended by DO NOT OPEN the manufacturer. 6A. An appliance and cart combination should be moved with care. Quick stops, excessive force, and uneven surfaces may cause the appliance and cart combination to overturn. 1 2 26 3 4 5 6 7 21 22 8 9 20 10 19 24 11 7. 8. 9. 10. 11. 12. 13. 14. 15. 16. 17. 18. Wall or Ceiling Mounting – The appliance should be mounted to a wall or ceiling only as recommended by the manufacturer. Ventilation – The appliance should be situated so that its location or position dose not interfere with its proper ventilation. For example, the appliance should not be situated on a bed, sofa, rug, or similar surface that may block the ventilation openings; or, placed in a built-in installation, such as a book case or cabinet that may impede the flow of air through the ventilation openings. Heat – The appliance should be situated away from heat sources such as radiators, heat registers, stoves, or other appliances (including amplifiers) that produce heat. Power Sources – The appliance should be connected to a power supply only of the type described in the operating instructions or as marked on the appliance. Grounding or Polarization – The precautions that should be taken so that the grounding or polarization means of an appliance is not defeated. CAUTION: To prevent electric shock, match the wide blade of this plug to the widle slot, fully insert. Do not use this (polarized) plug with an extension AC cord, receptable or other outlet unless the blades can be fully inserted to Polarized Plug prevent blade exposure. Power-Cord Protection – Power-supply cords should be routed so that they are not likely to be walked on or pinched by items placed upon or against them, paying particular attention to cords at plugs, convenience receptacles, and the point where they exit from the appliance. Cleaning – The appliance should be cleaned only as recommended by the manufacturer. Power Lines – An outdoor antenna should be located away from power lines. FM antenna should not be connected to outdoor antenna. Nonuse Periods – The power cord of the appliance should be unplugged from the outlet when left unused for a long period of time. Object and Liquid Entry – Care should be taken so that objects do not fall and liquids are not spilled into the enclosure through openings. Damage Requiring Service – The appliance should be serviced by qualified service personnel when: A. The power-supply cord or the plug has been damaged; or B. Objects have fallen, or liquid has spilled into the appliance; or C. The appliance has been exposed to rain; or D. The appliance does not appear to operate normally or exhibits a marked change in performance; or E. The appliance has been dropped, or the enclosure damaged. Servicing – The user should not attempt to service the appliance beyond that described in the operating instructions. All other servicing should be referred to qualified service personnel. 2 18 25 12 14 13 1. 2. 3. 4. 5. 6. 7. 8. 9. 10. 11. 12. 13. 16 15 17 PLAY/ PAUSE Button F. SKIP/ TUNING UP/ ADJ. UP (HOUR/ MIN.) Button B. SKIP/ TUNING DOWN/ ADJ. DOWN (HOUR/ MIN.) Button STOP Button MEMORY/ CLOCK ADJ. Button REPEAT/ MEM. UP Button MODE/ REMAIN Button POWER Button FUNCTION Switch (RADIO/ CD/ TAPE) BAND Selector (FM ST./ FM/ AM) LCD Display RECORD Button PLAY Button 14. 15. 16. 17. 18. 19. 20. 21. 22. 23. 24. 25. 26. REWIND Button FAST FORWARD Button STOP/ EJECT Button PAUSE Button BBS Switch (BASS BOOST SYSTEM) HEADPHONE JACK VOLUME UP/ DOWN Button SENSOR BEAT CUT Switch FM ANTENNA WIRE SPEAKER TERMINALS AC MAIN OUTLET CD DOOR OPEN EAR DISPLAY SECTION 27. 28. 29. 30. 31. 32. 33. 34. 35. AM FM ST MHz KHz 3 MEMORY Indicator Track Number Channel Number Radio Frequency/ CD Playing Time Clock Band Indicator REMAIN Indicator REPEAT Indicator RANDOM Indicator 23 PREPARATIONS AND CONTROLS RADIO OPERATION PREPARATIONS 1. 2. 3. 4. 1. Carefully unpack the unit and speakers. Remove all packing material from around the unit. 2. Locate the unit horizontally on a heavy duty stand or firm level surface and away from the speaker system to avoid acoustic feedback. CONNECTIONS 1. Connect the Speaker wires from Speaker Box to the Speaker Outlet on the rear of the main unit. 2. Connect the AC power cord to the AC outlet. 3. Press the POWER button [8] to turn on the unit. NOTE: - Before operating the unit in a new area for the first time, it is absolutely necessary to check the operating voltage of your unit is identical with the voltage of your local power supply. - This unit is to be operated only at the printed power source voltage on the back panel. - When the unit will not being used for a long period, you must disconnect the AC power cord from AC outlet. SOUND CONTROL VOLUME: Press the VOLUME UP button [20] to increase the volume, and the VOLUME DOWN button [20] to decrease the volume. CLOCK ADJUSTMENT 1. Set the FUNCTION switch [9] to “TAPE” mode. The clock will appear on the LCD display [11]. 2. Press the MEMORY/ CLOCK ADJ. button [5] once to adjust the hour. Press the button once more to adjust the minute. 3. Press the F.SKIP/ TUNING UP/ ADJ. UP button [2] and the B. SKIP/ TUNING DOWN/ ADJ. DOWN button [3] to set the time. - Press the F. SKIP/ TUNING UP/ ADJ. UP button once to add one hour or one minute to the time setting. When keep pressing the button, the “hour” or “minute” setting is increased continuously until the button is released. - Press the B. SKIP/ TUNING DOWN/ ADJ. DOWN button once to reduce one hour or one minute to the time setting. When keep pressing the button, the “hour” or “minute” setting is decreased continuously until the button is released. 4. Press the MEMORY/ CLOCK ADJ. button again to confirm the time setting. 5. If the unit is in the “RADIO” or “CD” mode, press the MODE/ REMAIN button [7] and repeat step 2-4. Press the POWER button [8] once to turn the unit on. Set the FUNCTION switch [9] to “RADIO” mode. Set the BAND selector [10] to the desired band. Press the F. SKIP/ TUNING UP/ ADJ. UP button [2] or B. SKIP/ TUNING DOWN/ ADJ. DWON button [3] momentarily (less than 0.5 sec.) to step up or down the receiving frequency in order to select the desired station. 5. For auto tuning, keep pressing the F. SKIP/ TUNING UP/ ADJ. UP button or B. SKIP/ TUNING DOWN/ ADJ. DWON button (more than 0.5 sec.) until the displayed frequency starts to change, then release the button. Tuning will stop automatically when a station is received. 6. To turn the unit off after use, simply press the POWER button once again. FM RECEPTION Raise and extend the FM antenna wire [23], then adjust the position for the best reception. ST indicator will appear on the display only if an actual stereo broadcast station is being received. AM RECEPTION Rotate horizontally or relocate the unit for best reception as the built-in ferrite bar antenna is directional. PRESET STATIONS 1. Set the FUNCTION switch [9] to “RADIO” mode. 2. Set the BAND selector [10] to the desired band. 3. When a desired station is tuned, press the MEMORY/ CLOCK ADJ. button [5] and then select the desired station you want to store by pressing the REPEAT/ MEM. UP button [6]. 4. Press the MEMORY/ CLOCK ADJ. button again to confirm the preset station. 5. Repeat steps 3 and 4 to enter remaining preset stations. NOTE: The preset memory operating can be repeated to store a maximum of 10 FM stations and 10 AM stations. RECEIVING A PRESET STATION To recall any preset station within the selected band, simply press REPEAT/ MEM. UP button [6] until preset number selection appears on the display. 5 COMPACT DISC OPERATION PLAYING A CD 1. Press the POWER button [8] once to turn the unit on. 2. Set the FUNCTION switch [9] to “CD” mode. 3. Place a compact disc on the spindle, label side up. A 3” (8cm) disc may also be played without an adaptor. 4. Push the CD compartment door back to the unit. The display will indicate “00:00” for a few seconds. Then, the total number of tracks [28] and the CD playing time [30] will appear on the display. 5. Press the PLAY/ PAUSE button [1] once to start playing from track 1 and the display indicates the playing track number [28] and the CD playing time. When pressing the MODE/ REMAIN button [7] once, the REMAIN indicator [33] appears and the display changes from playing time to remaining time. 6. When the last track has been played, playing will be stopped automatically and the total number of tracks and playing time will appear again. NOTE:When no disc is in the CD player, “DISC” appears on the display and starts flashing. Interrupt playing Press PLAY/PAUSE button [1] once for temporarily stop and the displayed playing time is flashing. Press the button again to resume playing from the same point. Stop playing Press STOP button [4] and the display returns to the total number of tracks and playing time. NOTE: Never open the CD compartment door [26] while the CD is playing. RANDOM PLAY (Remote control only) 1. Press the RANDOM button from the remote control unit during normal play and RANDOM indicator appears on the display, tracks will be played in random order. 2. Press the RANDOM button again to cancel selection. NOTE: When the unit is in MEMORY PLAY mode the RANDOM function cannot be set but the RANDOM indicator will flash on the display for a few seconds. REPEAT PLAY 1. Press the REPEAT/ MEM. Up button [6] before or during normal play to repeat the track. The repeat function has 2 different modes. – Press the REPEAT/ MEM. UP button once to enter to the REPEAT ALL mode and the REPEAT indicator appears on the display. Track will be played in order and the entire disc will be repeated endlessly. – Press the REPEAT/ MEM. UP button twice to enter to the REPEAT ONE mode and the REPEAT indicator is blinking on the display. The current track will be repeated endlessly. 2. To cancel repeat play, simply press the REPEAT/ MEM. UP button until the REPEAT indicator disappears on the display. SKIPPING FOR THE BEGINNING OF A TRACK 1. Press the B. SKIP/ TUNING DOWN/ ADJ. DOWN button [3] once during playing, the CD will return to the beginning of the current track. If the button is pressed continuously before playing starts, the CD will return to the previous track(s). 2. Press the F. SKIP/ TUNING UP/ ADJ. UP button [2] once during playing, the CD will move to the beginning of the next track. If the button is pressed continuoulsy, the CD will move to the following track(s). SEARCH A PARTICULAR POINT OF A TRACK 1. Press and hold the F. SKIP/ TUNING UP/ ADJ. UP button [26] or B. SKIP/TUNING DOWN/ ADJ. DOWN button [3] (more than 0.5 sec.) to locate a particular point in a track during playing by mointoring the high-speed cueing sound. – Keep the F. SKIP/ TUNING UP/ ADJ. UP button pressed to go ahead. – Keep the B. SKIP/ TUNING DOWN/ ADJ. DOWN button pressed to go back. 2. Release the button when you reach the point in the selection that you want. MEMORY PLAY This function allows you to play the track (up to 20 tracks) of a disc in any order or repeat the same tracks 20 times. 1. Press the MEMORY/ CLOCK ADJ. button [5] when the disc is not turning and “P-01” appears on the LCD display [11]. 2. Press the F. SKIP/ TUNING UP/ ADJ. button [2] or B. SKIP/TUNING DOWN/ ADJ. button [3] to select the desired track. 3. Press the MEMORY/ CLOCK ADJ. button again to store into the memory, than “P-02” appears on the display. 4. Repeat steps 2 and 3 to enter desired tracks, up to a maximum of 20 selections, into the program. 5. Press the PLAY/ PAUSE button [1] once to start playing. 6. After playing the selection of tracks, the display will return to the total number of tracks and playing time. If you want to play the selection again, press the MEMORY/ CLOCK ADJ. button and then the PLAY/ PAUSE button to start playing. NOTE: Memory program will be cleared automatically under the following conditions: - The power is turned off. - Press the STOP button [4] under condition of memory setting. - The CD compartment door [26] is opened. - Other function (RADIO/ TAPE) is selected. 7 8 STOP THE PLAY MODE RECORDING FROM RADIO Simply press the STOP button [4] to stop the play mode. 1. Set the FUNCTION switch [9] to “RADIO” mode. 2. Set the BAND selector [10] to the desired band. 3. Press the REPEAT/ MEM. UP button [6] to select the preset station, or use the F. SKIP/ TUNING UP/ ADJ. UP button [2] and B. SKIP/ TUNING DOWN/ ADJ. DOWN [3] to tune in the desired station. 4. Insert a cassette tape into the cassette compartment. 5. Press RECORD button [12] which also engages the play button, to being recording. 6. Press the PAUSE button [17] to suspend recording without deactivating the record mode. Press again to resume recording. TAPE OPERATION GENERAL INFORMATION ON CASSETTE TAPES • • • • • For playback, use normal (low-noise) tape for best sound. (Metal or chrome tape is not recommended.) For recording, use normal tape only. Do not use C-120 tapes, tapes with internal reels or pool-quality tapes because they can cause malfunctions. Before loading a tape into the cassette compartment, tighten the slack tape with a pen or pencil. Cassette have removable which prevent accidental recording from taking place. Removing the tab on the top left protects the disc facing you from erasure. Cover the tab holes with adhesive tape to erase or record again. CASSETTE PLAYBACK 1. Set the FUNCTION switch [9] to TAPE mode. 2. Press the STOP/ EJECT button [16] and insert a pre-recorded cassette tape into the cassette compartment. 3. Close the cassette door. 4. Press the PLAY button [13] to start playback. 5. Press the STOP/ EJECT button to stop playback. Also, playback will stop automatically when the end of the tape has been reached. Fast forward/rewind 1. Press the F.FWD button [15] to avance the tape or press the REW button [14] to rewind. 2. Press the STOP/ EJECT button when the desired location has been reached Beat Cut switch If feedback (whistling noise) occurs when recording from AM(MW) broadcasts, set the BEAT CUT selector [22] to I or II whichever gives the best reception. RECORDING FROM CD 1. 2. 3. 4. Set the FUNCTION switch [9] to “CD” mode. Place a compact disc in the CD compartment. Insert a cassette tape into the cassette compartment. Press the RECORD button [12], which also activates the PLAY/ PAUSE button [1] of the CD player, to begin recording. When pressing the STOP/ EJECT button [16] to stop recording, the CD playing will pause automatically. ERASING RECORDED TAPES 1. Insert the tape to be erased into cassette compartment. 2. Set the FUNCTION switch [9] to “TAPE” mode. 3. Press the RECORD button [12] to begin erasing. NOTE: In fast forward mode, the tape will not automatically stop when it reaches the end. It must be stopped manually to avoid damage to the tape and/or mechanism. Interrupt playback Press the PAUSE button [17] during playback and press it again to resume playback. RECORDING • • • When recording important selections, be sure to make a preliminary test to ensure that the desired material is being properly recorded. The ALC (Automatic Level control) circuit automatically controls the level of the input signal used for recording. Metal and chorme tapes cannot be used for recording. 9 10 COMPACT DISC OPERATION MAINTENANCE CONCERNING COMPACT DISCS CLEAN THE HEADS 1. Usable compact discs Use a compact disc bearing the mark as shown. To ensure the continued high performance of your unit, periodically clean the heads and pinch rollers to prevent accumulation of dust or tape oxide deposits. Failure to clean these parts may result in distortion of recorded sound, deterioration of reproduction of high frequencies, and inconsistent tape speed. 2. Notes on handling discs • Removing the disc from its storage case and loading it. Press the claws at the center of the case. Lift out without touching the recorded surface. • • • Insert with the label facing up. Incorrect Press the disc gently to insert it. Do not touch the rainbow color reflecting recorded surface. Do not stick paper or write anything on the label surface. Do not bend the disc. 3. Storage • For storage, be sure to return a disc to its case. • Do not expose discs to direct sunlight, high temperature such as from a heater, high humidity and dusty places. 4. Cleaning a disc Before operation, wipe off dust, dirt and fingerprints on the surface with a soft cloth. The disc should be cleaned from inward to outward. Correct To Clean heads: 1. Open the cassette compartment. 2. Moisten a cotton bud with heads cleaner or methylated spirit and apply to the faces of heads, rubbing gently until all traces of dirt or oxide are removed. Also, clean the surfaces of the pinch rollers and the capstans. 3. Dry, clean and polish the face of the heads with a piece of soft, lint-free cloth. Cassette Recorded/Playback Cotton Bud Cassette Playback Capstan Erase Head Cotton Bud Pinch Roller Pinch Roller Play Head Recorded/Play Head CLEAN THE UNIT To retain the beauty of the unit, simply wipe with a soft clean cloth moistened with plain lukewarm water. Incorrect From the center to the edge • Capstan Never use thinner, benzine, analog record cleaner or antistatic spray. 8-cm (3-3/16") "CD singles" 8-cm (3-3/16" compact discs can be used (without using an adapter) in this unit. 6 11 • OPERATION OF REMOTE CONTROL UNIT LOADING BATTERIES 1. Remove the battery compartment cover. 2. Insert 2 “AAA” size (R03) batteries as indicated by the polarity marking. (Placing the batteries in the wrong way around cause malfunction.) 3. Close the battery compartment cover. OPERATION PROCEDURE Plug the power cord of the system into an AC wall outlet, and press the POWER ON/ STAND BY button on the remote control unit to turn the power on. When the power is turned on, press the key of the source component to be operated. NOTE: • When the remote-controllable distance gets shorter than before, replace both batteries with new ones. • Malfunction may occur if direct sunlight or the light of a high-frequency lightning fluorescent lamp enters the remote control light sensor. In such a case, change the system installation position prevent the malfunction. FUNCTION OF THE REMOTE CONTROL UNIT 1. POWER ON/ STAND BY button Press once to turn on the main unit and press again to return to the “STAND BY” mode. ○ ○ ○ ○ ○ ○ ○ ○ ○ POWER MUTE ○ NUMBER KEYS ○ ○ 12 ○ VOLUME DOWN VOLUME UP ○ ○ 3. CD/Radio/Clock adjustment operation buttons UP and DOWN buttons: TUNING/ CLOCK/ SEARCH They have the same functions as the F. SKIP/ TUNING UP/ ADJ. and B. SKIP/ TUNING DOWN/ ADJ. buttons [26 and 27] on the main unit. • for clock setting, see item 3 of “CLOCK ADJUSTMENT”. • For radio operation, see item 4 and 5 of “RADIO OPERATION”. STOP button It has the same function as the STOP button [4] on the main unit. See “COMPACT DISC OPERATION”. RANDOM button Press to play the tracks in random order. Press again to cancel the selection. MODE/REMAIN button • In radio operation, press the button to change from frequency display to clock display and press again to return. • In CD operation, press the button to change the display from playing time to remaining time, and then to clock display. Press again to return. PLAY/ PAUSE button It has the same function as the PLAY/ PAUSE button [1] on the main unit. See “COMPACT DISC OPERATION”. MEMORY/ C. ADJ. button It has the same functions as the MEMORY/ CLOCK ADJ. button [5] on the main unit. • For clock setting, see item 2 and 4 of “CLOCK ADJUETMENT”. • For radio operation, see ‘PRESET STATION”. • For CD operation, see “MEMORY PLAY”. REPEAT/MEM. UP button It has the same functions as the REPEAT/ MEM. UP button [6] on the main unit. • For radio operation, see “PRESET STATION”. • For CED operation, see “PRESET PLAY”. ○ 2. Volume control buttons MUTE button: Press to mute the sound and press again to restore the sound. VOLUME button: Press to increase the sound level. VOLUME button: Press to decrease the sound level. TRANSMITTER For CD operation, see “SKIPPING FOR THE BEGINNING OF A TRACK”, “SEARCH A PARTICULAR POINT OF A TRACK” and “MEMORY PLAY”. ○ DOWN/B.SKIP UP/F. SKIP M-DN/RANDOM ○ 4. RADIO/ CD numeric buttons • In order operation, the numeric buttons can be used to enter the desired station directly. • In CD operation, the numeric buttons can be used to enter the desired track directly. If the track number or the number of selection is more than 19, follow the following examples. – To enter 20 — +10 +10 0 – To enter 25 — +10 +10 5 ○ PLAY/PAUSE STOP MODE/REMAIN Remote Control sensor 5. Infrared light-emitting diode Operating range: M-UP/REPEAT Approx. 6m MEMORY/C-ADJ. 13