1
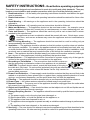
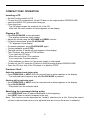
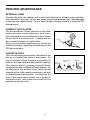
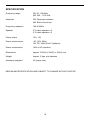
STEREO CD PLAYER WITH
RADIO / CASSETTE RECORDER
MODEL : 1776
INSTRUCTION MANUAL
WARNING
To prevent fire or shock hazard, do not expose this appliance to rain or moisture.
CAUTION
TO PREVENT ELECTRONIC SHOCK, DO NOT USE THIS (POLARIZED) PLUG WITH AN
EXTENSION CORD, RECEPTACLE OR OTHER OUTLET UNLESS THE PLUG CAN BE
FULLY INSERTED WITHOUT EXPOSING ANY PARTS OF THE BLADES.
RISK OF ELECTRIC SHOCK
DO NOT OPEN
The lightning flash with arrowhead symbol, within an equilateral triangle, is intended to alert
the user to the presence of
uninsulated "dangerous voltage" within the product's enclosure that may be of sufficient
magnitude to constitute a risk of
electric shock to persons.
WARNING: TO REDUCE THE
RISK OF ELECTRIC SHOCK,
DO NOT REMOVE COVER (OR
BACK). NO USER-SERVICEABLE PARTS INSIDE, REFER
SERVICING TO QUALIFIED
SERVICE PERSONNEL.
The exclamation point within an
equilateral triangle is intended to
alert the user to presence of important operating and maintenance (servicing) instructions in
the literature accompanying the
appliance.
IMPORTANT
Since the CD circuity may cause interference to other radio tuners nearby, switch this unit off when
not in use or move it away from the affected radio tuner.
This device complies with Part 15 of the FCC Rules. Operation is subject to the following two
conditions: (1) This device may not cause harmful interference, and (2) this device must accept any
interference received, including interference that may cause undesirable operation.
NOTE: This equipment has been tested and found to comply within the limits for a Class B digital
device, pursuant to Part 15 of the FCC Rules. These limits are designed to provide reasonable
protection against harmful interference in a residential installation. This equipment generates, uses
and can radiate radio frequency energy and, if not installed and used in accordance with the instruction, may cause harmful interference to radio communications. However, there is no guarantee that
interference will not occur in a particular installation. If this equipment does cause harmful interference
to radio or television reception, which can be determined by tuning the equipment off and on, the
user is encouraged to try to correct the interference by one or more of the following measures:
• Reorient or relocate the receiving antenna.
• Increase the separation between the equipment and receiver.
• Connect the equipment into an outlet on a circuit different from that to which the receiver is
connected.
• Consult the dealer or an experienced radio / TV technician for help.
SAFETY CERTIFICATION
This Compact Disc is made and tested to meet safety standards of the FCC, requirements and
compliance with safety performance of the U.S. Department of Health and Human Services, and
also with FDA Radiation Performance Standards 21 CFR Subchapter J.
1
SAFETY INSTRUCTIONS - Read before operating equipment
This product was designed and manufactured to meet strict quality and safety standards. There are,
however, some installation and operation precautions which you should be particularly aware of.
1. Read Instructions — All the safety and operating instructions should be read before the appliance is operated.
2. Retain Instructions — The safety and operating instructions should be retained for future reference.
3. Heed Warning — All warnings on the appliance and in the operating instructions should be
adhered to.
4. Follow Instructions — All operating and use instructions should be followed.
5. Water and Moisture — The appliance should not be used near water – for example, near a
bathtub, washbowl, kitchen sink, laundry tub, in a wet basement, or near a swimming pool, etc.
6. Carts and Stands — The appliance should be used only with a cart or stand that is recommended by the manufacturer.
6A.
An appliance and cart combination should be moved with care. Quick stops, excessive force, and uneven surfaces may cause the appliance and cart combination to
overturn.
7. Wall or Ceiling Mounting — The appliance should be mounted to a wall or ceiling only as
recommended by the manufacture.
8. Ventilation — The appliance should be situated so that its location or position does not interfere
with its proper ventilation. For example, the appliance should not be situated on a bed, sofa, rug,
or similar surface that may block the ventilation openings; or, placed in built-in installation, such
as a book case or cabinet that may impede the flow of air through the ventilation openings.
9. Heat — The appliance should be situated away from heat sources such as radiators, heat registers, stoves, or other appliances (including amplifiers) that produce heat.
10. Power Sources — The appliance should be connected to a power supply only of the type described in the operating instructions or as marked on the appliance.
11. Grounding or Polarization — The precautions that should be taken so
that the grounding or polarization means of an appliance is not defeated.
CAUTION: To prevent electric shock, match the wide blade of this plug to
AC
the widle slot, fully insert. Do not use this (polarized) plug with an extension
Polarized Plug
cord, receptable or other outlet unless the blades can be fully inserted to
prevent blade exposure.
12. Power-Cord Protection — Power-supply cords should be routed so that they are not likely to be
walked on or pinched by items placed upon or against them, paying particular attention to cords
at plugs, convenience receptacles, and the point where they exit from the appliance.
13. Cleaning — The appliance should be cleaned only as recommended by the manufacturer.
14. Power Lines — An outdoor antenna should be located away from power lines.
15. Nonuse Periods — The power cord of the appliance should be unplugged from the outlet when
left unused for a long period of time.
16. Object and Liquid Entry — Care should be taken so that objects do not fall and liquids are not
spilled into the enclosure through openings.
17. Damage Requiring Service — the appliance should be serviced by qualified service personnel
when:
A. The power-supply cord or the plug has been damaged; or
B. Objects have fallen, or liquid has spilled into the appliance; or
C. The appliance has been exposed to rain; or
D. The appliance does not appear to operate normally or exhibits a marked change in performance;
or
E. The appliance has been dropped, or the enclosure damaged.
18. Servicing — The user should not attempt to service the appliance beyond that described in the
operating instructions. All other servicing should be referred to qualified service personnel.
2
LOCATION OF CONTROLS AND INDICATORS
1.
2.
3.
4.
5.
6.
7.
8.
9.
10.
11.
12.
13.
14.
15.
16.
17.
18.
19.
20.
21.
22.
23.
24.
25.
Pause Button
Stop / Eject Button
Fast Forward Button
Fast Rewind Button
Play Button
Record Button
CD Door Open
Band Selector
Tuning Dial Pointer
CD. F. Skip Button
CD B. Skip Button
FM Stereo LED
Volume Knob
Function Switch
DBB Button
Play / Pause Button
Stop Button
LCD Display
Telescopic Antenna
Tuning Knob
Battery Door
AC Mains
Headphones Jack
Speakers (Front)
Speakers (Rear)
1 2 3
4 5 6
13
14
7
8
15
16
17
18
9
10
11
12
24
24
19
20
22
25
23
25
21
L.C.D. DISPLAY
26. Track Number Indicator
27. Pause Indicator
27
26
3
POWER SUPPLY
Battery supply
• Open the battery compartment and insert as shown 8 batteries, type R14, UM2 or C-cells.
• Remove the batteries if exhausted or if they will not be used again for a long period.
* The battery supply is switched off when the set is connected to the mains.
• To change over to battery supply, pull out the plug from the AC MAINS socket.
Note on Environmental Protection
Do not throw exhausted batteries in the household refuse.
Hand over the old batteries to your dealer or public collecting points when buying new ones.
Mains supply
• Check if the mains voltage as shown on the type plate (on the back of the set) corresponds
to your local mains voltage. If it does not, consult your dealer or
service organisation.
• Connect the mains lead to the AC MAINS socket and the wall socket.
* The mains supply is switched on.
• To disconnect the set from the mains completely, withdraw the mains plug from the wall
socket.
RADIO OPERATION
Radio aerials
• For FM, pull out the telescopic aerial. To improve FM-reception, incline and turn the aerial.
Reduce its length if the FM-signal is too strong (very close to a transmitter).
• For AM, the set is provided with a built-in aerial, so the telescopic aerial is not needed.
Direct the aerial by turning the whole set.
Radio reception
• Set the Function switch to RADIO.
• Adjust the sound using the VOLUME and DBBS controls.
• You may connect stereo headphones having a 3.5mm plug to the jack PHONES.
* Inserting the plug will disconnect the speakers.
• Select the wave band using the BAND SELECT selector.
• Tune to a desired radio station using the TUNING control.
• The set is switched off when the Function switch is in the TAPE position and no buttons are
pressed.
4
COMPACT DISC OPERATION
Inserting a CD
•
•
•
•
Set the Function switch to CD.
To open the CD compartment, lift the CD door on the edge marked OPEN/CLOSE.
Insert the AUDIO CD, printed side facing up.
Close the cover.
* The CD-player scans the contents list of the CD.
After that, the total number of tracks appears on the display.
Playing a CD
• Press PLAY/PAUSE to start playback.
* The display shows the track number.
• Adjust the sound using the VOLUME and DBBS controls.
• For brief interruptions, press PLAY/PAUSE.
* " ll " appears on the display.
• To resume playback, press PLAY/PAUSE again.
• To stop playback, press STOP.
– The total number of tracks will then appear on the display.
– The CD player also goes to STOP position:
* if you open the CD door;
* when the end of the CD is reached;
* if you move the Function selector;
* if the batteries run down or if the power supply is interrupted.
• To take out the CD, open the CD door by lifting the edge marked OPEN/CLOSE.
• Open the CD door only if the CD-player is in position STOP.
Previous / Next
Selecting another track during play
• Press PREVIOUS or NEXT until the required track number appears in the display.
* The selected track begins to play after PLAY/PAUSE is pressed.
Starting with a particular track
• Press PREVIOUS or NEXT until the required track number appears in the display.
• Press PLAY/PAUSE.
* Play starts from the selected track.
Searching for a passage during a play
• Hold PREVIOUS down to search backwards to the beginning.
• Hold NEXT down to search forwards to the end.
Note: This function can be described as "audibly" searching for a title. During the search,
volume is reduced and returns to its adjusted level as soon as the button is released.
5
HANDLING COMPACT DISCS
This unit is designed to play only compact discs
bearing the identification logo below. Other discs
may not conform to the CD standard and may
not play properly.
• Dirty, scratched or warped disc may cause
skipping or noise.
• Handle the disc only by the edges. To keep
clean, do not touch its surface.
• Discs should be stored in their cases after use
to avoid serious scratches.
• Do not expose disc to direct sunlight, high
humidity, high temperatures or dust etc. Prolonged exposure to extreme temperatures can
warp the disc.
• Do not stick or write anything on either side of
disc. Sharp writing instruments, or the inks used
in some felttip pens, may damage its surface.
CLEANING DISCS
• Finger prints should be carefully wiped from the
surface of disc with a soft cloth. Unlike
conventional records, compact discs have no
grooves to collect dust and microscopic debris,
so gently wiping them with a soft cloth should
remove most particles. Wipe in a straight motion
from the center to the edge.
• Never use thinner, benzine, record cleaner or
anti-static spray on a compact disc. Such
chemicals can damage its plastic surface.
6
INSERT WITH
THE LABEL
FACING UP.
PRESS THE CLAWS
AT THE CENTER OF
THE DISC CASE.
PRESS THE
DISC GENTLY
TO INSERT IT.
LIFT OUT WITHOUT
TOUCHING THE
RECORDED SURFACE.
INCORRECT
CORRECT
FROM THE CENTER TO THE EDGE
INCORRECT
CASSETTE DECK OPERATION
Cassette playback
•
•
•
•
•
Set the Function switch to TAPE.
Press STOP/EJECT to open the cassette holder.
Insert a recorded cassette.
Adjust the sound using the VOLUME and DBBS controls.
Press PLAY and playback will start.
* Playback stops when the tape in the deck reaches the end.
• For brief interruptions, press PAUSE.
* To restart playback, press this button once more.
• To stop, press STOP/EJECT.
* When the end of the tape is reached the PLAY button is released.
* The set will be switched off if the Function switch is in TAPE position and no buttons are
pressed.
Winding the tape
• Press FAST REWIND to search backward to the beginning of the tape.
• Press FAST FORWARD to search forward to the end of the tape.
Cassette recording
• Press STOP/EJECT to open the cassette holder.
• Insert the cassette.
• When monitoring during recording, adjust the sound using the controls VOLUME and DBBS
controls. These controls do not affect the recording.
• Start recording by pressing RECORD.
(The PLAY button is auotmatically also pressed).
* When the end of the tape is reached, the recorder buttons are released.
• To interrupt recording, press PAUSE.
• To continue recording, press PAUSE again.
• Press STOP/EJECT if you want to stop recording before the end of the tape.
On pressing again, the cassette holder will open.
• The set is switched off if the Function switch is in position TAPE and no buttons are pressed.
Recording from the CD-player
• Insert a blank or pre-recorded tape into the cassette compartment.
• Set the Function switch to CD.
• Start recording by pressing RECORD of cassette deck
(The PLAY button is automatically also pressed).
• Press PLAY/PAUSE of CD control to desired play track or from the beginning of the
programmed selection.
• As soon as the desired passage is reached, pause the CD and then start recording by
pressing RECORD.
7
Recording from the radio
• Insert a blank or pre-recorded tape into the cassette compartment.
• Set the Function selector to RADIO.
• Select the wave band using the BAND SELECT switch.
• Tune to desired radio station using the TUNING control.
• Start recording by pressing record of cassette deck.
TIPS ON CASSETES
CHECKING THE CASSETTE
Make sure that the cassette tape has no slack prior to
inserting it into the recorder. Unless the tape is taut, it
may wind around the head mechanism and trouble may
result. Use a pencil to wind the reels as necessary to
take up any tape slack.
CASSETTE TPE SELECTION
The quality conditin of cassette tapes used will have a direct effect on the performance of this
unit. low quality extended length tapes such as C90 (45 minutes per side) or longer are not
recommended. They tend to break, stretch and can easily become entangled in the drive
mechanism causing major damage. Use only NORMAL "tape A" or "type 1" cassette tape.
SAFEGUARD AGAINST ACCIDENTAL ERASING
To protect valuable recording from accidental erasing, the
tape deck and the cassette are equipped with standard
safety features. To protect the recorded material, break
out the tabs on the top of the cassette which correspond
to the side to be protected.
BREAK OUT
TAB TO
PROTECT
SIDE A
BREAK OUT
TAB TO
PROTECT
SIDE B
ADHESIVE TAPE
Note: Do not force the record ubton when the cassette
record-protec tab has been removed. This may result in
damage to the unit.
To record on a cassette whose tab have been broken off, simply attach adhesive tape over the
tab opening.
8
PERIODIC MAINTENANCE
EXTERNAL CARE
Periodically wipe the cabinet with a soft cloth damped in diluted soapy solution,
then wipe with a dry cloth. Do not use harsh cleansing chemicals, they may damager
or discolor the cabinet finish. Do not allow liquids or foreign objects to enter the CD
compartment.
COMPACT DISC PLAYER
The accumulation of dust particles on the laser
pickup lens may cause skipping or track jump.
Use a camera lens brush/blower to blow clean.
Do not touch the pickup lens. Fingerprints will
also cause the player to malfunction.
See your authorized dealer/service center for
further information regarding maintenance of the
CD pickup system.
CASSETTE DECK
This unit has been permanently lubricated at the
factory, no further lubrication is necessary. If a
loss in brilliance (high frequency response) is
noticed, the tape head probably needs cleaning.
This may be done by playing a special headcleaning cassette, available at most dealers. As
an alternative, the surface of the head may be
cleaned with a cotton swab moistened in alcohol
or special head-cleaning fluid. Carefully rub the
face of the head, being careful not to scratc its
polished surfce. also clean the surface of the
capstan and pinch roller.
9
Blower
Lens
Erase
Head
Play/Record
Head
Capstan
Pinch
Roller
SPECIFICATION
Frequency range
FM: 87 -108 MHz
AM: 530 - 1710 KHz
Antennas
FM: Telescopic antenna
AM: Built-in ferrite bar
Frequency response
100-8,000Hz
Speaker
3" 8 ohms speaker x 2
2" 8 ohms speaker x 2
Power output
1W + 1W
Power requriements
AC 110V 60Hz
12V DC, UM2 (Size C) batteries
Power consumption
14W in AC operation
Dimensions
Approx. 335(W) x 245(D) x 152(H) mm
Weight
Approx. 3 Kgs. w/o batteries
Accessory supplied
AC power cord
DESIGN AND SPECIFICATION ARE SUBJECT TO CHANGE WITHOUT NOTICE.
10