1
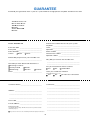
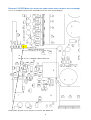
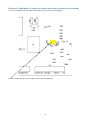
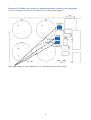
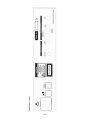
Talk Electronics
Thunder 2.2 CD Player
User Manual
T ALK ELECTRONICS LTD. U NIT 3 IMAGE HOUSE 326 MOLESEY R OAD HERSHAM SURREY KT12 3PD ENGLAND
TEL: +44 (0)1276 709966 FAX: +44 (0)1276 682843 E-MAIL: [email protected] www.talkelectronics.com
1
Talk Electronics
Thunder User Manual
INTRODUCTION
well-being – do not allow it to come into contact with
water. Keep it away from potted plants to avoid
those all-too-common watering accidents! To clean
the amplifier’s case disconnect it from the wall
socket and wipe it with a barely damp, lint-free cloth
or chamois leather. If you suspect that water has
entered the casework, return the amplifier to your
dealer so that he can examine it.
Thank you for choosing a Talk Electronics
Thunder CD player. We are confident that it
will provide you with many years of musical
enjoyment and reliable service. However,
please take the time to read this guide
thoroughly before using the amplifier. It
explains how to install and connect it, and
suggests how to ensure that you always
enjoy its optimum performance.
UNPACKING
Once you have installed your CD player please
retain all packaging including the polythene bag
which is designed to protect the finish of the unit
whilst in transit. If you decide to upgrade or add a
Whirlwind power supply, the packaging will be
required to protect the Thunder and ensure it arrives
undamaged at the factory or your distributor.
LIST
CD player
Remote control handset
AC power cord
Instruction manual
SAFETY
The Talk range of CD players contains Class 1 laser
optics. You must never remove the lid from a player
and look into the laser while it is operating: this could
damage your eyes.
NOTE: We recommend that the supplied AC
power cord is replaced with a high quality Merlin
Cables power cord for best results.
Please be aware that this unit is not supplied with
interconnects and we recommend the use of the
Merlin series of interconnect cables.
ELECTRICAL CONNECTIONS
The Thunder comes with a ready assembled mains
lead and we suggest that you use this to connect it
to the mains supply. We strongly recommend that
you connect the lead directly to a wall socket and do
not use extension blocks, which degrade sound
quality. For the same reason we also advise against
“line filters” and “mains conditioners”. If your mains
supply is noisy or you have household appliances
that generate clicks and pops that can be heard
through your hi-fi system, have an electrician correct
the problem at its source. We do however
recommend the use of ‘Merlin Cables’ power chords
which do not interfere with the current flow and offer
a significant performance improvement
INSTALLATION INSTRUCTIONS
HOW TO SITE AND CONNECT YOUR THUNDER CD PLAYER
FOR BEST PERFORMANCE AND SAFE OPERATION
Please unpack your CD player carefully and position
it on a stable, level surface close to a mains socket.
Before attempting to connect it into your system
please read this manual carefully.
The Thunder will perform well placed on a coffee
table or bookshelf but if you wish to achieve the best
performance we suggest you place it on a specialist
hi-fi support. There are many suitable designs
available, which your dealer will be happy to advise
you about.
Should you need to replace the fuse in the mains
plug, please fit only the correct replacement types.
This is a standard 5A.
If, for any reason, you wish to replace the plug or
cable, please note that the lead must be connected
as follows.
Position the CD player so that it will not be subjected
to high ambient temperatures: avoid sites where it
will be in direct sunlight or close to a central heating
radiator. For your own safety – and your CD player’s
2
NOTE: These instructions apply in the United
Kingdom only – consult your dealer about wiring
conventions in other countries.
Please ensure that the replacement lead contains a
5A fuse.
The power switch mounted on the Thunder’s rear
connects and disconnects the mains supply. When
mains is connected, the display on the facia will
illuminate. If you plan to be away from home for long
periods – when, for example, you are on holiday –
you can use this switch to power down the CD
player completely. For absolute safety, disconnect
the mains lead from the wall socket. We advise that
you do this during thunderstorms to avoid damage
from power line surges.
OPTIONAL DC POWER CONNECTIONS
REAR PANEL
Green and yellow wire connects to EARTH (E or
symbol
)
Blue wire connects to NEUTRAL (N)
Brown wire connects to LIVE (L)
Refer to Diagram on Page 11
If you have opted for one of our external Whirlwind
DC power supplies this should be connected using
only the cables supplied with the Whirlwind. We
strongly recommend that you do not replace or
attempt to modify these cables. Doing so can
adversely affect the CD player’s performance and is
likely to cause damage.
MAINS CONNECTIONS
Next to the mains switch, on the rear panel, is an
IEC socket into which the supplied mains lead fits.
The fuse in the UK mains plug is a 5A standard type.
Again, if you need to replace it use an identical type
rated at 5A. If the fuses keep blowing return the CD
player to your dealer.
You will also need to re-configure your player for
external DC operation using the internal jumpers as
described below.
OUTPUT CONNECTIONS
The analogue output sockets on the CD player are
found on the rear panel. There are both balanced
and unbalanced connections available and we
strongly advise you to use the balanced where
possible. Connect these to your amplifier or preamplifier’s CD or Auxiliary input using high quality
interconnect cables (we strongly recommend Merlin
cables for optimum performance). On all players, the
socket marked in red is the right channel, and the
white socket is the left channel.
Before attempting to re-configure your player, disconnect the mains lead at the wall socket. Having
made your player safe, remove the cover by unscrewing the screws located on the top and those
on the underside using a combination of a T10
security torx driver and a No.1 posi-drive screwdriver
lift the cover and locate the blue jumpers in the back
right corner using Diagram 3 (see page 9) and
position them for the desired configuration. Replace
the cover, connect your Whirlwind power supply and
re-connect the mains lead to the wall socket.
There are both optical and coaxial digital outputs as
standard on all our players. Our research shows that
the levels of signal jitter caused by separating the
player’s transport mechanism and DAC introduce an
unacceptable degradation in sound quality,
counteracting the benefits accrued through using
our high quality, ultra-low jitter, 24-bit DAC. If you
wish to make digital recordings you will need to
switch on the digital output provided using the
yellow internal jumper, see Diagram 1 (see page 7).
However, we caution you that this addition will have
a slight detrimental effect upon the player’s
performance.
SWITCHING YOUR CD PLAYER ON AND OFF
If you are using a Whirlwind external DC supply to
power the analogue parts of your CD player we
suggest that this, once connected, is left switched
on all the time. To avoid “switch-on thumps” being
transmitted to your loudspeakers when you switch
on your CD player, we recommend that you always
switch on – or cancel mute on – your amplifier last.
Start by powering source components, such as your
CD player, then power the pre-amplifier. Then switch
on the power amplifier. When you’ve finished
listening, mute or turn off the power amplifier and
then mute your pre-amplifier. Finally, turn off your CD
player and other source components. You may, if
you wish, leave your CD player powered up at all
times: this will enable it to deliver optimum
performance as soon as you begin listening,
however we suggest that you switch off the display
when not required. This requires that a disc is
present in the player at all times.
Before attempting to re-configure your player, disconnect the mains lead at the wall socket. Having
made your player safe, remove the cover by unscrewing the screws located on the top and those
on the underside using a combination of a T10
security torx driver and a No.1 posi-drive screwdriver
lift the cover and locate the yellow jumper using
Diagram 1 (page 7) and position it for the desired
configuration. Replace the cover and re-connect the
mains lead to the wall socket. The Digital Output
should now work accordingly.
3
VARIABLE OUTPUT VERSION.
TIME: Push once during Play mode to display the
time remaining on the current track. Push again to
display the time remaining on the disc. Push while
the player is in Stop mode to display the total
number of tracks and playing time of the disc.
Note: if the disc contains more than 69 tracks the
display will show “_ _ . _ _” instead of the remaining
time. It will show the same if the remaining time
exceeds 100 minutes during PROGRAM PLAY
mode.
If your player was specified as a variable type then
you will find a label “VAR”‚ next to the serial no.
There is no readout or display of the volume however
it will remember where you last left it, even if you
power the player off. So in answer to the question;
How do I know how loud it is? It is where you last left
it! The mute function on the handset will also mute
the players output completely, push the button for a
second time and output will be restored. There is
enough gain to drive any power amplifier into clipping however the factory default setting is quite low,
as we do not know what amp and speakers you
may have and we do not want you to leap out of
your skin when you first play a disk. The volume
control operates in the analogue domain so you are
not reducing the bit count or resolution, it is a micro
processor controlled resistor ladder and has only a
very subtle effect on sound quality like any volume
control.
DISPLAY: Push once to turn off the display. Push
again to return the display to full brightness.
Note: When the display is switched off, pushing any
control on the player or remote handset, or changing
the disc, will switch on the display for about 3
seconds. Please note that this function only works if
a disc is present in the player and playing.
REMOTE CONTROL FUNCTIONS
As well as duplicating the major controls found on
the player, the remote handset provides the following
additional features.
OPERATING YOUR CD PLAYER
You can control the major functions of your CD
player from either the remote control handset or the
buttons on the player’s facia. If you simply wish to
play a disc you do not need the remote control.
However, do not lose the handset because it is
required when you wish to program the player or use
features such as FF or FR.
PROGRAM: push to construct a program
containing up to twenty-four selected tracks. The
player will play your selections in the order in which
you enter them into the program.
1. Select a track number by pressing the PREVIOUS
or NEXT key, or by using the numerical keys.
2. Press PROGRAM. “PROGRAM” appears on the
display panel indicating Program Play mode. This
is quite dull.
PLAYER CONTROLS
OPEN: Push once to close the player’s drawer after
inserting a disc. Do not push the drawer closed with
your hand as this can damage the drawer
mechanism.
3. To add further tracks repeat steps 1 and 2.
Once you have entered all the desired tracks, you
can play your programme by pressing the PLAY
button
PLAY/PAUSE: Push once to start the disc playing. If
the player’s drawer is open, pushing play will cause it
to close and commence playing automatically.
Pressing for a second time whilst playing a disc will
pause the disc.
To erase a programmed track, press the CLEAR key.
Each time you press CLEAR, the last selection in the
program will be removed. Press STOP to stop the
program playing, then press STOP again.
REPEAT: Push once to repeat the whole disc. Push
twice to repeat the track currently playing. Pressing
the button a third time returns normal operation.
FAST FORWARD and REWIND: To move rapidly to
a particular section of music you can use the FAST
FORWARD or REWIND keys, depending, obviously,
upon whether you wish to access a section not yet
reached or one that you have passed. While the
player is in Play mode you will hear music playing at
high speed. To move quickly through the disc in
silence, press PAUSE before pushing the FF or REW
buttons.
STOP: Push once to stop the player operating.
PREVIOUS: Push during Play mode to play the
previous track. Pushing more than once will cause
the player to go back an equivalent number of
tracks.
NEXT: Push during Play mode to play the next track.
Pushing more than once will cause the player to
advance an equivalent number of tracks.
NUMERIC KEYS: These are used for entering
selections in Program mode or for starting Play
mode from a particular track. For example, loading a
disc and then pressing “7” will cause the player to
start playing the disc beginning at track 7. To access
tracks greater than 9, first press “0” followed by the
track number required.
4
TIMER MODE
VOLUME: The volume buttons will operate the
volume function on any remote control amplifier that
accepts RC5 commands. They are provided solely
for your convenience, as there are no volume control
functions on the CD player
Your player is equipped with a Timer Mode. This
allows the player to automatically play a disc when
powered on from the mains via the use of an external timer. It is switched off by default at the factory.
To turn this on follow the instructions below using
Diagram 2 (see page 8).
HIDDEN MODES
These are only accessible with the use of an RC5
handset with the appropriate keys (Not the supplied
handset).
Before attempting to re-configure your player, disconnect the mains lead at the wall socket. Having
made your player safe, remove the cover by unscrewing the screws located on the top and those
on the underside using a combination of a T10
security torx driver and a No.1 posi-drive screwdriver
lift the cover and locate the yellow jumper located in
the bottom right corner of the main PCB using
Diagram 2 (page 8). To set the Timer ON remove the
yellow jumper or place it in such a way that it is held
by only one pin. Replace the cover and re-connect
the mains lead to the wall socket. The Timer Mode
should now be operational via the use of an external
mains power timer.
SHUFFLE: Press SHUFFLE followed by PLAY to
listen to tracks in a random order. To cancel Shuffle
mode, press SHUFFLE again.
INTRO: Press INTRO and the player will scan
through the disc playing the first 10 seconds of each
track. Press INTRO while in Play mode and the
player will scan through the disc playing the first 20
seconds of each track. To cancel either Intro mode
simply press PLAY.
SPECIFICATIONS
THUNDER 2.2
Maximum Output Voltage
Output Impedance
Frequency Response
Distortion 1kHz max output
Signal - to - Noise Awtd
Mains Voltage
Dimensions
width
height
depth
2.6V* RMS
<100 ohms
5 – 20k ± 0.2dB
<=0.001%
–104dB
230V /115V/100V AC ± 10%
440mm
89mm
325mm
(allow at least 400mm for connections)
11.4kg
13.2kg
Weight per unit
unpacked
packed
* Variable output version 6V RMS
Talk Electronics’ policy of continued research and development means that the above specification may change without
notice.
The Thunder has been manufactured to conform with the protection requirements of the EC Council directive 89/336/EEC
relating to EMC by application of the following standards:
EN50081-1 1992 Emissions Standard
EN50082-1 1992 Immunity Standard
and also the requirements of the EC low voltage directive relating to electrical safety by application of the following standard
BSEN60065: 1994 Safety standard
For the purposes of testing the Thunder was used with the mains cables and high quality interconnects supplied by Merlin
Cables. Compliance with the above standards can only be made if the unit is installed as per this manual and using the
correct cables.
*Guarantee: 3 Years return to dealer.
To help us provide you with the most efficient service please return your guarantee card promptly. Your CD player is
guaranteed against manufacturing and component defects for a period of 3 years. The guarantee does not cover and
damage caused by accident, misuse, neglect or through incorrect installation, adjustment or repair by unauthorised
personnel or the cost of collecting the Thunder from you and returning it to the dealer. The above does not effect your
statutory rights as a consumer.
E & OE. Due to our policy of continued development we reserve the right to change the specifications at any time.
*Upon return of Guarantee Card
5
GUARANTEE
To extend your guarantee from 1 year to 3 years FREE of charge please complete and return this form
T ALK ELECTRONICS LTD.
UNIT 3 IMAGE HOUSE
326 MOLESEY ROAD
HERSHAM
SURREY KT12 3PD
ENGLAND
FOLD HERE
Model: Thunder 2.2
Please tell us about the rest of your system
Amplifier ________________________________
Purchase date ___________________________
Tuner ___________________________________
Price paid _______________________________
Speakers ________________________________
Serial Number ____________________________
Mains Cables ____________________________
Colour:
■
Black
■
Silver
Interconnect Cables ______________________
Speaker Cables __________________________
Where did you purchase your Thunder 2.2?
Why did you choose the Thunder 2.2?
________________________________________
________________________________________
________________________________________
How did you hear about Talk Electronics?
■ Existing customer
■ Family/Friend
■ Dealer
■ Advertising
■ Review
Are you interested in Home Cinema?
■ Yes
■ Internet
Other ___________________________________
■ No
■ Undecided
Have you visited our website?
www.talkelectronics.com
■ Yes
■ No
■ Do not have connection
FOLD HERE
Customer Name __________________________
Comments _______________________________
________________________________________
Address _________________________________
________________________________________
________________________________________
________________________________________
________________________________________
________________________________________
Post Code _______________________________
________________________________________
E-mail address ___________________________
________________________________________
Data Protection Act
Your details will be held by Talk Electronics Ltd. for promotional and
statistical purposes.
________________________________________
■
________________________________________
If you do not wish to receive marketing information please tick this box
6
DIAGRAM 1: SP DIF MODE (TO LOCATE THIS AREA
PLEASE REFER TO MAIN LAYOUT DIAGRAM)
This is an enlarged version of the hatched area on the main layout diagram
Place yellow jumper across the pins to turn SP DIF Mode ON
7
DIAGRAM 2: TIMER MODE (TO LOCATE THIS AREA PLEASE
REFER TO MAIN LAYOUT DIAGRAM)
This is an enlarged version of the hatched area on the main layout diagram
Remove yellow jumper from the pins to turn Timer Mode ON
8
DIAGRAM 3: DC MODE (TO
LOCATE THIS AREA PLEASE REFER TO MAIN LAYOUT DIAGRAM)
This is an enlarged version of the hatched area on the main layout diagram
Move blue jumpers to external position for use with Whirlwind 2.2 power supply
9
DIAGRAM 4: MAIN LOCATING DIAGRAM
10
1234567890123456789
1234567890123456789
1234567890123456789
1234567890123456789
1234567890123456789
1234567890123456789
1234567890123456789
1234567890123456789
1234567890123456789
1234567890123456789
1234567890123456789
1234567890123456789
1234567890123456789
1234567890123456789
1234567890123456789
1234567890123456789
1234567890123456789
1234567890123456789
1234567890123456789
1234567890123456789
1234567890123456789
1234567890123456789
1234567890123456789
1234567890123456789
1234567890123456789
1234567890123456789
Area of Diagram 2
12345678901234567890123456
12345678901234567890123456
12345678901234567890123456
12345678901234567890123456
12345678901234567890123456
12345678901234567890123456
12345678901234567890123456
12345678901234567890123456
12345678901234567890123456
12345678901234567890123456
12345678901234567890123456
12345678901234567890123456
12345678901234567890123456
12345678901234567890123456
12345678901234567890123456
12345678901234567890123456
12345678901234567890123456
12345678901234567890123456
12345678901234567890123456
12345678901234567890123456
12345678901234567890123456
12345678901234567890123456
12345678901234567890123456
12345678901234567890123456
12345678901234567890123456
Area of Diagram 1
Area of Diagram 3
1234567890123456789
1234567890123456789
1234567890123456789
1234567890123456789
1234567890123456789
1234567890123456789
1234567890123456789
1234567890123456789
1234567890123456789
1234567890123456789
1234567890123456789
1234567890123456789
1234567890123456789
1234567890123456789
1234567890123456789
1234567890123456789
1234567890123456789
1234567890123456789
1234567890123456789
1234567890123456789
1234567890123456789
1234567890123456789
1234567890123456789
1234567890123456789
1234567890123456789
1234567890123456789
11
REAR PANEL LAYOUT