1
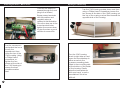
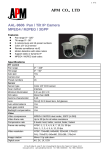
Help Desk / Support Details
English
All Countries E-mail: [email protected]
Telephone Helpdesk
UNITED STATES toll free
877-274-3695
(Sun-Thurs, 2pm-10.30pm PST)
800-627-2799
(Mon-Fri, 9am-1pm PST)
USA Exchange & Returns
562-777-2551
(Mon-Fri, 9am-4pm PST)
AUSTRALIA toll free
1300 13 8324
(Mon-Fri, 9am-5.30pm Aus EST)
International
+61 3 8412 4610
(Mon-Fri, 9am-5.30pm Aus EST)
See http://www.worldtimeserver.com for information on different time
zones and the time in Melbourne Australia compared to your local time.
WARRANTY INFORMATION
Swann Communications warrants this product against defects in workmanship and
material for a period of one (1) year from it’s original purchase date. You must present
your receipt as proof of date of purchase for warranty validation. Any unit which proves
defective during the stated period will be repaired without charge for parts or labour, or
replaced at the sole discretion of Swann. The repair or replacement will be warranted for
either ninety days or the remainder of the original one year warranty period, whichever is
longer. The end user is responsible for all freight charges incurred to send the product to
Swann’s repair centres. The end user is responsible for all shipping costs incurred when
shipping from and to any country other than the country of origin. The warranty does not
cover any incidental, accidental or consequential damages arising from the use of, or the
inability to use this product. Any costs associated with the fitting or removal of this
product by a tradesman or other person, or any other costs associated with its use are
the responsibility of the end user. This warranty applies to the original purchaser of the
product only, and is not transferrable to any third party.
Unauthorised end user or third party modifications to any component or evidence of
misuse or abuse of the device will render all warranties void.
www.swann.com.au
1060 Camera Housing
All Weather Camera Protection
with inbuilt heater / blower
If this device does not work correctly when you first
use it, do not take it back to the store.
Contact the Swann Helpdesk using our fast e-mail service
[email protected] or call us on one of the Toll-Free
numbers shown on the back cover of this booklet.
Most problems can be quickly and easily fixed with a simple
e-mail or a quick chat with one of our friendly technical staff.
(Toll-Free available in the US and Australia only)
Installation Guide
Mounting the 1060 Housing
INDEX
Introduction
This package comes with...
Opening the 1060 Housing
Installing a Camera
Connecting your Camera
Connecting the Heater / Blower Power
Mounting the 1060 Housing
Technical Specifications
Help Desk / Support Details
Warranty Information
2
2
3
4
5
6
7
7
Back Cover
Back Cover
Using the built in adjustable
mounting points you can mount the
1060 Housing on a stand, pole or
wall bracket. For alternative
mounting options, the Universal Tilt
and Swivel stand is available for
separate purchase. Product code
SW-A-CBI. Check with your local
retailer for more details.
INTRODUCTION
The Swann 1060 Camera Housing is designed to keep your CCTV camera
safely enclosed to minimise the risk of damage by vandals or storms, and also
from being affected by inclement weather. Its flexible design allows it to
accommodate most CCTV cameras currently available.
The 1060 Housing also comes equipped with a low voltage heater bar and
cooling fan to assist with keeping your images clear during periods of poor
weather.
Technical Specifications
Specification of Housing
1
Dimensions: (L x W x H): 15¾”x 5½”x 4 /3” ~ 400mm x140mm x112mm
This package comes with...
•
•
•
•
•
•
1 x CCTV Camera Housing
2 x Cable Seal Plug with Rubber Grommet and Locking Nut
1 x Camera Mounting Screw
2 x Camera Base Plate Mounting Screws
1 x Imitation Camera Fascia
This Instruction Sheet
If any of these items are missing, please contact your retailer.
2
Weight: 3¼lb ~ 1.5Kg (without camera)
Camera Opening Diameter: 2¾” ~ 72mm
Material: Case ~ Powder Coated Aluminium
Camera Opening ~ 1/8” (3mm) Glass
Camera Mounting plate ~ Impact Resistant Plastic
Specification of Heater / Blower
Power Requirement: 12 Volt DC ~ 0.5amp (500mA)
Temperature Activation: The fan or heater will activate automatically at the
following temperatures. The fan and heater do not both run at the same time.
Fan on at 98.6°F (37°C)
Hot Weather:
Cold Weather: Heater on at 59°F (15°C)
7
Connecting the Heater / Blower Power
+
+ -
Turn the camera on
and adjust the focus
to suit your
requirement then
close the top of the
1060 housing. Using
a “Philips Head”
screwdriver, retighten the two
screws at the side of
the 1060 housing to
ensure the best
possible weather
seal.
6
Opening the 1060 Housing
Connect the wires you
passed through the seal
plug to the Heater /
Blower power terminals
with the positive and
negative wires as
marked in this illustration.
Once the wires are in the
screw terminal holes,
tighten the screws down
to give the wires a good
electrical connection.
Turn the 1060 Housing upside-down and then
using a “Philips Head” screwdriver, loosen the
two screws at the side of the 1060 housing until
the top of the casing can be lifted towards the
opposite side of the housing.
Turn the 1060 housing
back to right side up and
open the top sideways to
allow access to the
camera mounting plate
fitted to the mounting rails
at the bottom of the inside
of the housing. Gently
prise the base plate up
with your hand, or use a
screwdriver if this is too
difficult.
3
Installing a Camera
Connecting your Camera
Fit your CCTV camera to the
camera mounting plate
using the supplied mounting
screw or the screws that may
have come with your
camera
Insert the cables for
the Camera Power,
Camera Video and
Heater / Blower
through the seal plug
on the underside of
the back end of the
1060 housing and
pass the cables
through in to the
housing. Once this is
done tighten the nuts
on the seal to
prevent moisture and
dust entering.
+-
Fit the camera mounting plate back into the mounting rails
at the bottom of the housing and push down firmly until it
clicks into place. Make any necessary adjustments to the
distance from the glass or angle of the camera then screw
in the supplied mounting screws to stop the mounting
plate from moving.
4
Connect the Video and Power
wires you passed through the seal
plug to your camera. Connect
the opposite end of the cables to
a video viewing device and
check for correct operation.
5