Transcript
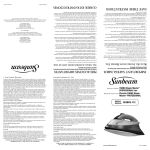
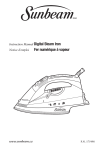
Quick Start Guide
TURBO Steam Master® Professional Iron
GCSBCS-112
7
6
4
2
8
9
5
3
1
10
11
12
1. SPRAY MIST® Release
2. Covered Water Fill Hole to Reservoir
3. Steam Select Dial
4. Wait / Ready Indicator
5. Fabric Select Buttons
6.SHOT OF STEAM® / Vertical Steam Button
(select models only)
7. SPRAY MIST® Trigger
8. Soft Grip Handle
9. 360° Tangle-Free Swivel Cord
10.See-Through Water Reservoir /
Maximum Fill Line
11. Self Clean Button
12. Soleplate
Using Your Iron
Filling The Water Reservoir (use tap water)
1. Make sure the iron is unplugged. Set the Steam Lever to
(Dry).
2. Lift the Covered Water Fill Hole to Reservoir.
3. Pour tap water into water reservoir, using the easy-pour
cup included with your iron.
WARNING: To prevent the risk of burns, be careful when
filling a hot iron with water. Hot metal parts, hot water and
steam can cause injuries.
Dry Ironing
1. Make sure the Steam Lever is turned to the (Dry) setting.
2. Plug the cord into a 120-Volt AC outlet.
3. Press the +/- buttons to select desired Fabric Setting.
Allow the iron to heat until wait/ready light turns green
indicating the unit is ready. While the iron is
heating, make sure it is sitting on its heel rest on a stable,
protected surface.
NOTE: While the Steam Lever is turned to the (Dry)
setting, you may still use the SHOT OF STEAM® or SPRAY
MIST® feature, as long as the fabric setting is set to wool,
cotton, or linen. Please make sure the water reservoir is
approximately ¼ full of water.
Steam Ironing
1. Follow the instructions for “Filling the Water Reservoir.”
2. Plug the cord into a 120-Volt AC outlet.
3. Press the +/- buttons to select desired fabric setting.
Allow iron to heat until Wait/Ready light turns green
indicating the unit is ready. While the iron is heating,
make sure it is sitting on its heel rest on a stable,
protected surface.
IMPORTANT: When not ironing, always set the Steam
Lever to (Dry) and the Fabric Select Buttons to OFF.
Caring for Your Iron After Use
Turning Off Your Iron
Turn the Steam Lever to (Dry) and press the Fabric Select
Buttons until OFF is illuminated. Unplug the iron from the
power source.
WARNING: NEVER yank the power cord when unplugging
the iron. This can damage the cord.
Storing Your Iron
1. Turn off iron following instructions above. Allow the iron
to cool.
2. If you do not use your iron on a daily basis, empty the
water reservoir after each use for a longer iron life. To do
so, unplug the iron, turn the iron upside down, open the fill
hole cover, and allow water to flow from the fill hole. Shake
the iron gently to remove trapped water drops.
3. Loosely loop the power cord around the heel rest and
store the iron on its heel rest.
IMPORTANT: Wrapping the cord around the iron too
tightly can damage the cord.
Visit www.sunbeam.com for an Ironing Guide and Ironing Tips
Please do not return
STOP product to the place
of purchase!
Call 1.800.458.8407 or visit www.sunbeam.com
Refer to manual for safety and cleaning instructions. For any questions please call 1.800.458.8407 or
visit us at www.sunbeam.com. © 2011 Sunbeam Products, Inc. doing business as Jarden Consumer
Solutions. All rights reserved. Distributed by Sunbeam Products, Inc. doing business as Jarden
Consumer Solutions, Boca Raton, Florida 33431. Printed in China SPR-051211-385 P.N. 147424
www.sunbeam.com