1
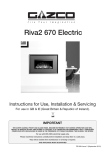
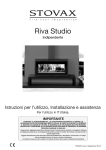
Winchester Front
Installation Instructions
For use with the Logic Hotbox, Logic Convector, Logic IPF,
Logic E-Box™and E-Studio™
PR1018 Issue 2 (July 2008)
USER AND INSTALLATION INSTRUCTIONS
Covering the following front:
Logic
8698 MB
8698 P
E-Box
E-Studio
8697 MB
8697 P
USER INSTRUCTIONS
30
2
508
1.2
269
Only clean the front when it is cold. The front should be
cleaned using a damp cloth and buffed with a lint free
duster.
Access to the controls is behind the ash pan cover.
618
1.1
28
40
1. CLEANING AND CONTROLS
210
INSTALLATION
INSTRUCTIONS
71
These instructions are supplemental to and must be read in
conjunction with the Installation Instructions supplied with the
gas fire. Read both thoroughly before installing the appliance.
Fitting of this front is to be carried out after the appliance has
been fully installed but before the commissioning tests. Except
for use with the E-Box where commissioning will need to take
place prior to fitting the front.
55
AR2178
2. FItting FOR ALL FIRE TYPES
There is a bracket on the reverse side of the front at the top
edge:
• Hook the bracket onto the lugs at the top of the fire, Diagram 3
3
1. FRONT DIMENSIONS
365
Diagram 1 shows the Winchester Front dimensions for the
Logic hotbox, Logic Convector and Logic IPF:
30
1
AR2179
508
618
4
210
337
There are two flat clips supplied to grip the bottom edge of the
front to the fire:
• Clip each side of the front to the fire as shown in Diagram 4
71
375
55
AR2180
AR2177
Diagram 2 shows the Winchester Front dimensions for the
E-Box, E-Studio Conventional and Balanced Flue:
• Slide the ash pan cover into place
Gazco Limited, Osprey Road, Sowton Industrial Estate, Exeter, Devon, England EX2 7JG
Tel: (01392) 261999 Fax: (01392) 444148 E-mail: [email protected]
A member of the Stovax Group