1
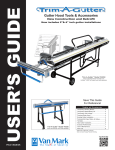
Operator's Manual . Trim Master-MBWT5B
WARNING: READ ENTIRE MANUAL BEFORE ATTEMPTING TO OPERATE MACHINE!
If incorrectly used this machine can cause severe injury. Those who use and maintain this
machine should be trained in its proper use, warned of its dangers, and should read the
entire manual before attempting to set up, operate, adjust, or service this machine.
The Engine Exhaust from this product contains chemicals known to the State of
California to cause cancer, birth defects or other reproductive harm.
IMPORTANT: THIS UNIT IS EQUIPPED WITH AN INTERNAL COMBUSTION ENGINE AND SHOULD NOT BE USED ON OR
NEAR ANY UNIMPROVED FOREST-COVERED, BRUSH-COVERED, OR GRASS-COVERED LAND UNLESS THE ENGINE'S
EXHAUST SYSTEM IS EQUIPPED WITH A SPARK ARRESTER MEETING APPLICABLE LOCAL LAWS (IF ANY). IF A SPARK
ARRESTER IS USED, IT SHOULD BE MAINTAINED IN EFFECTIVE WORKING ORDER BY THE OPERATOR.
IN THE STATE OF CALIFORNIA, A SPARK ARRESTER IS REQUIRED BY LAW (SECTION 4442 OF THE CALIFORNIA PUBLIC
RESOURCES CODE). OTHER STATES MAY HAVE SIMILAR LAWS. FEDERAL LAWS APPLY ON FEDERAL LANDS. SEE
YOUR AUTHORIZED SERVICE CENTER FOR A SPARK ARRESTER.
2
Impor
tant Rules for YYour
our Safet
Important
Safetyy
Before operating this machine read all the instructions for safe operation, as well as,
the instructions governing the engine and other components of this machine.
TRAINING
• Read the Owner's Manual carefully. Be thoroughly
familiar with the controls and the proper use of the equipment. Know how to stop the unit and disengage the
controls quickly.
• Never allow children to operate the equipment. Never
allow adults to operate the equipment without proper
instruction.
• Operators should be mature enough to understand the
dangers of the equipment.
PREPARATION
• Thoroughly inspect the area where the trimmer is to be
used and remove all foreign objects.
• Keep the area of operation clear of all persons, particularly small children and pets.
• Do not operate the equipment without wearing adequate
outer garments.
• Wear footwear that will improve footing and provide
adequate protection.
• Loose clothing may be caught by moving parts on the
machine or by the surrounding environment and cause
serious injury.
• Wear safety goggles to protect eyes from any debris or
objects that may be thrown from the trimmer.
• Wear long pants, sturdy shoes and gloves to protect
yourself from debris, sticks, rocks or other objects which
could be thrown from trimmer.
• Handle fuel with care. It is highly flammable.
• Use only an approved fuel container.
• Never add fuel to a running engine or a hot engine.
• Fill fuel tank outdoors with extreme care. Never fill fuel
tank indoors.
• Replace gasoline cap securely and clean up spilled fuel
before starting.
• Never attempt to make any adjustments while the engine
is running ( except where specifically recommended by
manufacturer).
• Do not operate trimmer until you are familiar with all
controls and safety symbols.
OPERATION
• Do not attempt to trim high slope areas. Move across
the slope, not up and down.
• Avoid areas with heavy debris and rocks, since the
objects could be thrown from the trimmer and cause
serious injury.
• Trim only when the grass is dry. Wet grass can cause
slipping.
• Exercise extreme caution when operating near or
crossing gravel drives, walks or roads. Gravel can be
thrown from the trimmer and cause injury.
• Stay alert for hidden hazards or traffic.
• Disengage trimmer head when crossing driveways or
other rocky areas.
• Keep trimming area free of children and pets.
• Never operate the trimmer indoors where exhaust from
engine can collect. It contains carbon monoxide which is a
tasteless, odorless, poisonous gas.
• Operator should never place hands, feet, or any part of
his body or clothing near any moving part of this trimmer.
• Never operate the trimmer without proper guards, plates,
or other safety protective devices in place.
• Take all possible precautions when leaving the machine
unattended. Stop the engine.
• Stop the engine when leaving the operating position.
• If the trimmer should start to vibrate abnormally, stop the
engine and check immediately for the cause. Vibration is
generally a warning of trouble.
• After striking a foreign object, stop the engine, remove
the spark plug wire, and thoroughly inspect the trimmer for
any damage. If damage has occurred repair the damage
before restarting and operating the trimmer.
• Do not put hands or feet near or under rotating parts.
• Never operate the machine at high speeds on slippery
surfaces. Look behind and use care when backing up.
• Do not run while using equipment.
• Equipment should only be used as it was intended.
Misuse can cause serious injury.
• Operate equipment only in a well lit area. Do not use
trimmer after dark without artificial light.
• Never operate equipment when under the influence of
drugs, alcohol, or prescription drugs which could cause
drowsiness or poor judgement.
MAINTENANCE
• Keep machine in good working condition.
• Before cleaning, repairing, or inspecting the machine,
shut off the engine and make certain all moving parts have
stopped. Disconnect spark plug.
• Follow the recommendations for maintenance described
in this manual and the engine literature.
• Keep engine and trimmer free from accumulations of
grass, leaves, or excessive grease. An accumulation
of these combustible materials may result in fire.
• Store gasoline only in an approved container.
• Never store machine with fuel in the fuel tank inside a
building where open flame or spark are present. Allow
engine to cool before storing in any enclosure.
• Frequently check all bolts and other connectors for
proper tightness before operating the equipment.
• Replace safety decals as needed.
ASSUMPTION OF RISK: THE OWNER AND/OR OPERATOR OF THIS TRIMMER ASSUMES ALL THE RISKS
INCIDENT TO AND ARISING OUT OF THE OPERATION OF THIS MACHINE. BEFORE OPERATING THE TRIMMER, READ ALL THE INSTRUCTIONS GOVERNING THE ENGINE AND THE TRIMMER.
3
Assembly
1. Remove the Trimmer from the carton by cutting the box on all four
corners and rolling it off the box base.
2. Remove owner's manuals and parts bag.
• Parts bag includes a pair of safety glasses and an allen wrench.
3. Raise the handles (See figure 1).
• Hold the handle with one hand and loosen handle knobs. Do not
remove the knobs.
• Raise the handle to the upright position.
• Insure cables are not caught between the two handle parts.
• Tighten the knobs on both sides of the handles.
• Insure handle is secure.
Handle
4. Attach the recoil start rope handle to the rope guide.
5. Attach the upper safety shield.
• Remove the loosened bolts on both sides of trimmer unibody
frame (in front of the wheels).
• Attach shield to trimmer frame.
5. Make sure all bolts are tight.
Handle in shipping position
knob
Bolts for upper shield
attachment
Operation
Bolts for
upper
shield
attachment
Figure 1
Before Starting Your Trim master . . .
1. Check your Trimmer. Be sure all bolts are tight. After several hours of operating and at periodic maintenance
intervals, check all fasteners and tighten securely as required.
2. Check oil and fill according to the engine owner's manual (See Figure 2).
WARNING : YOUR ENGINE IS SHIPPED WITHOUT OIL. YOU MUST FILL THE ENGINE WITH OIL BEFORE ATTEMPTING TO CRANK YOUR ENGINE.
•
•
•
•
•
•
•
•
Read Engine manual for full instructions and safety warnings.
Place trimmer on level ground.
Clean around oil fill area.
Remove dipstick. Wipe with clean cloth.
Reinsert dipstick and tighten. Remove dipstick and check.
Oil should be at FULL level.
If oil is required, add slowly. Recheck level.
Tighten dipstick and clean around oil fill area before starting.
Figure 2
3. Fill engine with clean unleaded gasoline according to the engine owner's manual.
WARNING: GASOLINE IS FLAMMABLE. USE CAUTION WHEN HANDLING OR STORING GASOLINE. NEVER FILL THE GAS TANK WHILE THE ENGINE IS RUNNING OR HOT. ALLOW THE
ENGINE TO COOL BEFORE ADDING GAS. CLEAN ANY SPILLED GASOLINE.
4. Remove all debris from guard, deck, muffler area, head cooling fins, and throttle controls.
5. Check the air cleaner element. Insure that the air filter is clean.
6. Familiarize yourself with all operating controls.
4
STRING TRIMMERS ARE PRONE TO DEBRIS BUILD-UP. CLEAN GRASS AND OTHER DEBRIS FROM
GUARD, DECK, MUFFLER AREA, HEAD COOLING FINS, AND THROTTLE CONTROLS.
DO NOT ATTEMPT TO START OR OPERATE THIS TRIMMER UNTIL YOU ARE COMPLETELY FAMILIAR
WITH LOCATION AND USE OF EACH CONTROL NECESSARY TO OPERATE THIS TRIMMER. YOU MUST
KNOW HOW TO STOP THIS MACHINE BEFORE YOU START IT. EACH TIME PRIOR TO STARTING, CHECK
THE THROTTLE ASSEMBLY TO INSURE IT IS WORKING PROPERLY.
Throttle Control Lever
Trimmer
control Bail
Recoil Starter Handle
Upper Handle
Upper Guard
Fuel Cap
Handle Knob
Lower Handle
Trimmer Line
Lower Guard
Trimmer Head
Figure 3
Operating Controls
1. Trimmer Control Bail -- Controls the rotation of the
trimmer head. To begin trimming pull the control bail
towards the handle. To stop trimming release the control
bail. It will return to the open position and disengage the
trimmer head.
2. Throttle Control Lever -- Controls the speed of the
engine or stops the engine. To stop the engine move the
throttle back towards the operator to the stop or off position. The faster the engine runs, the faster the trimmer
head will rotate.
3. Lower Guard -- The lower guard is a safety device that
will help prevent debris from hitting the operator's feet and
legs. Never operate this trimmer without the lower guard
or if the lower guard is broken.
4. Upper Guard -- The upper guard is a safety device that
will help prevent debris from hitting the operator's face and
body. Never operate this trimmer without the upper guard
or if the upper guard is broken.
NEVER OPERATE THE TRIMMER WITHOUT
PROPER GUARDS, PLATES, OR OTHER
SAFETY DEVICES IN PLACE. SERIOUS INJURY
OR DEATH COULD RESULT.
EVEN THOUGH THIS TRIMMER IS EQUIPPED
WITH SAFETY SHIELDS, IT IS POSSIBLE FOR
DEBRIS TO BE THROWN FROM THE TRIMMER.
WEAR SAFETY GLASSES AT ALL TIMES AND
KEEP THE TRIMMING AREA CLEAR OF BYSTANDERS ESPECIALLY SMALL CHILDREN
AND PETS.
5
Starting the engine
1. Read engine owner's manual for complete starting instruction. Do not operate this trimmer without reading the engine
owner's manual.
2. Move the throttle control lever forward to the START or FAST position.
3. Push primer bulb firmly 3 times before starting engine. Note: Priming is usually unnecessary when restarting a warm
engine.
4. Grasp rope handle and pull slowly until resistance is felt. Then pull cord rapidly to overcome compression, prevent
kickback and start engine.
5. Operate engine in the fast throttle position.
Adjustments and Maintenance
Trimmer Line
1.
2.
3.
4.
5.
6.
7.
8.
9.
Your trimmer loses trimming efficiency when the trimmer line is used beyond half of original length.
For best performance use a heavy gauge (.155" diameter) line.
Cut trimmer line to 23 inches.
Stop the engine. Wait for all moving parts to stop. Disconnect spark plug wire.
Remove worn trimmer line.
Thread trimmer line through to outside holes as shown in Figure 4.
Bring the two ends together and insert them (from the back) through the middle hole as shown in figure 5.
Tighten the trimmer line as shown in Figure 6.
Repeat for the other side.
Figure 4
Figure 5
Figure 6
Cut Height Adjustment
1. The cut height can be set at 1 7/8" and 3 3/4".
2. Stop the engine. Wait for all moving parts to stop. Disconnect the spark
plug wire.
3. Use the allen wrench found in the parts bag to loosen the set screw shown
in Figure 7.
4. Set the trimmer head at the desired height.
Belt Adjustment Bolt
5. Tighten the set screw.
Set Screw
Grease fitting
Lubrication of Jackshaft
1. Stop the engine. Wait for all moving parts to stop. Disconnect the spark
plug wire.
2. Use a grease gun with a good grade of automotive grease to lubricate the
jackshaft using the grease fitting (See Figure 7).
Drive Belt Adjustment
1.
2.
3.
4.
5.
6.
7.
If the trimmer head does not turn effectively. The drive belt may have seated.
Stop the engine. Wait for all moving parts to stop. Disconnect the spark plug wire.
Observe distance between inside span of belts at the narrowest point. Span should measure 1 inch.
Loosen the bolts that hold the trimmer head and jackshaft to the trimmer under body (See Figure 7).
Move the assembly forward to tighten the belt or remove belt and replace if it is worn.
Tighten bolts.
Recheck the belt inside span.
Figure 7
Maintenance Schedule
1. Before each use: Check engine oil level, Check trimmer lines, Check trimmer head engagement, Clean engine,
engine bonnet and machine of excess grass and oil, Remove debris from guard, engine bonnet, and deck, and Check
nuts and bolts for appropriate tightness.
2. After every 25 hours: Check spark plug, Change engine oil, Change or clean air filter, lubricate jackshaft, and lubricate wheel bearings.
Figure 8
6
Ref. No.
Part
Description
1
358202
Unibody -- painted
2
400184
3
Ref. No.
31
Part
Description
Ref. No.
Part
Description
KT1965
10 pack trimmer line
60
446130
1/4" Lock Washer
Cap screw -- 5/16 x 3/4 NC5
KT1966
20 pack trimmer line
61
443101
1/4" NC Hex Nut
455041
5/16 flat washer
KT1967
80 pack trimmer line
62
400297
Shoulder Bolt -- 3/8" x 1"
4
446136
5/16 Lock washer
32
313794
Glide Bowl
63
455042
3/8" Flat Washer
5
443106
5/16" NC hex Nut
33
455045
Fender Washer -- 3/8" x 1 1/2"
64
444716
5/16" NC Centerlock Nut
6
358205
Belt guide -- painted
34
463018
Key -- 3/16" x 1/2"
65
336779
Decal -- Caution
7
336667
pulley, 3-1/2" x 7/8"
35
463012
Key -- 3/16" x 2"
66
336720
Decal -- Do not operate
8
415562
Set Screw -- 5/16-18 x 5/16"
36
336670
Pulley -- 3 1/2" x 5/8"
67
336790
Decal -- Engage Blad Control
9
359383
Key -- 3/16" x 1"
37
455062
Shim Washer -- 41/64" x 1" x .032
68
336938
Decal -- Danger Keep Hands
10
132126
Engine
38
358201
Hub Belt Guide -- Painted
69
336792
Decal -- 24"
11
400200
Cap Screw -- 5/16" x 2 1/2" NC5
39
358203
L.H. Wheel Bracket -- painted
70
336761
Decal -- Maxim
12
400194
Cap Screw -- 5/16" x 1 1/2" NC5
40
358204
R.H. Wheel Bracket -- painted
71
336924
Decal -- Made in the USA
13
359559
Cable Holder
41
358219
Bottom Cover -- Painted
132119-A Bonnet guard
14
162055
Capro Control
42
408883
1/4" x 1/2" Hex Washer Screw
132119-B Foam Bonnet
15
358213
Idler Arm Assembly -- painted
43
359360
S-Hook
132119-C O Ring
16
359321
Idler Pulley -- 2 3/4" x 3/8"
44
358212
Drag Shield -- Painted
17
400290
Cap Screw -- 3/8" x 1 3/4" NC2
45
359349
3/4" Cap Plug
18
444721
3/8" NC Center lock Nut
46
130700
Wheel -- 14" Plastic Yellow
19
359344
Shoulder Bolt -- 1/2" x 1 7/8"
47
400294
Shoulder Bolt -- 3/8" x 1/2" x 2.50
20
455044
1/2" Flat Washer, STD
48
358206
LH Brace-- Top Shield -- Painted
21
272254
Belt -- L448
49
358207
RH Brace -- Top Shield -- Painted
22
359369
Extension Spring
50
358208
Top Shield
23
358220
Hub Plate -- painted
51
358210
Lower Handle -- Painted
24
400190
Cap Screw -- 5/16" x 1 1/4" NC5
52
358211
Upper Handle -- Painted
25
400186
Cap Screw -- 5/16" x 1" NC5
53
360106
Knob -- 5/16"
26
162011
Hub Asembly
54
162046
Throttle Control
27
358218
Dust Cup -- Spot Weld
55
358221
Control Lever Stop Bracket
28
358216
Cutter Head
56
400219
Pull Rope Guide
29
131103
Shaft. Hub
57
445768
1/4" hex Nut
30
358209
Support Washer, Glide -- painted
58
130623
Trimmer control Lever
31
358217
Trimmer Line-- 23"
59
400116
Cap Screw -- 1/4" x 2" NC5
KT1972
Engine Bonnet Kit
7
8
Limited Warrant
Warrantyy
Maxim Manufacturing Corporation, through its dealers will repair or replace any part, or parts of the
Trimmaster frame or handles that are defective in material or workmanship or both. Transportation
charges on parts submitted for repair or replacement under this Warranty must be borne by
purchaser. The original sales receipt must be submitted as proof of purchase date. The sales receipt
will be returned. Maxim Manufacturing Corporation assumes no liability for labor charges made in
performance of this warranty.
The Warranty periods are as follows:
A. Frame for 1 Year
B. Handles for 1 Year
The Throttle Cable, Tires, Fasteners, trimmer cord and belt are not warranted because during normal
service they are subject to wear.
The Warranty on the Frame is Void if:
A. Frame is broken or bent due to abuse.
B. Wheels are bent or broken due to impact.
C. Altering of engine or its components has occurred.
All warranties are voided if the Trimmer has been altered , rented, used under abnormal conditions, or subject to abuse, misuse, neglect, or improper maintenance.
The Engine is warranted by the engine manufacturer, not by Maxim Manufacturing Corporation. See
Engine Owner's Manual for information regarding engine warranty.
Should you experience problems with your Trimmer take it back to your authorized Maxim dealer
or distributor to make warranty claims.
Maxim Manufacturing is not liable for any damage claim or liability claim, personal or
otherwise, resulting from the operation of this vehicle in any way.
Maxim Manufacturing Corporation • Sebastopol, MS 39359 • (601) 625-7471 • 10/99 • Part No. 336763