1
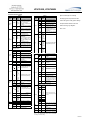
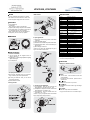
HTINT650S, HTINT650W
◐NOTES
<Wall mount>
1. You can install the camera indoors or outdoors.
2. Be careful not to scratch the lens or dome cover.
3. Use 1Amp power supply at 12V DC or 24V AC.
◐SPECIFICATION
Model No.
Image Sensor
Effective Pixel
Cell Size
Scanning System
◐FEATURES
Sync. Type
OSD
WDR Set
Resolution
S/N Ratio
1. IP67 (Waterproof)
2. Construction
Body : Aluminum, Dome : Polycarbonate
3. (Optional) Wall, Ceiling and pole mounts available
4. 25M range visible in total darkness with 24pcs of
IR LEDs (depends upon scene reflection)
5. Side control board for easy function adjustment
6. Dual power (12V DC or 24V AC) operation
(1) Remove the screw for fixing a cable on the bottom
of the base.
(2) Open the DOME COVER.
(3) Remove the TAP COVER and place the cables there.
(4) After distributing cables, use the TEPLON tape to
wipe the pipe.
(5) Attach the pipe to the base.
<Caution> If you don't wipe TEFLON tape on pipe, it
might cause water intrusion issues.
◐HOW TO INSTALL
1. Camera installation
(1) Fix the camera with the supplied screws on
ceiling or wall mount.
(2) Please refer to '3. Camera angle adjustment' regarding
adjust camera angle.
(3) Lens adjustment
2 : 1 Interlace
Shutter
Intensifier
Gain Control
Speco DNR
V Motion
Privacy
Mirror
Clarity
D&N
Stabilize
Digital Zoom
OFF / ON(1 ~ 32 Level adjustable)
ON / OFF(8 Zone, Alarm output)
ON / OFF(12 Zone)
H / V / BOTH / OFF
ON / OFF(Level adjustable)
ICR(COLOR / Black&White / AUTO)
ON / OFF
ON(x16) / OFF
DPC
Power Supply
Current Consumption
Operation Temp.
Dimension
Weight
256 point(Even 128 point, ODD 128 point)
Regulated 12V DC or 24V AC
150mA(LED OFF), 500mA(LED ON)
-20 to 122
Ø150 x 98.6(H)mm
1.76Ibs
Color Temp.
2. Pipe application
768(H) X 494(V) PIXEL
6.35㎛(H) X 7.4㎛(V)
Internal / Line lock(24V AC)
Multi-language
SSDR / BLC / HLC / OFF
Color : 600 TV-Line, B/W : 700 TV-Line
52dB(AGC OFF, Weight ON)
LED ON : 0 Lux(25M Range)
LED OFF : 0.0005 Lux(Color Sense-up),
0.0002 Lux(B/W Sense-up)
ATW(1,700°K ~ 11,000°K) /
AWC / MANUAL / OUTDOOR / INDOOR
1/60 ~ 1/120,000sec
AUTO / FIXED / OFF(x2 ~ x512 selectable)
LOW / HIGH / OFF
Min. Illumination
◐DIMENSION
HTINT650S, HTINT650W
1/3" SONY SUPER HAD CCDⅡ
※The specification is subject to change without any
prior notice to improve the quality.
◐FUNCTIONS
1. Setup for camera functions
After opening the LED cover,
①ENTER :
①By turning the "Tele-Wide" knob, you can access a
range of focal lengths within specified limits.
- Push the lever : Used to access the menu and
confirm selection.
- Push the lever for one second : Open the menu or
close the menu.
②By turning the "Near-Far" knob, you can set the
focus toward an object.
(4) Reassemble the camera.
②Up, ③Down :
Used to move the cursor to up or down.
<Ceiling mount>
3. Camera angle adjustment
(1) Pan adjustment : Grasp the disk of camera and
adjust direction to the right or left(-160˚~ 190˚)
(2) Tilt adjustment : Grasp the LED cover of camera and
adjust direction to up or down(6˚~ 90˚)
(3) Roll adjustment : Grasp the camera holder and
then rotate(-178˚~ 178˚)
<Caution> If you try to adjust the camera out of limited
angle, it might cause damage to camera.
④Left, ⑤Right :
Used to move the cursor to left or right and change
the value.
⑥EXT-VIDEO :
Extra video output terminal for installation.
Plug your test monitor in here. The cable is option.
HTINT650S, HTINT650W
2. Camera function setting
Select
menu
Sub
menu
DC IRIS
BRIGHT
NESS,
IRIS
SPEED,
FOCUS
ADD.
MANUAL
BRIGHT
NESS
ADJUST
LENS
BRIGHTNESS
ESHUTTER
Summary
Adjust the brightness of the screen
(Range : 1~70, Default : 25)
Adjust the Iris speed of the DC lens
(Range : 1~50, Default : 3)
Focus addition : To adjust the lens
focus correctly
Manual mode is not recommended
using built-in the DC Lens(Default :
25)
Brightness ADJ. : Adjust the brightness of the screen when using the
DC lens(Range : 1~70, Default : 25)
MANUAL
Auto setting is not selectable
FLK,
when selected DC Lens
---
OFF : Deactivates function
LOW : Auto selection between
5.3dB and 32dB
OFF,
AUTO
HIGH : Auto selection between
LOW,
GAIN
EX5.3dB and 37dB(You can not
HIGH
POSURE
use the DIS, Day&Night when
AGC is off)
OFF : Deactivates function
SENSOFF,
AUTO : Using sense up when it is
UP
AUTO
low luminance(x2~x512 selectable)
Save the value then move back
RETURN
to previous menu
*Notes : If the AGC is off, the sense-up function is not
available. As the sense-up level increases, an afterimage will appear.
ATW
Color temperature 1,700~11,000°K
OUTColor temperature 1,700~11,000°K
DOOR
COLOR
TEMP
INDOOR
MANUA
L
Color temperature 4,500~8,500°K
Adjust the Red or Blue values to
shift the color of the screen
Find the optimal white balance for
current luminance environment
(The camera focus must towards
to white paper)
Deactivates function
Wide dynamic range function(1
~15 level selec-table, Default : 8)
Deactivates function
AWC →
SET
WDR
SET
OFF
ON
OFF
SLC
SLC SET
HLC
SPECO
DNR
DAY &
NIGHT
Page 2
EXIT
LEVEL,
TOP,
BOTTOM,
LEFT,
RIGHT
LEVEL,
LIMIT,
MASK
COLOR,
MASK
TONE,
TOP,
BOTTO
M, LEFT,
RIGHT
User programmable SLC zone
and compensation level
Removed HIGH LIGHT, It enable
us to watch license plate clearly
Reduce noise in low illumination
(Reduction level is selectable,
Default : 20)
OFF
Deactivates function
*Notes : If the AGC is off, the DNR function is not available
BURST
MODE
COLOR Day : Color↔Night : B/W
→ B/W, (Switching time & speed adjustAUTO
B/W → able)
COLOR,
RETURN
Change the color↔B/W by exEXT
ternal signal (Not available)
COLOR
Fixed at color(LED OFF)
BURST
MODE
B/W
Fixed at B/W(LED ON)
(OFF/ON),
ON
Speco Technologies is constantly
Page 2
Page 1
Function
setting
menu
Level
RETURN
*Notes : If the AGC is off, this function is unavailable
Please refer to "Page 2"
SAVE
Save the value and exit menu
NOT
Exit the main menu without save
SAVE
DEReset the camera setup value
FAULTS
to the factory default
Special
setting
menu
ADJUST
Select
menu
V-REV
H-REV
DIGIZOOM
FONT
COLOR
CLARITY
RETURN
Sub
menu
Summary
Set a vertical image inversion
Set a horizontal image inversion
Max 16x digital zoom available
(Default : X1.0)
Change the color of OSD
(Default : Blue, 5 color is available)
The image outline will be strong
and clear according to sharpness
level increasing(Default : 13)
If this function is Off, it may looks
like un-focused
Save the value then move back
to previous menu
developing product improvements. We
reserve the right to modify product design
and specifications without notice and
without incurring any obligation.
Rev. 7/7/10.
GAMMA,
PED
LEVEL,
COLOR
LCD
GAIN,
DEFAULT
SET
GAMMA,
PED
MONILEVEL, You can change the settings value of
TOR
USER
COLOR video appropriate to your monitor
GAIN,
DEFAULT
SET
PED
LEVEL,
COLOR
CRT
GAIN,
DEFAULT
SET
OFF
No title displays on the screen
CAM
Display the camera's title on the
TITLE
screen(Max. 15character, position
ON
adjustable)
INT
Internal Sync with 12V DC power
SYNC
Setting
the phase is selectable when
TYPE
LL
used 24V AC(Dual power only)
When sensitivity number is high,
SENSITI AREA1~
also motion detection sensitivity
VITY
AREA8
will increase
AREA
Determines whether to use the MD
OFF, ON
MODE
area selected in SENSITIVITY
L_TOP,
R_TOP,
SEL
L_BOT- Determines which of the 4 vertices
of each MD area is to be used
POS
TOM,
R_BOTTOM
Determines the coordinate of the
V
XPOS
horizontal axis for SEL POS
MOTION
Determines the coordinate of the
YPOS
vertical axis for SEL POS
Fill the color in selected area(The
color of filling is sequentially seFILL →
lected as brown, orange, blue,
SET
cyan, yellowish green, yellow, magenta and red.)
Save the value then move back
RETURN
to previous menu
*Notes : If the camera detected motion, "MOTION
DETECTED" will appear on the screen
AREA
AREA1~
SEL
AREA12
AREA
ON, OFF
MODE
GREEN,
RED,
BLUE,
MASK
COLOR BLACK, Make a zone for your privacy
WHITE, You can select privacy zone up
GRAY
to 12 area
PRIVACY
MASK
1~10
TONE
TOP
BOTTOM
LEFT
RIGHT
Save the value then move back
RETURN
to previous menu
This function can be mitigates
STABI
ON,
image movement from external
-LIZE
OFF
factors
LANSelect language
GUAGE
Select this to save the special menu
PAGE 1
settings and return to the main menu
ㆍThe " " icon appeared with desired function, press the set
button to move sub menu.
ㆍThe "---" icon appeared with function that is una-vailable
according to function setting.
3B15011B