1
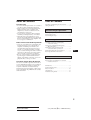
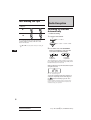
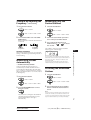
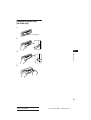
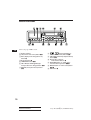
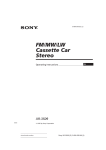
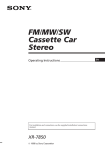
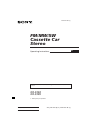
3-858-021-22 (1) FM/MW/SW Cassette Car Stereo Operating Instructions For installation and connections, see the supplied installation/connections manual. XR-3304 XR-3309 1996 by Sony Corporation Actual total number: Sony XR-3304 (E,Ar) 3-858-021-22 (1) EN Features Precautions General • Before operating the unit for the first time or after replacing the car battery, press the reset button with a ball-point pen etc., and then start operating the unit. • Detachable-front panel enables you to take the front panel away with you when you leave your car (page 4). • Caution alarm is activated if you turn off the ignition key without removing the front panel from the unit. • Built-in power amplifier (max. output: 20 W × 4 ch) enables you to enjoy a 4-speaker system. • Digital 12-hour clock provided (page 5). Tuner section • Up to 30 stations can be preset: 12 stations on FM, 6 stations on MW and 12 stations on SW. • Automatic Memory function stores a total of 30 stations in memory quickly and easily (page 7). EN Reset button • If your car is parked in direct sunlight resulting in a considerable rise in temperature inside the car, allow the unit to cool off before operating it. • If no power is being supplied to the unit, check the connections first. If everything is in order, check the fuse. • If no sound comes from the speakers of a 2-speaker system, set the fader control to the center position. • If your car is equipped with a power antenna, note that it is automatically extended while the unit is operating. If you have any questions or problems concerning your unit that are not covered in this manual, please consult your nearest Sony dealer. 2 Actual total number Sony XR-3304(E,Ar) 3-858-021-22 (1) Notes on Cassettes Table of Contents Cassette care Detaching and Attaching the Front Panel ............ 4 Setting the Clock ...................................................... 5 • Do not touch the tape surface of a cassette, as any dirt or dust contaminates the heads. • Keep cassettes away from equipment with built-in magnets such as speakers and amplifiers, as erasure or distortion of the recorded tape could occur. • Do not expose cassettes to direct sunlight, extremely cold temperatures, or moisture. • When the tape is played back for a long period, the cassette shell may become warm because of the built-in power amplifier. This is not a sign of a malfunction. Notes on Cassette Deck Tape Heads • Long use of cassette tapes contaminates the tape head causing poor sound quality or complete sound dropout. Therefore, we recommend cleaning the tape head once a month or so with the separately available Sony Cassette Cleaning Set. If the sound does not improve after using a cleaning cassette, please consult your nearest Sony dealer. • In case of old or inferior cassette tapes, the tape head gets contaminated much more quickly. Depending on the tape, one or two playbacks may cause poor sound. Cassettes longer than 90 minutes The use of cassettes longer than 90 minutes is not recommended except for long continuous play. The tapes used for these cassettes are very thin and tend to be stretched easily. Frequent playing and stopping of these tapes may cause them to be pulled into the cassette deck mechanism. Cassette Player Operation Listening to Tape Playback .................................... 5 Ejecting the Cassette ................................................ 5 Fast-winding the Tape ............................................ 6 Radio Reception Searching for Stations Automatically — Automatic Tuning ......................................... Tuning in by Adjusting the Frequency — Manual Tuning ............................................... Memorizing Stations Automatically — Automatic Memory Function ...................... Memorizing Only the Desired Stations ................ Receiving the Memorized Stations ....................... 6 7 7 7 7 EN Other Functions Adjusting the Sound Characteristics .................... 8 Enjoying Bass and Treble at Low Volume — Loudness Function ......................................... 8 Maintenance ............................................................. 8 Dismounting the Unit ............................................. 9 Button Locations .................................................... 10 Specifications .......................................................... 11 Troubleshooting Guide ......................................... 12 3 Actual total number Sony XR-3304( E,Ar) 3-858-021-22 (1) Detaching and Attaching the Front Panel The front panel of this unit can be detached in order to prevent the unit from being stolen. Detaching the Front Panel Before detaching the front panel, be sure to press the OFF button first. Then press the RELEASE button to open up the front panel. Then slide the front panel a little to the left, and pull it off towards you. • Do not expose the front panel to direct sunlight, heat sources such as hot air ducts or leave it in a humid place. Never leave it on the dashboard etc. of a car parked in direct sunlight where there may be a considerable rise in temperature inside the car. Caution alarm If you turn the ignition key to the OFF position without removing the front panel, the caution alarm is activated and a beep tone will be heard for a few seconds. RELEASE button EN Be sure not to drop the panel after detaching it from the unit. Attaching the Front Panel Apply the right hand side of the front panel to the unit by attaching part A of the front panel to part B of the unit as illustrated, then swing the left side into the unit until it clicks. A B Notes • Make sure that the front panel is the right way up when attaching it to the unit as it cannot be attached upside down. • Do not press the front panel hard against the unit when attaching it to the unit. It can easily be attached by pressing it lightly against the unit. • When you carry the front panel with you, put it in the supplied front panel case. • Do not press hard or give excessive pressure to the display window of the front panel. • Before removing the front panel, be sure to turn the power off. However, if you press the RELEASE button to detach the panel while the unit is still turned on, the power is automatically turned off in order to protect the speakers from being damaged. 4 Actual total number Sony XR-3304(E,Ar) 3-858-021-22 (1) Setting the Clock The clock has a 12-hour digital indication. Cassette Player Operation For example, setting it to 10:08 A.MEM 1 FM Press the or to turn on the unit. MW/SW 2 Display the time. (Press the button during unit operation.) 3 Press the seconds. button Listening to Tape Playback After inserting the cassette, playback will start automatically. DSPL DSPL button for more than two 100 To change the tape direction, press both the 0 and the ) buttons at the same time. The hour digits blinks. EN Set the hour digits. (to go back) (to go forward) 1000 4 Press the SEL The side facing up is being played. button momentarily. Cassette Player Operation Indication of Tape Transport Direction The side facing down is being played. 1000 Tape playback automatically changes direction at the end of the tape. The minute digits blinks. Set the minute digits. Note Before turning off the unit, eject the tape to avoid tape damage. (to go back) (to go forward) Ejecting the Cassette 1008 5 Press the button to stop playback and eject the cassette. DSPL Press the button momentarily. 1008 The clock activates. Note The clock cannot be set unless the power is turned on. Set the clock after you turn on the radio, or during tape playback. Actual total number 5 Sony XR-3304( E,Ar) 3-858-021-22 (1) Fast-winding the Tape Direction indicator* To advance Radio Reception To rewind ( Searching for Stations Automatically — Automatic Tuning 9 1 Select 0 the desired band. A.MEM FM To resume playback, press the other fastwinding button partially until the locked button is released. FM I ˜ FM II MW/SW MW n SWI n SWII n MW * The 9 or ( indicator flashes while fast-winding the tape. 2 EN Press either side of the SEEK/MANU button momentarily to search for the next station (automatic tuning). SEEK MANU For lower frequencies SEEK MANU For higher frequencies The scanning stops when a station is received. Press either side of the button repeatedly until the desired station is received. When an FM stereo program with sufficient signal strength is tuned in, ST 879 the “ST” indication appears. To keep the automatic tuning from stopping on stations too frequently (local seek mode), press button momentarily to get the “LCL” the indication. Only the stations with relatively strong signals will be tuned in. The local seek mode functions only when the automatic tuning is in operation. SENS LOUD 6 Actual total number Sony XR-3304(E,Ar) 3-858-021-22 (1) Tuning in by Adjusting the Frequency — Manual Tuning 1 0 the desired band. Select Memorizing Only the Desired Stations 1 A.MEM FM MW/SW 2 Select 0 the desired band. A.MEM FM I ˜ FM II FM MW n SWI n SWII n MW Press and hold either side of the SEEK/ MANU button. Release the button when the desired station is received. MW/SW For lower frequencies For higher frequencies Tune in the station which you wish to store on the preset number button. 3 Press and hold the desired preset number button ( 1 to 6 ) for about two seconds. Memorizing Stations Automatically The number of the pressed preset number button appears on the display. FM EN ST 879 1 Up to 6 stations on each band (FM I, FM II, MW, SW I and SW II) can be stored on the preset number buttons in the order of your choice. Therefore, 12 stations can be memorized on FM. If you try to store another station on the same preset number button, the previously stored station is erased. — Automatic Memory Function Stations with the clearest reception are automatically searched and memorized on each band (FM I, FM II, MW, SWI and SWII). Up to 6 stations on each band can be stored on the preset number buttons 1 to 6 in the order of band frequency. 1 Receiving the Memorized Stations 1 0 the desired band. Select A.MEM Select 0 the desired band. FM A.MEM FM 2 FM I ˜ FM II FM I ˜ FM II MW/SW MW/SW Cassette Player Operation/Radio Reception PREVENT ACCIDENTS! When tuning in during driving, use automatic tuning or the memory preset tuning instead of manual tuning. MW n SWI n SWII n MW 2 SEEK MANU SEEK MANU FM I ˜ FM II MW n SWI n SWII n MW MW n SWI n SWII n MW Press the FM/A.MEM button for more than0two seconds. A.MEM 2 Press momentarily the preset number button on which the desired station is stored. FM The unit starts scanning the selected band and memorize the tuned stations on the preset number button 1 through 6 automatically. Actual total number Note If you press the preset number button for more than two seconds, the currently received station is memorized. To receive the previously memorized station, make sure that the preset number button is pressed only momentarily. 7 Sony XR-3304( E,Ar) 3-858-021-22 (1) Other Functions Adjusting the Sound Characteristics 1 Maintenance Fuse Replacement When replacing the fuse, be sure to use one matching the amperage rating stated on the fuse. If the fuse blows, check the power connection and replace the fuse. If the fuse blows again after replacement, there may be an internal malfunction. In such a case, consult your nearest Sony dealer. Select the item you want to adjust by pressing the SEL button repeatedly. BAS (bass) n TRE (treble) n BAL (balance) n FAD (fader) n VOL (volume) n BAS (bass) 2 EN Fuse (10 A) Adjust the selected item by pressing either the or button. Adjust within three seconds after selecting. (After three seconds the buttons will again serves as the volume control buttons.) Enjoying Bass and Treble at Low Volume — Loudness Function SENS Press the button for more than two seconds. n “LOUD” will appear on the display. The bass and treble are boosted. To cancel, press again. LOUD Warning Never use a fuse with an amperage rating exceeding the one supplied with the unit as this could damage the unit. Cleaning the Connectors The unit may not function properly if the connectors between the unit and the front panel are not clean. In order to prevent this, open the front panel by pressing the RELEASE button, then detach it and clean the connectors with a cotton swab dipped in alcohol. Do not apply too much force. Otherwise, the connectors may be damaged. Main unit Back of the front panel 8 Actual total number Sony XR-3304(E,Ar) 3-858-021-22 (1) Dismounting the Unit (XR-3304 only) 1 Release key (supplied) 2 EN Other Functions 3 4 9 Actual total number Sony XR-3304( E,Ar) 3-858-021-22 (1) Button Locations DIR DSPL RELEASE 1 2 3 4 5 6 OFF A.MEM SENS SEL SEEK MANU FM MW/SW LOUD EN Refer to the pages in r for details. 1 Display window 2 SEL (control mode select) button 58 3 DSPL (display mode change/time set) button 5 4 6 (eject) button 5 5 SEEK/MANU button 67 6 0 • ) (fast winding)/DIR (tape transport direction change) buttons 56 7 RELEASE (front panel release) button 48 8 (bass/treble/balance/ fader control/volume) buttons 58 9 SENS/LOUD (sensitivity adjust/loudness) button 68 !º During radio reception: Preset number buttons 7 !¡ FM/A.MEM (radio on • band select/ automatic memory) button 567 !™ MW/SW (radio on • band select) button 567 !£ OFF button 4 10 Actual total number Sony XR-3304(E,Ar) 3-858-021-22 (1) Specifications Cassette player section Power amplifier section Tape track Wow and flutter Frequency response Signal-to- noise ratio Outputs 4-track 2-channel stereo 0.13 % (WRMS) 30 – 15,000 Hz 55 dB Speaker outputs (sure seal connectors) Speaker impedance 4 – 8 ohms Maximum power output 20 W × 4 (at 4 ohms) Tuner section General FM Output lead Tuning range Antenna terminal Intermediate frequency Usable sensitivity Selectivity Signal-to-noise ratio 87.5 – 108.0 MHz External antenna connector 10.7 MHz 12 dBf (75 ohms) 70 dB at 400 kHz 63 dB (stereo), 68 dB (mono) Harmonic distortion at 1 kHz 0.5% (stereo), 0.4% (mono) Separation 28 dB at 1 kHz Frequency response 30 – 15,000 Hz Capture ratio 5 dB MW/SW Tuning range Antenna terminal Intermediate frequency Sensitivity MW tuning interval: 531 – 1,602 kHz SW tuning interval: SWI: 2.940 – 7.735 MHz SWII: 9.500 – 18.135 MHz (except for 10.140 – 11.575 MHz) External antenna connector 450 kHz/10.71MHz 35 µV Tone controls Power requirements Dimensions Mounting dimension Mass Supplied accessories Optional accessories Power antenna relay control lead/Power amplifier control lead Bass ±8 dB at 100 Hz Treble ±8 dB at 10 kHz 12 V DC car battery (negative ground) Approx. 188 × 58 × 170 mm (w/h/d) not incl. projecting parts and controls Approx. 182 × 53 × 153 mm (w/h/d) not incl. projecting parts and controls Approx. 1.3 kg Parts for installation and connections (1 set) Front panel case (1) RCA pin cord RC-63 (1 m), RC-64 (2 m), RC-65 (5 m) EN Design and specifications are subject to change without notice. 11 Actual total number Sony XR-3304( E,Ar) 3-858-021-22 (1) Troubleshooting Guide The following checklist assists in the correction of most problems which you may encounter with your unit. Before going through the checklist below, refer to the connection and operating procedures. General Problem Cause/Solution No sound • Adjust the volume with the button. • Set the fader control to the center position for 2-speaker systems. Indications do not appear on the display. Remove the front panel and clean the connectors. See “Cleaning the Connectors” of “Maintenance” for details. Tape playback EN Problem Cause/Solution Playback sound is distorted. Contamination of the tape head. n Clean the head. Radio reception Problem Cause/Solution Preset tuning is not possible. • Memorize the correct frequency. • The broadcast is too weak. Automatic tuning is not possible. The broadcast is too weak. n Use manual tuning. The “ST” indication flashes. Tune in precisely. If the above-mentioned solutions do not help to improve the situation, consult your nearest Sony dealer. 12 Actual total number Sony XR-3304(E,Ar) 3-858-021-22 (1)