1
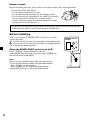
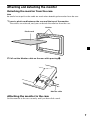
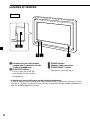
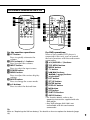
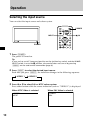
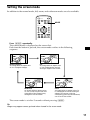
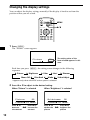
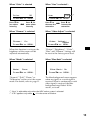
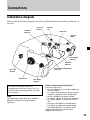
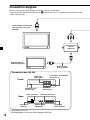
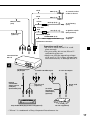
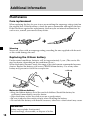
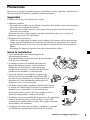
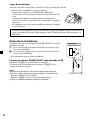
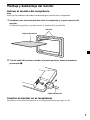
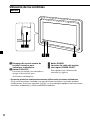
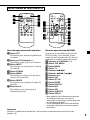
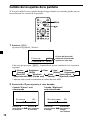
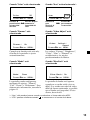
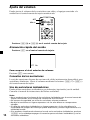
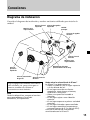
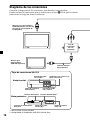
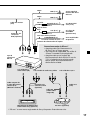
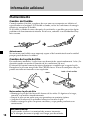
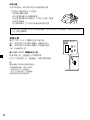
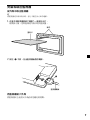
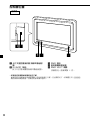
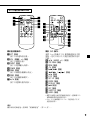
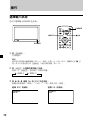
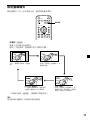
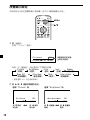
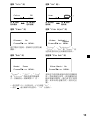
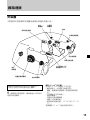
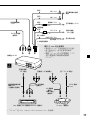
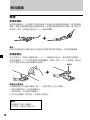
3-254-963-21 (3) Headrest Monitor Operating Instructions GB Manual de instrucciones ES CT XVM-H65 2003 Sony Corporation 2 Table of contents Welcome! .............................................................................................................................. 4 Precautions ........................................................................................................................... 5 Attaching and detaching the monitor .............................................................................. 7 Location of controls ............................................................................................................ 8 Operation Selecting the input source ................................................................................................ 10 Setting the screen mode ................................................................................................... 11 Changing the display settings ......................................................................................... 12 Adjusting the volume ....................................................................................................... 14 Connections Installation diagram ......................................................................................................... 15 Connection diagram ......................................................................................................... 16 Additional Information Maintenance ...................................................................................................................... 18 Specifications ..................................................................................................................... 20 Troubleshooting ................................................................................................................ 21 3 Welcome! Thank you for purchasing the Sony Headrest Monitor. • PAL or NTSC colour system compatible • Full, Zoom, and Widezoom screen modes available, in addition to the normal screen mode. • The low reflection liquid crystal panel reduces the glare from outside lighting sources. • Adjustable brightness control, according to lighting conditions • Backlight dimmer control produces sharp contrast image, free from reversed or blurred colours. • 2 Audio/Video inputs and 1 Audio/Video output are provided for connecting a video player, video game, and an additional monitor. • 7.5 V DC output is provided for connecting PS one™. • Built-in infrared transmitter for cordless headphones (optional) • Headphone jack is provided for connecting wired headphones (optional). * “PS one” is a trademark of Sony Computer Entertainment Inc. 4 Precautions To avoid the risk of serious injury or accident, read the following precautions before installing and operating the unit. On safety Comply with your local traffic rules and regulations. • While driving - The driver must not watch or operate the monitor. It may lead to distraction and cause an accident. - The driver must not use the headphones. It may lead to distraction and cause an accident. Park the car in a safe place when the driver watch and operate the monitor, or use headphones. • After installing - Take care not to bump your head against the unit when getting up from the back seat. - Take extra care not to wind the wire of the headphones around your neck avoiding injury or suffocation in the event of a sudden movement of the vehicle. - Keep small articles out of the reach of children. On installation • Installing this unit requires technical expertise. This unit should be installed by a qualified technician or service personnel. • If you try to install this unit by yourself, do it properly, referring to the installation and wiring diagrams in this operating manual. Improper installation may result in fire or electric shock. • Before installation, be sure to turn the ignition switch to the OFF position or take the key out. Installing this unit with the ignition on may cause battery drain or a short circuit. • Do not damage any pipes, tubes, the fuel tank or electric wiring when installing this unit. This can cause a fire. If you drill a hole in car panels, make sure that any hidden car parts will not be damaged. • Do not use any nuts or bolts for safety devices such as steering linkage, fuel supply or braking systems. This can cause a fire or an accident. • Take care to prevent cords and wires from getting tangled or crimped in the moving portion of a seat rail. continue to next page t 5 Where to install Before installing this unit, please check your local traffic rules and regulations. Do not install this unit where: - It will obstruct the driver’s view. - It will obstruct the operation of the airbag system. - It will obstruct the operation of the vehicle, especially the steering wheel, shift lever, or brake pedal. - A driver or passengers may injure themselves when getting into or out of the car. If you have any questions or problems concerning your unit that are not covered in this manual, please consult your nearest Sony dealer. Before installing Make sure that the POWER SELECT switch is set to the correct position. A*: If your car has an accessory position on the ignition key. B : If your car has no accessory position on the ignition key. POWER SELECT switch A * A is the factory preset position. B When the POWER SELECT switch is set to B Press (POWER) on the monitor to turn on. The monitor does not turn on by pressing (POWER) on the card remote commander. Note Be sure to turn off the monitor after driving your car. To turn off the monitor, follow the operations below: – Press (POWER) on the monitor. – Press (POWER) on the card remote commander. If the power is left on, it will cause battery drain. 6 Attaching and detaching the monitor Detaching the monitor from the case Note Be careful not to pull out the cable too much when detaching the monitor from the case. 1 Insert a plastic card between the case and the top of the monitor. The catches are released, and you can detach the monitor from the case. Catches Plastic card 2 Pull out the Monitor cable on the rear while pressing 1. 1 Monitor cable Attaching the monitor to the case Set the monitor to the case securely until you hear click sound. 7 Location of controls Monitor 1 Receptor for the card remote commander/Transmitter for the cordless headphones 2 IR ON/OFF button* Press to turn on or off the transmitter for the cordless headphones. 3 POWER button 4 Monitor cable connector 5 POWER SELECT switch For details, refer to page 6. * If interference occurs while using several cordless headphones If several monitors are installed, and used simultaneously, interference may occur. In this case, press (IR on/off) on the unit to turn off the transmitter for the cordless headphones, and use wired headphones instead. 8 Card remote commander RM-X122 ATT POWER INPUT ATT VOL MODE TOP MENU ALBUM+ LIST MENU SETUP POWER INPUT MENU MENU VOL MODE TOP MENU ALBUM+ LIST SETUP MENU ENTER ENTER DISPLAY DISPLAY ALBUM– ALBUM– OFF OFF AUDIO SUBTITLE For the monitor operations: 1 ATT button Press to quickly attenuate the volume. 2 VOL (volume) +/– buttons Press to adjust the volume. 3 INPUT button Press to select the input source. 4 POWER button 5 MENU button Press to adjust the various display settings. 6 MODE button Press to change the screen mode. 7 V/v buttons Press to select the desired item. AUDIO SUBTITLE For DVD operations: When a Sony mobile DVD player is connected to this unit, you can control the basic functions with the card remote commander. 8 V/v (ALBUM +/–) buttons 9 TOP MENU button 0 MENU button qa O button qs ./> buttons ) buttons qd m/M ( qf B/b buttons qg LIST button qh SET UP button qj ENTER button qk DISPLAY button ql u button w; OFF button wa SUBTITLE button ws AUDIO button • For function details, refer to the operating instructions supplied with the DVD player. • Sony DVD changer DVX-100 is not controllable with this card remote commander. Tip Refer to “Replacing the lithium battery” for details on how to replace the batteries (page 18). 9 Operation Selecting the input source You can select the input source and colour system. ATT POWER POWER INPUT MENU VOL MODE INPUT TOP MENU ALBUM+ LIST MENU SETUP ENTER DISPLAY ALBUM– POWER OFF AUDIO 1 SUBTITLE Press (POWER). The power is turned on. Tip If your car has no ACC (accessory) position on the ignition key switch, and the POWER SELECT switch is set to the B position, the monitor does not turn on by pressing (POWER) on the card remote commander (page 6). 2 Press (INPUT) to select the desired input source. Each time you press (INPUT), the indication changes in the following sequence: B VIDEO 1 3 B VIDEO 2 Press V or v to select PAL or NTSC colour system. Press either button while the source indication (such as “VIDEO 1”) is displayed. When NTSC Video is selected VIDEO1 NTSC 10 When PAL Video is selected VIDEO1 PAL Setting the screen mode In addition to the normal mode, full, zoom, and widezoom modes are also available. ATT POWER INPUT MENU VOL MODE MODE TOP MENU ALBUM+ LIST MENU SETUP ENTER DISPLAY ALBUM– OFF AUDIO SUBTITLE Press (MODE) repeatedly. The current mode is displayed on the screen first. Each time the button is pressed, the screen mode swiches in the following sequence: Normal Full Normal (regular) An image with an aspect ratio of 4 to 3 (regular image). Full An image with an aspect ratio of 4 to 3 enlarged to the left and right edges of the screen. Wide Widezoom An image with an aspect ration of 4 to 3, with only the left and right sides of the image being enlarged to fill the screen. Zoom Zoom An image with an aspect ratio of 4 to 3 enlarged to the left and right edges of the screen, with the overflowing parts (top and bottom) cut off to fill the screen. The screen mode is set after 5 seconds without pressing (MODE). Tip Images may appear coarse-grained when viewed in the zoom mode. 11 Changing the display settings You can adjust the display settings manually if the display is hard to see from the position where you are seated. ATT POWER INPUT MENU VOL MENU MODE TOP MENU ALBUM+ LIST MENU SETUP ENTER DISPLAY ALBUM– OFF AUDIO 1 SUBTITLE Press (MENU). The “Picture” screen appears. Picture The setting value of the item selected appears in this area. 32 Press Vv, or MENU. Each time you press (MENU), the setting screen changes in the following sequence: B Picture B Brightness Menu Off b B Color Blue Back b B Hue* Mode b B Dimmer Video Adjust * Appears only when the NTSC colour system is selected. 2 Press V or v to adjust to the desired setting. When “Picture” is selected Picture 32 Press Vv, or MENU. Press v to decrease the contrast 12 n Press V to increase the contrast When “Brightness” is selected Brightness 32 Press Vv, or MENU. Press v to darken the picture n Press V to brighten the picture When “Color” is selected Color 32 Press Vv, or MENU. Press v for less colour intensity n Press V for more colour intensity When “Dimmer” is selected Dimmer; On Press Vv, or MENU. When “Hue” is selected*1 Hue CTR *2 Press Vv, or MENU. Press v to Press V to decrease the n increase the saturation saturation When “Video Adjust” is selected Video Adjust; Reset Press Vv, or MENU. When this function is set to on, the brightness of the screen will be adjusted automatically. “Picture”, “Brightness”, “Color”, “Hue” and “Dimmer” settings will be reset to the factory preset level. When “Mode” is selected When “Blue Back” is selected Mode; Zoom Press Vv, or MENU. “Normal,” “Full,” “Zoom,” or “Widezoom” can be set as the screen mode. For details, refer to page 11. Blue Back; On Press Vv, or MENU. The blue background screen appears when no signal, or a weak signal is received. When a continuously weak video signal is received, the blue background may flicker. If this occurs, set to off. *1 “Hue” is adjustable only when the NTSC colour system is selected. is in the center of the bar. *2 “CTR” appears only when 13 Adjusting the volume You can adjust the volume of the wired headphones and the connected equipment with the supplied card remote commander. ATT POWER ATT INPUT VOL+/– MENU VOL MODE TOP MENU ALBUM+ LIST MENU SETUP ENTER DISPLAY ALBUM– OFF AUDIO SUBTITLE Press (VOL)(+) or (VOL)(–) on the card remote commander. Quickly attenuating the sound Press (ATT) on the card remote commander. ATT On To restore the previous volume level Press (ATT) again. Connecting headphones There is an output jack (mini phono plug) for wired headphones on the connection box. Adjust the volume using (VOL)(+) or (VOL)(–) on the card remote commander. Using cordless headphones You can use infrared cordless headphones (optional) with the unit. Please refer to the operating instructions for infrared cordless headphones. 14 Notes • The volume of the cordless headphones cannot be adjusted with the supplied card remote commander. Use the volume control on the cordless headphones. • For your safety, do not use the headphones while driving your car. • Do not leave the headphones in a place subject to direct sunlight, or in a high temperature. • If the cordless headphones are used while exposed to direct sunlight, sensitivity of the infrared receptor may deteriorate, and inferior quality sound may result. • If interference occurs while using several cordless headphones, press (IR on/off) on the unit to turn off the transmitter for the cordless headphones, and use wired headphones instead. Connections Installation diagram Refer to the installation diagram and ask a qualified technician for the installation of the unit. Front Left speaker Headrest Monitor Tweeter Left Head unit Tweeter Right Front Right speaker Headrest Monitor Sony mobile DVD player DVX-11A Rear Left speaker Subwoofer Rear Right speaker Be sure to securely fasten all equipment to the car chassis, etc., to prevent them moving while your car is in motion. Note All equipment other than one Headrest Monitor and one Connection Box is optional. Notes on the locations for PS one™ Do not set PS one™: — on a dashboard, or in a place subject to direct sunlight. — in a place near magnetic source such as magnets, speakers and a TV/Monitor. — on an unstable or uneven surface. — in a place subject to excessive vibration. — in a place subject to excessive dust or dirt. — in poorly ventilated or humid place. — in a place to subject to temperature extremes (below 5˚C or above 35˚C). Refer to the operating instructions supplied to PS one™. 15 Connection diagram Refer to the connection diagram for the proper connections. You can make connections shown in A area. Please ask a qualified technician for the other connections. Headrest Monitor XVM-H65 (6.5-inch wide colour LCD Monitor) Connection box XA-113 (optional) Headrest Monitor XVM-H65 (optional) Monitor cable (5 m) (optional) Connection box XA-113 Audio L/R/ Video Input 1 7.5 V (max 2 A) DC Output (for PS one™) Front: Headphone jack (stereo mini) 22 Pin connector Audio L/R/ Video Input 2 DVD (MV) connector*1 Rear: 4 Pin Power connector Remote Signal (IR) Output*2 *1 Not used in this unit *2 Not applicable to the Sony DVD changer DVX-100 16 Audio L/R/ Video Outputs Black GND (1 m) Black Monitor cable (5 m) Yellow To a metal surface of the car chassis GND (1 m) Back-up (5 m) To car battery (12 V) Fuse (8 A) Filter box Red RCA pin cord (optional) ACC (5 m) Fuse (1 A) Blue/White striped POWER REM (5 m) Max. supply current 0.3 A To ignition switch (ACC position) To a power amplifier 4 Pin Power connector Precautions on PS one™ • Be sure to fasten PS one™ in a safe place securely. • For your safety, do not use PS one™ while driving your car. • Make sure that the operating voltage of PS one™ is 7.5 V. Other voltages may cause malfunction, or damage PS one™. Connection box XA-113 To Remote Signal (IR) Output Remote Commander Signal receiver cord (5m) (Stereo Mini jack) To Audio L/R/Video Input To 7.5 V DC Output RCA pin cord (optional) Sony mobile DVD player DVX-11A (optional) DC-DC cord (3 m) AV Cable (integrated audio/video) (optional) PS one™ (optional) * “PS one” is a trademark of Sony Computer Entertainment Inc. 17 Additional Information Maintenance Fuse replacement When replacing the fuse, be sure to use one matching the amperage rating stated on the original fuse. If the fuse blows, check the power connection and replace the fuse. If the fuse blows again after replacement, there may be an internal malfunction. In such a case, consult your nearest Sony dealer. 1 2 c Warning Never use a fuse with an amperage rating exceeding the one supplied with the unit as this could damage the unit. Replacing the lithium battery Under normal conditions, batteries will last approximately 1 year. (The service life may be shorter, depending on the conditions of use.) When the battery becomes weak, the range of the card remote commander becomes shorter. Replace the battery with a new CR2025 lithium battery. Use of any other battery may present a risk of fire or explosion. + side up c Notes on lithium battery • Keep the lithium battery out of the reach of children. Should the battery be swallowed, immediately consult a doctor. • Wipe the battery with a dry cloth to assure a good contact. • Be sure to observe the correct polarity when installing the battery. • Do not hold the battery with metallic tweezers, otherwise a short-circuit may occur. WARNING Battery may explode if mistreated. Do not recharge, disassemble, or dispose of in fire. 18 About the liquid crystal display (LCD) panel Do not press on the LCD panel on the unit as doing so can distort the picture or cause a malfunction. The picture may become unclear, or the LCD panel may be damaged. Notes on cleaning — Clean the LCD panel with a slightly damp soft cloth. — Do not use solvents such as benzine, thinner, commercially available cleaners or antistatic spray. • Do not use the unit in temperatures under 5 °C or over 45 °C. • If your car was parked in a cold or hot place, the picture may not be clear. The monitor is not damaged. The picture will become clear after the temperature in your car becomes normal. Some stationary blue or red dots may appear on the monitor. These are called bright spots, and can happen with any LCD. The LCD panel is highly sophisticated, and more than 99.99 % of the segments used in the panel are flawless. However, there is a possibility that less than 0.01 % of the segments are defective and may not light up properly. 19 Specifications Monitor System Drive system Liquid crystal colour display TFT-LCD active matrix system Picture size 6.5 inches wide screen (16:9) 144 × 77 mm, 163 mm (w/h, d) Picture segment 336,960 (w 1440 × h 234) dots Power requirements 12 V DC car battery (negative ground) Current drain Approx. 700 mA Dimensions 164 × 103 × 29 mm (w/h/d) Operating temperature 5 °C – 45 °C Mass Approx. 370 g Connection box XA-113 A/V Output Output Impedance: less than 220 Ω less than 100 pF Output Level: 0 dBs ±0.3 dB (0.775 V rms) (Vol Max) Video: 75 Ω 1Vp-p A/V Input ×2 Input Impedance: more than 10 K Ω less than 1000 pF Input Level: ±1.3 dBs +0/–0.3 dB (0.775 V rms) Video: 75 Ω 1 Vp-p DC output 7.5 V (max 2 A) Dimensions 150 × 42 × 80 mm (w/h/d) Mass 250 g 20 Card remote commander RM-X122 Power requirements CR2025 lithium battery Operable range Approx. 2.5 m Dimensions 52 × 125 × 10 mm (w/h/d) Mass Approx. 40 g (including batteries) Supplied accessories Connection box XA-113 (1) Card remote commander RM-X122 (with supplied battery) (1) Power supply cord (1) DC-DC cord (3 m) (1) Stereo Mini Plug-to-Plug cable (5 m) (1) Monitor cable (5 m) (1) Collar (1) Operating Instructions (1) Optional accessories DVD player DVX-11A PS one™ Design and specifications are subject to change without notice. Troubleshooting The following checklist will help you solve problems you may encounter with your unit. Before going through the checklist below, check the connection and operating procedures. General No picture •The power cord or battery has been disconnected. •The fuse has blown. Good picture, but no sound Press the (VOL)(+) or (ATT) on the card remote commander. Dotted lines or stripes This may be caused by local interference such as a car engine or motorcycle. Adjust the antennas for minimum interference. No picture when you connect the optional equipment Makes noise when the ignition key is in the ON, ACC, or OFF position. The cord has been disconnected. Connect the cord securely. No response when pressing the buttons on the card remote commander The battery may be exhausted. 21 2 Índice Bienvenido ........................................................................................................................... 4 Precauciones ........................................................................................................................ 5 Montaje y desmontaje del monitor ................................................................................... 7 Ubicación de los controles ................................................................................................. 8 Funcionamiento Selección de la fuente de entrada ................................................................................... 10 Ajuste del modo de pantalla ........................................................................................... 11 Cambio de los ajustes de la pantalla .............................................................................. 12 Ajuste del volumen ........................................................................................................... 14 Conexiones Diagrama de instalación .................................................................................................. 15 Diagrama de las conexiones ............................................................................................ 16 Información adicional Mantenimiento .................................................................................................................. 18 Especificaciones ................................................................................................................. 20 Solución de problemas ..................................................................................................... 21 3 Bienvenido Gracias por adquirir el monitor para reposacabezas de Sony. • Compatible con el sistema de color PAL o NTSC • Además del modo de pantalla normal, puede usar los modos de pantalla completa, pantalla en zoom y pantalla en zoom panorámico. • El panel de cristal líquido de baja reflectividad reduce el resplandor procedente de otras fuentes de iluminación. • Control de brillo ajustable en función de las condiciones de iluminación • El control de luz de fondo mediante la función de atenuador produce imágenes de contraste nítido y evita que los colores aparezcan invertidos o borrosos. • Esta unidad dispone de 2 entradas de audio/video y 1 salida de audio y video para conectar un reproductor de video, una consola de videojuegos y un monitor adicional. • Se proporciona un terminal de salida de 7,5 V cc para conectar la PS one™. • La unidad dispone de un transmisor de infrarrojos incorporado para auriculares inalámbricos (opcional) • La unidad dispone de una toma para la conexión de auriculares alámbricos (opcional). * “PS one” es una marca registrada de Sony Computer Entertainment Inc. 4 Precauciones Para evitar el riesgo de lesiones graves o accidentes, lea las siguientes advertencias antes de instalar la unidad y ponerla en funcionamiento. Seguridad Cumpla con las leyes de tránsito de su país. • Mientras conduce - El conductor no debe ver ni utilizar el monitor. Esto puede causar distracciones y provocar un accidente de tránsito. - El conductor no debe usar los auriculares. Esto puede causar distracciones y provocar un accidente. Estacione el auto en lugar seguro cuando el conductor desee ver y operar el monitor, o para usar los auriculares. • Después de la instalación - Cuide de no golpearse la cabeza con la unidad al levantarse del asiento trasero. - Tenga especial cuidado en no enredarse el cable de los auriculares en el cuello para evitar lesiones o asfixia en caso de que el vehículo realice un movimiento súbito. - Mantenga los objetos pequeños fuera del alcance de los niños. Sobre la instalación • La instalación de esta unidad requiere de conocimientos técnicos. Esta unidad debe ser instalada por personal técnico o de servicio calificado. • Si intenta instalar esta unidad usted mismo, hágalo de manera correcta, consultando los diagramas de instalación y conexiones que contiene este manual. La instalación incorrecta puede causar incendios o electrocución. • Antes de realizar la instalación, asegúrese de colocar la llave de encendido en posición OFF o de retirarla por completo. La instalación de esta unidad con el auto encendido puede agotar la batería o causar un cortocircuito. • No dañe ningún tubo, conducto, cableado eléctrico ni el tanque de combustible al instalar esta unidad. Esto puede causar un incendio. Si va a realizar una perforación en los paneles del auto, asegúrese de no dañar los componentes ocultos del mismo. • No utilice tuercas ni tornillos de dispositivos de seguridad como el mecanismo de la dirección o los sistemas de suministro de combustible o frenos. Esto puede ocasionar un incendio o un accidente. • Asegúrese de evitar que los cables y alambres se enreden o se doblen en la parte móvil del riel de los asientos. continúa en la página siguiente t 5 Lugar de instalación Antes de instalar esta unidad, consulte las leyes locales de tránsito. No instale esta unidad en un lugar donde: - Pueda obstaculizar la visibilidad del conductor. - Obstaculice el funcionamiento del sistema de bolsas de aire. - Pueda obstaculizar la conducción del vehículo, en especial el volante, la palanca de velocidades o el pedal de freno. - El conductor o los pasajeros puedan lesionarse al entrar o salir del auto. Si desea realizar alguna consulta o solucionar algún problema relativo a la unidad y que este manual no trate, comuníquese con el proveedor Sony más cercano a su domicilio. Antes de la instalación Asegúrese de que el interruptor POWER SELECT está en la posición correcta. A*: Si el auto dispone de una posición de accesorios en la llave de encendido. B : Si el auto no dispone de una posición de accesorios en la llave de encendido. * A es la posición que se ajusta en fábrica. Cuando el selector POWER SELECT está ajustado en B Presione (POWER) para encender el monitor. El monitor no se enciende presionando (POWER) en el control remoto de tarjeta. Nota Asegúrese de desactivar el monitor cuando salga del auto. Para ello, siga las operaciones que se indican a continuación: – Presione (POWER) en el monitor. – Presione (POWER) en el control remoto de tarjeta. Si deja la unidad encendida se agotará la batería. 6 Interruptor POWER SELECT A B Montaje y desmontaje del monitor Extraer el monitor del receptáculo Nota Evite tirar bruscamente del cable cuando extraiga el monitor de su receptáculo. 1 Introduzca una tarjeta de plástico entre el receptáculo y la parte superior del monitor. Se liberan los ganchos y puede extraer el monitor del receptáculo. Ganchos Tarjeta de plástico 2 Tire del cable del monitor situado en la parte posterior mientras mantiene presionado 1. 1 Cable del monitor Insertar el monitor en el receptáculo Introduzca el monitor firmemente en el receptáculo hasta que oiga un clic. 7 Ubicación de los controles Monitor 1 Receptor del control remoto de tarjeta/Transmisor para auriculares inalámbricos 2 Botón IR ON/OFF* Presione este botón para encender o apagar el transmisor para auriculares inalámbricos. 3 Botón POWER 4 Conector del cable del monitor 5 Interruptor POWER SELECT Para obtener más información, consulte la página 6. * En caso de producirse interferencias mientras utiliza varios auriculares inalámbricos Si hay varios monitores instalados y se usan de forma simultánea, se pueden producir interferencias. En tal caso, presione (IR on/off) en la unidad para apagar el transmisor para auriculares inalámbricos y utilice auriculares alámbricos. 8 Control remoto de tarjeta RM-X122 ATT POWER INPUT ATT VOL MODE TOP MENU ALBUM+ LIST MENU SETUP POWER INPUT MENU MENU VOL MODE TOP MENU ALBUM+ LIST SETUP MENU ENTER ENTER DISPLAY DISPLAY ALBUM– ALBUM– OFF OFF AUDIO SUBTITLE Para las operaciones del monitor: 1 Botón ATT Presiónelo para atenuar rápidamente el sonido. 2 Botones VOL (volume) +/– Presiónelos para ajustar el volumen. 3 Botón INPUT Presiónelo para seleccionar la fuente de entrada. 4 Botón POWER 5 Botón MENU Presiónelo para ajustar los distintos valores de la pantalla. 6 Botón MODE Presiónelo para cambiar el modo de pantalla. 7 Botones V/v Presiónelos para seleccionar el elemento deseado. AUDIO SUBTITLE Para las operaciones del DVD: Si conecta un reproductor portátil de DVD de Sony a esta unidad, podrá controlar las funciones básicas de éste mediante el control remoto de tarjeta. 8 Botones V/v (ALBUM +/–) 9 Botón TOP MENU 0 Botón MENU qa Botón O qs Botones ./> ) qd Botones m/M ( qf Botones B/b qg Botón LIST qh Botón SET UP qj Botón ENTER qk Botón DISPLAY ql Botón u w; Botón OFF wa Botón SUBTITLE ws Botón AUDIO • Para obtener más información acerca de las distintas funciones, consulte el manual de instrucciones suministrado con el reproductor de DVD. • Con el cambiador DVD DVX-100 de Sony no puede utilizarse este control remoto de tarjeta. Sugerencia Consulte “Cambio de la pila de litio” para conocer en detalle cómo sustituir las pilas (página 18). 9 Funcionamiento Selección de la fuente de entrada Puede seleccionar la fuente de entrada y el sistema de color. ATT POWER POWER INPUT MENU VOL MODE INPUT TOP MENU ALBUM+ LIST MENU SETUP ENTER DISPLAY ALBUM– POWER OFF AUDIO 1 SUBTITLE Presione (POWER). La alimentación se activa. Sugerencia Si el auto no dispone de una posición ACC (accesorios) en el selector de la llave de encendido y el selector POWER SELECT está ajustado en la posición B, el monitor no se enciende al presionar (POWER) en el control remoto de tarjeta (página 6). 2 Presione (INPUT) para seleccionar la fuente de entrada deseada. Cada vez que presione (INPUT), la indicación cambiará en la secuencia siguiente: B VIDEO 1 3 B VIDEO 2 Presione V o v para seleccionar el sistema de color PAL o NTSC. Presione uno de estos botones cuando aparezca la indicación de fuente (como “VIDEO 1”). Cuando video NTSC está seleccionado VIDEO1 NTSC 10 Cuando video PAL está seleccionado VIDEO1 PAL Ajuste del modo de pantalla Además del modo de pantalla normal, puede usar los modos de pantalla completa, pantalla en zoom y pantalla en zoom panorámico. ATT POWER INPUT MENU VOL MODE MODE TOP MENU ALBUM+ LIST MENU SETUP ENTER DISPLAY ALBUM– OFF AUDIO SUBTITLE Presione (MODE) varias veces. El modo actual se muestra primero en la pantalla. Cada vez que se presiona el botón, el modo de pantalla cambia de la siguiente manera: Normal Full Normal (Pantalla normal (común)) Imagen con una proporción de 4 a 3 (imagen común). Full (Pantalla completa) Imagen con una proporción de 4 a 3 aumentada hacia los lados izquierdo y derecho de la pantalla. Wide Widezoom (Pantalla en zoom panorámico) Una imagen con un formato de 4 a 3 y en la que sólo se amplían los lados derecho e izquierdo para llenar la pantalla. Zoom Zoom (Pantalla en zoom) Imagen con una proporción de 4 a 3 aumentada a los límites izquierdo y derecho de la pantalla, con las partes rebasadas (arriba y abajo) cortadas para llenar la pantalla. El modo de pantalla se ajusta transcurridos 5 segundos sin presionar (MODE). Sugerencia Las imágenes pueden verse con textura de grano grueso cuando se usa el modo de pantalla en zoom. 11 Cambio de los ajustes de la pantalla Si le resulta difícil ver la pantalla desde el lugar donde está sentado, puede ajustar manualmente los valores de la pantalla. ATT POWER INPUT MENU VOL MENU MODE TOP MENU ALBUM+ LIST MENU SETUP ENTER DISPLAY ALBUM– OFF AUDIO 1 SUBTITLE Presione (MENU). Aparecerá la pantalla “Picture”. Picture 32 Press Vv, or MENU. El valor del ajuste del elemento seleccionado aparece en esta área. Cada vez que presione (MENU), la pantalla de ajustes cambiará en la secuencia siguiente: B Dimmer B Brightness B Color B Hue* B Picture (Brillo) (Matiz) (Atenuador) (Imagen) Menu Off b Blue Back b Mode b Video Adjust b (Ajuste de video) (Modo) (Menú desactivado) (Fondo azul) * Aparece sólo cuando se selecciona el sistema de color NTSC. 2 Presione V o v para ajustarla al valor deseado. Cuando “Picture” está Cuando “Brightness” seleccionado está seleccionado Picture 32 Press Vv, or MENU. v V Presione Presione para disminuir n para aumentar el contraste el contraste 12 Brightness 32 Press Vv, or MENU. v Presione para oscurecer la imagen Presione V n para hacer la imagen más brillante Cuando “Color” está seleccionado Color 32 CTR Hue Press Vv, or MENU. V v Cuando “Hue” está seleccionado*1 Press Vv, or MENU. v V Presione para Presione para disminuir n aumentar la intensidad del la intensidad color del color Presione para disminuir la saturación Cuando “Dimmer” está seleccionado Cuando “Video Adjust” está seleccionado Dimmer; On Press Vv, or MENU. *2 n Presione para aumentar la saturación Video Adjust; Reset Press Vv, or MENU. Cuando esta función está activada, el brillo de la pantalla se ajusta automáticamente. Los valores “Picture”, “Brightness”, “Color”, “Hue” y “Dimmer” se restablecerán a sus niveles predeterminados de fábrica. Cuando “Mode” está seleccionado Cuando “Blue Back” está seleccionado Mode; Zoom Press Vv, or MENU. La pantalla puede configurarse mediante los ajustes: “Normal” “Full” “Zoom” o “Widezoom”. Para obtener más información, consulte la página 11. Blue Back; On Press Vv, or MENU. La pantalla de fondo azul aparece cuando no se recibe señal o ésta es débil. Si se recibe una señal de video débil de forma continuada, es posible que el fondo azul parpadee. Si esto ocurre, desactívelo. *1 “Hue” sólo puede ajustarse cuando se selecciona el sistema de color NTSC. *2 “CTR” aparece solamente cuando se encuentra en el centro de la barra. 13 Ajuste del volumen Puede ajustar el volumen de los auriculares con cable y el equipo conectado a la unidad con el control remoto de tarjeta suministrado. ATT POWER ATT INPUT VOL+/– MENU VOL MODE TOP MENU ALBUM+ LIST MENU SETUP ENTER DISPLAY ALBUM– OFF AUDIO SUBTITLE Presione (VOL)(+) o (VOL)(–) en el control remoto de tarjeta. Atenuación rápida del sonido Presione (ATT) en el control remoto de tarjeta. ATT On Para recuperar el nivel anterior de volumen Presione (ATT) nuevamente. Conexión de los auriculares La caja de conexiones dispone de una toma de salida (miniconector fonográfico) para auriculares alámbricos. Ajuste el volumen mediante los botones (VOL)(+) o (VOL)(–) del control remoto de tarjeta. Uso de auriculares inalámbricos Puede utilizar auriculares inalámbricos por infrarrojos (opcionales) con la unidad. Consulte el manual de instrucciones de dichos auriculares. 14 Notas • No se puede ajustar el volumen de los auriculares inalámbricos con el control remoto de tarjeta suministrado. Use el control de volumen de los auriculares. • Por razones de seguridad, no utilice los auriculares mientras conduzca. • No deje los auriculares en lugares expuestos a la luz solar directa o a temperaturas elevadas. • Si utiliza los auriculares inalámbricos en lugares expuestos a la luz solar directa, la sensibilidad del receptor de infrarrojos puede deteriorarse y afectar negativamente a la calidad del sonido. • Si se producen interferencias durante el uso de varios auriculares inalámbricos, presione (IR on/off) en la unidad para apagar el transmisor para auriculares inalámbricos y use los auriculares alámbricos. Conexiones Diagrama de instalación Consulte el diagrama de instalación y acuda a un técnico calificado para instalar la unidad. Altavoz frontal Altavoz de agudos izquierdo izquierdo Monitor para reposacabezas Unidad principal Altavoz de agudos derecho Altavoz frontal derecho Monitor para reposacabezas Reproductor de DVD portátil DVX-11A de Sony Altavoz posterior izquierdo Altavoz potenciador Altavoz posterior de graves derecho Fije el equipo con firmeza en el chasis del vehículo, etc. para evitar que se mueva cuando este último se encuentra en movimiento. Nota Todos los dispositivos, excepto el monitor para reposacabezas y la caja de conexiones, son opcionales. Notas sobre la colocación de la PS one™ La PS one™ no debe colocarse: — Sobre un tablero o en un lugar expuesto a la luz directa del sol. — En un lugar cerca de una fuente magnética, como imanes, altavoces, televisores o monitores. — Sobre una superficie inestable o irregular. — En un lugar sujeto a una vibración excesiva. — En un lugar expuesto a polvo o suciedad excesivos. — En un lugar húmedo o poco ventilado. — En un lugar sometido a temperaturas extremas (menos de 5°C o más de 35°C). Consulte el manual de instrucciones suministrado con la PS one™. 15 Diagrama de las conexiones Consulte el diagrama de las conexiones para hacerlas correctamente. Puede realizar las conexiones que se muestran en el área A. Pida que las demás conexiones las haga un técnico calificado. Monitor para reposacabezas XVM-H65 (monitor en color de pantalla de cristal líquido de 6,5 pulgadas) Caja de conexiones XA-113 (opcional) Monitor para reposacabezas XVM-H65 (opcional) Cable del monitor (5m) (opcional) Caja de conexiones XA-113 Entrada de audio L/R y video 1 Salida de cc 7,5 V (máx. 2 A) (para la PS one™) Vista frontal: Toma de auriculares (miniestéreo) Entrada de audio L/R y video 2 Conector de 22 pines Conector de DVD (MV)*1 Vista posterior: Conector de alimentación de 4 pines Salida de la señal remota (IR)*2 *1 No se utiliza en esta unidad *2 No aplicable al cambiador DVD DVX-100 de Sony 16 Salidas de video y audio L/R Negro Negro Cable del monitor (5 m) A una superficie metálica del chasis del auto GND (1 m) GND (1 m) Amarillo Respaldo (5 m) A la batería del auto (12 V) Fusible de 8 A Caja de filtros Rojo Extensión con conectores RCA (opcional) A la llave de encendido (posición ACC) ACC (5 m) Fusible de 1 A Con rayas azules y blancas POWER REM (5 m) Corriente máxima de 0,3 A Conector de alimentación de 4 pines A un amplificador de potencia Precauciones sobre la PS one™ • Asegúrese de fijar firmemente la PS one™ en un lugar seguro. • Por razones de seguridad, no utilice la PS one™ cuando esté manejando. • Asegúrese de que el voltaje de funcionamiento de la PS one™ sea de 7,5 V. Cualquier otro voltaje puede causar fallos de funcionamiento o dañar dicha unidad. Caja de conexiones XA-113 A la salida de la señal remota (IR) Cable receptor de la señal del control remoto (5 m) (Minitoma estéreo) A la entrada de audio L/R y video A la salida de cc 7,5 V Extensión con conectores RCA (opcional) Cable cc-cc (3 m) Cable AV (audio/video integrado) Reproductor de DVD portátil DVX-11A de Sony (opcional) PS one™ (opcional) * “PS one” es una marca registrada de Sony Computer Entertainment Inc. 17 Información adicional Mantenimiento Cambio del fusible Cuando cambie el fusible, asegúrese de usar uno cuyo amperaje sea idéntico al especificado en el original. Si el fusible se funde, revise las conexiones de energía eléctrica y reemplace el fusible. Si el fusible se funde de nuevo después de sustituirlo, es posible que exista algún problema de funcionamiento interno. En tal caso, consulte a su distribuidor Sony más cercano. 1 2 c Advertencia No use nunca un fusible cuyo amperaje supere al del suministrado con la unidad porque puede dañarse la unidad. Cambio de la pila de litio En condiciones normales, la pila tiene una duración de aproximadamente 1 año. (La duración puede ser menor en función de las condiciones de uso.) El alcance del control remoto de tarjeta disminuye a medida que se agota la pila. Reemplace la pila con una pila de litio CR2025 nueva. El uso de cualquier otra pila puede ocasionar un incendio o una explosión. Lado + hacia arriba c Notas sobre la pila de litio • Mantenga la pila de litio fuera del alcance de los niños. Si alguien se la traga, consulte a un médico inmediatamente. • Limpie la pila con un paño seco para garantizar un contacto óptimo. • Asegúrese de observar la polaridad correcta al instalar la pila. • Nunca sostenga las pilas con pinzas metálicas ya que puede producirse un cortocircuito. ADVERTENCIA 18 La pila puede estallar si se manipula de manera incorrecta. No la recargue, desarme ni ponga en el fuego para desecharla. Acerca del panel de pantalla de cristal líquido (LCD) No haga presión sobre el panel LCD de la unidad del monitor, ya que ello puede distorsionar la imagen o causar un problema en su funcionamiento. La imagen puede aparecer menos nítida o el panel LCD puede dañarse. Notas sobre la limpieza — Limpie el panel LCD con un paño suave ligeramente humedecido. — No use disolventes como benzina, diluyentes, limpiadores comerciales ni aerosoles antiestáticos. • No use la unidad a temperaturas inferiores a 5 °C ni superiores a 45 °C. • Si su auto estuvo estacionado en un lugar frío o caliente, es posible que la imagen no sea clara. En este caso, el monitor no está dañado. La imagen se aclarará después de que la temperatura de su auto se normalice. Pueden aparecer algunos puntos estacionarios azules o rojos en el monitor. Se conocen como puntos brillantes y pueden presentarse en cualquier LCD. El panel LCD es altamente complejo y más del 99,99% de los segmentos usados en él carecen de defectos. Sin embargo, existe la posibilidad de que menos del 0,01% de los segmentos estén defectuosos y puedan no iluminarse correctamente. 19 Especificaciones Monitor Sistema Pantalla de color de cristal líquido Sistema de controladores Sistema de matriz activa TFT-LCD Tamaño de imagen pantalla de 6,5 pulgadas de ancho (16:9) 144 × 77, 163 mm (an/al, prf) Segmento de la imagen 336 960 (1 440 an. × 234 alt.) puntos Requisitos de alimentación Batería de auto de cc 12 V (tierra negativa) Gasto de corriente 700 mA aprox. Dimensiones 164 × 103 × 29 mm (an/al/prf) Temperatura de funcionamiento 5 °C – 45 °C Masa 370 g aprox. Caja de conexiones XA-113 Salida de audio y video Impedancia de salida: menos de 220 Ω menos de 100 pF Nivel de salida: 0 dBs ±0,3 dB (0,775 V rms) (volumen máximo) Video: 75 Ω 1 Vp-p Entrada de audio y video ×2 Impedancia de entrada: más de 10 K Ω menos de 1 000 pF Nivel de entrada: ±1,3 dBs +0/–0,3 dB (0,775 V rms) Video: 75 Ω 1 Vp-p Salida de cc 7,5 V (máx. 2 A) Dimensiones 150 × 42 × 80 mm (an/al/prf) Masa 250 g aprox. 20 Control remoto de tarjeta RM-X122 Requisitos de alimentación Pila de litio CR2025 Rango de funcionamiento 2,5 m aprox. Dimensiones 52 × 125 × 10 mm (an/al/prf) Masa 40 g aprox. (con pilas incluidas) Accesorios suministrados Caja de conexiones XA-113 (1) Control remoto de tarjeta RM-X122 (con pila suministrada) (1) Cable de suministro de energía (1) Cable cc-cc (3 m) (1) Cable minitoma a toma estéreo (5 m) (1) Cable del monitor (5 m) (1) Marco de protección (1) Manual de instrucciones (1) Accesorio opcional Reproductor de DVD DVX-11A PS one™ El diseño y las especificaciones están sujetos a cambios sin previo aviso. Solución de problemas La siguiente lista de verificación le ayudará a solucionar los problemas que puedan producirse con la unidad. Antes de consultar la siguiente lista, revise los procedimientos de conexión y de funcionamiento. Generales No hay imagen •Se desconectó el cable de alimentación o la batería. •El fusible se fundió. Buena imagen, pero sin sonido Presione (VOL)(+) o (ATT) en el control remoto de tarjeta. Líneas o franjas de puntos Esto puede deberse a interferencia local causada por el motor de un auto o una motocicleta. Ajuste las antenas hasta que la interferencia sea mínima. No hay imagen al conectar dispositivos opcionales Se oye ruido cuando la llave de encendido se encuentra en la posición ON, ACC u OFF. El cable se desconectó. Conéctelo firmemente. No hay respuesta al presionar los botones del control remoto de tarjeta La pila puede estar agotada. 21 2 3 • • • • • • • • • * 4 • • • • • • • • t 5 A* B A *A B B (POWER) (POWER) – – 6 (POWER) (POWER) 1 1 7 1 2 * 3 4 5 * (IR on/off) 8 RM-X122 ATT ATT POWER INPUT VOL MODE TOP MENU ALBUM+ LIST MENU MENU VOL MODE TOP MENU ALBUM+ POWER INPUT MENU LIST SETUP MENU SETUP ENTER ENTER DISPLAY DISPLAY ALBUM– ALBUM– OFF OFF AUDIO AUDIO SUBTITLE SUBTITLE 1 2 3 4 5 6 7V v +/– 8 9 0 qa qs qd qf qg qh qj qk ql w; wa ws V v +/– O . > m M B b u • • 9 ATT POWER POWER INPUT MENU VOL MODE INPUT TOP MENU ALBUM+ LIST MENU SETUP ENTER DISPLAY POWER ALBUM– OFF AUDIO SUBTITLE (POWER) B (POWER) (INPUT) (INPUT) B V B v VIDEO1 NTSC 10 VIDEO1 PAL ATT POWER INPUT MENU VOL MODE MODE TOP MENU ALBUM+ LIST MENU SETUP ENTER DISPLAY ALBUM– OFF AUDIO SUBTITLE (MODE) Normal Full Wide Zoom (MODE) 11 ATT POWER INPUT MENU VOL MENU MODE TOP MENU ALBUM+ LIST MENU SETUP ENTER DISPLAY ALBUM– OFF AUDIO SUBTITLE (MENU) Picture 32 Press Vv, or MENU. (MENU) B B B b * B B b b b * V v Picture 32 Press Vv, or MENU. v 12 n V Brightness 32 Press Vv, or MENU. v n V * Color 32 Press Vv, or MENU. v V n Dimmer; On Press Vv, or MENU. Mode; Zoom Press Vv, or MENU. CTR Hue * Press Vv, or MENU. v n V Video Adjust; Reset Press Vv, or MENU. Blue Back; On Press Vv, or MENU. * * 13 ATT POWER ATT INPUT VOL+/– MENU VOL MODE TOP MENU ALBUM+ LIST MENU SETUP ENTER DISPLAY ALBUM– OFF AUDIO (VOL) SUBTITLE (VOL) (ATT) ATT On (ATT) (VOL) (VOL) • • • • • 14 (IR on/off) 15 A * * * * 16 • • • * 17 1 2 c c • • • • 18 — — • • 19 × × × × × – Ω ± Ω × Ω ± . – Ω × 20 × × • • (VOL) (ATT) 21 Sony Corporation Printed in Korea