1
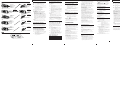
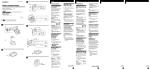
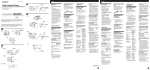
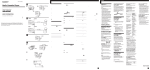
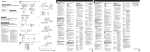
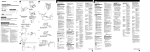
Radio Cassette Player 2 A a BATT lamp Lámpara BATT b Operating Instructions Manual de instrucciones c d Voltage selector 100-120V 220240V WM-FX553/FX551 Sony Corporation © 1997 Printed in Japan WALKMAN is a registered trademark of Sony Corporation. WALKMAN es marca registrada de Sony Corporation. B WARNING 2REMOTE a FX553 FX551 2 REMOTE To prevent fire or shock hazard, do not expose the unit to rain or moisture. ADVERTENCIA b c WARNING This equipment has been tested and found to comply with the limits for a Class B digital device, pursuant to Part 15 of the FCC Rules. These limits are designed to provide reasonable protection against harmful interference in a residential installation. This equipment generates, uses, and can radiate radio frequency energy and, if not installed and used in accordance with the instructions, may cause harmful interference to radio communications. However, there is no guarantee that interference will not occur in a particular installation. If this equipment does cause harmful interference to radio or Thank you for purchasing the Sony WM-FX553/FX551 Radio Cassette Player. Some features are: • You can enjoy low bass sounds by the powerful earphones (earphones type only). • You can choose from 2 different emphasizing tones: MB (MEGA BASS) and GRV (GROOVE) to adjust to your favorite sound. • LCD Menu function that lets you select and switch functions in the display window of the main unit. • Auto Memory Scanning function that lets you store and recall up to 16 stations for FM and 8 stations for AM automatically. • AMS (Automatic Music Sensor) function that searches the beginning of the current and 2 previous tracks, and succeeding 3 tracks at high speed. • Useful remote control (FX553 only) television reception, which can be determined by turning the equipment off and on, the user is encouraged to try to correct the interference by one or more of the following measures: – Reorient or relocate the receiving antenna. – Increase the separation between the equipment and receiver. – Connect the equipment into an outlet on a circuit different from that to which the receiver is connected. – Consult the dealer or an experienced radio/TV technician for help. This device complies with Part 15 of the FCC Rules. Operation is subject to the following two conditions: (1) This device may not cause harmful interference, and (2) this device must accept any interference received, including interference that may cause undesired operation. Preparing a Power Source FX553 Choose either dry battery or house current as the power source. For the tourist model, the supplied rechargeable battery can be used. Dry Battery (see Fig. A-a) C FX553 1 HOLD Indicator HOLD Indicador HOLD Open the battery compartment lid, and insert an R6 (size AA) dry battery (not supplied) like the illustration in this manual. When to replace the battery (see Fig. A-b) HOLD Replace the battery with a new one when the BATT lamp dims. D Battery life a (Approx. hours) Sony alkaline LR6 (SG) Tape playback 29 Radio reception 30 OPEN 4 Plug in the charger to the wall outlet. Full charging takes about 4 hours. If the plug does not fit your mains, attach the supplied AC plug adaptor (for the tourist model only). œ•REPEAT VOLUME (see Fig. A-a). When to charge the battery (see Fig. A-b) Charge the battery when the BATT lamp dims. You can charge the battery about 300 times. Battery life (Approx. hours) Rechargeable battery (NC-AA) Tape playback 8 Radio reception 9 VOL For maximum performance we recommend that you use an alkaline battery. b REW•AMS FF•AMS FX553 FF œ•REPEAT p REW Las instrucciones de este manual son para los modelos WM-FX553 y WM-FX551. Antes de comenzar a leerlas, compruebe el número de su modelo. El WM-FX553 es el modelo utilizado para las ilustraciones. Cualquier diferencia en las operaciones se indicará claramente en el texto, por ejemplo, “FX553 solamente”. œ•REPEAT p Notes • Do not charge a dry battery. • When you do not use the Walkman for a long time, remove the battery to avoid any damage caused by battery leakage and subsequent corrosion. Rechargeable Battery c BL SKIP MODE ON NR (see Fig. A-c) (Tourist model only) FM SOUND AVLS MODE 1 ON FWD MENU BATT Set the voltage selector to the correct position with the right operating voltage using a screwdriver, etc. The HOLD function locks the Walkman and the remote control separately to prevent them from operating when you accidentally press a button. Unlock it before operating. 1 Slide HOLD to the opposite direction of the arrow on the Walkman, or slide HOLD on the remote control so that the yellow HOLD indicator is hidden. Slide HOLD in the direction of the arrow on the Walkman, or slide HOLD on the remote control so that the HOLD indicator turns yellow. zOperating the Walkman Playing a Tape (see Fig. D-a) • Do not tear off the film on the rechargeable battery. • Use the Sony NC-AA rechargeable battery only with the supplied battery charger (for the tourist model only). • Do not leave the charger plugged in for more than 20 hours. Overcharging may damage the rechargeable battery. • The battery charger and the rechargeable battery may become warm during charging, but it is not a problem. House Current (mains) (see Fig. A-d) Connect the AC power adaptor ACE15HG (not supplied) to the DC IN 1.5 V jack and to the mains. Do not use any other AC power adaptor. The Auto Tape Selector automatically selects the tape (normal (TYPE I), CrO2 (TYPE II) or metal (TYPE IV) ) for playback. 1 Insert a cassette. 2 Press œ•REPEAT to start playing then adjust the volume. If the earphones do not fit to your ears or the sound is unbalanced, turn round the earphones a little to fit to your ears firmly. When adjusting the volume on the Walkman (FX553 only) Set the VOL control on the remote control at maximum. When adjusting the volume on the remote control (FX553 only) Set the VOLUME control on the Walkman to around 6. Sony R6P (SR) 8 8 • The battery life may shorten depending on the operation of the unit. (see Fig. C) To lock the Walkman Polarity of the plug To play the other side Note œ•REPEAT Releasing HOLD Insert the fully charged battery into the battery compartment FX553 You are cautioned that any changes or modifications not expressly approved in this manual could void your authority to operate this equipment. The illustrations in this manual are for WM-FX553 and WM-FX551. Before you start reading, check your model number. WM-FX553 is the model used for illustration purposes. Any differences in operation are clearly indicated in the text, for example, “FX553 only”. 3 Insert the supplied rechargeable battery (NC-AA) for the tourist model only into the charger with correct polarity. Notes For customers in the USA The model number is located at the rear and the serial number is located inside the tape holder. Record these numbers in the space provided below. Refer to them whenever you call upon your Sony dealer regarding this product. Model No. Serial No. Welcome ! zGetting Started Para evitar incendios o descargas eléctricas, no exponga la unidad a la lluvia ni a la humedad. Owner’s Record Español English 3-858-910-52(2) Connecting the Headphones/ Earphones (see Fig. B-a) 1 Connect the headphones/ earphones to 2REMOTE. To use the earphones (see Fig. B-b) You can put the longer earphone cord behind your neck. To use the supplied clip (FX553 only) (see Fig. B-c) Position the earphones cord through the guides on the supplied clip as shown. Fasten the clip to your clothes. stop playback fast forward rewind repeat the track you are listening to (Repeat Single Track function) find the beginning of the next track/ succeeding 3 tracks (AMS*) find the beginning of the current track/ previous 2 tracks (AMS) play the same side from the beginning (Auto Rewind Play function) Press (see Fig. D-b) œ•REPEAT during playback p FF•AMS during stop REW•AMS during stop œ•REPEAT for two seconds or more during playback To stop a single repeat, press it again. FF•AMS once/ repeatedly during playback REW•AMS once/ repeatedly during playback REW•AMS for two seconds or more during stop FF•AMS for two seconds or more during stop SET play the other side from the beginning (Skip Reverse function) MENU * Automatic Music Sensor SET Note on Beeps during AMS operations • The beeps differ in relation to the track number being searched. When finding the beginning of the next 3 tracks during AMS operations, beeps “• – – –” (beep followed by three long beeps) are emitted repeatedly. Likewise, when finding the beginning of the previous 2 tracks, beeps “•• – – –” are emitted repeatedly. While the remaining tracks are reduced, the number of long beeps are reduced accordingly. To skip a long blank space between musics. (BL SKIP* function) (see Fig. D-c) Press MENU repeatedly to set the cursor to BL SKIP in the display. Then press SET to show “ON”. * The Walkman fast forwards the tape to the next track if there is a blank space longer than 12 seconds. To select playback mode (see Fig. D-c) Press MENU repeatedly to set the cursor to MODE in the display. Then press SET to select the desired mode. To play Both sides repeatedly Both sides once from the side facing the cassette holder Select a Å Note on AMS, REPEAT Single Track and BL SKIP • To operate the AMS and the REPEAT Single Track functions, you need a blank of 4 seconds or longer between the tracks. For the BL SKIP function, you need a blank of 12 seconds or longer. Therefore, if there is noise between the tracks, these functions will not detect the blank and will not operate. Likewise, if the recording level is moderately low within a track, these functions may inaccurately operate. To play a tape recorded with Dolby NR* system (see Fig. D-c) Press MENU repeatedly to set the cursor to a NR (Dolby noise reduction) in the display. Then press SET to show “ON”. * Dolby noise reduction manufactured under license from Dolby Laboratories Licensing Corporation. “DOLBY”and the double-D symbol a are trademarks of Dolby Laboratories Licensing Corporation. ¡Bienvenido! Muchas gracias por la adquisición del radiocassette WM-FX553/ FX551. Algunas de sus características son: • Usted podrá disfrutar de sonidos con graves bajos con los potentes auriuculares (tipo sin casco solamente). • Usted podrá elegir entre 2 diferentes tonos de acentuación: MB (MEGA BASS) y GRV (GROOVE) para ajustar el sonido a su gusto. •Función de menús en visualizador de cristal líquido, que le permitirá seleccionar y cambiar funciones en el visualizador de la unidad principal. • Función de exploración automática de la memoria, que le permitirá almacenar e invocar automáticamente hasta 16 emisoras de FM y 8 de AM. • Función del sensor automático de canciones (AMS), que le permitirá buscar el comienzo de la canción actual y de 2 anteriores, y de 3 canciones siguientes a gran velocidad. • Controlador remoto muy útil (FX553 solamente) zPreparativos Preparación de una fuente de alimentación Como fuente de alimentación, elija una pila o la corriente de la red. Con el modelo para turistas podrá utilizarse la batería suministrada. Conexión de los auriculares con casco/auriculares 1 (Consulte la Fig. B-a) 2 3 4 Ponga el selector de tensión en la posición correcta correspondiente a la tensión de alimentación utilizando un destornillador, etc. Inserte la batería suministrada (solamente con el modelo para turistas) (NC-AA) en el cargador con la polaridad correcta. Enchufe el cargador en una toma de la red. La carga completa tardará unas 4 horas. Si el enchufe eno entra en la toma de la red, instálele el adaptador de enchufe de CA suministrado (solamente con el modelo para turistas). Inserte la batería completamente cargada en el compartimiento para la misma (consulte la Fig. A-a). Cuándo cargar la batería (Consulte la Fig. A-b) Cargue la batería cuando la lámpara BATT se ilumnine débilmente. Usted podrá cargar la batería unas 300 veces. Batería (NC-AA) Reproducción de cintas Radiorecepción Cuándo reemplazar la pila (Consulte la Fig. A-b) Reemplace la pila por otra nueva cuando la lámpara BATT se ilumine débilmente. Corriente de la red Abra la tapa del compartimiento de la pila e inserte una pila R6 (tamaño AA) (no suministrada) haciendo coincidir + y – de la pila como se muestra en la ilustración de este manual. Duración de la pila (Horas aproximadas) Pila Pila alcalina R6P LR6 (SG) (SR) Sony Sony 29 8 8 Nota • La duración útil de la pila puede acortarse dependiendo de la forma de utilización ede la unidad. Para obtener el máximo rendimiento, recomendamos utilizar una pila alcalina. Notas • No cargue la pila. • Cuando no vaya a utilizar el Walkman durante mucho tiempo, extraiga la pila para evitar el daño que podría causar el electrólito de la misma en caso de fugarse. (Consulte la Fig. A-d) Conecte el adaptador de alimentación de CA AC-E15HG (no suministrado) a la toma DC IN 1.5 V y a una toma de la red. No utilice ningún otro adaptador de alimentación de CA. Polaridad de la clavija Conecte los auriculares con casco/auriculares a 2REMOTE. Para utilizar los auriculares (Consulte la Fig. B-b) Usted podrá pasar el cable más largo de los auriculares por detrás de su cuello. Para utilizar la presilla para el cinturón suministrada (FX553 solamente) (Consulte la Fig. B-c) Coloque el cable de los auriculares a través de las guías de la presilla suministrada como se muestra en la ilustración. Enganche la presilla en su ropa. Desbloqueo (Consulte la Fig. C) La función de bloqueo (HOLD) bloqueará el Walkman para evitar que pueda funcionar en caso de presionar accidentalmente una tecla. Desbloquéelo antes de utilizarlo. 1 8 9 • No despegue la película de la batería. • Utilice la batería NC-AA Sony solamente con el cargador de baterías suministrado (solamente con el modelo para turistas). • No deje el cargador enchufado durante más de 20 horas. La sobrecarga podría dañar la batería. • El cargador de baterías y la batería pueden calentarse durante la carga, pero esto no significa problema alguno. 1 1 Duración de la batería (Horas aproximadas) Notas Pila (Consulte la Fig. A-a) Reproducción de cintas Radiorrecepción 30 (turn over) Batería (Consulte la Fig.A-c) (Modelo para turistas solamente) Deslice HOLD en sentido puesto al de la flecha del Walkman. Deslice HOLD del controlador remoto de forma que el indicador HOLD se vuelva amarillo. Para bloquear el Walkman Deslice HOLD en el sentido de la flecha. Para bloquear el controlader remoto Deslice HOLD de forma que el indicador se vuelva amarillo. zUtilización del Walkman Reproducción de una cinta (Consulte la Fig.D-a) El selector automático de cinta seleccionará de forma automática la cinta (normal (TYPE I), CrO2 (TYPE II), o metal (TYPE IV)) para reproducción. 1 Inserte el cassette. 2 Presione œ •REPEAT para iniciar la reproducción y después ajuste el volumen. Si los auriculares no encajan en sus oídos, o si oye el sonido desequilibrado, gírelos un poco para que encajen firmemente en sus oídos. Cuando desee ajustar el volumen en el Walkman (FX553 solamente) Ajuste el control VOL del controlador remoto al nivel máximo. Cuando desee ajustar el volumen en el controlador remoto (FX553 solamente) Ajuste el control VOLUME del Walkman alrededor de 6. Para Presione (Fig. D-b) reproducir la otra œ•REPEAT cara en el modo de reproducción parar la reproducción p hacer que FF•AMS la cinta avance en el modo de rápidamente parada rebobinar REW•AMS la cinta en el modo de parada repetir la canción œ•REPEAT que esté escuchando durante dos (función de segundos o repetición de más en el una sola canción) modo de reproducción Para parar la repetición de una sola canción, vuelva a presionarla. buscar el comienzo FF•AMS una de la canción vez/ siguiente/ rapetidamente 3 canciones en el modo de siguientes reproducción (AMS*) buscar el comienzo REW•AMS una de la canción vez/ actual/2 canciones repetidamente anteriores en el modo de (AMS) reproducción reproducir la misma REW•AMS cara desde el durante dos o comienzo más segundos (función de en el modo de reproducción parada automática después del rebobinado) reproducir la otra FF•AMS cara desde el durante dos o comienzo (función más segundos de inversión con en el modo de salto) reproducción * Sensor automático de canciones Nota sobre los pitidos durante las operaciones del AMS Para seleccionar el modo de reproducción (Consulte la Fig. D-c) Presione repetidamente MENU para colocar el cursor en MODE del visualizador. Después presione SET para que seleccionar el modo deseado. Para reproducir repetidamente ambas caras ambas caras una vez desde la situada hacia el portacassette Seleccione a Å Nota sobre el sensor automático de canciones, la repetición de una sola canción, y el salto de espacios en blanco • Para utilizar las funciones del sensor automático de canciones y de repetición de una sola canción, necesitará un espacio en blanco de 4 o más segundos entre las canciones. Para la función de salto de espacios en blanco, necesitará un espacio en blanco 12 o más segundos. Por lo tanto, si existe ruido entre las canciones, estas funciones no detectarán el espacio en blanco y no trabajarán. De forma similar, si el nivel de grabación es moderadamente bajo dentro de una canción, es posible que estas funciones no trabajen adecuadamente. Para reproducir una cinta grabada con el sistema de reducción de ruido Dolby* (Consulte la Fig. D-c) Presione repetidamente MENU para colocar el cursor en a NR (reducción de ruido Dolby) del visualizador. Después presione SET para que se visualice “ON”. * Reducción de ruido Dolby fabricado bajo licencia de Dolby Laboratories Licensing Corporation. DOLBY y el símbolo de la D doble a son marcas de Dolby Laboratories Licensing Corporation. • Los pitidos diferirán de acuerdo con el número de canción que esté buscándose. Cuando busque el comienzo de las 3 canciones siguientes con el AMS, se emitirán repetidamente pitidos “• – – –” (pitido corto seguido por tres largos) De forma similar, cuando busque el comienzo de 2 canciones anteriores, se emitirán repetidamente pitidos “•• – – –” A medida que vayan reduciéndose las canciones restantes, se reducirá también el número de pitidos largos. Para saltar un espacio en blanco largo entre canciones (función BL SKIP* ) (Consulte la Fig. D-c) Presione repetidamente MENU para colocar el cursor en BL SKIP del visualizador. Después presione SET para que se visualice “ON”. * El Walkman hará que la cinta avance rápidamente hasta la canción siguiente cuando haya un espacio en blanco de más de 12 segundos. (Dé la vuelta.) English E a FX553 Listening to the Radio (see Fig. E-a) Storing Radio Stations Manually (ManualMemory function) (see 1 Fig. E-d) FF VOLUME REW p•RADIO OFF p•RADIO OFF VOL BAND (RADIO ON• BAND) RADIO ON• BAND TUNING +/– b FX553 Español 2 3 FX551 Press RADIO ON•BAND to turn on the radio. Press RADIO ON•BAND repeatedly to select AM or FM. Press TUNING+/– to tune in to the desired station. If you keep pressing TUNING+/– for a few seconds, the Walkman will start tuning to the stations automatically. You can preset the stations in any order. 1 2 3 To turn off the radio Press p•RADIO OFF . To improve the broadcast reception SET MENU SET MENU c PRESET +/– FX553 RADIO ON• BAND ENTER BAND (RADIO ON•BAND) PRESET +/– • For AM: The Walkman has a built-in antenna. Reorient the Walkman horizontally to obtain optimum AM reception. For FM (see Fig. E-b): Extend the cord of the remote control , the aerial (FX553 only). Extend the earphones cord, the aerial (FX551 only). If the reception is still not good, press MENU repeatedly to set the cursor to FM MODE in the display. Then press SET to choose from MONO (monaural), LOCAL or none (stereo) mode for best reception. Note d PRESET +/– PRESET +/– FX553 BAND (RADIO ON•BAND) ENTER e Presetting Radio Stations Once you store your favorite stations in memory, you can play them easily. You can preset up to 16 stations for FM and 8 stations for AM of each mode (Eur, JPn, USA). FX553 PRESET +/– PRESET +/– RADIO ON• BAND TUNING +/– ENTER BAND (RADIO ON•BAND) Tuning In to and Storing Radio Stations Automatically (AutoMemory Scanning function) (see Fig. E-c) 1 2 3 F BL SKIP MODE NR 4 FM SOUND AVLS MODE GRV FWD MENU BATT SET SET MENU 5 Notes • If you cannot complete step 3 or 4 while the indications are flashing, repeat from step 2. • If you preset a new station to the same preset number, the previously stored station will be erased. To cancel the stored station Follow the procedure above and in step 3, instead of tuning in to a station, press and hold TUNING+/ – until “– – – –” is displayed. Press ENTER while “– – – –” is flashing. • Do not remove the power sources while listening to the radio, or the received stations may not be stored. RADIO ON• BAND TUNING +/– 4 Turn on the radio and select the desired band. Press ENTER. The frequency digits and a preset number flash in the display. While the frequency digits and the preset number are flashing, tune in to a station you wish to store using TUNING+/–, and select a preset number using PRESET+/–. While the frequency digits and the preset number are flashing, press ENTER. Tune in to a station using PRESET+/–. Press RADIO ON•BAND to turn on the radio. Press RADIO ON•BAND repeatedly to select AM or FM. Press ENTER until “A” appears in the display. The Walkman starts searching and storing stations. After the preset number appears, tune into a station using PRESET+/–. Receiving Stations Outside Your Country (see Fig. E-e) The frequency range differs depending on the area (see the chart “Area indication and frequency range”). If you listen to the radio in an area of different frequency range, change the area indication. 1 2 3 4 5 Press RADIO ON•BAND to turn on the radio. Press ENTER. Press and hold RADIO ON•BAND until the area indication flashes in the display. Press RADIO ON•BAND repeatedly to select the following area “Eur”, “JPn” or “USA” and press ENTER. Tune in to and store stations as necessary following the procedure of the “Listening to the Radio” and “Presetting Radio Stations”. Area indication and frequency range Area* Frequency range FM (MHz) AM(kHz) Eur 87.5–108.0 531–1,602 JPn 76.0–90.0 531–1,710 USA 87.5–108.0 530–1,710 *Eur : European and other countries JPn : Japan USA : USA and Canada Using Other Functions (see Fig. F) Emphasizing Bass 1 Press MENU repeatedly to set the cursor to SOUND in the display. Then, press SET to select the desired mode. With each press, the indications change as follows. MB (MEGA BASS) : emphasizes bass sound GRV (GROOVE) : emphasizes deeper bass sound No message: off (normal) • If the unit has not been used for long, set it in the playback mode and warm it up for a few minutes before inserting a tape. On tapes longer than 90 minutes We do not recommend the use of tapes longer than 90 minutes except for a long continuous playback. They are very thin and tend to be stretched easily. On the remote control (FX553 only) Use the supplied remote control only with this unit. Note On headphones/earphones • If the sound is distorted with the mode “GRV”, select the mode “MB” or no message. Road safety Do not use headphones/earphones while driving, cycling, or operating any motorized vehicle. It may create a traffic hazard and is illegal in some areas. It can also be potentially dangerous to play your headsets at high volume while walking, especially at pedestrian crossings. You should exercise extreme caution or discontinue use in potentially hazardous situations. Protecting Your Hearing (AVLS) When you set the AVLS (Automatic Volume Limiter System) function to active, the maximum volume is kept down to protect your ears. 1 Press MENU repeatedly to set the cursor to AVLS in the display. Then press SET to show “ ”. Notes • If the sound is distorted when you listen to the bass-boosted sound with the AVLS function, turn down the volume. • The setting is stored as long as the battery is not replaced. z Additional Information Precautions On rechargeable battery and charger (Tourist model only) • If the rechargeable battery is new or has not been used for a long time, it may not be charged completely until you use it several times. • The nameplate indicating the operating voltage, power consumption, etc. is located on the bottom exterior of the battery charger. On batteries Preventing hearing damage Do not use headphones/earphones at high volume. Hearing experts advise against continuous, loud and extended play. If you experience a ringing in your ears, reduce volume or discontinue use. Caring for others Keep the volume at a moderate level. This will allow you to hear outside sounds and to be considerate to the people around you. Maintenance To clean the tape head and path Use the cleaning cassette CHK-1 (not supplied) every 10 hours of use. Note • Use only the recommended cleaning cassette. To clean the exterior Use a soft cloth slightly moistened with water. Do not use alcohol, benzine or thinner. Do not carry the dry or rechargeable batteries with coins or other metallic objects. It can generate heat if the positive and negative terminals of the batteries are accidentally contacted by a metallic object. Note On the unit The cassette holder does not open. • If the tape is playing, stop and then slide OPEN. • This condition may occur when you remove the power sources during playback, or when you use exhausted dry or rechargeable battery. Set the power sources again or replace the exhausted battery with new one. • Do not drop the unit or give a shock to the unit, or it may cause a malfunction. • Do not leave the unit in a location near heat sources, or in a place subject to direct sunlight, excessive dust or sand, moisture, rain, mechanical shock, or in a car with its windows closed. • Clean the headphones/earphones plug periodically. Troubleshooting The volume is not turned up. If “ ” appears for AVLS display, press SET so that “ ” disappears. The tape fastforwards by itself during playback. If “ON” appears for BL SKIP display, press SET so that “ON” disappears. Escucha de la radio (Consulte la Fig. E-a) 1 2 Specifications Radio section Frequency range For “USA” indication FM: 87.5–108 MHz AM: 530–1,710 kHz For “Eur” indication FM: 87.5–108 MHz AM: 531–1,602 kHz Tape section Frequency response (Dolby NR off) Playback: 20–18,000 Hz Output Headphones/earphones (2 REMOTE jack) Load impedance 8–300 ohms Power output 4 mW + 4 mW (16 ohms) General Power requirements 1.5 V One R6 (size AA) battery Rechargeable battery (for the tourist model) Dimensions (w/h/d) Approx. 109 x 79.2 x 29.4 mm (43⁄8 x 31⁄8 x 13⁄16 inches) incl. projecting parts and controls Mass Approx. 150 g (5.3 oz) FX553:Approx. 270 g (9.6 oz) incl. battery, headphones and cassette Approx. 235 g (8.3 oz) incl. battery, earphones with remote control and cassette FX551: Approx. 235 g (8.3 oz) incl. battery, headphones and cassette Supplied accessories Stereo headphones or earphones with remote control (1) (FX553 only) Stereo headphones (1) (FX551 only) Clip (1) (FX553 only) Battery charger (1) (FX553 tourist model only) AC plug adaptor (1) (FX553 tourist model only) Rechargeable battery (NC-AA) (1) (FX553 tourist model only) Battery R6P (SR) (1) (FX553 tourist model only) Carrying pouch (1) Design and specifications are subject to change without notice. 3 Presione RADIO ON•BAND para conectar la alimentación de la radio. This warranty is valid only in the United States. Esta garantía es válida solamente en los Estados Unidos. Sintonía y almacenamiento automático de emisoras (función de exploración y memorización automáticas) (Consulte la Fig. E-c) Presione repetidamente RADIO ON•BAND para seleccionar AM o FM. Presione TUNING+/– para sintonizar la emisora deseada. Si mantiene presionada TUNING+/– durante algunos segundos, el Walkman iniciará automáticamente la sintonía de emisoras. Para desconectar la alimentación de la radio 1 2 3 4 Presione p•RADIO OFF . Para mejorar la recepción de emisiones • Para AM: El Walkman posee una antena incorporada. Oriente horizontalmente el Walkman hasta obtener la óptima recepción de AM. Para FM (Consulte la Fig. E-b): Extienda el cable del controlador remoto, que es la antena (FX553 solamente). Extienda el cable de los auriculares, que es la antena (FX551 solamente). Si la recepción sigue sin ser buena, presione repetidamente MENU para colocar el cursor en FM MODE del visualizador. Después presione SET para elegir el modo MONO (monoaural), LOCAL, o nada (estéreo), que ofrezca la mejor recepción. Almacenamiento manual de emisoras (función de memorización manual) Memorización de emisoras Después de haber almacenado sus emisoras favoritas en la memoria, podrá sintonizarlas fácilmente. Usted podrá memorizar hasta 16 emisoras de FM y 8 de AM de cada modo (Eur, JPn, USA). La gama de frecuencias diferirá dependiendo del área (consulte “Indicación de áreas y gamas de frecuencias”). Para escuchar la radio en un área de gama de frecuencias diferente, cambie la indicación del área. 1 2 3 4 5 (Consulte la Fig. E-d) Usted podrá memorizar las emisoras en cualquier orden. 1 2 3 Nota • No desconecte las fuentes de alimentación durante la escucha de la radio, ya que las emisoras recibidas podrían no almacenarse. Presione RADIO ON•BAND para conectar la alimentación de la radio. Presione repetidamente RADIO ON•BAND para seleccionar AM o FM. Presione ENTER hasta que en el visualizador aparezca “A”. El Walkman iniciará la búsqueda y el almacenamiento de emisoras. Después de haber aparecido el número de memorización, sintonice una emisora utilizando PRESET+/–. Recepción de emisoras fuera de su país (Consulte la Fig. E-e) 4 5 Conecte la alimentación de la radio y seleccione la banda deseada. Presione ENTER. En el visualizador parpadearán los dígitos de la frecuencia y un número de memorización. Mientras los dígitos de la frecuencia y el número de memorización estén parpadeando, sintonice la emisora que desee almacenar utilizando TUNING+/–, y seleccione el número de memorización utilizando PRESET+/–. Mientras los dígitos de la frecuencia y el número de memorización estén parpadeando, presione ENTER. Para sintonizar esta emisora, utilice PRESET+/–. Notas • Si no puede completar el paso 3 o el 4 mientras las indicaciones estén parpadeando, repita el procedimiento desde el paso 2. • Si almacena una nueva emisora en el mismo número de memorización, la previamente almacenada se borrará. Para cancelar una emisora almacenada Realice el procedimiento anterior y, en el paso 3, en vez de sintonizar una emisora, y mantenga presionada TUNING +/– hasta que se visualice “– – – –”. Presione ENTER mientras esté parpadeando “– – – –”. Presione RADIO ON•BAND para conectar la alimentación de la radio. Presione ENTER. Mantenga presionada RADIO ON•BAND hasta que en el visualizador parpadee la indicación del área. Presione repetidamente RADIO ON•BAND para seleccionar el área “Eur”, “JPn”, o “USA”, y presione ENTER. Sintonice y almacene las emisoras necesarias siguiendo los procedimientos de “Escucha de la radio” y “Memorización de emisoras”. Indicación de área y gama de frecuencias Área* Gama de frecuencias FM (MHz) AM(kHz) Eur 87,5–108,0 531–1.602 JPn 76,0–90,0 531–1.710 USA 87,5–108,0 530–1.710 *Eur : Europa y otros países JPn : Japón USA : EE.UU. y Canadá Utilización de otras funciones (Consulte la Fig. F) Acentuación de los graves 1 Presione repetidamente MENU para colocar el cursor en SOUND del visualizador. Después presione SET para seleccionar el modo deseado. Cada vez que presione esta tecla, las indicaciones cambiarán de la forma siguiente: MB (MEGA BASS): Acentuación del sonido de graves GRV (GROOVE): Mayor acentuación del sonido de graves Ausencia de mensaje: Sonido normal Nota • Si el sonido se oye distorsionado en el modo “GRV”, seleccione el modo “MB” o la ausencia de mensaje. Protección de sus oídos (AVLS) Cuando active la función del sistema limitador automático de volumen (AVLS), el volumen máximo se mantendrá bajo para proteger sus oídos. 1 Presione repetidamente MENU para colocar el cursor en AVLS del visualizador. Después presione SET para hacer que se visualice “ ”. Notas • Si el sonido se oye distorsionado cuando escuche el sonido de graves reforzados con la función de AVLS activada, reduzca el volumen. • El ajuste permanecerá almacenado mientas no reemplace la batería/ pila. z Información adicional Precauciones Precauciones sobre la batería y el cargador (modelo para turistas solamente) • Si la batería es nueva o no se ha utilizado durante mucho tiempo, es posible que no se cargue completamente hasta que la utilice varias veces • La placa de características en la que se indica la tensión de alimentación, el consumo, etc., se encuentra en la parte inferior exterior del cargador de baterías. Pila/batería No lleve la pila ni la batería con monedas ni otros objetos metálicos. Si los terminales positivo y negativo de la pila/batería se cortocircuitasen accidentalmente con un objeto metálico, se generaría calor. Unidad • No deje caer la unidad ni la golpee, ya que podría provocar su mal funcionamiento. • No deje la unidad cerca de fuentes térmicas, ni en un lugar sometido a la luz solar directa, a polvo excesivo, a arena, a la humedad, a la lluvia, ni a golpes, ni en el interior de un automóvil con las ventanillas cerradas. • Cuando no haya utilizado la unidad durante mucho tiempo, póngala en el modo de reproducción y deje que se caliente durante algunos minutos antes de insertarle un cassette. Cintas de más de 90 minutos No se recomienda la utilización de cintas de más de 90 minutos excepto para reproducción larga y continua. Estas cintas son muy finas y tienden a estirarse fácilmente. Controlador remoto (FX553 solamente) Utilice el controlador remoto suministrado solamente con esta unidad. Auriculares con casco/ auriculares Seguiridad en la carretera No utilice los auriculares cuando conduzca, vaya en bicicleta, o maneje cualquier vehículo motorizado. Esto podría suponer un peligro para el tráfico, y es ilegal en ciertas zonas. También puede resultar potencialmente peligroso escuchar a través de los auriculares a gran volumen mientras camine, especialmente en pasos cebra. En situaciones potencialmente peligrosas, deberá tener mucho cuidado o dejar de utilizar los auriculares. Cuidado de sus oídos Evite utilizar los auriculares con casco/auriculares a gran volumen. Los expertos en oídos no aconsejan la escucha prolongada a gran nivel. Si experimenta un silbido en sus oídos, reduzca el volumen o deje de escuchar a través de los auriculares. La cinta avanza rápidamente sola durante la reproducción. Si está indicándose “ON” para la visualización de BL. SKIP, presione SET de forma que desaparezca “ON”. Especificaciones Sección de la radio Gama de frecuencias Para la indicación “USA” FM: 87,5–108 MHz AM: 530–1.710 kHz Para la indicación “Eur” FM: 87,5–108 MHz AM: 531–1.602 kHz Sección del reproductor de cassettes Respuesta en frecuencia (sin sistema de reducción de ruido Dolby NR ) Reproducción: 20–18.000 Hz Solida Toma para auriculares con casco/ auriculares (2 REMOTE) Impedancia de carga: 8 – 300 ohmios Salida de potencia 4 mW + 4 mW (16 ohmios) Sección general Respeto a los demás Mantenga el volumen a un nivel moderado. Esto le permitirá escuchar los sonidos del exterior y respetar a quienes se encuentren a su alrededor. Mantenimiento Para limpiar las cabezas y la trayectoria de la cinta Utilice un cassette limpiador CHK-1 (no suministrado) cada 10 horas de utilización. Nota • Utilice solamente el cassette limpiador recomendado. Para limpiar el exterior Utilice un paño suave ligeramente humedecido en agua. No use alcohol, bencina, ni diluidor de pintura. Nota • Limpie periódicamente la clavija de los auriculares con casco/ auriculares. Solución de problemas El portacassette no se abre. • Si hay una cinta en reproducción, párela y presione OPEN. • Esta condición puede ocurrir al desconectar las fuentes de alimentación durante la reproducción, o cuando utilice una batería o una pila agotada. Conecte la fuente de alimentación, o reemplace la batería/pila agotada por otra cargada/nueva. El volumen no aumenta. Si aparece “ ” para la visualización de AVLS, presione SET de forma que “ ” desaparezca. Alimentación 1,5 V Una pila R6 (tamaño AA) Batería (modelo para turistas) Dimensiones (an/al/prf) Aprox. 109 x 79,2 x 29,4 mm, (incluyendo partes y controles salientes) Masa Aprox. 150 g FX553: Aprox. 270 g, incluyendo la pila, los auriculares y un cassette Aprox. 235 g, incluyendo la pila, los auriculares con controlador remoto, y un cassette FX551: Aprox. 235 g, incluyendo la pila, los auriculares, y un cassette Accesorios suministrados Auriculares estéreo con casco/ auricularaes con controlador remoto (1) (FX553 solamente) Auriculares estéreo (1) (FX551 solamente) Presilla para el cinturón (1) (FX553 solamente) Cargador de baterías (1) (modelo FX553 para turistas solamente) Adaptador de enchufe de CA (1) (modelo FX553 para turistas solamente) Batería (NC-AA) (1) (modelo FX553 para turistas solamente) Pila R6P (SR) Sony (1) (modelo FX553 para turistas solamente) Funda de transporte (1) El diseño y las especificaciones están sujetos a cambio sin previo aviso.