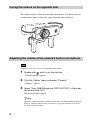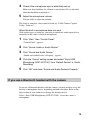
1
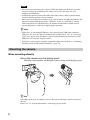
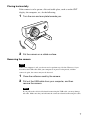
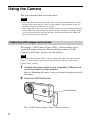
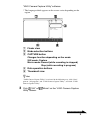
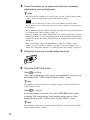
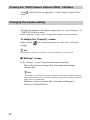
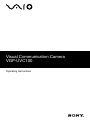
Visual Communication Camera VGP-UVC100 Operating Instructions • Sony, VAIO, , and the Eco Info logo are trademarks of Sony Corporation. • Microsoft and Windows are registered trademarks of Microsoft Corporation in the United States and/ or other countries. • IBM and PC/AT are registered trademarks of International Business Machines Corporation. • Intel, Pentium and Celeron are trademarks and registered trademarks of Intel Corporation. • The Bluetooth word mark and logos are owned by the Bluetooth SIG, Inc. and any use of such marks by SONY is under license. • Adobe and Adobe Reader are trademarks or registered trademarks of Adobe Systems Incorporated in the United States and/or other countries. • All other names of systems, products, and services are trademarks of their respective owners. In this manual, the ™ or ® marks are not specified. In this manual, Microsoft® Windows® XP Home Edition, Microsoft® Windows® XP Professional and Microsoft® Windows® Media Center Edition are referred to as Windows XP. 2 Table of Contents Introduction ........................................... 3 Compatible Computers .......................... 3 Names of Parts ....................................... 4 Setting up ............................................... 4 Checking the supplied accessories .................................... 4 Installing the driver and the software ........................................ 5 Mounting the camera ...................... 6 Using the Camera .................................. 8 Capturing still images and movies . 8 Seeing images ............................... 11 Closing the “VAIO Camera Capture Utility” software ........... 12 Changing the camera setting ........ 12 Facing the camera on the opposite side ............................................. 14 Adjusting the volume of the camera's built-in microphone ..... 14 If you use a Bluetooth headset with the camera .................................. 15 Confirming Installing and Proceeding with Uninstalling ........... 16 Checking that the driver is installed ...................................... 16 Uninstalling the driver .................. 17 Precautions .......................................... 18 Maintenance ........................................ 19 Getting Help ........................................ 20 Specifications ...................................... 21 Troubleshooting ................................... 22 Introduction This camera is a USB 2.0 compatible visual communication camera. The camera enables you to use the TV telephone function on your computer. These are the following features. • 1.3 Mega-pixel CMOS sensor and microphone. • Shoot moving and still images, and transfer as video mail with the supplied “VAIO Camera Capture Utility” software. • Various camera settings, such as Backlight compensation adjustment and brightness, added effects, such as setting a frame, etc., with “VGPUVC100 device driver.” • Video chatting when used as a web camera. Note Your “Messenger Software” may change the microphone volume automatically to prevent the speaker from howling; the software lowers the speaker volume when the microphone is close to the speaker. If voices are not easily audible, use a headphone or headset. Refer to the help section of your software instructions for details. Compatible Computers The camera is designed to work with computers pre-installed with Windows XP* and equipped with USB ports. * Requires Windows XP Service Pack 2 to be installed. If it is not installed, download it from Microsoft’s website. Notes • There is no guarantee of proper operation on a home-built computer or OS upgrade/ multi-boot. • In the above operation environments, there is no guarantee of proper operation on every computer. • A computer equipped with a camera is incompatible. Even if the camera is connected to the computer, you cannot use it. • The following operation environments are necessary for capturing still images and movies in the size of VGA or the larger size. CPU: Pentium III, or Celeron 1.2 GHz or more We recommend 256 MB of memory or more. We recommend reducing the screen size or image size, if the image is distorted during capturing. 3 • If you display over a million-pixels, this camera is necessarily connected to the connector with Hi-Speed USB (USB 2.0). • It is necessary to install the software from the supplied installation disc, in order to use the camera. Names of Parts Lens Focus ring Microphone CAPTURE button Arm plate Arm Setting up Checking the supplied accessories Remove the camera from the box and make sure that the box contains the accessories listed below. If any of the accessories are missing, contact the Sony dealer where you purchased this product or a Sony service representative in your area. • Visual Communication Camera • Installation disc (CD-ROM × 1) • Operating instructions (this manual) • Warranty card* * The accessories included vary according to country and region. 4 Installing the driver and the software Install the VGP-UVC100 device driver for using the camera on the computer. You can install “VAIO Camera Capture Utility” software for capturing still images and movies. Notes • Make sure that your disk drive, such as CD-ROM drive etc., is available for use on your computer. In this manual, the CD-ROM drives or multiple disk drives are referred to as “the CD-ROM drive.” For details on how to connect a CD-ROM drive, refer to the manuals provided with your computer or CD-ROM drive. • To use “VAIO Camera Capture Utility,” more than 2 GB free space of the hard disc is necessary. • Update Windows before installing the driver and software. • Exit all software before installing the driver and software. • Log on as Administrator before installing the driver and software. • If the “Add New Hardware Wizard” dialog box appears, click “Cancel,” then disconnect the camera from your computer and reinstall it. 1 Turn on the computer, start the Windows operating system and insert the supplied installation disc into the CD-ROM drive. The installation program starts automatically and the “Sony Visual Communication Camera VGP-UVC100 Application Installer Setup” screen appears. 2 Make sure that the checkbox to install the software has been checked, and click “Next.” z Hint The checkbox will not appear if the software is already installed. 3 Follow the on-screen instructions until the setup finishes and display closes. z Hint Click “Yes” if a restart pop-up message appears after installation. 4 Connect the USB cable of the camera to the USB port on your computer. The necessary driver is installed automatically. Click “Yes” if a restart pop-up message appears after installation. After restarting Windows, you can begin using the camera. Continued on next page 5 Notes • Do not disconnect/reconnect the camera’s USB cable while your Windows operating system is starting up or shutting down; doing so may cause the camera or your computer to malfunction. • Carefully disconnect/reconnect the USB cable of the camera; doing it quickly might result in unstable operation of your computer. • This camera is designed to constantly secure a fixed amount of USB bandwidth for data transfer to display high-quality images. Therefore, if you use a USB hub to connect USB composite device simultaneously, the amount of bandwidth available for data transfer might not be sufficient to support proper operation. z Hints • When there are the multiple USB ports, after connecting the USB cable to different USB ports, the necessary driver is automatically installed. Click “Yes” if a restart popup message appears after installation. After restarting Windows and connecting to the USB port, you can begin using the camera. • If the driver is not properly installed, uninstall and then reinstall. Refer to “Confirming Installing and Proceeding with Uninstalling.” (page 16) Mounting the camera When mounting directly Mount the camera onto the display panel. Pinch the arms together and hang the camera on top of the display panel. z Hint Depending on the type of computer you use, this camera sometimes cannot be mounted directly. In this case, see “Placing horizontally” on the next page for details. 6 Placing horizontally If the camera is to be put on a flat and stable place, such as on the CRT display, the computer, etc., do the following: 1 Turn the arm and arm plate towards you. 2 Put the camera on a stable surface. Removing the camera Note When your computer is off, you do not need to perform step 1 below. However, if you disconnect the USB cable while your computer is in power-saving mode, and then connect it again, the camera may not be detected. 1 2 Close the software used by the camera. Pull out the USB cable from your computer, and then remove the camera. Note If you pull on the cable itself when disconnecting the USB cable, you may damage the cable. Make sure that you hold onto the connector when disconnecting the cable. 7 Using the Camera This section describes how to use the camera. Notes • When using the camera for the first time, make sure that you install the driver and the software before connecting the camera to your computer. For installation details, see “Installing the driver and the software” (page 5). • When using software that can be used with this camera, do not disconnect/reconnect the cameras USB cable while running the software or when starting up or quitting. Doing so can cause the computer to become unstable. Disconnect/reconnect the USB cable after all software has been shut down. Capturing still images and movies The supplied “VAIO Camera Capture Utility” software enables you to capture still images and movies. Refer to the help section of “VAIO Camera Capture Utility” on how to use the software. Note The “VAIO Camera Capture Utility” software cannot work when other camera-related software is in use. Exit all camera-related software before using the “VAIO Camera Capture Utility” software. 1 Connect the camera cable to your computer’s USB port and mount the camera on the computer. Refer to “Mounting the camera” on page 6 for details on how to install the camera. 2 Press the CAPTURE button. CAPTURE button The “VAIO Camera Capture Utility” software activates. 8 “VAIO Camera Capture Utility” software * The language which appears on the screen varies depending on the region. 1 Finder view 2 Mode selection buttons 3 CAPTURE button Changes function depending on the mode. Still mode: Capture Movie mode: Record (while recording is stopped) Stop (while recording is progress) 4 Data operation buttons 5 Thumbnail view z Hint “VAIO Camera Capture Utility” is activated in the following way: click “Start”, point to “All programs” and “VAIO Camera Capture Utility”, and click “VAIO Camera Capture Utility”. 3 Click “Still” or Utility” screen. “Movie” on the “VAIO Camera Capture Continued on next page 9 4 Focus the camera on an object and make any necessary adjustments, such as brightness. z Hints • The initial size of a still image is 1,280 × 1,024. Use the “VAIO Camera Capture Utility” software to change the size of a still or moving image. Note When the size of a still image is 1,280 × 1,024, some “Effects” functions and the “Zoom” function are not activated. If you want to use these functions, change the size of the still image. • We recommend using the “Mirror” function. To change the setting of the function, see “Changing the camera setting” on page 12. • Faces, for example, may appear dark if lights such as fluorescent lamps are in the background. In that case, we recommend turning on the Backlight compensation function. To change the setting of the function, see “Changing the camera setting” on page 12. • If the screen blinks, change the White Balance setting on “Settings” on the property screen to “50 Hz” or “60 Hz”, according to your area frequency. To change the setting of the function, see “Changing the camera setting” on page 12. 5 Rotate the focus ring, and then adjust the focus. 6 Press the CAPTURE button. When is selected: After you capture images, they appear in the thumbnail view that is in the bottom of the “VAIO Camera Capture Utility” screen. z Hint It is possible to capture still images by clicking “Capture” in the “VAIO Camera Capture Utility” screen. When is selected: Its function begins to activate. Press the CAPTURE button to stop recording. The starting image of the moving image appears in the thumbnail view of the “VAIO Camera Capture Utility” screen. z Hint Moving Images can be recorded with a click on “Record,” which is on the “VAIO Camera Capture Utility” software. 10 z Hints • The “VAIO Camera Capture Utility” software enables you to do the following. For details, refer to the help section of “VAIO Camera Capture Utility.” – To set up the image quality or mode – To send images by e-mail • When the “VAIO Camera Capture Utility” software is used, the still image format is JPEG. • It is possible to shoot moving images using the “Windows Movie Maker” software, which is packaged with Windows XP. Refer to the help section of the “Windows Movie Maker” software on how to use the software. Note If the object moves fast, its image may not be displayed clearly in the finder view. This is not a malfunction. Seeing images Use the “VAIO Camera Capture Utility” software to view still or moving images. 1 Click “Preview” on the “VAIO Camera Capture Utility” software. 2 Double-click the images that you want to view in the thumbnail view of the “VAIO Camera Capture Utility” screen. The selected image appears. When the moving image is selected, the selected movie is played in the finder view, when playback reaches the last image, it stops and the finder view shows the first image of the movie. z Hint If playback volume is too low, set the volume setting on your computer. See the manual of your computer regarding the measure. 11 Closing the “VAIO Camera Capture Utility” software Click , which is on the top right of the “VAIO Camera Capture Utility” screen. Changing the camera setting To adjust the brightness, Backlight compensation, etc., go to “Property” of “VGP-UVC100 device driver.” In the “Property” screen, you can adjust the zoom or set up the frame. To display the “Property” screen Right-click the Settings.” icon of the notification area, then click “Advanced z Hint If this camera’s software is not started, “Advanced Settings” is not activated. x“Settings” screen In the “Settings” screen, change the following setting items: – Mirror (flip horizontal), Image Flip, Low Light and Backlight compensation. z Hint “Low Light” is an effective function for capturing in low-light conditions. However, image artifacts might occur as a result of lighting correction. Capturing in sufficient light is always recommended. – Brightness, Contrast, Gamma, Hue, Saturation and Sharpness – Exposure and White Balance 12 x“Effects” setting screen In the “Effects” setting screen, change the following setting items: – Effect – Frame Note Functions of the “Zoom” setting screen and the “Effects” setting screen cannot be used simultaneously. If you cannot use the “Effects” setting screen, deactivate “Enable Zoom” box or “Face Tracking” box in the “Zoom” setting screen. x“Zoom” setting screen In the “Zoom” setting screen, change the following setting items: – Zoom adjustment To use the zoom function, check the “Enable Zoom” box. While the zoom function is on, the “Effects” setting screen cannot be used. Use the arrow buttons to move on a zoomed-in image. – Face Tracking function The face tracking is the function that a face is set in the middle of picture. While “Face Tracking” is on, the “Effects” setting screen cannot be used. * This camera may not zoom depending on the number and position of objects in the subject area, or for example when a face is not in the middle of the picture. 13 Facing the camera on the opposite side The camera rotates as shown in the illustration below. You do not need to re-mount the camera to face the camera from the other direction. Adjusting the volume of the camera's built-in microphone Note Displayed names and screens vary depending on the model. 1 Double-click , which is on the task bar. “Volume control” appears. 2 Click the “Option” menu and select “Property.” “Property” appears. 3 Select “Sony USB Microphone (VGP-UVC100)” in the mixer device and click “OK.” The mixer window appears. z Hint The mixer window may not be displayed if the driver has been installed improperly. Refer to “Checking that the driver is installed” on page 16 and check if the driver has been properly installed. 14 4 Check if the microphone input is effectively set up. Make sure that checkbox for all mute is not checked. If it is checked, click the checkbox to uncheck it. 5 Adjust the microphone volume. Use the slider to adjust the volume. The setup is complete, after sound is heard on “VAIO Camera Capture Utility” software. When the built-in microphone does not work With certain types of software, you need to switch the audio input device manually to the camera’s built-in microphone. 1 Click “Start,” then “Control Panel.” “Control Panel” appears. 2 3 Click “Sound, Audio or Audio Device.” Click “Sound and Audio Device.” “Sound and Audio Device’s Property” appears. 4 Click the “Sound” setting screen and select “Sony USB Microphone (VGP-UVC100)” from “Default Device” in “Audio Recording.” 5 Click “OK” and close “Sound and Audio Device’s Property.” If you use a Bluetooth headset with the camera If you use a Bluetooth headset with the camera, you may need to set up the headset’s microphone device, depending on kind of headset. Refer to the help section of your software to change the headset device. Select “Sony USB Microphone (VGP-UVC100)” to use the camera’s microphone. 15 Confirming Installing and Proceeding with Uninstalling Checking that the driver is installed 1 Mount the camera to your computer. For details, see “Mounting the camera” (page 6). 2 Click “Start”, right-click “My Computer”, and then click “Properties”. The “System Properties” dialog box appears. 3 Click the “Hardware” tab, and then click the “Device Manager” button. The “Device Manager” window appears. 4 Click the plus symbol (+) to the left of “Imaging Device” in the “Device Manager” window. If “Sony Visual Communication Camera (VGP-UVC100)” appears, the driver is properly installed. 5 Click the plus symbol (+) to the left of “Sound, Video, and Game Controllers” in the “Device Manager” window. If “Sony USB Microphone (VGP-UVC100)” appears, the driver is properly installed. 6 Close the “Device Manager” window. Click “OK” in the “System Properties” dialog box. Note If a driver is not displayed or an exclamation mark (!) appears next to it, the driver is not installed properly. Follow the steps for “Uninstalling the driver,” and after you have deleted the driver, reinstall it. 16 Uninstalling the driver If the driver is not installed correctly, follow the steps below to uninstall, and then reinstall the driver. Notes • Log on as Administrator before uninstalling the driver. • Remove the USB device except this camera’s device from your computer before uninstalling the driver. • Before uninstalling the driver, close the software applications used with the camera, such as the “Windows Movie Maker” software, etc. 1 Mount the camera to your computer. For details, see “Mounting the camera” (page 6). 2 Click “Start”, right-click “My Computer”, and then click “Properties”. The “System Properties” dialog box appears. 3 Click the “Hardware” tab, and then click the “Device Manager” button. The “Device Manager” window appears. 4 5 Click the plus symbol (+) to the left of “USB Controllers.” Click “USB Composite Device”, and then click “Remove”. The “Confirm Device Removal” dialog box appears. Before uninstalling the driver, close the software applications used with the camera, such as “Windows Movie Maker” software, etc. 6 7 Click “OK”. Close the “Device Manager” window. Click “OK” in the “System Properties” dialog box. 17 Precautions Usage and storage locations Do not use or store this product in the following locations. Doing so may damage the camera. • Locations subject to abnormally high temperatures During periods of hot weather or the summer season, the temperature inside closed vehicles becomes especially high, and if the camera is left in such a location, it may warp or be damaged. • Locations subject to direct sunlight or next to heating appliances The camera may warp or be damaged. • Sandy locations, such as the beach Do not place the camera in a location where sand may be present, such as the beach or other sandy areas. Doing so may damage the camera, and in some cases, repair may not be possible. • Do not point the lens at the sun. This could cause burn-in or other lens damage. Be careful when leaving the camera next to a window or outdoors. Operation • Do not remove the camera’s USB cable during operation. Doing so may cause the camera to malfunction. • Do not place any objects on top of the camera. 18 • Avoid placing the camera in locations subject to sudden temperature changes. Do not use the camera immediately after moving it from a cold location to a warm location, or after the ambient temperature has risen drastically. Otherwise, condensation may occur inside the camera. Let the camera stand for a moment before using it. • Do not turn around the camera forcedly. Doing so, the malfunction might occur. • Do not use the computer except the specification. • Do not allow water or objects to get inside the camera. Do not open the camera. Lens Do not touch the lens. Notes on discs Note the following in order to protect data stored on discs. • If the edge of the label on the disc is off the disc surface or the label is not sticky enough to stay on the disc surface, the label may stick to the interior of the disc drive and cause a malfunction of your computer. Make sure that the label is properly fixed on the disc surface before using the disc. Sony assumes no liability for any malfunction of your computer or damage to the media caused by improper labeling. Please thoroughly read instruction notes of your label software and label sheets. • Do not touch the data side of the disc (opposite the label), and hold the disc as shown below. Cleaning the lens Remove any dust from the front of the lens using a blower brush or soft brush. Cleaning the disc • Do not scratch the disc. • Do not store the disc in locations subject to high humidity, high temperatures, direct sunlight, or high levels of dust. • Fingerprints and other contamination on the disc surface can lead to reading errors. Always keep the disc clean. • To clean the disc, lightly wipe it from the center outwards. • Take care not to spill any liquid on the disc. • Return the disc to its case when not in use in order to prevent data damage. • Use an oil-based felt pen when writing on a disc. Maintenance Cleaning the cabinet Wipe the outside of the camera with a soft, dry cloth. To remove stubborn stains, moisten the cloth with a mild, neutral detergent. Do not use solvents, cleaning alcohol, benzine or other substances that may damage the finish. • To remove stubborn stains, lightly moisten the cloth before wiping the disc, and use a dry cloth afterwards. • Do not use benzine, record cleaning liquid, antistatic fluids or other substances that may damage the surface of the disc. • Never use cleaners on an unused disc. Use specific CD cleaners to take off dust. • You may not be able to write on the discs if there are scratches or dust on the unrecorded area. Be careful not to damage the discs. 19 Getting Help This section provides information on how to get help and support from Sony, and on troubleshooting tips for your Visual Communication Camera. About Sony’s support options Sony provides several support options for your Visual Communication Camera. When you have questions about your camera or the software, refer to the following: ❑ This guide explains how to use your camera. For customers in the United States and Canada ❑ The Sony Customer Information Service Center offers information about your notebook and other Sony products that work with your computer. To contact Sony Customer Information Service Center, call 1-888-4SONYPC (1-888-476-6972). ❑ Sony Online Support This service provides instant access to information on commonly encountered problems. Type a description of the problem and the Knowledge Database searches for the corresponding solutions online. You can visit Sony Online Support at http://esupport.sony.com/ 20 For customers in Europe ❑ VAIO-Link. For addresses and numbers, refer to http://www.vaio-link.com/ For customers in other countries and regions ❑ VAIO Website provides Frequently Asked Questions and solutions. vaio-online.sony.com/ Power consumption Specifications Visual Communication Camera Image pickup 1/4” 1,330,000-pixel (1,310,000 effective pixels) color CMOS progressive scanning image sensor. Lens 2 groups, 2 lenses, F2.3 Focal length f=3.8 mm (0.1 inch) (equivalent to a 35 mm (1.4 inch) camera at f=31.3 mm (1.1 inch)) Focus range 30 mm to ∞ (1.2 inch to ∞) Angular field of view Horizontal approx. 56.8° Vertical approx. 42.6° White balance Indoors/Outdoors Shutter speed Approx. 1.0 W Dimensions Normal Approx. 2.4 × 2 × 1.8 inches (55 × 50.5 × 40.5 mm) (W × H × D) Horizontal Approx. 2.4 × 1.2 × 1.2 inches (55 × 39.5 × 39 mm) (W × H × D) Cable length Approx. 39.4 inches (100 cm) Weight Approx. 2.0 oz. (55 g) Operating environment Operating temperature 41°F to 95°F (5°C to 35°C) (temperature gradient less than 18°F (10°C)/hour) Operating humidity 50 Hz/60 Hz 20% to 80% (not condensed), provided that humidity is less than 65% at 95°F (35°C) (hygrometer reading of less than 84°F (29°C)) Video capture format Storage temperature RGB24 bits –4°F to 140°F (–20°C to 60°C) (temperature gradient less than 18°F (10°C)/hour) Auto Flicker cancel function Picture sizes 1,280 × 1,024 640 × 480 320 × 240 Movie sizes 640 × 480, WMV 320 × 240, WMV, MPEG1 160 × 120, WMV 160 × 112, MPEG1 Number of display frames Maximum: 30 frames/sec* * This rate differs depending on the specifications of your computer and the application you are using. Camera rotational range Above 10° below 90° Right and left 360° (as cable permits) Storage humidity 10% to 85% (not condensed), provided that humidity is less than 20% at 140°F (60°C) (hygrometer reading of less than 95°F (35°C)) Supplied accessories • Installation disc (CD-ROM × 1) • Operating instructions (1) • Warranty card (1)* * The accessories included vary according to country and region. Design and specifications are subject to change without notice. 21 Troubleshooting If a problem occurs during operation of the unit, refer to the information provided in this section. If the problem persists, consult your nearest Sony dealer. For contact information, see “Getting Help” on page 20. Also refer to the manuals provided with your computer. 22 Symptom Cause/Remedy The camera is not recognized by your computer. • The USB cable is not connected properly. c Close the currently open software, and reconnect the cable. • The driver is not installed. c Check whether the driver is installed, and if the device does not display properly, install the driver. For details, see “Confirming Installing and Proceeding with Uninstalling” (page 16). • The driver was not installed properly. c Uninstall the driver, then restart your computer and install it again. For details, see “Confirming Installing and Proceeding with Uninstalling” (page 16). • USB cannot be used. c Check the system properties for your computer. • The camera is connected to your computer via a USB hub, and the power supplied by the USB hub is insufficient. c Use a USB hub that is capable of supplying 500 mA to the port. • If your computer is equipped with multiple USB connectors, connect the camera to another USB connector and check whether it is recognized properly. • If the camera is connected to the USB connector on the display, the display and your computer are not connected properly. c Check the connection method. On the task bar, and the camera connection status are different. Images appear grainy in the software. Disconnect the camera from the USB port and restart your computer, then reconnect the camera. When a fast-moving subject is displayed in the finder, horizontal banding may occur in the image, or horizontal lines may occur through the moving part of the image. However, this does not indicate a malfunction. Symptom Cause/Remedy Still images and movie images downloaded from the camera appear grainy on the display. • Light may be reflected in images captured under fluorescent light. • If the downloaded image contains dark patches, red or green noise may appear. • The lens is dirty. c Clean the lens. • The image is out of focus. c Focus the image using the focus ring. Depending on the computer you are using, you may not be able to use the Fn key to adjust the volume when the camera is connected to your computer. Open the volume control from the taskbar and adjust the volume (page 14). • If multiple software applications are open concurrently, the processing speed of your computer may be exceeded. Close any software applications you are not using. • Your computer’s power management function is enabled. c Check the CPU speed setting for your computer. For setting details, refer to the manuals provided with your computer. Images may stop for a few seconds in the following situations. However, this is not a defect. • When the CPU load is too heavy. • When a keyboard shortcut that uses the Fn key is performed. • Multiple software applications are running concurrently. c Close any unnecessary software applications. • Depending on the screen mode and number of colors your computer is using, as well as other conditions of use, available video memory may be insufficient. c Reduce the resolution, or reduce the number of colors used. • If you perform the above procedure and the images still do not appear, restart your computer. • The images from the camera cannot be shown on the two displays or more. When it is necessary to display on the external monitor, refer to the manuals of your computer. You cannot adjust the speaker volume using the Fn key. When downloading movies from the camera, frame dropout occurs and sound is interrupted. Images downloaded from the camera stop for a few seconds. Images downloaded from the camera are not displayed. Continued on next page 23 Symptom Cause/Remedy Sound is not recorded even though the microphone is connected. • Check whether the recording control (or audio recording control) is set properly (page 14). • If the device driver is not installed, sound may not be recorded even though the microphone is connected. Follow the procedure described in “Installing the driver and the software” (page 5) to install the driver. • Depending on your software, you may have to set the microphone as the audio input method manually. For details about this setting, refer to your software’s documentation or to “When the built-in microphone does not work” (page 15). • If you use “Windows Movie Maker” software, setup of the audio device you use with the camera will be necessary. For details on how to set, refer to the help of “Windows Movie Maker” software. The device driver is not installed. c Click “Cancel” in the “Add New Hardware Wizard” dialog box and, after disconnecting the USB cable from the USB connector, follow the procedure described in “Installing the driver and the software” (page 5) to install the driver. When you connect the USB cable, the “Add New Hardware Wizard” dialog box appears on your computer screen. Operation does not shift to the powersaving mode, and Windows operation becomes unstable. The LCD on your computer appears dark or enters power-saving mode while you are using the camera. The computer does not return from the video standby mode. When downloading still images, the image does not download immediately after you press the CAPTURE button. (An image occurring after the point when you pressed the CAPTURE button is downloaded.) 24 Close all software applications currently in use and restart your computer. If you cannot restart your computer, refer to the manuals provided with your computer, and turn off the power. c Operating the computer’s touch pad, mouse, or keyboard brings the computer out of the power-saving mode. c You can adjust the settings on the “Power Schemes” tab of the “Power Options” dialog box so that your computer does not go on standby. It is also possible to modify power options with independent power management applications. For details, refer to the manuals provided with your computer. Operating the computer’s touch pad, mouse, or keyboard returns the computer from the power-saving mode. For details, refer to the manuals provided with your computer. Depending on the CPU speed of your computer, the processing load, and image size, the change in camera operation mode that occurs during download of still images may cause a lag between the time when you press the CAPTURE button and the time the image is actually downloaded . Symptom Cause/Remedy Compared to the background, the subject is dark. When using the VIDEO chatting software, audio is choppy and difficult to hear. If lighting such as floor lamp is in the background, faces, etc. might appear dark. In that case, use the Backlight Comp function (page 12). • Depending on your network environment, the communication bandwidth may not be sufficient. Connect to a network with a higher bandwidth. • The sound in software is muted. c Depending on the VIDEO chatting software, the auto voice adjustment might be operated. To return to microphone input, open the volume control from the task bar and adjust the volume (page 14). If a computer equipped with features, such as zoom/rotation/ zoom in, is connected to the camera, if these features are operated while using the camera, images might become mosaic. c Wait until the problem corrects itself or restart the software used with the camera, correcting the problem. c Before using these buttons, close the software used with the camera. The zoom function or the face tracking function in the “Zoom” setting screen is turned on. c The zoom function, the face tracking function and the function of the “Effects” setting screen cannot be used simultaneously. Turn off the zoom functions and/or the face tracking function in the “Zoom” setting screen when using function(s) of the “Effects” setting screen (page 12). c To display a high quality image, this camera keeps a specified USB transfer band open. Noise may occur on the screen if there is a shortage of space, depending on your computer or if you use other devices together at the same time. In this case, use this camera only, and disconnect other devices from the USB ports. c If you do not update Windows to the latest version, Windows operation may be unstable. In this case, update Windows before using the camera. For details on updating, refer to Microsoft’s website. c Change the White Balance setting to 60 Hz via the “Settings” tab of “Property.” c Video frame size of 1,280 × 1,024 captures up to 7 frames/ seconds. For this reason, the screen images appear more slowly than other sizes, but this is not a malfunction. The image from the camera becomes mosaic. The “Effects” setting screen in the “Property” screen is not available. Block noise occurs in the image of the camera. Software for using this camera is unstable. The screen blinks. When you change the size for still images to 1,280 × 1,024, the image does not move smoothly in the screen. 25 http://www.sony.net/ 2006 Sony Corporation A-CGT-100-11(1)