1
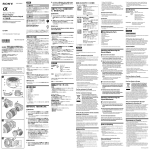
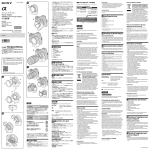
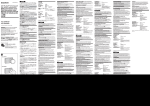
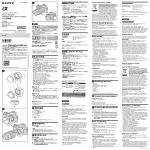
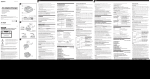
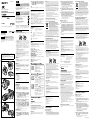
2 4-292-758-01(1) 安全のために マウントアダプター Mount Adaptor Adaptateur pour monture d’objectif ソニー製品は、安全に充分配慮されています。しかし、間違った使 いかたをすると、人身事故が起きる恐れがあり危険です。事故を 防ぐために次のことを必ずお守りください。 ˎ 安全のための注意事項を守る。 ˎ 故障したら使わずに、お買い上げ店、またはソニーの相談窓口に 修理を依頼する。 下記の注意事項を守らないと、 事故により死亡や大けがの 原因となります。 分解や改造をしない 火災や感電の原因となります。内部点検や修理はソニー の相談窓口にご依頼ください。 取扱説明書/Operating Instructions/Mode d’emploi/ Manual de instrucciones/ 乳幼児の手の届く場所に置かない 事故やけがなどの原因となります。 透過ミラーが破損した場合は触れない けがなどの原因となります。 LA-EA2 マウントアダプター LA-EA2 (以下、本機とする)は、Aマウント搭 載のαレンズ(以下、レンズとする)をEマウント搭載のソニー製 レンズ交換式デジタルカメラおよびレンズ交換式デジタルHDビ デオカメラレコーダー(以下、カメラとする)に取り付けるための アダプターです。 © 2011 Sony Corporation Printed in Japan 使用上のご注意 ˎ 透過ミラーおよび本機の内部を触らないでください。やむを得 ずゴミがついた場合は、ブロアをお使いください。 電気製品は、安全のための注意事項を守らない と、人身への危害や火災などの財産への損害を与 えることがあります。 この取扱説明書には、事故を防ぐための重要な注意事項と製品 の取り扱いかたを示しています。 この取扱説明書をよくお読みのうえ、製品を安全にお使いくだ さい。お読みになったあとは、いつでも見られるところに必ず 保管してください。 ˎˎ For the latest information on compatible lenses, consult your Sony dealer or local authorized Sony service facility. ˎˎ Pour les toutes dernières informations sur les objectifs compatibles, adressez-vous à votre revendeur Sony ou au service après-vente Sony le plus proche. 4 3 2 ご注意 ˎ 取り付け、取りはずしの際、透過ミラーにさわらないでくださ い。 撮影時のご注意 ˎ 本機の前後に、テレコンバーターなどを連結させないでくださ い。 ˎ お使いのレンズによっては、レンズの距離目盛と多少ずれる場 合があります。 ˎ 最短撮影距離が長くなる場合があります。 ˎ フォーカスモード切替スイッチ(AF (オートフォーカス)とMF (マニュアルフォーカス)の切替スイッチ)のあるレンズでは、レ ンズのスイッチが優先されます。 ˎ 本機を装着すると、画面上のフォーカスエリアの表示が変わり ます。 ˎ MF (マニュアルフォーカス)で撮影する場合、液晶画面または ファインダーを使ってピントを合わせてください。 ˎ お使いのカメラ本体が本機に対応している必要があります。 ˎ Aマウントレンズ使用時、AF補助光は発光しません。 ˎ 動画記録中はカメラやレンズの作動音、操作音などが記録され る場合があります。 主な仕様 対応撮像画面サイズ 外形寸法(約) 質量 同梱物 1 はソニー株式会社の商標です。 ˎ 本機を装着するときやご使用になる際には、衝撃を与えないよ うにご注意ください。 ˎ レンズの交換は、ゴミやほこりの少ない場所で行ってください。 ˎ レンズ信号接点を触らないでください。よごれ等により接触不 良になると、カメラとの信号のやりとりが正しく行われず、カメ ラが正しく動作しなくなりますのでご注意ください。 ˎ 本機にレンズを装着する際には、下記の内容に注意してご使用 ください。 三脚をお使いになる場合で下記レンズをお使いのときは、マウ ント部分に負荷がかかるため、レンズ側に三脚などを取り付け てください。 ˎ 本機に三脚を取り付けるときは、ネジの長さが5.5mm未満の三 脚をお使いください。ネジの長さが5.5mm以上の三脚ではしっ かり固定できず、傷を付けることがあります。 ˎ 本機を持ち運ぶ際は、ボディキャップおよびレンズリヤキャッ プを装着し、キャリングケースに入れてください。 ˎ レンズを取り付けてカメラを持ち運ぶときは、カメラとレンズ の両方をしっかり持ってください。 保管について 保証書とアフターサービス 保証書 ˎ この製品には保証書が添付されていますので、お買い上げの際 お買い上げ店でお受け取りください。 ˎ 所定事項の記入および記載内容をお確かめのうえ、大切に保存 してください。 ˎ 保証期間は、お買い上げ日より1年間です。 アフターサービス 調子が悪いときはまずチェックを この取扱説明書をもう一度ご覧になってお調べください。 それでも具合が悪いときは お買い上げ店、またはソニーの相談窓口にご相談ください。 保証期間中の修理は 保証書の記載内容に基づいて修理させていただきます。 詳しくは保証書をご覧ください。 保証期間経過後の修理は 修理によって機能が維持できる場合は、ご要望により有償修理さ せていただきます。 ˎ 必ず本機にボディキャップおよびレンズリヤキャップを取り付 けてください。 ˎ 湿度の高い場所に長期間置かないでください。カビが発生する ことがあります。 ご相談になるときは、次のことをお知らせください。 ˎ 品名:LA-EA2 ˎ 故障の状態:できるだけ詳しく ˎ 購入年月日 5 結露について ■ 困ったときは(サポートのご案内) 6 ˎ 結露とは、寒い場所から急に暖かい場所へ持ち込んだときなど に、本機の内側や外側に水滴が付くことです。結露を起こりに くくするためには、一度本機をポリ袋かバッグなどに入れて、使 用する環境の温度になじませてから、取り出してください。 ホームページで調べる 互換性情報やよくあるお問い合わせなどは 下記のホームページから 『α』専用サポートサイト http://www.sony.co.jp/DSLR/ support/ ˎ お手入れには、シンナー、ベンジンなどの有機溶剤は絶対に使わ ないでください。 『α』オフィシャルサイト http://www.sony.jp/dslr/ 各部の名前 4 8 2 (幅/高さ/奥行き) (突起部含まず) 約200 g マウントアダプター(1)、ボディキャップ(1)、 レンズリヤキャップ(1)、キャリングケース(1)、 印刷物一式 お手入れについて 7 APS-Cサイズ 78.5 mm×86.5 mm×44 mm 仕様および外観は、改良のため予告なく変更することがあります が、ご了承ください。 70-200mm F2.8G (SAL70200G) 70-400mm F4-5.6G SSM (SAL70400G) 300mm F2.8G (SAL300F28G) ˎ 対応レンズの最新情報は、弊社ホームページをご覧ください。 カメラのレンズ取りはずしボタンを押したまま、 本機を反時計方向に回してから、前方に引き出し てはずす。本機のレンズリヤキャップ(Eマウン ト側)を取り付ける。 1…透過ミラー 2…Eマウント標点 3…Eマウント 4…レンズ信号接点 5…Aマウント指標 6…レンズ取りはずしボタン 7…Aマウント 8…三脚用ネジ穴 電話で問い合わせる(ソニーの相談窓口) 使い方相談窓口 0120-333-020 フリーダイヤル ............. 携帯・PHS・一部のIP電話 .............................................. 0466-31-2511 取り付けかた/取りはずしかた 上記番号へ接続後、最初のガイダンスが流 れている間に「402」+「#」を押してくださ い。直接、担当窓口へおつなぎします。 受付時間:月∼金 9:00 ∼ 18:00 土・日・祝日 9:00 ∼ 17:00 取り付けかた 修理相談窓口 ˎ カメラの電源スイッチを「OFF」にしてください。 1 4 .............................................. 0466-31-2531 本機のレンズリヤキャップ(Eマウント側)、カメ ラに取り付けているレンズをそれぞれはずす。 上記番号へ接続後、最初のガイダンスが流 れている間に「402」+「#」を押してくださ い。直接、担当窓口へおつなぎします。 受付時間:月∼金 9:00 ∼ 20:00 土・日・祝日 9:00 ∼ 17:00 ˎ 本機のレンズリヤキャップは反時計方向に回すとはずれま す。 2 0120-222-330 フリーダイヤル ............. 携帯・PHS・一部のIP電話 取り付ける前に 本機の白の点(Eマウント標点)を、カメラの白の 点(マウント指標)に合わせてはめ込み、本機を軽 くカメラに押し当てながら、時計方向に「カチッ」 とロックがかかるまでゆっくり回す。 ホームページ http://www.sony.co.jp/di-repair/ FAX(共通):0120-333-389 本機のボディキャップ(Aマウント側)、レンズの レンズリヤキャップをそれぞれはずす。 ˎ 本機のボディキャップは反時計方向に回すとはずれます。 4 1 2 レンズのオレンジの点(マウント標点)を、本機の オレンジの点(Aマウント指標)に合わせてはめ込 み、レンズを軽く本機に押し当てながら、時計方向 に「カチッ」とロックがかかるまでゆっくり回す。 ˎ レンズを取り付けるときに、本機のレンズ取りはずしボタ ンを押さないでください。 ˎ レンズを斜めに差し込まないようにしてください。 取りはずしかた ˎ カメラの電源スイッチを「OFF」にしてください。 1 本機のレンズ取りはずしボタンを押したまま、レ ンズを反時計方向に回してから、前方に引き出し てはずす。本機のボディキャップ(Aマウント側) を取り付ける。 This equipment has been tested and found to comply with the limits for a Class B digital device, pursuant to Part 15 of the FCC Rules. These limits are designed to provide reasonable protection against harmful interference in a residential installation. This equipment generates, uses, and can radiate radio frequency energy and, if not installed and used in accordance with the instructions, may cause harmful interference to radio communications. However, there is no guarantee that interference will not occur in a particular installation. If this equipment does cause harmful interference to radio or television reception, which can be determined by turning the equipment off and on, the user is encouraged to try to correct the interference by one or more of the following measures: Reorient or relocate the receiving antenna. Increase the separation between the equipment and receiver. Connect the equipment into an outlet on a circuit different from that to which the receiver is connected. Consult the dealer or an experienced radio/TV technician for help. For the customers in Canada This Class B digital apparatus complies with Canadian ICES-003. For the customers in Europe Disposal of Old Electrical & Electronic Equipment (Applicable in the European Union and other European countries with separate collection systems) This symbol on the product or on its packaging indicates that this product shall not be treated as household waste. Instead it shall be handed over to the applicable collection point for the recycling of electrical and electronic equipment. By ensuring this product is disposed of correctly, you will help prevent potential negative consequences for the environment and human health, which could otherwise be caused by inappropriate waste handling of this product. The recycling of materials will help to conserve natural resources. For more detailed information about recycling of this product, please contact your local Civic Office, your household waste disposal service or the shop where you purchased the product. Notice for the customers in the countries applying EU Directives The manufacturer of this product is Sony Corporation, 1-7-1 Konan Minato-ku Tokyo, 108-0075 Japan. The Authorized Representative for EMC and product safety is Sony Deutschland GmbH, Hedelfinger Strasse 61, 70327 Stuttgart, Germany. For any service or guarantee matters please refer to the addresses given in separate service or guarantee documents. The Mount Adaptor LA-EA2 (referred to below as “this unit”) is an adaptor for a Sony Interchangeable Lens Digital Camera and Interchangeable Lens Digital HD Video Camera Recorder with an E-mount (referred to below as “camera”). Use this unit when attaching an α Lens with an A-mount (referred to below as “lens”). Notes on Use ˎˎ Avoid rough handling, disassembling, modifying, physical shock, or impact such as hammering, dropping or stepping on this unit. Be particularly careful of the lens. ˎˎ Do not touch the translucent mirror and inside of this unit. If there is any dirt on the translucent mirror or inside of this unit, remove it with a blower brush. WARNING To reduce fire or shock hazard, do not expose the unit to rain or moisture. For the customers in the U.S.A. This device complies with Part 15 of the FCC Rules. Operation is subject to the following two conditions: (1) This device may not cause harmful interference, and (2) this device must accept any interference received, including interference that may cause undesired operation. CAUTION You are cautioned that any changes or modifications not expressly approved in this manual could void your authority to operate this equipment. 2 Align the camera mounting (E-mount) mark on this unit with the white mark on the camera. Insert this unit into the camera’s mount and turn it clockwise until it locks into place. ˎˎ Do not press the lens release button on the camera while mounting this unit or this unit will not couple properly. ˎˎ Do not insert this unit at an angle. 3 Remove the body cap (A-mount side) attached to this unit and the rear lens cap attached to the lens. ˎˎ Turn the body cap of this unit counterclockwise to remove it. 4 Align the mounting mark on the lens barrel with the orange lens mounting (A-mount) mark on this unit. Insert the lens into this unit’s mount and turn it clockwise until it locks into place. ˎˎ Do not press the lens release button on this unit while mounting the lens or it will not couple properly. ˎˎ Do not insert the lens at an angle. To remove this unit ˎˎ Set the power of the camera to OFF. 1 Hold down the lens release button on this unit and turn the lens counterclockwise until it stops. Carefully lift the lens out of this unit’s mount. Attach the body cap (A-mount side) to this unit. 2 Hold down the lens release button on the camera body and turn this unit counterclockwise until it stops. Carefully lift this unit out of the camera’s mount. Attach the rear lens cap (E-mount side) to this unit. Notes ˎˎ Do not touch the translucent mirror when attaching and removing this unit or a lens. Notes on shooting ˎˎ Do not attach anything (teleconverter etc.) to the front or rear of this unit. ˎˎ Depending on your lens, the actual distance may differ slightly from the distance scale of the lens. ˎˎ When shooting with this unit, the minimum focal distance may increase. ˎˎ When using a lens with a focus mode switch (for switching between AF (Auto Focus) and MF (Manual Focus)), that switch on the lens has priority. ˎˎ When this unit is attached, the display of the AF area on the LCD monitor changes. ˎˎ When shooting in MF (Manual Focus), look at the LCD monitor or viewfinder to focus. ˎˎ Your camera must be compatible with this unit. ˎˎ When using an A-mount lens, the AF illuminator does not light. ˎˎ During movie recording, operation noise or beeps from the camera or lens may be recorded. Specifications Shooting screen size Dimensions (Approx.) Mass Included items ˎˎ Be careful not to subject this unit to mechanical shock while attaching and using it. ˎˎ Avoid changing the lens in dusty or dirty locations. ˎˎ Do not touch the lens contacts. Any dirt on the lens contacts may interfere with the sending and receiving of signals between the lens and the camera, resulting in operational malfunction. ˎˎ When attaching the lens to this unit, be careful of the following. When using a tripod for a camera with one of the lenses below attached, a load is placed on the mount. Use a tripod or other form of support for the lens, too. 70-200mm F2.8G (SAL70200G) 70-400mm F4-5.6G SSM (SAL70400G) 300mm F2.8G (SAL300F28G) ˎˎ When attaching a tripod to this unit, use one with a screw that is 5.5 mm or shorter. If the screw is longer than 5.5 mm, it will not fasten firmly and may damage this unit. ˎˎ When carrying this unit, attach the body cap and rear lens cap and put it in the carrying case. ˎˎ When carrying the camera with the lens attached, hold both the camera and lens. APS-C size 78.5 mm × 86.5 mm × 44 mm (w/h/d) (3 1/8 in. × 3 1/2 in. × 1 3/4 in.) (excluding the projecting parts) Approx. 200 g (7.1 oz) Mount adaptor (1), Body cap (1), Rear lens cap (1), Carrying case (1), Set of printed documentation Design and specifications are subject to change without notice. is a trademark of Sony Corporation. AVERTISSEMENT Afin de réduire les risques d’incendie ou de décharge électrique, n’exposez pas cet appareil à la pluie ou à l’humidité. À l’intention des clients aux É.-U. Cet appareil est conforme à la Partie 15 de la réglementation de la FCC des États-Unis. Son utilisation est sujette aux deux conditions suivantes : (1) Cet appareil ne doit pas générer d’interférences nuisibles et (2) il doit être en mesure d’accepter toute interférence reçue, y compris les interférences pouvant générer un fonctionnement indésirable. Storing this unit AVERTISSEMENT ˎˎ Always place the body cap and rear lens cap on this unit. ˎˎ To prevent mold, do not keep this unit in a very humid place for a long time. Par la présente, vous êtes avisé du fait que tout changement ou toute modification ne faisant pas l’objet d’une autorisation expresse dans le présent manuel pourrait annuler votre droit d’utiliser l’appareil. Condensation ˎˎ If you bring this unit directly from a cold place to a warm place, condensation may form on it. To avoid this, first place this unit in a plastic bag or something similar and then bring it to the warm place. When the air temperature inside the bag reaches the surrounding temperature, take this unit out. Cleaning this unit ˎˎ Do not use any organic solvent such as thinner or benzine to clean this unit. Identifying the Parts ˎ 本機を取り付けるときに、カメラのレンズ取りはずしボタ ンを押さないでください。 ˎ 本機を斜めに差し込まないようにしてください。 3 NOTE: 1...Translucent mirror 2...Camera mounting (E-mount) mark 3...E-mount 4...Lens contacts 5...Lens mounting (A-mount) mark 6...Lens release button 7...A-mount 8...Tripod screw hole REMARQUE: L’appareil a été testé et est conforme aux exigences d’un appareil numérique de Classe B, conformément à la Partie 15 de la réglementation de la FCC. Ces critères sont conçus pour fournir une protection raisonnable contre les interférences nuisibles dans un environnement résidentiel. L’appareil génère, utilise et peut émettre des fréquences radio; s’il n’est pas installé et utilisé conformément aux instructions, il pourrait provoquer des interférences nuisibles aux communications radio. Cependant, il n’est pas possible de garantir que des interférences ne seront pas provoquées dans certaines conditions particulières. Si l’appareil devait provoquer des interférences nuisibles à la réception radio ou à la télévision, ce qui peut être démontré en allumant et éteignant l’appareil, il est recommandé à l’utilisateur d’essayer de corriger cette situation par l’une ou l’autre des mesures suivantes : Réorienter ou déplacer l’antenne réceptrice. la distance entre l’appareil et le récepteur. Brancher l’appareil dans une prise ou sur un circuit différent de celui sur lequel le récepteur est branché. Consulter le détaillant ou un technicien expérimenté en radio/ téléviseurs. Augmenter Pour les clients au Canada Attaching and Removing the Mount Adaptor To attach this unit Before attaching this unit ˎˎ Set the power of the camera to OFF. 1 Remove the lens attached to the camera and the rear lens cap (E-mount side) attached to this unit. ˎˎ Turn the rear lens cap of this unit counterclockwise to remove it. Cet appareil numérique de la classe B est conforme à la norme NMB-003 du Canada. Pour les clients en Europe Traitement des appareils électriques et électroniques en fin de vie (Applicable dans les pays de l’Union Européenne et aux autres pays européens disposant de systèmes de collecte sélective) Ce symbole, apposé sur le produit ou sur son emballage, indique que ce produit ne doit pas être traité avec les déchets ménagers. Il doit être remis à un point de collecte approprié pour le recyclage des équipements électriques et électroniques. En s’assurant que ce produit est bien mis au rebut de manière appropriée, vous aiderez à prévenir les conséquences négatives potentielles pour l’environnement et la santé humaine. Le recyclage des matériaux aidera à préserver les ressources naturelles. Pour toute information supplémentaire au sujet du recyclage de ce produit, vous pouvez contacter votre municipalité, votre déchetterie ou le magasin où vous avez acheté le produit. Avis aux consommateurs des pays appliquant les Directives UE Le fabricant de ce produit est Sony Corporation, 1-7-1 Konan Minato-ku Tokyo, 108-0075 Japon. Le représentant agréé pour la compatibilité électromagnétique et la sécurité du produit est Sony Deutschland GmbH, Hedelfinger Strasse 61, 70327 Stuttgart, Allemagne. Pour toute question relative à la garantie ou aux réparations, reportez-vous à l’adresse que vous trouverez dans les documents ci-joints, relatifs à la garantie et aux réparations. L’adaptateur pour monture d’objectif LA-EA2 (désigné ci-dessous par le terme « cet article ») est un adaptateur conçu pour les appareils photo à objectif interchangeable et les caméscopes numériques HD à objectif interchangeable Sony pourvus d’une monture E (désigné ci-dessous par le terme « caméra »). Utilisez cet article lorsque vous fixez un objectif α à monture A (désigné ci-dessous par le terme « l’objectif »). Remarques sur l’emploi ˎˎ Évitez tout maniement brusque, démontage, modification, choc physique ou choc tel que martèlement, chute ou marcher dessus cet appareil. Faites particulièrement attention à l’objectif. ˎˎ Ne touchez pas le miroir translucide ni l’intérieur de cet article. Si de la poussière s’est déposée sur le miroir translucide ou à l’intérieur de cet article, enlevez-la avec une brosse soufflante. ˎˎ Veillez à ne pas soumettre cet article à un choc mécanique lorsque vous le fixez et l’utilisez. ˎˎ Évitez de changer l’objectif dans un endroit poussiéreux ou sale. ˎˎ Ne touchez pas les contacts de l’objectif. De la saleté sur les contacts de l’objectif peut gêner l’envoi et la réception des signaux entre l’objectif et la caméra et causer des dysfonctionnements. ˎˎ Lorsque vous fixez l’objectif sur cet article, tenez compte des points suivants. Si vous utilisez un trépied de caméra alors qu’un des objectifs suivants est rattaché, une charge s’exerce sur la monture. Utilisez un trépied ou un support quelconque également pour l’objectif. 70-200mm F2.8G (SAL70200G) 70-400mm F4-5.6G SSM (SAL70400G) 300mm F2.8G (SAL300F28G) ˎˎ Si vous vissez un trépied sur cet article, veillez à ce que sa vis ne dépasse pas 5,5 mm de longueur. Si la vis à plus de 5,5 mm, elle ne pourra pas être vissée à fond et peut endommager cet article. ˎˎ Lorsque vous portez cet article, fixez le capuchon de boîtier et le capuchon d’objectif arrière et rangez le tout dans l’étui de transport. ˎˎ Si vous portez la caméra avec l’objectif rattaché, tenez à la fois la caméra et l’objectif. Rangement de cet article ˎˎ Remettez toujours le capuchon de boîtier et le capuchon d’objectif arrière sur cet article. ˎˎ Pour éviter la formation de moisissure, ne laissez pas cet article longtemps à un endroit très humide. Condensation ˎˎ Si vous portez sans transition cet article d’un endroit froid dans une pièce chaude, de la condensation peut se former dessus. Pour pallier ce problème, mettez cet article dans un sac en plastique ou quelque chose de similaire avant de le porter dans la pièce chaude. Sortez cet article du sac lorsque la température de l’air à l’intérieur du sac a atteint la température ambiante. Nettoyage de cet article ˎˎ N’utilisez pas de solvants organiques, comme le diluant ou le benzène pour nettoyer cet article. Identification des éléments 1...Miroir translucide 2...Repère de montage de caméra (monture E) 3...Monture E 4...Contacts de l’objectif 5...Repère de montage d’objectif (monture A) 6...Bouton de déverrouillage de l’objectif 7...Monture A 8...Douille de trépied Fixation et retrait de l’adaptateur pour monture d’objectif Pour fixer cet article Avant de fixer cet article ˎˎ Mettez l’appareil photo en position OFF. 1 Déposez l’objectif fixé à la caméra et le capuchon d’objectif arrière (côté de la monture E) fixé à cet article. ˎˎ Tournez le capuchon d’objectif arrière de cet article dans le sens antihoraire pour le retirer. 2 Alignez le repère de montage de caméra (monture E) sur cet article et le repère blanc sur la caméra. Insérez cet article sur la monture de la caméra et tournez-le dans le sens horaire jusqu’à ce qu’il s’encliquette. ˎˎ N’appuyez pas sur le bouton de déverrouillage d’objectif de la caméra lorsque vous posez cet article sinon celui-ci ne s’enclenchera pas correctement. ˎˎ N’insérez pas cet article de biais. 3 Retirez le capuchon de boîtier (côté monture A) fixé à cet article et le capuchon d’objectif arrière fixé à l’objectif. ˎˎ Tournez le capuchon de boîtier de cet article dans le sens antihoraire pour le retirer. (Suite à la page arrière) 8...三脚架螺丝孔 ˎˎ Con respecto a la información más reciente sobre los objetivos compatibles, consulte a su proveedor Sony o a un centro de servicio local autorizado por Sony. 有关兼容镜头的最新信息,请咨询 Sony 经销商或当地的 Sony 授权服 务机构。 Spécifications Taille APS-C Taille de l’écran de prise de vue Dimensions (Environ) 78,5 mm × 86,5 mm × 44 mm (l/h/p) (3 1/8 po. × 3 1/2 po. × 1 3/4 po.) (parties saillantes non comprises) Environ 200 g (7,1 oz) Poids Articles inclus 4 5 3 6 2 Adaptateur pour monture d’objectif (1), Capuchon de boîtier (1), Capuchon d’objectif arrière (1), Étui de transport (1), Jeu de documents imprimés La conception et les spécifications peuvent être modifiées sans préavis. est une marque commerciale de Sony Corporation. 7 1 Nombre del producto: Adaptador de montaje de objetivo Modelo: LA-EA2 ADVERTENCIA Para reducir el riesgo de incendio o descarga eléctrica, no exponga la unidad a la lluvia ni a la humedad. 4 8 2 POR FAVOR LEA DETALLADAMENTE ESTE MANUAL DE INSTRUCCIONES ANTES DE CONECTAR Y OPERAR ESTE EQUIPO. RECUERDE QUE UN MAL USO DE SU APARATO PODRÍA ANULAR LA GARANTÍA. Para los clientes de Europa Aviso para los clientes de países en los que se aplican las directivas de la UE El fabricante de este producto es Sony Corporation, 1-7-1 Konan Minato-ku Tokyo, 108-0075, Japón. El representante autorizado en lo referente al cumplimiento de la directiva EMC y a la seguridad de los productos es Sony Deutschland GmbH, Hedelfinger Strasse 61, 70327 Stuttgart, Alemania. Para resolver cualquier asunto relacionado con el soporte técnico o la garantía, consulte las direcciones que se indican en los documentos de soporte técnico y garantía suministrados por separado. 4 Tratamiento de los equipos eléctricos y electrónicos al final de su vida útil (aplicable en la Unión Europea y en países europeos con sistemas de recogida selectiva de residuos) 1 2 Este símbolo en el equipo o el embalaje indica que el presente producto no puede ser tratado como residuos domésticos normales, sino que debe entregarse en el correspondiente punto de recogida de equipos eléctricos y electrónicos. Al asegurarse de que este producto se desecha correctamente, Ud. ayuda a prevenir las consecuencias negativas para el medio ambiente y la salud humana que podrían derivarse de la incorrecta manipulación en el momento de deshacerse de este producto. El reciclaje de materiales ayuda a conservar los recursos naturales. Para recibir información detallada sobre el reciclaje de este producto, póngase en contacto con el ayuntamiento, el punto de recogida más cercano o el establecimiento donde ha adquirido el producto. El adaptador de montura de objetivo LA-EA2 (a partir de ahora “esta unidad”) es un adaptador para cámara digital de lentes intercambiables y videocámara digital HD de objetivo intercambiable Sony con una montura E (a partir de ahora “cámara”). Utilice esta unidad cuando fije un objetivo α con una montura A (a partir de ahora “objetivo”). Notas sobre la utilización (Suite de la page avant) 4 Alignez le repère de montage sur le barillet de l’objectif et le repère de montage d’objectif orange (monture A) sur cet article. Insérez l’objectif sur la monture de cet article et tournez-le dans le sens horaire jusqu’à ce qu’il s’encliquette. ˎˎ N’appuyez pas sur le bouton de déverrouillage d’objectif de cet article lorsque vous posez l’objectif sinon celui-ci ne s’enclenchera pas correctement. ˎˎ N’insérez pas l’objectif de biais. Pour déposer cet article ˎˎ Mettez l’appareil photo en position OFF. 1 Appuyez sur le bouton de déverrouillage d’objectif sur cet article et tournez l’objectif dans le sens antihoraire jusqu’à l’arrêt. Tirez l’objectif avec précaution pour le détacher de la monture de cet article. Fixez le capuchon de boîtier (côté monture A) à cet article. 2 Appuyez sur le bouton de déverrouillage d’objectif sur la caméra et tournez cet article dans le sens antihoraire jusqu’à l’arrêt. Tirez cet article avec précaution pour le détacher de la monture de la caméra. Fixez le capuchon d’objectif arrière (côté monture E) à cet article. Remarques ˎˎ Ne touchez pas le miroir translucide lorsque vous fixez et déposez cet article ou un objectif. Remarques sur la prise de vue ˎˎ Ne fixez pas quelque chose (téléconvertisseur, etc.) à l’avant ou l’arrière de cet article. ˎˎ Selon l’objectif utilisé la distance réelle peut être différente de la distance indiquée par la graduation de l’objectif. ˎˎ Lors de la prise de vue avec cet article, la distance focale minimale peut être plus grande. ˎˎ Lorsqu’un objectif avec sélecteur de mode de mise au point est utilisé (pour commuter entre AF (Mise au point automatique) et MF (Mise au point manuelle)), le sélecteur de l’objectif a priorité. ˎˎ Lorsque cet article est rattaché, l’affichage de la zone AF sur l’écran LCD change. ˎˎ Lors de la prise de vue avec MF (Mise au point manuelle), regardez l’écran LCD ou le viseur pour faire la mise au point. ˎˎ Votre caméra doit être compatible avec cet article. ˎˎ Lorsqu’un objectif à monture A est utilisé, l’illuminateur AF ne s’éclaire pas. ˎˎ Pendant l’enregistrement de film, le bruit de fonctionnement ou les bips de caméra ou de l’objectif peuvent être enregistrés. ˎˎ Evite manejar con rudeza, desarmar, modificar, aplicar golpes físicos, o impactos tales como martillear, dejar caer o pisar esta unidad. Tenga especial cuidado con el objetivo. ˎˎ No toque el espejo translúcido ni el interior de esta unidad. Si hay suciedad en el interior del espejo translúcido o en el interior de esta unidad, elimínela suavemente con un cepillo soplador. ˎˎ Tenga cuidado de no someter esta unidad a golpes cuando la fije y utilice. ˎˎ Evite cambiar el objetivo en lugares polvorientos o sucios. ˎˎ No toque los contactos del objetivo. Cualquier suciedad en los contactos del objetivo puede interferir en la transmisión y la recepción de señales entre el objetivo y la cámara, lo que podría resultar en un mal funcionamiento. ˎˎ Cuando fije el objetivo a esta unidad, tenga cuidado de lo siguiente. Cuando utilice un trípode para una cámara con uno de los objetivos de abajo fijado, se aplicará una carga a la montura. Utilice un trípode u otra forma de soporte también para el objetivo. 70-200mm F2.8G (SAL70200G) 70-400mm F4-5.6G SSM (SAL70400G) 300mm F2.8G (SAL300F28G) ˎˎ Cuando fije un trípode a esta unidad, utilice uno con un tornillo de 5,5 mm o más corto. Si el tornillo tuviese más de 5,5 mm, no apretaría firmemente y podría dañar esta unidad. ˎˎ Cuando vaya a transportar esta unidad, fíjele la tapa de caja y la tapa trasera de objetivo y colóquela en la funda de transporte. ˎˎ Cuando transporte la cámara con el objetivo fijado, sujete tanto la cámara como el objetivo. Almacenamiento de esta unidad ˎˎ Coloque siempre la tapa de caja y la tapa trasera de objetivo en esta unidad. ˎˎ Para evitar el moho, no guarde esta unidad en un lugar muy húmedo durante un largo período de tiempo. Condensación de humedad ˎˎ Si traslada esta unidad directamente de un lugar frío a otro cálido, es posible que se produzca condensación de humedad en la misma. Para evitar esto, coloque primero esta unidad en una bolsa de plástico o algo similar y después llévela a un lugar cálido. Cuando la temperatura del aire del interior de la bolsa alcance la temperatura del entorno, extraiga esta unidad. Limpieza de esta unidad ˎˎ No utilice ningún disolvente orgánico, como diluyente de pintura o bencina, para limpiar esta unidad. Identificación de las partes 1...Espejo translúcido 2...Marca de montaje de la cámara (montura E) 3...Montura E 4...Contactos del objetivo 5...Marca de montaje del objetivo (montura A) 6...Botón de liberación del objetivo 7...Montura A 8...Orificio para el tornillo del trípode Fijación y extracción del adaptador de montura de objetivo Para instalar esta unidad Antes de instalar esta unidad ˎˎ Ajuste la alimentación de la cámara a OFF. 1 Extraiga el objetivo fijado a la cámara y la tapa trasera de objetivo (lado de la montura E) fijada a esta unidad. ˎˎ Gire las la tapa trasera de objetivo de esta unidad hacia la izquierda para extraerla. 2 Alinee la marca de montaje de la cámara (montura E) de esta unidad con la marca blanca de la cámara. Inserte esta unidad en la montura de la cámara y gírela hacia la derecha hasta que quede bloqueada en su lugar. ˎˎ No presione el botón de liberación del objetivo de la cámara mientras monte esta unidad ya que ésta no se acoplaría adecuadamente. ˎˎ No inserte esta unidad de forma inclinada. 3 Extraiga la tapa de caja (lado de la montura A) fijada a esta unidad y la tapa trasera de objetivo fijada al objetivo. ˎˎ Gire la tapa de caja de esta unidad hacia la izquierda para extraerla. 4 Alinee la marca de montaje del barril del objetivo con la marca naranja de montaje del objetivo (montura A) de esta unidad. Inserte el objetivo en la montura de esta unidad y gírelo hacia la derecha hasta que quede bloqueado en su lugar. 安装和拆卸卡口适配器 警告 为减少发生火灾或触电的危险,请勿 让本装置淋雨或受潮。 为减少火灾或触电的危险,请勿在本 装置上放置如花瓶等盛有液体的物 体。 Para extraer esta unidad ˎˎ Ajuste la alimentación de la cámara a OFF. 1 Mantenga presionado el botón de liberación del objetivo de esta unidad y gire el objetivo hacia la izquierda hasta que se pare. Levante cuidadosamente el objetivo de la montura de esta unidad. Fije la tapa de caja (lado de la montura A) a esta unidad. 2 Mantenga presionado el botón de liberación del objetivo del cuerpo de la cámara y gire esta unidad hacia la izquierda hasta que se pare. Levante cuidadosamente esta unidad de la montura de la cámara. Fije la tapa trasera de objetivo (lado de la montura E) a esta unidad. Notas ˎˎ No toque el espejo translúcido cuando fije o extraiga esta unidad o un objetivo. Notas sobre el fotografiado ˎˎ No fije nada (teleconversor, etc.) en la parte frontal ni en la posterior de esta unidad. ˎˎ Dependiendo de su objetivo, la distancia real puede diferir ligeramente de la escala de distancias del objetivo. ˎˎ Cuando fotografíe con esta unidad, la distancia focal mínima puede aumentar. ˎˎ Cuando utilice un objetivo con interruptor del modo de enfoque (para cambiar entre AF (enfoque automático) y MF (enfoque )), tal interruptor del objetivo tendrá prioridad. ˎˎ Cuando fije esta unidad, la visualización del área de AF del monitor LCD cambiará. ˎˎ Cuando fotografíe in MF (enfoque manual), observe el monitor LCD o el visor para enfocar. ˎˎ Su cámara tendrá que se compatible con esta unidad. ˎˎ Cuando utilice un objetivo con montura A, el iluminador de AF no se encenderá. ˎˎ Durante la grabación de películas, el ruido o los pitidos de operación de la cámara o del objetivo pueden grabarse. Especificaciones Tamaño de la pantalla Tamaño del APS-C de fotografiado Dimensiones (Aprox.) 78,5 mm × 86,5 mm × 44 mm (an/al/prf) Peso Elementos incluidos (excluyendo las partes salientes) Aprox. 200 g Adaptador de montura de objetivo (1), Tapa de caja (1), Tapa trasera de objetivo (1), Funda de transporte (1), Juego de información impresa El diseño y las especificaciones están sujetos a cambios sin previo aviso. es marca comercial de Sony Corporation. 安装本装置 安装本装置之前 将相机的电源设为 OFF。 1 取下相机上安装的镜头及本装置上安 逆时针转动本装置的镜头后盖, 将其取下。 2 将本装置上的相机安装(E 卡口系 使用须知 避免粗鲁对待本装置,或对其进行 拆解、改装,也不要使其受到物理 冲击或碰撞(如捶打、摔落或脚 踏)。尤其要注意保护镜头。 请勿触摸半透镜及本装置内部。如 果发现半透镜或本装置内部有污 垢,请用吹气刷将其拂去。 3 取下本装置上安装的机身盖(A 卡 统)标记对准相机上的白色标记。将 本装置插入相机的卡座中,并将其顺 时针转动,直至锁紧到位。 安装本装置时切勿按压相机上的 镜头释放按钮,否则本装置将会 结合不当。 切勿倾斜插入本装置。 口系统一侧)及镜头上安装的镜头后 盖。 逆时针转动本装置的机身盖,将 其取下。 4 将镜筒上的安装标记对准本装置上的 橙色镜头安装(A 卡口系统)标记。 将镜头插入本装置的卡座中,并将其 顺时针转动,直至锁紧到位。 安装镜头时切勿按压本装置上的 镜头释放按钮,否则镜头将会结 合不当。 切勿倾斜插入镜头。 安装和使用本装置时,小心不要使 其受到机械性冲击。 避免在多尘或过脏的地方更换镜 头。 请勿触摸镜头接点。若镜头接点沾 有污垢等,可能会干扰在镜头和相 机之间传送和接收信号,从而造成 操作故障。 向本装置上安装镜头时,请注意以 下几点: 对安装有下列镜头之一的相机使用 三脚架时,会增加卡座的负载。此 时请对镜头使用三脚架或其他形式 的支撑。 70-200mm F2.8G (SAL70200G) 70-400mm F4-5.6G SSM (SAL70400G) 300mm F2.8G (SAL300F28G) 在本装置上安装三脚架时,应确保 三脚架的螺丝长度不超过 5.5 mm。 如果螺丝的长度超过 5.5 mm,则 可能导致无法拧紧,有时甚至会损 坏本装置。 携带本装置时,请安装机身盖及镜 头后盖,并将其放入携带包内。 当在装有镜头的情况下携带相机 时,请同时握住相机和镜头。 存放本装置 应始终将机身盖及镜头后盖装在本 装置上。 请勿将本装置长期存放在非常潮湿 的地方,以免发霉。 结露 若将本装置从寒冷的地方直接拿到 温暖的地方,本装置上可能会结 露。为了避免这种情况,请先将本 装置放在塑料袋或类似物品中,然 后将其带到温暖的地方。当袋中空 气温度到达环境温度时,取出本装 置。 清洁本装置 请勿使用任何有机溶剂(如稀释剂 或汽油)来清洁本装置。 部件识别 1...半透镜 2...相机安装(E 卡口系统)标记 3...E 卡口系统 4...镜头接点 5...镜头安装(A 卡口系统)标记 6...镜头释放按钮 7...A 卡口系统 8...三脚架螺丝孔 安装和拆卸卡口适配器 有毒有害物质或元素 部件 名称 装的镜头后盖(E 卡口系统一侧)。 卡口适配器 LA-EA2(以下简称“本 装置”)是一种用于配备有 E 卡口系 统的 Sony 可更换镜头数码相机和可 更换镜头数码 HD 摄录一体机(以下 简称“相机”)的适配器。在 A 卡 口系统上安装 α 镜头(以下简称 “镜头”)时,请使用本装置。 ˎˎ No presione el botón de liberación del objetivo de esta unidad mientras monte el objetivo ya que éste no se acoplaría adecuadamente. ˎˎ No inserte el objetivo de forma inclinada. 产品中有毒有害物质或元素的名称 及含量 拆卸本装置 将相机的电源设为 OFF。 1 按住本装置上的镜头释放按钮,并逆 时针转动镜头,直至转动停止。小心 地将镜头从本装置的卡座中拔出。 为 本装置安装机身盖(A 卡口系统一 侧)。 2 按住相机机身上的镜头释放按钮,并 逆时针转动本装置,直至转动停止。 小心地将本装置从相机的卡座中拔 出。为本装置安装镜头后盖(E 卡口 系统一侧)。 注意 拆装本装置或镜头时,请勿触摸半 透镜。 拍摄注意事项 请勿在本装置的前后端安装任何物 品(增距镜等)。 取决于镜头,实际距离可能与镜头 的距离标度略有不同。 利用本装置进行拍摄时,最小焦距 值可能会变大。 使用带有对焦模式开关(在 AF(自 动对焦)和 MF(手动对焦)之间 切换)的镜头时,镜头上的上述开 关具有优先性。 安装本装置后,LCD 监视器上 AF 区域的显示会发生改变。 以 MF(手动对焦)模式拍摄时, 请目视 LCD 监视器或取景器进行 对焦。 您的相机须与本装置兼容。 使用 A 卡口系统镜头时,AF 照明 器不会闪光。 在电影拍摄期间,可能会记录下相 机或镜头的操作噪音或蜂鸣声。 规格 拍摄屏幕大小 APS-C 尺寸(约) 78.5 mm × 86.5 mm × 44 mm (宽/高/长) (不包括突出部位) 约 200 g 质量 所含物品 卡口适配器 (1)、 机身盖 (1)、镜头后盖 (1)、 携带包 (1)、成套印刷文件 设计或规格如有变动,恕不另行通 知。 是 Sony Corporation 的商标。 产品中有毒有害物质或元素的名称 多溴二 六价 多溴 苯醚 铅 汞 镉 铬 联苯 (PB (Pb) (Hg) (Cd) (Cr (PBB) (VI)) DE) 内置线 路板 外壳 附件 ︰ 表示该有毒有害物质在该部件 所有均质材料中的含量均在 SJ/ T11363-2006 标准规定的限量要 求以下。 ︰ 表示该有毒有害物质至少在该部件 的某一均质材料中的含量超出 SJ/ T11363-2006 标准规定的限量要 求。 索尼公司 出版日期:2011 年 7 月