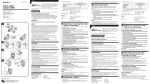
1
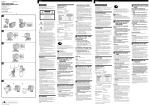
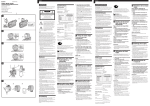
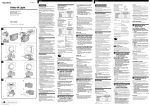
3-078-474-01 (1)
A-1 A
A-1
A-2
A-2 B
A-3
Video Flash Light
/Operating Instructions/
Mode d’emploi/Manual de instrucciones
1
HVL-F5DF
Sony Corporation © 2002 Printed in Japan
You are cautioned that any changes or modifications not
expressly approved in this manual could void your
authority to operate this equipment.
Features
•
• When attached to a camcorder this unit functions as a
video light and flash.
• Video light ON/OFF is controlled by the POWER mode
switch of the camcorder.
• The video flash can only be used on a camcorder with
the PHOTO recording function. As the brightness of the
flash is automatically adjusted according to the distance
of the subjects, your picture does not become whitish
with too much brightness.
1 2
•
A
ON OFF
•
POWER
OFF
Precautions
POWER
DC 6 V
5W
200cd
Caution for heat
OFF
Be careful not to touch the lighting section because the
glass window and surrounding surfaces are hot while
the light is on and just after it is turned off.
1
20
POWER
A
ON
NP-FF50
NP-FF70
40
90
2
1m
200
2m
50
3m
20
3 000K
100
B
•
•
1 500
14
5 500K
NO.
3 LANC
LANC
5.5 W
45 × 77 × 64 mm
/
/
100g
1
LANC
1
2
3
4
1
XB-5DX
POWER
OFF
LANC
LANC
1
5
After use
•
1
•
•
•
•
• Set the power switch to OFF.
• Make sure the video flash light has cooled down before
storing it.
Be sure to remove the battery pack when the video
flash light is not in use or stored in its case, etc.
English
On cleaning
WARNING
Clean the video flash light with a dry soft cloth. You can
remove stubborn stains with a cloth lightly dampened
with a mild detergent solution, then dry the unit with a
soft cloth.
Never use strong solvents, such as thinner or benzine,
since these will damage the finish on the surface.
To prevent fire or shock hazard, do not expose the unit to
rain or moisture.
To avoid electrical shock, do not open the cabinet. Refer
servicing to qualified personnel only.
m
• Never look directly at the bulb while the video light or
flash is on.
• Avoid placing the video flash light near combustible or
volatile solvents such as alcohol or benzine.
• Do not let any solid object or liquid fall onto or into the
video flash light.
• Do not knock or jolt the video flash light while it is
turned on as it may damage or shorten the life of the
bulb.
• Do not leave the video light on while it is resting on or
against something; it may cause a fire or damage the
video flash light.
• Do not pick up the camcorder by the head of the video
flash light.
• Remove the video flash light before putting the camera
into a carrying case.
• Do not place anything over the ventilation grill.
• When the cover is hot do not allow it to get wet.
• Do not leave the power switch of the video flash light
on when it is not in use.
• Do not turn the video flash light on without attaching
the front cover.
• If battery voltage drops to a certain level, the video flash
light may not function suddenly. This is not a
malfunction. In this case, turn off the power, then
charge the battery pack again or use another fully
charged battery pack.
• When the front cover is hot, do not allow it to get wet.
Otherwise, the video flash light may be damaged, or
personal injury could result.
• Do not place the video flash light in the following
locations as it may be damaged or deformed:
- extremely high temperature, such as in a car parked in
the sun
- directly in the sun, or near a heater
- extreme vibration
•
•
This symbol is intended to alert the user to
the presence of uninsulated “dangerous
voltage” within the product’s enclosure
that may be of sufficient magnitude to
constitute a risk of electric shock to
persons.
•
POWER
•
•
•
•
0564-62-4979
9
5
HVLF5DF
• POWER
•
OFF
OFF
This symbol is intended to alert the user to
the presence of important operating and
maintenance (servicing) instructions in the
literature accompanying the appliance.
NOTE
This equipment has been tested and found to comply
with the limits for a Class B digital device, pursuant to
Part 15 of the FCC Rules. These limits are designed to
provide reasonable protection against harmful
interference in a residential installation. This equipment
generates, uses, and can radiate radio frequency energy
and, if not installed and used in accordance with the
instructions, may cause harmful interference to radio
communications. However, these is no guarantee that
interference will not occur in a particular installation. If
this equipment does cause harmful interference to radio
or television reception, which can be determined by
turning the equipment off and on, the user is encouraged
to try to correct the interference by one or more of the
following measures:
— Reorient or relocate the receiving antenna.
— Increase the separation between the equipment and
receiver.
— Connect the equipment into an outlet on a circuit
different from that to which the receiver is connected.
— Consult the dealer or an experienced radio/TV
technician for help.
6 V DC
5W
Approx. 200 cd
Horizontal
20 degrees
Type of battery pack
Lighting duration
NP-FF50
40
NP-FF70
90
(Approx. minutes using fully-charged battery pack)
Illumination range
Color temperature
Average life of bulb
Approx. 1 m (3 1/5 ft) 200 lux,
Approx. 2 m (6 1/2 ft) 50 lux,
Approx. 3 m (9 4/5 ft) 20 lux
3 000 K
Approx. 100 hours
Video flash segment
Flash life
Guide no.
Color temperature
Approx. 1 500 times
equivalent to 14
(Memory Photo recording)
5 500 K
Others
Power consumption
Dimensions
(excluding projecting
parts)
Mass
Accessories (supplied)
Accessory (not supplied)
Using the shoe adapter
1
Attach the shoe adapter to the tripod receptacle of the
camcorder.
Turn the knob of the shoe adapter in the direction of
the arrow to tighten firmly.
A The guide marks to attach the camcorder to the
shoe adapter.
2 Attach the video flash light to the shoe adapter.
Make sure that the lighting section faces to the front
and slide it firmly into the shoe adapter.
You can turn the attached video flash light to the
desired direction.
Point the video flash light in the desired direction.
Turn the lock knob in the direction of the arrow to
tighten.
B The point to adjust the direction of the video flash
light.
•Attach the video flash light in parallel with the
camcorder when recording with the video flash.
•Turn the video flash light to illuminate the central
area of pictures when recording with the video light.
3 Connect the LANC cable.
Connect the LANC cable of the video flash light to the
LANC jack of the camcorder.
Removing the video flash light
1
2
3
4
5
Set the power switch of the video flash light to OFF.
Remove the LANC cable from the LANC jack of the
camcorder.
Loosen the lock knob by turning it in the direction of
the arrow 1.
Remove the video flash light from the shoe adapter.
Remove the shoe adapter from the camcorder.
Notes
• If you cannot insert the video flash light into the shoe
adapter, turn the lock knob in the direction of the arrow
1 fully and insert the video flash light again.
• Mount the video flash light correctly, observing the
direction of the arrow on the shoe adapter.
Français
AVERTISSEMENT
Afin d’éviter tout risque d’incendie ou d’électrocution, ne
pas exposer cet appareil à la pluie ou à l’humidité.
Afin d’écarter tout risque d’électrocution, garder le coffret
fermé. Ne confier l’entretien de l’appareil qu’à un
professionnel.
Caractéristiques
• Rattaché à un camescope, cet appareil sert de lampe et
de flash vidéo.
• La mise en marche ou l'arrêt (ON/OFF) de la lampe
vidéo est contrôlée par l'interrupteur POWER du
caméscope.
• Le flash vidéo ne peut être utilisé qu’avec un camescope
présentant le mode PHOTO. Comme la luminosité du
flash est automatiquement ajustée en fonction de la
distance du sujet, la photo ne risque pas d’être
surexposée sous un éclairage lumineux.
Attention à la chaleur
Video light segment
Power requirements
Lamp
Maximum luminous intensity
Lighting direction
Lighting angle
Continuous lighting time
Set the power switch of the video flash light to OFF
before attaching it to the shoe adapter or your camcorder.
If your camcorder has the accessory shoe for the video
flash light, attach the video flash light directly to the
accessory shoe.
Use the supplied shoe adapter when the accessory shoe is
not provided on the camcorder.
Précautions
Specifications
1
2
A Attaching the video
flash light
5.5 W
Approx. 45 × 77 × 64 mm
(1 13/16 × 3 1/8 × 2 5/8 inches)
(w/h/d)
Approx. 100 g (3 1/2 oz.)
Shoe adapter (1)
Operating instructions
Halogen lamp XB-5DX
Design and specifications are subject to change without
notice.
Faites attention à ne pas toucher la section d'éclairage
car la fenêtre en verre et les surfaces environnantes
sont chaudes quand la lampe est allumée et juste après
avoir été éteinte.
• Ne jamais regarder directement l’ampoule quand la
lampe ou le flash vidéo sont allumés.
• Evitez de poser la lampe-flash vidéo près de
combustibles ou de solvants volatils, comme l’alcool ou
la benzine.
• Veillez à ne pas laisser tomber de solide ni de liquide
sur ou dans la lampe-flash vidéo.
• Ne pas cogner ni secouer la lampe-flash vidéo quand
elle est éclairée afin de ne pas l’endommager ou de ne
pas réduire la durée de vie de l’ampoule.
• Ne pas laisser la lampe-flash vidéo allumée quand elle
est posée sur ou contre quelque chose. Il y a risque
d’incendie ou la lampe pourrait être endommagée.
• Ne pas saisir le camescope par la lampe-flash vidéo.
• Enlevez la lampe-flash vidéo avant de ranger le
camescope dans sa sacoche de transport.
• Ne rien poser sur la grille de ventilation.
• Quand le capot de la lampe est trop chaud, ne pas le
mouiller.
• Ne laissez pas l'interrupteur d'alimentation de la lampe
flash-vidéo sur ON si vous ne l'utilisez pas.
• N'allumez pas la lampe flash-vidéo sans fixer le cache
avant.
• Si la tension de la pile chute à un certain niveau, la
lampe flash-vidéo peut cesser de fonctionner tout à
coup. Il ne s'agit pas d'un dysfonctionnement. Dans ce
cas, mettez la lampe hors tension, puis rechargez le bloc
batterie ou utilisez un autre bloc entièrement rechargé.
• Si le cache avant est chaud, ne le mouillez pas. Sinon,
vous risquez d'endommager la lampe flash-vidéo ou de
vous blesser.
• N'installez pas la lampe flash-vidéo dans les endroits
suivants car elle risque de s'abîmer ou de se déformer :
- endroits soumis à une température très élevée, comme
une voiture stationnée en plein soleil
- en plein soleil ou à proximité d'un appareil de
chauffage
- endroits soumis à de fortes vibrations.
Après utilisation
• Réglez l’interrupteur d’alimentation sur OFF.
• Assurez-vous que la lampe-flash vidéo s'est refroidie
avant de la ranger.
Lorsque vous n'utilisez pas la lampe flash-vidéo ou
que celle-ci est rangée dans son boîtier, enlevez le bloc
batterie.
Otros
Español
ADVERTENCIA
Para evitar incendios o descargas eléctricas, no exponga la
unidad a la lluvia ni a la humedad.
Para evitar descargas eléctricas, no abra la unidad. En
caso de avería, solicite los servicios de personal
cualificado.
Nettoyage
Nettoyez la lampe-flash vidéo avec un chiffon doux et sec.
Vous pouvez enlever les tâches rebelles avec un chiffon
légèrement imprégné de détergent neutre, puis essuyez la
lampe avec un chiffon doux.
Ne jamais utiliser de solvants puissants, tel qu’un diluant
ou de la benzine, car ils peuvent endommager la finition.
Spécifications
Section Lampe vidéo
Alimentation
Lampe
Intensité lumineuse maximale
Direction d’éclairage
Angle d’éclairage
Temps d’éclairage continu
6 V CC
5W
Env. 200 cd
Horizontale
20 degrés
Type de batterie rechargeable
Temps d’éclairage
NP-FF50
40
NP-FF70
90
(Env. en minutes avec une batterie rechargeable pleine)
Env. 1 m (3 1/5 ft) 200 lux,
Env. 2 m (6 1/2 ft) 50 lux,
Env. 3 m (9 4/5 ft) 20 lux
Température de couleur 3 000 K
Durée de vie moyenne de l’ampoule
Env. 100 heures
Plage d’illumination
El diseño y las especificaciones están sujetos a cambio sin
previo aviso.
Características
• Fijada a una videocámara, esta unidad funcionará como
lámpara para vídeo y como flash.
• La lámpara para vídeo se activa y desactiva (ON/OFF)
mediante el interruptor POWER de la videocámara.
• El flash para vídeo solamente podrá utilizarse con una
videocámara con función de videofilmación PHOTO.
Como el brillo del flash se ajusta automáticamente de
acuerdo con la distancia hasta el motivo, es posible que
sus imágenes no resulten blanquecinas con demasiado
brillo.
Precauciones
Precauciones para evitar el
recalentamiento
Tenga cuidado de no tocar la sección de iluminación
porque la ventanilla de cristal y las superficies
circundantes estarán calientes cuando la lámpara esté
encendida e inmediatamente después de haberla
apagado.
Réglez l'interrupteur d'alimentation de la lampe-flash
vidéo sur OFF avant de la fixer sur la griffe porteaccessoires ou le caméscope.
Si le caméscope possède un porte-accessoires pour la
lampe-flash vidéo, fixez celle-ci directement sur la griffe
porte-accessoires.
Utilisez la griffe porte-accessoires fournie si le porteaccessoires n'est pas fourni avec le caméscope.
• No mire directamente hacia la bombilla cuando la
lámpara/flash para vídeo esté encendida.
• Evite colocar la lámpara/flash para vídeo cerca de
combustibles o disolventes volátiles, como alcohol o
bencina.
• No permita que dentro de la lámpara/flash para vídeo
entre ningún objeto sólido ni líquido.
• No golpee ni sacuda la lámpara/flash para vídeo
mientras esté encendida, ya que podría dañarla o
acortar la duración de la bombilla.
• No deje la lámpara/flash para vídeo encendida sobre ni
apoyada contra nada, porque podría provocar un
incendio o dañarla.
• No tome la videocámara por la cabeza de la lámpara/
flash para vídeo.
• Quite la lámpara/flash para vídeo antes de colocar la
videocámara en una caja de transporte.
• No coloque nada sobre la rejilla de ventilación.
• Cuando la cubierta esté caliente, no permita que se
humedezca.
• Apague el interruptor de alimentación de la lámpara/
flash para vídeo cuando no la utilice.
• Monte la cubierta frontal antes de encender la lámpara/
flash para vídeo.
• Si el voltaje de la batería desciende hasta un
determinado nivel, es posible que la lámpara/flash para
vídeo deje de funcionar de forma repentina. No se trata
de un error de funcionamiento. Si esto sucede, apague
la alimentación y vuelva a cargar la batería o utilice otra
batería totalmente cargada.
• Si la cubierta frontal está caliente, evite que se moje. De
lo contrario, pueden producirse lesiones físicas o daños
en la lámpara de flash para vídeo.
• Para evitar que la lámpara/flash para vídeo se dañe o se
deforme, evite colocarla en lugares:
- expuestos a temperaturas extremadamente altas,
como en un automóvil estacionado al sol
- expuestos a la luz solar directa o cerca de un calefactor
- expuestos a vibraciones muy fuertes
Utilisation de la griffe porte-accessoires
Después de la utilización
1
• Ponga el interruptor de alimentación en OFF.
• Asegúrese de que la lámpara/flash para vídeo se ha
enfriado antes de almacenarla.
Section Flash vidéo
Durée de vie du flash
Nombre guide
Température de couleur
Env. 1 500 éclairs
Equivalent à 14
(Enregistrement de photos
dans la mémoire)
5 500 K
Divers
Consommation
Dimensions
(parties saillantes non
comprises)
Poids
Accessoires (fournis)
Accessoire (non fourni)
5.5 W
Env. 45 × 77 × 64 mm
(1 13/16 × 3 1/8 × 2 5/8 po.)
(l/h/d)
Env. 100 g (3 1/2 on.)
Griffe porte-accessoires (1)
Mode d’emploi (1)
Lampe halogène XB-5DX
La conception et les spécifications peuvent être modifiées
sans avis préalable.
A Fixation de la lampe
flash-vidéo
Fixez la griffe porte-accessoires à la douille du trépied
du caméscope.
Tournez la bague de la griffe porte-accessoires dans le
sens de la flèche pour la bloquer.
A Repères pour fixer le caméscope sur la griffe porteaccessoires.
2 Fixez la lampe flash-vidéo sur la griffe porteaccessoires.
Vérifiez que la partie éclairante est bien orientée vers
l'avant et glissez-la fermement dans la griffe porteaccessoires.
Vous pouvez orienter la lampe-flash vidéo dans la
direction de votre choix.
Orientez la lampe flash-vidéo dans la direction
souhaitée.
Tournez la bague de blocage dans le sens de la flèche
pour la bloquer.
B Point pour ajuster l'orientation de la lampe-flash
vidéo.
•Fixez la lampe-flash vidéo parallèlement au
caméscope lorsque vous enregistrez avec le flash
vidéo.
•Tournez la lampe-flash vidéo pour éclairer la zone
centrale des images lorsque vous enregistrez avec la
lampe vidéo.
3 Branchement du câble LANC.
Branchez le câble LANC de la lampe flash-vidéo à la
prise LANC du caméscope.
Pour enlever la lampe-flash vidéo
1
2
3
4
5
Réglez l'interrupteur d'alimentation de la lampe vidéo
sur OFF.
Débranchez le câble LANC de la prise LANC du
caméscope.
Desserrez la bague de blocage en la tournant dans le
sens de la flèche 1.
Retirez la lampe flash-vidéo de la griffe porteaccessoires.
Retirez la griffe porte-accessoires du caméscope.
Remarques
• Si vous ne parvenez pas à insérer la lampe-flash vidéo
dans la griffe porte-accessoires, tournez la bague de
blocage complètement dans le sens de la flèche 1 puis
réinsérez la lampe-flash vidéo.
• Montez correctement la lampe-flash vidéo, en
respectant le sens de la flèche sur la griffe porteaccessoires.
Retire la batería cuando no utilice la lámpara/flash
para vídeo o cuando la guarde en su estuche, etc.
Limpieza
Limpie la lámpara/flash para vídeo con un paño suave y
seco. Usted podrá eliminar las manchas difíciles con un
paño ligeramente humedecido en una solución muy
diluida de detergente, y después secándola con un paño
suave.
No utilice nunca disolventes fuertes, como diluidor de
pintura o bencina, ya que podrían dañar el acabado de la
superficie.
Especificaciones
Segmento de la lámpara para vídeo
Alimentación
Bombilla
Intensidad luminosa máxima
Dirección de iluminación
Ángulo de iluminación
Tiempo de iluminación continua
6 V CC
5W
Aprox. 200 candelas
Horizontal
20 grados
Tipo de batería Duración de iluminación
NP-FF50
40
NP-FF70
90
(Minutos aproximados utilizando una batería
completamente cargada)
Alcance de iluminación
Temperatura de color
Duración media de la bombilla
Aprox. 1 m, 200 lux,
Aprox. 2 m, 50 lux,
Aprox. 3 m, 20 lux
3 000 K
Aprox. 100 horas
Segmento del flash para vídeo
Duración del flash
Número guía
Temperatura de color
Consumo
5.5 W
Dimensiones
Aprox. 45 × 77 × 64 mm
(excluyendo las partes
(an/al/prf)
salientes)
Masa
Aprox. 100 g
Accesorios (suministrados)
Adaptador para zapata (1)
Manual de instrucciones (1)
Accesorio (no suministrado)
Bombilla halógena XB-5DX
Aprox. 1 500 veces
Equivalente a 14 (Grabación
de fotos en la memoria)
5 500 K
A Montaje de la lámpara/
flash para vídeo
Ajuste el interruptor de alimentación de la lámpara/flash
para vídeo en OFF antes de colocarla en el adaptador
para zapata o la videocámara.
Si la videocámara dispone de la zapata accesoria para la
lámpara/flash para vídeo, instale dicha lámpara
directamente en la zapata accesoria.
Utilice el adaptador para zapata suministrado en el caso
de que la zapata accesoria no se incluyese con la
videocámara.
Utilización del adaptador para zapata
1
Monte el adaptador para zapata en el receptáculo del
trípode de la videocámara.
Fije el adaptador para zapata girando el mando en el
sentido de la flecha.
A Marcas de la guía para unir el adaptador para
zapata a la videocámara.
2 Monte la lámpara/flash para vídeo en el adaptador
para zapata.
Cerciórese de que la sección de destello quede
encarada hacia adelante e introdúzcala con firmeza en
el adaptador para zapata.
Es posible girar la lámpara/flash para vídeo instalada
hacia la dirección deseada.
Oriente la lámpara/flash para vídeo en el sentido
deseado.
Gire el mando de bloqueo en el sentido de la flecha
para fijarlo.
B Punto donde ajustar la dirección de la lámpara/
flash para vídeo.
•Coloque la lámpara/flash para vídeo de modo que
quede paralela a la videocámara cuando utilice el
flash para vídeo para grabar.
•Gire la lámpara/flash para vídeo para iluminar el
área central de las imágenes cuando grabe con dicha
lámpara.
3 Conecte el cable LANC.
Conecte el cable LANC de la lámpara/flash para
vídeo en la toma LANC de la videocámara.
Para desmontar la lámpara/flash para
vídeo
1
2
3
4
5
Ponga el interruptor de alimentación de la lámpara
para vídeo en OFF.
Desenchufe el cable LANC de la toma LANC de la
videocámara.
Afloje el mando de bloqueo girándolo en el sentido de
la flecha 1.
Retire la lámpara/flash para vídeo del adaptador para
zapata.
Retire el adaptador para zapata de la videocámara.
Notas
• Si no puede insertar la lámpara/flash para vídeo en el
adaptador para zapata, gire por completo el mando de
bloqueo en el sentido de la flecha 1 e inserte de nuevo
la lámpara/flash para vídeo.
• Coloque la lámpara/flash para vídeo correctamente,
siguiendo el sentido de la flecha del adaptador para
zapata.
C
B
E
D
F-1
1
1
F-2
F-3
READY
2
LIGHT
LIGHT
OFF
ON
OFF
ON
a
1
•
D Using the video light
c
POWER
OFF
B
2
2
E
•
•
•
•
Control the video light with the camcorder in standby
mode
1 Set the camcorder POWER switch to ON.
2 Set the power switch to LIGHT ON, pressing the
green button in the direction of the arrow 1 to turn
on the video light.
3 Turn on/off the camcorder. The video light is turned
on/off in sync with the camcorder.
1
•
•
POWER
OFF
•
•
1
After use
Set the power switch to OFF.
10
Note
Make sure the video light has cooled down before storing it.
-
C
DCR-IP220
E Installing the battery
pack
-
10 30
Use the battery pack NP-FF50/FF70.
1 Set the power switch of the video flash light to OFF.
2 Install the battery pack until it clicks, aligning the
terminal of the battery pack with the terminal of the
video flash light.
AC
removing the battery pack
F
1
2
1
2
XB-5DX
POWER
1
ON
READY
READY
•
•
•
1
1
2
3
HVL-F5DF
English
2
B Lighting up a subject
• When recording indoors with this unit, you can get
clear and beautiful color pictures.
• For wide angle shots, the video light may not light the
corners of pictures completely. Use the video light for
shooting the main subject of the picture effectively.
• When bright light shines from behind the subject
(backlighting), the video light is very effective for
lighting up the main part of the subject, such as the
person’s face.
Outdoors, be sure that you do not stand facing the sun.
• Fluorescent lights tend to produce flickering in the
recording. Use of the video flash light may help to
produce better pictures with less color blur.
3
READY
1
2
•
•
4
•
C Using the video flash
•
POWER
OFF
•
1 5m
•
A
OFF
OFF
•
POWER
ON
POWER
OFF
c
OFF
ON
OFF
D
ON
1
LANC
ON
2
POWER
ON
POWER
LIGHT ON
1
3
ON/OFF
OFF
/
POWER
POWER
ON
LANC
OFF
POWER
OFF
LANC
POWER
ON/
OFF
/
Use the video flash only with a camcorder which has the
PHOTO recording function. The DCR-IP220/IP210 is the
model used for illustration purposes. For details, refer to
the operating instructions of your camcorder.
(The instructions below show the operations when the
camcorder POWER switch is set to CAMERA. However
you can also use the video flash light when the power
switch is set to MEMORY.)
1 Set the camcorder POWER switch to CAMERA.
pressing the green button
2 Slide the power switch to
in the direction of the arrow 1 to set the power
switch of the video flash light to ON.
The charge complete lamp READY blinks as the video
flash light starts to charge. When charging is
complete, the charge complete lamp READY stops
blinking but remains on.
3 Keep pressing the camcorder PHOTO button lightly
to confirm the image.
Keep the camcorder PHOTO button pressed down
lightly.
The flashing of the video flash light is linked to the
PHOTO button. A still picture appears in the
viewfinder and the memory indicator comes on.
Recording is not carried out at this point.
To change the still picture, release the camcorder
PHOTO button. The video flash light starts charging
again after you release the camcorder PHOTO button.
Wait until the battery charge complete lamp READY
appears before lightly pressing the PHOTO button
again.
Because the camcorder automatically adjusts the
brightness when you press the PHOTO button, the
image may get darker or the colors may seem to
change.
4 Press the camcorder PHOTO button deeper.
When you press the PHOTO button, the bar scroll
indicator disappears and recording stops. During
recording, captured images appear in the viewfinder
or on the LCD.
When you release the PHOTO button, the video flash
light automatically starts to recharge after the image is
recorded.
After use
LED
E
NP-FF50/FF70
1
Set the power switch to OFF.
l
POWER
OFF
2
LED
•
c
•
c
2
1
1
1
2
POWER ON
POWER ON
Notes
• The appropriate distance between a subject and the
video flash light is approx. 1 m to 5 m in a dark room.
• During recording, keep your fingers away from the
sensor A of this unit. Otherwise, the brightness of the
flash cannot be adjusted properly.
• The video flash light will be recharged even if it is
completely charged after:
- you set the power switch to OFF.
- you set the camcorder POWER switch to OFF.
Set the power switch of the video flash light to OFF.
Pressing down the battery release lever in the
direction of the arrow 1, remove the battery pack in
the direction of the arrow 2. (see illustration E)
Note
• Be sure to turn the power switch OFF when installing or
removing the battery pack.
• Battery pack performance decreases in low-temperature
surroundings (lower than 10˚C) so that the time the
battery pack can be used becomes shorter. We
recommend the following to use the battery pack
longer:
- Put the battery pack in a pocket to warm it up, and
insert it in your video flash light immediately before
you start taking shots.
- We recommend charging the battery pack (by
attaching to the AC adapter) in an ambient
temperature of between 10˚C to 30˚C (50°F to 86°F).
F Replacing the bulb
Use the Sony XB-5DX halogen lamp (optional).
The bulb is hot when it has just burned out. Wait until the
bulb cools down before removing it.
1 Remove the front cover after making sure that the unit
is cool enough to handle.
Push in the direction of 1 to loosen the lock knob.
Pull in the direction of 2 to remove the front cover.
2 When the bulb has cooled sufficiently, grasp it
securely and pull it out to replace. Insert the new bulb
into the socket straightly.
3 After the bulb has been inserted, attach the front cover
straightly.
Align the front cover with 1.
Push 2 in the direction of the arrow until the knob is
locked.
Notes
• The bulb is hot when it has just burned out. Make sure
that the bulb is cool enough to handle.
• To prevent the bulb from being smudged with
fingerprints, handle it with a dry cloth. If the bulb is
smudged, wipe it completely clean.
• The interior of this unit contains high voltage, opening
it can cause electrical shock. To inspect the unit’s
interior, consult your nearest Sony dealer or Sony
Service facility.
Type of trouble and how to
correct trouble
If you run into any problem using your video flash light,
use the following table to troubleshoot the problem. If the
problem persists, turn the video flash light off and contact
your Sony dealer or Sony Service facility.
Symptom
Cause and/or Corrective Action
The video flash light
lights up if the power
switch is set to
LIGHT ON while the
power switch of your
camcorder is set to
OFF.
When the power switch of
your camcorder is set to OFF,
the power switch of the video
flash light is not interlocked
with it.
c To interlock the video flash
light with your camcorder,
turn on your camcorder, then
turn off your camcorder. The
video flash light is also turned
off and is now interlocked.
The video flash light
goes out if you
disconnect the LANC
cable, although the
power switch of the
video flash light is set
to LIGHT ON and
your camcorder is
turned on.
This is not a malfunction.
The video flash light
remains turned on if
you set the power
switch of the video
flash light to LIGHT
ON and disconnect
the LANC cable while
the power switch of
your camcorder is set
to OFF.
This is not a malfunction. To
turn off the video flash light,
set the power switch of the
video flash light to OFF. When
the LANC cable is not
connected, set the power
switch of the video flash light
to LIGHT ON or OFF to turn
on or off the light.
LED indicator
In Flash mode
The indicator flashes l The indicator lights up
(Charging)
(Fully charged)
In Light mode
The indicator flashes
(The battery is nearly dead)
In the following instances the indicator flashes fast:
• The battery is discharged.
c Charge the battery fully.
• The rating of the replaced halogen lamp is not correct.
c Check the rating of the lamp.
• Something is wrong with the battery pack.
c Install a new battery pack.
Français
B Eclairage d’un sujet
• Si vous filmez en intérieur avec la lampe vidéo, vous
obtiendrez des images nettes avec de belles couleurs.
• Lors de la prise de vues en grand angle, la lampe vidéo
ne pourra peut-être pas éclairer complètement les
angles de l’image. Utilisez la lampe vidéo pour bien
éclairer et filmer le sujet principal de l’image.
• Quand une lumière intense se trouve derrière le sujet
(contre-jour), la lampe vidéo éclaire de manière efficace
la partie principale du sujet, par exemple le visage
d’une personne.
A l’extérieur, veillez à ne pas filmer face au soleil.
• Les lampes fluorescentes ont tendance à produire un
vacillement de l’image. L’utilisation de la lampe vidéo peut
améliorer les images en accentuant la netteté des couleurs.
C Utilisation du flash
vidéo
Utilisez le flash vidéo seulement avec un camescope
présentant le mode PHOTO. Les illustrations représentent
le DCR-IP220/IP210. Pour les détails, consultez le mode
d’emploi du camescope.
(Les instructions ci-après montrent les opérations lorsque
l'interrupteur POWER du caméscope est réglé sur
CAMERA. Toutefois, vous pouvez également utiliser la
lampe-flash vidéo lorsque l'interrupteur d'alimentation
est réglé sur MEMORY.)
1 Réglez l'interrupteur POWER du caméscope sur
CAMERA.
2 Faites glisser l'interrupteur d'alimentation vers
en
appuyant sur le bouton vert dans le sens de la flèche
1 afin de régler l'interrupteur d'alimentation de la
lampe-flash vidéo sur ON.
Le témoin de charge READY clignote pendant la
recharge. Lorsqu’elle est terminée, le témoin READY
cesse de clignoter et reste allumé.
3 Tenez la touche PHOTO du camescope légèrement
enfoncée jusqu’à ce qu’une image apparaisse.
Le fonctionnement de la lampe-flash vidéo est lié à
l’activation de la touche PHOTO. Une image fixe
apparaît dans le viseur et l’indicateur
d’enregistrement en mémoire s’allume lorsque vous
appuyez sur cette touche. L’enregistrement n’est pas
encore exécuté à ce moment.
Pour changer d’image, relâchez la touche PHOTO du
camescope. Le flash vidéo se recharge aussitôt.
Attendez que le témoin de charge READY apparaisse
avant d’appuyer une nouvelle fois légèrement sur la
touche PHOTO.
La luminosité s’ajuste lorsque vous appuyez sur la
touche PHOTO, et l’image peut paraître plus sombre
ou les couleurs différentes à ce moment.
4 Appuyez plus fort sur la touche PHOTO du camescope.
Lorsque vous appuyez sur la touche PHOTO,
l’indicateur à barres disparaît et l’enregistrement
s’arrête. Pendant l’enregistrement, les images saisies
apparaissent dans le viseur ou sur l’écran LCD.
Lorsque vous relâchez la touche PHOTO, la lampeflash vidéo se recharge dès que l’image est enregistrée.
2
Poussez le bloc batterie jusqu'à ce qu'il s'encliquette en
alignant la borne du bloc batterie sur celle de la
lampe-flash vidéo.
Retrait du bloc batterie
1
2
Réglez l'interrupteur d'alimentation de la lampe-flash
vidéo sur OFF.
Appuyez sur l'ergot de dégagement de la batterie
dans le sens de la flèche 1 puis retirez la batterie
dans le sens de la flèche 2. (Voir l’illustration E)
Remarques
• Lors de la mise en place ou du retrait du bloc batterie,
veillez à mettre l'interrupteur d'alimentation hors
tension (OFF).
• Les performances du bloc batterie diminuent dans des
environnements à basses températures (inférieures à
10 °C) de sorte que le temps d'utilisation du bloc
batterie décroît. Pour optimiser le temps d'utilisation du
bloc batterie, nous vous recommandons de :
- mettre le bloc batterie dans une poche pour le
réchauffer et de l'insérer dans votre lampe flash-vidéo
juste avant de faire des prises de vue.
- Nous vous conseillons de charger le bloc batterie (en
le fixant à l'adaptateur secteur) à une température
ambiante située entre 10 °C et 30 °C (50 °F à 86 °F).
F Remplacement de
l’ampoule
Utilisez une lampe halogène Sony XB-5DX (en option).
L’ampoule est brûlante quand elle vient d’être éteinte.
Laissez-la refroidir avant de l’enlever.
1 Enlevez le capot avant après avoir vérifié que la
lampe était suffisamment froide.
Poussez dans le sens de 1 pour desserrer le bague de
serrage.
Tirez dans le sens de 2 pour retirer le capot avec avant.
2 Quand l’ampoule est suffisamment froide, prenez-la
avec précaution et tirez dessus. Insérez la nouvelle
ampoule tout droit dans la douille.
3 Après avoir remplacé l’ampoule, remettez le capot
tout droit sur la lampe.
Alignez le capot avant sur 1.
Poussez 2 dans le sens de la flèche jusqu’à ce que la
bague soit serrée.
Remarques
• L’ampoule reste chaude un moment après avoir été
éteinte. Assurez-vous que l’ampoule est suffisamment
froide avant de la sortir.
• Pour éviter de laisser des traces de doigts sur
l’ampoule, tenez l’ampoule avec un chiffon sec. Si
l’ampoule est sale, essuyez-la bien.
• L’intérieur de la lampe contient un circuit haute
tension. Afin d’éviter tout risque d’électrocution, ne pas
ouvrir la lampe. Pour tout contrôle interne, consultez
votre revendeur Sony ou un centre de réparation Sony.
Type de problème et
comment y remédier
Si vous rencontrez un problème lors de l'utilisation de
votre lampe flash-vidéo, utilisez le tableau suivant pour y
remédier. Si le problème persiste, mettez la lampe flashvidéo hors tension et contactez votre revendeur Sony ou
le service après-vente Sony.
Symptôme
Cause et/ou action corrective
La lampe flash-vidéo
s'allume lorsque
l'interrupteur
d'alimentation est
réglé sur LIGHT ON
alors que
l'interrupteur
d'alimentation du
caméscope est réglé
sur OFF.
Lorsque l'interrupteur
d'alimentation de votre
caméscope est sur OFF,
l'interrupteur d'alimentation
de la lampe flash-vidéo n'est
pas synchronisé avec celui-ci.
c Pour synchroniser la lampe
flash-vidéo avec votre
caméscope, mettez le
caméscope sous tension, puis
hors tension. La lampe flashvidéo est également hors
tension et maintenant
synchronisée.
Après utilisation
Réglez l’interrupteur d’alimentation sur OFF.
Remarques
• La distance appropriée entre un sujet et la lampe-flash
vidéo est d’environ 1 à 5 m dans une pièce sombre.
• Pendant la prise de vues, ne pas mettre les doigts sur le
capteur A de la lampe-flash vidéo, sinon la luminosité
du flash ne pourra pas être ajustée correctement.
• La lampe-flash vidéo devra être à nouveau rechargé
même après une recharge si :
- vous avez réglé l’interrupteur d’alimentation du flash
sur OFF.
- vous avez réglé le commutateur d'alimentation sur OFF.
D Utilisation de la lampe
vidéo
Pour contrôler la lampe vidéo quand le caméscope est en
mode d'attente.
1 Réglez l'interrupteur d'alimentation sur ON.
2 Réglez l'interrupteur d'alimentation sur LIGHT ON
en appuyant sur le bouton vert dans le sens de la
flèche 1 afin d'allumer la lampe vidéo.
3 Mettez le caméscope sous tension/hors tension. La
lampe vidéo est allumée/éteinte en même temps que
le caméscope.
Après utilisation
Réglez l’interrupteur d’alimentation sur OFF.
Remarque
Assurez-vous que la lampe vidéo est froide avant de la ranger.
E Installation du bloc
batterie
Utilisez le bloc batterie NP-FF50/FF70.
1 Réglez l'interrupteur d'alimentation de la lampe-flash
vidéo sur OFF.
La lampe flash-vidéo Il ne s'agit pas d'un
s'éteint lorsque vous
dysfonctionnement.
débranchez le câble
LANC bien que
l'interrupteur de la
lampe flash-vidéo soit
réglé sur LIGHT ON
et que votre
caméscope soit sous
tension.
La lampe flash-vidéo
reste allumée si vous
réglez l'interrupteur
d'alimentation de la
lampe flash-vidéo sur
LIGHT ON et
débranchez le câble
LANC alors que
l'interrupteur
d'alimentation du
caméscope est sur OFF.
Il ne s'agit pas d'un
dysfonctionnement. Pour
mettre la lampe flash-vidéo
hors tension, réglez
l'interrupteur de la lampe
flash-vidéo sur OFF. Si le câble
LANC n'est pas branché,
réglez l'interrupteur
d'alimentation de la lampe
flash-vidéo sur LIGHT ON ou
OFF pour mettre sous tension
ou hors tension la lampe.
Témoin LED
En mode Flash
Le témoin clignote
l Le témoin s'allume
(chargement en cours)
(chargement terminé)
En mode Light
Le témoin clignote
(La batterie est presque vide)
Le témoin clignote rapidement dans les cas suivants :
• La batterie est déchargée.
c Rechargez la batterie complètement.
• La valeur nominale de la lampe halogène de
remplacement n'est pas correcte.
c Vérifiez la valeur nominale de la lampe.
• Le bloc batterie ne fonctionne pas bien.
c Installez un bloc batterie neuf.
Español
extracción de la batería
1
2
B Iluminación de un
motivo
• Cuando videofilme en interiores con esta unidad, podrá
obtener imágenes claras y de hermosos colores.
• Para tomas en gran angular, es posible que la lámpara
para vídeo no ilumine completamente las esquinas de
las imágenes. Utilice la lámpara para vídeo para
videofilmar efectivamente el motivo principal de la
imagen.
• Cuando haya una luz brillante detrás del motivo
(contraluz), la lámpara para vídeo será muy efectiva
para iluminar la parte principal del motivo, como la
cara de una persona.
En exteriores, cerciórese de no colocarse de cara al sol.
• Las luces fluorescentes tienden a producir parpadeo en
la videofilmación. La utilización de la lámpara para
vídeo puede ayudar a conseguir mejores imágenes con
menos difuminación de los colores.
C Utilización del flash
para vídeo
Utilice el flash para vídeo solamente con una
videocámara que posea función de grabación PHOTO. El
modelo utilizado para fines de ilustración es el
DCR-IP220/IP210. Con respecto a los detalles, consulte el
manual de instrucciones de la videocámara que vaya a
utilizar.
(Las siguientes instrucciones muestran el funcionamiento
cuando el interruptor POWER de la videocámara está
ajustado en CAMERA. Sin embargo, también es posible
utilizar la lámpara/flash para vídeo cuando el interruptor
de alimentación está ajustado en MEMORY.)
1 Ajuste el interruptor POWER de la videocámara en
CAMERA.
2 Deslice el interruptor de alimentación hacia
pulsando el botón verde en el sentido de la flecha 1
para ajustar el interruptor de alimentación de la
lámpara/flash para vídeo en ON.
3 Mantenga ligeramente presionada la tecla PHOTO de
la videocámara para confirmar la imagen.
Mantenga ligeramente presionada la tecla PHOTO de
la videocámara.
El parpadeo del flash para vídeo está vinculado con la
tecla PHOTO. En el visor aparecerá una imagen fija y
el indicador de memoria.
La grabación no se realizará en este punto.
Para cambiar la imagen fija, suelte la tecla PHOTO.
Después de haber soltado la tecla PHOTO, la
lámpara/flash para vídeo comenzará a cargarse de
nuevo.
Espere hasta que se encienda la lámpara de carga
completa READY antes de volver a presionar
ligeramente la tecla PHOTO.
Como la videocámara ajusta automáticamente el brillo
al presionar la tecla PHOTO, la imagen puede
obscurecerse o es posible que parezca que los colores
han cambiado.
4 Presione a fondo la tecla PHOTO de la videocámara.
Cuando presione la tecla PHOTO, el indicador de
barras desplazables desaparecerá y la grabación se
parará. Durante la grabación, las imágenes captadas
aparecerán en el visor o en la pantalla de cristal
líquido.
Cuando suelte la tecla PHOTO, la lámpara/flash para
vídeo comenzará a recargarse automáticamente
después de haberse grabado la imagen.
Después de la utilización
Ponga el interruptor de alimentación en OFF.
Notas
• La distancia apropiada entre el motivo y la lámpara
para vídeo deberá ser de aproximadament 1 a 5 m en
una sala obscura.
• Durante la videofilmación, mantenga sus dedos
alejados del sensor A de esta unidad. De lo contrario, el
brillo del flash no se ajustaría adecuadamente.
• La lámpara/flash para vídeo se cargará incluso aunque
esté completamente cargada después de:
- haber puesto el interruptor POWER en OFF.
- haber puesto el interruptor POWER de la
videocámara en OFF.
D Utilización de la
lámpara para vídeo
Para controlar la lámpara para vídeo con la videocámara
en el modo de espera.
1 Ponga el interruptor POWER de la videocámara en
ON.
2 Ajuste el interruptor de alimentación en LIGHT ON,
pulsando el botón verde en el sentido de la flecha 1
para encender la lámpara para vídeo.
3 Encienda/apague la videocámara. La lámpara para
vídeo se enciende/apaga a la misma vez que la
videocámara.
Después de la utilización
Ajuste el interruptor de alimentación de la lámpara/
flash para vídeo en OFF.
Mientras presiona la palanca de liberación de la
batería en el sentido de la flecha 1, extraiga la batería
en el sentido de la flecha 2. (consulte la ilustración
E)
Notas
• Asegúrese de colocar el interruptor en OFF cuando
instale o sustituya la batería.
• El rendimiento de la batería disminuye en entornos con
bajas temperaturas (inferiores a 10 ºC) y, en
consecuencia, se reduce su tiempo de utilización. Se
recomienda realizar los siguientes pasos para prolongar
la duración de la batería:
- Colóquese la batería en el bolsillo para calentarla e
instálela en la lámpara/flash para vídeo justo antes de
empezar a filmar.
- Es recomendable cargar la batería (conectándola al
adaptador de CA) en una temperatura ambiente entre
10 ºC y 30 ºC.
F Reemplazo de la
bombilla
Utilice una bombilla halógena XB-5DX Sony (opcional).
La bombilla estará caliente inmediatamente después de
haberse fundido. Espere a que la bombilla se haya
enfriado antes de extraerla.
1 Extraiga la cubierta frontal después de haberse
cerciorado de que la unidad esté suficientemente fría
como para tocarla.
Empuje en el sentido 1 para aflojar el mando de
bloqueo.
Empuje en el sentido 2 para extraer la cubierta frontal.
2 Cuando la bombilla se haya enfriado suficientemente,
sujétela con seguridad y tire de ella para
reemplazarla.
Inserte de forma recta la nueva bombilla en el casquillo.
3 Después de haber insertado la bombilla, coloque la
cubierta frontal en forma recta.
Alinee la cubierta frontal con 1.
Presione 2 en el sentido de la flecha hasta que el
mando se bloquee.
Notas
• La bombilla estará caliente después de haberse fundido.
Cerciórese de que esté suficientemente fría antes de
tocarla.
• Para evitar que la bombilla se manche con huellas
dactilares, tómela con un paño seco, etc. Si la bombilla
se ha manchado, frótela para limpiarla completamente.
• En el interior de esta unidad hay alta tensión, y el
abrirla podría causar descargas eléctricas. Para
inspeccionar el interior de la unidad, consulte a su
proveedor Sony o a un centro de reparaciones Sony.
Problemas y soluciones
Si tiene algún problema con la lámpara/flash para vídeo,
utilice la tabla siguiente para solucionarlo. Si el problema
persiste, apague la lámpara/flash para vídeo y póngase en
contacto con un distribuidor o un centro de servicio Sony.
Problema
Causa y/o acción correctiva
La lámpara/flash
para vídeo se ilumina
cuando su
interruptor de
alimentación está
ajustado en LIGHT
ON y el interruptor
de alimentación de la
videocámara se
encuentra en OFF.
Cuando el interruptor de
alimentación de la
videocámara está ajustado en
OFF, el de la lámpara/flash
para vídeo no queda
bloqueado.
c Para sincronizar el bloqueo
de la lámpara/flash para vídeo
con la videocámara, encienda
primero la videocámara y
luego apáguela. La lámpara/
flash para vídeo también se
apagará y el bloqueo se
sincronizará.
La lámpara/flash
para vídeo se apaga si
desconecta el cable
LANC, aunque el
interruptor de
alimentación de dicha
lámpara esté ajustado
en LIGHT ON y la
videocámara esté
encendida.
No se trata de un error de
funcionamiento.
La lámpara/flash para
vídeo permanece
encendida si ajusta su
interruptor de
alimentación en
LIGHT ON y
desconecta el cable
LANC con el
interruptor de
alimentación de la
videocámara ajustado
en OFF.
No se trata de un error de
funcionamiento. Para apagar la
lámpara/flash para vídeo,
ponga su interruptor de
alimentación en OFF. Cuando
el cable LANC no esté
conectado, ponga el
interruptor de alimentación de
la lámpara/flash para vídeo en
LIGHT ON u OFF para
encenderla o apagarla.
Ponga el interruptor de alimentación en OFF.
Nota
Indicador LED
Antes de guardar la lámpara/flash para vídeo, cerciórese
de que se haya enfriado.
En modo Flash
El indicador parpadea l El indicador se ilumina
(Cargando)
(Carga completa)
E Instalación de la batería
En el modo Light (Lámpara)
El indicador parpadea
(la batería está a punto de agotarse)
Utilice una batería NP-FF50/FF70.
1 Ajuste el interruptor de alimentación de la lámpara/
flash para vídeo en OFF.
2 Para instalar la batería, haga coincidir su terminal con
el de la lámpara/flash para vídeo y presione hasta
que oiga un clic.
En los casos siguientes, el indicador parpadea deprisa:
• La batería está descargada.
c Cárguela completamente.
• La potencia de la nueva lámpara halógena es incorrecta.
c Compruébela.
• La batería es defectuosa.
c Instale otra.