1
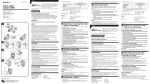
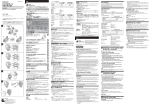
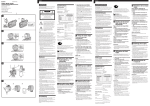
2-549-526-03 (1)
DCR-HC90
Video Flash Light
Lampe flash vidéo
HVL-HFL1
35
30
NP-FA70
70
60
•
•
1,500
10
•
31.5 × 62.5 × 47 mm
52 g
m
1
2
/
Precautions
Be careful not to touch the lighting section, because the plastic window
and surrounding surfaces are hot while the light is on and just after it is
turned off.
1
• Never look directly at the lamp while the video light or flash is on.
• Avoid placing the video flash light near combustible or volatile solvents
such as alcohol or benzine.
• Do not let any solid object or liquid fall onto or into the video flash light.
• Do not knock or jolt the video flash light while it is turned on as it may
damage or shorten the life of the lamp.
• Do not leave the video light on while it is resting on or against something;
it may cause a fire or damage the video flash light.
• While using the video flash light, the battery supplies power to both the
camcorder and the video flash light. This shortens the operating time of
the battery to less than half of the normal time.
• Do not pick up the camcorder by the head of the video flash light.
• Remove the video flash light before putting the camcorder into a carrying
case.
• Do not place anything over the ventilation grill.
• When the cover is hot do not allow it to get wet.
• The battery level may not be displayed correctly when using an
“InfoLITHIUM” battery and “InfoLITHIUM” compatible camcorder with
the video flash light.
• The flash does not operate when recording moving pictures.
/
1
1
8
A
•
•
•
OFF
1
2
3
A 1
HVL-HFL1
1
2
3
4
Clean the video flash light with a dry soft cloth. You can remove stubborn
stains with a cloth lightly dampened with a mild detergent solution, then
dry the unit with a soft cloth.
Never use strong solvents, such as thinner, benzine or alcohol, since these
will damage the finish on the surface.
2
1
2
0570-00-0066
PHS
0466-38-0253
9
5
HVL-HFL1
OFF
3
Specifications
8
9
B
2
DCR-HC90
1
108-0075
1-7-1
ON
2
B
READY
READY
LIGHT
AUTO
READY
1
Before operating the unit, please read this manual thoroughly, and retain it
for future reference.
WARNING
4
To prevent fire or shock hazard, do not expose the unit to rain or moisture.
C
For the Customers in the U.S.A.
THIS DEVICE COMPLIES WITH PART 15 OF THE FCC RULES.
OPERATION IS SUBJECT TO THE FOLLOWING TWO CONDITIONS:
(1) THIS DEVICE MAY NOT CAUSE HARMFUL INTERFERENCE, AND
(2) THIS DEVICE MUST ACCEPT ANY INTERFERENCE RECEIVED,
INCLUDING INTERFERENCE THAT MAY CAUSE UNDESIRED
OPERATION.
READY
LIGHT
AUTO
OFF
•
•
•
Video light segment
Lamp
6 V DC/3 W
Maximum luminous intensity Approx. 100 cd
Lighting direction
Horizontal
Lighting angle
Approx. 15 degrees
Continuous lighting time (when not using the flash)
Lighting duration
READY
OFF
7.2 V DC
Approx. 3.5 W
Type of battery pack
This mark indicates the Active Interface Shoe
System for use with Sony video products.
Video components and accessories equipped
with this system are designed to make
effective recording simple.
OFF
Power requirements
Power consumption
English
READY
3
A
NP-FA50
35 (30)
NP-FA70
70 (60)
(Approx. minutes using fully-charged battery pack)
* When used with the LCD panel closed. Duration with the LCD panel
open is shown in parentheses.
Illumination range
Approx. 1 m (3 1/4 ft) : 100 lux,
Approx. 2 m (6 1/2 ft) : 25 lux,
Approx. 3 m (9 3/4 ft) : 11 lux
Color temperature
Approx. 3,000 K
Average life of lamp Approx. 100 hours
Video flash segment
Flash life
Approx. 1,500 times
Guide no.
equivalent to approx. 10
Others
Dimensions
Mass
Included items
1 5m
A
Used with camcorder (DCR-HC90)*
Approx. 31.5 × 62.5 × 47 mm
(1 1/4 × 2 1/2 × 1 7/8 inches) (w/h/d)
Approx. 52 g (1.9 oz)
Video flash light (1)
Pouch (1)
Set of printed documentation
Design and specifications are subject to change without notice.
•
READY
A Attaching or removing the video
flash light to a camcorder
•
OFF
LIGHT
AUTO
/
OFF
Set the power switch of the video flash light to OFF before attaching or
removing it from the camcorder.
C
1
2
To attach the video flash light
AUTO
AUTO
D
5
LIGHT
1 2
•
•
ON OFF
AUTO
1
2
LIGHT
OFF
NOTE:
This equipment has been tested and found to comply with the limits for a
Class B digital device, pursuant to Part 15 of the FCC Rules. These limits are
designed to provide reasonable protection against harmful interference in a
residential installation. This equipment generates, uses, and can radiate
radio frequency energy and, if not installed and used in accordance with
the instructions, may cause harmful interference to radio communications.
However, there is no guarantee that interference will not occur in a
particular installation. If this equipment does cause harmful interference to
radio or television reception, which can be determined by turning the
equipment off and on, the user is encouraged to try to correct the
interference by one or more of the following measures:
— Reorient or relocate the receiving antenna.
— Increase the separation between the equipment and receiver.
— Connect the equipment into an outlet on a circuit different from that to
which the receiver is connected.
— Consult the dealer or an experienced radio/TV technician for help.
OFF
E
•
•
2
•
•
•
•
1
D
•
•
•
•
•
2
3
E
XB-3L
XB-3L A-1099-823DC 7.2 V
3.5 W
1
2
1
2
DC 6 V/3 W
100cd
15
3
•
•
This symbol is intended to alert the user to the presence of
important operating and maintenance (servicing) instructions in
the literature accompanying the appliance.
CAUTION
You are cautioned that any changes or modifications not expressly
approved in this manual could void your authority to operate this
equipment.
•
1
This symbol is intended to alert the user to the presence of
uninsulated “dangerous voltage” within the product’s enclosure
that may be of sufficient magnitude to constitute a risk of electric
shock to persons.
OFF
•
4 Press the camcorder PHOTO button deeper.
The PHOTO button controls video flash operation when the camcorder
POWER switch is set to CAMERA-MEMORY.
When you press the PHOTO button, the bar scroll indicator disappears
and recording stops. During recording, captured images appear in the
viewfinder or on the LCD.
When you release the PHOTO button, the video flash light automatically
starts to recharge after the image is recorded.
After use
Set the power switch to OFF.
Notes
• You cannot use this unit with the built-in flash of the camcorder.
• The appropriate distance between a subject and the video flash light is
approx. 1 m to 5 m (3 1/4 ft to 16 1/4 ft) in a dark room.
• During recording, keep your fingers away from the sensor A of this unit.
Otherwise, the brightness of the flash cannot be adjusted properly.
• The video flash light uses the same battery as your camcorder. If the
battery level is low, the flash light takes more time to recharge.
• The video flash light will be recharged even if it is completely charged
after:
- you set the power switch to OFF.
- you set the camcorder to PLAY/EDIT.
C Using the video light
On cleaning
180
3
Recording is not carried out at this point.
To change the still picture, release the camcorder PHOTO button. The
video flash light starts charging again after you release the camcorder
PHOTO button. Wait until the battery charge complete lamp READY
appears before lightly pressing the PHOTO button again.
Because the camcorder automatically adjusts the brightness when you
press the PHOTO button, the image may get darker or the colors may
seem to change.
3
4
5
1
4
•
•
•
1m
100
2m
25
3m
11
3,000K
100
©2005 Sony Corporation Printed in Japan
• The video flash can only be used on a camcorder with the PHOTO
recording function.
As the brightness of the flash is automatically adjusted according to the
distance of the subjects, your picture does not become whitish with too
much brightness.
DCR-HC90
NP-FA50
/Operating Instructions/Mode d’emploi/
Manul de instrucciones/
•
•
For the Customers in CANADA
THIS CLASS B DIGITAL APPARATUS COMPLIES WITH CANADIAN
ICES-003.
1 Make sure that you completely turn the lock knob
counterclockwise1.
2 Align the arrow on the rear of the video flash light2 with the
arrow on the camcorder3.
3 Attach the shoe connector (terminal) of the video flash light to
the concave part of the camcorder4, and then slide the video
flash light in the direction of the arrow3.
4 Turn the lock knob clockwise until it clicks into place.
5 Turn the video flash light to the same direction as the
camcorder lens.
The video flash light can be rotated more than 180 degrees.
To remove the video flash light
1 Loosen the lock knob by turning it counterclockwise in the
opposite direction of the arrow.
2 Push down and pull out the video flash light in the opposite
direction of the arrow to remove it.
To turn on the video light automatically in a
dark place
1 Set the power switch to AUTO.
2 Set the camcorder to standby mode.
The video light turns on automatically when using the camcorder in a
dark place.
In AUTO mode, the video light is turned off automatically after about 5
minutes even during recording.
To turn off the video light when the light is on, switch the camcorder to
OFF (CHG), or set the video light to OFF.
To turn on the video light for the entire recording time, switch the video
light to LIGHT.
To control the video light with the camcorder
in standby mode
1 Set the power switch to LIGHT.
2 Set the camcorder to standby mode.
The video light is turned on in sync with the camcorder.
To turn off the video light, switch the camcorder to OFF (CHG), or
switch the video light to OFF.
After use
Set the power switch to OFF.
Notes
• The battery discharges while the camcorder is in standby mode. Be sure
to switch from standby to OFF (CHG).
• Store in pouch when not in use.
• Make sure the video light has cooled down before storing it.
D Lighting up a subject
• When recording indoors with this unit, you can get clear and beautiful
color pictures.
• For wide angle shots, the video light may not light the corners of pictures
completely. Use the video light for shooting the main subject of the
picture effectively.
• Fluorescent lights tend to produce flickering in the recording. Use of the
video light may help to produce better pictures with less color blur.
E Replacing the lamp
Use the Sony XB-3L xenon lamp. Consult your Sony dealer or local
authorized Sony service facility for replacement of xenon lamp XB-3L.
Order the following parts number when purchasing the xenon lamp :
A-1099-823-s.
The lamp is hot when it has just burned out. Wait until the lamp cools
down before removing it.
1 Remove the front cover by inserting something like a coin after
making sure that the unit is cool enough to handle.
2 Replace the lamp.
1 Cover the old lamp with the tube supplied with the new
lamp for replacement and pull the tube out to replace the old
lamp.
2 Insert the new lamp into the socket straightly.
*Do not tilt the lamp.
3 Insert the pawls on the front cover and attach it.
Notes
• The lamp is hot when it has just burned out. Make sure that the lamp is
cool enough to handle.
• To prevent the lamp from being smudged with fingerprints, handle it
with a dry cloth. If the lamp is smudged, wipe it completely clean.
• The interior of this unit contains high voltage, opening it can cause
electrical shock.
• To inspect the unit’s interior, consult your nearest Sony dealer or Sony
Service facility.
Français
Note
If you cannot insert the video flash light, turn the lock knob
counterclockwise until it reaches the end to cancel the lock.
B Using the video flash
Use the video flash only with a camcorder which has the PHOTO recording
function. The DCR-HC90 is the model used for explaining the instructions.
For details, refer to the operating instructions of your camcorder.
1 Set the camcorder POWER switch to CAMERA-TAPE or CAMERAMEMORY.
Set the camcorder to any flash setting except “no flash.”
When auto flash is set, the flash automatically operates if there is
insufficient surrounding light. When “forced flash” is set, the flash
always operates regardless of the surrounding brightness.
Features
2 Set the power switch to
• When attached to a camcorder this unit functions as a video light and
flash.
• This video flash light is compatible with camcorders that have an active
interface shoe attached. The video flash light can therefore receive power
via the camcorder.
• Video light ON/OFF is controlled with the camcorder in standby mode.
When setting to AUTO, the video light comes on automatically in dark
places.
3 Keep pressing the camcorder PHOTO button lightly to confirm
the image. Keep the camcorder PHOTO button pressed down
lightly.
READY.
The charge complete lamp READY blinks as the video flash light starts
to charge. When charging is complete, the charge complete lamp
READY stops blinking but remains on.
The PHOTO button controls video flash operation when the camcorder
POWER switch is set to CAMERA-TAPE.
A still picture appears in the viewfinder and the memory indicator
comes on.
Ce label indique le système de griffe Active
interface shoe conçu pour les produits vidéo
Sony. Les composants et accessoires munis de
ce label permettent une prise de vues plus
simple et efficace.
Avant d’utiliser l’appareil, veuillez lire attentivement ce manuel et
conservez-le pour toute référence ultérieure.
AVERTISSEMENT
Afin d’éviter tout risque d’incendie ou d’électrocution, ne pas exposer cet
appareil à la pluie ou à l’humidité.
Pour les clients au Canada
CET APPAREIL NUMÉRIQUE DE LA CLASSE B EST CONFORME À LA
NORME NMB-003 DU CANADA.
Caractéristiques
• Rattaché à un camescope, cet appareil sert de lampe et de flash vidéo.
• Cette lampe-flash vidéo est compatible avec les caméscopes équipés
d’une griffe Active interface shoe. La lampe-flash vidéo peut par
conséquent être alimentée par le caméscope.
(Suite á la page arrière)
1 Réglez le commutateur POWER du caméscope sur CAMERATAPE ou sur CAMERA-MEMORY.
Français
(Suite de la page avant)
• La lampe vidéo est allumée et éteinte avec le caméscope en mode de
veille.
En mode AUTO, la lampe vidéo s’allume automatiquement dans les
endroits sombres.
• Le flash vidéo ne peut être utilisé qu’avec un camescope présentant le
mode PHOTO.
Comme la luminosité du flash est automatiquement ajustée en fonction
de la distance du sujet, la photo ne risque pas d’être surexposée sous un
éclairage lumineux.
Précautions
Veillez à ne pas toucher la section d’éclairage, car la fenêtre en plastique
et les surfaces environnantes sont chaudes quand la lampe est allumée et
juste après qu’elle a été éteinte.
• Ne jamais regarder directement l’ampoule quand la lampe ou le flash
vidéo sont allumés.
• Evitez de poser la lampe-flash vidéo près de combustibles ou de solvants
volatils, comme l’alcool ou la benzine.
• Veillez à ne pas laisser tomber de solide ni de liquide sur ou dans la
lampe-flash vidéo.
• Ne pas cogner ni secouer la lampe-flash vidéo quand elle est éclairée afin
de ne pas l’endommager ou de ne pas réduire la durée de vie de
l’ampoule.
• Ne pas laisser la lampe-flash vidéo allumée quand elle est posée sur ou
contre quelque chose. Il y a risque d’incendie ou la lampe pourrait être
endommagée.
• Quand vous utilisez la lampe-flash vidéo, la batterie alimente le
camescope et la lampe-flash vidéo. L’autonomie de la batterie est alors
réduite de plus de moitié par rapport à l’autonomie normale.
• Ne pas saisir le camescope par la lampe-flash vidéo.
• Enlevez la lampe-flash vidéo avant de ranger le camescope dans sa
sacoche de transport.
• Ne rien poser sur la grille de ventilation.
• Quand le capot de la lampe est trop chaud, ne pas le mouiller.
• L’autonomie de la batterie peut ne pas être très exacte lorsqu’une batterie
« InfoLITHIUM » et un camescope compatible « InfoLITHIUM » sont
utilisés avec la lampe-flash vidéo.
• Le flash ne fonctionne pas pendant l’enregistrement de séquences vidéo.
Nettoyage
Nettoyez la lampe vidéo avec un chiffon sec et doux. Vous pouvez enlever
les tâches rebelles avec un chiffon légèrement imprégné de détergent
neutre, puis essuyez la lampe avec un chiffon doux.
N’utilisez jamais de solvant concentré, tel qu’un diluant ou de la benzine,
qui risquerait d’abîmer la finition de la surface.
Alimentation
Consommation
2 Réglez le commutateur d’alimentation sur
Temps d’éclairage
Utilisée avec un camescope
(DCR-HC90)*
NP-FA50
35 (30)
NP-FA70
70 (60)
3 Tenez la touche PHOTO du camescope légèrement enfoncée
jusqu’à ce qu’une image apparaisse.
La touche PHOTO commande le fonctionnement du flash vidéo lorsque
le commutateur POWER du caméscope est réglé sur CAMERA-TAPE.
Une image fixe apparaît dans le viseur et l’indicateur d’enregistrement
en mémoire s’allume lorsque vous appuyez sur cette touche.
L’enregistrement n’est pas encore exécuté à ce moment.
Pour changer d’image, relâchez la touche PHOTO du camescope. Le
flash vidéo se recharge aussitôt. Attendez que le témoin de charge
READY apparaisse avant d’appuyer une nouvelle fois légèrement sur la
touche PHOTO.
La luminosité s’ajuste lorsque vous appuyez sur la touche PHOTO, et
l’image peut paraître plus sombre ou les couleurs différentes à ce
moment.
4 Appuyez plus fort sur la touche PHOTO du camescope.
La touche PHOTO commande le fonctionnement du flash vidéo lorsque
le commutateur POWER du caméscope est réglé sur CAMERAMEMORY.
Lorsque vous appuyez sur la touche PHOTO, l’indicateur à barres
disparaît et l’enregistrement s’arrête. Pendant l’enregistrement, les
images saisies apparaissent dans le viseur ou sur l’écran LCD.
Lorsque vous relâchez la touche PHOTO, la lampe-flash vidéo se
recharge dès que l’image est enregistrée.
Après utilisation
Réglez l’interrupteur d’alimentation sur OFF.
Remarques
• Vous ne pouvez pas utiliser cet appareil avec le flash intégré du
caméscope.
• La distance appropriée entre un sujet et la lampe-flash vidéo est d’environ
1 à 5 m (3 1/4 à 16 1/4 ft) dans une pièce sombre.
• Pendant la prise de vues, ne pas mettre les doigts sur le capteur A de la
lampe-flash vidéo, sinon la luminosité du flash ne pourra pas être ajustée
correctement.
• Pendant l’enregistrement, La lampe-flash vidéo et le camescope
fonctionnent sur la même batterie. Si le niveau de la batterie est trop
faible, la lampe mettra plus de temps à se charger.
• La lampe-flash vidéo devra être à nouveau rechargé même après une
recharge si:
- vous avez réglé l’interrupteur d’alimentation du flash sur OFF.
- que vous réglez le caméscope sur PLAY/EDIT.
1 Réglez l’interrupteur d’alimentation sur AUTO.
2 Mettez le camescope en mode d’attente.
La lampe vidéo s’allume automatiquement quand vous utilisez le
camescope dans un lieu sombre.
En mode AUTO, la lampe vidéo s’éteint automatiquement après 5
minutes environ, même en cours d’enregistrement.
Pour éteindre la lampe vidéo lorsque la lampe est allumée, réglez le
caméscope sur OFF (CHG) ou réglez la lampe vidéo sur OFF.
Pour allumer la lampe vidéo pendant toute la durée d’enregistrement,
réglez la lampe vidéo sur LIGHT.
Pour allumer et éteindre la lampe quand le
camescope est en attente
(Env. en minutes avec une batterie rechargeable pleine)
* Avec le panneau LCD fermé. Le temps avec l’écran LCD ouvert est
indiqué entre parenthèses.
Plage d’illumination
Env. 1 m (3 1/4 ft) : 100 lux
Env. 2 m (6 1/2 ft) : 25 lux
Env. 3 m (9 3/4 ft) : 11 lux
Température de couleur
Env. 3 000 K
Durée de vie moyenne de l’ampoule Env. 100 hours
1 Réglez l’interrupteur d’alimentation sur LIGHT.
2 Mettez le camescope en mode d’attente.
Section Flash vidéo
Durée de vie du flash Env. 1 500 éclairs
Nomble guide
Equivalent à env. 10
Remarques
Divers
Dimensions
Poids
Articles inclus
Env. 31,5 × 62,5 × 47 mm
(1 1/4 × 2 1/2 × 1 7/8 po.) (l/h/d)
Env. 52 g (1,9 on.)
Lampe-flash vidéo (1)
Pochette (1)
Jeu de documents imprimés
La conception et les spécifications peuvent être modifiées sans avis
préalable.
A Fixation ou retrait de la lampeflash vidéo sur un camescope
Réglez le commutateur d’alimentation de la lampe-flash vidéo sur OFF
avant de la fixer ou de la retirer du caméscope.
Pour rattacher la lampe-flash vidéo
1 Veillez à tourner complètement le bouton de verrouillage dans
le sens anti-horaire1.
2 Alignez la flèche à l’arrière de la lampe-flash vidéo2 sur la
flèche située sur le caméscope3.
3 Fixez le connecteur (la borne) de griffe de la lampe vidéo sur la
partie concave du caméscope4, puis faites coulisser la lampe
vidéo dans le sens de la flèche3.
4 Tournez le bouton de verrouillage dans le sens horaire, jusqu’à
ce que vous entendiez un déclic.
5 Orientez la lampe-flash vidéo dans la même direction que
l’objectif du caméscope.
Vous pouvez faire pivoter la lampe vidéo à plus de 180 degrés.
Pour retirer la lampe-flash vidéo
1 Desserrez le bouton de verrouillage en le tournant dans le sens
anti-horaire, dans le sens contraire de la flèche.
2 Tirez la lampe-flash vidéo dans le sens contraire de la flèche en
appuyant dessus pour la retirer.
Remarque
Si vous ne pouvez pas insérer la lampe-flash vidéo, tournez le bouton de
verrouillage dans le sens anti-horaire jusqu’au bout pour déverrouiller.
B Utilisation du flash vidéo
Utilisez le flash vidéo uniquement avec un caméscope doté de la fonction
d’enregistrement PHOTO. Le modèle DCR-HC90 a été utilisé pour illustrer
les instructions.
Pour plus de détails, reportez-vous au mode d’emploi de votre caméscope.
Esta marca indica el sistema de zapata de
interfaz activa para utilizarse con productos
de vídeo Sony. Los componentes y los
accesorios de vídeo provistos de este sistema
han sido diseñados para facilitar la
videofilmación efectiva.
READY.
Le témoin de charge READY clignote pendant la recharge. Lorsqu’elle
est terminée, le témoin READY cesse de clignoter et reste allumé.
Pour utiliser l’éclairage et l’extinction
automatiques de la lampe
7,2 V CC
Env. 3,5 W
Section Lampe vidéo
Lampe
6 V CC/3 W
Intensité lumineuse maximale Env. 100 cd
Direction d’éclairage
Horizontale
Angle d’éclairage
Env. 15 degrés
Temps d’éclairage continu (si vous n’utilisez pas le flash)
Type de batterie
rechargeable
Réglez le caméscope sur tout réglage flash autre que « no flash ».
Lorsque le flash automatique est activé, le flash se déclenche
automatiquement en cas de lumière ambiante insuffisante. Lorsque le
« flash forcé » est activé, le flash se déclenche toujours, quelle que soit la
luminosité ambiante.
C Utilisation de la lampe vidéo
Spécifications
Para montar de la lámpara/flash para vídeo
Español
La lampe vidéo s’allume en même temps que le camescope.
Pour éteindre la lampe vidéo, réglez le camescope sur OFF (CHG), ou
réglez la lampe vidéo sur OFF.
Nombre del producto: Làmpera/flash para vídeo
Modelo: HVL-HFL1
Para desmontar la lámpara/flash para vídeo
Antes de utilizar la unidad, lea detenidamente este manual, y consérvelo
para futuras referencias.
Para evitar incendios o descargas eléctricas, no exponga la unidad a la
lluvia ni a la humedad.
Características
• Fijada a una videocámara, esta unidad funcionará como lámpara para
vídeo y como flash.
• Esta lámpara/flash para vídeo es compatible con videocámaras que
tengan fijada una zapata de interfaz activa. De esta forma, la lámpara/
flash para vídeo podrá recibir alimentación de la videocámara.
• La conexión/desconexión de la alimentación de la lámpara para vídeo se
controla con la videocámara en el modo de espera.
Cuando haya ajustado a AUTO, la lámpara para vídeo se encenderá
automáticamente en lugares oscuros.
• El flash para vídeo solamente podrá utilizarse con una videocámara con
función de videofilmación PHOTO.
Como el brillo del flash se ajusta automáticamente de acuerdo con la
distancia hasta el motivo, es posible que sus imágenes no resulten
blanquecinas con demasiado brillo.
Precauciones
Tenga cuidado de no tocar la sección de iluminación, porque la
ventanilla de plástico y las superficies circundantes estarán calientes
cuando la lámpara esté encendida e inmediatamente después de haberla
apagado.
• No mire directamente hacia la bombilla cuando la lámpara/flash para
vídeo esté encendida.
• Evite colocar la lámpara/flash para vídeo cerca de combustibles o
disolventes volátiles, como alcohol o bencina.
• No permita que dentro de la lámpara/flash para vídeo entre ningún
objeto sólido ni líquido.
• No golpee ni sacuda la lámpara/flash para vídeo mientras esté
encendida, ya que podría dañarla o acortar la duración de la bombilla.
• No deje la lámpara/flash para vídeo encendida sobre ni apoyada contra
nada, porque podría provocar un incendio o dañarla.
• Mientras esté utilizando la lámpara/flash para vídeo, la batería
alimentará tanto la videocámara como la propia lámpara/flash para
vídeo. Esto acortará el tiempo de operación de la batería a menos de la
mitad del normal.
• No tome la videocámara por la cabeza de la lámpara/flash para vídeo.
• Quite la lámpara/flash para vídeo antes de colocar la videocámara en una
caja de transporte.
• No coloque nada sobre la rejilla de ventilación.
• Cuando la cubierta esté caliente, no permita que se humedezca.
• El nivel de la batería puede no visualizarse correctamente cuando utilice
una batería “InfoLITHIUM” y una videocámara compatible con
“InfoLITHIUM” con la lámpara/flash para vídeo.
• El flash no funcionará cuando grabe imágenes móviles.
Limpieza
Réglez l’interrupteur d’alimentation sur OFF.
• La batterie se décharge lorsque le camescope est en mode d’attente.
Annulez le mode d’attente en réglant le camescope sur OFF (CHG).
• Rangez la lampe dans sa pochette quand vous ne l’utilisez pas.
• Assurez-vous que la lampe vidéo est froide avant de la ranger.
Limpie la lámpara/flash para vídeo con un paño suave y seco. Usted podrá
eliminar las manchas difíciles con un paño ligeramente humedecido en una
solución muy diluida de detergente, y después secándola con un paño
suave.
No utilice nunca disolventes fuertes, como diluyente de pintura, bencina, o
alcohol, ya que éstos podrían dañar el acabado de la superficie.
D Eclairage d’un sujet
Especificaciones
• Si vous filmez en intérieur avec la lampe vidéo, vous obtiendrez des
images nettes avec de belles couleurs.
• Lors de la prise de vues en grand angle, la lampe vidéo ne pourra peutêtre pas éclairer complètement les angles de l’image. Utilisez la lampe
vidéo pour bien éclairer et filmer le sujet principal de l’image.
• Les lampes fluorescentes ont tendance à produire un vacillement de
l’image. L’utilisation de la lampe vidéo peut améliorer les images en
accentuant la netteté des couleurs.
Alimentación
Consumo
Utilisez la lampe au xénon XB-3L de Sony. Contactez votre revendeur Sony
ou un service après-vente agréé Sony pour remplacer la lampe au xénon
XB-3L. Pour l’achat d’une lampe au xénon, commandez les références de
pièce suivantes : A-1099-823-s.
L’ampoule est brûlante quand elle vient d’être éteinte. Laissez-la refroidir
avant de l’enlever.
1 Une fois que l’appareil a suffisamment refroidi, retirez le
panneau avant en insérant un objet tel qu’une pièce de
monnaie.
2 Remplacez la lampe.
1 Recouvrez l’ancienne lampe à l’aide du tube fourni avec la
lampe neuve de rechange et tirez le tube pour remplacer
l’ancienne lampe.
2 Insérez la lampe neuve bien droite dans la douille.
* Ne penchez pas la lampe.
3 Insérez les cliquets du panneau avant et fixez-le.
Remarques
• L’ampoule reste chaude un moment après avoir été éteinte. Assurez-vous
que l’ampoule est suffisamment froide avant de la sortir.
• Pour éviter de laisser des traces de doigts sur l’ampoule, tenez l’ampoule
avec un chiffon sec. Si l’ampoule est sale, essuyez-la bien.
• L’intérieur de la lampe contient un circuit haute tension. Afin d’éviter
tout risque d’électrocution, ne pas ouvrir la lampe.
• Pour tout contrôle interne, consultez votre revendeur Sony ou un centre
de réparation Sony.
cc 7,2 V
Aprox. 3,5 W
Segmento de la lámpara para vídeo
Bombilla
cc 6 V/3 W
Intensidad luminosa máxima Aprox. 100 candelas
Dirección de iluminación
Horizontal
Ángulo de iluminación
Aprox. 15 grados
Tiempo de iluminación continua (cuando no esté utilizando el flash)
Duración de iluminación
Tipo de batería
Utilizada con la videocámara
(DCR-HC90)*
NP-FA50
35 (30)
NP-FA70
70 (60)
(min aproximados utilizando una batería completamente cargada)
* Cuando se utilice con el panel LCD cerrado. La duración con la
pantalla de cristal líquido abierta se muestra entre paréntesis.
Alcance de iluminación
Aprox. 1 m : 100 lux,
Aprox. 2 m : 25 lux,
Aprox. 3 m : 11 lux
Temperatura de color
Aprox. 3 000 K
Duración media de la bombilla
Aprox. 100 h
Segmento del flash para vídeo
Duración del flash
Aprox. 1 500 veces
Número guía
Equivalente a aprox. 10
Otros
Dimensiones
Masa
Elementos incluidos
1 Afloje el mando de bloqueo girándolo hacia la izquierda en
sentido opuesto al de la flecha.
2 Empuje hacia abajo la lámpara/flash para vídeo en sentido
opuesto al de la flecha para desmontarla.
Nota
ADVERTENCIA
Après utilisation
E Remplacement de l’ampoule
1 Cerciórese de girar completamente hacia la izquierda el mando
de bloqueo1.
2 Alinee la flecha de la parte posterior de la lámpara/flash para
vídeo2 con la flecha de la videocámara3.
3 Fije el conector (terminal) de la zapata de la lámpara/flash para
vídeo a la parte cóncava de la videocámara4, y después deslice
la lámpara/flash para vídeo en el sentido de la flecha3.
4 Gire el mando de bloqueo hacia la derecha hasta que chasquee
en su lugar.
5 Gire la lámpara/flash para vídeo en el mismo sentido que el del
objetivo de la videocámara.
La lámpara/flash para vídeo podrá girarse más de 180 grados.
Aprox. 31,5 × 62,5 × 47 mm (an/al/prf)
Aprox. 52 g
Làmpera/flash para vídeo (1)
Bolsa transporte (1)
Juego de documentación impresa
El diseño y las especificaciones están sujetos a cambio sin previo aviso.
A Montaje o desmontage de la
lámpara/flash para vídeo en una
videocámara
Antes de instalar la lámpara/flash para vídeo en la videocámara o
desinstalarla de ella, ponga su interruptor de alimentación en OFF.
Si no puede insertar la lámpara/flash para vídeo, gire el mando de bloqueo
hacia la izquierda hasta que llegue al final para desbloquearla.
B Utilización del flash para vídeo
Utilice el flash para vídeo solamente con una videocámara que posea la
función de grabación PHOTO. La DCR-HC90 es el modelo utilizado para
dar las explicaciones.
Con respecto a los detalles, consulte el manual de instrucciones de su
videocámara.
1 Ponga el selector POWER de la videocámara en CAMERA-TAPE o
CAMERA-MEMORY.
Ponga la videocámara en cualquier ajuste de flash excepto “sin flash”.
Cuando ajuste el flash a automático, éste se disparará automáticamente
cuando la iluminación ambiental sea insuficiente. Cuando lo ajuste a
“flash forzado”, el flash se disparará siempre independientemente de la
iluminación ambiental.
2 Ponga el interruptor de alimentación en
• Para tomas en gran angular, es posible que la lámpara para vídeo no
ilumine completamente las esquinas de las imágenes. Utilice la lámpara
para vídeo para videofilmar efectivamente el motivo principal de la
imagen.
• Las luces fluorescentes tienden a producir parpadeo en la videofilmación.
La utilización de la lámpara para vídeo puede ayudar a conseguir mejores
imágenes con menos difuminación de los colores.
A
E Reemplazo de la bombilla
1
2
Utilice una bombilla de xenón XB-3L Sony. Para reemplazar la bombilla de
xenón XB-3L, consulte a su proveedor Sony o a un centro de reparaciones
autorizado por Sony. Utilice el número de pieza siguiente cuando adquiera
una bombilla de xenón: A-1099-823-s.
La bombilla estará caliente inmediatamente después de haberse fundido.
Espere a que la bombilla se haya enfriado antes de extraerla.
1 Quite la cubierta frontal utilizando algo como una moneda
después de asegurarse de que la unidad se haya enfriado
suficientemente como para poder manejarla.
2 Reemplace la bombilla.
1 Cubra la bombilla vieja con el tubo suministrado con la nueva
bombilla para reemplazo y tire del tubo para reemplazar la
bombilla vieja.
2 Inserte de forma recta la nueva la bombilla en el casquillo.
* No incline la bombilla.
3 Inserte las uñas de la cubierta frontal y fíjela.
3
4
3
B
Notas
• La bombilla estará caliente después de haberse fundido. Cerciórese de
que esté suficientemente fría antes de tocarla.
• Para evitar que la bombilla se manche con huellas dactilares, tómela con
un paño seco, etc. Si la bombilla se ha manchado, frótela para limpiarla
completamente.
• En el interior de esta unidad hay alta tensión, y el abrirla podría causar
descargas eléctricas.
• Para inspeccionar el interior de la unidad, consulte a su proveedor Sony o
a un centro de reparaciones Sony.
READY.
Cuando comience a cargarse la lámpara/flash para vídeo parpadeará la
lámpara de carga completa READY. Cuando finalice la carga, la lámpara
READY dejará de parpadear y permanecerá encendida.
3 Mantenga ligeramente presionada la tecla PHOTO de la
videocámara para confirmar la imagen. Mantenga ligeramente
presionada la tecla PHOTO de la videocámara.
El botón PHOTO controlará la operación del flash para vídeo cuando el
selector POWER de la videocámara esté ajustado a CAMERA-TAPE.
En el visor aparecerá una imagen fija y el indicador de memoria.
La grabación no se realizará en este punto.
Para cambiar la imagen fija, suelte la tecla PHOTO. Después de haber
soltado la tecla PHOTO, la lámpara/flash para vídeo comenzará a
cargarse de nuevo. Espere hasta que se encienda la lámpara de carga
completa READY antes de volver a presionar ligeramente la tecla
PHOTO.
Como la videocámara ajusta automáticamente el brillo al presionar la
tecla PHOTO, la imagen puede obscurecerse o es posible que parezca
que los colores han cambiado.
4 Presione a fondo la tecla PHOTO de la videocámara.
El botón PHOTO controlará la operación del flash para vídeo cuando el
selector POWER de la videocámara esté ajustado a CAMERAMEMORY.
Cuando presione la tecla PHOTO, el indicador de barras desplazables
desaparecerá y la grabación se parará. Durante la grabación, las
imágenes captadas aparecerán en el visor o en la pantalla de cristal
líquido.
Cuando suelte la tecla PHOTO, la lámpara/flash para vídeo comenzará
a recargarse automáticamente después de haberse grabado la imagen.
Después de la utilización
Ponga el interruptor de alimentación en OFF.
Notas
• Usted no podrá utilizar esta unidad con el flash incorporado de la
videocámara.
• La distancia apropiada entre el motivo y la lámpara para vídeo deberá ser
de aproximadament 1 a 5 m en una sala obscura.
• Durante la videofilmación, mantenga sus dedos alejados del sensor A de
esta unidad. De lo contrario, el brillo del flash no se ajustaría
adecuadamente.
• La lámpara/flash para vídeo utiliza la misma batería que su videocámara.
Si el nivel de la batería es bajo, la lámpara/flash para vídeo tardará más
tiempo en recargarse.
• La lámpara/flash para vídeo se cargará incluso aunque esté
completamente cargada después de:
- haber puesto el interruptor de alimentación en OFF.
- haber ajustado la videocámara a PLAY/EDIT.
•
•
•
•
•
•
•
A
•
•
•
•
•
•
•
–
–
C
•
•
•
•
•
•
•
C Utilización de la lámpara para
vídeo
Para que la lámpara para vídeo se encienda
automáticamente en un lugar obscuro
1 Ponga el selector de alimentación en AUTO.
2 Ponga la videocámara en el modo de espera.
La lámpara para vídeo se encenderá automáticamente cuando utilice la
videocámara en un lugar obscuro.
En el modo AUTO, la lámpara para vídeo se apagará automáticamente
después de unos 5 min incluso durante la grabación.
Para apagar la lámpara para vídeo cuando esté encendida, ajuste la
videocámara a OFF (CHG), o ponga el interruptor de la lámpara para
vídeo en OFF.
Para mantener encendida la lámpara para vídeo durante toda la
grabación, ponga su interruptor en LIGHT.
Para controlar la lámpara para vídeo con la
videocámara en el modo de espera
•
•
•
D
•
•
•
E
1 Ponga el selector de alimentación en LIGHT.
2 Ponga la videocámara en el modo de espera.
La lámpara para vídeo se encenderá en sincronización con la
videocámara.
Para apagar la lámpara para vídeo, ponga de la videocámara en OFF
(CHG) o el interruptor de alimentación en OFF.
s
Después de la utilización
Ponga el interruptor de alimentación en OFF.
1
Notas
• La batería se descargará con la videocámara en el modo de espera.
Cuando no vaya a utilizarla, cambie el modo de espera a OFF (CHG).
• Cuando no vaya a utilizarla, guárdela en la bolsa de transporte.
• Antes de guardar la lámpara/flash para vídeo, cerciórese de que se haya
enfriado.
D Iluminación de un motivo
• Cuando videofilme en interiores con esta unidad, podrá obtener
imágenes claras y de hermosos colores.
2
•
•
•
•