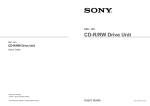
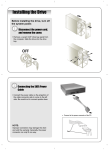
1
CD-RW Drive External USB CD-RW Drive External USB User’s Guide Mode d’emploi Bedienungsanleitung Manual de instrucciones Manuale d’istruzione ©1999 by Sony Corporation Rev. 1.1 BKC: 98 0017 17 User’s Guide Mode d’emploi Bedienungsanleitung Manual de instrucciones Manuale d’istruzione The model and serial numbers are located on the botton of the drive. Record these numbers in the spaces provided below. Refer to them whenever you call upon your sales representative regarding this product. Model No. __________________ Serial No. ___________________ Safety Regulations This unit uses CD-R discs and CD-RW discs with the following mark. English Owner’s Record This unit uses CD-ROM discs with the following mark. When you use this unit as a CD player, use compact discs with the following mark. WARNING To prevent fire or shock hazard, do not expose the unit to rain or moisture. To avoid electrical shock, do not open the cabinet. Refer servicing to qualified personnel only. Caution: As the laser beam in this CD-RW drive is harmful to the eyes, do not attempt to disassemble the cabinet. Refer servicing to qualified personnel only. The use of optical instruments with this product will increase eye hazard. The use of controls or adjustments or performance of procedures other than those specified herein may result in hazardous radiation. DANGER INVISIBLE LASER RADIATION WHEN OPEN. AVIOD DIRECT EXPOSIRE TOP BEAM VORSICHT This label is located on the drive unit’s internal chassis. UNSICHTBARE LASERSTRAHLUNG. WENN ABDECKUNG GEOFFNET NICHT DEMSTRAHL AUSSETZEN. INVISIBLE LASER RADIATION WHEN OPEN. AVOID DIRECT EXPOSURE TO BEAM. RADIATIONS INVISIBLES DU LASER EN CAS D'OUVERTURE. EVITER TOUTE EXPOSITION DIRECTE AU FAISCEAU. VORSICHT UNSICHTBARE LASERSTRAHLUNG, WENN ABDECKUNG GEÖFFNET. NICHT DEM STRAHL AUSSETZEN. ADVARSEL USYNLIG LASERSTRÅLING VED ÅBNING. UNDGÅ UDS/ETTELSE FOR STRÅLING. You are cautioned that any changes or modifications not expressly approved in this manual could void your authority to operate this equipment. Note: This equipment has been tested and found to comply with the limits for a Class B digital device, pursuant to Part 15 of the FCC Rules. These limits are designed to provide reasonable protection against harmful interference in a residential installation. This equipment generates, uses, and can radiate radio frequency energy and, if not installed and used in accordance with the instructions, may cause harmful interference to radio communications. However, there is no guarantee that interference will not occur in a particular installation. If this equipment does cause harmful interference to radio or television reception, which can be determined by turning the equipment off and on, the user is encouraged to try to correct the interference by one or more of the following measures: ● Reorient or relocate the receiving antenna. ● Increase the separation between the equipment and receiver. ● Connect the equipment into an outlet on a circuit different from that to which the receiver is connected. ● Consult the dealer or an experienced radio/TV technician for help. DANGER DANGER CLASS 1 LASER PRODUCT LASER KLASSE 1 PRODUKT This CD-RW drive unit is classified as a CLASS 1 LASER PRODUCT. The CLASS 1 LASER PRODUCT label is located at the bottom of the enclosure. ADVARSEL USYNLIG LASERSTRÅLING NÅR DEKSEL ÅPNES. UNNGÅ EKSPONERING FOR STRÅLEN. VARNING OSYNLIG LASERSTRÅLING NÅR DENNA DEL AR ÖPPNAD. STRÅLEN ÄR FARLIG. VAROI NÄKYMÄTÖN AVATTAESSA OLET ALTTINA LASERSÄTEILYLLE. ÄLÄ KATSO SÄTEESEN. This label is located on the bottom of the drive unit enclosure. 2 Trademarks ● MS-DOS/Windows/Windows 95/98/NT are registered trademarks of Microsoft Corporation. ● Pentium is a trademark of Intel Corporation. ● IBM PC, PC/XT and PC/AT are registered trademarks of International Business Machines Corporation. ● Apple, iMac, MacOS and Macintosh are registered trademarks of Apple Computer, Inc. ● PHOTO CD is a registered trademark of Eastman Kodak Company. 3 Contents Introduction Introduction 5 Features..........................................................................................................5 System requirements......................................................................................5 Location of controls 6 Front panel......................................................................................................6 Rear panel ......................................................................................................6 Precautions 7 Features The external CD-RW has the following features: General ● Transportable external drive with Universal Serial Bus (USB) interface ● Hot Plug-n-Play compatible ● Integrated buffer memory ● Power tray loading and ejection of disc (manual eject too) ● Housed in an airtight frame casing Formats and modes supported CD-ROM (Mode 1), CD-ROM XA (Mode 2 form 1 & 2 data) ● PHOTO-CD (reads only) & Video-CD, CD-I (Mode 2, form 1 and 2) ● CD-Digital Audio, CD-EXTRA and CD-I Ready (reads only) ● CD-TEXT, CD-Recordable (CD-R), & CD-ReWritable (CD-RW) ● Hardware Installation 8 Step 1: USB (Universal Serial Bus) cable and connectors ............................8 Step 2: Attaching USB drive to PC .................................................................9 Step 3: Attaching USB drive to Mac .............................................................16 Audio Audio output and headphone jack for audio CD playback ● Software Installation Operating the drive 18 18 Starting the drive...........................................................................................18 Opening the drawer manually in an emergency...........................................19 Troubleshooting 20 A few words about the USB interface...........................................................20 Troubleshooting table ...................................................................................20 Service contact in Europe.............................................................................21 Specifications 21 Note: This manual provides step-by-step instructions for drive installation. Please read carefully and thoroughly before attempting installation and save it for future reference. System requirements Windows PC ● IBM-compatible PC, Pentium 233 MHz or higher ● Windows 98 ● 32MB of RAM or more ● Available USB port ● 3.5” floppy disk drive & a mouse (Microsoft compatible) ● Installation requires 125MB of free hard disk drive space MacOS Apple iMac or USB equipped G3 ● Available USB port ● 32 MB of RAM or more ● MacOS 8.5 (USB manager 1.1) or higher ● IMPORTANT NOTE: For best results, Sony CD-R and CD-RW media should be used. Problem free operation cannot be guaranteed with other media. 4 Contents Introduction 5 Location of controls Precautions Front panel ■ Installation The front panel controls are described below. ● Avoid placing the drive in a location subject to: – high humidity – high temperature – excessive dust – mechanical vibration – direct sunlight ● Do not move drive during operation, it may cause an error. Avoid sudden temperature changes, condensation may form inside the drive. Should ambient temperature suddenly change, wait at least 1 hour before turning off power. Operation directly after a temperature change may cause a malfunction. Do not place beverages near drive, extending the tray may spill them. ■ Operation ● Insert/Eject Button Power On/Off Indicator ● ■ Transportation ● ● Headphone Jack Volume Control Busy Indicator CD Tray Emergency Eject Hole Close the disc drawer before moving the drive. Keep the original packing materials for future drive transport. Insert/Eject Button Rear panel The rear panel controls and connectors are described below. RCA Style Audio Outputs (cinch) 6 Location of controls Interface Connector Power On/Off Button AC Power Inlet Precautions 7 Hardware installation Step 1: USB (Universal Serial Bus) cable and connectors Step 2: Attaching USB drive to PC Unpack the included materials and locate the USB port on the drive. Connects to drive’s interface connector Connects to open USB port of PC or Macintosh The USB is easy to use and requires no adjustment of computer settings. USB ports and cables are identified by the USB symbol. Attach the USB and power cable to the drive, then plug in the power cable to an electrical outlet and switch on the external unit. Next, locate the USB connector on the PC. One advantage of the USB connector is that it may only be inserted one way. Atop the connector is a USB symbol. To attach the port connector of the USB cable: ● Keep USB symbol up and insert it into the USB port. Interlocking tongue elements hold the USB cable and port together. To remove the USB port connector: ● Grasp the port connector and pull to remove. 8 Hardware installation Hardware installation 9 Insert the port connector of the USB cable into the PC’s USB port. Note: If no USB connector(s) available (already in use), see Troubleshooting, page 20. Note: This will only appear the first time a USB device is connected. Click the Next> button, then the following screen should appear: Then Windows will display the following message: 10 Hardware installation Hardware installation 11 Accept the default and click Next>, the following message appears: Insert the floppy USB driver diskette and click Next> or select CD-ROM drive, (see below) and click Next>. 12 Hardware installation The following message appears for the driver on floppy option (path may differ). Click Next>. The following message appears indicating that the installation almost complete. Click on Finish to complete the installation. Hardware installation 13 Now USB adapter driver will begin its installation automatically with: Then click Finish and check System Properties* (Device Manager) screen to assure proper installation. It should appear as illustrated. *System Properties is found by moving the cursor to My Computer icon, then clicking the opposite mouse button and selecting Properties. Click Next>, which will bring up the following screen: The USB drive is now ready to use! PC users skip Step 3, it is for Mac customers. 14 Hardware installation Hardware installation 15 Step 3: Attaching USB drive to Mac Thread USB cable through the opening in the cover. The following example will be for an iMac. G3 computers equipped with USB have a visible connector on the back, much like a PC. Unpack the included materials and locate the USB port symbol on the drive. 1 2 Attach power cable, then USB cable to drive’s USB interface connector. Locate the port with a USB symbol. Insert USB port connector into USB port of the iMac computer. Switch the drive on. Open cover to iMac ports. 1 2 Insert the “Mac Software” CD in the built-in CD-ROM drive and follow the installation instructions. The USB drive is now ready to use! 16 Hardware installation Hardware installation 17 Software Installation Please refer to the CD-RW formatting software manual (on software CD) for instruction on software installation. Formatting software must first be properly installed in order to write CD’s with this drive. Opening the tray manually in an emergency The tray may be manually opened if it fails to come out by means of eject button or software command. Turn off and unplug the USB drive. Insert a pointed object, like a paper clip, into the emergency eject hole and push (typical force 46 N [4.7kg]). Operating the drive Starting the drive Turn on the drive. Press the eject button and the drive’s tray extends. Note: Eject button does not function if software disabled. ❳ Place a disc in the drive tray with label side facing up. Note: When used vertically, disc locks prevent disc from falling. Gently press tray or eject button to close the tray. Drive may begin reading Lead in Data as it accepts disc. Busy indicator lights amber while reading Lead in Data. For subsequent drive operation, see software instructions. Insert a pointed object to the emergency eject hole. (Avoid pushing too hard!) Approx. 40 mm After an emergency removal, consult dealer or qualified service personnel. Note:Busy indicator stays lighted if: • the disc is not properly placed on loading tray • a malfunction occurs In either case, eject the disc and replace it in the loading tray assuring it sits properly in the tray. Should this not resolve the problem, contact the local dealer or qualified service personnel. Caution: Do not forcibly close disc tray. Excessive force may damage the mechanism, which is designed to operate at a "feather touch.” To eject media, simply press eject button and tray will extend from drive. 18 Software Installation / Operating the drive Operating the drive 19 Service contacts in Europe Troubleshooting Should further support or service be required, please contact the local technical support professionals. Problems installing or operating the CD-RW drive? Please review: For Europe (German or English) contact the hotline at: Has the prescribed installation procedure been followed? Tel.: +49 (0) 2389 - 951047 or [email protected] (Monday – Thursday, 8:00 am – 4:30 pm / Friday, 8:30 am – 2:00 pm) Please verify the power supply cable is attached to drive and that the For DK, N, SW & FIN, please call: Tel. +47 (0) 6281 8666 (Monday – Friday, 8:30 am to 4:00 pm Norwegian time) tray responds to the eject button. Within the UK, please call: Tel. 0870 900 8166 (Monday – Friday, 8:45 am to 5:00 pm) See the "Troubleshooting Table” section below. For France, please call: +33 (0) 155 870 866 (Monday – Friday, 9:00 am to 6:00 pm) or E-Mail: [email protected] A few words about the USB interface For Italy: Tel.: (+39) 02-61838500 (Monday – Friday, 8:30 am – 12:45 pm and 2:00 pm – 4:30 pm) or e-mail: [email protected] Because the USB interface allows for connection and disconnection while the computer is running, it is easy to overlook whether the unit is connected. Please assure the unit is connected before conducting other troubleshooting steps. All this information and more can be downloaded at: http://www.sony-cp.com/cd-rw Troubleshooting table Symptom Question Actions Cannot access the device through software? Are both ends of the USB connected? WINDOWS: Use the Device Manager in the Windows Control Panel to verify the drive is “seen”. Power switched on? MAC: Use the CD Software to verify the drive is “seen”. Once the connections are verified restart the computer. Power cable connected? Always verify that cable connections are seated properly by taking the connector off and reseating. Improper connections are the most common point of failure with peripheral devices. No free USB port Purchase a USB hub (powered version preferred) Specifications ■ General Data transfer rate Sustained Burst 6X max (900 kB/s) 1.2 MB/s ■ Environmental conditions Humidity Atmosphere Temperature Non-operating / Storage Temperature 10% to 90% (Max. wet bulb 29°C) Non-condensing 5° C to 45° C (41° F to 113° F) -30°C to 50°C (-22° F to 122° F) ■ Mass 2.24 kg ■ Dimensions 205 x 66 x 277 mm Design and specifications are subject to change without notice. 20 Troubleshooting / Specifications Specifications 21