1
3-074-603-12 (1)
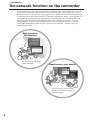
Network Function
Operating
Instructions
Registration code (for a detailed explanation of this cord, see page 28.)
© 2002 Sony Corporation
On trademarks
•ImageStation is the registered trademark of Sony Corporation.
•“Memory Stick” and
are registered trademarks of Sony Corporation.
•The BLUETOOTH trademarks are owned by their proprietor and used by Sony
Corporation under license.
•NetFront by Access Co., Ltd. is adopted for the Internet function of this product.
NetFront is a registered trademark of Access Co., Ltd in Japan.
Copyright © 1996 – 2002 ACCESS CO., LTD.
•Portions of the supplied software are based partially on the work of the Independent
JPEG Group.
All other product names mentioned herein may be the trademarks or registered
trademarks of their respective companies. Furthermore, “™” and “®” are not
mentioned in each case in this manual.
No compensation for your recordings
Any recording contents or downloaded files cannot be compensated for being lost due
to redording/playback malfunction or storage media problems.
Precautions
•Before using the network function, make sure to set the clock on the camcorder. For
details, refer to the operating instructions of the camcorder. If you use the network
function without setting the clock, you may not be able to send/receive email, or view
a web page.
•Do not remove the battery pack or disconnect the AC power adaptor while operating
in NETWORK mode. The setup for the NETWORK mode may be lost. Also, exit the
NETWORK mode when setting the POWER switch to OFF (CHG) or switching the
mode. These are to prevent the NETWORK mode setup from being lost.
•It is recommended that you make backup copies of your email messages and your
network preferences. These may be lost from time to time due to memory corruption.
To save the network preferences, write them down on paper, or use “Setup memo,”
described (p. 108). Also, this data may be lost when the camcorder is repaired by
services.
•The network function with this product is available only in the U.S.
•The reset button cannot reset the network preferences.
Note on network operation when using the battery pack
When the remaining battery time is insufficient in NETWORK mode, use the AC power
adaptor or replace the battery pack with a fully charged battery pack. Before connecting
the AC power adaptor or replacing the battery pack, be sure to exit the NETWORK
mode.
2
Table of contents
Introduction
Preparation
Using the NETWORK functions .............. 18
Overview of the Bluetooth wireless
technology ............................................ 19
Registering a Bluetooth device ......... 20
Using your Modem Adaptor with
Bluetooth Function ...................... 20
When the registration has failed ...... 24
Displaying information on your
camcorder ..................................... 24
Radio wave indication ....................... 26
Selecting other Bluetooth devices
from the list .................................. 26
Deleting a registered Bluetooth
device from the list ...................... 26
Customer registration ................................ 28
DI customer registration .................... 28
Online registration using your PC ... 28
Online registration with your
camcorder ..................................... 28
Registering your album on the Web ........ 31
Internet service provider ........................... 32
Registering with “So-net” ......................... 33
Setting network preferences ..................... 34
Entering your DI customer ID and
password ...................................... 34
Setting your provider preferences ... 36
Introduction
The network function on the camcorder ... 4
Basic operations in the NETWORK mode
.................................................................. 6
How to use the Network Menu .......... 6
How to hold your camcorder when
operating in the NETWORK
mode ................................................ 7
How to use the stylus .......................... 8
How to input characters ...................... 9
Character input display ..................... 11
The available characters list .............. 12
Character input setting ...................... 17
Using email .................................................. 58
Sending email ...................................... 58
Using the address book ..................... 69
Receiving email ................................... 75
Deleting unnecessary email .............. 80
Viewing web pages .................................... 82
Viewing web pages ............................ 82
How to use the menu bar on the
browser ......................................... 84
Storing the web page into a
“Memory Stick”
– Page Memo ................................ 90
Shutting down the browser .............. 95
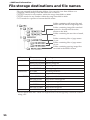
Additional Information
File storage destinations and file names
................................................................ 96
Troubleshooting .......................................... 97
Trouble accessing the Internet .......... 97
Trouble with email ............................. 98
Trouble viewing web pages .............. 99
Troubles about the album on the
Web .............................................. 100
Adjusting the LCD screen
(CALIBRATION) ....................... 100
Specifications ............................................. 101
Messages .................................................... 102
General ............................................... 102
Album on the Web ........................... 103
Email ................................................... 103
Browser .............................................. 104
Album error codes .................................... 105
Glossary ..................................................... 106
Setup memo ............................................... 108
Network Operation
Making your album on the Web .............. 45
Uploading images to your album
on the Web .................................... 45
Viewing or editing your album
on the Web .................................... 52
Deleting images from your album ... 57
Finishing viewing or editing the
album ............................................ 57
3
– Introduction –
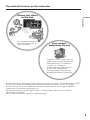
The network function on the camcorder
Congratulations on your purchase of this Sony Handycam. This Handycam can access
to the Internet through your provider using a dial-up networking connection with a
Bluetooth device. You can view web pages, receive email, and send email with images
recorded on your camcorder attached. Customer registration allows you to use the “Sonet” option for setting network preferences easily, as well as an “album on the Web”,
your own private Internet-based photo album. The “album on the Web” uses the
“ImageStation” function. The communication system is Bluetooth Ver.1.1 and its
compatible Bluetooth profiles are the “Generic Access Profile” and the “Dial-up
Networking Profiles”.
Easy access to
the Internet
You can view a web page
via the Internet.
Send/receive your emails
You can send or receive email
anytime, and attach images to
email messages.
4
The network function on the camcorder
Making your album
on the Web
Introduction
You can upload images to
your album, and view or
edit your album.
Easy network
preferences (So-net)
Using the “So-net” option, you can
easily set the required Internet and
email preferences. For details on
“So-net,” see “Using the
recommended provider (So-net)”
(p. 32), or the supplied flyer
“Getting Online with your Sony
Network Handycam® camcorder.”
Set the camcorder’s clock setting before using the Network functions. (The default setting is OFF.)
If you do not set the clock setting, you cannot send and receive emails or view web pages.
You also have to set up your camcorder and the peripheral device, and complete required
registrations (DI customer registration, etc.).
For more information, see the supplied flyer “Getting Online with your Sony Network
Handycam® camcorder”.
“DI” in “DI customer ID” stands for “Digital Imaging”.
5
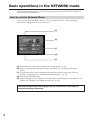
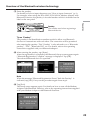
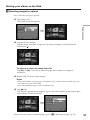
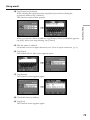
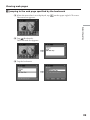
Basic operations in the NETWORK mode
This section describes basic control ways to operate your camcorder, those which are
used for network operations.
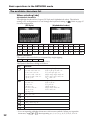
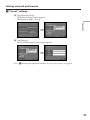
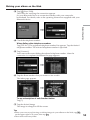
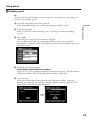
How to use the Network Menu
To access the Network Menu, refer to “Accessing the network” in the operating
instructions supplied with your camcorder.
[a]
[b]
[c]
[d]
[e]
[a]: Send and receive email. For details, see “Using email” (p. 58).
[b]: View a web page through the Internet. For details, see “Viewing web pages”
(p. 82).
[c]: You have to make various settings using this menu before using the network
function. For details, see “Setting network preferences” (p. 34).
[d]: Exit the NETWORK mode.
[e]: Upload images to your album on the Web and post the images on the Internet. For
details, see “Making your album on the Web” (p. 45).
The actual screens may differ slightly from the illustrations in this network
function operating instructions.
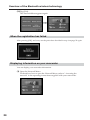
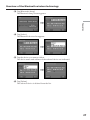
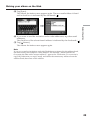
6
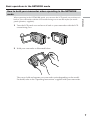
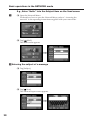
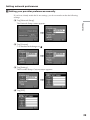
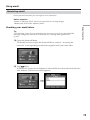
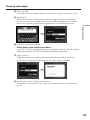
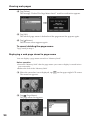
Basic operations in the NETWORK mode
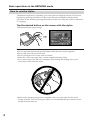
How to hold your camcorder when operating in the NETWORK
mode
1
Turn the LCD panel over and move it back to your camcorder with the LCD
screen facing over.
2
Hold your camcorder as illustrated below.
Introduction
When operating in the NETWORK mode, you can turn the LCD panel over and move it
back to your camcorder with the LCD screen facing over to use the stylus (for touch
panel operation, supplied).
The way to hold and operate your camcorder varies depending on the model.
For detail, refer to the “Operating Instructions” supplied with your camcorder.
7
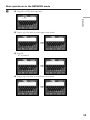
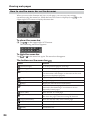
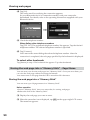
Basic operations in the NETWORK mode
How to use the stylus
The buttons required for operating your camcorder are displayed on the LCD screen.
Operate by pressing the buttons on the screen directly but lightly with the stylus
provided. In this manual, pressing the buttons in this way using the stylus is referred to
as “tapping”.
Tap the desired button on the screen with the stylus.
The selected button turns orange.
,
Notes
•Do not tap them with sharp-pointed objects other than the stylus supplied.
•Do not tap the LCD screen too hard.
•Do not touch the LCD screen with wet hands.
•When the LCD screen gets dirty, use the supplied cleaning cloth.
•You cannot drag icons, like on a computer, by touching and sliding across your
camcorder screen with the stylus.
•Refer to the operating instructions supplied with your camcorder for the stylus
storage location. To avoid losing the stylus, we recommend that you return it to the
storage location after use.
8
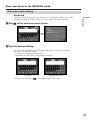
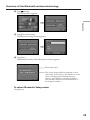
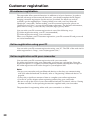
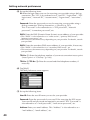
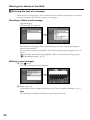
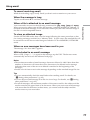
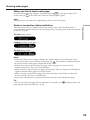
Basic operations in the NETWORK mode
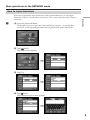
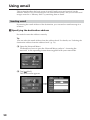
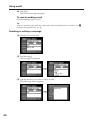
How to input characters
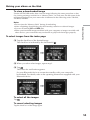
1
(1) Open the Network Menu.
For details on how to open the Network Menu, refer to “Accessing the
network” in the operating instructions supplied with your camcorder.
Introduction
You have to frequently enter characters, such as email addresses, or web pages
addresses (URL), to use the network function. This section describes how to input
characters.
(2) Tap [
Mail].
The Send screen appears.
,
(3) Tap [To].
,
(4) Tap [ New].
The character input screen appears.
,
9
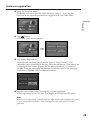
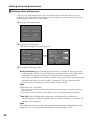
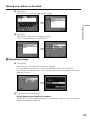
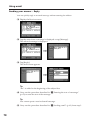
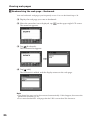
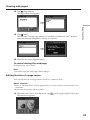
Basic operations in the NETWORK mode
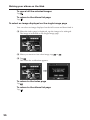
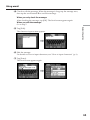
2 Selecting the character type
Tap [abcy123], then tap the desired character type.
abc: When inputting alphabetical characters.
123: When inputting numerical characters.
When you selected abc
When you selected 123
3 Inputting characters
(1) Tap the character you want to input.
(2) After you input the characters, tap [Enter].
The screen which is displayed before you display the character input screen
appears.
10
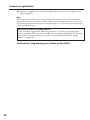
Basic operations in the NETWORK mode
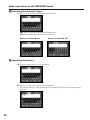
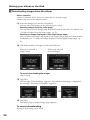
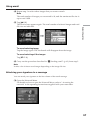
Character input display
3
2
4
5
6
9
7
8
1
[a/A] button
[a/A] button is displayed when you input alphabetical characters.
You can switch between upper case and lower case.
2
[abcy123] button
A list box appears when you tap the [abcy123] button. Tap the desired
type of letter from the list box.
3
Input byte number/maximum byte number
4
Preferences
You can change the keyboard type for alphabet input.
5
Text area
You can scroll up or down the display by tapping v or V.
6
[Space] button
A space is entered.
7
[Back space] button
The letter right before the cursor is deleted. If you tap the button for
about three seconds, all the characters before the cursor are deleted.
8
button
The cursor moves to a new line.
9
[Enter] button
Tap this button to decide or close the input screen.
Introduction
1
11
Basic operations in the NETWORK mode
The available characters list
When selecting [abc]
Alphabetical characters
The alphabet keyboard has 2 types (PC Style and Alphabetical order). The default
setting is PC arrangement. You can change the keyboard setting in
. Refer to page 17
for more information.
(PC Style)
(Alphabetical order)
a
b
c
d
e
f
g
h
i
j
k
l
n
o
p
q
r
s
t
u
v
w
x
y
z
A
B
C
D
E
F
G
H
I
J
K
L
M
N
O
P
Q
R
S
T
U
V
W
X
Y
Z
Symbol characters
The symbol characters below are inputted by single tapping:
~
–
_
@
:
The green keys input the symbol characters.
The symbol characters change as follows:
Key
Character
`´ˆ
*
a: à t á t â t a t...
e: è t é t ê t e t...
i: ì t í t î t i t...
o: ò t ó t ô t o t...
u: ù t ú t û t u t...
y: ý t y t...
A: À t Á t  t A t...
E: È t É t Ê t E t...
I: Ì t Í t Î t I t...
O: Ò t Ó t Ô t O t...
U: Ù t Ú t Û t U t...
Y: Ý t Y t...
¨˜
*
a: ä t ã t a t...
e: ë t e t...
i: ï t i t...
n: ñ t n t...
o: ö t õ t o t...
u: ü t u t...
y: ÿ t y t...
A: Ä t à t A t...
E: Ë t E t...
I: Ï t I t...
N: Ñ t N t...
O: Ö t Õ t O t...
U: Ü t U t...
’ ”
’ t ” t ’ t ...
? ¿
? t ¿ t ? t ...
! ¡
! t ¡ t ! t ...
çÇß
ç t Ç t ß t ç t...
. ,
. t , t . t ...
/
/ t \ t / t ...
\
* You can input the alphabet characters with accent symbols. When you input the
characters, tap ` ´ ˆ or ¨ ˜ after inputting a, e, i, n, o, u, y, A, E, I, N, O, U or Y.
12
m
Basic operations in the NETWORK mode
When selecting [123]
Symbol characters
(Numerical order)
Introduction
1
2
3
+
(
)
$
4
5
6
–
7
8
9
/
*
0
#
=
<
C
\
%
[
]
{
}
&
ˆ
|
˜
`
”
’
>
,
.
:
;
_
To switch between upper and lower case alphabet letters
Tap [a/A] to change the alphabetical keyboard, then enter characters.
To delete a character
Move the cursor with the stylus to the right of the character at which you want to
delete, tap [Back space]. The character at the left of the cursor is deleted.
To add a character
Move the cursor with the stylus to the position at which you want to add a character,
then input characters.
To start a new line
Tap [
].
13
Basic operations in the NETWORK mode
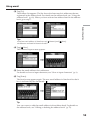
E.g., Enter “Hello” into the Subject item on the Send screen
1
(1) Open the Network Menu.
For details on how to open the Network Menu, refer to “Accessing the
network” in the operating instructions supplied with your camcorder.
(2) Tap [
Mail].
The Send screen appears.
,
2 Entering the subject of a message
(1) Tap [Subject].
(2) Tap [ New].
The character input screen appears.
,
14
Basic operations in the NETWORK mode
3
(1) Tap [abcy123], then tap [abc].
Introduction
(2) Tap [a/A] to be able to enter upper-case letters.
,
(3) Tap [H].
“H” is entered.
,
(4) Tap [a/A] to be able to enter lower-case letters.
,
15
Basic operations in the NETWORK mode
(5) Tap [e].
“e” is entered.
,
(6) Tap [l], [l] and [o].
“llo” is entered.
,
(7) Tap [Enter].
“Hello” is entered and the Send screen appears again.
,
16
Basic operations in the NETWORK mode
Character input setting
Keyboard
1 Tap
in the character input screen.
Introduction
You can change the display of the alphabet, PC arrangement keyboard or ABC
arrangement keyboard into a setup you want when you input characters.
,
2 Tap the desired setting.
You can set as the following two displays when [abcy123] is set as [abc].
(PC Style is the default setting.)
– PC Style (PC arrangement keyboard)
– Alphabetical order (ABC arrangement keyboard)
PC Style
To switch the setting, tap
Alphabetical order
on the upper-right LCD screen.
17
– Preparation –
Using the NETWORK functions
There are three Network functions, namely album on the Web, email, and browser. To
use the album on the Web and So-net, you need to complete customer registration.
“So-net” is charged service. For more information, see the supplied flyer “Getting
Online with your Sony Network Handycam® camcorder”.
To fully use the function in the NETWORK mode, you have to complete the following
registrations and setup tasks via your camcorder:
1
2
3
4
5
Bluetooth device registration (p. 20)
DI customer registration (p. 28)
Album registration (p. 31)
So-net registration* (p. 33)
Network Setup (p. 34)
* So-net registration is not necessary to use the other provider.
The above registrations can also be done on the web site using a computer. Access to
the following URL:
“http://www.myimagecam.com/”
18
Overview of the Bluetooth wireless
technology
What is the Bluetooth wireless technology?
Authentication
The authentication routine can block unspecified users’ access to this network. When
attempting communication with an unregistered Bluetooth device, the devices must
first be registered with each other by entering a common passkey to each device. When
connecting with a previously registered Bluetooth device, communication starts
without entering the passkey.
Preparation
The Bluetooth wireless technology allows communication between various Bluetooth
devices without using cables. Devices which can use this technology include PCs,
computer peripheral devices, PDAs, and mobile phones. This omnidirectional
communication system enables communication even if the Bluetooth device is in a bag
or having obstacles between the devices.
Also, the Bluetooth wireless technology has advanced security functions, such as
scrambled frequencies and data encryption.
19
Overview of the Bluetooth wireless technology
Registering a Bluetooth device
This section describes making a registration of a Bluetooth device. Here we describe the
procedure for registering the Sony Modem Adaptor with Bluetooth Function. Once the
registration is completed, your camcorder can connect to your Bluetooth device without
reregistering the device. You can register up to three Bluetooth devices. Also, refer to
the operating instructions supplied with your Bluetooth device.
For more information about Bluetooth devices compatible with your camcorder, access
the following URL: “http://www.myimagecam.com/”
Notes
•When using Sony BTA-NW1/BTA-NW1A Modem Adaptor with Bluetooth Function,
place it at a location that has no obstacles between your camcorder and the device.
The distance between the devices must be within 10 m (33 feet).
•The connection may be interrupted depending on the communication conditions.
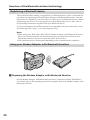
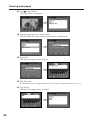
Using your Modem Adaptor with Bluetooth Function
1 Preparing the Modem Adaptor with Bluetooth Function
Set the Modem Adaptor with Bluetooth Function to connection standby (BONDING).
For details, refer to the operating instructions supplied with your Modem Adaptor with
Bluetooth Function.
20
Overview of the Bluetooth wireless technology
2 Specifying your Modem Adaptor with Bluetooth Function as the
connection device
(1) Open the Network Menu.
For details on how to open the Network Menu, refer to “Accessing the
network” in the operating instructions supplied with your camcorder.
Preparation
(2) Tap [
Setup].
The Setup screen appears.
,
(3) Tap [Bluetooth Setup].
The Bluetooth Setup screen appears.
,
21
Overview of the Bluetooth wireless technology
(4) Tap [Select].
The Bluetooth devices list appears. When making a registration for the first
time, only [ Return] and [ New] are indicated. The list shows up to three
Bluetooth devices. You can select one of the latest used three Bluetooth devices
from the list.
,
Tip
The last-used Bluetooth device is listed next to [
Return] and [
New].
(5) Tap [ New].
Your camcorder starts searching for your Bluetooth devices. When the
searching is completed, the available Bluetooth devices list appears.
When some Bluetooth devices with the same name appear, display each
Bluetooth device address by tapping [More info.].
,
,
Notes
• The search takes from about 10 to 60 seconds. The time depends on the number of
Bluetooth devices around your camcorder.
• If the Bluetooth device you want to register is not found, carry out the procedure
again from step 4.
(6) Tap the desired Bluetooth device.
The character input screen appears.
,
22
Overview of the Bluetooth wireless technology
(7) Enter the passkey.
For details on how to input characters, see “How to input characters” (p. 9).
For example, when using the BTA-NW1/BTA-NW1A Modem Adaptor with
Bluetooth Function, the passkey is its serial number which is indicated on the
label on the rear panel.
MODEL NO.
BTA-NW1
Passkey
The number used when registering a
Bluetooth device
Preparation
®
MODEM ADAPTOR WITH BLUETOOTHTM FUNCTION
Tip on “Passkey”
The passkey is an identification number needed to allow two Bluetooth
devices to communicate with each other. The connection will be permitted
after entering the passkey. This “Passkey” is also referred to as a “Bluetooth
passkey”, “PIN”, “Bluetooth PIN”, etc. For details, refer to the operating
instructions supplied with your Bluetooth adaptor.
(8) After entering the passkey, tap [Enter].
After the registration is completed, the Bluetooth Setup screen appears again.
“Bluetooth Registration Complete” message is displayed. Tap [OK].
The selected Bluetooth device is specified.
,
,
Note
When the message “Bluetooth Registration Error Check the Passkey” is
indicated, tap [OK]. Carry out the procedure again from step 4.
(9) Tap [Exit].
The Setup screen appears again. For details on how to turn off the Modem
Adaptor with Bluetooth Function, refer to the operating instructions supplied
with your Modem Adaptor with Bluetooth Function.
23
Overview of the Bluetooth wireless technology
(10) Tap [Exit].
The Network Menu appears again.
,
When the registration has failed
After pressing [OK], and carry out the procedure described in step 4 on page 22 again.
Displaying information on your camcorder
You can display your camcorder information.
(1) Open the Network Menu.
For details on how to open the Network Menu, refer to “Accessing the
network” in the operating instructions supplied with your camcorder.
24
Overview of the Bluetooth wireless technology
(2) Tap [
Setup].
The Setup screen appears.
Preparation
,
(3) Tap [Bluetooth Setup].
The Bluetooth Setup screen appears.
,
(4) Tap [Info.].
The Bluetooth Setup: Self information screen appears.
The model name
This is the unique address assigned to each
camcorder at the factory. This address is used
when exchanging information between
devices. This address cannot be modified.
(The number indicated on the illustration is
an example number.)
To return Bluetooth Setup screen
Tap [Return].
25
Overview of the Bluetooth wireless technology
Radio wave indication
indicates the radio wave status of the connected Bluetooth device. (Use this
indication as a guide.)
Selecting other Bluetooth devices from the list
Tap the Bluetooth device you want to specify in step 4 on page 22. The device
information is indicated.
Tap [Exit].
Deleting a registered Bluetooth device from the list
You can register up to three Bluetooth devices on your camcorder. When deleting a
Bluetooth device from the list, follow the procedure below.
(1) Open the Network Menu.
For details on how to open the Network Menu, refer to “Accessing the
network” in the operating instructions supplied with your camcorder.
(2) Tap [
Setup].
The Setup screen appears.
,
26
Overview of the Bluetooth wireless technology
(3) Tap [Bluetooth Setup].
The Bluetooth Setup screen appears.
Preparation
,
(4) Tap [Select].
The Bluetooth devices list appears.
,
(5) Tap the device you want to delete.
The device name and address of the selected device are indicated.
,
(6) Tap [Delete].
The selected device is deleted from the list.
27
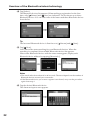
Customer registration
DI customer registration
The camcorder offers network functions in addition to its basic functions. In order to
take full advantage of these network functions, you should complete the DI (Digital
Imaging) customer registration for the services provided. For details on services
available, see the supplied flyer “Getting Online now with your Sony Network
Handycam® camcorder.” Before making your DI customer registration, please see
“Online Privacy Policy” on page 109 and agree to the terms. For the latest information,
please refer to “http://www.sel.sony.com/SEL/legal/privacy.html”.
You can make your DI customer registration in one of the following ways:
1 Online registration using your PC (recommended)
2 Online registration using your camcorder
When you complete your DI customer registration, your DI customer ID and password
are issued immediately.
Online registration using your PC
You can make your DI customer registration using your PC. The URL of the web site for
online registration is “http://www.myimagecam.com/”.
Online registration with your camcorder
You can make your DI customer registration with your camcorder.
For online registration using your camcorder, you must use a private line. Since the
registration process is assigned a toll-free telephone number, the telephone charge for
the online registration will not be charged to your telephone bill.
Notes
•Set up your camcorder and your Bluetooth device so that they are communicating
with each other beforehand. For details, refer to “Registering a Bluetooth device” on
page 20.
•It may take a significant amount of time to complete your online registration.
•Use the AC power adapter when registering online using your camcorder.
•Be sure to set up the clock of your camcorder beforehand. For details, refer to “Setting
the date and time” in the operating instructions supplied with your camcorder.
The procedure for registering online with your camcorder is as follows:
28
Customer registration
(1) Open the Network Menu.
For details on how to open the Network Menu, refer to “Accessing the
network” in the operating instructions supplied with your camcorder.
Preparation
(2) Tap [
Setup].
The Setup screen menu appears.
,
(3) Tap [Online Registration].
The screen for verifying the connection appears. Tap [Connect]. Your
camcorder starts connecting to the site. Once the connection is completed, the
online registration screen appears. Set the Bluetooth device to connection
standby using the camcorder beforehand. For details, refer to the operating
instructions supplied with your Bluetooth device.
(4) Register your information following the on-screen guidance.
When registering for the first time, tap [Registration link] from the menu.
Note
When you are registering, you will need the registration code located on the cover
of your operating instructions. After entering this code, follow the on-screen
guidance.
29
Customer registration
(5) After you complete your customer registration, continue on to register your
album (page 31).
Note
When registering online with your camcorder, the connection may be disconnected.
However, data entry can be done offline. When your camcorder needs to connect with
the site, the screen for verifying the connection appears. Tap [Connect], the connection
will be established again.
About the DI customer ID and password
After customer registration, album registration, or “So-net” registration has
been completed, a DI customer ID and password will be displayed. The ID and
password are very important, so be sure to write them down in the “Setup
memo” on page 108.
Continue to “Registering your album on the Web”.
30
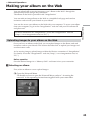
Registering your album on the Web
To upload an image recorded with your camcorder to your album on the Web, you
have to complete your album registration. Before registering, be sure to read
“ImageStation’s Privacy Policy” (p. 109) and “Member Agreement” (p. 114). If you do
not agree to the terms, you cannot complete the registration.
The Album registration is done by either of the following ways:
1 Complete the album registration during your DI customer
registration step
Preparation
1 Complete the album registration during your DI customer registration step
2 Complete the album registration after the DI customer registration is completed
(1) Continue the album registration after completing DI customer registration. Fill
in the album registration form following on-screen directions.
After the album registration is completed, continue on to the “So-net” registration
screen (page 33).
2 Complete the album registration after the DI customer registration
is completed
(1) Display the online registration screen following the procedure described in
“Completing the online registration with your camcorder” (p. 28).
(2) Tap [Login link].
(3) Enter your DI customer ID and password, and log in.
(4) Tap [Album sign-up link].
(5) Complete the album registration following the on-screen guidance.
Tip on Member name
Your member name is a nickname used on the ImageStation web site.
Once you register your member name, that member name is indicated on your album
when it is opened using a computer, and it is also used on your invitation card.
Tip
• If you do not have email address, complete registering “So-net” before registering
your album on the Web.
• To cancel your album registration, then tap menu on the upper-right LCD screen, and
tap END in the menu bar. For detail on how to display menu bar, refer to page 84.
31
Internet service provider
To access the Internet, you have to sign-up with an Internet service provider (ISP). The
provider acts as an intermediary between your camcorder and the Internet. After you
sign-up with a provider; you can view various web pages through the Internet, you can
send and receive email using your email address. The email address is a destination
address in email transmission. Also, various other services may be available depending
on your provider.
Notes
•A credit card may be required to sign-up with some providers.
•The connection fee depends on your provider.
Using the recommended provider (So-net)
“So-net” is an Internet service provider. For details on the services of “So-net”, see the
supplied flyer “Getting Online with your Sony Network Handycam® camcorder.”
The “So-net” option makes it easy to set the Internet and email preferences. Once you
complete your DI customer registration, you can get your DI customer ID and
password. Entering your DI customer ID, password, and the telephone number of an
access point, you can access the Internet right away.
Using the other provider
When using an ordinary provider or when not using the “So-net” option, you have to
set the Internet and email preferences. For details on setup, see “Setting network
preferences” (p. 34).
Note
You cannot use the network function when using a provider that requires its own
exclusive browser software.
32
Registering with “So-net”
You can complete your online registration with “So-net” using your camcorder. You
can also sign up with “So-net” in your DI customer registration step. The “So-net”
registration is done by either of the following ways:
1 Register for “So-net” in your DI customer registration step
2 Register for “So-net” after the DI customer registration is completed
(1) Fill in “So-net” registration form following on-screen directions.
(2) After completing registration, tap END in the menu bar.
Preparation
1 Register for “So-net” in your DI customer registration step
2 Register for “So-net” after the DI customer registration is
completed
(1) Display the online registration screen following the procedure described in
“Online registration with your camcorder” (p. 28).
(2) Tap [Login link].
(3) Enter your DI customer ID and password, and log in.
(4) Tap [So-net sign-up link].
(5) Input necessary items for registering “So-net” as following message on the
screen.
You can search information about access point on the registration web site. For details,
see the supplied flyer “Getting Online with your Sony Network Handycam®
camcorder.”
Tip
•Be sure to make a note of telephone numbers of access points indicated on the screen
on the “Setup Menu” (p. 108).
•To cancel registering with “So-net”, then tap the menu button menu on the upper-right
LCD screen, and tap END in the menu bar.
For detail on how to display the menu bar, refer to page 84.
33
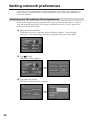
Setting network preferences
You have to access the Internet to make your album on the Web, view web pages, or
send or receive your email. This section describes how to set network preferences to
access the Internet.
Entering your DI customer ID and password
Enter the DI (Digital Imaging) customer ID and password you obtained as a result of
your DI customer registration. This setup is required to use the “So-net” option and
make your album on the Web.
(1) Open the Network Menu.
For details on how to open the Network Menu, refer to “Accessing the
network” in the operating instructions supplied with your camcorder.
(2) Tap [
Setup].
The Setup screen appears.
,
(3) Tap [Network Setup].
The Network Setup screen appears.
,
34
Setting network preferences
(4) Tap [ID].
The character input screen appears.
Preparation
,
(5) Enter your DI customer ID.
For details on how to input characters, see “How to input characters” (p. 9).
(6) Tap [Enter].
The Network Setup screen appears again.
,
(7) Tap [Password].
The character input screen appears.
,
(8) Enter your password.
For details on how to input characters, see “How to input characters” (p. 9).
Note
When you check the item “Verify Password” in the Network Options screen,
you cannot enter your password. If you try to enter it, the message “Password
Already Set Check the Password Profile” appears.
35
Setting network preferences
(9) Tap [Enter].
The Network Setup screen appears again.
,
Tip
While inputting password characters, they are visible as they are. However,
after it has been entered, each character is indicated as “∗”. If you enter your
password again, delete all “∗” before entering the password.
(10) Tap [Exit].
The setup of the DI customer ID and password are complete, and the Setup
screen appears again.
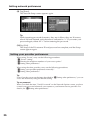
Setting your provider preferences
When using “So-net” carry out the following procedures:
“1 “So-net” setting”
“2 Entering the telephone numbers of your access points”
“4 Setting other preferences”
When using the other provider, carry out the following procedures:
“3 Setting your provider preferences manually”
“4 Setting other preferences”
Tip
Even if you do not set up the items described in “4 Setting other preferences,” you can
access the Internet by using the default setting.
Tip on password
When you check the item “Verify Password” on the Network Options screen, you have
to enter your password whenever you connect to your Internet service provider. For
details, see “4 Setting other preferences”
36
Setting network preferences
1 “So-net” settings
(1) Tap [Network Setup].
The Network Setup screen appears.
The default setting is “So-net”.
Preparation
,
(2) Tap [Setting].
The Provider Setting: So-net screen appears.
,
Go to “2 Entering the telephone numbers of your access points” on page 38.
37
Setting network preferences
2 Entering the telephone numbers of your access points
This setup is only for those using “So-net”. For more information on the telephone
numbers of access points, see the supplied flyer “Getting Online with your Sony
Network Handycam® camcorder.”
Tip on access points
“So-net” installs access points in various areas. We recommend that you select the most
convenient access point which allows you to obtain the lowest telephone charges.
(1) Tap [TEL1].
The character input screen appears.
,
(2) Enter the telephone number of your access point.
For details on how to input characters, see “How to input characters”(p. 9).
Note
Do not insert hyphens or spaces in the telephone number. (e.g. 12345678)
(3) Tap [Enter].
The Provider Setting: “So-net” screen appears again.
,
Tip
You can also register the telephone numbers of access points into [TEL2] and
[TEL3]. If necessary, enter the numbers into [TEL2] and [TEL3].
(4) Tap [Exit].
The telephone number registration is complete.
Go to 4 “Setting other preferences” (p. 42).
38
Setting network preferences
3 Setting your provider preferences manually
If you have already made the So-net settings, you do not need to make the following
settings.
Preparation
(1) Tap [Network Setup].
The Network Setup screen appears.
,
(2) Tap [Custom].
a is checked and changes to
.
,
(3) Tap [Setting].
The Provider Setup: Custom screen appears.
,
(4) Tap [PPP].
39
Setting network preferences
(5) Set up the following items:
ID: Enter the login name you use for accessing your provider using a dial-up
connection. This “ID” is also referred to as a “user ID”, “login name”, “PPP
login name”, “network ID”, “account name”, “logon name”, “user name”,
etc.
Password: Enter the password you use for accessing your provider using a
dial-up connection. (Dial-up connection t Glossary (p. 107))
This “Password” is also referred to as a “PPP password”, “network
password”, “connection password”, etc.
DNS1: Enter the DNS (Domain Name System) server address of your provider.
• This “DNS1” is also referred to as a “name server”, “primary DNS server”,
“primary name server”, etc.
• This entry may be unnecessary, depending on your provider. For details, consult
your provider.
DNS2: Enter the secondary DNS server address of your provider, if necessary.
• This “DNS2” is also referred to as a “secondary DNS server”, etc.
• This entry may be unnecessary, depending on your provider. For details, consult
your provider.
TEL No. 1: Enter the telephone number of your most convenient access point.
(Access point t “Glossary” (p. 106))
TEL No. 2/TEL No. 3: Enter the second and third telephone numbers, if
necessary.
(6) Tap [Mail].
The Mail preference screen appears.
(7) Set up the following items:
User ID: Enter the user ID name you use for your provider.
Password: Enter the password of your user ID for accessing the POP server.
Your user ID and password are required to use email. This “Password” is
also referred to as a “mail password”, “mail server password”, etc.
Address: Enter your email address. This “Address” is also referred to as a
“mail address”, “email address”, etc.
40
Setting network preferences
POP Server: Enter the POP (Post Office Protocol) server address of your
provider. The POP server is for receiving email. This “POP Server” is also
referred to as a “mail server”, “POP3 server”, etc.
APOP: Select whether you want to use APOP. (APOP t “Glossary” (p. 106))
Preparation
SMTP Server: Enter the SMTP (Simple Mail Transfer Protocol) server address
of your provider. The SMTP server is for sending email. This “SMTP Server”
is also referred to as a “mail server”, “SMTP mail server”, etc. The SMTP
server may be the same as the POP server, depending on the provider.
(8) Tap [Browser].
The Browser screen appears.
(9) Set up the following items:
Proxy: Enter the proxy server address of your provider.
Port: Enter the port number of the proxy server of your provider.
This entry may be unnecessary, depending on your provider. For details,
consult your provider.
(10) Tap [Exit].
The setup is completed, and the Network Setup screen appears again.
(11) Tap [Exit].
The Setup screen appears again.
41
Setting network preferences
4 Setting other preferences
You can access the Internet with your camcorder using the default settings. It is not
necessary to make the following settings. This example is provided to show you how to
make changes, if necessary, in the future.
(1) Display the Setup screen.
(2) Tap [Network Options].
The Network Options screen appears.
,
(3) Set up the following items:
Verify Password: Select whether password entry is required when you access
your provider. When you check this item, your password on the PPP screen
is deleted. You have to enter your DI customer ID and password for
accessing your album on the Web, or enter your password for accessing your
provider each time you try to make a connection. This can prevent other
persons from connecting to your provider using your ID.
Note
When this item is checked:
– You cannot set your DI customer ID password and your password for accessing
your provider.
– You cannot use your album on the Web if you set your preferences manually.
Time Out: Select whether the connection is automatically canceled if no
communication is made for specific time (1 minute, 2 minutes, 5 minutes, 15
minutes, or 30 minutes).
Note
The telephone line may not be disconnected automatically depending on web
pages. In this case, disconnect the telephone line manually (p. 95).
42
Setting network preferences
Mail
Send&Receive: Select whether to check the email inbox after sending email.
Restrict: Select whether to skip an email message if its file size is more than
50 KB, 200 KB, or 500 KB.
Save Mail to Server: Select whether to keep copies of the messages on the
server.
Preparation
Note
If you try to receive email without checking this item, email messages may
not be downloaded and may be lost from your server, depending on the
type of email you receive. For details, see “Note on “Save Mail to Server””
(p. 44).
Signature: Set up this item when you want to attach your signature to
email (p. 67).
Browser
Cookie: Select whether to accept a cookie. When you do not want to send
your personal information, do not check this item. This item is checked at
the default setting.
Image Display: Select whether to display images on the screen when
viewing a web page. This item is checked at the default setting.
Reset: Reset all the items on the Network Options screen except “Signature”
and “Modem Init.”
Note
A verification message does not appear when you try to reset items.
Modem Init: Set up the character string to be used for modem initialization. If
no setup is specified, you do not need to modify this item.
Note
If the setup is wrong, the message “Connection Error No Response From
PPP Server” appears when you try to access the Internet and you will not be
able to access the Internet.
(4) Tap [Exit].
The Setup screen appears again.
43
Setting network preferences
Note on “Save Mail to Server”
When “Save Mail to Server” is not checked, copies of email messages received will not
be stored on your server. However, the following error messages described below
depend on the type of email messages. See the table below.
Messages1)
Cause and/or Corrective Actions
Memory Stick Memory Full
You tried to download email when the “Memory Stick” is
already full. 2)
c Delete the email, and delete unnecessary email
messages or image files in the “Memory Stick,” then
download your email again.
c Insert another “Memory Stick” that has sufficient
memory, then download your email again.
Mail Over Size Limit
You tried to download email whose size is over the size set
in the item “Restrict”. 2)
c You can download that email using your computer, etc.
c Delete the email, and release the checkmark of the item
“Restrict”, then download that email again.
Attached Invalid File Deleted You downloaded email that has an attached file whose file
name extension is invalid. 3)
c The camcorder cannot receive files other than those in
the JPEG or MPEG format.
Mail Over Size Limit
Memory Stick Directory Error
1)
You downloaded an email message whose the number of
characters of the message is more than 4000. 3)
c The camcorder cannot receive an email message that
has 4 000 characters or more. 4)
c Insert another “Memory Stick” that has sufficient
memory, then download your email again.
These error messages are indicated in a message.
These email messages are stored on the server even if you did not check the item
“Save Mail to Server”. You can retrieve that email using your computer, etc.
3)
The previously downloaded email is not stored on the server if you did not check the
item “Save Mail to Server”. You cannot retrieve this email using your computer, etc.
4)
For email messages that have lots of line break, the number of available characters is
less than 4 000.
2)
44
— Network Operation—
Making your album on the Web
You can upload still or moving images to your “album on the Web” through the
Internet and post the images on your album.
The album on the Web is provided with “ImageStation.”
You can make an image album on the Web as a simplified web page and send an
invitation card to invite your friends to your album.
For more information on “ImageStation”, access the “ImageStation” web site
(“http://www.imagestation.com/us/PC/”).
Uploading images to your album on the Web
Network Operation
You can also access your album on the Web with your computer. To access your album
from your computer, log in to the “ImageStation” web site with your DI customer ID
and password.
Once you have an album on the Web, you can upload images to the album, and send
invitation cards to your friends. This section describes how to upload your images and
send invitation cards.
As for moving images, upload images within the file size constraints of “ImageStation.”
For details, access the “ImageStation” web site (“http://www.imagestation.com/us/
PC/”).
Before operation
Store the desired images in a “Memory Stick” and insert it into your camcorder.
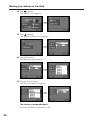
1 Selecting an album
First, select an album to use to upload images.
(1) Open the Network Menu.
For details on how to open the Network Menu, refer to “Accessing the
network” in the operating instructions supplied with your camcorder.
45
Making your album on the Web
(2) Tap [ Album].
The Album screen appears.
,
(3) Tap [ Upload].
The Album: Upload screen appears.
,
(4) Tap [Album No.].
The album list page appears.
,
(5) Tap the desired album.
Selecting the album is complete.
,
The number of prepared albums
There are 10 albums (Album 01 to 10).
46
Making your album on the Web
2 Selecting images to upload
Next, select the images to upload.
(1) Tap [Image Sel.].
The image index list appears.
Network Operation
,
(2) Tap the desired images.
Tap the image you want to upload. The selected image is indicated by the
checkmark ( ).
To page up or down the image index list
Tap [<] or [,]. The next or previous page that contains six images is
displayed.
(3) Repeat step 2 to select other images.
Notes
• The total number of images you can upload is 99, and the maximum file size you
can upload is up to total 3 MB.
• You can upload images to only one album once.
(4) Tap [ OK].
The Album: Upload screen appears again. The total number of selected images
and total file size are indicated.
,
When you only want to upload images, go to “5 Uploading images” (p. 51).
47
Making your album on the Web
3 Sending an invitation card (email)
Select the addressee to send the invitation card (email) to.
(1) Tap [Invitation].
The Album: Invitation screen appears.
,
(2) Tap [To].
The address list appears. The list shows the destination addresses that are
registered in the address book. For details on the address book, see “Using the
address book” (p. 69).
,
When you have selected the address listed in the address book, go to step 6.
Tips
• The last-used address is listed next to New.
• Addresses are listed in historical order.
(3) Tap [ New].
The character input screen appears.
,
(4) Enter the email address of the destination address.
For details on how to input characters, see “How to input characters” (p. 9).
48
Making your album on the Web
(5) Tap [Enter].
The Album: Invitation screen appears again. The new email address is listed
and its check box is indicated by the checkmark ( ).
(6) If you want to send the invitation card to other addressees, tap other email
addresses.
The check box of the selected email address is indicated by the checkmark ( ).
(7) Tap [ Return].
The Album: Invitation screen appears again.
Network Operation
,
Note
If you try to send an invitation card with 50 addresses registered in the address book,
the least recently used address will be deleted. The message “Address Book Full
Overwrite the Data with Current Address?” appears for verification. To overwrite it,
tap [OK]. Otherwise you tap [Cancel], and delete the unnecessary address from the
address book, then enter a new address.
49
Making your album on the Web
4 Entering the text of a message
Enter the text of the message. You can select the text from the message list, or edit it to
suit your purposes. The list shows up to six messages.
Selecting a lately used message
Tap [Message].
The message list appears.
,
The list shows messages that were written previously. Tap the message to
select it from the list.
If you want to edit text, tap [Edit]. The character input screen appears. Go to
step 3.
When desired text is selected, tap [OK]. After you select the message, go to
“5 Uploading images” (p. 51).
Writing a new message
(1) Tap [ New].
The character input screen appears.
,
(2) Enter your text.
For details on how to input characters, see “How to input characters” (p. 9).
Note
The maximum number of characters you can enter is 512.
50
Making your album on the Web
(3) Tap [Enter].
The Album: Invitation screen appears again.
,
Network Operation
(4) Tap [OK].
The Album: Upload screen appears again.
“Yes” is indicated next to [Invitation].
,
5 Uploading images
(1) Tap [Send].
The screen for verifying the connection appears.
Set your Bluetooth device to connection standby with your camcorder
beforehand. For details, refer to the operating instructions supplied with your
Bluetooth device.
,
(2) Check the telephone number.
When dialing other telephone numbers
Tap [TEL No.]. The registered telephone number list appears. Tap the desired
telephone number to select it.
51
Making your album on the Web
(3) Tap [Connect].
Your camcorder starts dialing the selected telephone number. After the
uploading is completed, the message “Upload Complete” appears.
,
,
(4) Tap [OK].
The Album: Upload screen appears again.
To cancel uploading
During uploading, tap [Cancel].
To send only an invitation card (email)
You can send an invitation card without uploading images. Carry out the following
procedures:
“1 Selecting an album” (p. 45)
“3 Sending an invitation card” (email) (p. 48)
“4 Entering the text of a message” (p. 50)
“5 Uploading images” (p. 51)
After the invitation card has been sent, the message “Invitation Mail Complete”
appears.
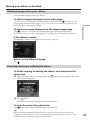
Viewing or editing your album on the Web
You can view or download images from your album on the Web.
1 Viewing images
(1) Open the Network Menu.
For details on how to open the Network Menu, refer to “Accessing the
network” in the operating instructions supplied with your camcorder.
(2) Tap [ Album].
The Album screen appears.
,
52
Making your album on the Web
(3) Tap [
View/Edit].
The screen for verifying the connection appears.
Set your Bluetooth device to connection standby with your camcorder
beforehand. For details, refer to the operating instructions supplied with your
Bluetooth device.
Network Operation
,
(4) Check the telephone number.
When dialing other telephone numbers
Tap [TEL No.]. The registered telephone number list appears. Tap the desired
telephone number. The selected telephone number is specified.
(5) Tap [Connect].
Your camcorder starts dialing the selected telephone number. After the
connection is completed, the album list page appears.
,
(6) Tap the album number that you want to view or edit.
The index page appears.
,
To see a description of each function button
Tap [?].
(7) Tap the desired image.
The image is enlarged to fill the screen.
Tips
•When you want to end viewing or editing images in your album on the Web, tap
on the upper-right LCD screen, then tap END .
•The actual screen may differ.
menu
53
Making your album on the Web
2 Downloading images from the album
Before operation
•Insert a “Memory Stick” into your camcorder, for storing images.
•Release the lock of the “Memory Stick.”
(1) Select the images you want to download.
You can select the images in the following two ways:
Selecting images from the index page:
You can select several images and download them at one time. For details, see
“To select images from the index page” (p. 55).
Selecting an image displayed on the single-image page:
You can select the image displayed on the single-image page and download it.
For details, see “To select an image displayed on the single-image page” (p.
56).
(2) Check the number of images and the total file size.
When you selected a
single image
When you selected
several images
To cancel downloading the images
Tap [Cancel].
(3) Tap [OK].
The message “Downloading” appears. After the downloading is completed,
the message “Download Complete” appears.
,
(4) Tap [OK].
The index page or single-image page appears.
To cancel downloading
During downloading, tap [Cancel].
54
,
Making your album on the Web
To view a downloaded image
Exit the NETWORK mode, then view the image following the same procedure as that
for viewing an image recorded on a “Memory Stick.” In such cases, the file name of the
still image displayed on your camcorder is indicated in the following order: 700-0001,
700-0002, 700-0003 ...
To select images from the index page
(1) Tap the check box of the desired image.
The check box is indicated by the checkmark ( ).
Network Operation
Notes
•Do not eject the “Memory Stick” during downloading.
•After completing downloading, the check mark(s) remains on selected images.
•You can download JPG and MPG files.
•When you download images modified with your computer or images recorded with
other devices, your camcorder may not be able to play back the images properly.
,
(2) When you select other images, repeat step 1.
.
(3) Tap
The screen for verification appears.
Set your Bluetooth device to connection standby with your camcorder
beforehand. For details, refer to the operating instructions supplied with your
Bluetooth device.
,
To select all the images
Tap
.
To cancel selecting images
Tap the check box of the image again.
55
Making your album on the Web
To cancel all the selected images
Tap
.
To return to the album list page
Tap
.
To select an image displayed on the single-image page
You can select an image displayed on the full-screen and download it.
(1) When the index page is displayed, tap the image to be enlarged.
The image is indicated on the single-image page.
(2) When you want to view other image, tap
.
(3) Tap
The screen for verification appears.
,
To return to the index page
Tap
.
To return to the album list page
Tap
56
.
or
.
Making your album on the Web
Deleting images from your album
You can delete images from your album.
To delete images displayed on the index page
You can select several images and delete them at one time. Tap
in step 3 in “To
select images from the index page” (p. 55). The screen for verification appears. Tap
[OK]. The index page appears again.
Tap
in step 3 in “To select an image displayed on the single-image page”
(p. 56). The screen for verification appears. Tap [OK]. The next image is displayed.
If the album is empty
The message “There is no pictures in this album.” appears.
Network Operation
To delete an image displayed on the single-image page
Return to the Album list page
Tap
.
Finishing viewing or editing the album
To finish viewing or editing the album, and disconnect the
phone line
(1) When the menu bar is not displayed, tap
The menu bar appears.
menu
on the upper-right LCD screen.
(2) Tap END (End).
The album is closed, then the line is disconnected.
To only disconnect the phone line
Tap
(Line Close). Only the phone line is disconnected.
Tip
When you only disconnect the phone line, you can continue to view the album
displayed on the screen. If you try to download an image, delete an image, or view
another album, verification appears on the screen.
57
Using email
This section describes the basic usage of email. Email is sent and received via the
Internet. Email is very convenient; you can send email anytime, and you can also send
images stored in a “Memory Stick” by attaching them to email.
Sending email
By entering the email address of the destination, you can send an email message in a
moment.
1 Specifying the destination address
Be careful to enter the address correctly.
Tip
You can select the email address from the address book. For details, see “Selecting the
destination address from the address book” (p. 74).
(1) Open the Network Menu.
For details on how to open the Network Menu, refer to “Accessing the
network” in the operating instructions supplied with your camcorder.
(2) Tap [
Mail].
The Send screen appears.
,
58
Using email
(3) Tap [To].
The address list appears. The list shows the latest used six addresses that are
registered in the address book. For details on the address book, see “Using the
address book” (p. 69). When you have selected an address listed in the address
book, go to step 7.
Network Operation
,
Tips
• The last-used address is listed next to [
• Addresses are listed in historical order.
Return] and [
New].
(4) Tap [ New].
The character input screen appears.
,
(5) Enter the email address of an addressee.
For details on how to input characters, see “How to input characters” (p. 9).
(6) Tap [Enter].
The Send screen appears again. The new email address is listed and its check
box is indicated by the checkmark ( ).
,
Tip
You can correct or edit the email address in the address book. For details on
the address book, see “Editing or deleting the address book” (p. 72).
59
Using email
(7) If you want to send the email message to other addressees, tap other email
addresses.
The check box of the tapped email address is indicated by the checkmark ( ).
(8) Tap [ Return].
The Send screen appears again.
Note
If you try to send an email message with 50 addresses registered in the address book,
the least recently used address will be deleted. The message “Address Book Full
Overwrite the Data with Current Address?” appears for verification. When you
overwrite it, tap [OK]. When you tap [Cancel], delete the unnecessary address from the
address book, then enter a new address.
60
Using email
2 Entering the subject of a message
(1) Tap [Subject].
The subject list appears. The list shows the latest used six subjects.
When you want to use a subject shown on the list, tap the subject. After
selecting the subject, go to “3 Entering the text of a message” (p. 62).
Tip
The last-used subject is listed next to [
You cannot edit or delete the subject.
Return] and [
Network Operation
,
New].
(2) Tap [ New].
The character input screen appears.
,
(3) Enter the subject.
For details on how to input characters, see “How to input characters” (p. 9).
Note
The maximum number of characters you can enter is 24.
(4) Tap [Enter].
The Send screen appears again.
,
61
Using email
3 Entering the text of a message
Enter the text of the message. You can select the text from the message list, or edit it to
suit your purposes. The list shows up to six messages.
(1) Tap [Message].
The message list appears.
,
When you select the message you wrote previously, tap the message from the
list.
When you do not edit message, tap [OK]. After you select the message, go to
“4 Sending email” (p. 63).
If you edit the selected text, tap [Edit]. The character input screen appears. Go
to step 3.
(2) Tap [ New].
The character input screen appears.
,
(3) Enter your message.
For details on how to input characters, see “How to input characters” (p. 9).
Note
The maximum number of characters you can enter is 512.
(4) Tap [Enter].
The Send screen appears again.
,
62
Using email
4 Sending email
Tip
You can send an email message with your signature. For details, see “Attaching your
signature to a message” (p. 67).
(1) Select the image that you want to attach.
When attaching images, see “Attaching images to email” (p. 66).
(3) Tap [Send].
The screen for verifying the connection appears.
Set your Bluetooth device to connection standby with your camcorder
beforehand. For details, refer to the operating instructions supplied with your
Bluetooth device.
Network Operation
(2) Check the message.
When you check or edit a message, see “Checking or editing a message”
(p. 64).
(4) Check the telephone number.
When dialing other telephone numbers
Tap [TEL No.]. The registered telephone number list appears. Tap the desired
telephone number. The selected telephone number is specified.
(5) Tap [Connect].
Your camcorder starts dialing the selected telephone number. After the
sending is completed, the message “Sending Mail Complete” appears. The
phone line is automatically disconnected.
,
63
Using email
(6) Tap [OK].
The Send screen appears again.
To cancel sending email
During sending, tap [Cancel].
Tip
You can automatically check the email inbox after sending email. For details, see “4
Setting other preferences” (p. 42).
Checking or editing a message
(1) Display the Send screen.
(2) Tap [Message].
The message list appears.
,
(3) Tap the message you want to check or edit.
The following screen appears.
,
64
Using email
(4) Check or edit the message. When the message is long, tap the message area,
then tap the scroll button V to scroll the message.
When you only check the message:
After checking the message, tap [OK]. The Send screen appears again.
When you edit the message:
Go to step 5.
Network Operation
(5) Tap [Edit].
The character input screen appears.
,
(6) Edit the message.
For details on how to input characters, see “How to input characters” (p. 9).
(7) Tap [Enter].
The Send screen appears again.
,
65
Using email
Attaching images to email
You can send images by attaching them to email messages.
Before operation
•Insert the “Memory Stick” that the desired images are stored in into your camcorder.
•Release the lock of the “Memory Stick”.
(1) Follow these procedures: “1 Specifying the destination address” (p. 58), “2
Entering the subject of a message” (p. 61), and “3 Entering the text of a
message” (p. 62).
The Send screen appears.
(2) Tap [Attach].
The images recorded in the “Memory Stick” are displayed.
,
(3) Tap the desired images.
The selected image is indicated by the checkmark ( ).
To page up or down the index list
Tap [<] or [,]. The next or previous page is displayed.
66
Using email
(4) Repeat step 3 to select other images that you want to attach.
Note
The total number of images you can attach is 99, and the maximum file size is
up to total 3 MB.
,
Network Operation
(5) Tap [ OK].
The Send screen appears again. The total number of selected images and total
file size are indicated.
To cancel selecting image
Tap the image again. The checkmark will disappear from the image.
To cancel selecting all the images
Tap [ CLR].
(6) Carry out the procedure described in “4 Sending email” (p. 63) from step 3.
Note
It takes a lot of time to send images depending on the image file size.
Attaching your signature to a message
You can attach your signature to the last column of the email message.
(1) Open the Network Menu.
For details on how to open the Network Menu, refer to “Accessing the
network” in the operating instructions supplied with your camcorder.
67
Using email
(2) Tap [
Setup].
The Setup screen appears.
,
(3) Tap [Network Options].
The Network Options screen appears.
,
(4) Tap [Signature].
The character input screen appears.
,
(5) Enter your signature.
For details on how to input characters, see “How to input characters” (p. 9).
Note
The maximum number of characters you can enter is 256.
68
Using email
(6) Tap [Enter].
The setup of your signature is completed, and the Network Options screen
appears again. “Yes” is indicated next to [Signature].
(7) Tap [Exit].
The Setup screen appears again.
Network Operation
,
(8) Tap [Exit].
The Network Menu appears again.
Using the address book
Once you register frequently used email addresses in the address book, you can send
email without entering the email address manually.
Registering destination addresses in the address book
You can register frequently used email addresses in the address book. You can register
up to 50 addresses. Be careful to enter the address correctly.
(1) Open the Network Menu.
For details on how to open the Network Menu, refer to “Accessing the
network” in the operating instructions supplied with your camcorder.
69
Using email
(2) Tap [
Mail].
If the Address screen is not displayed, tap the Address. The address screen
appears.
,
(3) Tap [New].
The Address Book: New screen appears.
,
(4) Tap [Name].
The character input screen appears.
,
(5) Enter the destination name.
For details on how to input characters, see “How to input characters” (p. 9).
Note
The maximum number of characters you can enter in the [Name] box is 24.
70
Using email
(6) Tap [Enter].
The Address Book: New screen appears again.
,
Network Operation
(7) Tap [Address].
The character input screen appears.
,
(8) Enter the email address.
For details on how to input characters, see “How to input characters” (p. 9).
(9) Tap [Enter].
The Address Book: New screen appears again.
,
(10) Tap [Return].
The Address screen appears again.
,
71
Using email
(11) Tap [Exit].
The Network Menu appears again.
Tips
•The addresses are listed in alphabetical order.
•When you reply to the address of a previously received email message, the address
will be automatically registered on the address book. To edit the address, see “Editing
or deleting the address book” below.
Editing or deleting the address book
You can edit or delete the names or email addresses in the address book.
(1) Follow steps 1 and 2 in “Registering destination addresses in the address
book” (p. 69).
The Address screen appears.
(2) Display the address you want to edit or delete by tapping
(3) Tap [Edit] to select the address.
The Address Book: Edit screen appears.
,
72
or
.
Using email
(4) Tap [Name] or [Address].
When editing the registered name, tap [Name], and when editing the
registered address, tap [Address].
The character input screen appears.
When you want to delete an address, tap [Delete]. When verification appears,
tap [OK]. When you stop deleting, tap [Cancel].
Network Operation
,
(5) Edit the name or address.
For details on how to input characters, see “How to input characters” (p. 9).
(6) Tap [Enter].
The Address Book: Edit screen appears again.
,
(7) Tap [Return].
The Address screen appears again.
,
(8) Check the name or address.
(9) Tap [Exit].
The Network menu appears again.
73
Using email
Selecting the destination address from the address book
You can select the destination address from the address book.
(1) Follow steps 1 and 2 in “Registering destination addresses in the address
book” (p. 69).
The Address screen appears.
(2) Select the address you want to send a email by tapping
or
.
(3) Tap [tTo].
The Send screen appears. The selected address is set as the destination address.
,
(4) Carry out the procedures described in “2 Entering the subject of a message”
(p. 61).
74
Using email
Receiving email
Once you receive email, you can reply to it or forward it.
Before operation
•Insert a “Memory Stick” into your camcorder, for storing images.
•Release the lock of the “Memory Stick.”
Tip
You can keep copies of your messages on your server even if you download the
message using your camcorder. For details, see “Setting other preferences”
(p. 42).
Network Operation
Checking your email inbox
(1) Open the Network Menu.
For details on how to open the Network Menu, refer to “Accessing the
network” in the operating instructions supplied with your camcorder.
(2) Tap [
Mail].
If the Receive screen is not displayed, select the Receive from the Send, Receive
and Address. The Receive screen appears.
,
75
Using email
(3) Tap [Receive].
The screen for verifying the connection appears.
Set your Bluetooth device to connection standby with your camcorder
beforehand. For details, refer to the operating instructions supplied with your
Bluetooth device.
,
(4) Check the telephone number.
When dialing other telephone numbers
Tap [TEL No.]. The registered telephone number list appears. Tap the desired
telephone number. The selected telephone number is specified.
(5) Tap [Connect].
Your camcorder starts dialing the selected telephone number. When an email
message has been sent to you, your camcorder download it, and the message
“Receiving Mail Complete” appears. Tap [OK]. The phone line is automatically
disconnected after email is received.
,
(6) When an email message has been received, tap the area where a message is
displayed or [Message].
The message is displayed.
,
(7) Tap [Return].
The Receive screen appears again.
76
Using email
To cancel receiving email
While downloading, tap [Cancel]. Email you don’t receive remains on your server.
When the message is long
Tap the scroll button V to scroll the message.
When a file is attached to an email message
To view an attached image
Exit the NETWORK mode, then view the image following the same procedure as that
for viewing an image recorded in a “Memory Stick.” In such cases, the attached file will
be stored next to the last-recorded image recorded in VCR or MEMORY/NETWORK
mode.
Network Operation
Your camcorder can receive the following extension file: .jpg, .mpg, .jpeg and .mpeg.
When you receive other types of files, the message “Attached Invalid File Deleted” is
inserted in the email message. Your camcorder cannot play back the attached image if
the file is in an incompatible format.
When no new messages have been sent to you
The message “No New Mail” appears.
URL included in an email message
When a URL (“http://...”) is typed in the message, tap the URL. The browser starts
automatically and accesses the indicated web page.
Notes
•The maximum number of email message characters allowed is 4 000. More than that
number of characters will cause the excess characters to be deleted and a message
indicating that some of the text was deleted is attached to the beginning of the
message.
•It takes a lot of time to receive the message depending on the attached image file size.
Tips
•You can automatically check the email inbox after sending email. For details, see
“4 Setting other preferences” (p. 42).
•You can skip an email message if its file size is too large. For details, see “4 Setting
other preferences” on (p. 42).
•For email messages, the maximum number of characters used for the subject and the
sender name has an upper limit of 24 characters. When you receive an email message
with more than 24 characters in these items, you cannot read the subject and the
sender name on your camcorder.
77
Using email
Sending your answer – Reply
You can quickly reply to an email message without entering the address.
(1) Display the Receive screen.
(2) Tap the area where a message is displayed or tap [Message].
The selected message is displayed.
,
(3) Tap [Reply].
The Send screen appears.
,
Tip
“Re:” is added to the beginning of the subject line.
(4) Carry out the procedure described in “3 Entering the text of a message”
(p. 62) to enter the text of the message.
Tip
You cannot quote a received email message.
(5) Carry out the procedure described in “4 Sending email” (p. 63) from step 3.
78
Using email
Forwarding the message to others – Forward
You can forward a downloaded message to others.
(1) Display the Receive screen.
or
.
Network Operation
(2) Display email you want to forward the message by tapping
(3) Tap the area where a message is displayed or tap [Message].
The selected message is displayed.
,
(4) Tap [Forward].
The Send screen appears.
,
Tips
• An attached file is not automatically forwarded. When you want to send the
attached file, see “Attaching images to email” (p. 66).
• “Fw:” is added to the top of the subject line.
(5) Carry out the procedure described in “1 Specifying the destination address”
(p. 58) from step 3 or “Selecting the destination address from the address
book” (p. 74) to specify the destination address.
79
Using email
(6) Carry out the procedure described in “3 Entering the text of a message”
(p. 62) to modify the message.
Tip
The maximum number of characters you can enter in a message is 512. The
characters over that number will be deleted.
(7) Carry out the procedure described in “4 Sending email” (p. 63) from step 3.
Deleting unnecessary email
You can store up to 50 received email messages in a “Memory Stick.” If you try to
receive a 51st email message, an error message appears and your camcorder cannot
receive the email message.
Before operation
•Insert the “Memory Stick” that the email message you want to delete is stored in into
your camcorder.
•Release the lock of the “Memory Stick.”
(1) Open the Network Menu.
For details on how to open the Network Menu, refer to “Accessing the
network” in the operating instructions supplied with your camcorder.
(2) Tap [
Mail].
If the Receive screen is not displayed, select the Receive from the Send, Receive
and Address. The Receive screen appears.
,
80
Using email
(3) Display email you want to delete the message by tapping
The selected message is displayed.
or
.
,
Network Operation
(4) Tap [Delete].
The message “Delete This Mail?” used for verification appears.
,
(5) Tap [OK].
The selected email message is deleted.
To cancel deleting email
Tap [Cancel] in step 5.
81
Viewing web pages
A site that posts information on the Internet is called “web page” or “web site”. You can
easily retrieve information by accessing a web site on the Internet.
Viewing web pages
1 Entering the URL needed to access the web page
Enter the address of the web page, and then access the Internet. Be careful to enter the
address correctly.
Tip on URL
A web site has a unique address on the Internet. The address is called a URL. This URL
is required to access a web site.
(1) Open the Network Menu.
For details on how to open the Network Menu, refer to “Accessing the
network” in the operating instructions supplied with your camcorder.
(2) Tap [ Browser].
The following screen appears.
,
(3) Tap
(New URL).
The character input screen appears.
,
82
Viewing web pages
(4) Enter the URL.
For details on how to input characters, see “How to input characters” (p. 9).
(5) Tap [Enter].
The screen used for verifying the connection appears. Set your Bluetooth
device to connection standby with your camcorder beforehand. For details,
refer to the operating instructions supplied with your Bluetooth device.
Network Operation
,
(6) Check the telephone number.
When dialing other telephone numbers
Tap [TEL No.]. The registered telephone number list appears. Tap the desired
telephone number. The selected telephone number is specified.
(7) Tap [Connect].
Your camcorder starts dialing the selected telephone number. After the
connection is completed, the web page selected in step 4 is loaded.
,
(8) Operate the browser using the menu bar.
For details on the menu bar, see “How to use the menu bar on the browser”
(p. 84).
83
Viewing web pages
How to use the menu bar on the browser
When you access the Internet and view a web page, you can carry out various
operations using the menu bar. While the browser screen is displayed, tap menu on the
upper-right LCD screen to display the menu bar.
To show the menu bar
(1) Tap menu on the upper-right LCD screen.
The following menu bar appears.
To hide the menu bar
Tap
menu
or
in the menu bar again. The menu bar disappears.
The buttons on the menu bar
Button
menu
Function
(Previous Page)
Go to the previous page in your step.
(Next Page)
Go to the next page in your step.
(Refresh)
Refresh the current page.
Use this button when images or characters on the web
page are not displayed properly.
(Stop)
Stop loading the current page.
(Zoom)
Change the page size.
? (Help)
(Bookmark)
Display the introduction of each button.
Bookmark the current page. (Bookmarks are stored in the
camcorder.) Bookmarking is convenient to access
frequently-visited pages.
(New URL)
Enter the URL of a web page.
(Page Memo)
Store the current page in the “Memory Stick.” You can
then view the page without accessing the Internet.
(Page Information)
Show the title and URL of the current page.
(Line Close)
Disconnect the phone line.
Hide the menu bar.
END
84
(END)
Exit the browser.
Viewing web pages
When you fail to load a web page
[Loading Error] message appears. Tap [OK], then tap menu on the upper-right LCD
screen, and tap END in the menu bar. Network menu appears again.
Note
The buttons may not function, depending on the accessed web page.
Note on connection status indication
Off Line: being offline
Network Operation
The connection status is indicated on the top of the screen. This item also shows a
connected time and the address of the web page. The connecting time indication should
be used as a guide.
Loading: Loading a web page
On Line: being online
Notes
•When the address is too long to display, the whole address is not indicated. If you
want to know the correct address of the page, tap
. The address is indicated in full.
•A portion of the whole page is displayed on the screen.
•It takes more time to load a large size page, and its images or text may not be
displayed properly. This is not a malfunction.
•When you try to open a large size page, the message “Data too Large for Full Display”
appears and the entire page may not be loaded.
•When viewing a scaled-down page, the screen may show some flicker or the color
may be strange. This is not a malfunction.
•To prevent a malfunction, operate the menu bar buttons after loading the page.
Tip
You can access the web page from a bookmark. For details, see “3 Jumping to the web
page specified by the bookmark” (p. 89).
85
Viewing web pages
2 Bookmarking the web page – Bookmark
You can bookmark web pages you frequently access. You can bookmark up to 30.
(1) Display the web page you want to bookmark.
(2) When the menu bar is not displayed, tap
The menu bar appears.
menu
on the upper-right LCD screen.
(3) Tap
(Bookmark).
The bookmark list appears.
,
(4) Tap [ Add].
The bookmark is added, and the display returns to the web page.
Note
•The phone line may not be disconnected automatically. If this happen, disconnect the
phone line manually (p. 95).
•You cannot bookmark a web page that the URL is more than 256 characters.
86
Viewing web pages
To edit a bookmark
You can edit the title of a bookmark.
(1) Tap
(Bookmark).
The bookmark list appears.
(2) Tap the bookmark you want to edit.
The title and URL are indicated.
Network Operation
,
,
(3) Tap [Edit].
The character input screen appears.
,
(4) Edit the name.
For details on how to input characters, see “How to input characters” (p. 9).
(5) Tap [Enter].
The title of the bookmark is modified.
,
(6) Tap [ Return].
The Browser screen appears again.
87
Viewing web pages
To delete bookmarks
You can delete bookmarks. We recommend that you delete unnecessary bookmarks
since you can only store up to 30 bookmarks.
(1) Tap
(Bookmark).
The bookmark list appears.
,
(2) Tap the bookmark you want to delete.
,
(3) Tap [Delete].
The message “Delete This Bookmark?” used for verification appears.
,
(4) Tap [OK].
The selected bookmark is deleted.
,
To cancel deleting the bookmark
88
Tap [Cancel] in step 4.
Viewing web pages
3 Jumping to the web page specified by the bookmark
(1) When the menu bar is not displayed, tap
The menu bar appears.
menu
on the upper-right LCD screen.
Network Operation
(2) Tap
(Bookmark).
The bookmark list appears.
,
(3) Tap the bookmark.
,
89
Viewing web pages
(4) Tap [Go].
The screen used for verifying the connection appears.
Set your Bluetooth device to connection standby with your camcorder
beforehand. For details, refer to the operating instructions supplied with your
Bluetooth device.
,
(5) Check the telephone number.
When dialing other telephone numbers
Tap [TEL No.]. The registered telephone number list appears. Tap the desired
telephone number. The selected telephone number is specified.
(6) Tap [Connect].
Your camcorder starts dialing the selected telephone number. After the
connection is completed, the web page specified by the bookmark is displayed.
To select other bookmark
Tap [Return] in step 4. The bookmark list appears. Tap other bookmark.
Storing the web page into a “Memory Stick” – Page Memo
You can store your favorite web pages in a “Memory Stick.” Once you store them, you
can view the web page without accessing the Internet.
You cannot store a web page that the URL is more than 256 characters.
Storing the web page into a “Memory Stick”
You can store up to 30 page memos in a “Memory Stick.”
Before operation
•Insert a “Memory Stick” into your camcorder, for storing web pages.
•Release the lock of the “Memory Stick.”
(1) Display the web page you want to store.
(2) When the menu bar is not displayed, tap
The menu bar appears.
90
menu
on the upper-right LCD screen.
Viewing web pages
(3) Tap
(Page Memo).
The page memo list appears.
,
Network Operation
(4) Tap [ Add].
The message “Saving Page Memo Do Not Remove Memory Stick” appears.
After the message disappears, storing is complete.
,
(5) The browser screen appears again.
To cancel storing the web page
During storing, tap [Cancel].
Note
You cannot store the web page while loading it.
Editing the title of a page memo
You can edit the title of a page memo stored in a “Memory Stick.”
Before operation
• Insert a “Memory Stick” that the page memo you want to edit is stored in into your
camcorder.
• Release the lock of the “Memory Stick.”
(1) When the menu bar is not displayed, tap
The menu bar appears.
menu
on the upper-right LCD screen.
91
Viewing web pages
(2) Tap
(Page Memo).
The page memo list appears.
,
(3) Tap the page memo you want to edit.
The title and URL of the selected page memo are indicated.
,
(4) Tap [Edit].
The character input screen appears.
,
(5) Edit the name.
For details on how to input characters, see “How to input characters” (p. 9).
(6) Tap [Enter].
The title of the page memo is edited.
,
92
Viewing web pages
(7) Tap [ Return].
The browser screen appears again.
To delete the page memo
You can delete page memos. We recommend that you delete unnecessary page memos
since you can only store up to 30 page memos.
(1) When the menu bar is not displayed, tap
The menu bar appears.
menu
on the upper-right LCD screen.
Network Operation
Before operation
•Insert a “Memory Stick” into your camcorder, for storing page memos.
•Release the lock of the “Memory Stick.”
(2) Tap
(Page Memo).
The page memo list appears.
,
(3) Tap the page memo you want to delete.
The following screen appears.
,
93
Viewing web pages
(4) Tap [Delete].
The message “Delete This Page Memo Item?” used for verification appears.
,
(5) Tap [OK].
The selected page memo is deleted and the page memo list appears again.
(6) Tap [ Return].
The browser screen appears again.
To cancel deleting the page memo
Tap [Cancel] in step 4.
Displaying a web page stored in page memo
You can display a page memo stored in a “Memory Stick.”
Before operation
•Insert the “Memory Stick” that the page memo you want to display is stored in into
your camcorder.
•Release the lock of the “Memory Stick”.
(1) When the menu bar is not displayed, tap
The menu bar appears.
(2) Tap
(Page Memo).
The page memo list appears.
,
94
menu
on the upper-right LCD screen.
Viewing web pages
(3) Tap the page memo you want to display.
,
To select other page memo
Network Operation
(4) Tap [Open].
The web page stored in page memo is displayed.
Tap [Return] in step 3. The page memo list appears. Tap other page memo.
Shutting down the browser
To finish viewing the web page, and disconnect the phone line
(1) Tap
menu
on the upper-right LCD screen to display the menu bar.
(2) Tap END (End).
The browser is closed, then the phone line is disconnected.
To only disconnect the line
Tap
(Line Close). The phone line is disconnected.
Note
When shutting down the browser, a verification message may appear, depending on
your camcorder.
95
– Additional Information –
File storage destinations and file names
Files are grouped in the following folders. You can only view these folders on a
computer. The meanings of the file names are as follows.
sssss stands for any number within the range from 00001 to 99999.
ssss stands for any number within the range from 0001 to 9999.
aaa stands for a portion of an attached file name.
Folder containing still image files and
MPEG MOVIE AD moving image files
Folder containing image files attached
to email or downloaded from the
album on the Web
Folder containing the text data of email,
etc.
Folder containing files of page memo
(1), etc.
Folder containing files of page memo
(2), etc.
Folder containing moving image files
recorded in the MPEG format
Folder
100MSDCF
File name
Meaning
DSCsssss.JPG
Still image file
MOVsssss.MPG Moving image file
700MSNET
aaasssss.JPG
Still image file over the network
aaasssss.MPG Moving image file over the network
CAM NET01
RCV.MBX
Incoming email list*
IMAGEMEM.CNF
Page memo management file*
MEMOssss MEMOssss.HTM Page memo HTML file
MOML0001
IMGssss.JPG
Page memo still image file
IMGssss.GIF
Page memo image file
IMGssss.PNG
Page memo image file
IMGssss.XBM
Page memo image file
MOVsssss.MPG Moving image file
* Do not delete these files. These are required files even though they cannot be verified
using a PC.
96
Troubleshooting
Trouble accessing the Internet
The message “...Incomplete” or “Authentication Error...” is indicated and your camcorder
cannot access the Internet.
c When setting network preferences using the “So-net” option
Check your setup according to the procedure described in “Setting network
preferences” (p. 34).
c When setting network preferences using the custom setup
Check your setup according to the procedure described in “3 Setting your provider
preferences manually” of “Setting network preferences” (p. 39).
The message “Line is Busy or Phone number may be Wrong” is indicated and your
camcorder cannot access the Internet.
c The phone line of your provider is busy. Call again after a while.
c The settings for the telephone number may be incorrect. Please check those settings.
c The telephone signaling type setup of the Modem Adaptor with Bluetooth function
may be wrong. Check the setup.
Additional Information
The camcorder cannot access the Internet.
c Try to access it again after a while.
The message “Bluetooth Connection Error” is indicated and your camcorder cannot access
the Internet.
c Check that the Bluetooth device is turned on.
c Install the Bluetooth device nearer to your camcorder.
The message “Phone Line Disconnected” is indicated when making an entry in the online
registration procedure.
c Data entry can be done offline. When the camcorder needs to connect with the site, the
screen for verifying the connection appears. Tap [Connect], then the connection will
be established again.
The message “Bluetooth Authentication Error Check the Certified Status” is indicated and
your camcorder cannot access the Internet.
c The Bluetooth device may be deleted from the registration. Set it up again.
The message “Bluetooth Connection Error Select Bluetooth Device” is indicated and your
camcorder cannot access the Internet.
c Check your setup according to the procedure described in “Registering a Bluetooth
device” (p. 20).
The message “Low Battery” is indicated and your camcorder cannot access the Internet.
c Charge the battery pack or use the AC power adaptor, then connect again.
You forget your ID and/or password.
c Please call Customer Support.
97
Troubleshooting
Trouble with email
The message “DNS Error The Requested URL Could Not Found” is indicated and your
camcorder cannot send or receive email.
c When setting network preferences using the custom setup
The DNS setup may be wrong. Check the PPP setup.
Your camcorder cannot send email.
c The clock setting of your camcorder is not set. Set up the clock setting.
c When setting network preferences using the “So-net” option
Check your setup according to the procedure described in “Setting network
preferences” (p. 34).
c When setting network preferences using the custom setup
Check your setup according to the procedure described in “3 Setting your provider
preferences manually” of “Setting network preferences” (p. 39).
c Connect again after a while.
Your camcorder cannot receive email.
c The clock of your camcorder is not set up. Set it up.
c When setting network preferences using the “So-net” option
Check your setup according to the procedure described in “Setting network
preferences” (p. 34).
c When setting network preferences using the custom setup
Check your setup according to the procedure described in “3 Setting your provider
preferences manually” of “Setting network preferences” (p. 39).
c All of your downloaded email messages are stored in the “Memory Stick.” Insert a
new “Memory Stick” that has sufficient memory and download your email again.
Also, check that the lock switch is set to release.
c You can restrict the file size of downloaded email messages. Check the setup of the
item “Restrict” on the Network Options screen.
c Up to 50 downloaded email messages can be stored in a “Memory Stick.” If you want
to store a 51st email message, delete unnecessary email or insert a new “Memory
Stick” that has sufficient memory and then download your email again.
All of the email message cannot be received.
c The maximum size of an email is 4 000 characters. You cannot receive the entire text of
email that has more than 4 000 characters.
The message “PPP Authentication Error” is indicated.
c When setting network preferences using the “So-net” option
Check your setup according to the procedure described in “Setting network
preferences” (p. 34).
c When setting network preferences using the custom setup
Check your setup according to the procedure described in “3 Setting your provider
preferences manually” of “Setting network preferences” (p. 39).
You received an email message sent from Mailer Daemon.
c Your email has not been sent to its destination address. Check the email address. If
you receive an email message from Mailer Daemon and the destination address is
correct, the server may be down, or the email address may have changed.
98
Troubleshooting
Attached files are not saved in the “Memory Stick.”
c Compatible file types are .jpg, .mpg, .jpeg and .mpeg only. Check the file type.
c The message “Memory Stick Directory Error” may be indicated when a “Memory
Stick” whose directory structure does not correspond to the DCF standard is inserted.
c All of your downloaded email messages are stored in the “Memory Stick.” Insert a
new “Memory Stick” that has sufficient memory and download your email again.
Also, check that the lock switch is set to release.
c You can restrict the file size of downloaded email messages. Check the setup of the
item “Restrict” on the Network Options screen.
The images are not displayed.
c Check the setup of the item “Image Display” on the Network Options screen.
Some of the web page or all of the web page is not displayed.
c When the page has been made using the software, such as Macromedia Flash, the
page does not correspond to the browser of your camcorder.
Additional Information
Trouble viewing web pages
It takes some time to load the web page.
c When the web page is busy, try to connect through other providers or other access
points, or connect during off-peak times.
The web page is not loaded.
c When entering its URL
Check that the address is correct. (For example, did you enter “0” or “O”, “-” or “_”)
c When accessing through the bookmark or page memo
The address may have been changed or the link structure of the web site may have
been modified. When the link structure is modified, follow the address to its source.
(For example, when you cannot access “http://www.sony.co.jp/xxxx/”, then try to
access “http://www.sony.co.jp/”)
The web page cannot be displayed.
c The item “Cookie” may not be checked. Check the item “Cookie” on the Network
Options screen.
The cookie is not saved.
c Exit the NETWORK mode, the cookie will be deleted.
The message “DNS Error The Requested URL Could Not Found” is indicated and the web
page is not displayed.
c The setup of the item “DNS” may be wrong. Check the setup of the PPP screen.
c The setup of the item “Proxy” may be wrong. Check the setup of the Browser screen.
99
Troubleshooting
Troubles about the album on the Web
The message “DI Customer ID profile Incomplete” is indicated and your camcorder cannot
access the album on the Web.
c The DI customer ID is required to use the album on the Web.
You cannot view or edit your album, send an invitation card, or upload images. (An error
code is indicated.)
c See “Album error codes” (p. 105).
It takes some time to load the album.
c When the web site is busy, try to connect through other providers or access points, or
connect during off-peak times.
The image cannot be deleted.
c There may be no images. Tap
(Refresh).
The image cannot be downloaded.
c There may be no images. Tap
(Refresh).
Adjusting the LCD screen (CALIBRATION)
The buttons on the touch panel may not work correctly. If this happens, follow the
procedure below.
(1) Set the POWER switch to OFF (CHG).
(2) Eject the cassette from your camcorder, then disconnect any connecting cable
from your camcorder.
(3) Set the POWER switch to VCR while pressing DISPLAY/TOUCH PANEL on
your camcorder, then keep pressing DISPLAY/TOUCH PANEL for about five
seconds.
(4) Follow the procedure below using the stylus supplied with your camcorder.
1 Touch at the upper left corner.
2 Touch at the lower right corner.
3 Touch in the middle of the screen.
CALIBRATE
CALIBRATE
CALIBRATE
Note
If you do not tap the right spot,
always returns to the position at the upper left
corner. In this case, start from step 4 again.
100
Specifications
Bluetooth
The number of registered
devices available
3
Album on the Web
Email
Sending
The maximum number of
email destination addresses to
which a message can be sent
at one time
50
The registrable number of
subjects
6
The maximum number of
characters of a subject
24
The registrable number of
messages
6
The maximum number of
characters of a message
512
The maximum number of
images attached to email
99
The maximum file size of
images attached to email
3 MB
Signature
The number of characters
256
Address book
The registrable number of
destination addresses
50
The maximum number of
characters of a name
24
The maximum number of
characters of an email address
64
Browser
The number of bookmarks
available
30
The maximum number of
characters of a bookmark title
27
The maximum number of page
memos recordable in a
“Memory Stick”
30
The maximum number of
characters of a page memo title
27
The maximum number of
characters of URL
255
Additional Information
The number of albums
10
The maximum number of
images uploaded at one time
99
The maximum file size of
images uploaded at one time
3 MB
Receiving
Compatible attachment file
standards
Extension: .jpg, .mpg, .jpeg,
.mpeg
The maximum number of
characters of an email
message
Approx. 4 000
The maximum number of
email messages recordable in
a “Memory Stick”
50
101
Messages
Various messages appear on the screen. Check the corresponding descriptions in the
following list.
General
Message
Cause and/or Corrective Actions
Bluetooth Connection Error
• The Bluetooth device is too far from the camcorder.
• The Bluetooth device is busy.
Bluetooth
Authentication Error
Check the Certified Status
Register the Bluetooth device again.
Bluetooth
Registration Error
Check the Passkey
• The pass key was wrong.
• The pass key transmission failed.
Bluetooth Communication
Disconnected
• The Bluetooth device was turned off.
• The Bluetooth device is too far from the camcorder.
• The Bluetooth device became impossible to connect.
Bluetooth
Connection Error
Select Bluetooth Device
No Bluetooth devices are registered. Register the Bluetooth device
(p. 20).
PPP Authentication Error
Check ID or Password
Your ID or password entered on the PPP screen during manual
setup may be wrong.
Phone Line Disconnected
Check the connection status.
Connection Error
No Response From PPP Server
• The telephone number entered on the PPP screen in manual setup
may be wrong.
• The setup of Modem unit on the Network Options screen is wrong.
Bluetooth Connection Error
Check Phone Line
Check that the Bluetooth device is connected to a telephone terminal.
Low Battery
The capacity of the battery pack is insufficient. Change the battery
pack or use the AC power adaptor.
Profile Error
Reset Profile
Check the setup. If an entry is missing, set up again referring to your
notes.
DI Customer ID Profile
Incompleted
* Password Already Set
Check the Password Profile
Check your DI customer ID or password entered on the Network
Setup screen. For details on “Verify Password,” see “Setting other
preferences” (p. 42). You cannot use your album on the Web if you
set your preferences manually.
Memory Error
Exit the NETWORK mode, then enter the NETWORK mode again.
Memory Stick Error
The “Memory Stick” may be broken. Do the following; exit the
NETWORK mode, turn off the camcorder, remove and insert the
“Memory Stick,” then operate the camcorder. If the message still
appears, use another “Memory Stick.”
Memory Stick Error
Outgoing Mail Canceled
Memory Stick Error
Unable to Open the File
Memory Stick Error
Action Canceled
Memory Stick Error
Incoming Mail Canceled
102
Memory Stick Format Error
Format the “Memory Stick” with your camcorder.
Messages
Message
Cause and/or Corrective Actions
Enter Password for
DI Customer ID
For details on “Verify Password,” see “Setting other preferences” (p.
42).
Enter PPP Password
Saving the Profile
Do not turn off the camcorder while the message is indicated.
Album on the Web
Cause and/or Corrective Actions
Album Server Disconnected
Try again after a while.
Upload Error
Outgoing Mail Error
Select Pictures
Select the image or set up the invitation card before uploading
(p. 47).
Wrong File
Unable to Save This File
Check the File Type
You tried to download a file that is not in the JPEG or MPEG format.
You can download only JPEG or MPEG files.
Memory Stick Directory Error
You tried to download a file to a “Memory Stick” whose directory
structure does not conform to the DCF standard. You cannot
download a file to a “Memory Stick” not conforming to the DCF
standard.
No Picture Files
There are no images in the “Memory Stick.”
Additional Information
Message
When an 4-digit error code is indicated, see “Album error codes” (p. 105).
Email
Message
Cause and/or Corrective Actions
POP Server Disconnected
The POP server may be down. Connect to the page again after a
while.
POP Server Connection Error
• Your password entered on the Mail screen during manual setup
may be wrong. Check your password.
• Connect the page after a while.
SMTP Server Disconnected
Connect to the page again after a while.
SMTP Server Connection Error
Your password entered on the Mail screen during manual setup may
be wrong. Check your password.
PPP Profile Incomplete
Check the “So-net” or custom setup in provider preferences.
Mail Profile Incomplete
Check the “So-net” or custom setup in provider preferences.
No Picture Files
No images in the “Memory Stick.”
103
Messages
Browser
Message
Cause and/or Corrective Actions
You tried to open an SSL page. When you know that the page is safe,
You are About to View
Pages Over a Secure Connection tap [OK].
Do You Want to Continue?
You are About to Leave
a Secure Internet Connection
Do You Want to Continue?
Warrant Date Expired
Invalid Data
Open Anyway?
Set the Date and Time
Invalid Data
Open Anyway?
The clock is not set up on your camcorder. Set up the clock setting.
Page Certification Error
Invalid Data
Open Anyway?
The certification of the page may be broken, wrong, or it may be of
other pages. When you know that the page is safe, tap [OK].
Opening Error
Invalid File Type
You cannot display this page on your camcorder.
DNS Error
The Requested URL
Could Not Found
• The URL may be wrong.
• The DNS entry on the PPP screen during manual setup may be
wrong. Check this item.
• Connect to the page again after a while.
Loading Error
Tap
Read-Only File in Directory
Unable to Delete the File
Check the File Status
Files modified with a computer may not be deleted by the camcorder.
menu
on the upper-right LCD screen, then tap
END
.
Opening File Error
Read-Only File
This File is Locked
104
Enter User Name
and Password
User authentication is required to access the page. Enter your user
name and password.
Timeout
Disconnected Automatically
Check the Network Options setup (p. 42).
Loading...
Retry Later
The page memo cannot be stored while the unit is loading a web
page. Store it again after the web page has been loaded (p. 90).
Album error codes
ImageStation
Cause
Corrective Actions
1000
Authentication error
occurred. Please check ID
and Password.
Login error. ID or password
may be incorrect on your
camcorder.
Check your ID and
password, and try to login
again.
1001
Upload error occurred.
Please try to upload again
later.
Error in finding album.
Check your selection and try
again.
1002
Your ID is not registered.
Please register.
ID is not registered.
Try to register again by
online registration button on
your camcorder.
1003
Upload error occurred.
Please try to upload again
later.
There was an error in
saving the file in the album.
Try uploading the file again.
1004
The email address you are
Invitation error occurred.
Please try to send again later. trying to send is invalid.
Check the email address and
try again.
1006
Invitation error occurred.
There is no message in the
Please try to send again later. invitation.
This error should not occur.
Call Customer Support if
you see this message.
1007
Upload error occurred.
Please try to upload again
later.
There is an error with the
image file in the album.
Check the selected images
and try again.
1008
Error occurred. Please reenter Album.
Login error. Not logged into
album.
Check your ID and
password, and try to login
again.
1009
Upload error occurred. The
uploaded image was too
large.
The image is too large to
upload.
The image cannot be
uploaded. Remove it from
your selection.
1010
Upload error occurred.
Please check the image file.
Unable to read the image
format.
The image cannot be
uploaded. Remove it from
your selection.
1112
Authentication error
occurred. Please check ID
and password.
Login error
Check your ID and
password, and try to login
again.
2100
Your message could not
send. Please send again.
The server is unable to send
now.
Try to send email again after
a while.
2200
The server is temporarily
busy. Please try again later.
The authentication server is
temporarily busy.
Try to send email again after
a while.
3094
Upload error occurred.
Please check the image file.
Unable to read the video
format.
The file cannot be uploaded.
Remove it from your
selection.
3099
Upload error occurred. The
uploaded video was too
large.
The video is too large to
upload.
The video cannot be
uploaded. Remove it from
your selection.
3131
Upload error occurred. The
total size limit of video is
over.
You have exceeded the
video storage limit.
Delete some of the other
video(s) in your albums and
try to upload again.
6000
Your ID validity is expired.
Please login again.
The server validity time is
expired.
Try to login again.
8025
Authentication error
occurred. Please re-enter
Album.
Login error
Check your ID and
password, and try to login
again.
Additional Information
Error
Number
105
Glossary
Access point (p. 38, 40)
A telephone number used to access the Internet, which is provided by an Internet
service provider.
Most providers install access points in various areas. We recommend that you select the
most convenient access point which allows you to obtain the lowest telephone charges.
Address book (p. 69)
Used to register email destination addresses.
APOP (p. 41)
APOP is an authentication protocol for security. When your provider supports APOP,
we recommend that you check this item. For more information on whether the provider
support APOP or not, consult your provider.
@ (At mark)
Used to separate the domain name and the user name.
Attachment (p. 66)
To attach a file to an email message.
Connect time (p. 85)
The time for being connected with an Internet service provider using a dial-up
connection. Most Internet service providers charge for the time connected.
Cookie (p. 43)
Used by the operator of an Internet site to identify the user. This is frequently used in
online shopping.
Dial-up connection (p. 38, 40)
The dial-up connection is used to access the Internet using a phone line.
DNS (p. 40)
An abbreviation for Domain Name System. This “DNS” is also referred to as a “name
server,” “primary DNS server,” “primary name server,” etc. This is a server that
replaces a domain name with an IP address. This is specified by an IP address.
Download
Load information from the server through the phone line.
Email (p. 58)
Also referred to as “Email”, “Mail”, etc. Using a network, such as the Internet, you can
send and receive a message very quickly. Email is easy to edit or store.
Email address (p. 40)
Also referred to as an “Email address”, “Mail address”, etc. This is the destination
address for email. There is no need to specify the country and the house number. The
same address does not exist in the world. You can receive your email even if your are in
another country.
Forward (p. 79)
To forward a received email message to another person. “Fw:” (Forward) is added to
the beginning of the title in order to indicate that the email is a forwarded email.
106
ID (p. 40)
Used to identify the user in combination with a password when accessing the Internet
through the Internet service provider.
Glossary
Internet (p. 32)
A worldwide network of computers. You can use email, information retrieval services,
etc., over this network.
Internet service provider (p. 32)
Also referred to as a “Provider,” an “ISP,” etc. A company that provides access to the
Internet.
Link
A related page address listed on a Web page as a Web link.
POP3 (p. 41)
An abbreviation for Post Office Protocol, Version 3. This is a server used to receive
email.
PPP (p. 39)
An abbreviation for Point to Point Protocol, Version 3. This is a protocol for accessing a
provider using a dial-up connection.
Additional Information
Password (p. 34, 40)
Used to access the provider in combination with a user ID.
Proxy (p. 41)
A server or program to make a computer located inside a firewall pass through the
firewall.
Reply (p. 78)
To reply to a previously received email message. When replying, “Re:” (Reply) is added
to the beginning of the title in order to indicate that the email is a reply.
Signature (p. 67)
Used to add your name, your address, etc., to the end of a message.
SMTP (p. 41)
An abbreviation for Simple Mail Transfer Protocol. This is a server used to send email.
SSL
An abbreviation for Secure Sockets Layer. A protocol for exchanging information safely
between web browsers and web servers. SSL is frequently used for credit card
transactions over the Internet. SSL also has a function to verify ownership and to
encrypt data.
Subject (p. 61)
The title of an email message. When replying, “Re:” (Reply) is added to the beginning of
the title in order to indicate that the email is a reply. When forwarding an email
message, “Fw:” (Forward) is added to the beginning of the title in order to indicate that
the email is a forwarded email message.
URL (p. 82)
An abbreviation for Uniform Resource Locator. An address on the Internet. By
specifying this address, you can access the web page.
Web page (p. 82)
A web site that makes information available on the Internet. When the page includes
Web links, you can specify other pages by selecting the link.
107
Setup memo
Be careful not to reveal these entries.
Network Menu
Network Setup
Example
DI Customer Setup
ID
Password
Provider Setup
So-net
TEL1
XXXXXXX
TEL2
TEL3
Custom
PPP
ID
[email protected]
Password
hcHZ7yd
DNS1
192.168.0.1
DNS2
192.168.0.2
TEL No. 1
XXXXXXX
TEL No. 2
TEL No. 3
Mail
User ID
abc123
Password
hcHZ7yd
Address
[email protected]
POP Server
pop.xxx.so-net.com
SMTP Server
smtp.xxx.so-net.com
Browser
108
Proxy
proxy.xxx.so-net.com
Port
8080
Online Privacy Policy
Sony Electronics Inc.
Effective: June 21, 2001
Last Update: November 15, 2001
Your Privacy
Additional Information
At Sony we believe our online visitors have a right to know our practices regarding the
information we may collect when you visit our Web sites and what type of information
is collected. The guidelines contained herein apply only to your visit to the Web sites
operated by or for Sony Electronics Inc. and the entities it controls (collectively, “SEL”).
These sites include, but are not limited to, those that contain “sel.sony.com” and those
that contain “sonystyle.com” in their URLs. Sites which are linked to/from these sites
(including sites of other Sony affiliated companies (e.g., Sony Music Entertainment,
Sony Pictures Entertainment, Sony Computer Entertainment America) and via banner
ads) may have different policies; therefore, please review the privacy policy notices on
those sites for details.
While SEL does not generally require that you provide us with personally identifiable
information in order to visit and use the SEL sites, please note that in order to
participate in some activities, it will be necessary for you to provide this information. If
you choose not to provide it for those activities, you may not be able to participate in
them.
Collection of Information
For each visitor to an SEL Web site, SEL’s Web server automatically recognizes, collects
and/or stores information such as the visitor’s IP address/Domain name combination
and any referring sites. SEL may use several technologies to accomplish this. Examples
of such technologies are cookies and Web beacons.
When you visit SEL’s Web sites or advertisements appearing thereon, or use one or
more of the SEL Web site services, we may use an industry-wide technology called
“cookies” which stores certain information on your computer and which will allow us
to customize your experience to better match your interests and preferences or to
simply facilitate your signing in to use the services. Most browsers will allow you to
erase cookies from your computer hard drive, block acceptance of cookies, or receive a
warning before a cookie is stored. However, if you block or erase cookies, we may not
be able to restore any preferences or customization settings you previously specified
and our ability to personalize your online experience would be limited. Please refer to
your browser instructions or “help” screen to learn more about these functions.
SEL may also itself use, or engage third parties to use, Web beacons for researching
certain usage and activities on our Web site. The information collected by SEL or
requested from third parties through these Web beacons is in an aggregate, nonindividually identifiable form and is used to find out more about users including
demographic information and usage patterns for more accurate reporting and to
improve the effectiveness of our marketing.
SEL may ask you to provide “personal information”, meaning individually identifiable
information such as your email address, name, mailing address, telephone number,
social security number, credit card number, or persistent identifier (such as a customer
109
number held in a cookie) which is associated with individually identifiable information,
to enable you to participate in contests, chat rooms, on bulletin boards, to fill out a
registration, or to order products and services using these sites. SEL may combine the
information you provide on our Web sites with information we may collect offline from
you or from third parties so that we can more effectively tailor our site, services and
offerings to you.
Unless you instruct us otherwise, SEL may contact you to provide information about
products, services, promotions, contests, or other activities or offerings that may be of
interest to you. You can instruct us whether or not you wish to be contacted by
checking or unchecking the box indicating your preference, as applicable, at the place
where your information is collected, or by other means (such as an email request). In
addition, with each communication you receive from SEL, you will be given the
opportunity to indicate if you do not wish to receive future communications.
SEL will not share the personal information you provide on the SEL Web sites with any
other parties, except (a) with your consent, (b) as may be permitted or required by law
or court order and/or (c) to persons or companies with whom SEL contracts to carry
out the internal operations of the site or our business (for example, to send you a
promotional item that you have requested on the site.)
With your consent, SEL may share your personal information with other affiliated Sony
companies (i.e., (i) Sony Corporation, (ii) any company of which more than 50% of its
outstanding shares are owned by Sony Corporation, directly or indirectly, and (iii) any
company with the name “SONY” as a part of its trade name) who may want to contact
you about products, services or other offerings that may be of interest to you. Further,
with your consent, SEL may share your personal information with specific third parties
outside of the Sony group of companies who may want to contact you about products,
services or other offerings that may be of interest to you. Each of these companies may
have their own privacy policies. SEL will seek to obtain your consent at the place where
the information is collected either by an “opt-out” or “opt-in” method, or by other
means (such as an email request). If you consent to receiving communications from any
of these affiliated Sony companies, or third parties, you will need to communicate with
them directly if you later decide that you no longer wish to receive their
communications.
Use and Disclosure of Anonymous Aggregated Information
SEL may also collect, aggregate and maintain anonymous information about the visitors
to our Web sites, such as visitors hobbies, interests, purchasing habits, music
preferences, and the like. This data can then be used to tailor SEL’s Web site content and
advertising to deliver a better experience for our visitors. SEL may also share such
aggregate information about our visitors with advertisers, business partners, sponsors,
and other third parties; for example, to inform them about the percentage of male/
female visitors or percentage of visitors within a particular age range.
Security
SEL takes great care in maintaining the security of your personal information and in
preventing unauthorized access to it through the use of appropriate technology and
internal procedures. However, SEL does not guarantee that unauthorized access will
never occur.
110
Notice To/Regarding Children Under the Age of 13
SEL believes that children using the Internet require special protection, and we urge
parents or guardians to explain Internet safety to their children. Parents are urged to
spend time online with their children to become familiar with the types of content
available on the SEL sites and the Internet in general. Control tools are available from
online services and software manufacturers to help create a safer environment for
children.
If a child under 13 years of age wishes to participate in any SEL Web site activity, or
wishes to take advantage of a product or service offering, available to children, and to
do so necessitates the furnishing of any of the child’s personal information, please note
the following:
Additional Information
If you are under 13 years of age, you should not provide any personally identifiable
information (for example, your last name, home address or e-mail address) on these
sites without the knowledge and permission of your parent or guardian. If SEL learns
that you are under 13 years of age, SEL will not maintain or use any personally
identifiable information about you without the verifiable consent of your parent or
guardian, except as allowed by law. This may mean that you will be unable to
participate in some activities on the sites without that verifiable consent.
(i) The names, addresses, telephone numbers, and email addresses of the operators
collecting or maintaining personal information from children through this Web site
are:
Sony Electronics Inc.
1 Sony Drive
Park Ridge, New Jersey 07656
Telephone: 201-930-4800
e-mail address: [email protected]
Sony Electronics e-Solutions Company LLC
155 Tice Boulevard
Woodcliff Lake, New Jersey 07677
Telephone: 201-930-4800
e-mail address: [email protected]
(ii) The types of personal information collected from children may include the name,
email address, home address, telephone number and/or any other information
reasonably necessary for the child to participate in a particular activity. This
information may be collected directly and/or passively (e.g., through a web server
that automatically recognized and stores information such as a visitor’s IP address/
domain name combination).
(iii) The information collected may be used for purposes such as fulfillment of a
requested transaction, record keeping, marketing back to the child, or making it
publicly available through a chat room or by other means.
(iv) Unless specific consent is obtained from the child’s parent or guardian, the child’s
personal information will not be disclosed to third parties who are not contractors
hired to carry out the internal operations of the Web sites, other than as may be
required or permitted by law. We have required, or will require, such contractors to
111
agree to use personal information of site visitors only for the purposes of carrying
out these operations and to keep such information confidential. A parent or
guardian has the option of consenting to the collection and use of the child’s
personal information without consenting to the disclosure of that information to
third parties.
(v) SEL is prohibited from conditioning a child’s participation in an activity on the
child’s disclosing more personal information than is reasonably necessary to
participate in such activity; and
(vi) A parent can review and have deleted the child’s personal information, can refuse
to permit further collection or use of the child’s information, and can revoke or limit
consents previously given. For instructions on how to do so, please send an email
to: [email protected] or write to us at:
Sony Electronics Inc.
Personal Information Management Office
1 Sony Drive
MD TA3-12
Park Ridge, New Jersey 07656
Except as permitted by law, before any collection of a child’s personal information takes
place at a Web site directed to children or where SEL is knowingly collecting children’s
personal information, the child will be asked to provide his/her parent’s or guardian’s
e-mail address so that SEL can contact the child’s parent or guardian. SEL will then
send an email (the “Initial Notification”) to the parent/guardian indicating, among
other things, the information that the child is requested to provide, the intended use(s)
of the information and information on how the parent/guardian can, at their election,
delete the child’s information from SEL’s database or records. Upon receipt of the Initial
Notification, a parent or guardian may respond back to SEL to grant his/her consent or
to deny consent in which case SEL will delete the parent or guardian’s email address
and any other personal information, if any, previously obtained for securing parental
consent. Upon SEL’s receipt of the parent/guardian consent, SEL will send a confirming
email to the parent/guardian’s email address.
If SEL desires to use a child’s information for purposes other than that for which the
parent/guardian consent was previously given, SEL will not do so without first getting
the parent/guardian consent.
Consent to Processing
By providing any personal information to the SEL Sites, all users, including without
limitation users in the member states of the European Union, fully understand and
unambiguously consent to the collection and processing of such information in the
United States of America.
Policy Governs Use: Changes to Privacy Policy
The terms of this policy will govern the use and any information collected while it is in
place. SEL reserves the right to change this policy at any time, so please re-visit this
page as often as you wish.
112
Questions
If you have any questions or comments about our personal information practices or
about this Privacy Statement, please feel free to send us an email at [email protected]
or write us at:
Please check “http://www.sel.sony.com/SEL/legal/privacy.html” for the latest
information.
Additional Information
Sony Electronics Inc.
Personal Information Management Office
1 Sony Drive
MD TA3-12
Park Ridge, New Jersey 07656
113
ImageStation membership Agreement
Membership Agreement (paper copy of terms as of November 2001 provided for
convenience, please visit online for current terms).
This Membership Agreement sets forth the terms and conditions on which
ImageStation, a division of Sony Electronics Inc., offers products and services to
registered users (each a “Member”) of the website “www.ImageStation.com.”
PLEASE READ THIS MEMBERSHIP AGREEMENT CAREFULLY BEFORE REGISTERING
TO BECOME A MEMBER.
By completing the Member registration process and clicking on the “I AGREE”
button, on your PC or Network Handycam camcorder, you (hereafter either “you”
or “Member”) agree to be bound by the terms and conditions of this Membership
Agreement
By clicking on the “I DECLINE” button on your PC or Network Handycam
camcorder, you will be returned to the previous page, and your application for
registration will be deleted.
1. Terms
The Membership Agreement is comprised of (a) all terms and conditions set forth
herein; (b) all operating rules and policies that are by published on the Site from
time to time, (c) Legal Notices and Trademarks and (d) the Sony Electronics Online
Privacy Policy, each as modified from time to time and published at
[www.imagestation.com]. In light of the evolving nature of web-based offerings,
ImageStation may post a notice on the Site, or broadcast messages through the
Service, to inform you of changes to this Membership Agreement, the Service, or
other matters of importance. Such posting or broadcast will constitute notice to you.
Any amendment to the Membership Agreement shall be effective immediately
upon posting of the notice, or broadcast of the message. Your continued use of the
Service after such notice or broadcast will reaffirm your agreement to be bound and
to abide by this Membership Agreement as amended.
2. The Service
• The term “Service” includes all functionality made available by ImageStation on
the Site. ImageStation may add to, delete from, or modify the Service. Unless
explicitly stated otherwise, any new text, content, file, data, product, services,
information, software, software tool or other feature that augments or enhances
the current Service, will be subject to this Membership Agreement.
3. Member’s Privileges and Obligations
114
The Service is available only to individuals over the age of 13. The Service is not
available to corporations or other business entities. In order to use the Service, you
must first register as a Member. You agree to provide accurate information, as
prompted by the registration form, including an accurate email address where you
can be contacted. Each Member is allowed to have only one Membership.
Membership is intended for personal use only and is non-transferable. You must
choose a password. You are responsible for any activity that occurs under your user
ID. You agree to immediately notify ImageStation of any unauthorized use of your
user ID or another breach of security in relation to the Service. You may use the Service
only for your personal, non-commercial use. You may not take the results from
your use of the Service and link to them, or mirror pages from the Site on another
website, or create links from other websites onto any area of the Site.
4. Member Content; Member Private Area; Community Area
• As “Private Member Content”, in a private area of the Site, which is accessible
only to you and your guests, and which require the use of a password (the
“Member Private Area”) or
• As “Public Member Content”, in the public area of the Site, which is accessible by
all users of the Site, whether or not they are Members, and which does not
require the use of a password (the “Community Area”).
Additional Information
You may store, display and publish your “Member Content” on the Site. The
“Member Content” may include images, video, audio, music, sound files, and other
materials, data, or text. Your Member Content is linked to your userID. As a
Member, you can display or publish your Member Content:
You agree not to post, send, transmit, upload, display, publish or distribute through
any part of the Site, any Member Content that:
(a) Misappropriates materials of others that are protected by copyright, trademark
or trade secrets, patent or other intellectual property law without the express
permission of the author or owner;
(b) Contains false or misleading statement of facts or description of the origin of the
material or communications;
(c) Violates anyone’s copyright, moral rights, author’s rights, trade secrets,
trademark rights, patent, or other intellectual property or other rights;
(d) Interferes with the privacy rights of any person, or impersonates any person;
(e) Contains a virus, may corrupt files or other content that may compromise or
harm the Site or any user thereof;
(f) Makes or purports to make any commercial use of the Site;
(g) Constitutes a criminal offense, gives rise to civil liability, or violates any
applicable laws or regulations, or encourages anyone to break the law; or
advocates illegal activity; or
(h) Contains links to your Member Private Area (defined below) that does any of
the above.
You are responsible for creating and maintaining copies of your Member Content,
as back-ups, prior to posting or uploading any material, data, text, image, video,
music, sound, audio file, or other content or materials on the Site.
5. Price and Payment
Certain content, products or services on the Site, such as photo printing and gift and
hardware sales, are subject to charges and specific terms and conditions, which are
115
explained in connection with such content and services. The Service and other
content, product, services or information on the Site are presently available free of
charge, exclusive of Internet or other telecommunications fees. ImageStation may, at
its discretion, elect to modify, delete, reduce, augment, or discontinue the Service or
any product, service, feature, functionality on the Site, or institute a fee, and will
notify the Members of such change. ImageStation shall not be liable to you or any
third party for any such change.
6. License Grant and Intellectual Property Rights
In consideration for the Service, and the potential benefits related thereto, you grant
ImageStation, its successors, licensees and assigns, a non-exclusive, worldwide,
perpetual, royalty free license to use, modify, reproduce, distribute, publish,
publicly perform, and publicly display your Member Content, by all means now
known, or later created, including but not limited to display on the Internet, and in
all forms of media, now known or later created.
• With respect to your Public Member Content, such license includes, without
limitation, (a) the right for ImageStation and third parties to access and view the
portions of your Public Member Content on the Community Area; (b) the right to
access, display, reproduce, modify, any portions of your Public Member Content,
and to create, reproduce, display and distribute selected images, frames,
thumbnails or stills from such Public Member Content. You agree that
ImageStation may use the Member Content that you provide and make available
on the Community Area (by selecting such an option when uploading materials
on the Site, or at a later time), at any time for any other purposes.
• With respect to your Private Member Content, such license includes, without
limitation, granting ImageStation the right to access, display, reproduce, modify,
any portions of your Private Member Content as necessary to store, host and
display it on the Site and comply with applicable laws.
You acknowledge and agree that certain technical processing or reformatting of
your Member Content may be required to (a) perform indexing functions; (b)
conform to connecting network technical requirements; (c) conform to the
limitations of the Service or other similar requirements.
As between ImageStation and you, you will own your Member Content, and
ImageStation owns all right, title and interest (including all intellectual property
rights) in and to the Site, the Service, the technology, information, documents, files,
webpages and other product developed in connection with the Site or available on
the Site.
You agree not to translate, reverse engineer, reverse compile, disassemble or create
derivative works from software programming contained in the Site or the Service.
7. Member Profiles
Member Profiles are intended to be brief descriptions of a Member’s interest and
contact information. Any information you place on your Member Profile is
accessible to anyone visiting the Site, unless you have made it private by checking
the “Hide” box. You agree not to send transmissions through the Site that attempt
to hide your identity or represent yourself as someone else.
116
8. Responsibility for Member Content
ImageStation does not as a policy review or screen any images, video, text, music,
sound, audio files or other Member Content that a Member posts, displays or stores
before they appear on the Site. ImageStation’s automated machinery and computers
indexes the Member Content. ImageStation does not endorse the content or views
expressed in any Member Content and is not responsible or liable in any manner for
any conduct by any Member or for any Member Content.
You agree not to use the Service for illegal purposes. Your use of the Site, the
Service, and the products, services, information available on the Site, is subject to all
applicable local, state, national and foreign laws and regulations, and international
treaties, including, without limitation, U.S. laws regarding the transmission of
technical data exported from the United States.
Additional Information
You are solely responsible for the Member Content that you provide to
ImageStation for hosting, display or access on the Site, on the Community Area
and/or on your Private Member Area. This includes, without limitation,
responsibility for the nature, content, subject matter, views that you express,
display or publish in your Member Content.
You represent and warrant that (a) you have the right to enter into this Membership
Agreement without any other approvals; (b) you have the right to use, upload,
publish, display the Member Content linked to your userID;(c) you have the right to
grant the licenses granted herein; and (d) the use by ImageStation of the rights that
you grant ImageStation in this Membership Agreement will not violate the rights of
any third parties, including without limitation your employer and your clients.
9. Code of Conduct
ImageStation provides Members with storage space on the Site as a service to
Members. ImageStation encourages the free exchange of ideas, but has established
the following parameters for any Member Content. When using any area of the Site,
including, without limitation the Member Private Area, you agree not to post, send,
transmit, upload, or otherwise publish any data, text, image, video, music, sound,
audio file, text, or other content or material that:
• Contains or displays any expression of bigotry, racism, or hatred, or is ethnically
offensive, objectionable or inappropriate;
• Is or might be perceived by ImageStation or ImageStation members or users, as
defamatory, libelous, disparaging, obscene, pornographic, profane, threatening,
abusive, deceptive, offensive, vulgar, ethnically offensive, objectionable or
inappropriate, including nudity, adult content, illegal content, content of a sexual
nature, and unacceptable language;
• Is inconsistent with the values or the spirit of the ImageStation Community, as
determined by ImageStation in its sole discretion;
• Interferes with anyone else’s use of this Site;
• Contains links to your Member Private Area that promotes or does any of the
above.
117
10. Illegal Activities
It is ImageStation’s policy to report suspected illegal activities to law enforcement
agencies and to cooperate fully with their investigations.
11. Warranty, Disclaimer of Warranty
The Service and the Site, including all content, products, services and information
made available or accessed through the Site, are provided “AS IS”, with no
warranties of any kind. Uploading, downloading or transmitting any Member
Content or any other material, data, text, images, video, music, sound or audio files
on the Site or through the use of the Service is at your own risk and in your sole
discretion. You will be solely responsible for any damages to your computer system
or loss of data, or any other damages that result from such uploading, downloading
or transmittal, or otherwise.
ImageStation makes no representation or warranty of any kind
(a) that the Site or Service will meet your requirements;
(b) that defects in the software for the Service will be corrected;
(c) that the Service will be timely, secure, error free, uninterrupted;
(d) that the Service or any content, product, services or information on the Site are
accurate, correct, reliable or complete;
(e) that Member Content or any material, data, text, images, video, music, sound,
audio file, content or materials posted, displayed or stored on or through the
Site will not be altered, deleted or damaged, or will be available for access,
upload or download at all times or indefinitely;
(f) as to the result that may be obtained from the use of the Service;
(g) that the Site or the Service is free of viruses or other components that may
infect, harm, or cause damage to computer equipment, data, software, or any
other property when you access, browse, download from, upload to, or
otherwise use the Service, the Site or any product or content on the Site.
ImageStation expressly disclaims all warranties of any kind, whether express or
implied, including but not limited to any warranty of merchantability, fitness for a
particular purpose or non-infringement of any products, content, information or
service published on, or available through the Site or the Service.
Some jurisdiction to not allow the exclusion of certain warranties, so some of the
above exclusions may not apply to you.
12. Disclaimer of Damages; Limitation of Liability
118
Even if ImageStation, or any of its authorized representatives have been advised of
the possibility of such damages, under no circumstances (including but not limited
to ImageStation’s negligence), shall ImageStation be liable for any direct, indirect,
consequential, incidental, special or punitive damages for any claim, loss and/or
causes of action, whether in contract, tort (including but not limited to negligence)
or otherwise. related to:
Some jurisdictions do not allow the exclusion or limitation of consequential or
incidental damages, and therefore, the above limitation may not apply to you.
Some Members may have additional rights.
Additional Information
(a) the quality, reliability, accuracy, completeness, of the Service;
(b) any modification, alteration, publication, display, failure to store, failure to
index, loss, deletion, alteration, loss of access, or damages of or to your
Member Content, computer equipment, software, data, or any text, image,
video, music, sound, audio or other material that result from your use of the
Site or the Service;
(c) any harm, errors, omissions, cost, losses, or damages arising from the use of, or
inability to use (whether because of interruption, suspension, termination or
otherwise) of the Site, the Service, Member Content or any content, products,
services or information provided on the Site;
(d) any failures, delays, misdeliveries, or interruptions in the Service or any
content, products, services or information on the Site;
(e) any harm resulting from downloading or accessing any Member Content, or
any other content, products, services or information provided on the Site
(f) any unauthorized access to or alteration of Member Content or any breach of
security related to any server used by the Site or the Service; or
(g) the cost of procurement of any substitute goods or services.
If, despite the above limitations, Sony and/or ImageStation were found
responsible to a Member for any reason whatsoever, this liability will not
exceed one hundred dollars ($100)
13. Privacy
It is ImageStation’s policy to respect the privacy of all of its customers. For more
information, please see our full privacy policy published at
[www.imagestation.com].
14. Site Content
Domestic and foreign copyright, trademark, patents, and other intellectual property
rights law and international treaties, and other laws, protect all material, data, text,
images, photos, video, graphics, music, sound and audio files available on the Site
(“Site Content”), both as individual works and as a collection. Unless authorized,
you may not copy, reproduce, display, perform distribute, or create derivative
works from the Site Content, without being expressly authorized to do so by the
owners of the intellectual property or proprietary rights in such Content.
You may download or use individual images, photos, video, graphics, music,
sound, and audio files that are displayed in the Community Area of the Site only
for personal non-commercial use. You may not copy, reproduce, retransmit,
distribute, publish, commercially exploit, or otherwise transfer any part of the Site
Content in any format, electronic or otherwise.
15. Copyrighted Material
ImageStation respects the intellectual property of others, and requires that its users
and Members do the same.
119
You may not place any material protected by copyright anywhere on the Site
without the express permission of the author or owner of the copyright in that
material.
ImageStation will promptly take down or block access to infringing or allegedly
infringing material on its servers if ImageStation becomes aware that such material
infringes the copyright rights of a third party, whether ImageStation identifies such
infringement in the course of its ordinary and reasonable business activities, or
through notification by a third party. ImageStation will promptly contact the
Member responsible for the Member Content, and alert him or her of the allegations
of infringement, and of ImageStation’s take down or blocking of the allegedly
infringing material. If the Member believes that the removal or blocking of his or
her material was a result of a mistake or a misidentification of the material, the
Member shall provide ImageStation a counter-notification establishing the
Member’s rights to display the material in question, as well as any other
information ImageStation shall request. Upon receipt, ImageStation will promptly
forward the counter-notification to the party that claims to be the copyright owner.
If that party then does not file suit to enjoin the alleged infringement, ImageStation
will re-post or unblock the material within 14 days after receiving the counter
notification.
If you believe that your work has been copied in a way that constitutes copyright
infringement, and appears on the Site, please provide ImageStation’ copyright
agent, designated below, the following information:
1. an electronic or physical signature of the person authorized to act on behalf of
the owner of the copyright interest;
2. a description of the copyrighted word that you claim has been infringed;
3. a description of where the material that you claim is infringing is located on the
Site;
4. your address, telephone number and email address;
5. a statement by you that you have a good faith belief that the disputed use is no
authorized by the copyright owner, its agent or the law;
6. a statement by you, made under penalty of perjury, that the above information
in your notice is accurate and that you are the copyright owner or authorized to
act on behalf of the copyright owner.
ImageStation’s agent for notice of claims of copyright infringement on the Site is
Christopher W. Ekren who can be reached as follows:
Christopher W. Ekren
Copyright Agent
C/o ImageStation
16765 W. Bernardo Drive
San Diego, CA 92127
Phone: 858-942-7775
Fax: 858-942-8171
Email: [email protected]
120
16. Indemnity
17. Force Majeure
ImageStation is not liable for any delay or failure in performance resulting directly
or indirectly from causes beyond its reasonable control, including, without
limitation, failure of the Internet, power failure, failure of computer,
telecommunication or other equipment, strikes, labor disputes, riots, insurrections,
civil disturbances, shortage of labor or materials, fires, floods, storms, explosions,
act of God, war, governmental actions, orders of domestic or foreign courts, nonperformance of third parties.
Additional Information
Since you are responsible for your Member Content and the consequences of its use
and publication, you agree to indemnify and hold ImageStation, its parents,
subsidiaries, affiliates, officers, employees, licensors, contractors and users harmless
from and against any and all claims, demands, and expenses, including attorneys’
fees, made by any third party, due to or arising from: (a) your use of the Site or the
Service; (b) your violation of this Member Agreement; (c) your violation of a third
party’s privacy rights; (d) your violation or infringement of a third party’s
copyright, trademark, trade secret, patent, or other intellectual property rights; (e)
any libelous or unlawful material contained within your Member Content; or (f)
your violation of this Membership Agreement.
18. Termination of Service
If you object to any portion of this Membership Agreement, or any subsequent
modification thereto, or become dissatisfied with the Service, the Site, or any
materials, data, text, images, video, audio, music, sound or other Site Content, or
any transaction entered into through the Site or Service, your only recourse is to
immediately discontinue use of the Service and notice ImageStation of such
termination. The preceding sentence sets forth your sole and exclusive remedy
regarding any objection to the terms of this Membership Agreement, or any
dissatisfaction with the Service or the Site.
ImageStation reserves the right, in its sole discretion, to terminate all or a portion of
the Service at any time and for any reason.
ImageStation reserves the right, in its sole discretion, to terminate your membership
in the Site, or to remove your Member Content (including unlisted, password
protected and unassigned Member Content) or to edit, delete or remove any
postings from the Site without prior notice for any cause or no cause in its sole
discretion.
Any termination under any provision of this Membership Agreement may be
effected without prior notice, and ImageStation may immediately delete and
discard all of your Member Content, and bar any further access to such files on the
Site or through the Service. Upon any termination of your membership, or of this
Membership Agreement, your right to use the Service will immediately cease.
ImageStation will have no obligation thereafter to host or provide access to your
Member Content, or to forward any materials stored through the Service or any
unread or unsent messages. ImageStation may retain certain materials for
administrative and other reasons.
121
19. Notices; Questions
All notices from a Member to ImageStation shall be in writing, and shall be made or
delivered to ImageStation via email or conventional mail
If you have any question about the Service, this Membership Agreement, please feel
free to contact us support @ImageStation.com.
20. Choice of Law
This Membership Agreement shall be constructed and controlled by the laws of the
State of California, excluding its conflict of law provisions. With the exception of
ImageStation’s rights to pursue injunctive relief in any court of competent
jurisdiction, you agree to submit to the exclusive jurisdiction of the state and federal
courts of the State of California.
21. General
This Membership Agreement constitutes the entire agreement between you and
ImageStation with respect to the Service; and your Member Content, and it
supersedes any other agreement, proposals and communications, written or oral,
between you and any ImageStation representatives with respect to the Service and
your Member Content.
If a court of competent jurisdiction holds that any provision of this Membership
Agreement is illegal, unenforceable, or contrary to law, such provision shall be
construed, as nearly as possible to reflect the original intent of this Membership
Agreement, with the other provisions remaining in full force and effect.
Any failure by ImageStation to exercise or enforce any right or provision of this
Membership Agreement shall not constitute a waiver of such rights or provision
unless ImageStation acknowledges and agrees to it in writing.
ImageStation may assign this Membership Agreement to any third party at its sole
discretion. You shall not assign or sublicense the rights granted under this
Membership Agreement without the prior written authorization of ImageStation.
You and ImageStation agree that any cause of action arising out of, or related to the
Service or the Site must commence without one (1) year after the cause of action
arose, otherwise, such cause of action is permanently barred.
Please check “http://www.imagestation.com/” for the latest information.
122
Sony Corporation
Printed in Japan
3 0 7 4 6 0 3 1 2