1
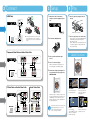
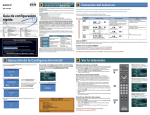
3-452-887-11 (2) 1 Select one of the connections below The number of stars ( ) indicates picture quality. [HD] Capable up to 1080p, 1080/24p resolution (recommended) Quick Start Guide Blu-ray Disc / DVD Player BDP-BX1 Video HDMI Cable + Audio (supplied) A single HDMI cable carries both video and audio signals. [HD] Capable up to 1080i Video Component Video Cable (not supplied) Follow the steps below to use your Blu-ray Disc / DVD Player. Audio Audio / Video Cable (supplied) 1 Select t 2 Connect For any inquiries, please call 1-800-222-SONY(7669) [SD] 480i only or visit the Sony Web Site : http://esupport.sony.com/ p 3 Setup Video S Video Cable (not supplied) 4 Play For more information, refer to the supplied Operating Instructions. Audio Audio / Video Cable (supplied) or Video Audio / Video Cable + Audio (supplied) ©2008 Sony Corporation Printed in Malaysia 2 Connect HDMI Cable 3 Setup 4 Play 1 1 After all of the other connections are complete, connect the supplied AC power cord. Press (open/close), and place a disc on the tray. Playback side facing down to AC outlet Carefully align the HDMI OUT jack on the rear of the player and the HDMI connector by checking their shapes. Make sure the connector is not upside down or tilted. 2 2 Insert two Size AA (R6) batteries. 3 Turn on your TV and switch the input selector. 4 Press / to turn on the player. Component Video Cable and Audio / Video Cable Press (open/close) to close the disc tray. When you insert a commercially available BD‑ROM or DVD VIDEO, playback automatically starts depending on the disc. Refer to “Playback” in the Operating Instructions for more details on playback, or when playback does not start automatically. Useful Functions Wait for a short while before the player turns on. The OSD language selection display appears. 5 S Video Cable and Audio / Video Cable Perform basic settings by following the onscreen instructions in “Easy Setup” using ////ENTER. Audio / Video Cable or TOP MENU POP UP / MENU Shows the original menu provided with the disc. Shows the pop-up menu, which can be displayed during playback. HOME OPTIONS Shows the XMB™ (XrossMediaBar) menu that allows you to operate disc playback and setups. Shows the optional menu available in each case. When “Easy Setup” is complete, the player is ready. To shorten the startup time from standby mode, set “Standby Mode” to “Quick Start” in the “System Settings” setup. Refer as well to “Standby Mode” in the Operating Instructions. To enjoy more BD functions, the following steps in the supplied Operating Instructions are necessary. – Step 3: Inserting the External Memory – Step 4: Connecting to the Network