1
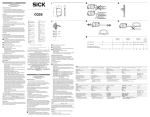
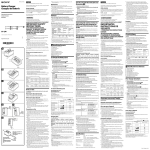
水のある場所に置かない 4-477-755-01(1) ACC-DCBXは以下のアクセサリーを同梱しています。 ACC-DCBX リチャージャブルバッテリーパック(NP-BX1) (1) (1) トラベルDCチャージャー(BC-DCX) (1) カーバッテリーアダプター(DCC-UD10) マイクロUSBケーブル(1) 印刷物一式 アクセサリーキット Accessory Kit Kit d’accessoires 配件套装 安全のために 警告表示の意味 取扱説明書および製品では、次のような表示をしています。表 示の内容をよく理解してから本文をお読みください。 この表示の注意事項を守らないと極めて危険 な状況が起こり、その結果大けがや死亡にい たる危害が発生します。 取扱説明書 Operating Instructions Mode d’emploi この表示の注意事項を守らないと思わぬ危険 な状況が起こり、その結果大けがや死亡にい たる危害が発生することがあります。 この表示の注意事項を守らないと、感電やそ の他の事故によりけがをしたり周辺の家財や 自動車に損害を与えたりすることがありま す。 ©2013 Sony Corporation Printed in China 注意を促す記号 行為を禁止する記号 ACC-DCBX 本機やバッテリーに水が入ったり、ぬれたり、風 呂場で使ったりすると、火災や感電の原因とな ります。 火のそばや炎天下、高温になった車の中など で放置したり、充電したりしない 危険防止の保護回路が壊れることがあります。 交通安全のために ˎ カーバッテリーアダプターとバッテリーチャージャーおよびデ ジタルカメラの接続や、シガレットライターソケットへの接続 は、危険ですので運転中には行わず、運転前に接続してくださ い。 ˎ バッテリーチャージャーおよびデジタルカメラは運転の妨げと ならない場所に置いてください。 エアバッグシステムの動作を妨げる取り付けをしな い チャージャーマーク Charger mark バッテリーマーク Battery mark 安全のための注意事項を守る この取扱説明書の注意事項をよくお読みください。お読みになっ たあとは、いつでも見られるところに必ず保管してください。 運転の妨げになる場所、車体の可動部の妨げになる 場所に取り付けや配線をすると、事故や感電、火災の 原因となります。 ˎ ネジやシートレールなどの可動部へマイクロUSB ケーブルをはさみ込まない。 ˎ マイクロUSBケーブルはまとめる。 ˎ ステアリングやシフトレバー、ブレーキペダルなど が正しく操作できることを確認する。 Charger バッテリーパック Battery pack 1年に1度は、故障したまま使用していないか、また、マイクロUSB 端子部とマイクロUSBケーブル端子、またはカーバッテリーアダ プターとシガレットライターソケットの間にほこりがたまってい ないか、などを点検してください。 故障したら使わない CHARGEランプ 動作がおかしくなったり、破損しているのに気づいたら、すぐにソ ニーの相談窓口にご相談ください。 CHARGE lamp 万一、異常が起きたら 変な音・においがしたら、煙が出たら、 異常に温度が上がったら、 NP-BX1 すぐにバッテリーをはずし、ソニーの相談窓口にご相談ください。 パソコン、USB AC チャージャーなどの USB充電対応機器 USB charging device (PC, USB AC charger) マイクロUSBケーブル(同梱) Micro USB cable (supplied) BC-DCX 本機からマイクロUSBケーブルを抜く ソニーの相談窓口に相談する DCC-UD10 安全な場所に車を止める シガレットライターソケットから本機を取りはずす ソニ−サ−ビス窓口に修理を依頼する バッテリーから液が漏れたら、 マイクロUSBケーブル(同梱) Micro USB cable (supplied) ˎ すぐに火気より遠ざけてください。漏れた液や気体に引火して 発火、破裂の恐れがあります。 ˎ 目に入った場合は、こすらずにすぐに水道水など多量のきれい な水で充分に洗ったあと、医師の治療をうけてください。 ˎ 液を口に入れたり、なめた場合、すぐに水道水で口を洗浄し医師 に相談してください。 ˎ 液が身体や衣服についたときは、水でよく洗い流してください。 下記の注意事項を守らないと火災・破裂により死亡や 大けがなどの人身事故が生じます。 POWERランプ POWER indicator ˎ 火の中に入れない。ショート(短絡)させたり、分解しない。電子 レンジやオーブンなどで加熱しない。コインやヘアピン、ネック レスなどの金属類と一緒に携帯、保管するととの端子(図の a)に接触し、ショート(短絡)することがあります。 ˎ 火のそばや炎天下、高温になった車の中などで放置したり、充電 したりしない。 ˎ 水・海水・牛乳・清涼飲料水・石鹸水などの液体で濡れたバッテ リーを充電したり、使用しない。 カーバッテリーアダプターを座布団などでおおった 状態で使わない 熱がこもってケースが変形したり、火災の原因とな ることがあります。 下記の注意事項を守らないと、けがをしたり周辺の家財 や自動車に損害を与えたりすることがあります。 水滴のかかる場所など、湿気の多い場所やほ こり、油煙、湯気の多い場所では使わない 上記のような場所で使うと、火災や感電の原因 となることがあります。 ぬれた手で本機をさわらない 感電の原因となることがあります。 安定した場所に置く トラベルDCチャージャーをぐらついた台の上 や傾いたところなどに置くと、製品が落ちてけ がの原因となることがあります。 また、カーバッテリーチャージャーに接続した バッテリーチャージャーおよびデジタルカメラ は、振動の多いところや、天井などに取り付ける と、製品が動く、落ちるなどにより、事故やけが の原因となることがあります。 通電中の本機、充電中のバッテリーに長時間 ふれない 温度が上がることがあります。長時間皮膚がふ れたままになっていると、低温やけどの原因と なることがあります。 規定容量のヒューズを使う ヒューズを交換する時は、必ずヒューズに記された 規定容量のアンペア数のものをお使いください。規 定容量を超えるヒューズを使うと、火災の原因とな ります。 通電中のカーバッテリーアダプターや製品に長時間 ふれない 長時間皮膚がふれたままになっていると、低温やけ どの原因となることがあります。 NP-BX1 主な仕様 最大電圧:DC 4.2 V/公称電圧:DC 3.6 V/定格容量:4.5 Wh (1,240 mAh)/使用温度:0 ℃∼40 ℃/最大外形寸法:約29.9 mm×9.2 mm×42.7 mm(幅×高さ×奥行き)/質量:約25 g マイクロUSBケーブル(同梱) Micro USB cable (supplied) ˎ ハンマーなどでたたいたり、踏みつけたり、落下させるなどの衝 撃や力を与えない。 ˎ 水・海水・牛乳・清涼飲料水・石鹸水などの液体でバッテリーを濡 らさない。 ˎ 乳幼児の手の届かない所に置き、口に入れないよう注意する。 万一飲み込んだ場合は、ただちに医師に相談してください。 ˎ 外装シールを剥がしたり、傷つけたりしない。シールの破れや剥 がれのある電池は、絶対に使用しない。 分解や改造をしない 火災や感電の原因となります。 内部の点検や修理はソニーの相談窓口にご相談 ください。 指定以外のバッテリー(電池)を使わない 火災やけがの原因になることがあります。 POWERランプ POWER indicator カーバッテリー アダプター Car battery adaptor リチウム リチウムイオン電池は、リサ イオン イクルできます。不要になっ たリチウムイオン電池は、金 電池 お願い 属部にセロハンテープなどの 絶縁テープを貼ってリサイク ル協力店へお持ちください。 充電式電池の回収・リサイクルおよびリサイクル協力店に ついては 一般社団法人JBRCホームページ http://www.jbrc.net/hp/contents/index.html を参照してください。 BC-DCX 使用上のご注意 本機は防じん、防滴、防水仕様ではありません。 充電について ˎ 必ずソニー製純正バッテリーをお使いください。 ˎ 専用バッテリー以外の充電には使わないでください。 ˎ バッテリーはしっかり取り付けてください。 充電するときの温度 室温が0℃∼40℃の範囲で充電できますが、電池の性能を充分 に発揮させるためには、10℃∼30℃での充電をおすすめしま す。10℃∼30℃以外では、効率のよい充電ができないことがあ ります。 置いてはいけない場所 使用中、保管中にかかわらず、次のような場所に置かないでくださ い。故障の原因になります。 ˎ 異常に高温になる場所 直射日光の当たる場所や、熱器具の近くには置かないでくださ い。炎天下や夏場の窓を閉め切った自動車内は特に高温になり ます。放置すると変形したり、故障したりすることがあります。 ˎ 激しい振動のある場所 ˎ 強力な磁気や放射線のある場所 ˎ 砂地、砂浜などの砂ぼこりの多い場所 海辺や砂地、あるいは砂ぼこりが起こる場所などでは、砂がかか らないようにしてください。故障の原因になります。 使用について ˎ 本機の型名や動作電圧などを表示したラベルは、製品の底面に あります。 ˎ 充電するときは、バッテリーを本機にしっかり取り付けてくだ さい。 ˎ 衝撃を与えたり、落としたりしないでください。 ˎ TVやAMラジオやチューナーの近くで使わないでください。 TVやラジオ、チューナーに雑音が入ることがあります。 ˎ 本機の接点部に他の金属類が触れないようにしてください。 ショートすることがあります。 ˎ 充電中および充電直後のバッテリーまたは本機は、あたたかく なる場合があります。 お手入れについて ˎ 汚れがついたときは、柔らかい布やティッシュペーパーなどで、 きれいに拭き取ってください。 ˎ 汚れがひどいときは、水でうすめた中性洗剤に柔らかい布をひ たし、固くしぼってから汚れを拭き取り、乾いた布で仕上げてく ださい。 ˎ アルコール、シンナー、ベンジンなどは使わないでください。変 質したり、塗装を傷めたりすることがあります。 ˎ 化学ぞうきんをご使用の際は、その注意書きに従ってください。 ˎ 殺虫剤のような揮発性のものをかけたり、ゴムやビニール製品 に長時間接触させると、変質したり、塗装を傷めたりすることが あります。 バッテリーを充電する 本機をマイクロUSBケーブルに接続する前に、必ずバッテリーを 本機に取り付けてください。 1 2 バッテリーを取り付ける。 本機のトップカバーをスライドして開けてください。 バッテリーの▼マークと本機の▼マークの方向を合わせて、 バッテリーを「カチッ」と音がするまで、奥まで差し込んでく ださい。 本機のトップカバーを反対方向にスライドさせて閉じてくだ さい。 (イラスト) マイクロUSBケーブル(同梱)を本機に接続してか ら、パソコンやUSB ACアダプターなどのUSB充 電機器に接続する。 (イラスト) 充電が始まると、 CHARGEランプ(オレンジ色)が点灯します。 充電が終了するとCHARGEランプが消えます。 バッテリーを取りはずすとき 本機からマイクロUSBケーブルをはずし、本機のトップカバーを スライドして開けてください。 バッテリーを▼マークの方向へ軽く押し、バッテリーの端を引き 上げて本機の留め金からはずし、スライドして本機から取りはず してください。 本機のトップカバーを反対方向にスライドして閉じてください。 (イラスト) ヒューズ Fuse プラグの先端 End of the plug 締める to tighten はずす to remove 内部に水や異物を入れない ˎ 水や異物が入ると火災や感電の原因となりま す。万一、トラベルDCチャージャー使用時に水 や異物が入ったときは、 チャージャーらマイク ロUSBケーブルを抜いて、ソニーの相談窓口に ご相談ください。カーバッテリーアダプター 使用時に水や異物が入ったときは、すぐにUSB 接続ケーブルを抜き、カーバッテリーアダプ ターをシガレットライターソケットから抜い て、ソニーの相談窓口にご相談ください。 ˎ シガレットライターソケット内に異物が入っ ていると危険ですので注意してください。 トラベルDCチャージャー(BC-DCX)はバッテリーを持ち運びす る際の保護ケースとしてもお使いいただけます。 a 使用上のご注意 ˎ 高温になる所に放置しないでください。性能劣化や故障の原因 になることがあります。 ˎ 端子(図のa)にゴミや砂などの異物が付着しないように注意し てご使用ください。異物が付着してしまった場合には、先の細い やわらかい綿棒などで完全に取り除いたあと、充電器や機器へ の取り付け、取りはずしをくり返してください。 ˎ お使いになる機器の取扱説明書もあわせてご覧ください。 充電について ご使用前に必ずソニー製専用充電器、または充電機能がある機器 で充電してください。(バッテリーチャージャーBC-DCX/BC-TRX など、本バッテリーを充電できる機器) 周囲の温度が10 ℃∼30 ℃の範囲で、満充電まで充電することを おすすめします。この温度以外では、効果的な充電ができないこと があります。詳細な充電のしかたと充電時間については、充電する 各機器の取扱説明書をご覧ください。 バッテリーの上手な使いかた ˎ 通常のご使用においては、充電の前に電池を使い切る必要はあ りません。残量があっても充電容量には影響ありません。 ˎ 周囲の温度が低いとバッテリーの性能が低下します。ポケット などに入れて暖かくしておき、ご使用の直前にお使いになる機 器に取り付けることをおすすめします。 ˎ 撮影には予定撮影時間の2∼3倍の予備バッテリーを準備して、 事前に試し撮りをしましょう。 バッテリーの保管方法について 充電時間について バッテリー 満充電時間 NP-BX1 約155分(AC-UD10、AC-UD11を使用した場 合) 約230分(パソコンまたはAC-UB10を使用し た場合) ˎ 本機を使用し、使い切ったバッテリーを25℃の室温で充電した ときの時間です。 ˎ 周囲の温度やバッテリーの状態によっては、上記の充電時間と 異なる場合があります。 急いで使いたいとき バッテリーは、充電が完了する前でも必要なときに取りはずして 使えます。ただし、充電時間によってお使いになれる時間が異なり ます。 ご注意 ˎ CHARGEランプが点灯しないときはバッテリーがしっかり取り 付けられているか確認してから一度マイクロUSBケーブルをは ずし、再度接続してください。 ˎ すでに充電を完了しているバッテリーを取り付けたとき、 CHARGEランプが1度点灯してから消えます。 ˎ 長期間使用していないバッテリーを充電する場合は、充電時間 が長くなることがあります。 ˎ 充電済みのバッテリーは、使用していなくても徐々に放電され ています。撮影機会を逃さないよう、ご使用前にバッテリーを充 電してください。 ˎ 長期保管の際は1年に1回程度満充電にしてご使用の機器で使 い切った後、取りはずして、涼しい場所で保管してください。 故障かな?と思ったら バッテリーの寿命について ˎ バッテリーが満充電になっています。 ˎ マイクロUSBケーブル(同梱)が本機とUSB充電機器にしっかり 接続されているか確認してください。 ˎ USBハブなどを使用せず、本機を直接パソコンに接続してくだ さい。 ˎ バッテリーには寿命があります。使用回数を重ねたり、時間が経 過するにつれバッテリーの容量は少しずつ低下します。使用で きる時間が大幅に短くなった場合は、寿命と思われますので新 しいものをご購入ください。 ˎ 室温が充電に適した温度範囲外のとき、自動的に充電が一時停 止されます。 充電に適切な温度の範囲内に戻ると、CHARGEランプが点灯し 充電が再開されます。 バッテリーの充電は、周囲温度が10℃∼ 30℃の環境で行うこと をおすすめします。 主な仕様 定格入力 定格出力 使用温度 保存温度 外形寸法(約) 質量 DC 5V DC4.2 V 0.86 A 0℃∼40℃ −20℃∼+60℃ 36 mm×70 mm×13.5 mm DCC-UD10 本機を同梱のマイクロUSBケーブルでバッテリーチャージャー (トラベルDCチャージャーBC-DCXなど)に接続すると、シガーラ イターソケットからバッテリーを充電することができます。 また、本機を同梱のマイクロUSBケーブルでデジタルカメラに接 続すると、シガーライターソケットからデジタルカメラに給電し ながら撮影できます。 使いかた 充電は、必ず車のエンジンがかかった状態で行ってください。エン ジンを切ったままで使用すると、車のバッテリーを消耗させてし まう場合があります。 CHARGEランプ(オレンジ色)が点灯しない ˎ 本機を設置するときは、アクセルやシフトレバーを誤操作しな いよう周囲の安全に配慮してから行ってください。 ˎ 運転中の操作は危険なので、接続や充電に必要な操作は、必ず運 転する前に、停車状態で行ってください。 バッテリーを充電する(イラスト) 1 2 シガレットライターソケットへ本機を差し込む。 本機のPOWERランプが緑色に点灯します。 同梱のマイクロUSBケーブルを使い、本機とバッ テリーチャージャーを接続する。 接続したバッテリーチャージャーは、安全な場所に置いてく ださい。 デジタルカメラに給電する(イラスト) 1 2 ˎ アルコール、シンナー、ベンジンなどは使わないでください。変 質することがあります。 ˎ 化学ぞうきんをご使用の際は、その注意書きに従ってください。 ˎ 殺虫剤のような揮発性のものをかけたり、ゴムやビニール製品 に長時間接触させると、変質することがあります。 主な仕様 定格入力電圧 (マイナスアース車専用) DC 12 V/24 V、 定格出力電圧 DC 5.0 V 定格出力電流 1,500 mA 最大外形寸法 約93 mm (幅/高さ/奥行き) 約17 g ご注意 ちょっと一言 下記の注意事項を守らないと火災・感電・交通事故 により死亡や大けがの原因となります。 以下のような場合、一度目の充電ではCHARGEランプが早い点滅 になる場合があります。 その場合は一度バッテリーをバッテリーチャージャーからはず し、再度充電を行ってください。 長期間バッテリーを放置した場合 長期間バッテリーをカメラ本体に取り付けたまま放置した場 合 お買い上げ直後 なお、二度目の充電でも早い点滅*になる場合はバッテリーもしく はバッテリーチャージャーの異常が考えられますので、ご使用な さらずソニーの相談窓口にお問い合わせください。 * 早い点滅:1秒間に3回程度の点滅 火災やけがの原因となることがあります。 道路交通法に従って安全運転する チャージャー 充電できないときは 本機は対応機種以外では使わない 運転者は道路交通法に従う義務があります。前方注意をおこたる など、安全運転に反する行為は違法であり、事故やけがの原因とな ることがあります。 定期的に点検する 万一、バッテリーなどの不具合によって撮影や記録、再生がされな かった場合、撮影・記録内容の補償についてはご容赦ください。 運転操作や車体の可動部を妨げる取り付けはしない 上記のような場所に取り付けると、火災や感電の原 因となります。 ソニー製品は安全に充分配慮して設計されています。しかし、電気 製品はすべて、まちがった使いかたをすると、火災や感電などによ り人身事故になることがあり危険です。事故を防ぐために次のこ とを必ずお守りください。 撮影・記録内容の補償について 動作の妨げになる場所に取り付けると、エアバッグ が正常に働かず、けがの原因となります。 雨、水がかかる場所、湿気、ほこりの多い場所には取り 付けない 行為を指示する記号 ˎ 寿命は、保管方法、使用状況や環境、バッテリーごとに異なりま す。 シガレットライターソケットへ本機を差し込む。 本機のPOWERランプが緑色に点灯します。 同梱のマイクロUSBケーブルを使い、本機とデジ タルカメラを接続する。 約90 mm 約20.6 mm 質量 約40 g 保証書とアフターサービス 保証書について ˎ BC-DCXとDCC-UD10には保証書が添付されていますので、お この取扱説明書をもう一度ご覧になってお調べください。 それでも具合の悪いときは ソニーの相談窓口にご相談ください。 ご相談になるときは、次のことをお知らせください。 ˎ 型名:BC-DCX/DCC-UD10 ˎ 故障の状態:できるだけ詳しく ˎ お買い上げ日 保証期間中の修理は 保証書の記載内容に基づいて修理させていただきます。詳しくは 保証書をご覧ください。 保証期間経過後の修理は 修理によって機能が維持できる場合は、ご要望により有料修理さ せていただきます。 記録内容は補償できません 万一、本機の不具合により記録や再生がされなかった場合、画像や 音声などの記録内容の補償については、ご容赦ください。 NP-BX1 車のエンジンを切ったときには BC-DCX/DCC-UD10 ご注意 5 新しいヒューズを用意する。 6 7 ヒューズが切れていないか確認する。 切れている場合は、手順5へ 切れていない場合は、手順6へ 市販の同じ定格のヒューズ (1 A 125 V、長さ約20 mm)をお求めください。 ヒューズを差し込む。 プラグの先端を元通りにしっかり締める。 ご注意 ˎ 定格の異なるヒューズをご使用になると故障や火災の原因にな ります。 ˎ ヒューズを針金などで代用しないでください。 ˎ ヒューズを交換したあとも、再び切れるような場合には、お買い 上げ店にご相談ください。 使用上のご注意 置いてはいけない場所 使用中、保管中にかかわらず、次のような場所に置かないでくださ い。故障の原因になります。 ˎ 異常に高温になる場所 炎天下や夏場の窓を閉め切った自動車内は特に高温になり、放 置すると変形したり、故障したりすることがあります。 ˎ 直射日光の当たる場所、熱器具の近く 変形したり、故障したりすることがあります。 ˎ 激しい振動のある場所 使用について ˎ 本機を使用する前には、必ず接続するバッテリーチャージャー やデジタルカメラの定格電圧、定格電流を確認の上ご使用くだ さい。 ˎ 本機の使用状態によって、定格電流より過大な電流が流れた場 合は、安全の為に本機の出力電圧が一時的に途切れ、使用されて いる機器の電源が切れる場合があります。 ˎ 強い衝撃を与えたり、落としたりしないでください。 ˎ 使用後は必ずカーバッテリーアダプターをシガレットライター ソケットから抜いておいてください。 ˎ シガレットライターソケットから抜くときは本機を持って抜い てください。 ˎ 本機の接点部に他の金属類が触れないようにしてください。 ショートすることがあります。 ˎ 本機をシガレットライターソケットに挿入した状態で、車のエ ンジンをかけたり止めたりすると、本機に接続したデジタルス チルカメラのメモリーデータが破損、消失する場合があります ので、充分にご注意ください。 お手入れについて ˎ 汚れたときは、柔らかい布やティッシュペーパーなどで、きれい に拭き取ってください。 汚れがひどいときは、水でうすめた中性洗剤に柔らかい布をひ たし、固くしぼってから汚れを拭き取り、乾いた布で仕上げてく ださい。 Before operating this charger, please read this manual thoroughly and retain it for future reference. Owner’s Record Brand Name Sony Battery Type NP-BX1 Rating DC 3.6 V 4.5 Wh (1,240 mAh) Notes on Use This unit does not have dust-proof, splash-proof or waterproof specifications. Warranty for Recorded Content Contents of the recording cannot be compensated if recording or playback is not made due to a malfunction of the battery pack, charger, etc. Where not to place this unit Do not place this unit in any of the following locations, whether it is in use or in storage. Doing so may lead to a malfunction. ˎˎIn direct sunlight or near heating apparatus, as this unit may become deformed or malfunction ˎˎWhere there is excessive vibration ˎˎWhere there is strong electromagnetism or radiant rays ˎˎWhere there is excessive sand In locations such as the seashore and other sandy areas or where dust clouds occur, protect this unit from sand and dust. There is a risk of malfunction. ˎˎAttach the battery pack firmly to this unit when charging the battery pack. ˎˎDo not drop or apply mechanical shock to this unit. ˎˎKeep this unit away from TVs or AM receivers. Noise from this unit may enter a TV or radio if placed nearby. ˎˎBe sure that nothing metallic comes into contact with the metal parts of this unit. If it does, a short may occur and this unit may be damaged. ˎˎThe battery pack and this unit can become warm during or immediately after recharging. ˎˎIf this unit gets dirty, wipe it using a soft dry cloth. ˎˎIf this unit gets very dirty, wipe it using a cloth with a little neutral solvent added, and then wipe it dry. ˎˎDo not use thinners, benzine, alcohol, etc., as they will damage the surface of this unit. ˎˎWhen you use a chemical cleaning cloth, refer to its instruction manual. ˎˎUsing a volatile solvent such as an insecticide or keeping this unit in contact with a rubber or vinyl product for a long time may cause deterioration or damage to this unit. To Charge the Battery Pack Make sure to attach the battery pack to the charger before connecting a micro USB cable. 1 Attach the battery pack to the charger. ヒューズの交換(イラスト) ヒューズを取り出す。 Thank you for purchasing the Sony charger. Maintenance ˎ シガレットライターソケットへの接続はしっかりと確実に 行ってください。 ˎ シガレットライターソケットの位置・形状によっては本機が使 用できない場合があります。 ˎ 車が急ブレーキをかけた際に、本機に接続した機器が動かない ようしっかりと固定してください。 ˎ マイクロUSBケーブルは運転操作や可動部の妨げにならないよ うに設置してください。 また断線、故障の原因となりますので強く引っ張らないでくだ さい。 ˎ USBハブやUSB延長ケーブルをご使用の場合の動作保証はいた しかねます。必ず、同梱のマイクロUSBケーブルを使用し、バッ テリーチャージャーおよびデジタルカメラ側の指定する接続方 法に従ってください。 ˎ 本機は充電中に温かくなることがありますが故障ではありませ ん。 プラグの先端部分を回してはずす。 BC-DCX Precautions on Use 車のバッテリーの消耗を避けるために、本機を使用しないときは、 必ずシガレットライターソケットから抜いておいてください。 シガレットライターソケットから本機を抜く。 Maximum output voltage: DC 4.2 V / Nominal output voltage: DC 3.6 V / Capacity: 4.5 Wh (1,240 mAh) / Operating temperature: 0 °C to 40 °C (32 °F to 104 °F) / Dimensions (Approx.): 29.9 mm × 9.2 mm × 42.7 mm (w/h/d) (1 3/16 in. × 3/8 in. × 1 11/16 in.) / Mass: Approx. 25 g (0.9 oz.) Battery to be recharged for this product is follows 本機を使用しないときは 1 2 3 4 Specifications 調子が悪いときはまずチェックを アフターサービスについて 詳しくはお使いのデジタルカメラの取扱説明書をご覧くださ い。対応機種によっては、給電をするための操作が必要のない 機種もあります。 ˎ デジタルカメラは、イラストのものとは限りません。 本機が正常に動作しない場合は、カーバッテリーアダプター内部 のヒューズが切れていないかを確認してください。 NP-BX1 The model and serial numbers are located on the bottom. Record the serial number in the space provided below. Refer to these numbers whenever you call upon your Sony dealer regarding this product. Model No. BC-DCX Serial No. デジタルカメラ側で給電に必要な操作を行う。 車の種類によっては、エンジンを切ってもシガレットライターソ ケットの電源が切れない場合があります。エンジンを切ったまま で使用すると、車のバッテリーを消耗させてしまいますので、エン ジンを切った時には、必ず本機をシガレットライターソケットか ら抜いておいてください。 The shielded USB cable must be used with the equipment in order to comply with the limits for a digital device pursuant to Subpart B of Part 15 of FCC Rules. 買い上げの際、お受け取りください。 ˎ 所定事項の記入および記載内容をお確かめのうえ、大切に保存 してください。 ˎ 保証期間は、お買い上げ日より1年間です。 接続したデジタルカメラは、カーマウントに装着し、安全な場 所に設置してください。 3 This device complies with Part 15 of the FCC rules. Operation is subject to the following two conditions: (1) this device may not cause harmful interference, and (2) this device must accept any interference received, including interference that may cause undesired operation. 仕様および外観は、改良のために予告なく変更することがありま すが、ご了承ください。 Slide the top cover of the charger to open. Keeping the battery mark in the same direction as the charger mark , insert the battery pack into the charger until it clicks into place. Slide the top cover of the charger in the reverse direction to close. (See illustration ) 2 Connect a micro USB cable (supplied) to this unit, The ACC-DCBX comes with the following accessories: ACC-DCBX Rechargeable Battery Pack (NP-BX1) (1) Travel DC charger (BC-DCX) (1) Car Battery Adaptor (DCC-UD10) (1) Micro USB cable (1) Set of printed documentation WARNING To reduce the risk of fire or electric shock, 1) do not expose the unit to rain or moisture. 2) do not place objects filled with liquids, such as vases, on the apparatus. Do not expose the batteries to excessive heat such as sunshine, fire or the like. Note This device complies with Part 15 of the FCC rules. Operation is subject to the following two conditions: (1) this device may not cause harmful interference, and (2) this device must accept any interference received, including interference that may cause undesired operation. CAN ICES-3 B/NMB-3 B NOTICE FOR THE CUSTOMERS IN THE U.S.A. CAUTION You are cautioned that any changes or modifications not expressly approved in this manual could void your authority to operate this equipment. NOTE This equipment has been tested and found to comply with the limits for a Class B digital device, pursuant to Part 15 of the FCC Rules. These limits are designed to provide reasonable protection against harmful interference in a residential installation. This equipment generates, uses, and can radiate radio frequency energy and, if not installed and used in accordance with the instructions, may cause harmful interference to radio communications. However, there is no guarantee that interference will not occur in a particular installation. If this equipment does cause harmful interference to radio or television reception, which can be determined by turning the equipment off and on, the user is encouraged to try to correct the interference by one or more of the following measures: ˎˎReorient or relocate the receiving antenna. ˋˋIncrease the separation between the equipment and receiver. ˋˋConnect the equipment into an outlet on a circuit different from that to which the receiver is connected. ˋˋConsult the dealer or an experienced radio/TV technician for help. and then to the USB charging device (PC, USB AC charger). (See illustration ) The CHARGE lamp (orange) lights up and charging begins. When the CHARGE lamp goes out, charging is completed. To remove the battery pack Disconnect the micro USB cable from this unit, and then slide the top cover of the charger to open. Lightly push the battery pack in the direction of its mark , lift the end of the battery pack to release it from the charger’s clamp, then slide the battery pack from the charger. Slide the top cover of the charger in the reverse direction to close. Tip The travel DC charger (BC-DCX) also can be used as a protected case when carrying the battery. Charging time Battery pack Full charging time (Approx.) NP-BX1 155 min (Using AC-UD10, AC-UD11) 230 min (Using PC, AC-UB10) ˎˎFor more about the battery life, see the instruction manual of your camera. ˎˎThe charging time may differ depending on the condition of the battery pack or the ambient temperature. ˎˎThe times shown are for charging an empty battery pack, which has been run down with a camera, using this unit at an ambient temperature of 25 °C (77 °F). Charging temperature The temperature range for charging is 0 °C to 40 °C (32 °F to 104 °F). For maximum battery efficiency, the recommended temperature range when charging is 10 °C to 30 °C (50 °F to 86 °F). To use the battery pack quickly Troubleshooting The CHARGE lamp (orange) does not light up ˎˎThe battery is fully charged. ˎˎMake sure a micro USB cable (supplied) is connected to this unit and the USB charging device firmly. ˎˎConnect this unit directly to the PC, not via a USB hub, etc. ˎˎIf the room temperature is out of the appropriate temperature range, charging stops automatically. When the room temperature returns to the appropriate range, the CHARGE lamp lights up and charging restarts. We recommend charging the battery pack at 10 °C to 30 °C (50 °F to 86 °F). Specifications Input rating Output rating DC 5 V Battery charge terminal: DC 4.2 V 0.86 A Operating temperature 0 °C to 40 °C (32 °F to 104 °F) Storage temperature –20 °C to +60 °C (–4 °F to +140 °F) Dimensions (Approx.) 36 mm × 70 mm × 13.5 mm (w/h/d) (1 7/16 in. × 2 7/8 in. × 9/16 in.) Mass Approx. 17 g (0.6 oz) DCC-UD10 Before operating the unit, please read this manual thoroughly and retain it for future reference. By connecting this Car Battery Adaptor DCC-UD10 to the battery charger (Travel DC Charger BC-DCX etc.) with the Micro USB cable supplied with this unit, you can enable a battery pack to be charged from the cigarette lighter socket. By connecting this Car Battery Adaptor DCC-UD10 to the compatible digital camera with the Micro USB cable supplied with this unit, you can enable the digital camera to record while the digital camera is powered from the cigarette lighter socket. To reduce the risk of fire, do not cover the ventilation of the apparatus with news papers, tablecloths, curtains, etc. And don’t place lighted candles on the apparatus. To reduce the risk of fire or electric shock, do not place objects filled with liquids, such as vases, on the apparatus. To avoid electrical shock, do not open the cabinet. Refer servicing to qualified personnel only. Precautions On safety ˎˎUnplug the unit from the cigarette lighter socket if it is not to be used. To disconnect the unit, grasp the unit and pull it. Never pull the cord connected to the unit. ˎˎShould any liquid or solid object fall into the unit, disconnect the unit from the cigarette lighter socket and the equipment and have the unit checked by qualified personnel before operating it any further. Installation Do not place the car battery adaptor in a location where it is: ˎˎSubject to extreme high temperature. (E.g., in a car with its windows closed) ˎˎSubject to direct sunlight or near a heat source. ˎˎSubject to mechanical vibration or shock. ˎˎSubject to excessive dust. Operation ˎˎMake sure the outlet matches the current and voltage of the battery charger or digital camera you want connect to the car battery adaptor. ˎˎFor safety, if the input current is too high, the unit will automatically shut down. ˎˎTo prevent damage, be careful not to drop or otherwise cause a mechanical shock to the unit. ˎˎAfter using, disconnect the unit from the cigarette lighter socket and the equipment. ˎˎDisconnect the unit from the cigarette lighter socket by grasping the unit itself. Do not pull on the cord connected to the unit. ˎˎTo avoid short-circuiting, do not allow the terminals of the unit or connector to touch any metal object. ˎˎNote that data stored in the digital still camera connected to this unit may be lost or damaged, if the engine is started or stopped while this unit is inserted into the cigarette lighter socket. Cleaning ˎˎClean the unit with a soft, dry cloth. If the unit is very dirty, wipe it off with a soft cloth lightly moistened with a mild detergent solution, and then wipe with a soft dry cloth. ˎˎDo not use any type of solvent such as alcohol, thinner, or benzine as it may damage the finish of the cabinet. ˎˎIf you use any chemical cleaner, observe the instructions provided with the product. ˎˎIf the cabinet of the unit is splashed with any type of solvent such as insecticide, or remains in contact for a long time with rubber or vinyl, the finish of the cabinet may be damaged. How to Use Be sure to charge the device with the engine of the car running. If the unit is left plugged into the cigarette lighter socket when the engine is not running, power may be consumed from the car battery. Notes ˎˎEnsure that the car battery adaptor is safely installed so as not to interfere with the operation of the accelerator or gears. ˎˎNever perform connection and charging while your car is in motion. Charging the battery pack (See illustration ) 1 Insert the car battery adaptor into the cigarette lighter socket. The POWER indicator lights up green. 2 Connect the car battery adaptor to the battery charger using the micro USB cable supplied with this unit. Put the connected battery charger in a safe place. Powering the digital camera (See illustration ) 1 Insert the car battery adaptor into the cigarette lighter socket. The POWER indicator lights up green. 2 Connect the car battery adaptor to the digital camera, using the micro USB cable supplied with this unit. Attach the connected digital camera to the car mount, and put it in a safe place. 3 Set the digital camera to recharge. See the instruction manual of your digital camera for details. Some models do not require setting to recharge. ˎˎYour digital camera may not be the one illustrated in these operating instructions. You can remove the battery pack from this unit and use it even if charging is not completed. However, the charging time affects the time that the battery pack can be used. While not using the car battery adaptor Notes When you turn the car engine off ˎˎIf the CHARGE lamp does not light up, check if the battery pack is firmly attached to this unit, and then disconnect and reconnect the micro USB cable. ˎˎWhen a fully charged battery pack is installed, the CHARGE lamp lights up once and then goes out. ˎˎA battery pack that has not been used for a long time may take longer than usual to charge. ˎˎThe charged battery pack gradually discharges even if you do not use it. Charge the battery pack before use to avoid missing any recording opportunities. To avoid unnecessary car battery consumption, unplug this unit from the cigarette lighter socket when not in use. Unplug this unit from the cigarette lighter socket whenever the engine of the car is not running. Depending on the car type, even if the engine is off, the power supply may not turn off automatically. In this case, this may cause unnecessary car battery consumption. (Continued on the reverse side.) 当 CHARGE 灯熄灭时,表示完成充电。 Repère du chargeur 充电器 标记 Repère de la batterie 电池 标记 Notes ˎˎUse of a higher amperage fuse may cause serious damage or fire. ˎˎDo not use a piece of wire instead of a fuse. ˎˎIf the replaced fuse blows again, consult your dealer. Specifications Input voltage Rated output voltage Rated output current Dimensions Approx. 93 mm Chargeur 充电器 DC 12 V/24 V (only for negative grounded cars) DC 5.0 V 1,500 mA Approx. 90 mm Batterie rechargeable 电池 Approx. 20.6 mm Témoin CHARGE CHARGE 灯 Mass Approx. 40 g (1.4 oz) Design and specifications are subject to change without notice. Périphérique de charge USB (PC, Chargeur CA USB) USB 充电设备 (PC、USB AC 充电器) Câble micro-USB (fourni) Micro USB 连接线(附带) L’ACC-DCBX est livré avec les accessoires suivants : ACC-DCBX Batterie rechargeable (NP-BX1) (1) Chargeur CC de voyage (BC-DCX) (1) Adaptateur pour batterie de voiture (DCC-UD10) (1) Câble micro-USB (1) Jeu de documents imprimés AVERTISSEMENT Pour réduire les risques d’incendie ou d’électrocution, 1) n’exposez l’appareil à la pluie ou à l’humidité ; 2) ne placez pas d’objets remplis de liquides (vases, etc.) sur l’appareil. N’exposez pas les piles à une chaleur excessive, notamment aux rayons directs du soleil, à une flamme, etc. Cet appareil est conforme à la Partie 15 des réglementations FCC. Son fonctionnement est soumis à ces deux conditions : (1) cet appareil ne doit pas causer d’interférences nuisibles, et (2) cet appareil doit accepter toutes les interférences reçues, incluant celles qui pourraient compromettre son fonctionnement. CAN ICES-3 B/NMB-3 B AVIS À LA CLIENTÈLE AUX ÉTATS-UNIS AVERTISSEMENT Par la présente, vous êtes avisé du fait que tout changement ou toute modification ne faisant pas l’objet d’une autorisation expresse dans le présent manuel pourrait annuler votre droit d’utiliser l’appareil. Note Témoin POWER POWER(电源)指示灯 Câble micro-USB (fourni) Micro USB 连接线(附带) L’appareil a été testé et est conforme aux exigences d’un appareil numérique de Classe B, conformément à la Partie 15 de la réglementation de la FCC. Ces critères sont conçus pour fournir une protection raisonnable contre les interférences nuisibles dans un environnement résidentiel. L’appareil génère, utilise et peut émettre des fréquences radio; s’il n’est pas installé et utilisé conformément aux instructions, il pourrait provoquer des interférences nuisibles aux communications radio. Cependant, il n’est pas possible de garantir que des interférences ne seront pas provoquées dans certaines conditions particulières. Si l’appareil devait provoquer des interférences nuisibles à la réception radio ou à la télévision, ce qui peut être démontré en allumant et éteignant l’appareil, il est recommandé à l’utilisateur d’essayer de corriger cette situation par l’une ou l’autre des mesures suivantes : ˋˋRéorienter ou déplacer l’antenne réceptrice. ˋˋAugmenter la distance entre l’appareil et le récepteur. ˋˋBrancher l’appareil dans une prise ou sur un circuit différent de celui sur lequel le récepteur est branché. ˋˋConsulter le détaillant ou un technicien expérimenté en radio/ téléviseurs. Cet appareil est conforme à la Partie 15 des réglementations FCC. Son fonctionnement est soumis à ces deux conditions : (1) cet appareil ne doit pas causer d’interférences nuisibles, et (2) cet appareil doit accepter toutes les interférences reçues, incluant celles qui pourraient compromettre son fonctionnement. Témoin POWER POWER(电源)指示灯 Adaptateur pour batterie de voiture 车用电池转接器 Fusible 保险丝 Extrémité de la fiche 插头末端 pour visser 拧紧 (Continued from the front side.) Notes ˎˎPlug securely into the cigarette lighter socket. ˎˎThis unit may not fit, depending on the location or shape of the cigarette lighter socket. ˎˎSecure the connected battery charger or digital camera so that it will not move in the event of sudden braking. ˎˎBe careful to route the micro USB cable so that it will not interfere with driving, become entangled with passenger movements, or be damaged by seat adjustments, etc. Never yank or pull the micro USB cable connected to the unit. This may cause malfunctions or wire breaks. ˎˎDo not use the battery charger or digital camera in a place subject to liquid or moisture to avoid fire or electric shock. ˎˎPerformance is not guaranteed in case of using an USB hub or USB extension cable. Follow the connection method designated by the battery charger or digital still camera. ˎˎThis unit may become warm while using. This is not a malfunction. Fuse replacement (See illustration ) If this unit does not work correctly, check the fuse in the car battery adaptor. If the fuse is blown, replace it. 1 Pull this unit out of the cigarette lighter socket. 2 Detach the end of the plug by turning it counter3 4 clockwise. Take out the fuse. Check the fuse. 5 Install a new fuse. If the fuse is blown, go to Step 5. If no fuse is blown, go to Step 6. Use a fuse of the correct amperage, as stated on the fuse compartment of this unit (1 A, 125 V, 20 mm). 6 Insert the fuse. 7 Reattach the end of the plug by turning it clockwise firmly. Le câble USB blindé doit être utilisé avec l’appareil pour que celui-ci soit conforme aux critères régissant les appareils numériques, conformément à la sous-partie B de la Partie 15 de la réglementation de la FCC. Entretien ˎˎVérifiez que la prise correspond au courant et à la tension du chargeur de batterie ou de l’appareil photo qui doit être raccordé à l’adaptateur pour batterie de voiture. ˎˎPar mesure de sécurité cet accessoire s’arrête automatiquement si le courant d’entrée est trop élevé. ˎˎPour éviter tout dommage, veillez à ne pas laisser tomber cet accessoire et à ne pas l’exposer à un choc mécanique. ˎˎAprès utilisation, débranchez cet accessoire de la prise allume-cigare et de l’appareil. ˎˎDébranchez cet accessoire de la prise allume-cigare en saisissant son boîtier. Ne tirez pas sur le cordon raccordé à cet accessoire. ˎˎPour éviter les courts-circuits, ne touchez pas d’objet métallique avec les bornes ou le connecteur de cet accessoire. ˎˎNotez que les données enregistrées dans l’appareil photo numérique raccordé à cet accessoire peuvent être perdues ou altérées si le moteur est démarré ou arrêté quand cet accessoire est inséré dans la prise allume-cigare. ˎˎLorsque cet accessoire est sale, essuyez-le avec un chiffon sec et doux. ˎˎLorsque cet accessoire est très sale, essuyez-le avec un chiffon et un peu de solvant neutre puis séchez-le. ˎˎN’utilisez pas de diluants, benzine, alcool, etc. car ils endommageraient la surface de cet accessoire. ˎˎSi vous utilisez un tissu de nettoyage chimique, consultez son mode d’emploi. ˎˎL’emploi d’un solvant volatil, comme un insecticide, ou la mise en contact direct de cet accessoire avec un produit en caoutchouc ou en plastique pendant une longue période peut détériorer ou endommager cet accessoire. Pour charger la batterie Veillez à fixer la batterie sur le chargeur avant de raccorder un câble micro-USB. 1 Fixez la batterie au chargeur. Faites glisser le couvercle supérieur du chargeur pour l’ouvrir. Alignez le repère de la batterie dans la direction du repère du chargeur et insérez la batterie dans le chargeur de sorte qu’elle s’encliquette. Faites glisser le couvercle supérieur du chargeur dans le sens inverse pour le fermer. (Voir l’illustration ) 2 Raccordez un câble micro-USB (fourni) à cet accessoire, puis au périphérique de charge USB (PC, chargeur CA USB). (Voir l’illustration ) Le témoin CHARGE (orange) s’allume et la charge commence. Lorsque le témoin CHARGE s’éteint, la charge est terminée. Débranchez le câble micro-USB de cet accessoire et faites glisser le couvercle supérieur du chargeur pour l’ouvrir. Poussez légèrement la batterie dans la direction de son repère , soulevez l’extrémité de la batterie pour la libérer de la fixation du chargeur, puis faites glisser la batterie pour la retirer du chargeur. Faites glisser le couvercle supérieur du chargeur dans le sens inverse pour le fermer. Conseil Le chargeur CC de voyage (BC-DCX) peut aussi faire office de boîtier lors du transport de la batterie. Temps de charge Batterie rechargeable Temps de charge complète (environ) NP-BX1 155 min (Avec l’AC-UD10, l’AC-UD11) 230 min (Avec un PC, l’AC-UB10) ˎˎPour plus d’informations sur l’autonomie de la batterie, reportez-vous au mode d’emploi de votre appareil photo. ˎˎLe temps de charge peut être différent selon l’état de la batterie ou la température ambiante. ˎˎLes temps indiqués correspondent à la charge d’une batterie vide, usée sur un appareil photo, avec cet accessoire à une température ambiante de 25 °C (77 °F). Température de charge La température doit se situer entre 0 °C et 40 °C (32 °F et 104 °F) pour la charge. Pour une efficacité maximale de la batterie, la température conseillée pour la charge est de 10 °C à 30 °C (50 °F à 86 °F). Vous pouvez retirer la batterie de cet accessoire et l’utiliser même si la charge n’est pas terminée. Cependant, le temps de charge a une influence sur l’autonomie de la batterie. ˎˎSi le témoin CHARGE ne s’allume pas, vérifiez si la batterie est bien insérée dans cet accessoire, puis débranchez et rebranchez le câble micro-USB. ˎˎLorsqu’une batterie chargée est installée, le témoin CHARGE s’allume une fois puis s’éteint. ˎˎUne batterie qui n’a pas été utilisée pendant longtemps peut être plus longue à charger que la normale. ˎˎLa batterie chargée se décharge graduellement même si elle n’est pas utilisée. Chargez la batterie rechargeable pour éviter de manquer des occasions d’enregistrer. En cas de problème Le témoin CHARGE (orange) ne s’allume pas. Merci pour l’achat de ce chargeur Sony. Spécifications Avant d’utiliser ce chargeur, veuillez lire attentivement ce manuel et le conserver pour toute référence future. Puissance nominale d’entrée Puissance nominale de sortie Aide-mémoire Les numéros de modèle et de série se situent sous l’appareil. Prendre en note le numéro de série dans l’espace prévu ci-dessous. Se reporter à ces numéros lors des communications avec le détaillant Sony au sujet de ce produit. Modèle no BC-DCX No de série Les batteries pouvant être rechargées pour ce produit sont les suivantes Marque Sony Type de batterie NP-BX1 Valeur nominale CC 3,6 V 4,5 Wh (1 240 mAh) Remarques concernant l’emploi Cet accessoire n’est pas étanche à la poussière, aux éclaboussures d’eau ou à l’eau. Garantie concernant les enregistrements L’utilisateur ne pourra pas être dédommagé pour une absence d’enregistrement ou de lecture due à une défectuosité de la batterie, du chargeur, ou autre. Où ne pas poser cet accessoire Ne posez pas cet accessoire aux endroits suivants, ni pour la charge ni pour l’entreposage. Ceci peut entraîner une panne. ˎˎÀ la lumière directe du soleil ou à proximité d’un appareil de chauffage, car cet accessoire peut se déformer ou tomber en panne. ˎˎÀ un endroit exposé à des vibrations excessives ˎˎÀ un endroit exposé à un électromagnétisme ou à des rayons radiants puissants ˎˎÀ un endroit où il y a beaucoup de sable Au bord de la mer ou sur des sols sableux, où aux endroits où des nuages de poussière sont fréquents, protégez l’appareil du sable ou de la poussière. Cet accessoire risquerait de tomber en panne. Précautions d’emploi ˎˎInsérez bien comme il faut la batterie dans cet accessoire avant de la charger. CC 5 V Borne de charge de la batterie : CC 4,2 V 0,86 A Température de fonctionnement 0 °C à 40 °C (32 °F à 104 °F) Température d’entreposage -20 °C à +60 °C (-4 °F à +140 °F) Dimensions (Environ) 36 mm × 70 mm × 13,5 mm (l/h/p) (1 7/16 po. × 2 7/8 po. × 9/16 po.) Poids Environ 17 g (0,6 oz) DCC-UD10 Avant d’utiliser cet accessoire, veuillez lire attentivement ce manuel et le conserver pour toute référence future. En raccordant cet adaptateur pour batterie de voiture DCC-UD10 au chargeur de batterie (Chargeur CC de voyage BC-DCX etc.) avec le câble micro-USB fourni, vous pouvez charger une batterie par la prise allume-cigare. En raccordant cet adaptateur pour batterie de voiture DCC-UD10 à un appareil photo numérique compatible avec le câble micro-USB fourni, vous pouvez prendre des photos avec votre appareil photo alimenté par la prise allume-cigare. Pour réduire le risque d’incendie, n’obstruez pas la ventilation de l’appareil avec des journaux, nappes, rideaux, etc. Ne posez pas non plus de bougies allumées sur l’appareil. Pour réduire le risque d’incendie ou de décharge électrique, ne posez pas d’objets remplis de liquide, comme des vases, sur l’appareil. Pour éviter toute décharge électrique n’ouvrez pas le boîtier. Confiez toute réparation à un personnel qualifié seulement. Précautions Sécurité ˎˎDébranchez cet accessoire de la prise allume-cigare quand il n’est pas utilisé. Pour débrancher cet accessoire, saisissez le boîtier et tirez dessus. Ne tirez jamais sur le cordon branché sur cet accessoire. ˎˎSi du liquide ou un objet devait tomber dans cet accessoire, débranchez l’accessoire de la prise allume-cigare et de l’équipement et faites contrôler l’accessoire par un personnel qualifié avant de le réutiliser. Spécifications Tension d’entrée Tension de sortie nominale Courant de sortie nominal Dimensions Environ 93 mm Nettoyage ˎˎNettoyez cet accessoire avec un chiffon doux et sec. Si cet accessoire est très sale, essuyez-le avec un chiffon doux imprégné légèrement d’une solution détergente neutre puis séchez-le avec un chiffon doux et sec. ˎˎN’utilisez pas de solvants comme l’alcool, les diluants ou la benzine, etc. car ils endommageraient la surface de cet accessoire. ˎˎSi vous utilisez un produit de nettoyage chimique, lisez les instructions fournies avec le produit. ˎˎSi un solvant volatil, par exemple un insecticide, est dispersé sur le boîtier de cet accessoire ou si le boîtier de cet accessoire reste longtemps au contact d’un produit en caoutchouc ou en plastique, la surface du boîtier peut être endommagée. Emploi Veillez à charger l’appareil quand la voiture est en marche. Si cet accessoire reste branché sur la prise allume-cigare quand le moteur est à l’arrêt, il consommera de l’énergie de la batterie de la voiture. Remarques ˎˎAssurez-vous que l’adaptateur pour batterie de voiture est installé de sorte qu’il ne gêne pas le fonctionnement de l’accélérateur ou du levier de vitesses. ˎˎNe raccordez jamais cet accessoire et n’effectuez jamais de charge pendant la conduite. Charge de la batterie (Voir l’illustration ) 1 Insérez l’adaptateur pour batterie de voiture dans la prise allume-cigare. Le témoin POWER s’allume en vert. 2 Raccordez l’adaptateur pour batterie de voiture au chargeur de batterie avec le câble micro-USB fourni avec cet accessoire. Posez le chargeur de batterie raccordé en lieu sûr. Alimentation de l’appareil photo numérique (Voir l’illustration ) 1 Insérez l’adaptateur pour batterie de voiture dans la prise allume-cigare. Le témoin POWER s’allume en vert. 2 Raccordez l’adaptateur pour batterie de voiture à l’appareil photo numérique avec le câble micro-USB fourni avec cet accessoire. Fixez l’appareil photo numérique raccordé à la monture de voiture et posez-le en lieu sûr. 3 Réglez l’appareil photo numérique pour le recharger. Reportez-vous au mode d’emploi de votre appareil photo numérique pour les détails. Certains modèles n’ont pas besoin d’être réglés pour être rechargés. ˎˎVotre appareil photo numérique peut être différent de celui qui est illustré dans ce mode d’emploi. Lorsque l’adaptateur pour batterie de voiture n’est pas utilisé Pour éviter de trop solliciter la batterie de la voiture, débranchez cet accessoire de la prise allume-cigare quand vous ne l’utilisez pas. Lorsque le moteur de la voiture est arrêté Débranchez cet accessoire de la prise allume-cigare quand le moteur de la voiture est à l’arrêt. Selon le type de voiture, l’alimentation peut ne pas être automatiquement coupée même lorsque le moteur est arrêté. Dans ce cas, la batterie peut être inutilement sollicitée. Remarques ˎˎBranchez à fond la fiche dans la prise allume-cigare. ˎˎSelon l’emplacement ou la forme de l’allume-cigare, il peut être impossible d’insérer cet accessoire. ˎˎFixez bien le chargeur de batterie ou l’appareil photo numérique raccordé de sorte qu’il ne risque pas de bouger en cas de freinage brusque. ˎˎVeillez à disposer le câble micro-USB de sorte qu’il ne gêne pas la conduite, les mouvements des passagers, ou ne soit pas endommagé par les ajustements des sièges, etc. Ne tordez et ne tirez pas le câble micro-USB raccordé à cet accessoire. Ceci peut causer un dysfonctionnement ou les fils pourraient être coupés. ˎˎAfin d’éviter tout risque d’incendie ou de décharge électrique, n’utilisez pas le chargeur de batterie ou l’appareil photo numérique à un endroit exposé à des liquides ou à l’humidité. ˎˎIl n’est pas garanti que cet accessoire fonctionne avec un hub USB ou un cordon-rallonge USB. Raccordez cet accessoire de la façon indiquée par le chargeur de batterie ou l’appareil photo numérique. ˎˎCet accessoire peut chauffer quand il est utilisé. C’est normal. Remplacement du fusible (Voir l’illustration ) Si cet accessoire ne fonctionne pas correctement, vérifiez le fusible dans l’adaptateur pour batterie de voiture. Si le fusible a sauté, remplacez-le. 1 Débranchez cet accessoire de la prise allumecigare. 2 Détachez l’extrémité de la fiche en la tournant 3 4 dans le sens antihoraire. Sortez le fusible. Vérifiez le fusible. Si le fusible a sauté, passez au point 5. Si le fusible n’a pas sauté, passez au point 6. 5 Installez un nouveau fusible. Utilisez un fusible ayant le nombre d’ampères indiqué dans le logement de fusible de cet accessoire (1 A, 125 V, 20 mm). 6 Insérez le fusible. 7 Remettez l’extrémité de la fiche en la vissant à fond dans le sens horaire. Remarques ˎˎL’emploi d’un fusible ayant un nombre d’ampères supérieur peut causer des dommages ou un incendie. ˎˎN’utilisez pas un morceau de fil à la place du fusible. ˎˎSi le fusible saute à nouveau, consultez votre vendeur. CC 12 V/24 V (seulement pour les voitures à masse négative ) CC 5,0 V 1 500 mA Environ 90 mm Fonctionnement Remarques BC-DCX Tension de sortie maximale : CC 4,2 V / Tension de sortie nominale : CC 3,6 V / Capacité : 4,5 Wh (1 240 mAh) / Température de fonctionnement : 0 °C à 40 °C (32 °F à 104 °F) / Dimensions (Environ) : 29,9 mm × 9,2 mm × 42,7 mm (l/h/p) (1 3/16 po. × 3/8 po. × 1 11/16 po.) / Poids : Environ 25 g (0,9 oz) Ne posez pas l’adaptateur pour batterie de voiture à un des endroits suivants : ˎˎEndroit exposé à une température extrême. (ex. dans une voiture toutes vitres closes) ˎˎEndroit exposé à la lumière directe du soleil ou près d’une source de chaleur. ˎˎEndroit exposé à des vibrations ou chocs mécaniques. ˎˎEndroit exposé à une poussière excessive. Pour utiliser rapidement la batterie ˎˎLa batterie est complètement chargée. ˎˎVérifiez qu’un câble micro-USB (fourni) est fermement raccordé à cet accessoire et au périphérique de charge USB. ˎˎRaccordez cet accessoire directement au PC, pas par un hub USB, etc. ˎˎSi la température de la pièce est hors de la plage de températures appropriée, la charge s’arrêtera automatiquement. Lorsque la température de la pièce revient à la plage appropriée, le témoin CHARGE s’allume et la charge redémarre. Il est conseillé de charger la batterie rechargeable entre 10 °C et 30 °C (50 °F et 86 °C). NP-BX1 Spécifications pour retirer 松开 Installation Pour retirer la batterie Note Câble micro-USB (fourni) Micro USB 连接线(附带) ˎˎNe laissez pas tomber cet accessoire et ne le soumettez pas à des chocs mécaniques. ˎˎGardez cet accessoire à l’écart des téléviseurs ou récepteurs AM. Placé près d’un téléviseur ou d’un poste de radio, cet accessoire peut causer du bruit. ˎˎVeillez à ne pas mettre d’objets métalliques au contact des pièces métalliques de cet accessoire. Ceci pourrait causer un courtcircuit et endommager l’accessoire. ˎˎLa batterie rechargeable et cet accessoire peuvent devenir chauds pendant ou immédiatement après la charge. Environ 40 g (1,4 oz) La conception et les spécifications peuvent être modifiées sans préavis. ACC-DCBX 随带有下列附件: ACC-DCBX 可重复充电电池 (NP-BX1) (1) 旅行直流充电器 (BC-DCX) (1) 车用电池转接器 (DCC-UD10) (1) Micro USB 连接线 (1) 成套印刷文件 警告 为减少发生火灾或触电的危险: 1) 请勿让本装置淋雨或受潮。 2) 请勿在本装置上放置如花瓶等盛有液体的物 体。 切勿将电池暴露在阳光、火或类似的极热环境 下。 为避免造成环境污染,请将废弃产品按照当地 法规进行处置。 为减少发生火灾的危险,请勿让报纸、桌布、 窗帘等挡住本装置的通风口。同时,请勿将点 燃的蜡烛放在本装置上。 为减少火灾或触电的危险,请勿在本装置上放 置如花瓶等盛有液体的物体。 为避免遭受电击,请勿打开外壳。 有关维修事 宜,请务必向合格的技术人员咨询。 本产品经测试符合EMC规章有关使用米以下连 接电缆的限制规定。 NP-BX1 规格 最大输出电压: DC 4.2 V / 标称输出电压: DC 3.6 V / 电容量: 4.5 Wh (1240 mAh) / 操作温度: 0 ℃ - 40 ℃ / 尺寸(约): 29.9 mm × 9.2 mm × 42.7 mm(宽/高/长)/ 质 量: 约 25 g BC-DCX 感谢您购买 Sony 充电器。 操作本充电器之前,请全文阅读本说明书并加 以妥善保存,以备将来参考。 使用须知 本装置不具备防尘、防溅湿或防水功能。 有关拍摄内容的担保 如果因电池、充电器等的故障而导致无法拍摄 或播放,恕不对拍摄内容做任何补偿。 禁放本装置的场所 请勿在以下场所中使用或存放本装置。否则可 能会引起故障。 有阳光直射或靠近加热设备的地方,否则可导 致本装置发生故障或变形 有强烈震动的地方 有强电磁或强辐射线的地方 沙尘过多的地方 在海边和其他多沙区域或出现尘雾的地方,应 对本装置采取防沙尘措施,否则会有出现故障 的危险。 使用前须知 为电池充电时,应将电池牢牢安装到本装置 中。 请勿跌落装置或对其进行机械性碰撞。 请将装置远离电视机或调幅收音机放置。 如果靠得太近,本装置产生的噪音可能会干扰 电视机或收音机。 确保不会有任何金属物体接触到本装置的金属 部分。 否则可能发生短路且本装置可能受损。 充电期间或充电刚结束时,电池及本装置都会 变热。 保养 如果本装置被弄脏,请使用软的干布进行擦 拭。 如果本装置太脏,请先用布蘸一点中性溶剂进 行擦拭,然后再将其擦干。 请勿使用稀释剂、汽油、酒精等制品,因为它 们会损坏本装置表面。 使用化学清洁布时,请参阅其使用说明书。 若使用挥发性溶剂(如杀虫剂)或使本装置长 时间接触橡胶或乙烯制品,可能会损坏本装置 或导致其品质降低。 为电池充电 连接 micro USB 连接线前,请确保将电池安装 到充电器中。 1 将电池安装到充电器中。 滑动充电器顶盖将其打开。 在确保电池标记 与充电器标记 方向相 同的情况下,将电池插入充电器中直至它咔 哒一声就位。 朝相反方向滑动充电器顶盖则将其关闭(参 看图 )。 2 将 micro USB 连接线(附带)连接至本装 置,然后连接至 USB 充电设备(PC、USB AC 充电器)(参见图 )。 CHARGE 灯(橙色)亮起,充电开始。 当 CHARGE 灯熄灭时,表示完成充电。 取出电池 触任何金属物品。 断开 micro USB 连接线与本装置的连接,然后 滑动充电器顶盖将其打开。 朝标记 方向轻推电池,将电池末端抬起以使 其从充电器弹簧夹中松脱,然后从充电器中滑 出电池。 朝相反方向滑动充电器顶盖则将其关闭。 旅行直流充电器 (BC-DCX) 也可用作携带电池 时的保护盒。 充电时间 电池 NP-BX1 155 分钟 (使用 AC-UD10、AC完全充电时间 UD11) (约) 230 分钟 (使用 PC、AC-UB10) 有关电池寿命的更多信息,请参阅相机的使用 说明书。 充电时间可能会因电池状况或环境温度而异。 所示的时间是指在环境温度为 25 ℃ 的情况 下,用相机耗尽电池电量后再为其充电所需的 时间。 充电温度 充电的温度范围为 0 ℃ - 40 ℃。 为发挥电池的最大效能,建议充电时的温度范 围介于 10 ℃ 至 30 ℃ 之间。 下启动或停止发动机,连接至本装置的数码相 机上所存储的数据就可能会丢失或损坏。 如果本装置太脏, 请先用软布略微蘸一点中性洗涤剂进行擦拭, 然后再用软的干布将其擦净。 请勿使用任何类型的溶剂,如酒精、稀释剂或 汽油等,因为它们会损坏外壳的涂层。 如果使用化学清洁剂,应遵守产品附带的使用 说明。 如果本装置的外壳溅上了诸如杀虫剂等溶剂, 或者长时间接触橡胶或乙烯制品,可能会损坏 外壳的涂层。 使用方法 请务必在汽车发动机处于运转状态的情况下为 设备充电。 如果在发动机未运转时将本装置 插入点烟器插孔中,就会消耗车载蓄电池的电 量。 注意 确保安全地安装车用电池转接器,以免干扰加 速踏板或变速箱的正常操作。 切勿在车辆行驶过程中进行连接和充电。 为电池充电(参见图 ) 1 将车用电池转接器插入点烟器插孔中。 POWER(电源)指示灯以绿色亮起。 2 利用本装置附带的 micro USB 连接线将 车用电池转接器连接到充电器上。 即使在未充完电的情况下,也可以从本装置上 取下电池并开始使用。 但是,充电时间会影响 电池所能使用的时间。 将连接好的充电器放在安全的地方。 为数码相机供电(参见图 ) 1 将车用电池转接器插入点烟器插孔中。 POWER(电源)指示灯以绿色亮起。 注意 如果 CHARGE 灯未亮起,请检查电池是否在 本装置中安装牢固,然后断开并重新连接 micro USB 连接线。 装入完全充电的电池时,CHARGE 灯会先亮 一下,随即熄灭。 为长期不用的电池充电时,充电时间可能会比 正常情况下长。 即使不用,充电后的电池也会逐渐放电。 请在 使用之前为电池充电,以免错失任何拍摄良 机。 2 利用本装置附带的 micro USB 连接线将 故障排除 为避免对车载蓄电池造成不必要的电量损耗, 请在不用时将本装置从点烟器插孔中拔出。 CHARGE 灯(橙色)未亮起 电池已充满电。 确保将 micro USB 车用电池转接器连接到数码相机上。 将连接好的数码相机安装到车架上并放在安 全的地方。 3 将数码相机设定为充电状态。 详情请参见数码相机的使用说明书。 有些机型无需进行设定即可充电。 您的数码相机可能与使用说明书中所示的相 机有所不同。 不使用车用电池转接器时 关闭汽车发动机时 连接线(附带)牢固地连 接至本装置和 USB 充电设备。 将本装置直接连接至 PC,而非通过 USB 集线 器等进行连接。 如果室温超出适宜的温度范围,充电过程便会 自动停止。 当室温恢复到正常范围以内时,CHARGE 灯 亮起,并重新开始充电。 建议在 10 ℃ 至 30 ℃ 的条件下为电池充电。 请务必牢牢插入点烟器插孔中。 取决于点烟器插孔的位置或形状,有时可能无 规格 请将连接好的充电器或数码相机牢牢固定就 操作温度 储藏温度 尺寸(约) 质量 DC 5 V 电池充电端子: DC 4.2 V 0.86 A 0 ℃ - 40 ℃ –20 ℃ - +60 ℃ 36 mm × 70 mm × 13.5 mm(宽/高/长) 约 17 g DCC-UD10 操作本装置之前,请全文阅读本说明书并加以 妥善保存,以备将来参考。 通过本装置附带的 Micro USB 连接线将此车用 电池转接器 DCC-UD10 连接至充电器(旅行直 流充电器 BC-DCX 等)后,即可利用点烟器插 孔为电池充电。 通过本装置附带的 Micro USB 连接线将此车用 电池转接器 DCC-UD10 连接至兼容的数码相机 后,即可利用点烟器插孔为数码相机供电,同 时用数码相机进行拍摄。 当汽车发动机未处于运转状态时,请将本装置 从点烟器插孔中拔出。 取决于车辆的类型,有 时即便关闭了发动机,仍无法自动切断电源。 在这种情况下,可能会对车载蓄电池造成不必 要的电量损耗。 注意 法安装本装置。 位,以确保其在突然制动时不会发生移动。 micro USB 连接线时要小心,确保它不 会干扰行车、妨碍乘客席的活动或在调整座位 时受损,诸如此类。 切勿猛拉或拽动已连接在本装置上的 micro USB 连接线。 否则可导致故障或线路断开。 请勿在有可能被液体溅湿或潮湿的地方使用充 电器或数码相机,以免引起火灾或触电。 在使用 USB 集线器或 USB 延长线的情况 下,将无法担保性能。 请依照充电器或数码相 机所指定的连接方法进行连接。 本装置在使用过程中可能会变热。 这并不是故 障。 布设 更换保险丝(参见图 ) 如果本装置无法正常工作,请检查车用电池转 接器中的保险丝。 如果保险丝已熔断,应予以更换。 注意 1 2 3 4 请注意,未经本说明书中明确许可而擅自进行 改动或改装,可导致您丧失对本设备的操作 权。 5 安装新保险丝。 注意事项 安全 不用时,请将本装置从点烟器插孔中拔出。 断 开本装置时,请握住本装置并向外拉。 切勿拉 拽装置上连接的电线。 万一有液态或固态物体落入本装置内,请将本 装置从点烟器插孔及设备上断开,并在下一次 操作前由合格的技术人员对本装置进行检查。 安装 请勿将车用电池转接器置于下列环境中: 超高温环境。 将本装置从点烟器插孔中拔出。 逆时针转动插头,将插头末端卸下。 取出保险丝。 检查保险丝。 如果保险丝已熔断,请转至步骤 5。 如果保险丝未熔断,请转至步骤 6。 请使用正确电流强度的保险丝,相应的值可 见本装置保险丝盒上的标示(1 A, 125 V,20 mm)。 6 插入保险丝。 7 顺时针用力转动插头,将插头末端重新 装好。 注意 使用高电流强度的保险丝可导致严重损坏或火 灾。 切勿用一段导线来代替保险丝。 如果更换后的保险丝再次熔断,请向经销商咨 (例如,车窗关闭的车厢内) 询。 直射的阳光下或加热器附近。 遭受机械震动或碰撞的地方。 多尘的地方。 规格 操作 额定输出电压 额定输出电流 尺寸 约 93 mm 约 90 mm 确保插座与要连接至车用电池转接器的充电器 或数码相机的电流及电压相符。 出于安全考虑,如果输入电流过高,本装置就 会自动关闭。 为防止损坏,小心不要将本装置摔落到地上或 输入电压 DC 12 V/24 V(仅限 负极 接地的车辆) DC 5.0 V 1500 mA 以其他方式对其施加机械性碰撞。 约 20.6 mm 使用后,请将本装置从点烟器插孔及设备上断 开。 从点烟器插孔上断开本装置时,请握住装置本 身。 切勿拉拽装置上连接的电线。 为防止短接,切勿使本装置或连接器的端子接 触任何金属物品。 请注意,如果在本装置插入点烟器插孔的情况 下启动或停止发动机,连接至本装置的数码相 产品中有毒有害物质或 元素的名称及含量 清洁 请用软的干布清洁本装置。 快速使用电池 额定输入 额定输出 设计或规格如有变动,恕不另行通知。 请注意,如果在本装置插入点烟器插孔的情况 提示 Environ 20,6 mm Poids 取出电池 为防止短接,切勿使本装置或连接器的端子接 质量 约 40 g 设计或规格如有变动,恕不另行通知。 产品中有毒有害物质或 元素的名称及含量 部件 名称 有毒有害物质或元素 铅 汞 镉 六价铬 多溴联苯 多溴二苯醚 (Pb) (Hg) (Cd) (Cr(VI)) (PBB) (PBDE) 内置 线路 × ○ ○ ○ ○ ○ 板 外壳 × ○ ○ ○ ○ ○ 附件 × ○ ○ ○ ○ ○ ○ :表示该有毒有害物质在该部件所有均质材 料中的含量均在 SJ/T11363-2006 标准规 定的限量要求以下。 × :表示该有毒有害物质至少在该部件的某一 均质材料中的含量超出 SJ/T11363-2006 标准规定的限量要求。 制造商 : 总经销商 : 地址 : 原产地 : 出版日期: 索尼公司 索尼(中国)有限公司 北京市朝阳区 太阳宫中路 12 号楼 冠城大厦 701 中国(主机) 2013年8月