1
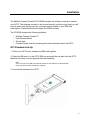
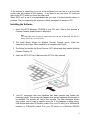
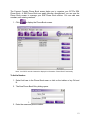
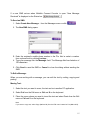
GC75
Mobilink Connect Console GC75
Sony Ericsson GPRS PC Card Modem GC75
User’s Guide
1
Content
Introduction……………………………………………………………….…………….….....4
Hardware Overview………………………………………………………………………...4
Software Overview………………………………………………………….………………4
Getting Started……………………………………………………….………….…………....6
Checklist……………………………………………………………….…………………...6
System Requirements………………………………………….……………………………6
Services Available Over the Internet ………………………………………………………… 7
Installation………………………………………………………………………….………….8
GC75 Hardware Set Up……………………………………………………….………………8
Installing the Software………………………………………………………………………...9
Start Using GC75 Manager………………………………………………….…………….. 11
Safe Removal of the GC75…………………………………………………………………………11
Connect Console GPRS Screen……………………………………………………………11
Connect Console Phone Book Screen………………………………………………………11
Connect Console SMS Messages Screen……..……………………………………………14
Troubleshooting… …………………………………………………………………..……... 17
Software Errors ………………………………………………………………………..…… 17
Error Messages ……………………………………………………...……………………..17
Error Codes ……………………………………………………………………….…..……17
Additional Information………………………………………………………………..……22
Saanga Software Support Website……………………………………………..…………… 22
Important Information…………………………………………………………………..……22
Technical Specifications ………………………………………………………………..……23
Software Upgrade……….……………………………………………………………..……25
Glossary………………………………………………………….……….……………..……26
2
Sony Ericsson GPRS PC Card Modem GC75
(Version 1.0 July 2005)
This manual is published by Saanga Software, without any warranty. Improvements
and changes to this manual necessitated by typographical errors, inaccuracies of
current information, or improvements to programs and/or equipment, may be made by
Saanga Software at any time and without notice. Such changes will, however, be
incorporated into new editions of this manual. This manual is copyrighted work of
Saanga Software. The programs referred to herein are copyrighted and trademarked
works of Saanga Software. Reproduction in whole or in part, including utilization in
machines capable of reproduction or retrieval, without the express written permission of
the copyright holders is prohibited. Reverse engineering is also prohibited. All other
product or service names mentioned in this manual are trademarks of their respective
companies.
All rights reserved.
Saanga Software, 2005
3
Introduction
Congratulations and thank you for buying the Sony Ericsson GPRS PC Card
Modem GC75.The GC75 is a triple band GSM product that enables you to
communicate wirelessly from your laptop on all five continents, in over one
hundred and sixty countries. As the GC75 provides wireless communications you
no longer need to carry cables, telephone jack converters, chargers and batteries. The
GC75 is very simple to install and use; the software provided allows you to select the
best Data service available so that the GC75 is always available for data transfer.
The GC75 enables your laptop PC to:
?
?
?
?
?
Browse the Internet
Send and receive e-mails
Receive information services in real time
Access files, databases and discussion groups\
Edit SIM card entries
Hardware Overview
The GC75 is a standard 16 bit type II PC card. The card is standard length and only the
antenna protrudes outside the PC card slot. The amount of power drawn from the laptop
battery is dependant upon a number of factors including status, frequency band,
distance to GSM base station and number of timeslots used. See Technical
Specifications on page 48 for a general guide to power consumption.
Before you can start using the GC75 you need to put the hardware together. You will
also need a SIM card.
SIM Card
When you subscribe to Mobilink, you are issued with a SIM card (Subscriber
Identity Module card). The SIM contains your personal subscriber data. You need a SIM
to use GC75.
Software Overview
Mobilink Connect Console 75
4
You can use the Mobilink Connect Console
?
?
?
?
Display GC75 status information
Connect to the Internet or a corporate network
Manage SIM card and PC phone books
Send and receive SMS messages
5
Getting Started
Checklist
Make sure the following items are in the box when you unpack it:
?
?
?
?
?
?
Protective case for storing the GC75 and its antenna
GC75 PC Card
SIM tray
Antenna
Quick Start Guide
CD-ROM
The CD contains; drivers, software and documentation.
System Requirements
This section lists the network subscriptions, hardware and software requirements for
running the GC75 PC Card.
Network and Subscription
The network subscription you use in conjunction with your GC75 depends on the
subscriptions your network operator can provide. Contact your network operator or
service provider to make sure the options you require are available. Make sure that data
options are included in your subscription, as these are usually optional services.
Note:
Mobile operators often provide a number of connectivity options via GPRS such as WAP and
Internet, so check that the Internet or VPN service you require is enabled for your subscription.
General Packet Radio Service (GPRS)
GPRS is a new network connection which provides “always on” mobility. The
connection set up is fast and, once connected, applications may send and receive data
whenever required. In today’s GPRS networks, the GC75 receives data at speeds up to
53.6 kbps and transmits at speeds up to 26.8 kbps.
Short Message Service (SMS)
The PC can send and receive SMS text messages using the SMS Messages screen in
the Mobilink Connect Console 75.
6
Hardware
You will need:
?
?
?
?
A PC that has the minimum specification recommended by Microsoft to run the
version of Windows® installed on it.
16 bit type II PC Card slot.
Sony Ericsson GPRS PC Card Modem GC75
SIM card
Software
You will need:
?
?
Windows ® 98SE, Me, 2000 (SP2) or XP.
Mobilink Connect Console 75.
Services Available Over the Internet
The connect console web site contains support to facilitate easy communications and
rapid information retrieval, wherever you are. It gives you access to on-line customer
services, on-line user manuals, software downloads, and useful information. The
address is:
http://www.mobility.com.pk
Saanga Software’s home page address is:
http://www.saanga.net
7
Installation
The Mobilink Connect Console75 CD-ROM contains the software required to operate
your GC75. The software is simple to set up and operate, but before you begin you will
need to make sure that the services you require are included on your SIM card
subscription. Contact Mobilink and request the GPRS services.
The CD-ROM contains the following software:
?
?
?
?
Mobilink Connect Console 75
User Documentation
On-line Help
ConnectConsole text file containing the latest information about the GC75
GC75 Hardware Set Up
1. Collect your GC75 card, antenna and SIM card together.
2. Place the SIM card i n to the GC75 SIM tray and push the tray back into the GC75.
Make sure the tray is closed properly before proceeding.
Note:
The cut corner of the SIM card must be placed into the SIM tray as demonstrated
below, the SIM contacts should face upwards.
3. Connect the antenna to the GC75.
8
If the antenna is obstructing your use of the keyboard you can turn it to a horizontal
position and still connect to the network. If you want to use your other PC card port
remove the GC75 whilst you insert the other card.
When GC75 isn't in use it is recommended that you store it in the protective carrier ox
provided. The unit, especially the antenna could be damaged if it remains in PC.
Installing the Software
1. Insert the GC75 Manager CD-ROM in your CD drive. After a few seconds a
Connect Console splash screen is displayed.
Note:
If the CD-ROM does not autorun, select Start Run and type D:\Setup.bat into the Run
dialog. (Where D is your CD drive.)
2. The Install Shield Wizard for Mobilink Connect Console opens; follow the
Instructions on screen. When installation is complete click Finish.
3. The Setup first installs the Sony Ericsson GC75 driver and then installs Mobilink
Connect Console 75.
4. Insert the GC75 PC Card. Make sure the GC75 is fully inserted.
5. Your PC recognizes that new hardware has been inserted and installs the
necessary driver. This process will happen twice as two hardware drivers need to
be installed. The process will take a few seconds. The New Hardware Wizard
may require you to locate a specific driver file. If this happens a dialog opens,
click Browse and select D:\Driver9x (where D is your CD drive) on a Windows 98
machine or D:\Driver2k (where D is your CD drive) on a Windows 2000/XP
9
machine. Select the driver file and click Open. The Hardware Wizard finishes the
installation.
6. Select Programs Connect Console 75 Connect Console75 to start using your
GC75.
7.
The Mobilink Connect Console is ready for use.
10
Start Using Connect Console 75
1. To start Connect Console select Start Programs
Connect Console 75.
2. Your SIM must be unlocked, otherwise ConnectConsole75 will display error
message and exit.
3. The Connect Console75 Icon is displayed in the system tray of your PC.
Safe Removal of the GC75
You must stop the ConnectConsole75 before attempting to remove it.
1. Close the Dial-up Networking Connection.
2. Exit ConnectConsole.
3. Click on the Connect Console icon.
i. Select Stop Sony Ericsson GC75 Wireless Card.
4. A dialog is displayed telling you it is safe to remove the card.
Important! Incorrect removal of the GC75 can damage the card.
Connect Console GPRS Screen
To connect to Mobilink GPRS click
. Or use File –> Connect GPRS menu.
Mobilink Connect Console 75 will check Signal’s strength and then connect to Mobilink
GPRS.
Note: While GPRS is connected, the phone book and SMS functionalities will be
unavailable.
To disconnect the GPRS click
.
If you have disconnected the GPRS using network icon in the system tray u will have to
press the disconnect button again.
Connect Console Phone Book Screen
11
The Connect Console Phone Book screen helps you to organize your GC75’s SIM
Phone Book. A SIM Phone Book can easily become disorganized; you can use the
Phone Book screen to manage your SIM Phone Book entries. You can add new
numbers, edit existing numbers.
1. Click
to display the Phone Book screen.
Note: Your GC75 must be inserted to display this information. Phone Book Functionality
To Add a Number:
1. Select Add new in the Phone Book menu or click on the toolbar or key Ctrl and
N.
2. The New Phone Book Entry dialog opens.
1.
2. Enter the name and phone number.
12
3. Click OK to save the entry or Cancel to close the dialog.
Note:
Phone Book numbers are limited to 20 digits (including +) and names are limited to 18
alphanumeric characters. New entries are added to the next available SIM index position.
To Modify a number:
1. Select the number you want to modify.
2. Select Modify... in the Phone Book menu.
3. The Edit Phone Book Entry dialog opens.
4. The fields in the dialog display the current entry’s name and number.
5. Edit the information.
6. Click OK to close the dialog and save your changes.
7. If the modified entry is in the SIM Phone Book the changes are automatically
sent to the SIM.
To Find Entries:
1. Select Find in the Phone Book menu.
2. The Find dialog opens. Enter the Contact Name you want to search for in the
Look for field. The entry can be complete or incomplete. You can search on the
First Name of the contact.
3. Click Find. The GC75 Manager searches Phone Book, when a match is found it
highlights the selected contact.
13
To Delete a number:
1. Select the number that you want to delete.
2. Select Delete, from the right side of the Phone Book screen.
3. A confirmation dialog opens, click OK to delete the number.
Connect Console SMS Messages Screen
The Mobilink’s Connect Console SMS Messages screen enables you to view, compose,
delete, reply or forward SMS messages from your GC75 to other mobile devices.
Note:
To use Message functionality SMS must be included in your subscription, contact your network
operator for more details.
14
If a new SMS arrives when Mobilink Connect Console is open “New Message
Received” is displayed on the Status bar.
To Send an SMS:
1. Select Create New Message... from the Messages menu or click
.
2. The New SMS dialog opens.
3. Enter the recipient’s mobile phone number in the To: field or select a number
from a phone book by clicking Lookup...
4. Type your message into the Message: field. The Message field has limitation of
150 characters
5. Click Send to send the SMS or Cancel to close the dialog without sending the
SMS.
To Edit a Message:
When you are working with a message, you can edit the text by cutting, copying and
pasting.
Moving Text:
1. Select the text you want to move, the text can be in another PC application.
2. Select Cut from the Edit menu or Ctrl and X on the keyboard.
3. Place the cursor where you want to insert the text and select Paste from the Edit
menu or Ctrl and V on the keyboard.
Note:
If you want to copy text, select Copy (Ctrl and C) from the Edit menu instead of Cut (Ctrl and X).
15
Reply to an SMS:
1. Select the SMS you want to reply from the SMS Messages window.
2. From the list, select the message you want to reply to. The contents of the
message are displayed in the information view.
3. Select Reply in the Messages menu. A dialogue appears. The To: field is
automatically filled in and the original message is displayed in the Message: field.
4. Type your reply and click Send.
To Forward an SMS:
1. Select the folder where the message is located.
2. From the list, select the message you want to forward. The contents of the
message are displayed in the information view.
3. Click Forward, a dialogue opens.
4. Enter the phone number in the To: field or click Lookup... to select a number
from a phone book.
5. Click Send.
Delete an SMS:
1. Select the folder where the message is located.
2. From the list, select the message you want to delete. The contents of the
message are displayed in the information view.
3. Select Delete from the popup menu, or press the Delete button on the
side of your SMS Inbox screen.
right
4. A confirmation message box opens, click OK to delete the message.
16
Troubleshooting
This chapter lists some problems that you might encounter while using your GC75.
Some problems require you to contact your service provider, but most of the problems
you can easily correct yourself.
Software Errors
Grey menu options in the
software
applications
Grey text indicates a function that is temporarily
unavailable, for example due to your subscription or due
to a certain setting which has not been turned on.
Error Messages
General
Dial-Up fails
Try to connect again.
Error Codes
Windows® 98
Error 619:
The port is disconnected
during dial-up
Up An ISDN mode (V110 or V120) has been selected
when creating a connection, but is not supported by the
network. Select Analogue mode when creating the
connection in the Connection Wizard.
Error 630:
The port was
disconnected
due to hardware failure
during dial-up
A Dial-up networking connection is already connected.
Close the connected dial-up and try again.
Error 645:
Internal authentication
error during dial-up
Up Incorrect APN or CID selected for network. Modify your
Dial-up Connection, see Create a Connection on page 19
for more details. Make sure that the APN file contains the
name of the access point your network operator is using.
See the support section on www.SonyEricsson.com site
for a full list of network operator APNs.
17
Error 650:
The Remote Access
server is not responding
during dial-up
Incorrect User ID and/or password. Re enter correctly.
Error 678:
Computer you are dialing
is not responding during
dial-up
Either: Service is not supported by SIM (usually for
CSD/HSCSD) or the computer is not answering.
1. Check SIM settings with your service provider if
necessary.
2. Make sure that the server you are dialing is OK.
3. Make sure that Analogue mode has not been
selected with 57.6kbps data rate (V110 or V120
mode must be selected and supported by the
network)
Error 720:
No PPP control protocols
Configured during dial-up
The service is not supported by the SIM, usually appears
when you are trying to connect to GPRS Internet. Contact
service provider to enable GPRS Internet access on SIM
card
Windows® 2000
Error 619:
The port is disconnected
during dial-up
Error 678:
Computer you are dialing
is not responding during
dial-up
An ISDN mode (V110 or V120) has been selected when
creating a connection, but is not supported by the network
Select Analogue mode when creating the connection in
the Connection Wizard.
Either: Service is not supported by SIM (usually for
CSD/HSCSD) or the computer is not answering.
1. Check SIM settings with your service provider if
necessary.
2.
3.
Make sure that the server you are dialing is OK.
Make sure that Analogue mode has not been
selected with 57.6 kbps data rate (V110 or V120
mode must be selected and supported by the
network).
Error 691:
Access denied, user
name and password
incorrect on the domain
during dial-up
The domain name entry is incorrect.
Correct the domain name entry or delete if not required.
Error 718:
The card was unable to
This error indicates a PPP conversation started, but it was
terminated because the remote server did not respond
18
dial during dial-up
within an appropriate time. This can be caused by poor
line quality or a problem with the server (ISP). This error
can occur when your modem has connected to the ISP
and has sent a username and password, but there is no
response from the server. Wait a few minutes and try
again
All Windows® Operating Systems
Error 734: The PPP link
control protocol was
terminated during dial-up
The APN entry is incorrect, the signal is weak or the
connection is lost whilst dialing. See the support section
on www.mobility.com.pk site for a full list of network
operator APNs.
Error 678:
Computer you are dialing
is not responding during
dial-up
Either: Service is not supported by SIM (usually for
CSD/HSCSD) or the computer is not answering. Check
SIM settings with your service provider if necessary. Make
sure that the server you are dialing is OK. If you are
unsure which speed to choose from the Speed tab, start
with Analogue 9600, and check to see if it works. Once
your connection works on Analog, you can try the
V110/V120 settings to see if faster speeds are available.
V110/V120 also connects faster than analog. When
roaming you may need to repeat this procedure to adapt
your settings to the capability of the local network
operator.
Connection Failed or
Activation Failed.
Please contact your
Service Provider.
No specific reason for failure is available. Wait a few
minutes and try again. If you continue to get this error
check your connection settings or call your service
provider for help.
Connection Failed. Invalid
APN. Please check and
enter the APN again.
The APN entry is incorrect, the signal is weak or the
connection is lost whilst dialing. See the support section
on www.SonyEricsson.com site for a list of network
operator APNs or contact your service provider.
Connection Failed. Invalid
User Name or Password.
Please check and enter
the User Name and/or
Password in your
connection profile.
Choose to modify your connection in the Connection
Wizard. Go to the User ID screen and re enter the User
Name and Password given to you by your service
provider. If you were not supplied with a User Name and
Password leave the fields blank. Contact your service
provider if you continue to have problems.
Connection Failed. Invalid
Profile. Please check and
re-enter your connection
profile information, and
Your service provider doesn't recognize you. Check the
setting you have entered to create your connection. If you
still get the error contact your service provider and check
you have GPRS Internet enabled on your subscription and
19
try again. If the problem
continues please contact
your Service Provider.
then setting you should enter to create a connection.
Disconnected from
Network
You have been disconnected from the network. Wait a few
minutes and try again. If the problem persists contact your
service provider.
Connection failed.
Temporary Network
problem. Please try again.
If the problem continues
please contact your
Service Provider.
This error indicates a PPP conversation started, but it was
terminated because the remote server did not respond
within an appropriate time. This can be caused by poor
line quality or a problem with the server (ISP). This error
can occur when your modem has connected to the ISP
and has sent a username and password, but there is no
response from the server. Wait a few minutes and try
again.
Connection Failed.
Not authorized to access
network. Please contact
your Service Provider.
Your service provider doesn't think your authorized to
access their network. Check the setting you have entered
to create your connection. If you still get the error contact
your service provider and check your subscription.
Connection Failed.
SIM is invalid for GPRS
service. Please contact
your Service Provider.
Contact your service provider and request the GPRS
Internet subscription is activated for your SIM.
Connection Failed.
Access to network not
allowed.
Please contact your
Service Provider.
Your service provider is not allowing you to access their
network. Check the setting you have entered to create
your connection. If you still get the error contact your
service provider and check your subscription.
Connection Failed.
Roaming not allowed.
Please contact your
Service Provider.
Contact your service provider to get your roaming
activated.
Connection Failed. Please
try again. If the problem
continues please contact
your Service Provider.
You couldn’t connect to the network. Wait a few minutes
and try again. If the problem persists contact your service
provider.
Connection Failed.
Service not supported.
Please try again. If the
problem continues please
contact your Service
Your service provider is not allowing you to access their
network. Contact your service provider and check you
have the subscriptions required activated for your SIM.
20
Provider.
Connection Failed.
Network Problem. Please
try again. If the problem
continues please contact
your Service Provider.
You couldn’t connect to the network. Wait a few minutes
and try again. If the problem persists contact your service
provider.
21
Additional Information
Saanga Software Support Web Site
At http://www.mobility.com.pk you can find help and tips in a few clicks. The support site gives
you access to:
?
?
?
?
the latest software updates
tips on how to use your GC75 efficiently
function guides
additional help
Important Information
Please read this information before using your GC75.
Recommendations
?
?
?
?
?
?
?
?
Always treat your product with care and keep it in a clean and dust-free place.
Do not expose your product to liquid, moisture or humidity.
Do not expose your product to extreme high or low temperatures.
Do not expose your product to open flames or lit tobacco products.
Do not drop, throw or try to bend your product.
Do not paint your product.
Do not attempt to disassemble your product. Only Sony Ericsson authorized personnel
should perform service.
Do not remove the SIM
Antenna
Only use an antenna that has been specifically designed by Sony Ericsson for your GC75.Use
of unauthorized or modified antennas could damage your GC75.
Children
Do NOT allow children to play with your GC75. They could hurt themselves or others, or could
accidentally damage the GC75. Your GC75 may contain small parts that could be detached and
create a choking hazard.
Disposing of the Product
Your GC75 should not be placed in municipal waste. Please check local regulations for disposal
of electronic products.
22
Electronic Devices
Most modern electronic equipment, for example equipment in hospitals and cars, is shielded
from RF energy. However, certain electronic equipment is not, therefore: Do not use your GC75
near medical equipment without requesting permission.
The GC75 may affect the operation of some implanted cardiac pacemakers and other medically
implanted equipment. Pacemaker patients should be aware that the use of a GC75 very close to
a pacemaker might cause the device to malfunction. Avoid placing the GC75 over the
pacemaker. If a minimum distance of 15 cm (6'' inches) is kept between the GC75 and the
pacemaker, the risk of interference is limited. If you have any reason to suspect that
interference is taking place, immediately turn off your GC75. Contact your cardiologist for more
information. If you use any other personal medical device, consult the manufacturer of your
device to determine if it is adequately shielded from external RF energy.
Turn your GC75 off in any facility where posted notices so require.
Aircraft
You MUST remove your GC75 before boarding any aircraft. To prevent interference with
communication systems and abide by the law, you must not use your GC75 while the plane is in
the air. Do not use it on the ground without permission from the crew.
Blasting Areas
Turn off your GC75 when in a blasting area or in areas posted turn off two-way radio to avoid
interfering with blasting operations. Construction crews often use remote control RF devices to
set off explosives.
Explosive Atmospheres
Turn off your GC75 when in any area with a potentially explosive atmosphere. It is rare, but your
GC75 could generate sparks. Sparks in such areas could cause an explosion or fire resulting in
bodily injury or even death. Areas with a potentially explosive atmosphere are often, but not
always, clearly marked. They include fuelling areas, below deck on boats, fuel or chemical
transfer or storage facilities, and areas where the air contains chemicals or particles, such as
grain, dust, or metal powders. Do not transport or store flammable gas, liquid, or explosives in
the compartment of your vehicle, which contains your GC75 and accessories.
Inserting and removing the SIM card – precautions against electrostatic
discharge (ESD)
Do not touch the SIM card connectors. As a precaution, always make sure that the GC75 is
already in your hand before you insert or remove the SIM card.
Technical Specifications
23
Product name
System
GSM 1800
GSM 1900
Services supported
Speech services are not
Supported
SIM Card
SIM Lock supported
GC75
E-GSM 900
Type Number
6130201-BV
CSD, HSCSD, GPRS, SMS, Fax
Small plug-in card
Exterior Description
Size
PC Card
Weight
Battery
Antenna
85.6 mm long x 54.0mm wide x 5.0
mm thick
Type II, 16 bit
38g including antenna, excluding
SIM card
Powered via the PC card slot i.e.
uses laptop battery
50 ohm interface; Antenna supplied
Ambient Temperatures
Operating
Storage
10 to 55 degrees C
-20 to 65 degrees C
Electrical Characteristics
Supported Voltages
Nominal Operating Voltage
Standby Current
Standby Power Consumption (no
PDP context active)
Idle current
(9/2 multiframe paging period)
(PDP context active)
Idle power (9/2 multiframe)
Maximum Current
3.3V ± 10%
3.6V
4.2mA
13.86mW
5.0mA/7.6mA
800mA
2W
Operating System Support
Supported Operating Systems
Minimum PC Specification
Microsoft Windows 98 (SE)
Microsoft Windows Me
Microsoft Windows 2000 (SP2)
Microsoft Windows ? XP
Processor size as recommended
by Microsoft for the version of
24
Windows ® in use 30 MB free disk
space
Current Consumption
Standby
Idle
Transmitting (Max)
Switched on but not making a call
and not attached to GPRS
Current Consumption < 5 mA
Connected to the Internet using
GPRS, in an ‘always connected’
state with no data flowing Current
Consumption < 8 mA
Maximum power output, GSM900
Current Consumption 800 mA
Software Upgrade
Via secure internet download the upgraded version from www.mobility.com.pk
.
25
Glossary
Bearer
GPRS
General Packet Radio Services.
Path over which data flows. Specifically in CSD
and HSCSD, the type of telephony link from the
GSM network to the server - V PSTN or ISDN.
bps
Bits per second - rate of data flow.
COM Port
Defines a serial/RS -232 port within the Windows ®
environment. May be physical (COM1 port on the
rear
of the PC) or virtual (COM5 port communicating
with
a PC card modem)
CS
Circuit Switched. Connection from A to B which
has
a fixed bandwidth and is maintained over a period
of time, for example a voice telephone call.
CS-1 to CS-4
Coding Scheme. Determines the data rate per
timeslot
in GPRS.
GSM
Global System for Mobile Communications. GSM
is the
world’s most widely-used digital mobile phone
system,
now operating in over 160 countries around the
world.
GSM 900
The GSM system family includes GSM 900, GSM
1800
and GSM 1900. There are different phases of rollout for
the GSM system and GSM phones are either
phase 1
or phase 2 compliant.
GSM 1800
Also known as DCS 1800 or PCN, this is a GSM
digital
network working on a frequency of 1800 MHz. It is
used
in Europe and Asia-Pacific.
GSM 1900
CSD
Circuit Switched Data. CSD is a GSM service
providing
a CS data connection at a rate of 9.6 or 14.4 kbps.
Also known as PCS. Refers to a GSM system
running
in the 1900MHz band. Used in the USA and
Canada,
for instance.
DUN
HSCSD
Dial-Up Networking.
High Speed Circuit Switched Data.
e-GSM
HTML
Extended GSM. New frequencies specified by the
European Radio Communications Committee
(ERC)
for GSM use when additional spectrum is needed
(Network-dependent). It allows operators to
HyperText Markup Language.
HTTP
26
transmit
and receive just outside GSM’s core 900
frequency
band. This extension gives increased network
capability.
ETSI
HyperText Transfer Protocol.
European Telecommunications Standards
Institute.
www.etsi.org
GGSN
ISP
Internet Service Provider.
Gateway GPRS Support Node
LAN
Kilobits per second - rate of data flow
ISDN
Integrated Services Digital Network. Can provide
circuit-switched data connections in multiples
of 64 kbps.
kbps
PSTN
Local Area Network.
ME
Mobile Equipment.
Public Switched Telephone Network, for example
ordinary analogue phone line for speech and/or
computer modem.
MO
RADIUS
Mobile Origination. For example, an SMS
message sent from a mobile terminal.
Remote Access Dial-In Service. Facility at the ISP
or corporation to manage remote data
connections.
RX
MMI
Man-Machine Interface.
Receive SC Service Centre (for SMS).
MS
Service Provider
Mobile Station.
MT
A company that provides services and
subscriptions to GC75 users.
Mobile Termination.
SIM card
PC
Subscriber Identity Module card – a card that must
be inserted in any GSM-based mobile terminal. It
contains subscriber details, security information
and memory for a personal directory of numbers.
The card can be a small
plug-in type or credit card-sized, but both types
have the same functions. The GC75 uses the
small plug-in card.
Personal Computer.
PCS
Personal Communications Services, often used
to describe GSM1900 networks.
PC Card
SMS
A card having physical and electrical
characteristics specified by PCMCIA providing
extra functionality when inserted into a laptop PC.
Typical examples are modems and network cards.
Type refers to the thickness of the card. The
GC75 is type II.
PCMCIA
Personal Computer Memory Card International
Association – defines specifications for PC Cards.
Short Message Service. Allows messages
of up to 160 characters to be sent and received
via the network operator's message centre to a
GC75.
TCP/IP
Transmission Control Protocol/Internet Protocol.
TCP/IPv4
27
www.pcmcia.org
PDP
Packet Data Protocol.
Phone book
A memory in the SIM card where phone numbers
can
be stored and accessed by name or position.
TLS
TCP/IP Version 4. Most widely implemented form
of TCP/IP today having a 4 byte address format
such as 212.161.127.136.
TE
Terminal Equipment. Generic term for GSM
terminals such as phones and PC cards.
Terminal Adaptor
Generic term for the equipment terminating a
digital comms line such as an ISDN2 line. The
GC75 is a Terminal Adaptor since it interfaces to
GSM digital data services.
Transport Layer Security. Used by Web browsers,
for example.
TX
Transmit
Type II
Refers to thickness of a PC Card as defined in
The specification from PCMCIA.
URL
Uniform Resource Locator.
USSD
Unstructured Supplementary Services Data.
Narrow-band GSM data service. For example
entering *79*1234# might return the stock price for
stock 1234.
V.110
ETSI standard for data over an ISDN circuit.
V.120
ETSI standard for data over an ISDN circuit.
VPN
Virtual Private Network.
WWW
World Wide Web.
XML
Extensible Markup Language
28