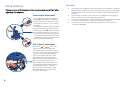
1
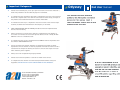
Important Safeguards
Please ensure the Odyssey is set up as per instructions. Ensure that induction /
hand over procedures as described on page 4 are followed.
It is imperative that the product log form is completed at the rear of the end user
manual on a regular basis. This form must be used to record setups, changes to
the product and scheduled maintenance checks undertaken.
To validate the warranty it is important that each section of the end user log is
actioned, recorded and initialled each time Odyssey is reviewed.
CARE, MAINTENANCE AND CLEANING procedures must be implemented to
ensure client well being.
Always ensure that a new end-user manual is supplied each time product is
re-issued. For new sets of instructions please contact a2u on +44 (0) 121 523
5004 or e-mail us at [email protected].
It is imperative that all users understand the CORRECT USE of the product and
also what is INAPPROPRIATE USE.
Secure the child using the 45 deg pelvic strap before you make any other
adjustments. Ensure the belt is securely adjusted and fitted each time a child is
seated and for changes of clothing for secure fit. Ensure the straps are fitted
from under the pelvic supports.
Always use all of the positioning straps provided.
Please ensure that the product is used on an indoor even surface.
It is imperative that children are continuously monitored whilst using this
equipment. NEVER LEAVE A CHILD UNATTENDED IN THIS PRODUCT.
PO.Box 2125 Wolverhampton, WV6 7FB
Tel / Fax +44 (0) 121 523 5004
Tel / Fax +44 (0) 1902 741675
E-mail: [email protected]:
Website : www.a2u.co.uk
Odyssey
End User manual
Contents
Product Log:
Date
Welcome
1
Before Starting
2
Product Induction
4
Getting Started
5
Using Odyssey
6
Maintenance & Cleaning
10
Warrenty
11
Specification
12
Issuing Information
14
Product log
15
Set up / Check / Amendments Signature
Print Name
18
Product Log:
Date
Set up / Check / Amendments Signature
Welcome
Print Name
Thank you for purchasing the Odyssey. Odyssey is a unique multi-adjustable seating
system. Odyssey has been designed to complement the development of the young
child for whom it has been prescribed by the health care professional.
IMPORTANT: READ THE INSTRUCTIONS CAREFULLY BEFORE USE AND KEEP
THEM FOR FUTURE REFERENCE. FAILURE TO FOLLOW INSTRUCTIONS MAY
IMPAIR USE AND IMPEDE FUNCTION AND MAY POSE A RISK TO THE USER.
The correct use and maintenance of your Odyssey will ensure it gives long and
trouble-free use.
Here are some of the key features of Odyssey
Only one base and three seat inserts.
Electric height adjustment from floor.
Seat angle / Tilt in space facility.
Seat depth and width adjustments.
Multi adjustable backrest.
Multi density seat design.
Variety of additional supports.
17
1
Before Starting
Important
2
Product Log:
Date
Set up / Check / Amendments Signature
Print Name
Always read instructions before use. Failure to follow instructions may impair
use, impede function and more importantly may affect the user’s safety.
This user guide is for Odyssey, item Code: Ody A, Ody B & Ody C.
Each product has a serial number which will be found on the battery pack.
Please quote this number in any correspondence.
The materials and foam within Odyssey meet all the required current regulations.
This product conforms to CE Marking Regulations, Medical Devices Directive
(MMD)93/ 42 EEC.
Do not add any other accessories other than those supplied by a2u to this
product. Ring a2u on +44 (0) 121 523 5004 for advice if unsure.
The warranty conditions are stated on page 18 and provide further information.
Odyssey A: maximum user weight 35KG.
Odyssey B: maximum user weight 45Kg.
Odyssey C: maximum user weight 55Kg.
Service or repair must only be carried out by an a2u authorised service person.
Any service or repair carried out by any other person will invalidate the
guarantee and a2u cannot accept any liability for injury or damage thus caused.
The tools required to adjust odyssey are supplied by a2u. These adjustments are
to be made by the therapist only. Store these in a safe place. Keep away from
children.
Before using the Odyssey for the first time please charge the batteries for 12
hours.
To charge the batteries, plug the charger into the mains and connect the
charger lead into the handset.
Batteries should be charged for 30 mins to an hour at the end of each day
to maintain optimum life.
An audible bleep sound from the handset is a low battery warning and the
batteries should be charged immediately.
Ensure that the product is fully assembled before use. Contact a2u if you need
advice at this stage.
It is essential that the equipment / system is cleaned regularly so as not to
impede function and to remain hygienic. Use warm soapy water but not
abrasive detergents.
Please ensure the Odyssey is set up as per instructions. Ensure that induction /
hand over procedures as described on page 4 are followed.
15
Important issuing Information
This form must be completed on
issue or re-issue of the product
Safety
Child’s Name
Therapist Name
Address
Telephone
Primary Carer’s Name
Product Issue Date
Product Serial No.
Product Purchase Date
Induction Check List
Please ensure that the following sections are covered with the primary carer before the
product is issued. Please initial each box when instructing carer / end user through the
induction process.
Safety Information
Induction Given By
Induction Received By
Cleaning
Product Log Updated
Date
14
WARNING
Daily User Guide
Care & Maintenance
It is imperative that children are continuously monitored whilst using this
equipment. NEVER LEAVE A CHILD UNATTENDED IN THIS PRODUCT.
If there is the slightest concern regarding the supports, use or function of the
product then immediately contact a2u for advice on +44(0) 121 523 5004 or
e-mail us at [email protected].
Secure the child using the 45 deg pelvic strap before you make any other
adjustment. Ensure the pelvic strap is adjusted for each child and for changes of
clothing. Ensure the straps are fitted under the pelvic support and fitted snugly to
ensure correct posture and safety.
When doing a hoist transfer, please ensure that the hoist sling is not caught on
any part of the Odyssey.
Always ensure that the back of the Odyssey chair is held to provide additional
security and control when tilting the chair.
Ensure casters are always locked when the Odyssey is stationery.
Due to the nature of the product, please be aware of the length of the base and
the surrounding in which the Odyssey is being used.
Do not allow other individuals to use, play with, stand on, ride on or run around
the Odyssey.
When using the chest strap or Jacket , please ensure the position of the
harness is anatomically correct. Ensure the pad is not impeding on the throat.
Please ensure that the product is used on an indoor level and even surface. If the
chair is to be pulled over a small incline it is recommended that the chair is pulled
backwards.
Small parts if loose will be a potential hazard for small children.
Keep products away from sources of heat such as naked flames, cigarettes,
open fires, heaters, radiators etc.
Always use all of the positioning straps provided.
Before moving the Odyssey, ensure all brakes are released and the footrest is at
least 1” / 25 mm above the ground level.
Secure the child using the 45 deg pelvic strap before you make any other
adjustments. Ensure the belt is securely adjusted and fitted each time a child is
seated and for changes of clothing for secure fit. Ensure the straps are fitted
from under the pelvic supports.
The safety advice and directions in this manual cannot cover all eventualities and
unforeseen situations that may occur. It must be understood that common sense,
general caution and care are factors that cannot be built into this product. These
are factors which the person actually using this product must assume
responsibility for.
3
Product Induction
4
Notes:
This product has been prescribed by the Therapist or practitioner who should
have adjusted the Odyssey to meet the child’s need. If this product has not been
adjusted by the therapist please do not use it.
Before using the product please ensure you have had a product induction from
your therapist. Formal induction plan is shown on page 14.
It is imperative that you understand the responsibility you are taking as a primary
carer.
Please ensure this manual is kept in a safe place.
It is imperative that the product log form is completed by your therapist at the
rear of this manual on a regular basis. This form must be used to record setups,
changes to the product and scheduled maintenance checks undertaken.
It is imperative as a primary carer you understand the CORRECT USE of the
product and also what is INAPPROPRIATE USE.
You must understand and appreciate all SAFETY aspects of a2u products.
CARE, MAINTENANCE AND CLEANING procedures must be followed to
ensure client well being.
DO NOT undertake any adjustments unless directed by the therapist, please
contact your Therapist for directions.
CARERS AND HOME USERS MUST BE AWARE. This product has been prescribed
by the Therapist or practitioner for a specific child and should ONLY be used as
directed by the prescriber.
13
Odyssey Specification
Getting Started
Intended Use
Odyssey has been designed to complement the development of the youngster for
which it has been prescribed by the health care professional.
It is imperative that Odyssey is used correctly (as per instructions) and adjusted and
maintained regularly (as per instructions) to accommodate development and growth.
Young children using this equipment should be continuously monitored and not left
unattended.
Using the Odyssey
12
Odyssey A, (Max User Weight 35Kg).
Odyssey B, (Max User Weight 45Kg).
Odyssey C, (Max User Weight 55Kg).
Before using the Odyssey always check all the supports are secure and tight.
Open the pelvic strap and any other harness fitted to the chair, before transfer.
Lock the casters before transferring.
When doing a hoist transfer, please ensure that the hoist sling is not caught on
any part of the chair.
Flip up the sandals if it assists tranfer.
As soon as the child has been transferred into the Odyssey, please secure the
pelvic strap and any other harness, along with the foot straps immediately.
Fit the tray and any other accessories supplied.
Always ensure that the back of the Odyssey chair is held to provide additional
security and control when tilting the chair.
Batteries should be charged for 30 mins to an hour at the end of each day
to maintain optimum life.
To charge the batteries, plug the charger into the mains and connect the
charger lead into the handset.
It is imperative that children are continuously monitored whilst using this
equipment. NEVER LEAVE A CHILD UNATTENDED IN THIS PRODUCT.
Please refer to Using Odyssey section on pages 6to9 for further information.
5
Warranty
Using Odyssey
Please ensure all the knobs and screws are secure and tight after
adjusting the odyssey.
Base Height Adjustment
1
2
Use the handset to adjust the height of
Odyssey . When lowering the Odyssey,
please ensure that the footrest is always
at least 25 mm ( 2.5 cm / 1” inch ) above
the ground.
To charge the batteries, plug the charger
into the mains and connect the charger
lead into the handset . Batteries should
be charged for 30 mins to an hour at the
end of each day to maintain optimum life.
An audible bleep sound from the handset
is a low battery warning and the batteries
should be charged immediately.
a2u warrants that equipment sold by a2u will be free of all defects in material and
workmanship for a period of 2 years from the date of purchase. We will not be
held responsible for any damage, injury due to misuse or modification of our
products.
a2u will repair or replace, at our discretion, any equipment or parts proving
defective within the terms and period of this warranty.
If any part of the equipment is found to be defective within the terms and period
of this warranty a2u will, at its own discretion, repair or replace it.
For advice on the use of this product please phone our after sales line on
+ 44 (0) 121 523 5004.
Tilt In Space Adjustment
First loosen red or orange lever. Hold
the back of the chair and loosen the
corresponding lever on the other side of
the chair. Always ensure that the back of
the chair is held to provide additional
security and control. Odyssey can be
positioned in both recline and prone.
Whilst there is a stop to control the seat
angle, it is essential that the seat is
positioned by holding the backrest and
then secured by tightening BOTH levers
on each side of the chair. Failure to
secure the levers could result in angle
movement which may cause distress,
insecurity for the user.
6
11
Maintenance
Using Odyssey
This product has been prescribed by the Therapist or practitioner who must ensure
that all users understand and implement correct use, safety checks, care, maintenance
and cleaning. It is the user (carer for the child) who is responsible for ensuring the
product is correctly used on day to day basis. The Therapist should direct the following
checks to be undertaken, the frequency of the check is only a minimum and should be
adjusted depending on the environment in which the equipment functions.
Pelvic Strap Adjustment
It is imperative that the pelvic buckle is
positioned in the centre of the seat width.
Once the buckle is fitted together, pull
both the side D loops to enhance a more
secure fitting. To release place fingers
under each side of buckle and gently pull
from side to side. This will release the
side webbing and enable easier access.
The pelvic strap is designed to fit across
the pelvis NOT around the waist. The
length of the lapstrap can be adjusted
through the triglide under the seat.
Readjust strap to allow for changes in
clothing and change of child.
Check that the straps go under the
pelvic support and that they fit snugly.
Daily Checks
Check that supports and straps are securely fixed.
Check that the pelvic strap fits the child snugly.
Check that the backrest angle fixing is secure and tight. Yellow & Orange Knobs
Check all upholstery for wear and tear.
Check framework for wear and tear, splinters, breaks.
Monthly Checks
The monthly check, again the frequency is only a minimum and should be adjusted
depending on the environment in which the equipment functions. As this check is a
more in-depth check a suitably competent individual should be nominated by/on behalf
of the prescriber.
1
2
Check that supports and straps are functionally correct and securely fixed.
Check that all the supports are secure and tight.
Check for missing or worn bolts/fixings as required.
Check straps for fraying and missing or broken buckles.
Check all upholstery for wear and tear.
Check framework for wear and tear, splinters, breaks.
Check the overall structure of the Odyssey for any signs of fatigue or damage.
Ensure end user log is updated.
The sandals fitted to round tubing are
secured into position by tightening black
wing nut . Sandals can also be removed
this way or flipped out of the way to
10
Metalwork and coated parts can be wiped with soapy water or antibacterial
spray. Please dry the product thoroughly. Please do NOT use solvents, abrasive
cleaners, caustic soda, sodium hypochlorite and organic solvents.
Padded chest, pelvic and knee block should be wiped regularly with soapy water
or antibacterial spray. Please dry material thoroughly after wiping.
Please do not soak the fabric.
assist transfer. The sandals can be
secured to the feet by means of webbing
fed through buckles and secured .
Tray Adjustment
Cleaning
Footrest Adjustment
1
The tray height is attained by loosing blue
knob and adjusting armrest to
required height and secure. To angle the
tray loosen grey knob, place arms to
required angle and secure. The tray will
only slide easily into the tubes if both
arms are the same height and angle.
Secure the tray with the black Wing nuts.
7
Using Odyssey
1
2
Using Odyssey
Dynamic Zip Jacket
Flip Away Knee Blocks
The shoulder straps are fitted by two flip
up buckles at the top of the backrest. The
lower straps are fitted in the desired
position to the H frame on the backrest
. Pull the D loop on the lower straps to
tension the jacket. The jacket is removed
by unzipping and then removing the two
upper buckles on he backrest. When
putting jacket on do up the zip first, pull
on D ring to ensure a secure fit as low as
possiable on the torso. Lastly secure
webbing. Check that jacket is fitted low
down so that material does not ride up towards child’s throat.
To release the knee block and flip away
lift the black knob . To adjust the
depth of the knee block undo the corner
screw on the side of the seat, position and
re-tighten. To adjust height loosen the
red knob and secure. Knee block can also
be adjusted laterally by loosening the
corner screw located in the front on the
knee block.
NEVER FORCE KNEE BLOCKS INTO POSITION AS BOTH SHOULD FIT WITH EASE.
1
Abduction Support
Groin Harness
1
2
8
The child is seated on top of the groin
harness and the 2 padded straps are fed
between and over the legs and secured at
the pelvic. To remove the child from the
harness undo the buckles over each leg
.
HOW TO FIT & ADJUST GROIN HARNESS
Place the groin harness flat on the seat.
The Harness should be in-line with the
square padded edge to the rear and the 2
long straps to the front of the seat.
The 2 straps at rear of seat are secured
on the Seat H frame . Take /work each
strap individually by lengthening /
shortening the webbing through the
tri-glide as required. .
The 2 padded long straps each need to be
fed over each corresponding (same side)
rear strap and secured again in the same
way. It is essential that this fitting is snug.
Once the desired position is attained
small adjustments can be made via the
webbing and the buckle fixing.
1
Secure the abductors by slotting the stem
into square brackets under the seat and
secure using the black wing nuts. The
padding should be next to the user. Width
adjustment is by means of a screw
adjustment, located under the seat on the
square abduction support brackets.
9