1
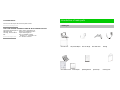
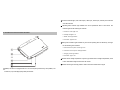
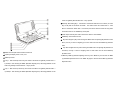
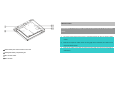
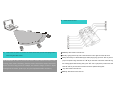
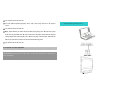
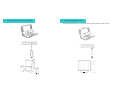
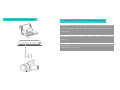
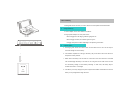
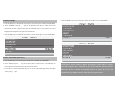
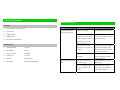
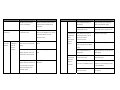
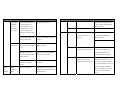
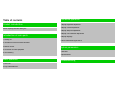
Table of contents
Advanced operation
Product introduction
1 Display brightness adjustment
Points requiring attention during use
2 Display contrast adjustment
3 Display sharpness adjustment
Introduction of main parts
1 Packing list
4 Display color saturation adjustment
5 Display language
6 Select video/audio signal source
2 Introduction of host functional interface
3 Remote control
System parameters
4 Connection to other equipment
5 Use of battery
1 Interface
2 Specifications
Basic operation
1 Turn it on
2 Play video/audio files
Troubleshooting
Product introduction
7. Do not place the device on a bed, sofa, carpet, or a similar surface that will block the ventilation
port. Do not place this device in a sealed environment, such as an unventilated closed bookcase or
Video-55 is a video/audio player used along with iPod ® 5G 30G/60G. It is equipped with a 7"
high-definition LCD unit, a high-performance audio speaker system, a fully functional IR remote control,
USB interface, and video/audio input/output interfaces.
This system can be used to view movies, pictures, or other video files played by iPod ® 5G
and to listen to the music files stored in "iPod ® 5G."
cabinet.
8. Please keep the device away from electric heaters, radiators, ovens, or other heating equipment
(including power amplifier)
9. Power supply – The power supply to which this device is connected should match the type described
in the operating instructions or on the device label.
10. Protection of power cord – The power cord should be arranged properly to keep it from being
Points requiring attention during use
stepped on or crushed by other objects. Please pay special attention to the power input line and
1. Please read the Video-55 operating instructions carefully before operating this device.
the connection input ports coming out of the side of the video player.
2. Please keep these operating instructions for later use.
3. Please heed all warnings printed on the device and in the operating instructions.
4. Please follow all of the operating and use instructions.
5 . Please do not use this device near a bathtub, washbasin, kitchen sink, laundry sink, damp basement,
or swimming pool.
Warning: In order to reduce the risk of fire or electrical shock, please do not place
11. Grounding and polarization – Preventive measures should be taken to ensure proper grounding and
polarization.
12. Please use a soft cloth for routine cleaning. If there are persistent stains, you can apply a small
amount of a neutral cleaning agent to the cloth, dilute it in 5-6 times the same amount of water,
squeeze the water out of the cloth, and wipe off the persistent stains, followed by wiping with a
piece of dry cloth.
this device in a rainy or damp environment.
ATTENTION: Please be careful when using alcohol, solvent, benzene, bug
6. Find a flat and stable place to use this device near the system to be connected. Do not place this
repellent, etc., since these chemical products will leave marks on the body of the
device on the top of a TV or color display unit. Please use this device in an environment away from
device or cause the housing to detach. Similarly, please do not keep rubber or
magnetic fields.
plastic articles in contact with this device over long periods since they will damage
the body of the device. When using a cleaning cloth containing a chemical, please
carefully read the use instructions for the cleaning cloth. Please unplug the power
cord when cleaning the device.
e. The device falls to the ground or the housing has been damaged.
20. Repair – The user should not try to repair the device. Repair should be conducted by a qualified
technician or the retailer. It is also possible to call the SI hotline to get help.
When cleaning the liquid crystal display unit, please use a piece of soft, dry cloth (such as lens
cleaning cloth). Water left on the display unit for a long time will cause discoloration of the screen or
leave stains. Please use special liquid crystal display cleaner to clean persistent stains.
One year warranty
SI warranties to the final user that all of the sourced audio, PC audio, portable audio, TV or
13. Storage period – Please unplug the device if it is not used for a long time.
game speaker systems are free of defective materials or workmanship in the course of reasonable and
14. Thunderstorms – Please unplug the special adapter during thunderstorms.
regular use for a term of one year from the purchase date.
15. Penetration of foreign matter or liquid – Please be careful not to let foreign matter or liquids enter
the housing through the gap.
This warranty is the only warranty in effect relative to SI sourced audio, PC audio, portable
audio, TV or game speaker systems, and no other expressed or implied warranties are valid. Neither SI
16. Auxiliary parts – Use only the auxiliary parts specified by Sonic Impact.
nor any retailer authorized by SI is responsible for any indirect damage occurring during use of the
17. Do not place any article on the body of this device.
speakers. (The limitation with regard to indirect damage may be inapplicable in some areas where such
18. When using this device in a hospital, airplane, or other special environment, please follow hospital
limitation is prohibited.)
administrative regulations, aviation law, and other special regulations.
19. Repair is required when the following types of damage occur – In these cases, the device should be
repaired by an authorized service agent:
a. Power cord or plug is damaged.
b. Foreign matter or liquid enters the device.
c. The device is exposed to rain.
d. The device works abnormally or the performance changes significantly.
Under this warranty, SI is not responsible for any problem, defect, or malfunction under the
following circumstances: misuse, abuse, incorrect installation, use with defective or improper
equipment, or use of the speakers with any equipment for which they were not intended.
The terms of this warranty are applicable only when the source audio, PC audio, portable
audio, TV or game speaker system is returned to the authorized SI retailer that sold said products.
Introduction of main parts
CUSTOMER SERVICE
For service or warranty of the electronics please contact:
1 Packing list
[email protected]
HTU
UTH
THIS CLASS B DIGITAL APPARATUS COMPLIES WITH CANADIAN ICES-003.
Sonic Impact Technologies LLC
2555 State Street
San Diego, California 92101
USA
www.si-technologies.com
HTU
UTH
©Sonic Impact Technologies LLC
Video-55 is a trademark of Sonic
Impact Technologies LLC
iPod® is trademark of Apple
Computer, Inc., registered in the
U.S. and other countries
One main unit
One power adapter
One remote control
Insert adapter
One car charger
One video cable
Operating Manual
Quick Set Up
One bag
Cleaning cloth
2 Functional interface gate, with video output, video input, audio input, external power interface
and "USB" interface
3 Operating status indicator light indicates the current operational status of the device. The
indicator light has the following four statuses.
2 Introduction to host functional interface
a. Turned on: Green light is on
b. Standby: Red light is on
c. Muted: Green light flashes
d. Turned off: Lights are off
4 Battery status indicator light indicates only the current operating status of the battery. This light
has the following four indicators:
a. Sufficient electric power: Green light is on
b. Insufficient electric power: Red light flashes
c. Charging: Green light flashes
d. Turned off: Light is off
5 Remote control storage compartment. Ejection-type remote control storage compartment, which
further facilitates storage and removal of the remote.
6 Remote control signal receiving window: Used to receive the remote control signal
1 Speaker, The device is equipped with two 1.25" full-frequency titanium alloy cone speakers, one
at each end, to provide high-quality audio performance.
screen will gradually decrease when the "–" key is pressed.
6 HOLD Key: Panel locking key: 1. If the device is switched to "HOLD" after it is turned on, all of the
keys on the panel of the device are locked.
The remote control will remain active. 2. If the
device is switched to "HOLD" after it is turned off, the device cannot be turned on using either
the remote control or the "POWER" key on the panel.
7 iPod ® "30pin" interface jack: Used to connect this device to "iPod ® VIDEO"
8 POWER key: Turns the device on/off
9
key: Menu navigate up key: After entering the "MENU" menu for adjusting the parameters of the
device, this key is used for navigating up to select items from the device MENU-up parameter
menu.
key: Menu navigate down key: After entering the "MENU" menu for adjusting the parameters of
the device, this key is used for navigating down to select items from the device MENU-up
1 Rubber anti-wear pad: Protect the device from wear
2 Liquid crystal display screen: 7-inch, 16:9
3 Speaker port holes
4 + Key: 1. Total volume-up control key: the volume of the device will gradually increase when "+"
is pressed; 2. After entering the "MENU" parameter-adjusting menu, the analog parameter on the
screen will gradually increase when the "+" key is pressed.
5 - Key: 1. Total volume-up control key: the volume of the device will gradually decrease when "–"
is pressed; 2. After entering the "MENU" parameter-adjusting menu, the analog parameter on the
parameter menu.
11 MENU key: MENU up parameter-adjusting menu key: Press "MENU" key once to enter the MENU
up parameter adjustment menu. Press "MENU" key again to exit the device MENU up parameter
adjustment menu.
3 Remote control
ATTENTION: To avoid damage, please do not throw, step on, or hit the remote
control.
1)
The remote control may not work if there is an obstacle between the main unit and the remote
control.
2)
Please do not expose the remote control to strong light sources. Otherwise, the remote control
may not be able to operate.
3)
1 Bottom rubber pads: Protect the device from wear
2 Rechargeable battery compartment gate
3 Main unit label sticker
4 Main unit label
Please use the remote control within the effective receiving range. The effective receiving range is
shown below.
5)
4)
Remote control functions
Please remove the plastic film between the remote control battery and the metal spring contacts
1 POWER key: Same as that on the main unit
before using the remote control.
2 Mute key: Lightly press this key once to mute the sound. Press it again to restore the sound.
3
key: Rewind key for "iPod ® VIDEO" player: When playing songs, press the
ATTENTION: In order to prevent the remote control lithium-ion battery from
jump to the previous song. Hold down the
leaking, please remove the battery from the remote control if the remote control will
that is being played. When browsing slides, press
not be used for a long period (for example, one month or longer). If there is liquid
down the
leaking from the remote, please wipe away the liquid and install a new battery.
""
"" key for more than 2 seconds to rewind the song
""
once to jump to the previous slide. Hold
"" key for more than 2 seconds to enter the upward browsing state.
4 + key: Same as that on the main unit
5 MENU key: Same as that on the main unit
key once to
6
7
key: Same as that on the main unit
key: Video-55 pause key/play key: Press "" once to play. Press the "" again to
pause
8
9
key: Same as that on the main unit
key: Fast-forward key for iPod ® 5G player: When playing songs, press "" key once to jump
to the next song. Hold down the "" key for more than 2 seconds to fast-forward the song that
is being played. When browsing slides, press "" once to jump to the next slide. Hold down the
"" key for more than 2 seconds to enter the downward browsing state.
– key: Same as that on the main unit
4 Connection to other equipment
ATTENTION: Please turn off the power of the main unit before connecting to
other equipment.
1)
Diagram illustrating connection to TV
2)
. Diagram illustrating connection to external speaker
3)
Diagram illustrating connection to PC
Data communication between "PC" and iPod ® 5G can be realized through the "USB" interface.
4)
Diagram illustrating connection to video input equipment
5)
Diagram illustrating connection between power adapter and external power supply
ATTENTION: Please place the device in a stable location when making the
electrical connection. Avoid short-circuits at the charging terminals of the device
and the adapter.
ATTENTION: The battery adapter is suitable for 100-240 V. It is globally
applicable.
ATTENTION: Please make sure that the power of the device is already turned off
when plugging in or unplugging.
5 Use of battery
A rechargeable lithium-ion battery is used in this device. Please operate as described below.
1)
Charge the battery
a. Connect adapter to the "DC IN" socket of this device.
b. Plug the power adapter into an AC power outlet.
· When charging starts the charging indicator light glows red.
· When charging is finished, the indicator light turns green.
· Charging usually takes 4-6 hours depending on the operating environment.
2)
Important points
a. The charging time should not be shorter than 12 hours before the first use. This can help to
extend the average life of the battery.
b. If the ambient temperature is too high, the battery may not be able to work since the device
has protective safety features.
c. Please remove the battery from the main unit if this device will not be used for an extended
time. Avoid keeping the battery in the main unit for a long time since a weak current will flow
out continuously, leading to excess battery discharge. In some cases, the battery may be
unusable even when it is recharged.
d. If the battery is not fully charged, the picture may become unstable. Please make sure that the
battery is fully charged before using the device.
e. The battery should be stored at a temperature of 15-25°C. Please do not expose the battery to
excessively low or high temperatures. Please do not store the battery in a dusty environment.
f. If the battery is to be stored for a long time, it is recommended to charge/discharge the battery
once every year. Use the battery in the main unit until it is discharged. Then, recharge the
battery and store it.
g. If the battery cannot be charged or the playing time is very short, it means that the service life
of the battery has expired. It is necessary to replace it with a new battery. (Please follow the
battery replacement instructions.
ATTENTION: Only a battery with the same specifications designated by SI
can be used. To do otherwise can be dangerous.
3)
Replacing the lithium-ion battery
To replace the lithium-ion battery, please disassemble and install the parts as shown below.
4)
Special reminders:
Because of the intrinsic properties of lithium-ion batteries, please note the following:
5)
a. When disposing of a defective or old battery, please apply adhesive tape to the terminals and
Battery specifications
Nominal Voltage:7.0V
dispose of the battery according to local regulations.
Nominal Capacity:4000mAh
b. In order to prolong the service life of the battery, please do not charge the battery frequently in
Max.Charging Voltage:8.4V
an intermittent way. The number of charging cycles has significant influence on the service life
GB/T 18287-2000
of the battery.
c. Charging will cause slight heating, which is considered normal.
d. If the temperature in the charging environment is too high, the battery will not become fully
charged. Please do not charge the battery at an excessively high ambient temperature. It is
preferred to charge the battery at an ambient temperature of 10-30°C.
e. In normal storage, the capacity of the lithium-ion battery will decrease naturally over time. As a
6)
Use power adapter to supply power
a. Connect the DC output plug on the power adapter to the "DC IN" socket on the device.
b. Insert the AC plug of the power adapter into a power outlet. The device will enter standby
status.
result, the playing time will be shortened.
f. The capacity of the lithium-ion battery will decrease gradually as the number of charging cycles
Basic operation
increases. As a result, the playing time will be shortened.
g. The capacity of the lithium-ion battery will decrease gradually along with a drop in ambient
1 Turning it on
temperature. As a result, the playing time will be shortened.
The aforementioned consumptions are normal consumptions of the lithium-ion battery. It is
recommended that the user charge the battery when it is nearly discharged in order to extend the
service life of the lithium-ion battery.
a. Insert the power plug of the adapter into a power outlet.
b. Insert the DC output plug of the adapter into the "DC" input socket of the main unit.
c. If the "HOLD" key on the keypad is in the locked position, please release the "HOLD" key and press the
2)
Play the program source signal
"POWER" key. If the "HOLD" key is in the released state, press the "POWER" key directly to turn on the
a. iPod ®
device.
1 If the Video-55 is opened and turned on and the "30pin" interface is correctly connected to an "iPod
d. The power indicator light will turn on, indicating that the device can be used.
e. In the standby mode (when the power indicator light is red), it is also possible to turn on the device
by pressing the standby key on the remote control.
®," the device will play the video/audio signals output from the "iPod ®."
2 The Video-55 will turn on the display screen when it detects a video signal output from an "iPod ®."
3 Two minutes after the iPod ® ceases output of a video signal, the display screen of the Video-55 will
turn off automatically and will enter the audio play mode.
2 Play video/audio files
4 If the display screen is closed while the Video-55 is playing video/audio, the display screen will turn
off instantly, while the audio continues to play.
1)
Identify the program source equipment
Make sure that the Video-55 "30pin" interface has been correctly connected to "iPod ® 5G," or
that the "AV IN" socket has been correctly connected to another video/audio player.
If the Video-55 is not connected correctly to as iPod ® or other video/audio player, the device
will show a blue screen after it is turned on, and will automatically enter standby status after 30
5 If the iPod ® connected to the Video-55 is in the off status, the "POWER" key on the operating panel
of the Video-55 or on the remote control can be used to turn on the "iPod ®."
b. Other video/audio players
1 If the Video-55 is opened and turned on and the "AV IN" interface is correctly connected to another
video/audio player, the device will play the current video/audio signal.
2 The Video-55 will turn on the display screen when it detects a video signal output from an "iPod ®."
seconds.
If the Video-55 is correctly connected to an iPod ® and another video/audio player at the
same time, the video/audio signal output from the iPod ® will be given priority.
ATTENTION: Be careful when connecting equipment. The interface on the
device can be damaged by improper use.
3 Two minutes after the iPod ® stops outputting a video signal, the display screen of Video-55 will turn
off automatically and will enter the audio play mode.
4 If the display screen is closed when the Video-55 is playing video/audio, the display screen will turn
off instantly, while the audio continues to play.
ATTENTION: When the "30pin" interface of the Video-55 is corrected to an
4)
iPod ® that is on, the Video-55 cannot play signals output from the video/audio
a. iPod ®
Vidio fast-forward navigate down, rewind navigate up
player connected to the "AV IN" interface. It is necessary to select and confirm
When the device plays songs, if the "HOLD" key on the iPod ® control panel is in the released
"VIDEO" in the "iPod ®/VIDEO" program source section in the "MENU"
state, press the "" key once to jump to the next song. Hold down the "" key for more than 2
menu in order to play other video/audio equipment. When the device is turned
seconds to fast-forward the song that is being played. When browsing slides, press "" once to jump to
off and turned on again, the device will automatically give higher priority to
the next slide. Hold down "" key for more than 2 seconds to enter the downward browsing state.
the iPod ® program source.
When playing songs, press "" key once to jump to the previous song. Hold down "" key for more
than 2 seconds to rewind the song that is being played. When browsing slides, press "" once to jump
3)
to the previous slide. Hold down "" key for more than 2 seconds to enter the upward browsing state.
Playing and pausing the Video-55
a. iPod ®
If the "HOLD" key is in the locked state, operation from the iPod ® control panel is ineffective. The
If the "HOLD" key on the iPod ® control panel is in the released state, Press "
" once to play.
Press it again to pause. When the "HOLD" key is in the locked state, operation from the iPod ® control
remote control of the Video-55 is not limited by locking the "HOLD" key on the iPod ® control panel.
b. Other video/audio players
A video/audio player connected to the "AV IN" interface cannot be fast-forwarded, navigated
panel is ineffective. The remote control of the Video-55 is not limited by locking the "HOLD" key on the
iPod ® control panel.
up and down, or rewound by the remote control of the Video-55. It is necessary to fast-forward or
b. Other video/audio players
navigate down, rewind or navigate up by means of the video/audio equipment connected to the "AV IN"
The remote control of the Video-55 cannot play/pause other video/audio players connected
interface.
to the "AV IN" interface. It is necessary to play/pause by means of the video/audio equipment connected
to the "AV IN" interface.
5)
Volume adjustment
a. iPod ®
When the Video-55 is playing, the volume is adjusted using the "+," "–" keys. The volume key
on the iPod ® control panel cannot control the volume of this device.
to enter standby status instead of turning off the power of the Video-55.
b. Other video/audio players
When this device is playing, the volume is adjusted using "+," "–" keys. The volume keys on the
Advanced operations
video/audio equipment connected to this device have the same functions.
Advanced Video-55 operations are realized through the "Video-55 MENU" displayed by pressing
3 Turning it off
the "MENU" key. When the MENU key on the control panel or the remote control is pressed once, the
Video-55 MENU will be displayed in a semi-transparent state on the display screen. The user can select
1)
Standby status
If the "POWER" key is pressed to enter standby status when the Video-55 is operating and the
"HOLD" key is in the released state, the status light of this device will be lit red. If the "HOLD" key is in
the released state, pressing the "POWER" key on the remote control of the Video-55 is the same as that
operation on the operation panel.
ATTENTION: If the "HOLD" key of the Video-55 is in the locked state,
pressing the "POWER" key on the remote control will turn off the power.
2)
Turning off the power
If the "HOLD" key is locked when the Video-55 is in standby status, the power will be turned
off, and the status light will be off.
ATTENTION: If the "HOLD" key of the Video-55 is in the released state,
pressing the "POWER" key on the remote control of the Video-55 will cause it
items from the Video-55 MENU using the " , " keys and adjust the parameter using the "+, –" keys.
1 Display brightness adjustment
2 Display contrast adjustment
a. Press the "MENU" key on the control panel or the remote control to display the VIDEO MENU."
a. Press the "MENU" key on the Video-55 control panel or remote control to display the VIDEO MENU."
b. Select "BRIGHTNESS" using the " , " keys on the control panel or the remote control. The selected
b. Select "CONTRAST" using the " , " keys on the Video-55 control panel or remote control. The selected
item will have a different color from the unselected items. In the meantime, the numeric level
item will have a different color from the unselected items. In the meantime, the numeric level
describing the current status of the selected item will appear to the right of the selected item. A
describing the current status of the selected item will appear to the right of the selected item. A
corresponding display in graphic form will also be shown at the bottom of the "VIDEO MENU."
corresponding display in graphic form will also be shown at the bottom of the "VIDEO MENU."
c. Use the "+, –" keys on the control panel or the remote control to adjust to an appropriate number. The
larger the number, the higher the brightness and vice versa. The adjustment range is 1-100.
d. Press the "MENU" key on the control panel or the remote control again to exit the "VIDEO MENU."
c. Use the "+, –" keys on the Video-55 control panel or the remote control to adjust to an appropriate
number. The larger the number, the higher the contrast and vice versa. The adjustment range is 1-100.
d. Press the "MENU" key on the Video-55 control panel or remote control again to exit the "VIDEO MENU."
3 Display sharpness adjustment
4 Display color saturation adjustment
a. Press the "MENU" key on the Video-55 control panel or remote control to display the VIDEO MENU."
a. Press the "MENU" key on the control panel or remote control to display the "VIDEO MENU."
b. Select "SHARPNESS" using the " ,
" keys on the Video-55 control panel or remote control. The
b. Select "COLOR" using the " , " keys on the control panel or remote control. The selected item will
selected item will have a different color from the unselected items. In the meantime, the numeric
have a different color from the unselected items. In the meantime, the numeric level describing the
level describing the current status of the selected item will appear to the right of the selected item.
current status of the selected item will appear to the right of the selected item. A corresponding
A corresponding display in graphic form will also be shown at the bottom of the "VIDEO MENU."
display in graphic form will also be shown at the bottom of the "VIDEO MENU."
c. Use the "+, –" keys on the Video-55 control panel or remote control to adjust to an appropriate
number. The larger the number, the higher the sharpness and vice versa. The adjustment range is 1-6.
d. Press the "MENU" key on the Video-55 control panel or the remote control again to exit the "VIDEO
MENU."
c. Use the "+, –" keys on the control panel or remote control to adjust to an appropriate number. The
larger the number, the higher the degree of color saturation and vice versa. The adjustment range is
1-100.
d. Press the "MENU" key on the control panel or remote control again to exit the "VIDEO MENU."
5 Display language
d. Press the "MENU" key on the control panel or remote control again to exit the "VIDEO MENU."
a. Press the "MENU" key on the Video-55 control panel or the remote control to display the VIDEO MENU."
b. Select "LANGUAGE" using the " ,
" keys on the Video-55 control panel or remote control. The
selected item will have a different color from the unselected items. In the meantime, the current
language status will appear to the right of the selected item.
c. Press the "MENU" key on the Video-55 control panel or remote control again to exit the "VIDEO MENU."
6 Select video/audio signal source
a. Press the "MENU" key on the control panel or remote control to display the "VIDEO MENU."
b. Select "SOURCE" using the " , " keys on the control panel or remote control. In the meantime, the
current signal source will appear to the right of the selected item.
c. Select iPod ® or another video/audio player as the current video/audio signal source with higher
priority using "+, –" keys.
ATTENTION: When VIDEO is MENU through the VIDEO MENU, another
video/audio signal source connected to the AV IN interface will be selected.
When this device is turned off and then turned on again, the device will
automatically give higher priority to the iPod ® program source.
System parameters
Troubleshooting
1 Interface
1)
DC IN: 9V 2A DC power input terminal
Symptom
Possible problem
Solution
The status light is not on
Power is not turned on.
Release HOLD to turn on the power.
2)
AV IN: AV input
3)
AV OUT: AV output
The power cord is not
Insert the power plug into a wall
4)
Earphone output
connected to the wall outlet,
outlet and plug the power connector
and/or the power connector is
into the power socket.
5)
(when AC power is used)
Data terminal: Mini USB socket
not plugged into the power
socket on the back.
2 Specifications
The power for the voltage
If the power cable has been plugged
1)
Audio system mode
2-channel
stabilizer (if one is used) is not
into the voltage stabilizer, please
2)
Power (PMPO)
20 W x 2
turned on.
make sure that the voltage stabilizer
3)
Frequency response
200-18 kHz
4)
Display screen
7-inch 16:9
5)
Resolution
480 x RGB x 234
6)
Power supply
Input AC110V-260V/50/60Hz
power has been turned on
The outlet on the wall is
Plug another device into the (same)
inoperable.
wall outlet to make sure that the
outlet works properly.
The remote control does not
The remote control is out of
Move the remote control into the
work
its effective range
effective range
There is an obstacle between
Move the obstacle or move the
the device and the remote
remote control into the effective
control
range without the obstacle
Symptom
Possible problem
Solution
The battery of the remote
control is discharged
Symptom
Possible problem
Solution
Replace the battery (see the quick-
The rechargeable battery is
Charge the device [sic; battery] or
reference card for details of the
discharged
use an external power supply
The rechargeable battery is
Establish close contact between the
making poor contact
rechargeable battery and the device
Normal, play video signal
procedure)
There is radio wave
Too close to the radio
Move the speaker to see if the
interference
transmission tower
interference disappears. You can buy
A black screen
The video/audio file has no
a shielded cable at the local
is displayed
video signal output, and the
electronics store.
when
device has entered
video/audio
screensaver status
The display
A black screen
The power is not turned on
Release HOLD to turn on the power
files are
screen has
is displayed
when using an external power
switch
played
problems
when the
supply.
Fasten the power supply outlet
when using an external power
supply
device is
turned on
The power supply comes loose
When using an external power
Insert the power plug into a outlet
The rechargeable battery is
Charge the device or use an external
supply, the power cord is not
wall
discharged
power supply
A blue screen
The video/audio player is not
Correctly connect iPod ® or other
is displayed
connected correctly
video/audio player
The video/audio signal input
Make sure that iPod ® or VIDEO is
interface is not MENU correctly
selected for video/audio signal input
connected to the wall outlet.
When using an external power
Plug the power connector into the
supply, the power connector is
DC socket.
not connected to the power
when the
device is
turned on
in the VIDEO MENU
socket on the back of the
Video-55 system.
The video/audio player is in
Operate the video/audio player to
blue screen status
start playing
Symptom
Possible problem
Solution
A blue screen
The video/audio file has no
Normal, play video signal
is displayed
video signal output. The
when a
device enters blue screen
video/audio
status within the next two
file is played
minutes. The device then
Symptom
Possible problem
Solution
Check whether the power switch is
in the "on" position and whether the
indicator light is on.
enters the screensaver mode.
The video/audio signal input
Fasten the video/audio signal input
interface comes loose
terminal
There is noise
There is strong magnetic field
Select an appropriate place to
on the screen
interference near the display
position the device
screen
The volume is too low
Press "+" key to increase the volume
iPod ® 30pin interface is not in
Check the volume of the backup
the correct connection
audio equipment and MENU the
position
volume to medium.
Remove the iPod ® and reinsert it.
3.5 mm stereo cable is not
Connect the 3.5 mm stereo cable to
connected to the audio source.
the audio source. Make sure that
The output signal of the
Change to a video/audio program
these signal cables are firmly
video/audio equipment has
source with better quality
inserted into the correct sockets.
quality problems
The video/audio signal input
Check whether the plug is inserted
interface is making poor
all the way
contact
Speaker
Speaker
Power is not turned on
Check whether the power plug is
has
outputs no
inserted into the wall outlet and into
problems
sound
the power socket.
3.5 mm stereo cable is
Unplug the 3.5 mm stereo cable from
connected to an incorrect
the audio source and connect it to
audio source output terminal.
the line out, audio-out or earphone
jack of another audio source (such as
a portable CD player, casMENUte
player, or FM radio) in order to test
the speaker with another audio
source.
Symptom
Possible problem
Solution
Symptom
Possible problem
Solution
The audio source has
Check whether the iPod ® is
to occur when using high-power
problems.
connected at the correct position.
speakers. Try other audio sources,
Check whether the 3.5 mm stereo
such as a music CD.
cable is connected properly. Make
sure that it is connected to the line-
The audio source is distorted
out, audio-out or earphone jack
system and lower it if necessary
instead of to the speaker-out of the
sound card or other audio source.
Speaker makes
Bad connection
Sound is
The volume of the operating
distorted
system is too high
Remove the stereo cable from the
(when
crackling
audio source equipment and plug it
connected to a
noises
into the earphone jack of another
PC)
audio source (such as a Walkman,
Discman, or FM radio).
Speaker makes
The volume of the operating
crackling
system is too high
Lower the volume
sounds (when
connected to a
PC)
Sound
The volume of the Video-55
WAV and .MID files often have
distortion
system is too high
relatively poor sound quality.
Therefore, distortion and noise tend
Check the volume of the operating