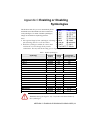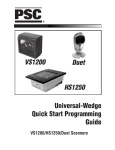
1
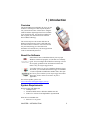
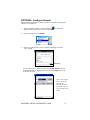
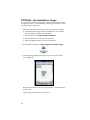
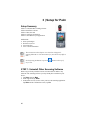
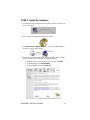
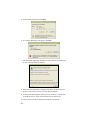
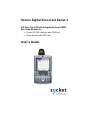
Secure Digital Scan Card Series 3
SD Scan Card 3E with Integrated Linear CMOS
Bar Code Reader for:
• Pocket PC 2003 devices with SDIO slot
• Palm devices with SDIO slot
User’s Guide
4/2005
Document # 6410-00206 D
Copyright Notice
Copyright © 2005 Socket Communications, Inc. All rights reserved.
Socket, the Socket logo and Battery Friendly are registered trademarks of
Socket Communications, Inc. SD Scan Card and SocketScan are trademarks
of Socket Communications, Inc. All other brand and product names are
trademarks of their respective holders.
The SD Scan Card includes technology licensed under United States Patent
Nos. 4,543,450, 4,603,320, 4,686,506, and 4,972,470.
Reproduction of the contents of this manual without the permission of
Socket Communications is expressly prohibited. Please be aware that the
products described in this manual may change without notice.
Feel free to contact SOCKET COMMUNICATIONS at:
Socket Communications, Inc.
37400 Central Court
Newark, CA 94560
Other than the above, Socket Communications can assume no responsibility
for anything resulting from the application of information contained in this
manual.
Socket Communications requests that you refrain from any applications of
the Socket SD Scan Card that are not described in this manual. Please
refrain from disassembling the card. Disassembly of this device will void
the product warranty.
You can track new product releases, software updates and technical
bulletins by visiting Socket’s web page at: www.socketcom.com.
2
Table of Contents
Copyright Notice
2
1 | INTRODUCTION
5
Overview
About the Software
System Requirements
Package Contents
Product Registration
2 | SETUP FOR POCKET PC 2003
STEP 1: Uninstall Other Scanning Software
STEP 2: Install the Software
STEP 3: Insert the Card
STEP 4: Assign a Trigger Button
STEP 5: Scan Data into Your Application
OPTIONAL: Select Symbologies
OPTIONAL: Configure Prefix/Suffixes
OPTIONAL: Configure Sounds
OPTIONAL: Use SocketScan Trigger
3 | SETUP FOR PALM
STEP 1: Uninstall Other Scanning Software
STEP 2: Install the Software
STEP 3: Insert the Card
STEP 4: Configure SocketScan
STEP 5: Scan Data into Your Application
OPTIONAL: Select Symbologies
OPTIONAL: Perform a Scan Test
OPTIONAL: View Help Files
OPTIONAL: View Version Information
5
5
5
6
6
7
8
9
11
12
13
15
16
17
18
20
20
21
23
24
27
28
29
30
30
APPENDICES
A | SPECIFICATIONS
31
B | BAR CODE LABEL SPECIFICATIONS
32
C | ENABLING OR DISABLING SYMBOLOGIES
33
D | DECODE ZONE
36
E | TIPS FOR BETTER SCANNING
38
F | TROUBLESHOOTING
40
G | TECHNICAL SUPPORT
41
3
Limited Warranty
Limited Software Warranty
Regulatory Compliance
4
43
44
45
1 | Introduction
Overview
The Socket SD Scan Card (SDSC) 3E gives you the
freedom of scanning bar codes anytime anywhere
into your Pocket PC 2003 or Palm device using the
smallest and most lightweight form factor available
for an expansion card. In a small size totaling less
than 23 grams, the card features state-of-the-art
linear CMOS technology.
The world’s only bar code scanner built into an
SDIO card, the SD Scan Card is a small and sleek
unit with no cables or batteries. You can scan with
only one hand, letting you collect data with
maximum ease and efficiency. The most popular bar
codes are automatically detected.
About the Software
SocketScan™ enters scanned data directly into any open
Windows or Palm OS program, as if the data were manually
typed. You can configure Prefix/Suffixes and assign a .WAV
file to signify good data reads. SocketScan for Palm also
makes it easy to assign a trigger button.
If you don’t want to or can’t use a hardware button to trigger
the scanner, you can install SocketScan Trigger for Windows
CE (also compatible with Windows Mobile 2003). This puts
an icon on your screen that you can tap to trigger the scanner.
The trigger “floats” on the screen above any active
application.
For software updates, please visit:
www.socketcom.com/support/support_bar.asp
System Requirements
Pocket PC 2003 with SDIO slot:
• ARM processor
• Windows Mobile 2003 or Windows Mobile 2003 SE
• SDIO Now! software from bSQUARE in System ROM
Palm devices with SDIO slot:
• Palm OS v4.1 or greater
CHAPTER 1: INTRODUCTION
5
Package Contents
•
•
•
Socket SD Scan Card 3E
Installation CD containing software and user documentation
Booklets containing warranty and copyright information
Product Registration
Socket highly recommends that all users register their Socket products.
Registered users receive priority for technical support. Register your Socket
product online at www.socketcom.com/prodreg
6
2 | Setup for Pocket PC 2003
This chapter explains how to install and use the Socket SD Scan Card 3E
with a Pocket PC running Windows Mobile 2003 or Windows Mobile 2003
Second Edition. The SocketScan software supports both portrait and
landscape mode for Windows Mobile 2003 Second Edition.
Setup Summary
STEP 1: Uninstall other scanning software.
STEP 2: Install the software.
STEP 3: Insert the card.
STEP 4: Assign a trigger button.
STEP 5: Scan data into your application.
OPTIONAL:
• Select symbologies.
• Configure prefix/suffixes.
• Configure sounds.
• Use SocketScan Trigger.
CHAPTER 2: SETUP FOR POCKET PC 2003
7
STEP 1: Uninstall Other Scanning Software
Delete any bar code scanning software you may already have installed on
your Pocket PC. You can uninstall either directly from your Pocket PC, or
indirectly via ActiveSync.
OPTION 1: Uninstall Directly from the Pocket PC
1.
Make sure the bar code scanning software is closed, and remove the
ISC from your Pocket PC.
2.
Tap Start | Settings. Tap on the System tab or Control Panel.
3.
Tap on the Remove Programs icon.
4.
Select the bar code scanning software, then tap Remove.
5.
Tap Yes to confirm removal of the program.
6.
Soft reset the Pocket PC by pressing the reset button.
OPTION 2: Uninstall via ActiveSync
1.
Make sure the bar code scanning software is closed, and remove the
ISC from your Pocket PC.
2.
Use ActiveSync and a serial/Ethernet/USB cable or cradle to make an
active connection between your Pocket PC and a host PC.
3.
On the host PC, open Microsoft ActiveSync.
4.
Click Tools | Add/Remove Programs.
5.
Select the bar code scanning software and click Remove.
6.
In the confirmation screen, click OK.
7.
The next dialog will ask if you want to remove the software from your
host PC as well.
• Click NO to keep a copy of the software on the host PC that can
later be re-installed onto a Pocket PC.
• Click YES to remove the software from the host PC.
8
STEP 2: Install the Software
1. Make an active connection between your Pocket PC and a host PC.
Use ActiveSync and a serial/USB/Ethernet connection cable or cradle.
2. Insert the installation CD into your host PC.
3. Use My Computer or Windows Explorer to access your CD-ROM drive.
In the CD, click on SETUP.EXE.
4. Follow the instructions on your screen to install the software.
• Read the information in the first screen and click next.
• In the Main Page, click Install Software.
• In the Installation screen, click Windows CE.
CHAPTER 2: SETUP FOR POCKET PC 2003
9
5. In the File Download screen, click Run.
6. If the Security Warning screen appears, click Run.
7. The InstallShield Wizard for SocketScan Software will begin. Follow
the screens that appear to install the software.
8. When software installation is complete, disconnect the Pocket PC from
the host PC. Soft reset the Pocket PC by pressing the reset button. Now
you are ready to insert the card.
10
STEP 3: Insert the Card
Make sure you have soft reset your device after software
installation before you insert the card.
Insert the card into your Pocket PC’s SDIO slot. Make sure the card is
positioned correctly. Do not insert the card upside-down or force the card in
too hard.
IMPORTANT! To remove the SDSC 3E, push the card
completely into the slot. After the card springs back, you can
safely remove the card. Do not pull the card out without
pushing first, or you can damage the connector the next time
you insert a card.
Do not soft reset the Pocket PC when the Socket card is
inserted, or errors may occur in applications using the card.
If errors occur, remove the card and soft reset the device.
Wait for the device reset to finish before you re-insert the
card.
The SDIO slots of some Pocket PCs will continue to draw
power from the Pocket PC’s main battery whenever an
SD/SDIO card is inserted (whether the card is from Socket or
another manufacturer), even when the Pocket PC is turned
off (suspended). If you have one of these Pocket PCs, Socket
recommends that you completely remove the card whenever
the card is not in use. For more information, please visit:
www.socketcom.com/support/support_bar.asp
CHAPTER 2: SETUP FOR POCKET PC 2003
11
STEP 4: Assign a Trigger Button
Refer to your device’s user documentation to assign a trigger button.
If you do not want to assign a hardware button to trigger the
scanner, you can install Socket’s Floating Trigger, available on
the installation CD.
If SocketScan is not running yet, you can press the assigned
trigger button to quickly launch SocketScan. Pressing the
trigger button will fire the laser only when SocketScan is open.
1. Go to Start | Settings | Buttons.
2. From the Button list, select a button to trigger the SD Scan Card.
In the Button assignment field, select SocketScan. When done, tap ok.
Note: For maximum
ergonomic placement,
choose a button located
directly beneath your thumb
or forefinger when you hold
the Pocket PC. The Voice
Record button is a good
choice for most Pocket PCs.
12
STEP 5: Scan Data into Your Application
1. Start SocketScan. Go to Start | Programs | SocketScan.
Alternatively, you can press the trigger button to
start the program.
2. Make sure the “Scan Card detected” icon appears in the task tray, visible
from the Today screen.
Icon
Meaning.
SD Scan Card detected
SocketScan detects the
scanner and is ready to
scan.
No scanner detected
No scanner detected. The
scanner is either missing or
improperly inserted.
3. Start the Windows application that you want to receive the data (e.g.,
Excel, Notepad, etc.). Make sure a document or spreadsheet is open.
CHAPTER 2: SETUP FOR POCKET PC 2003
13
4. Press the assigned trigger button and scan the code.
For example, try this Code 39 bar code:
When data is read, a beep should sound, and the
imager should turn off. If the SD Scan Card fails to
read data within a few seconds, the imager will turn
off, and you must try again.
If your device enters sleep mode when SocketScan is running,
press the ON button to initialize the scanner and resume
operation.
5. After a successful scan, data should appear in your document. For
example, after you scan the code above into a Pocket Excel spreadsheet,
data should appear in the first cell.
For tips on scanning technique, please refer to Appendix E.
For information about bar code scanning applications, please
email [email protected]
14
OPTIONAL: Select Symbologies
The applet makes it quick and convenient to modify which symbologies
you want the scanner to recognize. By default, the scanner is set to
recognize nine of the most common symbologies.
1.
2.
3.
Tap on the SDSC scanner icon in the menu bar
to launch the
applet (visible in the Today screen for Pocket PCs).
In the pop-up menu, select Symbology Selector...
In the screen that appears, check the symbologies you wish to enable.
Uncheck those you wish to disable. Tap ok.
Symbologies not supported by the SDSC card will be grayed out.
Trioptic Code 39 must be enabled for Code 128 to work
correctly.
Enabling all possible symbologies will make the decode process
slightly longer.
CHAPTER 2: SETUP FOR POCKET PC 2003
15
OPTIONAL: Configure Prefix/Suffixes
The SocketScan applet lets you specify prefix and/or suffix characters to be
added automatically to the data you scan. This helps to further eliminate
manual data entry.
to launch the
1. Tap on the SDSC scanner icon in the menu bar
applet (visible in the Today screen for Pocket PCs). You can configure
prefix/suffixes even if the “no scanning card detected” icon appears.
2. In the pop-up menu, select Prefix/Suffix...
3. In the screen that appears, enter the characters you want to be appended
to each scan (128 character maximum). Tap ok.
The default suffix is a carriage return. Only printable ASCII
characters can be used as prefixes or suffixes.
16
OPTIONAL: Configure Sounds
The SocketScan applet lets you choose any WAV sound file to be played to
indicate a successful scan.
1.
Tap on the SDSC scanner icon in the menu bar
to launch the
applet (visible in the Today screen for Pocket PCs).
2.
In the pop-up menu, select Sounds...
3.
In the screen that appears, select a sound for indicating successful
scans. Tap ok.
Browse box
To you want to play a .WAV file, after selecting Play .wav file, you can
search through files by tapping the browse box. In the Open screen, tap
on the file you want:
Note: You can only
select a WAV file
from the My
Documents folder.
If needed, copy the
file you need to this
folder.
CHAPTER 2: SETUP FOR POCKET PC 2003
17
OPTIONAL: Use SocketScan Trigger
If you find it inconvenient or impossible to assign or use a hardware button
to trigger the scanner, you can install this virtual trigger button that “floats”
on top of the active application.
1. Make sure to do all of the following before using SocketScan Trigger:
• Install SocketScan Trigger from the installation CD. The software
must be installed separately from SocketScan.
• Start SocketScan. Tap Start | Programs | SocketScan.
• Insert the SD Scan Card 3E into your Pocket PC.
• Open the application that you want to scan data into.
2. Start SocketScan Trigger. Tap Start | Programs | SocketScan Trigger.
3. The floating trigger button will appear on your screen on top of the
active application.
Drag from the title bar to move the trigger button to a convenient place
on the screen.
Tap the trigger button to activate the scanner.
18
4. A SocketScan Trigger icon will also appear in the menu bar of the
Today screen. Tap this icon to open a pop-up menu with the following
options:
• Tap Scan Now to activate the scanner as if you had tapped the trigger
button.
• Tap Remove Floating Trigger to remove the trigger button from the
screen but keep the icon handy on the task bar. To restore the trigger
button, tap on the menu bar icon. In the pop-up menu, tap Launch
Floating Trigger.
• Tap About to view SocketScan Trigger version information.
• Tap Close SocketScan Trigger to close the application completely.
From this state, the SocketScan trigger can only be launched from
the Programs page.
CHAPTER 2: SETUP FOR POCKET PC 2003
19
3 | Setup for Palm
Setup Summary
STEP 1: Uninstall other scanning software.
STEP 2: Install the software.
STEP 3: Insert the card.
STEP 4: Configure SocketScan.
STEP 5: Scan data into your application.
OPTIONAL:
• Select symbologies.
• Perform a scan test.
• View Help files.
• View version information.
The instructions in this chapter were based on a Tungsten T
running Palm OS 5.0. The instructions for your device may differ a
little.
For help using SocketScan, tap on the
any screen.
button on the top of
STEP 1: Uninstall Other Scanning Software
Delete any previously installed versions of SocketScan for Palm or any
other bar code scanning software you may already have installed on your
device.
1. Tap Home, then tap Menu
2. In the App menu, tap Delete.
3. In the Delete screen, scroll to select your bar code scanning application.
Tap Delete. In the confirmation screen, tap Yes.
20
STEP 2: Install the Software
1. Use HotSync and a serial/Ethernet/USB cable or cradle to connect your
device to a host PC.
2. Insert the Socket installation CD into your host PC.
3. Use My Computer or Windows Explorer to access your CD-ROM drive.
In the CD, click on SETUP.EXE.
4. Follow the instructions in the SD Scan Card 3E Setup Center to install
the SocketScan for Palm software on your Palm Desktop.
• Read the instructions in the Welcome screen, then click Next.
• In the Main Page, click Install Software.
• In the Installation screen, click Palm OS.
CHAPTER 3: SETUP FOR PALM
21
5. In the File Download screen click Run.
6. If a Security Warning screen appears, click Run.
7. The SocketScan Installation program will begin. Follow the instructions
on your screen to install the software.
8. When software installation is complete, disconnect the device from the
host PC. Soft reset the device by pressing the reset button.
9. A Socket icon should appear on the screen of your device. Tap this icon
to install the correct version of SocketScan on your Palm device.
10. Soft reset the Palm device again by pressing the reset button.
22
STEP 3: Insert the Card
Insert the card into your Palm device’s SDIO slot. Make sure the card is
positioned correctly. Do not force or shove the card in too hard.
Older Palm m100 & m500 series devices: The SDIO slot is
reversed, so the scanner must be inserted backwards.
To remove the SD Scan Card 3E, push the card completely
into the slot. After the card springs back, you can safely
remove the card. Do not pull the card out without pushing
first, or you may damage the connector the next time you
insert a card
Make sure you have soft reset your device after software
installation before you insert the card. Press the reset button.
CHAPTER 3: SETUP FOR PALM
23
STEP 4: Configure SocketScan
1. Start SocketScan. Tap on the Home icon.
2. In the menu in the upper right corner, select All.
3. Scroll to the SocketScan icon. Tap on the icon.
4. The main screen of SocketScan will appear. In the Scanner Device field,
make sure SD Scan Card is selected. A picture of the SD Scan Card 3E
should appear.
5. In the Device Is field, tap Enabled. Buttons will appear at the bottom of
the screen. Tap Configure.
24
6. Use the Configure screen to configure basic SocketScan options:
For help on SocketScan, tap on the
right corner.
symbol in the upper
• Scan Trigger Button: Tap to select the hardware button you would
like to use to trigger the scanner. In the screen that appears, select the
hardware button and tap OK.
At this time, Palm utilities do not allow assignment of the
Record or Voice button as a trigger.
• Sound on Good Read: Check if you would like the device to make a
sound whenever the scanner successfully reads a bar code. In the
drop-down menu, select the sound you want.
• Sound Volume: Select the sound volume used to indicate good reads.
• Insert Special: Make sure the cursor is in either the Prefix or Suffix
field. Use the Insert Special drop-down menu to select a special
function or data (e.g., time stamp) to insert before or after each scan.
CHAPTER 3: SETUP FOR PALM
25
• Prefix/Suffix: Enter any characters or functions you would like to append
to each scan. Besides special functions listed in the Insert Special menu,
only printable ASCII characters can be used as prefixes or suffixes.
A carriage return [CR] is the default Suffix. This suffix
advances the cursor to the next data field in your application.
• Launch App: Check if you want SocketScan to launch an application
when you start to scan. In the drop-down menu, select the
application.
7. Tap OK to make the settings take effect.
26
STEP 5: Scan Data into Your Application
1. Make sure the Scanner is enabled in SocketScan. To check if the
scanner is enabled, tap the Home icon. In the drop-down menu in the
upper right corner, select All. Tap on the SocketScan icon.
2. If you did not assign SocketScan to launch an application, then you need
to manually start the application that you want to receive data (e.g.,
SheetToGo). Make sure a new document or spreadsheet is open.
3. Press the assigned trigger button and scan the
code.
For example, try this Code 39 bar code:
4. When data is read, your device will make a sound if you configured
SocketScan to do so, the scanner will turn off, and data will appear in
your application.
For example, after you scan the bar code above into a new spreadsheet,
data should appear on the first line.
If no data is read within a few seconds, the scanner will turn off, and
you must try again.
For tips on scanning technique, please refer to Appendix E.
For information about bar code scanning applications, please
email [email protected]
CHAPTER 3: SETUP FOR PALM
27
OPTIONAL: Select Symbologies
1. In the main screen of SocketScan, make sure the SDSC scanner is
enabled and tap Symbologies.
2. Use the checkboxes to select which symbologies you would like the
scanner to decode. Tap OK.
Enabling all possible symbologies will make the decode process
slightly longer.
Triop Code 39 must be enabled for Code 128 to work correctly.
28
OPTIONAL: Perform a Scan Test
1. In the main screen of SocketScan, make sure the SDSC scanner is
enabled and tap Test.
2. Tap Scan to trigger the scanner and scan a bar code.
You cannot use the hardware trigger button for the scan test. Use
the Scan button to trigger the scanner.
3. SocketScan will report the encoded data, as well as its symbology type
and length. To view the data in hexadecimal format, check View as Hex.
4. When done, tap OK to exit the Test Scan.
CHAPTER 3: SETUP FOR PALM
29
OPTIONAL: View Help Files
Whenever SocketScan is open, you can access help files by simply tapping
on the
symbol in the upper right corner.
OPTIONAL: View Version Information
1. In the main screen of SocketScan, tap on the Options button
or tap
on the upper left corner of the screen to access the Options menu.
2. In the Options menu, tap About SocketScan.
3. View the software version information, then tap OK.
30
Appendix A Specifications
Physical Characteristics:
SDSC Card Size: 32 x 24 x 2 mm
Laser Scanner Size: 27.1 x 29.6 x 14.8 mm
Total Mass: approx. 22.7 g
Power Consumption (3.3 V Supply):
Idle: 0.4 mA (1.32 mW)
Typical: 65 mA
Interface Standard: SDIO
Operating System Support:
Windows Mobile 2003 or 2003 Second Edition with ARM processor
Palm OS v4.1 or greater
Bar Code Symbologies Automatically Detected:
Code 39, UPC/EAN, Code 128, I 2of5, D 2of5, Code 93, Codabar,
MSI/Plessey, Code 11, and Web Code
Scanner Decode Distance: 1.5 to 24+ inches (depends on symbol size,
symbology, label media, W-N ratio, scan angle). See appendix D on Page
29 of this User Guide for more detailed information.
Software Included:
• Installation utility
• SocketScan software with keyboard emulation for Windows CE
and Palm OS
• SocketScan Trigger for Windows CE
Warranty: Three years
Certification/Compliance:
FCC: Part 15, Class B
CE:EN55024:1998
C-TICK s.182
APPENDIX A: SPECIFICATIONS | 31
Appendix B Bar Code Label
Specifications
All bar code symbols/labels should satisfy the appropriate AIM Uniform
Symbology Specification.
Background Substrate:
The bar code symbol should be printed on material (media) that is reflective
and has a matte (not glossy) finish. A background diffuse reflectance of at
least 70% to 80% is desirable for optimum contrast. Retro-reflective media
should be used to obtain decode distances greater than 36 inches.
Ink Color and Type:
The inked bars should not exceed 25% reflectance at the wavelength that is
being used for reading, whether printed with black ink or colored ink. The
reflectance value should not vary more than 5% within the same character.
Voids and Specks:
The code should be printed clearly, free of voids, specks, blemishes and
lines that could “fool” the scanner. Specks or blemishes in the white
spaces, or false or missing bar sections could be interpreted by the reading
equipment as part of the code. Generally, the width of such flaws is more
serious than the height. Code symbols/ labels should be rejected if these
defects are present.
Definition:
The bars in the bar code symbol should be well defined. Their edges
should not be rough or fuzzy, so that the bars and spaces have the proper
widths intended for the bar code symbology used.
Contrast:
Background reflectance (that of the substrate on which the codes are
printed) should always provide a good contrast relative to the ink
reflectance (that of the code bars). The difference between the two should
be at least 37.5% at the wavelength used for reading.
Tolerance:
The ratio of the widths of bars and spaces in a bar code symbol must
conform to the appropriate AIM bar code specifications and can cause
problems if not correct throughout the bar code. Problems can occur when
bar edges are smeared or rough, or when they exhibit voids.
32 | APPENDIX B: BAR CODE LABEL SPECIFICATIONS
Appendix C Enabling or Disabling
Symbologies
The SD Scan Card 3E is pre-set to automatically detect
and decode (auto-discriminate) the most common bar
code symbologies. To enable or disable symbologies,
simply use SocketScan’s Symbology Selector.
Notes:
• The supported length of some symbologies will change
after Symbology Selector is used. See Table 1.
• With more symbologies enabled, the scanner must
work harder to search through all the possible
combinations. This may make the decoding process slightly longer.
Table 1. Default Symbologies
Symbology
UPC/EAN/JAN
UPC-A
UPC-E
UPC-E1
EAN-8
EAN-13
Code 128 (USS-128 & UCC/EAN 128)
Code 39*
Code 39
Trioptic Code 39
Code 39 Full ASCII
Code 93
Interleaved 2 of 5*
Discrete 2 of 5*
Codabar
MSI Plessey*
Code 11
Webcode
Scanner
Default
Default
Length
Length after
Symbology Selector
Enabled
Enabled
Disabled
Enabled
Enabled
Enabled
N/A
N/A
N/A
N/A
N/A
Any
N/A
N/A
N/A
N/A
N/A
Any
Enabled
Enabled
Disabled
Disabled
Enabled
Disabled
Disabled
Disabled
Disabled
Disabled
2 to 23
2 to 23
2 to 23
2 to 38
14 Only
12 Only
5 to 55
1 to 30
2 to 41
2 to 55
2 to 55
2 to 55
2 to 55
2 to 55
2 to 55
2 to 55
2 to 55
2 to 55
2 to 41
2 to 55
WARNING! Setting the length to “Any” may lead to inaccurate decodes of
these symbologies!
APPENDIX C: ENABLING OR DISABLING SYMBOLOGIES | 33
The advanced symbology parameters listed in Table 2 can be modified by
following the instructions in the Advanced Programming Guide or by using the
SocketScan SDK. Check Socket’s website for updates.
Table 2. Other Symbology Parameters
Symbology Parameters
Scanner Default
UPC/EAN/JAN
Supplementals
Transmit Check Digit
Bookland EAN
Decode UPC/EAN Supplementals
UPC/EAN Supplemental Redundancy
Transmit UPC-A Check Digit
Transmit UPC-E Check Digit
Transmit UPC-E1 Check Digit
Convert UPC-E to A
Convert UPC-E1 to A
EAN-8 Zero Extend
UPC/EAN Security Level
UPC/EAN Coupon Code
Disabled
Enabled
Disabled
Ignore
Seven
Enabled
Enabled
Enabled
Disabled
Disabled
Disabled
0
Disabled
Code 39
Convert Code 39 to Code 32
Code 32 Prefix
Check Digit Verification
Transmit Check Digit
Code 39 Full ASCII
Disabled
Disabled
Disabled
Disabled
Disabled
Interleaved 2 of 5
Check Digit Verification
Transmit Check Digit
Convert I 2 of 5 to EAN-13
Disabled
Disabled
Disabled
MSI Plessey
MSI Plessey Check Digits
Transmit Check Digit
Check Digit Algorithm
One
Disabled
Mod 10/Mod 10
Webcode
Enable GT Web Code
Disabled
34 | APPENDIX C: ENABLING OR DISABLING SYMBOLOGIES
For more information on bar codes, symbologies, labels or other bar
code related topics, visit any of the following web sites:
a. www.aimglobal.org/technologies/barcode/
b. www.aimglobal.org/aimstore/stackedsymbologies.htm
c. www.adams1.com
d. www.bizfonts.com
e. www.barcode-us.com/info_center/upc.htm (UPC Codes)
f. www.barcode-us.com/info_center/bookinfo.htm (Bookland EAN)
g. www.dataid.com/bcsymbology.htm
h. www.aaabarcodes.com
i. www.snx.com/mechanics.html
j. www.pscnet.com/html/aabcsymbologies.htm#Checksums
k. www.idautomation.com/barcoding4beginners.html
APPENDIX C: ENABLING OR DISABLING SYMBOLOGIES | 35
Appendix D Decode Zone
Decode Zone
The decode zone for the SD Scan Card 3E is shown below. The decode
zone is a function of various symbol characteristics including density, print
contrast, wide-to-narrow ratio, and edge acuity. The minimum element
width (also known as the “X Dimension”, “size” or “symbol density” of a
bar code) is the width in thousandths of an inch (or ‘mils’) of the narrowest
element (bar or space) in the bar code. The figures shown are the typical
scanning distances (Depth of Field) for selected bar code sizes.
For example, the SD Scan Card 3E should be able to scan a 10 mil bar code
when the bar code is positioned between 1.25 and 7.5 inches from the nose
of the scanner.
The maximum readable length of a bar code symbol (Width of Field) at any
given range is also shown. In the example above, the maximum length of a
10 mil bar code scanned at a distance of 7.5 inches is approximately 8
inches including the quiet zone.
36 | APPENDIX D: DECODE ZONE
Decode Distances
The table below lists the typical and guaranteed scanning distances for
selected bar code sizes. The minimum element width (“X Dimension”,
“size” or "symbol density") is the width in mils of the narrowest element
(bar or space) in the symbol.
Symbol
Density /Bar
Code Type
/W-N Ratio
6 mil
Code 39; 2.5:1
Typical Working
Ranges
Guaranteed
Working Ranges
Near
Far
Near
Far
123
80% MRD
2.25 in
5.72 cm
4.50 in
11.43 cm
3.00 in
7.62 cm
4.00 in
10.16 cm
7.5 mil
Code 39; 2.5:1
ABCDEF
80% MRD
1.75 in
4.45 cm
6.25 in
15.88 cm
2.50 in
6.35 cm
4.75 in
12.07 cm
10 mil
Code 39; 2.5:1
FGH
80% MRD
1.25 in
3.18 cm
7.50 in
19.05 cm
2.00 in
5.08 cm
6.00 in
15.24 cm
13 mil
UPCA; 2.5:1
012345678905
80% MRD
2.00 in
5.08 cm
8.50 in
21.59 cm
2.50 in
6.36 cm
7.25 in
18.42 cm
20 mil
Code 39; 2.5:1
123
80% MRD
2.20 in
5.59 cm
12.00 in
30.48 cm
Note 2
10.75 in
27.31 cm
55 mil (4)
Code 39; 2.5:1
CD
80% MRD
4.30 in
10.92 cm
24.00 in
60.96 cm
Note 2
16.00 in
40.64 cm
Bar Code
Content
/Contrast
Notes:
1. Contrast measured as Mean Reflective Difference (MRD) at 670 nm.
2. Near ranges on lower densities depend on the width of the bar code and the
scan angle.
3. Working range specifications at ambient temperature (23 C).
4. Retro-reflective label media used for 55 mil bar code.
APPENDIX D: DECODE ZONE | 37
Appendix E Tips for Better Scanning
Socket’s SD Scan Card 3E is based on miniature CMOS linear imaging
technology. This device is basically a camera that captures rectangular
digital images measuring about 1 degree high and 40 degrees wide. The
imaging rate varies between about 20 and 40 images per second and
automatically compensates for ambient lighting conditions — the more
ambient light, the more images per second. It is inappropriate, however, to
compare this imaging rate to the rate of the sweeping beam of a laser
scanner because the CMOS image is affected by blurring, while the laser
technology is not. For this reason, it’s important to hold this scanner still
while scanning.
Adequate lighting of the target bar code is critical to scanning with imaging
technology. Unfortunately, providing auxiliary lighting increases the size,
energy consumption, control complexity and cost of the scanning device.
For these reasons, the red light from the SDSC scanner is simply an aiming
beam — it does not add any auxiliary lighting to the target bar code. For
this reason, it’s important to provide adequate ambient lighting to the target
bar code while scanning with this scanner.
Like all cameras, the SD Scan Card 3E has a "focal length" (minimum and
maximum distance from the target) where the image can be clearly
captured. The focal length of the SDSC scanner is rather small compared to
that of laser scanners. For best results while scanning “normal” sized bar
codes such as the UPC codes used on retail items, the SDSC scanner should
be held from about 4 to 7 inches (10 to 18 cm) from the target.
Tips for Maximizing SDSC Scanner Performance:
1. Minimize movement during scanning — The SD Scan Card 3E must be
held reasonably steady on the target for a short period of time while the
camera focuses and captures a clear image. The scanner typically
requires only several milliseconds to capture a clear image, no more than
a quarter to a half of a second.
2. Provide adequate ambient lighting —The SDSC scanner, like any
camera, works much better when the target bar code is well-lit.
3. Determine the optimum focal length — The SDSC scanner has a fairly
small focal length, so it is helpful to experiment until you find the best
scanning distance. Hint: When encountering scanning difficulties, most
people have a tendency to move the scanner too close to the target bar
code! Try moving it farther away for better results.
38 | APPENDIX E: TIPS FOR BETTER SCANNING
4. Position the scanner at an angle — No bar code scanner works well
when positioned exactly perpendicular to the target bar code label,
because the reflected light tends to “blind” the sensing mechanism. For
best results, position the scanner at least 15 degrees away from the
perpendicular to the surface of the bar code.
5. Experiment with different techniques and conditions — The more you
experiment with different techniques, lighting conditions, scanning
distances and positions, the more proficient you will become.
Conclusion
Socket’s SD Scan Card 3E is a convenient and affordable bar code
scanning accessory for your mobile device, and with a little
experimentation and practice, the performance will approach that of the
larger and more expensive laser-based CompactFlash In-Hand Scan Card.
APPENDIX E: TIPS FOR BETTER SCANNING | 39
Appendix F Troubleshooting
For help on SocketScan, tap Start | Help on a Pocket PC, or tap on the
icon on a Palm device.
SYMPTOM:
I get the “No Card Detected”
icon in the task tray of
my Pocket PC and can’t trigger the laser or scan any bar
codes.
POSSIBLE REASON
Your Pocket PC does not
recognize the SD Scan Card 3E..
SOLUTION
Make sure the card is inserted
properly. If necessary, remove and
reinsert. If using battery power, be
sure to tap Yes if asked whether
you want to use battery power.
SYMPTOM:
When I try to scan, the scanner activates, but no data
appears on my screen, and the scanner eventually
deactivates.
POSSIBLE REASON
The scanner is too close or too far
from the bar code.
The bar code is incorrectly
formatted or poorly printed.
The bar code symbology may be
disabled.
SOLUTION
Practice so you get accustomed the
most effective distance and
scanning angle.
Try scanning a bar code that is
correctly formatted or printed well,
such as on a retail package.
If you have Palm device, you can
perform a scan test to identify the
symbology. If needed, use
Symbology Selector to enable the
symbology.
SYMPTOM:
When I press the trigger button, nothing happens.
POSSIBLE REASON
You programmed the trigger
button incorrectly.
SOLUTION
Test the button by assigning a
different program to it and make
sure it works properly.
40 | APPENDIX F: TROUBLESHOOTING
Appendix G Technical Support
For help on SocketScan, tap Start | Help on a Pocket PC, or tap on the
icon on a Palm device.
If you have trouble installing or using SD Scan Card 3E, Socket has two
technical support resources to help you. Please note that technical support is
available in English only.
1. Socket On-Demand Support (SOS)
Socket On-Demand Support is an interactive technical
support program that focuses in on your specific
problem to provide the answers you need. SOS
provides immediate service and is the best place to start for technical
support. To access SOS, visit: www.socketcom.com/support. Click on
the SOS icon.
If SOS cannot solve your problem, end the session by submitting an
email inquiry to a Socket technical support engineer as prompted. Your
interactive session will be saved for reference.
APPENDIX G: TECHNICAL SUPPORT | 41
2. Live Technical Support
IMPORTANT! To obtain personal assistance from a Socket technical
support engineer, you must first register your product online at
www.socketcom.com/prodreg.
After you register your product and log in, click on the Technical
Support tab, then click New Trouble Ticket to submit an online request
for technical support.
Afterwards, you can log in anytime to monitor the status of your request.
If we are unable to resolve your support inquiry online, we can arrange
for a technical support representative to call you at a specific time.
Please refrain from disassembling the scanner. Disassembly of this
device will void the product warranty.
42 | APPENDIX G: TECHNICAL SUPPORT
Limited Warranty
Socket Communications Incorporated (Socket) warrants this product against defects
in material and workmanship, under normal use and service, for the following
period from the date of purchase:
Plug-in card: Three years
Incompatibility is not a defect covered by Socket’s warranty. During the warranty
period, Socket will, at its option, repair or replace the defective product at no charge
when furnished with proof of retail purchase, provided that you deliver the product
to Socket or to an authorized Socket Service Center.
The returned product must be accompanied by a return material authorization
(RMA) number issued by Socket or by Socket's Authorized Service Center. If you
ship the product, you must use the original container or equivalent and you must pay
the shipping charges to Socket. Socket will pay shipping charges back to any
location in the contiguous United States. This warranty applies only to the original
retail purchaser and is not transferable.
Socket may, at its option, replace or repair the product with new or reconditioned
parts and the returned product becomes Socket's property. Socket warrants the
repaired or replaced products to be free from defects in material or workmanship for
ninety (90) days after the return shipping date, or for the duration of the original
warranty period, whichever is greater.
This warranty does not cover the replacement of products damaged by abuse,
accident, misuse or misapplication, nor as a result of service or modification other
than by Socket.
SOCKET IS NOT RESPONSIBLE FOR INCIDENTAL OR CONSEQUENTIAL
DAMAGES RESULTING FROM BREACH OF ANY EXPRESS OR IMPLIED
WARRANTY, INCLUDING DAMAGE TO PROPERTY AND, TO THE EXTENT
PERMITTED BY LAW, DAMAGES FOR PERSONAL INJURY. THIS
WARRANTY IS IN LIEU OF ALL OTHER WARRANTIES INCLUDING
IMPLIED WARRANTIES OF MERCHANTABILITY AND FITNESS FOR A
PARTICULAR PURPOSE.
Some states do not allow limitation of implied warranties, or the exclusion or
limitation of incidental or consequential damages, so that the above limitations or
exclusions may not apply to you. This warranty gives you specific legal rights and
you may also have other rights which vary from state to state.
This product may contain fully tested, recycled parts, warranted as if new.
For warranty information, email [email protected].
43
Limited Software Warranty
LIMITED WARRANTY. SOCKET warrants that the original disk or CD ROM is
free from defects for 90 days from the date of delivery of the SOFTWARE.
CUSTOMER REMEDIES. SOCKET’S entire liability and your exclusive remedy
shall be, at SOCKET’S option, either (a) return of the price paid or (b) replacement
of the SOFTWARE which does not meet SOCKET’S Limited Warranty and which
is returned to SOCKET with a copy of your receipt. Any replacement SOFTWARE
will be warranted for the remainder of the original warranty period or 30 days,
whichever is longer. THESE REMEDIES ARE NOT AVAILABLE OUTSIDE OF
THE UNITED STATES OF AMERICA.
NO OTHER WARRANTIES. SOCKET disclaims all other warranties, either
express or implied, including but not limited to implied warranties of
merchantability and fitness for a particular purpose, with respect to the
SOFTWARE and the accompanying written materials. This limited warranty gives
you specific legal rights. You may have others which vary from state to state.
NO LIABILITY FOR CONSEQUENTIAL DAMAGES. In no event shall SOCKET
or its suppliers be liable for any damages whatsoever (including, without limitation,
damages for loss of business profits, business interruption, loss of business
information, or other pecuniary loss) arising out of the use of or inability to use the
SOFTWARE, even if SOCKET has been advised of the possibility of such
damages. Because some states do not allow the exclusion or limitation of liability
for consequential or incidental damages, the above limitation may not apply to you.
EXPORT LAW ASSURANCES. You may not use or otherwise export or reexport
the SOFTWARE except as authorized by United States law and laws of the
jurisdiction in which the SOFTWARE was obtained. In particular, but without
limitation, none of the SOFTWARE may be used or otherwise exported or
reexported (a) into (or to a national or resident of) a United States embargoed
country or (b) to anyone on the U.S. Treasury Department’s list of Specially
Designated Nationals or the U.S. Department of Commerce’s Table of Denial
Orders. By using the SOFTWARE, you represent and warrant that you are not
located in, under control of, or a national or resident of any such country or on any
such list.
GOVERNMENT END USERS. If the SOFTWARE is supplied to the U. S.
Government, the SOFTWARE is classified as “restricted computer software” as
defined in clause 52.227-19 of the FAR. The U. S. Government ‘s rights to the
SOFTWARE are as provided in clause 52.227-19 of the FAR.
CONTROLLING LAW AND SEVERABILITY. This License shall be governed by
the laws of the United States and the State of California. If for any reason a court of
competent jurisdiction finds any provision, or portion thereof, to be unenforceable,
the remainder of this License shall continue in full force and effect.
44
Regulatory Compliance
The Socket SD Scan Card 3E is designed to be compliant with the rules and
regulations in locations where they are sold and will be labeled as required.
This product is type approved users are not required to obtain license or
authorization before using.
Radio Frequency Interference Requirements
This device complies with part 15 of the FCC rules. Operation is subject to
the following conditions: (1) This device may not cause harmful
interference, and (2) this device must accept any interference received,
including interference that may cause undesired operation.
This equipment is also ETS 300 328, ETS 300 826 and C-TICK compliant.
These limits are designed to provide reasonable protection against harmful
interference when the equipment is operated in a commercial environment.
This equipment generates, uses, and can radiate radio frequency energy
and, if not installed and used in accordance with the instruction manual,
may cause harmful interference to radio communications. Operation of this
equipment in a residential area is likely to cause harmful interference in
which case the user will be required to correct the interference at his or her
own expense.
If this equipment does cause harmful interference to radio or television
reception, which can be determined by turning the equipment off and on,
the user may try to correct the interference by one or more of the following
measures:
•
•
•
•
Reorient or relocate the receiving antenna of the radio or television.
Increase the distance separating the equipment and the receiver.
Connect the equipment to an outlet on a different branch circuit than
that of the receiver.
Consult the dealer or an experienced radio/TV technician for help.
The user may find the following booklet helpful:
How to Identify and Resolve Radio-TV Interference Problems
This booklet is available from the U.S. Government Printing Office,
Washington, D.C. 20402.
45
© Socket Communications, Inc.
January 2005
Printed in U.S.A.