1
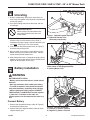
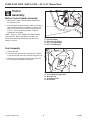
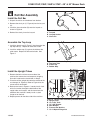
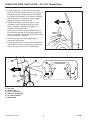
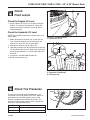
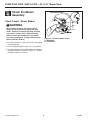
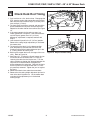
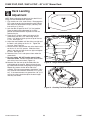
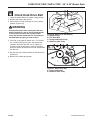
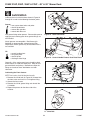
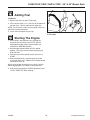
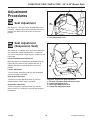
Dealer Setup
& Adjustment Instructions
S150X - 21HP, 23HP, 25HP & 27HP
48” & 52” Mower Deck
This Dealer Setup Instruction covers the following products:
TABLE OF CONTENTS:
Model No.
5900686
5900665
5900696
5900697
SETUP PROCEDURES
Description
S150XKAV2148, 21HP Kawasaki w/ 48” Mower
S150XKAV2552, 25HP Kawasaki w/ 52” Mower
S150XKOH2348 S/S, 23HP Kohler w/48” Mower
S150XKOH2752 S/S, 27HP Kohler w/52” Mower
Quick Setup List ................................................................2
Uncrating ............................................................................3
Battery Installation ............................................................3
Tractor Assembly ..............................................................4
Motion Control Handle Assembly ....................................4
Seat Assembly .................................................................4
Roll Bar Installation...........................................................5
Check Fluid levels .............................................................7
Check Engine Oil Level ...................................................7
Check Hydraulic Oil Level................................................7
Check Tire Pressure..........................................................7
Check Mower Assembly ...................................................8
Check Torque - Mower Blades ........................................8
Check Deck Rod Timing ...................................................9
Deck Leveling Adjustment .............................................10
Check Deck Drive Belt ....................................................11
Lubrication .......................................................................12
Adding Fuel......................................................................13
Starting The Engine ........................................................13
Perform Safety Checks ...................................................14
Functional Tests.............................................................14
Safety Interlock System .................................................14
ATTENTION SETUP PERSONNEL:
The safety warnings provided in this guide and in
the operator's manual included with the unit contain
important information that must be obeyed when
assembling, setting-up, operating, servicing,
transporting, or storing the unit.
These warnings are highlighted by the safety alert triangle
symbol shown above, which signifies that an important safety
message is being provided.
You must read, understand, and follow these warnings and
instructions, and use safe shop and work practices at all
times while working on or around this unit and all other
outdoor power equipment.
Sections and items denoted by the Setup symbol
provide the information necessary to fully assemble,
test, and prepare the units described above for
delivery to your customers.
A Quick Setup List is provided on page 2 of this booklet
to help you identify and check that the items have been
performed.
ADJUSTMENT PROCEDURES
Seat Adjustment ..............................................................15
Seat Adjustment (Suspension Seat)..............................15
Motion Control Handle Adjustment ...............................16
Return-To-Neutral Adjustment .......................................17
Neutral Adjustment .........................................................17
Parking Brake Adjustment .............................................18
Additional information concerning functional tests,
general adjustment procedures, and the location of
normal lubrication points are included in these
instructions.
Although all required lubrication and normal adjustments on
factory-assembled components are done at the factory, this
additional information is provided to assist you in ensuring that
each unit is delivered to the customer in proper working order.
10/2007
1
5101096
Rev. A
TP 300-7343-A-M1-SP
S150X 21HP, 23HP, 25HP & 27HP - 48” & 52” Mower Deck
Quick Setup List Page
Setup Procedure
Steps to Perform
3
Uncrating
❏
❏
❏
❏
3
Battery Installation
❏ Install Battery.
4
Tractor Assembly
❏ Assemble the Motion Control Handles.
❏ Assemble the Seat.
5
Roll Bar Installation
❏ Install the Roll Bar.
6
Check Fluid Levels
❏ Check Engine Oil level.
❏ Check Hydraulic Oil level.
❏ Check Tire Pressure
7
Check Mower Assembly
❏
❏
❏
❏
11
Lubrication &
Fuel Preparation
❏ Lubricate all grease & oil points.
❏ Add fuel.
❏ Start the Engine.
13
SAFETY CHECKS
❏ Check for LOOSE HARDWARE.
❏ Check all OPERATOR CONTROLS.
❏ Perform SAFETY INTERLOCK SYSTEM CHECK.
TP 300-7343-A-M1-SP
Remove Crate & Banding.
Loosen Hydraulic Release Valves.
Release Parking Brake and Roll Tractor forward off skid.
Tighten Hydraulic Release Valves.
Check
Check
Check
Check
2
Blade Bolt Torque.
& Adjust Deck Lift Rod Timing.
& Level Mower Deck.
Deck Drive Belt.
10/2007
S150X 21HP, 23HP, 25HP & 27HP - 48” & 52” Mower Deck
Uncrating
1. Using a reciprocating utility saw or equivalent, cut
crate away from bottom skid. Remove crate. Remove
shrink-wrap plastic.
A
2. Cut nylon banding from front of the frame and rear
rear bumper.
IMPORTANT NOTE
When cutting crate from bottom skid,
use caution around tractor tires and
mower rollers.
Figure 1. Hydraulic System By-Pass
A. Hydraulic Release Valve
(left-hand pump shown)
3. Open the hydraulic release valves. To open the
release valves, turn the release valve, which is
located on front of the pump, counter-clockwise 2 full
turns MAX. See Figure 1 for valve location.
A
4. Push down on the parking brake lever (A, Figure 2)
to release the parking brake.
5. Be sure there are no nails or sharp objects on the
bottom skid to puncture the tractor’s tires. Roll the
tractor forward off the bottom skid.
6. After moving the tractor, re-engage the pumps (drive
position) by turning the release valves clockwise and
tighten to 80-120 in/lbs (9-13.5 N.m.).
Figure 2. Disengaging the Parking Brake
(lever shown in disengaged position)
A. Parking Brake Lever
Battery Installation
WARNING
BATTERY SAFETY RULES
• Battery acid causes severe burns. Avoid contact
with skin.
• Wear eye protection while handling the battery.
• To avoid an explosion, keep flames and sparks
away from the battery, especially while charging.
• When installing the battery cables, CONNECT
THE POSITIVE (+) CABLE FIRST and the negative
(-) cable last. If not done in this order, the
positive terminal can be shorted to the frame by a
tool.
A
B
Connect Battery
1. Connect the red positive battery cable (B, Figure 3)
to the positive battery post.
Figure 3. Connect the Battery
A. Positive (+) Cable & Terminal
B. Negative (-) Cable & Terminal
2. Connect the black negative battery cable (A) to the
negative battery post.
10/2007
3
TP 300-7343-A-M1-SP
S150X 21HP, 23HP, 25HP & 27HP - 48” & 52” Mower Deck
Tractor
Assembly
A
D
Motion Control Handle Assembly
B
1. Remove the handles and mounting hardware from
the handle bar box.
C
2. Install the ground speed control handles (A, Figure 4)
onto the control lever base using the 5/16-18 x 3/4”
bolts, 5/16” lock washers and 5/16” flat washers (B,
C, & D). Prior to tightening the bolts, align the
handles with each other.
NOTE: There is a LEFT-HAND and a RIGHT-HAND
control handle. When assembled to the base, the
handle base should be pointing towards the rear as
shown in Figure 4.
Figure 4. Install the Control Handle(s)
A. Control Handle
B. 5/16-18 x 3/4” Bolt(s)
C. 5/16” Lock Washer(s)
D. 5/16” Flat Washer(s)
Seat Assembly
A
1. Unpack the seat.
2. Install the seat onto the seat mount plate (C, Figure
5) and secure with the 5/16-18 nylock flange nuts (A).
B
D
3. Connect the wire harness (B) to the seat switch (D)
that is located in the bottom of the seat.
C
A
Figure 5. Remove The Existing Seat
A. 5/16-18 Nylock Flange Nuts
B. Wire Harness
C. Seat Mount Plate
D. Seat Switch
TP 300-7343-A-M1-SP
4
10/2007
S150X 21HP, 23HP, 25HP & 27HP - 48” & 52” Mower Deck
B
A
Roll Bar Assembly
Install the Roll Bar
1. Unpack the roll bar and hardware from the box.
2. Remove the clevis pin (C, Figure 6) from the lanyard
(A).
C
3. Install the lanyard anchor (B) onto the lanyard as
shown in Figure 6.
Figure 6. Assemble the Retainer Pins
A. Lanyard
B. Lanyard Anchor
C. Clevis Pin
4. Reinstall the clevis pin on the lanyard.
Assemble the Top Loop
1. Install the plastic cap (B, Figure 7) into the end of the
top loop tube (A). Repeat for other end of tube.
B
2. Install the rubber stop (C) against the inside of the
pivot mount. Repeat for other end of tube. See
Figure 7.
A
C
Figure 7. Assemble the Top Loop
A. Top Loop Tube
B. Plastic Cap
C. Rubber Stop
Install the Upright Tubes
1. Remove the bolts and nuts on one side of the
machine that secure the rear bumper for shipping.
Save this hardware for reinstallation in Step 3.
2. Place the roll bar upright tube onto the outside of the
rear bumper (A, Figure 8). Refer to Figure 9 for the
correct roll bar orientation.
F
A
3. Refer to the insert in Figure 8. Loosely install a bolt
with a flat washer through the both holes of the
upright tube, rear bumper, and the frame from the
outside of the machine. Loosely install a nylock
flange nut on the bolt.
B
A
C
D
4. Repeat process for the other side of the machine.
E
Figure 8. Upright Tube Placement (Left Side Shown)
A. Upright Tube
B. 1/2-13 X 3” Bolt
C. 1/2” SAE Washer
D. Rear Bumper
E. Frame of the Machine
F. 1/2-13 Nylock Flange Nut
10/2007
5
TP 300-7343-A-M1-SP
S150X 21HP, 23HP, 25HP & 27HP - 48” & 52” Mower Deck
5. Install the top loop (A, Figure 10) onto the upright
tubes (B). From the outside, install the 1/2-3” bolt (C)
through the top loop and upright tube, then through
the retainer pin assembly (D), as shown in Figure 5E.
Loosely install the 1/2” side lock nut on the bolts.
Repeat this process for the other side.
6. Tighten the hardware installed in steps 3 & 4 for
securing the roll bar upright tubes to the roll bar
pocket. Tighten the hardware until there is no
movement in the upright tubes.
7. Tighten the 1/2”-3 bolts and hex side lock nuts (C &
E) securing the top loop (A) to the upright tubes (B).
Do not over-tighten. The top loop should pivot snugly
with the retainer pins removed.
8. Raise the top loop (A) until the rubber stops (F)
contact the upright tubes.
9. Push or pull the top of the roll bar forward against the
rubber stops and install the retainer pins and hair pin
clips to secure the roll bar in the raised position.
Figure 9. Roll Bar Orientation
A
E
A
C
D
F
B
D
E
E
D
C
B
B
Figure 10. Install Top Loop (Right Side Shown)
A. Top Loop
B. Upright Tube
C. 1/2” x 3” Bolt GD.5
D. Retainer Pin Assembly
E. 1/2” Side Lock Nut
F. Rubber Stop
TP 300-7343-A-M1-SP
6
10/2007
S150X 21HP, 23HP, 25HP & 27HP - 48” & 52” Mower Deck
Check
Fluid Levels
A
Check the Engine Oil Level
1. Use the dipstick (A, Figure 11) to check the engine
oil level. If necessary add engine oil. Check the
engine manufacturer’s owner’s manual for the oil
recommendations.
Check the Hydraulic Oil Level
NOTE: Do not open the hydraulic reservoir unless oil is
being added.
Figure 11. Pre-start Checks
A. Crankcase Oil Fill
1. Before removing the reservoir cap, make sure the
area around the reservoir cap and fill neck of the
reservoir is free of dust, dirt, or other debris.
2. Unscrew the reservoir cap (B, Figure 12).
3. Look down the filler neck of the hydraulic oil reservoir
(A) and observe the oil level. When cold, the oil level
should be approximately 4” (10 cm) below top of the
filler neck.
4. If necessary, add SAE 20W-50 motor oil.
5. Reinstall the reservoir cap.
B
A
Figure 12. Checking the Hydraulic Oil Level
A. Hydraulic Oil Reservoir
B. Reservoir Cap
Check Tire Pressures
Tire pressure should be checked periodically, and
maintained at the levels shown in the chart. Note that
these pressures may differ slightly from the “Max
Inflation” stamped on the side-wall of the tires. The
pressures shown provide proper traction, improve the
cut quality, and extend the tire life.
Tire
Pressure
Front
25 psi (1,72 bar)
Rear
15 psi (1,03 bar)
10/2007
Figure 13. Checking Tire Pressure
7
TP 300-7343-A-M1-SP
S150X 21HP, 23HP, 25HP & 27HP - 48” & 52” Mower Deck
Check the Mower
Assembly
Check Torque - Mower Blades
WARNING
Mower blades are sharp. For your personal
safety, do not handle mower blades with bare
hands. Careless or improper handling of blades
may result in serious injury. Blade mounting
bolts must each be installed with a flat washer
then securely tightened. Torque blade mounting
bolts to 70 ft.lbs. (94 N.m.)
Figure 14. Check the Blade Torque
A. Blade Bolt
B. Flat Washer
1. Park the machine on a flat, level surface and engage
the parking brake.
2. Lock the deck lift pedal in the 5” (12,7 cm) position.
3. Check that blades are installed with the tabs pointing
up toward the deck as shown in Figure 14. Torque
the bolts to 70 ft.lbs. (94 N.m.).
TP 300-7343-A-M1-SP
8
10/2007
S150X 21HP, 23HP, 25HP & 27HP - 48” & 52” Mower Deck
Check Deck Rod Timing
1. Park machine on a flat, level surface. Disengage the
PTO, stop the engine and engage the parking brake.
Rear tires must be inflated to 15 psi (1,03 bar); front
tires to 25 psi (1,72 bar).
2. To check the lift rod timing, measure and record the
distance between the lift pivots and the rod pivots.
Repeat for the other side of the machine. See Figure
15.
3. If the measurements for the rods are equal, no
further adjustment is required. If the measurements
are NOT equal (greater than 1/8” (3,17mm)
difference), adjustment is required, continue with
Step 5.
4. Lock the deck lift pedal in the 5” (12,7cm) position.
Remove the cutting height adjustment pin and lower
the mower deck.
5. To ensure that the deck is in the lowest position,
push the pedal by hand towards the rear of the
machine and install the height adjustment pin in the
3” (7.6cm) position to hold in place.
6. Block up the mower deck until all hanger chains are
slack. Refer to Figure 16.
7. See Figure 15. To adjust the lift rod, loosen the jam
nut on the clevis then remove the 1/2” clevis pin
fastening the clevis the the lift pivot arm. Turn the
clevis clockwise to shorten the distance between the
rod pivots or counterclockwise to lengthen the
distance between the rod pivots. Reinstall the clevis
on the lift pivot arm and secure with the 1/2” clevis
pin previously removed. Tighten the jam nut against
the clevis.
8. Remove the blocks from under the mower deck.
9. Remove the the cutting height adjustment pin from in
front of the deck lift pedal arm. Lift the mower deck
and reinstall the adjustment pin in the desired
mowing height.
10/2007
Figure 15. Check Lift Rod Timing
Figure 16. Adjust Lift Rod Timing
9
TP 300-7343-A-M1-SP
S150X 21HP, 23HP, 25HP & 27HP - 48” & 52” Mower Deck
Deck Leveling
Adjustment
NOTE: Before adjusting the deck level, the deck lift rod
timing must be checked and/or adjusted.
1. Park machine on a flat, level surface. Disengage the
PTO, stop the engine and engage the parking brake.
Rear tires must be inflated to 15 psi (1,03 bar); front
tires to 25 psi (1,72 bar).
2. Lock the deck lift pedal in the 5” (12,7cm) position.
Place the deck height adjustment pin in the 4"
position and lower the deck lift pedal until the arm
contacts the pin.
3. Place the 2 x 4 blocks under each corner of the
mower deck with the 3-1/2” sides being vertical.
Place a 1/4” (0,64cm) thick spacer on top of the rear
2 x 4’s. See Figure 17.
6. Adjust the front eyebolts until the chains are tight and
the deck is still resting on the 2 x 4’s. Tighten the
jam nuts. See Figure 18.
7. Loosen the nuts and allow the rear of the deck to rest
on the 2 x 4’s and 1/4” spacers. Slide the chains
down in the slots until the chains are tight and tighten
the nuts. See Figure 18.
8. Remove all the 2 x 4’s and spacers from under the
mower deck.
9. For your safety, DO NOT handle mower blades
with bare hands. Position the outside mower blades
so that they face front-to-back (Figure 19).
10. Measure from the front tip of the blade from the
cutting edge to the ground. Measure from the rear
tip of the blade from the cutting edge to the ground.
Repeat this process for the other side of the
machine. The front measurements should be 4” (10,2
cm), the back measurements should be 4-1/4” (10,8
cm). If the measurements are greater than 1/8” (3,17
mm) of what they should be adjust the deck height
until they are correct.
Figure 17. 2 x 4 Locations
Figure 18. Hanger Chain Adjustment
Figure 19. Checking The Blade Height Measurement
TP 300-7343-A-M1-SP
10
10/2007
S150X 21HP, 23HP, 25HP & 27HP - 48” & 52” Mower Deck
B
D
C
Check Deck Drive Belt
1. Lower the mower deck to its lowest cutting position.
2. Remove the mower deck guards.
3. Make sure the V-side of the belt runs in the pulley
grooves (Figures 20).
WARNING
A
A
D
Use extreme caution when rotating the idler arm
with the breaker bar, due to the increased tension
in the spring as the idler arm is being rotated.
Injury may result if the breaker bar is prematurely
released while the spring is under tension.
A
Figure 20. Mower PTO Belt Routing
A. Spindle Pulley
B. PTO Drive Belt
C. Spring-loaded Idler Pulley
D. Stationary Idler Pulley
4. If the belt is not properly seated, use a 1/2” breaker
bar, and place the square end in the square hole
located in the end of the idler arm (A, Figure 21).
Carefully rotate the breaker bar counter clockwise,
which will relieve the tension on the belt exerted from
the idler arm.
A
B
5. Re-seat belt and carefully release the tension on the
breaker bar.
6. Reinstall the mower deck guards.
B
Figure 21. Mower PTO Belt
A. Spring-loaded Idler
B. Stationary Idler Pulley
10/2007
11
TP 300-7343-A-M1-SP
S150X 21HP, 23HP, 25HP & 27HP - 48” & 52” Mower Deck
Lubrication
Lubricate the unit at the locations shown in Figure 22
through 25 as well as the following lubrication points.
Grease:
•
•
•
•
front caster wheel axles and yokes
deck lift pivot blocks
mower deck spindles
mower deck idler arm
Use grease fittings when present. Disassemble parts to
apply grease to moving parts when grease fittings are
not installed.
Figure 22. Deck Lubrication
Not all greases are compatible. Red Grease (p/n
5022285) is recommended, automotive-type hightemperature, lithium grease may be used when this is
not available.
Oil:
•
•
•
•
control handle pivots
seat plate pivots
deck lift pivots
discharge chute hinge
Figure 23. Control Handle Pivots & Seat Plate Pivots
Generally, all the moving metal parts should be oiled
where contact is made with other parts. Keep oil and
grease off belts and pulleys. Remember to wipe the
fittings and surfaces clean both before and after
lubrication.
Lubricating the Front Casters:
NOTE: Front casters should be lubricated annually.
1. Remove the 1/4-28 bolt (A, Figure 25) screwed into
the front caster and install a 1/4-28 grease fitting.
2. Grease the front caster.
3. Remove the 1/4-28 grease fitting and reinstall the
1/4-28 bolt.
4. Repeat the process for the other side of the
machine.
Figure 24. Deck Lift Linkage Pivots
A
Figure 25. Front Caster & Wheel
A. 1/4-28 Bolt
TP 300-7343-A-M1-SP
12
10/2007
S150X 21HP, 23HP, 25HP & 27HP - 48” & 52” Mower Deck
Adding Fuel
A
To add fuel:
1. Remove the fuel cap (see A, Figure 26).
2. Fill the tank to about 1-1/2” (3,81 cm) of the bottom of
the filler neck. This will allow for fuel expansion.
NOTE: Do not overfill. Refer to your engine manual for
specific fuel recommendations.
3. Install and hand tighten the fuel cap.
Figure 26. Adding Fuel
A. Fuel Cap
Starting The Engine
1. While sitting in the operator’s seat, engage the
parking brake and make sure the PTO switch is
disengaged and the motion control handles are
locked in the NEUTRAL position.
2. Set the engine throttle control to FULL throttle
position. Then fully close the choke by pulling the
knob OUT fully.
3. Insert the key into the ignition switch and turn it to
START.
4. After the engine starts, gradually open the choke
(push knob down fully). Reduce to half throttle speed
and allow to warm up.
Warm up the engine by running it for at least a minute
before engaging the PTO switch or driving the rider.
5. After warming the engine, ALWAYS operate the unit
at FULL THROTTLE when mowing.
10/2007
13
TP 300-7343-A-M1-SP
S150X 21HP, 23HP, 25HP & 27HP - 48” & 52” Mower Deck
Perform the
Safety Checks
SAFETY INTERLOCK
SYSTEM
WARNING
This unit is equipped with safety interlock switches.
These safety systems are present for your safety, do
not attempt to bypass the safety switches, and never
tamper with the safety devices. Check their operation
regularly.
Disengage the PTO, stop the engine, set the parking
brake, and wait for moving parts to stop before
leaving operator's position for any reason.
If the tractor does not pass the test, do not
operate tractor. Under no circumstance should
you attempt to defeat the purpose of the safety
system.
Operational SAFETY Checks
Functional Tests
Test 1 — Engine should NOT crank if:
• PTO switch is engaged, OR
• Parking brake is not engaged, OR
• Motion control handles are not in the NEUTRAL
position.
1. Check the tractor for loose bolts, screws, nuts, etc.
2. Start the engine and check all the controls for proper
operation: ground speed control levers, parking
brake, throttle cable, electric PTO clutch, etc.
Test 2 — Engine SHOULD crank if:
3. Stop the engine and check for fluid leaks: oil, fuel
and hydraulic oil.
• PTO switch is NOT engaged, AND
• Parking brake is engaged, AND
• Motion control handles are locked in the NEUTRAL
position.
4. If any control fails to operate properly during testing
or seems to be out of adjustment, check and readjust
it according to the following Adjustments section.
Test 3 — Engine should SHUT OFF if:
• Operator rises off seat with PTO engaged, OR
• Operator rises off seat with parking brake
disengaged.
• Operator moves motion control handles out of their
neutral positions before disengaging parking brake.
Test 4 — Blade Brake Check
Mower blades and the mower drive belt should come to
a complete stop within seven (7) seconds after the
electric PTO switch is turned off (or the operator rises
off seat). If the mower drive belt does not stop within
seven (7) seconds, see your dealer.
NOTE: Once the engine has stopped, PTO switch must
be turned off, parking brake must be engaged, and the
motion control handles must be locked in the NEUTRAL
position after the operator returns to the seat in order to
start the engine.
WARNING
If the unit does not pass a safety test, do not
operate it. See your authorized dealer. Under no
circumstance should you attempt to defeat the
purpose of the safety interlock system.
TP 300-7343-A-M1-SP
14
10/2007
S150X 21HP, 23HP, 25HP & 27HP - 48” & 52” Mower Deck
Adjustment
Procedures
Seat Adjustment
A
See Figure 27. The seat can be adjusted forward and
backward. Move the lever forward, position the seat as
desired, and release the lever to lock the seat into
position.
Figure 27. Seat Adjustment
A. Seat Adjustment Lever
Seat Adjustment
(Suspension Seat)
See Figure 28. In addition to the forward and backward
seat adjustment, models equipped with a suspension
seat can be adjusted for lumbar support, suspension and
back angle.
B
Forward and Backward Adjustment:
Move the forward / backward seat adjustment lever (A,
Figure 28) away from the seat, position the seat as
desired, and release the lever to lock the seat into
position.
A
C
Lumbar Adjustment:
Turn the lumbar adjustment knob (B) until the desired
amount of lumbar is achieved.
D
Back Angle Adjustment:
Turn the back angle adjustment knob (C) until the
desired amount of back angle is achieved.
Figure 28. Suspension Seat Adjustment
A. Forward / Backward Seat Adjustment Lever
B. Lumbar Adjustment Knob
C. Back Angle Adjustment Knob
D. Suspension Adjustment Knob
Suspension Adjustment:
Turn the suspension adjustment knob (D) until the
display scale has a reading that matches the weight of
the operator.
10/2007
15
TP 300-7343-A-M1-SP
S150X 21HP, 23HP, 25HP & 27HP - 48” & 52” Mower Deck
Motion Control Handle
Adjustment
B
The control levers can be adjusted in three ways. The
alignment of the control levers, the placement of the
levers (how close the ends are to one another) and the
height of the levers can be adjusted.
A
TO ADJUST THE HANDLE ALIGNMENT
Loosen the mount bolts (A, Figure 29) and pivot the
lever(s) (B) to align with each other.
TO ADJUST THE HANDLE PLACEMENT
Loosen the jam nuts and adjust the placement bolt (C) in
or out to properly adjust the lever end spacing.
C
TO ADJUST THE HANDLE HEIGHT
Remove the mounting hardware and reposition the
handle either up or down from its original position. You
will need to readjust the handle alignment as described
above.
Figure 29. Control Lever Adjustment
A. Placement Hardware
B. Ground Speed Control Lever
C. Alignment Hardware
TP 300-7343-A-M1-SP
16
10/2007
S150X 21HP, 23HP, 25HP & 27HP - 48” & 52” Mower Deck
Return-To-Neutral &
Neutral
Adjustment
RETURN-TO-NEUTRAL ADJUSTMENT
D
3.25”
(8,23cm)
To determine if it is necessary to adjust the neutral return,
perform the following steps.
1. Disengage the PTO, engage the parking brake and turn
off the engine.
2. Move the ground speed control levers into the
operating position, pull levers rearward and release.
3. Move the ground speed control levers out towards the
neutral position. If the levers do not align with the
notches in the neutral lock plate, it is necessary to
adjust the neutral return rod (B, Figure 30).
ADJUSTMENT
1. Lock the ground speed control lever in the neutral
position.
2. Measure the length of the neutral return spring (C,
Figure 30) it should be set at 3.25” (8,23cm). If the
spring does not measure 3.25” (8,23cm) loosen the
front set collar (D) and the rear set collar (A), then
move the front set collar forward or back on the neutral
return rod (B) until the spring length equals 3.25”
(8,23cm). Retighten the front set collar.
3. Make sure that the neutral return bushing (E) is seated
correctly in the spring stop plate (F).
4. Position the rear set collar so that it sets tightly against
neutral return bushing and tighten.
5. Pull the ground speed control lever rearward and
release to check position again. Adjust as necessary to
align the ground speed control levers with the notches
in the neutral lock plate.
It is important to note that after every adjustment of the
neutral return rod, the lever must be pulled rearward and
released to properly check the neutral position.
E
B
C
F
A
Figure 30. Neutral Return Spring Adjustment
A. Rear Set Collar
B. Neutral Return Rod
C. Neutral Return Spring
D. Front Set Collar
E. Neutral Return Bushing
F. Spring Stop Plate
A
B
NEUTRAL ADJUSTMENT
If the tractor “creeps” while the ground speed control levers
are locked in NEUTRAL, than it may be necessary to
adjust the linkage rod.
NOTE: Perform this adjustment on a hard, level surface
such as a concrete floor.
1. Disengage the PTO, engage the parking brake and turn
off the engine.
2. There are three nuts (B, Figure 31) on the linkage rod.
The first two are to be used together to turn the rod and
the third (towards the front of the machine) is used to
lock the rod in place. Loosen the jam nut that locks
against the ball joint (B) and turn the linkage rod (A) to
adjust. If the machine creeps forward, turn the rod
CLOCKWISE (while standing at the rear of the
machine, facing forward), if the machine creeps
backward, turn the rod COUNTER-CLOCKWISE.
3. Lock the jam nut (B) against the ball joint when neutral
is achieved.
NOTE: This adjustment should not be performed while the
machine is running. It may take several attempts to
achieved neutral, depending upon how much the machine
creeps.
17
Figure 31. Neutral Adjustment
(RH side shown)
A. Adjustment Linkage Rod
B. Nuts
TP 300-7343-A-M1-SP
S150X 21HP, 23HP, 25HP & 27HP - 48” & 52” Mower Deck
Parking Brake
Adjustment
1. Disengage the PTO, engage the parking brake, stop
the engine and remove the ignition key.
2. Locate the brake spring (A, Figure 32).
3. With the parking brake engaged, measure the
compressed spring length. The spring should be
2” - 2-1/8” (5,0 - 5,4 cm) when compressed.
4. If the spring is not within this range, release the
parking brake and turn the adjustment nut (B) to
compress or release the spring.
5. Engage the parking brake and remeasure the spring.
CAUTION
2" - 2-1/8"
(5,0 - 5,4cm)
A
B
Figure 32. Parking Brake Adjustment
A. Brake Spring
B. Adjustment Nut
Do not adjust the spring to be shorter than
1-15/16” (4,9 cm) when compressed. This may
damage the brake mechanism.
TP 300-7343-A-M1-SP
18 18
10/2007
S150X 21HP, 23HP, 25HP & 27HP - 48” & 52” Mower Deck
Briggs & Stratton Yard Power Products Group
Copyright © 2007 Briggs & Stratton Corporation
Milwaukee, WI, USA. All rights reserved.
The Snapper Pro logo is a trademark of Briggs & Stratton
Corporation Milwaukee, WI, USA.
Contact Information:
Briggs & Stratton Yard Power Products Group
5375 N. Main St.
Munnsville, NY 13409-4003
(800) 933-6175
www.SnapperPro.com
10/2007
19
TP 300-7343-A-M1-SP