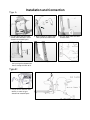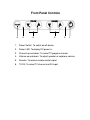
1
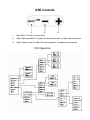
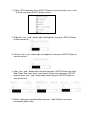
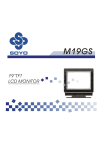
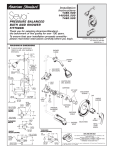
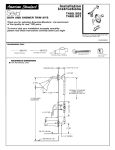
15” TFT LCD MONITOR
USER MANUAL
Model: GMTV15
CONTENT:
1.
2.
3.
4.
5.
6.
7.
Unpacking
Specification
Important Safety Instructions
Installation and Connection
Front Panel Controls
OSD Controls
Trouble Shooting
Unpacking
Our 15” LCD TV shall be content with following items. Make sure you get all there
set ready, otherwise please contact with your dealer or the store where you purchased
from. And if it still doesn’t work, please feel free to contact us.
Please keep the packing parts ( such as the box and the foam…) precisely, that would
provide protection just for once if you need to send the fault product back for repairing.
15” TFT LCD TV
Power Cord
ADAPTER TECH
External Universal AC Adapter
(100v-240v, 50/60Hz)
User Manual
Signal and power in integrated box
(This parts only for Momentum T3, T5, T7
serials and T480 serials )
M5 × 10mm bolt 2pcs
For fix both extra speaker
Extra Speaker
(option)
Head Set
(option)
Remote Control
(option)
Specification
LCD Panel
Type
Viewing Angle
Contrast Ratio
Response Time
Display colors
Pixels H × V
Pixel Pitch
15.0” XGA Color TFT-LCD Display
H:65°° V:65 °
500 : 1 (Type)
12ms
16.2M colors
1024( ×3) × 768
0.297mm(per one triad) ×0.297mm
Input Signals
Video in
ANT*
Auto Detect NTSC/PAL interlaced video with input
format of Composite video (AV)
NTSC or PAL- B/G, D/K, L/L
Connector
Video in
Audio in
ANT*
Power
RCA - Jack
RCA – Jack (L/R)
RF Tuner PH Type terminal
12V/DC Jack
Power
Voltage
Consumption
Power saving mode
100v~240v, 50/60Hz(universal) via external AC
Adapter
Active < 48Watt Max
Standby < 3Watt
Speaker
5W+5W (Stereo)
User Interface
LED Indicator
Active
-Green
Off
-Turn off
Standby -Orange
Operating Condition
Temperature
Storage (Shipping)
Air Humidity
0℃
℃ ~ 50 ℃
-20℃
℃ ~ 60 ℃
20% ~ 80% R.H.
Dimensions
Physical
321mm(H) × 590mm(W) × 108mm(D)
Net Weight
5.6kg
*ANT and Cable system will difference follow export country from manufactory.
Important Safety Instructions
1. Read instructions –
Please make sure the instruction has been read and understood before starting using.
2. Keep this manual precisely –
Please keep the manual well just for once if you need it as future reference.
3. Check warnings –
Please check the warnings both on the product and in the manual.
4. Follow the instructions –
All the operating instructions must be followed.
5. Attachments –
Do not use attachments which has never be recommended by the manufacturer. Use of
inadequate attachments could possibly couse accidents.
6. Power source –
This product must be operated on the power source specified on the specification label. If
you are not sure about which type of power supply is used in your house, please contact with
your dealer or local power company.
7. Power cord protection –
The power cord must be routed properly to prevent people from stepping on them or objects
form resting on them. Check the cords at the plugs and product.
8. Servicing –
Do not attempt to repair the product by yourself. Removing covers can expose you to high
voltage & other danger. Please request someone who has been trained and qualified to
provide servicing.
9. Repair –
Please make sure you unplug the power cord and have someone who’s qualified to do the
repairing service in the following status.
a.
When the AC cord of plug is damaged.
b.
Once if the power cord is damaged.
c.
When a liquid was spilled on the product or when objects have fallen into the product.
If you have the liquid spilled out from the product or any crash causing the damage on the
product.
a.
b.
When the product has been exposed to rain or water.
When the product does not operate properly as described in the operating instructions.Do
not touch the controls other than those described in the operating instructions. Improper
adjustment of controls not described in the instructions can cause damage, which often
requires extensive adjustment work by a qualified technician.
c.
d.
When the product has been dropped or damaged.
When the product displays an abnormal condition. Any noticeable abnormality in the product
indicates that the product needs servicing.
Installation and Connection
Type A:
1. Use pill. driver and 5mm allen
wrench move out both L and R
ahead fix on treadmill parts.
4. Pull two cable then connect on
the input signal and power box
then use original 2 bolts to fix.
Type B:
1. Use pill. driver and 5mm allen
wrench as same as type
ahead fix on treadmill parts.
2. After installed TV support then
cables penetrate into the hole.
5. Achievement diagram.
3. Use pill. driver move out cover
on base frame.
TV install:
1. Attachment cable and installation both speakers with M5×10 2 bolts. (Optional)
2. Then put TFT TV bracket on support base with M6×10 2 bolts.
3. Connect DC in, TV cable, Video, Audio L and R.
DC
Video
Cable
Audio
L R
4. Plug the power cord into the wall outlet, and the other end of the power cable into
the Adapter AC socket then plug the other end of Adapter the power input of the
back of LCD monitor.
5. Power on, turn on the Power Switch of your LCD monitor.
Front Panel Controls
6
5
4
3
2
1
1.
Power Switch: To switch on/off device.
2.
Power LED: To display DC power in.
3.
Channel up and down: To select TV program channel.
4.
Volume up and down: To adjust speaker or earphone volume.
5.
Remote: To receive remote control signal.
6.
TV/AV: To select TV channel and AV input.
OSD Controls
1
2
3
1.
Main Menu: To enter / to select item.
2.
Adjust (decrease/down): To adjust the decreasing value / to adjust decreasing item.
3.
Adjust (increase/up): To adjust the increasing value / to adjust increasing item.
OSD Operation:
1. Display OSD information: Press SELECT button to show main menu, use + and –
to select, then press SELECT button to enter.
2. Brightness: Use + and – button adjust the brightness then press SELECT button
to execute and exit.
3. Contrast: Use + and – button adjust the brightness then press SELECT button to
execute and exit.
4. Color: Use + and – button adjust the color then press SELECT button into select
Red, Green, Blue select menu, select one of 3 color menu then press SELECT
button to enter, use + and – button adjust color then press SELECT button to
execute and exit.
5. Recall: If adjustment not advisability to present, select Recall to reset from
manufactory adjust value.
Trouble Shooting
1. No picture and sound :
Is the power cable plugged? Confirm the connection of SPEAKER or AUDIO cable.
Components connection status checking.
2. Picture only, no sound :
Confirm the connection of AUDIO cable. Confirm the volume.
3. No power :
Please confirm the device is correctly connected to the AV power cable. Is the POWER
button pressed on the remote control? AC power cable removed form plug? Is the main
switch on device on?
4. Failure to operate device :
Strong lighting source may cause operation fail, turn off the device and unplug it, wait for
1~2 minutes then restart to operate device again.
5. No picture :
Confirm the component connection. Setting after connection to the component. Please
confirm the input source. Uncompetitive signal? Please check the screen mode.