1
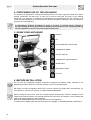
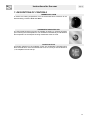
Summary
1. PRECAUTIONS FOR USE .................................................................................................... 13
2. TIPS FOR SCRAPPING– SAFEGUARDING THE ENVIRONMENT ..................................... 14
3. SAFETY PRECAUTIONS ..................................................................................................... 15
4. PRESCRIBED USE OF THE APPLIANCE ............................................................................ 16
5. KNOW YOUR APPLIANCE ................................................................................................... 16
6. BEFORE INSTALLATION ..................................................................................................... 16
7. DESCRIPTION OF CONTROLS ........................................................................................... 17
8. CARE AND MAINTENANCE ................................................................................................. 18
8.1 Cleaning the stainless steel .......................................................................................................................... 18
8.2 Routine daily cleaning ................................................................................................................................... 18
8.3 Food stains or residues ................................................................................................................................. 18
8.4 Cleaning the glass-ceramic surface .............................................................................................................. 18
8.5 Cleaning the tray ........................................................................................................................................... 18
9. INSTALLING THE APPLIANCE ............................................................................................ 19
9.1 Technical specifications data plate ................................................................................................................ 19
9.2 Electrical connection ..................................................................................................................................... 19
9.3 Overall dimensions ........................................................................................................................................ 20
9.4 Positioning the hotplate ................................................................................................................................. 20
9.5 Levelling the hotplate .................................................................................................................................... 20
INSTRUCTIONS FOR THE USER: these contain user advice, description of the commands and the
correct procedures for cleaning and maintenance of the appliance.
INSTRUCTIONS FOR THE INSTALLER: these are for the qualified technician who must install the
appliance, set it functioning and carry out an inspection test.
12
Precautions for Use
1. PRECAUTIONS FOR USE
THIS MANUAL IS AN INTEGRAL PART OF THE APPLIANCE AND THEREFORE MUST BE KEPT IN
ITS ENTIRETY AND IN AN ACCESSIBLE PLACE FOR THE WHOLE WORKING LIFE OF THE
APPLIANCE.
WE ADVISE YOU READ THIS MANUAL AND ALL THE INSTRUCTIONS THEREIN CAREFULLY
BEFORE USING THE APPLIANCE. THIS APPLIANCE IS INTENDED FOR PROFESSIONAL USES
AND CONFORMS TO EEC DIRECTIVES CURRENTLY IN FORCE. THE APPLIANCE IS DESIGNED
FOR THE FOLLOWING FUNCTIONS: TO GRIDDLE FOOD (HAMBURGERS, CHOPS, SAUSAGES,
EGGS, FISH, VEGETABLES ETC) AND TOASTING SANDWICHES AND FILLED ROLLS; ANY
OTHER USE IS TO BE CONSIDERED IMPROPER. DO NOT USE IT TO HEAT POTS AND PANS.
THE MANUFACTURER DECLINES ALL LIABILITY FOR IMPROPER USE.
NEVER USE THIS APPLIANCE FOR THE PURPOSE OF HEATING .
DO NOT LEAVE THE PACKAGING MATERIALS UNATTENDED IN THE HOME ENVIRONMENT.
SEPARATE THE DIFFERENT WASTE MATERIALS FROM THE PACKAGING AND DELIVER THEM
TO THE NEAREST COLLECTION CENTRE FOR RECYCLABLE WASTE.
WHEN DISPOSING OF THE APPLIANCE, TAKE IT TO A COLLECTION CENTRE FOR RECYCLABLE
WASTE.
DO NOT OBSTRUCT ANY VENTILATION OPENINGS OR COOLING VENTS.
THE DATA PLATE, WITH TECHNICAL DATA, REGISTRATION NUMBER AND BRAND NAME, IS
POSITIONED AT A VISIBLE POINT ON THE REAR OF THE APPLIANCE.
THIS DATA PLATE MUST NEVER BE REMOVED.
TAKE CARE NOT TO SPILL SUGAR OR SWEET SUBSTANCES ON THE
HOTPLATE WHILE COOKING, AND NOT TO PLACE MATERIALS OR ITEMS
THAT COULD MELT (PLASTIC OR ALUMINIUM FOIL); IF THIS HAPPENS,
SWITCH THE APPLIANCE OFF IMMEDIATELY IN ORDER TO PROTECT THE
SURFACES, THEN ONCE THE HOTPLATE HAS COOLED SUFFICIENTLY BUT IS
STILL WARM, CLEAN USING THE SCRAPER PROVIDED. IF THE GLASS
CERAMIC SURFACE IS NOT CLEANED IMMEDIATELY, THE DEPOSITS MAY
BECOME BAKED ON AND PROVE IMPOSSIBLE TO REMOVE ONCE THE
SURFACE IS COLD.
DO NOT PLACE OBJECTS OR CLOTHS ON THE CLOSED APPLIANCE, ESPECIALLY WHILE IT IS
WORKING.
BEFORE ANY KIND OF COOKING, ALWAYS LOWER THE LID; ONLY RAISE IT BRIEFLY.
IT IS BEST TO POSITION THE HOTPLATE LEAVING THE REAR SECTION SLIGHTLY HIGHER
THAN THE FRONT. SEE PARAGRAPH "9.5 Levelling the hotplate"
The manufacturer declines all liability for injury to persons or animals and for damage to property
resulting from non-observance of the above prescriptions or from tampering with any part of the
appliance or for the use of non-original spare parts.
13
Tips for scrapping– Safeguarding the environment
2. TIPS FOR SCRAPPING– SAFEGUARDING THE ENVIRONMENT
The packaging materials used for our products are non-pollutant, eco-friendly and recyclable. Please
dispose of the packaging materials responsibly. Ask your dealer or competent local authority for the
addresses of local recylcing plants or collection centres for waste disposal and scrapping.
Do not discard the packaging or parts thereof in the environment. In the hands of young children,
packaging materials can cause suffocation, plastic bags in particular.
Even when scrapping your old appliance, do so responsibly!
Important: deliver it to your local centre authorized for the scrapping of electrical appliances. Proper
scrapping allows sensible recovery of valuable materials.
14
Safety Precautions
3. SAFETY PRECAUTIONS
ELECTRICAL CONNECTION: SEE INSTALLATION INSTRUCTIONS FOR SAFETY REGULATIONS
PERTAINING TO ELECTRICAL APPLIANCES. IN THE INTERESTS OF SAFETY, THE LAW
REQUIRES THAT INSTALLATION AND MAINTAINANCE OF ELECTRICAL APPLIANCES BE
CARRIED OUT BY COMPETENT PERSONS IN ACCORDANCE WITH CURRENT REGULATIONS.
OUR RECOGNIZED INSTALLERS PROVIDE A GUARANTEE OF GOOD WORKMANSHIP.
ELECTRICAL APPLIANCES MUST ONLY BE DISMANTLED BY A QUALIFIED ELECTRICIAN.
THE PLUG TO BE CONNECTED TO THE POWER SUPPLY CABLE AND THE SOCKET MUST BE OF
THE SAME TYPE AND MUST CONFORM TO CURRENT REGULATIONS.
THE POWER SOCKET MUST BE ACCESSIBLE AFTER THE APPLIANCE HAS POSITIONED.
NEVER UNPLUG THE APPLIANCE BY PULLING THE POWER SUPPLY CABLE.
THIS APPLIANCE MUST NOT BE INSTALLED ON TOP OF OTHER APPLIANCES, BUT ON A
WORKTOP.
REGULATIONS REQUIRE THAT THE APPLIANCE IS EARTHED IN ACCORDANCE WITH
ELECTRICAL SAFETY REGULATIONS.
ALWAYS CHECK THAT THE CONTROL KNOBS ARE TURNED TO 0 (OFF) WHEN YOU HAVE
FINISHED USING THE APPLIANCE.
IMMEDIATELY AFTER INSTALLATION, CARRY OUT A BRIEF INSPECTION TEST OF THE
APPLIANCE, FOLLOWING THE INSTRUCTIONS BELOW. SHOULD THE APPLIANCE NOT
FUNCTION, DISCONNECT IT FROM THE POWER SUPPLY AND CONTACT YOUR NEAREST
AFTER-SALES ASSISTANCE CENTRE.
NEVER ATTEMPT TO REPAIR THE APPLIANCE YOURSELF.
DURING USE, THE GLASS CERAMIC HOTPLATE BECOMES VERY HOT. MAKE SURE YOU NEVER
TOUCH IT WITH YOUR HANDS.
EVEN WHEN VERY HOT, THE GLASS CERAMIC HOTPLATES MAY NOT SEEM HOT, THEREFORE
BE VERY CAREFUL WHENEVER TOUCHING THEM WITH BARE HANDS.
THE APPLIANCE IS DESIGNED FOR PROFESSIONAL USE BY TRAINED PERSONNEL. DO NOT
ALLOW CHILDREN TO GO NEAR OR PLAY WITH THE APPLIANCE.
NEVER, UNDER ANY CIRCUMSTANCES, PLACE ALUMINIUM FOIL OR PLASTIC CONTAINERS ON
THE HOTPLATE.
NEVER ATTEMPT TO REPAIR THE APPLIANCE YOURSELF. ALL REPAIRS MUST BE CARRIED OUT
BY AN AUTHORIZED TECHNICIAN OR AN AUTHORIZED AFTER-SALES SERVICE CENTRE. IN
THE EVENT OF MALFUNCTION, DISCONNECT THE APPLIANCE FROM THE POWER SUPPLY.
IF YOU NOTICE ANY CRACKS OR DAMAGE TO THE SURFACE OF THE GLASS CERAMIC
HOTPLATE, IMMEDIATELY DISCONNECT THE APPLIANCE FROM THE POWER SUPPLY AND
CONTACT AN AUTHORIZED AFTER-SALES SERVICE CENTRE.
WHEN DISPOSING OF THE APPLIANCE, TAKE IT TO A COLLECTION CENTRE FOR RECYCLABLE
WASTE.
The manufacturer declines all liability for injury to persons or animals and for damage to property
resulting from non-observance of the above prescriptions or from tampering with any part of the
appliance or for the use of non-original spare parts.
15
Instructions for the user
4. PRESCRIBED USE OF THE APPLIANCE
The appliance is designed for cooking and heating food such as chops, eggs and similar fare, and for
toasting sandwiches and filled rolls. It must not be used to heat pots and pans of any material
whatsoever. The appliance is designed and manufactured for professional use and conforms to all
current relevant EEC directives. The manufacturer declines all liability for damage or injury resulting from
improper use of the appliance.
Attention:
The manufacturer declines all liability for injury to persons or animals and for damage to
property resulting from non-observance of the above prescriptions or from tampering with any
part of the appliance or for the use of non-original spare parts.
5. KNOW YOUR APPLIANCE
HANDLE
LID
GLASS CERAMIC HOTPLATES
THERMOSTAT KNOB
ON-OFF SWITCH
THERMOSTAT INDICATOR LED
DRAIN HOLE
REMOVABLE TRAY
CLUTCH
6. BEFORE INSTALLATION
Do not leave the packaging materials unattended. Separate the different waste materials of the
packaging and deliver them to the nearest collection centre for recyclable waste.
We advise you clean the appliance before use in order to remove any residue from manufacturing. For
more details on cleaning, see chapter "8. CARE AND MAINTENANCE".
Before cooking for the first time, clean the cooking hotplate. Subsequently, switch the hotplate on for 5
minutes at the highest setting. This will help eliminate "the new smell" and will burn off any humidity that
might have built up inside the heating elements.
Remove all REMOVABLE labels and protective films from the appliance.
To switch on the hotplate, follow the instructions given in paragraph "7. DESCRIPTION OF CONTROLS".
16
Instructions for the user
7. DESCRIPTION OF CONTROLS
THERMOSTAT KNOB
To select the cooking temperature, turn the thermostat knob clockwise to the
desired setting, between 50°C and 350°C.
THERMOSTAT INDICATOR LED
The thermostat led lights up when the hotplate is heating. It switches off again
upon reaching the set temperature. The led flashes intermittently to indicate that
the temperature of the hotplate is being maintained at the set level.
ON-OFF BUTTON
This button switches on the hotplates, which are nonetheless controlled using
the thermostat knob. If the thermostat knob is set to 0, and you set the button to
1, the hotplates will not heat up.
17
Instructions for the user
8. CARE AND MAINTENANCE
Before any intervention, disconnect the appliance from the mains.
8.1 Cleaning the stainless steel
Do not use a jet of water to clean the appliance.
To keep stainless steel in good condition it should be cleaned regularly each time the hotplate is used.
Let it cool first.
8.2 Routine daily cleaning
To clean and preserve the stainless steel surfaces, always use only specific products that do not contain
abrasives or chlorine-based acids.
Use: pour the product on a damp cloth and wipe the surface, rinse thoroughly and dry with a soft cloth or
chamois leather.
8.3 Food stains or residues
Under no circumstances must metallic scourers or sharp scrapers be used: they will damage
the surface.
Use normal non-abrasive products, and a wooden or plastic tool if necessary. Rinse thoroughly
and dry with a soft cloth or chamois leather.
8.4 Cleaning the glass-ceramic surface
The glass-ceramic surface must be cleaned regularly, preferably after every use.
If burnt-on residue is present after cooking, remove it with the scraper
provided, rinse with water and dry thoroughly with a clean cloth. Regular use
of the scraper significantly reduces the need to use chemical products for daily
cleaning of the hotplate. Never under any circumstances use abrasive or
corrosive detergents (e.g. abrasive powders, oven sprays, stain removers or
metallic scourers).
8.5 Cleaning the tray
Below the hotplate, at the front, is a steel tray designed to collect the grease
and juices that are produced when cooking meat and which drain away
through the hole “A”. Before cooking, it is advisable to pour some water into
the tray to facilitate subsequent cleaning operations.
The tray can be removed completely by sliding it out of its runners, and
washed in the dishwasher.
8.6 Adjusting the clutch
Over time, the clutch mechanism installed to prevent quick or accidental
closure of the lid may become slack. In this case, simply use a D4 Allen key to
re-tighten the clutch mechanism on the underside of the lid.
18
Instructions for the installer
9. INSTALLING THE APPLIANCE
The hotplate must be installed on a horizontal worksurface, and must be freestanding. The distance from
the rear wall must allow easy access to the terminal board in order to allow connection of the power
supply cable.
Installation must be carried out by a qualified technician and in accordance with current EEC regulations.
9.1 Technical specifications data plate
Make sure that the voltage and capacity of the power
supply cable conform to the data shown on the plate
located under the protective cover. Do not remove this
plate for any reason.
9.2 Electrical connection
Regulations require that the appliance is earthed in accordance with electrical safety regulations.
Make sure that the voltage and capacity of the power supply cable conform to the data shown on the
plate located on the rear of the appliance. Do not remove this plate for any reason.
The hotplate comes supplied with a 3-pole H07RN-F cable for use at 220-240V~ and with a power plug.
The cable provided is 3-pole 3 x 1.5 mm2 type H07RN-F.
In order to avoid any risks, have the power cable replaced if necessary by a qualified electrician only.
Ifusing a permanent connection, install an all-pole disconnect switch on the line with a minimum contact
gap of 3 mm, located at an easily accessible position near the appliance.
Ifusing a power plug and socket connection, ensure these are of the same type. Do not use reducers,
adapters or shunts since they could caused overheating or burns.
9.2.1 Safety thermostat
The appliance is equipped with a safety device that trips in the event of serious malfunction. To reset the
safety device, contact the after-sales technical service.
The manufacturer declines all liability for injury to persons or animals and for damage to property
resulting from non-observance of the above prescriptions or from tampering with any part of the
appliance.
19
Instructions for the installer
9.3 Overall dimensions
The overall dimensions of the appliance when open and closed are specified below.
9.4 Positioning the hotplate
There are a few things to bear in mind when positioning the
hotplate.
Leave a distance of at least 50 mm between the appliance and the
rear and side walls.
Surfaces close to the appliance must be of non inflammable
material or covered with a non-flammable heat insulating material.
Pay particular attention to fire prevention measures.
If two hotplates are positioned side by side, leave a gap of at least 67 mm between them.
They can also be connected using the special bracket and screws
provided with each product. There are two holes at the front
underneath the hotplate specially for joining the appliances
together, maintaining the minimum safety distance.
9.5 Levelling the hotplate
The hotplate is equipped with height-adjustable feet front and back.
It is advisable to leave the rear section slightly higher so that the product tilts forward, allowing grease
and cooking juices to run to the front of the hotplate and drain through the hole into the drip tray, which
can then be removed and washed separately.
20