1
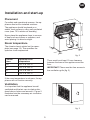
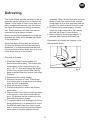
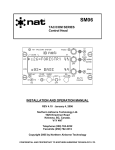
CH300, CH400, CH500
UK Instructions for use.
DE Bedienungsanleitung
FR Mode d’emploi
DK
NO
NL
Brugsanvisning
Bruksanvisning
Genruiksaanwijzing
GB
Warning
WARNING: This appliance is not intended
for use by young children or
infirm persons unless they have
been adequately supervised by
a responsible person to ensure
that they can use the appliance
safely. Young children should
be supervised to ensure that
they do not play with the appliance
In case this appliance contains hydrocarbon refrigerant please refer to guidelines
listed below.
As the appliance contains a flammable
refrigerant, it is essential to ensure that the
refrigerant pipes are not damaged.
Standard EN378 specifies that the room in
which you install your appliance must have
a volume of 1m³ per 8 g of hydrocarbon
refrigerant used in the appliances. This is
to avoid the formation of flammable gas/
air mixtures in the room where the appliance is located in the event of a leak in the
refrigerant circuit. The quantity of the refrigerant used in your appliance is indicated on
the rating plate.
●● Always keep the keys in a separate place
and out of reach of children
●● Before servicing or cleaning the appliance, unplug the appliance from the
mains or disconnect the electrical power
supply
WARNING: Keep ventilation openings in
the appliance’s cabinet or in
the built-in structure clear of
obstruction
●● If the supply cord is damaged, it must be
replaced by the manufacturer, its service
agent, or similarly qualified persons in
order to avoid a hazard
WARNING: Do not use other mechanical
devices or other means to accelerate the defrosting process
than those recommended by
the manufacturer
●● Relevant for Australia: Supply cord
fitted with a plug complies with AS/NZS
3112.
●● Frost formation on the interior evaporator
wall and upper parts is a natural phenomenon. Therefore, the appliance should
be defrosted during normal cleaning or
maintenance.
WARNING:Do not damage the refrigerant
system
WARNING: Do not use electrical appliances inside the refrigerated
storage compartment, unless
they are of a type recommended by the manufacturer
●● Please note that changes to the appliance construction will cancel all warranty
and product liability
WARNING: Do not expose the appliance
to rain
2
GB
Contents
Before use
Warning...................................................2
Before operating your new appliance,
please read the following instructions carefully as they contain important information
on safety, installation, operation and maintenance. Keep the instructions for future
reference.
Before use...............................................3
Get to know your chest freezer............... 4
Installation and start-up........................... 5
Electrical connection............................... 6
Operation and function............................ 7
On receipt check to ensure that the appliance has not been damaged. Transport
damage should be reported to the local distributor before the appliance is put to use.
Use..........................................................8
Defrosting................................................9
Cleaning and maintenance.................... 10
Remove the packaging. Clean the inside of
the cabinet using warm water with a mild,
perfume-free detergent. Rinse with clean
water and dry thoroughly (see cleaning
instructions). Use a soft cloth.
Fault finding........................................... 11
Warranty, spare part and service........... 12
Disposal.................................................13
If the appliance has been stored in cold
surroundings (colder than +5 °C), it must
be allowed to stabilise for at least an hour
before being switched on.
If the appliance has been stood on end during transport, it must be allowed to stabilise
in normal position for approx. 12 hours
before being switched on.
3
GB
Get to know your chest freezer
Handle
Lamp
Sealing strip
Nameplate
Partition/defrost
water tray
Basket
Frezing compartment
Ventalation grille
Mechanical control
panel
Defrost water drain
CONTROL
SUPER
MIN
MAX
Foot
fig. 1
4
GB
Installation and start-up
Placement
For safety and operational reasons, the appliance must not be installed outdoors.
800 mm
The appliance should be placed on a
stable, level surface in a dry, well-ventilated
room (max. 75% relative air humidity).
Never place the appliance close to sources
of heat such as cookers or radiators, and
avoid placing it in direct sunlight.
Room temperature
CONTROL
SUPER
The climate class is stated on the nameplate (see page 12). This specifies the
optimum room temperature.
10
0
Optimum room
temperature
SN
+10 ºC à +32 ºC
N
+16 ºC à +32 ºC
ST
+18 ºC à +38 ºC
T
+18 ºC à +43 ºC
MAX
m
m
m
100 m
20 mm
Climate
class
MIN
fig. 2
There must be at least 15 mm clearance
between the base of the appliance and the
floor.
IMPORTANT! There must be free access to
the ventilation grille (fig. 3).
If the room temperature is sub zero, the appliance will not function correctly.
Ventilation
It is important that the appliance be well
ventilated and that air can circulate unhindered above, below and around it. Figure 2
illustrates how the necessary air circulation
can be ensured.
fig. 3
5
GB
Technical data
Electrical connection
This device complies with relevant EU
directives including Low Voltage Directive
2006/95 EEC. and Electromagnetic Compatibility Directive 2004/108/EC
The appliance is intended for connection to
alternating current. The required voltage (V)
and frequency (Hz) are stated on the nameplate on the rear of the appliance. Power
must be connected via an independent wall
socket outlet.
The rating plate provides various technical information as well as type and serial
number.
If the mains lead has been damaged, it
must be replaced with a corresponding
type supplied by the manufacturer or an
approved service centre.
6
GB
Operation and function
-18
fig. 4
Mechanical controls
In addition to a thermostat knob, the control
panel contains two control lamps and a button (fig. 4). Control panel design and lamp
position may vary.
Super Freeze
The green lamp is lit when power is correctly supplied.
1. Press the Super Freeze button (the
yellow lamp lights up). The freezer then
operates at maximum capacity (the compressor runs continuously).
2. Activate Super Freeze 24 hours before
placing fresh items in the freezer.
3. After placing fresh items in the freezer,
leave Super Freeze on for a further 24
hours.
4. Then press the Super Freeze button
again (the yellow lamp goes off).
If more than 3 kg of fresh items are to be
frozen, proceed as follows:
The yellow lamp is lit when the Super
Freeze button has been pressed (see Super
Freeze).
Starting up
Connect the appliance to the socket outlet.
The green lamp lights up to indicate that
power is supplied. The red lamp on the control panel will also light up to indicate that
the temperature inside the freezer is not yet
sufficiently low.
Acoustic alarm
When plugging in the unit an acoustic alarm
will activate. Push the yellow button to
deactivate the alarm. Notice that the alarm
must be activated again after 24 hours by
pushing the yellow button.
Temperature setting
The temperature is set by turning the
thermostat knob from MIN to MAX. It is
recommended that a coin be used to turn
the knob. The more the thermostat knob is
turned towards MAX, the lower the temperature. To test whether the setting is correct,
measure the temperature of the uppermost
item in the centre of the freezer.
It must be no warmer than –18 °C.
7
GB
Use
Freezer
ages as possible to prevent the surfaces of
the items from drying out.
The appliance is a four-star freezer approved for freezing and storing frozen items
of food.
Items to be frozen should be placed in the
freezing compartment or evenly distributed
along the inner walls of the freezer.
Freezing
Always remember to write the date, content
and quantity on the packages before placing them in the freezer. It is a good idea
to group items within the freezer. Keep
vegetables in one place, meat in another,
and so on.
To keep food at its best, items must be
frozen to –18 °C as quickly as possible.
The freezing capacity of the freezer is
stated on the nameplate in kg/24 hours (see
page 12).
Activating the Super Freeze function reduces freezer temperature to –25 °C. If items
weighing 3 kg or more are to be frozen, the
Super Freeze button should be activated
about 24 hours in advance.
There must be at least 5 mm clearance
between the lid and items stored in the
freezer.
Items stored in the baskets are highly visible and easily accessible (fig. 5).
To freeze smaller quantities, it is sufficient
to activate Super Freeze just a couple of
hours in advance, or even at the same time
as items are placed in the freezer.
There is no need to use Super Freeze when
pre-frozen items are placed in the freezer or
when small, single items are involved.
fig. 5
Only freeze high-quality fresh products.
Meat, poultry, fish, vegetables, fruit, dairy
products and ready-made meals are suitable for freezing. Items with a high water
content, e.g. lettuce, radishes, grapes, apples, pears and cucumbers, are not suitable
for freezing.
Thawing
Frozen vegetables and fruit require no
thawing before use and can be immersed in
boiling water directly from the freezer.
To thaw meat, it is advisable to take it out
of the freezer the day before it is to be used
and place it in a refrigerator to defrost. This
ensures the best hygiene and maintains
meat quality as much as possible.
Pack items to be frozen in airtight containers, freezer bags or similar. Freeze items in
suitable portions. Do not freeze vegetables
or meat in portions larger than 2.5 kg. Keep
packages dry to prevent them from freezing
together. To ensure rapid freezing, make
sure, as far as possible, that items placed
in the freezer are not touching each other.
Ensure that there is as little air in the pack-
Note:
Glass bottles or cans containing carbonated (fizzy) drinks must never be placed
in the freezer as they may explode.
8
GB
Defrosting
The items stored and the humidity of the air
gradually cause frost and ice to form in the
freezer. A thin layer of frost or ice does not
affect freezer performance, but the thicker
the layer, the higher the energy consumption. Small amounts of loose frost can be
removed using a plastic scraper.
splashes. When all the frost and ice have
melted, clean the inside of the cabinet
using water with a mild, perfume-free detergent. Dry the freezer with a soft cloth.
8. Reconnect the power supply. If many
items are to be returned to the freezer,
activate the Super Freeze button.
9. Return items to the freezer approx. 5
minutes after having switched it on.
Never use electrical apparatus or sharp implements as these may damage the inside
of the appliance.
Remember to reinsert the stopper in the
defrost water drain.
When the layer of frost and ice exceeds
4-5 mm the freezer should be completely
defrosted. It is recommended that defrosting be performed when there are no or only
a few items stored in the freezer.
Proceed as follows:
1. Press the Super Freeze button 4-5
hours before defrosting. This lowers the
temperature of the items stored to approx. –25 °C, thus prolonging the length
of time they remain frozen after having
been removed from the freezer (see step
3 below).
2. Disconnect the power supply.
3. Remove the items of food. Place them
in a refrigerator or wrap them up to keep
them as cold as possible.
4. Keep the freezer lid open.
5. Position the partition under the defrost
water drain.
6. Place a bowl of hot (but not boiling) water
in the freezer, close the lid and wait approx. 30 minutes before removing loose
frost with the plastic scraper.
7. To prevent water from damaging the floor
during defrosting, it is advisable to check
the defrost water tray from time to time
and to cover the floor around the defrost
water drain to protect against ice and
fig. 6
9
GB
Cleaning and maintenance
Cleaning
Replacing the bulb
The cabinet is best cleaned using warm
water (max. 65 °C) with a little mild,
perfume-free detergent. Never use cleaning
agents that scour. Use a soft cloth. Rinse
with clean water and dry thoroughly. It is
important to prevent water from entering the
control panel.
2 . Remove the lamp cover by pressing its
upper edge downwards to release it from
the two clips (fig. 7).
Before cleaning, disconnect the power supply and remove all loose fittings.
1. Disconnect the power supply by pulling
the plug out of the socket.
3. Replace the bulb(s).
4. Refit the cover and reconnect the power
supply.
The sealing strip around the lid must be
cleaned regularly to prevent discolouration
and prolong service life. Use clean water.
After cleaning the sealing strip, check that it
continues to provide a tight seal.
max.
15 W
The ventilation grille must be kept free
of dust and dirt. Clean it with a vacuum
cleaner.
If the appliance is not to be used for any
length of time, switch it off, disconnect the
power supply, empty it, clean the cabinet
and leave the lid open to allow air circulation and prevent smells.
fig. 7
Advise for minimising the energy consumption
●● The lower ambient temperature the lower
energy consumption.
●● Thaw frozen items in a refrigerator.
●● Place frozen items in a refrigerator while
defrosting the freezer.
●● The lower temperature inside the unit the
higher energy consumption.
●● Recommended temperature -18°C
●● Defrost when the ice build-up is more
than 5 mm thick.
●● Do not open the lid more than necessary.
●● Cool hot food and beverages before placing them in the freezer.
10
GB
Fault finding
Fault
Possible cause
Remedy
No light in display.
There is not enough light for the solar
sensor.
Turn on the light.
No control lamps are
lit.
The appliance is switched off.
Check the plug and socket.
Power failure; the fuse is blown; the
appliance is not plugged in correctly.
Check that power is connected.
Reset the fuse.
Temperature in freezer
too high.
The ventilation grille is blocked.
Ensure unhindered air circulation.
The lid is not closed properly.
Close the lid and wait a few hours.
Wait a few hours.
The quantity of fresh items placed
in the freezer is greater than the
capacity of the appliance.
Defrost the freezer.
Thick layer of frost and ice.
The thermostat is set too high.
Set the thermostat to a lower
temperature.
Super Freeze is activated.
Switch Super Freeze off.
The thermostat is set too low.
Set the thermostat to a higher
temperature.
The lid is touching items stored in the
freezer.
Reposition items inside the freezer
and check that the lid closes tightly.
Air humidity in the room is high.
Ventilate the room more often or
move the freezer to a room with lower
humidity.
Items placed in the freezer are giving
off moisture.
Repack items stored in the freezer.
The lid cannot be
opened.
There is underpressure in freezer.
Wait 2-3 minutes until the
underpressure has been equalised
and try again.
Vibration and unusual
noise.
The appliance is not on a level
surface.
Position the freezer on a flat, level
and stable surface.
The appliance is not free standing.
Move the appliance away from other
appliances or pieces of furniture.
Baskets or partition are loose.
Check movable fittings and reposition
them.
Temperature in freezer
too low.
The freezer produces
large quantities of frost.
11
GB
Warranty, spare parts and service
Warranty disclaimer
Spare parts
Faults and damage caused directly or
indirectly by incorrect operation, misuse,
insufficient maintenance, incorrect building,
installation or mains connection. Fire, accident, lightening, voltage variation or other
electrical interference, including defective
fuses or faults in mains installations are not
covered by the warranty.
When ordering spare parts, please state
the type, serial and product numbers of
your appliance. This information is given on
the rating plate. The rating plate contains
various technical information, including type
and serial numbers.
Repairs performed by others than approved
service centres and any other faults and
damage that the manufacturer can substantiate are caused by reasons other than
manufacturing or material faults are not
covered by the warranty.
Product number.
Please note that changes to the construction of the appliance or changes to the
component equipment of the appliance will
invalidate warranty and product liability, and
the appliance cannot be used lawfully. The
approval stated on rating plate will also be
invalidated.
Transport damage discovered by the buyer
is primarily a matter to be settled between
the buyer and the distributor, i.e. the distributor must ensure that such complaints
are resolved to the buyer’s satisfaction.
Before calling for technical assistance,
please check whether you are able to rectify
the fault yourself. If your request for assistance is unwarranted, e.g. if the appliance
has failed as a result of a blown fuse or
incorrect operation, you will be charged
the costs incurred by your call for technical
assistance.
12
GB
Disposal
For business users in the European Union.
If you wish to discard electrical and
electronic equipment, please contact
your dealer or supplier for further
information.
Information for Users on Collection
and Disposal of Old Equipment and
used Batteries
These symbols on the products,
packaging, and/or accompanying
documents mean that used electrical and electronic products and
batteries should not be mixed with
general household waste. For proper
treatment, recovery and recycling
of old products and used batteries,
please take them to applicable collection points, in accordance with your
national legislation and the Directives
2002/96/EC and 2006/66/EC.
[Information on Disposal in other
Countries outside the European
Union]
These symbols are only valid in the
European Union. If you wish to discard this product, please contact your
local authorities or dealer and ask for
the correct method of disposal.
Note for the battery symbol (bottom two symbol examples):
By disposing of these products and
batteries correctly, you will help to
save valuable resources and prevent
any potential negative effects on
human health and the environment
which could otherwise arise from
inappropriate waste handling.
This symbol might be used in combination with a chemical symbol. In this
case it complies with the requirement
set by the Directive for the chemical
involved.
For more information about collection and recycling of old products and
batteries, please contact your local
municipality, your waste disposal
service or the point of sale where you
purchased the items.
Penalties may be applicable for incorrect disposal of this waste, in accordance with national legislation.
13