1
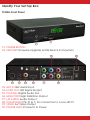
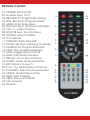
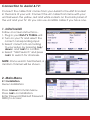
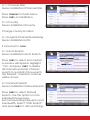
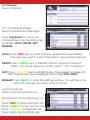
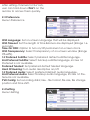
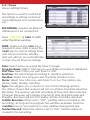
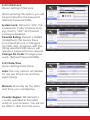
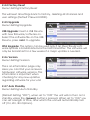
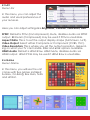
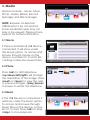
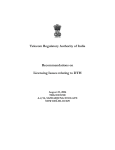
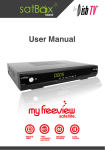
T1000n
User Manual
Contents:
Important Safety Instructions
Precautions
Identify Your Set Top Box
Remote Control
1. Initial Install
2. Main Menu
2.1 Installation
2.1.1 Channel Filter
2.1.2 Country
2.1.3 LCN
2.1.4 Auto Search
2.1.5 Manual Search
2.2 Channel
2.2.1 Channel Manager
2.2.2 Favorite List
2.3 Preference
2.4 Setting
2.4.1 Timers
2.4.2 Child Lock
2.4.3 Date/ Time
2.4.4 Factory Reset
2.4.5 Upgrade
2.4.6 Version
2.4.7 Auto Standby
2.5 AV
2.6 Game
3. Media
3.1 Movie
3.2 Photo
3.3 Music
4. Convenient Functions
4.1 Ways to Select Programs
4.2 Program Information
4.3 EPG
4.4 Audio
4.5 Subtitle
4.6 Recording
5. Troubleshooting
6. Warranty
Important Safety Instructions:
1. Read, Follow and Keep these Instructions.
2. Do not use this unit near water.
3. Clean only with a damp cloth. Remember to unplug power prior to
cleaning.
4. Do not block any of the ventalation openings. Install in accordance with the manufacturers instructions.
5. Do not install near any heat sources such as radiators, heat registers, stoves, or other appliances (including amplifiers) that produce
heat.
6. Protect the power cord from being walked on or pinched, particularly at the plug/ receptacles and the point where they exit from
the unit.
7. Unplug this unit during lightning storms or when unused for long
periods of time.
8. Refer all servicing to qualified personnel.
Servicing is required when the unit has been damaged in anyway;
such as...
-when the power supply or plug is damaged.
-liquid has been spilled into the unit.
-objects have fallen into the unit.
-the unit has been exposed to rain or moisture.
-unit does not operate normally.
-unit has been dropped.
WARNING: To reduce risk of fire or electric shock, do not expose unit
to rain or moisture.
Precautions:
Please read these precautions before operating this unit.
1. Power Cord Protection
To avoid any malfunctions of the unit and to protect against electric
shock, fire or personal injury, please observe the following...
- Hold plug firmly when connecting/disconnecting AC power cord.
- Keep AC power cord away from heated appliances.
- Never put any heavy object on the AC power cord.
- Do not attempt to repair the AC power cord in any way.
- Never make or change connections with power switched on.
2. Placement
Avoid placing the unit in areas of:
- Direct sunlight or heat sources.
- High temperature (over 35 °C) or high humidity (over 90%).
3. Non-use Periods
When the unit is not being used, turn it off. When not used for a long
period of time, the unit should be unplugged from the power source.
4. No Fingers/Objects Inside
- Touching internal parts of this unit is dangerous, and may cause
serious damage to the unit.
- Do not attempt to disassemble the unit.
- Do not put any foreign objects in this unit.
5. Keep Away From Water
- Keep the unit away from flower vases, tubs, sinks, etc...
if liquids are spilled into the unit, serious damage could occur.
- If the unit has been exposed to moisture do not operate the unit.
Identify Your Set Top Box:
T1000n Front Panel
01: POWER BUTTON
02: USB PORT Firmware Upgrade & USB Device Connection
03: ANT IN UHF Aerial Input
04: LOOP OUT UHF Signal Output
05: COAXIAL Digital Audio Out
06: HDMI PORT High Definition Output
07: L/R AUDIO Audio Output
08: COMPONENT Pb, Pr & Y, for connection to a non-HD TV
09: VIDEO AV Video Output
00: POWER LEAD Connects to Power
Remote Control:
01. POWER: Turn On/Off
02. Number Keys: <0-9>
03. RECORD: TV Program Recording
04. EPG: Electronic Program Guide
05. MENU: Enter Main Menu
06. Direction Keys: Up/Down/Left/Right
07. VOL +/-: Adjust Volume
08. R/G/Y/B Keys: Function Keys
09. SUBTITLE: Select Subtitles
10. TTX: Teletext
11. TIMESHIFT: Starts Timeshift
12. GOTO: Set time of playing for Media
13. PAUSE/PLAY Program Playback
14. STOP: Stop Program Playback
15. MUTE: Toggle Sound On/Off
16. INFO: Information Window
17. RECALL: Go to Prev Channel
18. AUDIO: Audio Mode Operation
19. EXIT: Returns to Live TV
20. P+/P-: Go Next/Previous Channel
21. TV/RADIO: Switch between Modes
22. MEDIA: Media Player Mode
23. NEXT: Next Chapter
24. PREV: Previous Chapter
25. Fast Forward
26. Rewind
Connection to Aerial & TV:
Connect the cable that comes from your Aerial to the ANT IN socket
in the back of your unit. Connect the AV cable that came with your
unit between the yellow, red and white sockets on the back panel of
the unit and your TV. Or you can use an HDMI cable if you have one.
1. Inital Install
Follow on screen instructions...
1. Plug in your Dish TV T1000n unit.
2. Turn on your TV and select the
correct corresponding input.
3. Select correct info according
to your setup, by pressing <up/
down> and <ok> to confirm.
4. Select “Start Search” and press
<ok> to search for channels.
NOTE: Once search has finished, a
random channel will be shown.
2. Main Menu
2.1 Installation
Menu>Installation
Press <menu> for Main Menu.
Press <ok> on Installation.
Enter Password (Default Password
0000) to access.
2.1.1 Channel Filter
Menu>Installation>Channel Filter
Press <menu> for Main Menu.
Press <ok> on Installation.
2.1.2 Country
Menu>Installation>Country
Change country location.
2.1.3 Logical Channel Numbering
Menu>Installation>LCN
It is best set to <on>.
2.1.4 Auto Search
Menu>Installation>Auto Search
Press <ok> to select Auto Search.
A window will appear. Highlight
“Yes” and press <ok> to delete
all channels and start channel
search to re-install. Once search
has finished, a random channel
will be shown.
2.1.5 Manual Search
Menu>Installation>Manual Search
Press <ok> to select Manual
Search. Use this option to scan
individual frequencies.
Set corrosponding frequency and
bandwidth. Select “Start Search”
and press <ok> to start searching.
2.2 Channel
Menu>Channel
2.2.1 Channel Manager
Menu>Channel>CH. Manager
Press <up/down> to select any
channel listed. Four Functions are
available, LOCK, DELETE, SKIP,
RENAME.
LOCK: Press <RED> key to LOCK channel. (Default Password 0000).
User will now need to enter Password to view locked channel.
DELETE: Press <GREEN> key to DELETE channel. (Default Password
0000). You will be asked to confirm, select “Yes” to delete it.
SKIP: Press <YELLOW> key to set SKIP status. Press again to toggle off.
This channel will now be skipped when using <CH-/CH+>.
RENAME: Press <BLUE> to enter the editing window. You will have the
option to change the name of the channel.
2.2.2 Favorite List
Menu>Channel>Favorite List
Set channels to Favorite Lists (1-4).
Press <RED> to add to First FAV List.
Press <GREEN> for Second FAV List.
Press <YELLOW> for Third FAV List.
Press <BLUE> for Fourth FAV List.
After setting channels to FAV Lists,
user can hold down <FAV> on the
remote to access them quickly.
2.3 Preference
Menu>Preference
OSD Language: Set on-screen Language that will be displayed.
OSD Timeout: Set the length of time Banners are displayed (Range 1-6
seconds).
Time On OSD: Option to turn on/off permanent on-screen clock.
OSD Transparency: Select transparency of on-screen window (Range
0%-60%).
1st Preferred Subtitle: Select preferred default subtitle language.
2nd Preferred Subtitle: Select backup subtitle language, incase 1st
Preferred is not available.
Preferred Teletext: Set preferred default teletext language.
Hard Of Hearing: Turn audio descriptive on/off.
1st Preferred Audio: Select preferred default audio language.
2nd Preferred Audio: Select backup audio language, incase 1st Preferred is not available.
PVR Config: Set recording data; like... file format, file size, file storage
position and time shift.
2.4 Setting
Menu>Setting
2.4.1 Timers
Menu>Setting>Timers
This option is used for multi-timer
recordings or setting a channel
to be displayed at a certain time
etc...
RECORDING, requires an External
USB Device to be connected.
Press <YELLOW> or <ok> to edit/
enter the timer window.
NOTE, make sure the <ok> key is
pressed to save data or press the
<exit> key to cancel setting timer.
User can put unit into standby,
and unit will turn on automatically
to start any set timer recordings.
Date: Select date you would like timer to begin.
Program Name: Select channel you would like recorded or displayed.
Start Time: Select time you wish timer to start.
End Time: This will change according to duration selected.
Duration: Select how long you wish the timer duration to be.
Mode: Select how often you wish timer to occur. The options are
(Once, Daily, Weekly, Monthly).
Type: This will give you a choice of one of the following options...
On- When chosen the receiver will turn on at time and date selected.
Recorder- The receiver will start recording at time and date selected.
Channel- Receiver will change channel at time and date selected.
Standby- Receiver will turn to standby at time and date selected.
Subtitle Recorder: When set to “ON”, subtitles will be included in the
recording. As long as the program has subtitles available. Press the
<subtitle> key on your remote to view subtitles during playback.
Teletext Record: When this option is set to “ON”, teletext will be included in the recording.
2.4.2 Child Lock
Menu>Setting>Child Lock
When entering this option, you will
be prompted for the password
(Default Password 0000).
System Lock: Default is “ON”, this
enables Pin Code Channel Locking. If set to “OFF” all Channel
Locking is disabled.
Parental Rating: Default is UNDEF
(Undefined); this means there
is no Parental Lock. If changed
(G, PGR, AO), programs with the
rating selected and above will
require a password to be viewed.
Change Pin Code: Change password, (Default Password 0000).
2.4.3 Date/Time
Menu>Setting>Date/Time
Auto: The only options accessible
for use are Time Zone and Day
Light Saving.
Manual: Manually set the Date
and Time your unit displays.
Country Region: Will default to
country specified in the initial
setup of your receiver. You will not
be able to alter from this menu.
2.4.4 Factory Reset
Menu>Setting>Factory Reset
This will reset all settings back to factory, deleting all channels and
user settings (Default Password 0000).
2.4.5 Upgrade
Menu>Setting>Upgrade
USB Upgrade: Insert a USB Device
with new firmware/ software on.
Select the software file on the USB
Device, press <ok> to upgrade.
OTA Upgrade: This option can be used only if an Over The Air software update is broadcasted via the UHF transmitter. The software will
only be broadcast for a few weeks if a major update is needed.
2.4.6 Version
Menu>Setting>Version
This is an information page only.
Here you can find your receivers
hardware/ software versions. This
information is important when
checking for any new updates
regarding software for your unit.
2.4.7 Auto Standby
Menu>Setting>Auto Standby
(Default Setting “OFF”), when set to “OFF” the unit will not turn on to
standby unless the <power> button is pressed. When set to “ON” you
can set a length of time, after which the unit will automatically turn
off (1hr, 2hr, 3hr Options).
2.5 AV
Menu>AV
In this menu, you can adjust the
audio and visual preferences of
your receiver.
Here you can adjust settings like Brightness, Contrast, Saturation, Hue.
SPDIF: Default is PCM (Uncompressed). Mute, disables audio via SPDIF
output. Bitstream (Compressed) may be used if PCM is unsuitable.
Aspect Ratio: This is to set the output display shape (Full Screen, 16:9).
Video Output: Select either Composite or Component (CVBS, YUV).
Video Resolution: This is where you set the output resolution, depending on what your TV can handle. 50Hz and 60Hz options available.
HDMI Audio: Default is HDMI Raw. HDMI Mute, disables audio via
HDMI output. HDMI PCM may be used if HDMI Raw is unsuitable.
2.6 Game
Menu>Game
In this menu, you will see the unit
comes with five games installed;
Sudoku, Go Bang, Box Man, Tetris
and Hit Rat.
3. Media
Options include... Movie, Music,
Photo, Game, EBook, Record
Manager and Disk Manager.
NOTE: Requires an External
USB Device to be connected.
Some media file types may not
play or be viewed. Please phone
support for further information.
3.1 Movie
If there is an External USB Device
connected, it will show under
the Movie option. To access and
browse through movies on the
device. Just select it, to start. Recordings made are viewed here.
3.2 Photo
Press <ok> to start slideshow.
<up/down/left/right> will change
the orientation of the image. Press
<next> or <prev> to view the next
or previous images. <play/pause>
to pause or restart the slideshow.
3.3 Music
If the USB Device is connected, it
will show under the Music option.
To access and browse through
Music Files on the device. Just select it, to start. Press <ok> to play,
<stop> to stop playback.
4. Convenient Functions
4.1 Ways to Select Programs
Currently there are 4 ways to select a desired channel.
Press <ok> to select a channel from the program list.
Press <epg> to select a channel from the Electronic Program Guide.
Press <0-9> to change to the corresponding channel.
Press <ch+/ch-> to change to next or previous channel.
4.2 Program Information
To view information on current program, press <i> on your remote,
press it again to view more detailed information. <i/exit> to exit.
4.3 EPG
Press <epg> to view the Electronic Program Guide.
When viewing “Today” press the <YELLOW> key to view next weeks
program info. From there or any other day, pressing the <YELLOW>
key will move to previous day in EPG.
Pressing the <BLUE> key will move you to the next day in EPG.
4.4 Audio
Press <audio> on your remote to enter the multi-audio window. Press
<left/right> to switch between options (stereo, left, right). To select
stream, use <up/down>. To confirm selection, press <ok/exit> and
return to Live TV.
4.5 Subtitle
Press <subtitle> on your remote to access subtitle page. From here
select desired option, and press <ok> to confirm choice and exit.
4.6 Recording
NOTE: Requires an External USB Device to be connected.
To record you can either set a Timer (2.4.1) or Instant Record <rec>.
Instant Record: Insert USB Device, into USB socket. Select channel you
wish to record. Press <rec> to start recording current playing program. Press <rec> again to display duration window, to set how long
you wish recording to go for. To stop the recording at any time, press
<stop> and select “Yes”. Press <i> to view recording info any time.
5. Troubleshooting
There may be various reasons for the abnormal operation of the
receiver. Check the receiver according to the procedures shown
below. If the receiver doesn’t work properly after checking it, please
contact the dealer. Don’t open the receiver cover. It may cause a
dangerous situation .
Front Panel Display doesn’t light up:
-Make sure Power Lead is plugged in. An that Power Switch is on.
No Picture:
-Make sure that the receiver is not in standby mode.
-Check the HDMI/AV Lead is correctly connected to correct TV input.
-Check that your TV has the correct corresponding input selected.
-Make sure the UHF Antenna Cable is correctly connected to ANT IN.
No or Bad Signal Message:
-Check all antenna connections, or adjust antenna position.
-Factory default and try to re-scan the channels.
Poor Picture & Sound Quality:
-Check there is nothing obstructing the UHF Antenna.
-Due to bad interference in your area. Installing a filter may solve it.
-Check you’re using RG6 Coax to an outdoor antenna, an that all the
connections are good.
No or Poor Sound:
-Check the volume level of the TV.
-Check the Mute status of the TV and T1000n Receiver.
-Press the audio button to change the Sound Track type.
No Remote operation:
-To manipulate the equipment with the remote control, the control’s
emitting part should be directly pointing towards the receiving part
(IR Sensor) of receiver.
-Replace the batteries in the remote and ensure correctly inserted.
NOTE: If the problem can not be solved by going through this Trouble
Shooting Guide. Please contact Our Customer Care Centre for more
additional help. Call 0800 Dish TV (3474 88).
6. Warranty
Please keep your receipt as proof of purchase. This product is warranted for any defect in materials or workmanship for one year after
the original date of purchase. This product is for normal domestic use
only. This warranty does not cover damage from misuse or neglect,
accidental damage, vermin infestation, excessive voltages such us
lightning or power surges or any alteration that affects the performance or reliability of the product. In the unlikely event that your product fails to work normally please contact your supplier and have your
receipt of purchase on hand.
This warranty is subject to the following provisions:
-This is only valid within New Zealand.
-The product must be correctly connected and operated in accordance with the instructions contained in the manual.
-This product must be used solely for domestic purposes.
-The warranty does not cover accidental damage.
-The warranty will be rendered invalid if the product is resold or has
been damaged by unauthorised repair.
-The manufacturer disclaims any liability for incidental or consequential damages.
Warranty & Product Registration
Register your product to assist with warranty and product updates.
To do this, please visit www.dishtv.co.nz
Click on warranty & registration