1
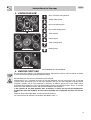
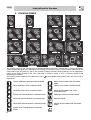
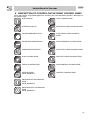
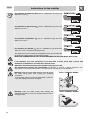
Contents
1.
INSTRUCTIONS FOR PROPER USE ______________________________________ 19
2.
SAFETY INSTRUCTIONS _______________________________________________ 20
3.
KNOW YOUR HOB ____________________________________________________ 21
4.
BEFORE FIRST USE___________________________________________________ 21
5.
COOKING ZONES_____________________________________________________ 22
6.
DESCRIPTION OF CONTROL ON THE FRONT CONTROL PANEL______________ 23
7.
USE OF THE COOKING HOB____________________________________________ 24
8.
CLEANING AND MAINTENANCE _________________________________________ 28
9.
SOMETHING WRONG? ________________________________________________ 28
10. INSTALLATION _______________________________________________________ 29
INSTRUCTIONS FOR THE USER: these contain user advice, description of the commands and the
correct procedures for cleaning and maintenance of the appliance.
THE SYMBOLS SHOWN IN THIS MANUAL MAY DIFFER FROM THOSE ON THE PRODUCT.
INSTRUCTIONS FOR THE INSTALLER: these are intended for the qualified technician who must
install the appliance, set it functioning and carry out an inspection test.
18
Instruction for proper use
1. INSTRUCTIONS FOR PROPER USE
ELECTRICAL CONNECTION: PLEASE REFER TO INSTALLATION INSTRUCTIONS FOR THE GAS
& ELECTRICAL SAFETY REGULATIONS AND THE VENTILATION REQUIREMENTS.
IN YOUR OWN INTEREST, AND THAT OF SAFETY, IT IS THE LAW THAT ALL GAS AND
ELECTRICAL APPLIANCES BE INSTALLED AND SERVICED BY COMPETENT PERSONS, WHO
WILL COMPLY WITH THE RELEVANT STANDARDS AND REGULATIONS.
SMEG REGISTERED INSTALLERS UNDERTAKE TO WORK TO SATISFCTIORY STANDARDS.
DISCONNECTION OF GAS AND ELECTRIC APPLIANCES SHOULD ALWAYS BE CARRIED OUT
BY COMPETENT PERSONS
THIS MANUAL IS AN INTEGRAL PART OF THE APPLIANCE AND THEREFORE MUST BE KEPT
IN ITS ENTIRETY AND IN AN ACCESSIBLE PLACE FOR THE WHOLE WORKING LIFE OF THE
HOB. WE ADVISE READING THIS MANUAL AND ALL THE INSTRUCTIONS THEREIN BEFORE
USING THE HOB. INSTALLATION MUST BE CARRIED OUT BY QUALIFIED PERSONNEL IN
ACCORDANCE WITH THE REGULATIONS IN FORCE. THIS APPLIANCE IS INTENDED FOR
DOMESTIC USES AND CONFORMS TO CURRENT REGULATIONS IN FORCE. THE APPLIANCE
HAS BEEN BUILT TO CARRY OUT THE FOLLOWING FUNCTIONS: COOKING AND HEATING-UP
OF FOOD. ALL OTHER USES ARE CONSIDERED IMPROPER.
THE MANUFACTURER DECLINES ALL RESPONSIBILITY FOR IMPROPER USE.
NEVER USE THIS APPLIANCE FOR HEATING ROOMS.
DO NOT LEAVE THE PACKING IN THE HOME ENVIRONMENT. SEPARATE THE VARIOUS
WASTE MATERIALS AND TAKE THEM TO THE NEAREST SPECIAL GARBAGE COLLECTION
CENTRE.
THIS APPLIANCE IS MARKED ACCORDING TO THE EUROPEAN DIRECTIVE 2002/96/EC ON
WASTE ELECTRICAL AND ELECTRONIC EQUIPMENT (WEEE).
THIS GUIDELINE IS THE FRAME OF A EUROPEAN-WIDE VALIDITY OF RETURN AND
RECYCLING ON WASTE ELECTRICAL AND ELECTRONIC EQUIPMENT.
THE IDENTIFICATION PLATE, WITH TECHNICAL DATA, SERIAL NUMBER AND MARKING IS
CLEARLY VISIBLE UNDER THE CASING.
THE PLATE ON THE CASING MUST NOT BE REMOVED.
TAKE CARE NOT TO SPILL SUGAR OR SWEET MIXTURES ON TO THE HOB
WHEN HOT. NEVER PLACE MATERIALS OR SUBSTANCES WHICH MAY MELT
(PLASTIC OR ALUMINIUM FOIL) ON THE HOB. IN THE EVENT, PROMPTLY
SWITCH OFF AND REMOVE THE MOLTEN MATERIAL WITH THE SCRAPER
PROVIDED WHILE THE COOKING ZONE IS STILL WARM TO PREVENT IT
FROM BEING DAMAGED. FAILURE TO INSTANTLY CLEAN THE CERAMIC
HOB COULD LEAD TO ENCRUSTATIONS WHICH ARE IMPOSSIBLE TO
REMOVE ONCE THE HOB HAS COOLED DOWN.
The manufacturer declines all responsibility for damage to persons or things caused by nonobservance of the above prescriptions or by interference with any part of the appliance or by the use
of non-original spares.
19
Safety instruction
2. SAFETY INSTRUCTIONS
INSTRUCTIONS FOR THE INSTALLER: THESE ARE INTENDED FOR THE QUALIFIED
TECHNICIAN WHO MUST INSTALL THE APPLIANCE, SET IT FUNCTIONING AND CARRY OUT
AN INSPECTION TEST.
IT IS OBLIGATORY FOR THE ELECTRICAL SYSTEM TO BE GROUNDED ACCORDING TO THE
METHODS REQUIRED BY SAFETY RULES.
WHEN LINKING UP TO MAINS BY PLUG AND SOCKET, MAKE SURE THAT BOTH ARE
COMPATIBLE AND CONNECT BY MEANS OF A POWER CABLE COMPLYING WITH APPLICABLE
REGULATIONS.
THE SOCKET MUST BE ACCESSIBLE AFTER THE APPLIANCE HAS BEEN BUILT IN.
NEVER UNPLUG BY PULLING ON THE CABLE.
ALWAYS CHECK THAT THE CONTROLS ARE IN THE POSITION 0 (OFF) WHEN YOU FINISH
USING THE HOB.
DURING USE THE APPLIANCE BECOMES VERY HOT. TAKE CARE NOT TO TOUCH THE
SURFACE OF THE HOB.
THE APPLIANCE IS INTENDED FOR USE BY ADULTS. KEEP CHILDREN AT A SAFE DISTANCE
AND NEVER ALLOW THEM TO PLAY WITH IT.
THE APPLIANCE BECOMES VERY HOT DURING USE.
SHOULD BE WORN FOR ALL OPERATIONS.
SUITABLE HEAT-PROOF GLOVES
BEFORE THE APPLIANCE IS PUT INTO OPERATION, ALL THE LABELS AND PROTECTIVE
FILMS APPLIED INSIDE OR OUTSIDE MUST BE REMOVED.
IMMEDIATELY AFTER INSTALLATION CARRY OUT A BRIEF INSPECTION TEST OF THE
APPLIANCE, FOLLOWING THE INSTRUCTIONS BELOW. SHOULD THE APPLIANCE NOT
FUNCTION, DISCONNECT IT FROM THE POWER SUPPLY AND CALL THE NEAREST
TECHNICAL ASSISTANCE CENTRE.
NEVER ATTEMPT TO REPAIR THE APPLIANCE. ALL REPAIRS MUST BE CARRIED OUT BY AN
AUTHORISED ENGINEER OR AT AN AUTHORISED SERVICE CENTRE.
Important.
Beware of children in the vicinity as the warning lights indicating residual heat are out of
sight to them. In fact, even after having been turned off, the cooking zone remains hot for a
certain period of time.
Make sure that children never touch thehob.
20
Instructions for the user
3. KNOW YOUR HOB
Glass surface of the appliance
Single cooking zone
Dual oval cooking zone
Dual round cooking zone
Timer controls
Control panel
Triple cooking zone
Heating zone
NOT ALL COMPONENTS DESCRIBED ARE PRESENT ON ALL MODELS
4. BEFORE FIRST USE
Do not leave the packing in the home environment. Separate the various waste materials and take
them to the nearest special garbage collection centre.
Before cooking for the first time the hob has to be cleaned.
Following this, put a saucepan of water on the front hotplates and turn them full on for at least 30
minutes. After 30 minutes turn off the front hotplates and turn the rear hotplates and the central
hotplate, if present, full on. This treatment is necessary in order to get rid of the “new smell” and to
evaporate the humidity that may have collected during the manufacturing process. That is, it must be
done so that the electronic circuits and the control buttons work properly.
If the controls do not work properly after 30 minutes, it means that not all the humidity has
evaporated: leave the hotplates on until all the humidity has evaporated and then turn off the
hob.
Remove all the removable labels and any protective sheeting.
To switch on the hob, follow the instructions provided in point "7".
21
Instructions for the user
5. COOKING ZONES
The appliance features 4/5 cooking zones of different diameter and power. Their position is clearly indicated by
circles and the heat given off is defined by the markings on the glass surface. The 5 cooking zones are of the
HIGH-LIGHT type and come on after a few seconds of being activated. Heating intensity can be adjusted by
means of the knobs located on the front panel from a minimum setting of 1 to a maximum setting of 6/9
(Depending on models).
The cooking zones marked by two concentric circles ( )feature double heating either within the inner circle or
both circles.
22
FRONT CENTRAL SINGLE COOKING ZONE
REAR RIGHT-HAND DUAL COOKING
ZONE
REAR CENTRAL DUAL COOKING ZONE
FRONT LEFT-HAND COOKING ZONE
CENTRAL OVAL DUAL COOKING ZONE
REAR RIGHT-HAND DUAL OVAL
COOKING ZONE
FRONT LEFT-HAND SINGLE COOKING ZONE
CENTRAL TRIPLE COOKING ZONE
REAR LEFT-HAND SINGLE COOKING ZONE
HEATING ZONE
REAR RIGHT-HAND SINGLE COOKING ZONE
FRONT RIGHT-HAND DUAL COOKING
ZONE
FRONT RIGHT-HAND SINGLE COOKING
ZONE
RIGHT-HAND TRIPLE COOKING ZONE
Instructions for the user
6. DESCRIPTION OF CONTROL ON THE FRONT CONTROL PANEL
All the hob controls are grouped together on the front panel. The table below provides a description of
the symbols used.
HOB IGNITION
OVAL COOKING ZONE
CONTROLS ON-OFF
REAR RIGHT-HAND COOKING ZONE
VALUE INCREASE BUTTON
FRONT RIGHT-HAND COOKING
ZONE
VALUE DECREASE BUTTON
FRONT CENTRAL COOKING ZONE
TIMER SETTING BUTTON
FRONT LEFT-HAND COOKING ZONE
DUAL COOKING ZONE
REAR LEFT-HAND COOKING ZONE
TRIPLE COOKING ZONE
REAR CENTRAL COOKING ZONE
HEATING ZONE
(MOD. SE2958TC)
CENTRAL COOKING ZONE
SWITCHING ON THE HEATING
ZONE
(MOD. SE2958TC)
SWITCHING OFF THE HEATING
ZONE
(MOD. SE2958TC)
23
Instructions for the user
7. USE OF THE COOKING HOB
7.1 Hobs with knobs
7.1.1 Single cooking zones
Each knob shows the cooking zone it is for.
identifies the knob that
For example, the symbol
controls the rear right-hand cooking zone.
To heat, turn the knob to the desired position (1 to 6).
Adjustment is continuous so that the appliance also
operates at any intermediate value.
7.1.2 Dual cooking zones
Each knob shows the cooking zone it is for.
identifies the knob that controls the rear right-hand
For example, the symbol
cooking zone.
To heat the inner cooking zone, turn the knob to the desired position (1 to 6).
and then
To heat both the inner and outer cooking zones, turn the knob to
release. The knob will thus return to 9. To adjust heating intensity, rotate the
knob anticlockwise to the desired position. To return to heating of the inner
cooking zone only, set the knob back to 0 and then turn to the desired position
(1 to 6).
7.1.3 Description of symbols
REAR LEFT
REAR RIGHT
FRONT LEFT
FRONT RIGHT
7.1.4 Residual heat
The 4 warning lights located between the cooking zones come on when the temperature
of one or more of the zones exceeds 60°C.
The lights go off upon temperature dropping to below approximately 60°C.
7.1.5 Switching off
To turn off, return the knob to 0.
24
Instructions for the user
7.2 Hobs with touch-control buttons
When an icon is pressed the unit beeps to confirm.
To operate the panel of the hobs equipped with touch-controls, lightly press the icons printed on its
surface.
On first connection to the electrical mains, an operating check will be carried out automatically
and all the indicator lights will come on for a few seconds.
7.2.1 Switching on the hob
for 2 seconds to switch the
When not in use, all hob components will be switched off. Hold down
hob on; a led will turn on above the symbol to confirm that the hob is lit. If no functions are used within
30 seconds of switching the hob on, it will automatically turn itself off.
7.2.2 Single cooking zones
The relevant hotplate is indicated next to each control zone. For example, the
symbol identifies the
knob which controls the rear right-hand cooking zone.
Having switched on the hob as described in “7.2.1 Switching on the hob”, press the
and
keys to
activate the hotplate (with the display indicating 0) and adjust the power to the desired operating
setting.
The operating power levels are 1 (lowest) to 9 (highest).
The power must be set within 5 seconds of activating the hotplate as otherwise it will deactivate
automatically.
and
as follows:
To activate the hotplate and adjust its power level, press
1. Press
(0 appears on the display to indicate that the hotplate has been activated);
2. Press
again (9 appears on the display to indicate that the hotplate is active at the maximum
power setting).
or
to increase or reduce the power to the desired level (1…9).
3. Press
7.2.3 Dual cooking zones
To activate heating of the dual cooking zone, once power 9 is reached by following the instructions
provided in paragraph “7.2.2 Single cooking zones”, press the
again. Now the maximum power of
the cooking zone is activated, and is shown by the LED light turning on next to the number indicating
and
to adjust the power of the dual cooking zone to
the operating power. Press on the symbols
the desired value.
7.2.4 Triple cooking zones
To activate heating of the triple cooking zone, once power 9 of the dual cooking zone is reached by following
the instructions provided in paragraph “7.2.3 Dual cooking zones”, press the
again. Now the maximum
power of the triple cooking zone is activated, and the LED indicating the operating power remains fix. Press
and
to adjust the power of the triple cooking zone to the desired value.
on the symbols
7.2.5 Heating zone
This zone, which is present only on some models in the range, keeps the area inside the dashed line
at a temperature of approximately 90°C. It is used for warming dishes up or keeping them hot. If the
hob is not locked, simply press the button
to switch it on. Press the button
to switch it off.
7.2.6 Cooking zone lock-out
The cooking zone lock-out function is a user safety functions. It locks out the hob controls to prevent
the ceramic cooking zones being switched on accidentally.
Hold down
for 1 second to lock out the hob. The hob can be reactivated by holding down
again
for 1 second.
7.2.7 Cooking zone layout
REAR LEFT
REAR RIGHT
REAR
CENTRAL
CENTRAL
FRONT LEFT
FRONT RIGHT
FRONT
CENTRAL
OVAL
CENTRAL
25
Instructions for the user
7.2.8 Timer (on some models only)
Some models are equipped with a 1 to 99-minute cooking timer.
To use the timed cooking, first set the power level by following the instructions given in paragraphs
“7.2.2 Single Cooking Zones” and “7.2.3 Dual Cooking Zones”.
key to enable the functions), press
Now, with the hob NOT locked out (if it is locked out, press the
the symbol .
Between the symbols
and
of the first active cooking zone, a LED light will turn on to indicate that
the minutes to be set will refer to operation of that particular zone.
The automatic operation minutes of the cooking zone can be increased or decreased by using the
and
keys beside
.
After 5 seconds have gone by since the last time it is pressed, the timer will start and the cooking zone
reaches 0.
will operate until the display above the symbol
At this point the cooking zone will automatically turn off.
It is also possible to use the timed cooking function on more than cooking zone at the same time.
key to shift the timer controls over to the next active
Once the timer is set on the first zone, press
zone (the LED light between the symbols
and
of the second active cooking zone will be
activated) and then set the cooking duration as previously described.
When the timed cooking is active on several cooking zones at the same time, the display between the
and
of the cooking zone will alternatively turn on and at the same time the minutes
symbols
display found on the symbol
will show the time remaining for the zone with the LED light on.
7.2.9 Modifying the data set
and
symbols increases or reduces the power
During timed cooking, each single pressure on the
of the cooking zone.
key until the LED light in the cooking
To change the remaining time of a zone, you have to press
zone turns on. Now it will be possible to change the operating time by working with the symbols
and
of the timer.
7.2.10 Residual heat
Each cooking zone is equipped with a residual heat warning device. After any zone is switched off, a
flashing “ ”may appear on the display. This warns that the cooking zone concerned is still very hot.
Cooking can be restarted while the
is flashing; proceed as described in points “7.2.2 / 7.2.3”.
7.2.11 Control circuit board thermal protection
If the cooking zones cause overheating of the internal electronic circuit board, the heat will be switched
and
flash alternately
off automatically. This switches off power to the front zones, and the letters
on the power leds. If the circuit board does not cool down, power to all the cooking zones is switched
off, and the power leds display the text
. Cooking can be resumed once the temperature
has dropped below the safety threshold.
7.2.12 Operator Error
appears on the power display; it will
If the user makes a mistake when using the push-buttons, an
remain there as long as the user continues to press the button being used incorrectly.
7.2.13 Switching off the cooking zones
The cooking zones are switched off when the operational power display indicates 0. The zone will
automatically deactivate 5 seconds after the display shows 0.
If the cooking zones are hot, the blinking residual heat “ ” will appear after they are switched off.
26
Instructions for the user
7.2.14 Switching off
for 1 second; this deactivates all cooking zones even if they are in
To switch the hob off, hold down
use or the lock-out function is active, and the hob will turn off completely.
will start flashing a few seconds after the hob is turned
If the cooking zones have just been used,
off to warn that they are still hot.
7.3 Cooking tips
The table below shows the power values which can be set, with the relative type of food alongside.
Setting may vary depending on the amount of food and personal taste.
KNOB
NUMBER ON
TYPE OF FOOD
SETTING
THE DISPLAY
1
1
To melt butter, chocolate, and the like.
2
2-3
To heat food, keep small amounts of water on the boil, and whip
up sauces with egg yolk or butter.
3
4-5
To heat solid or liquid food, keep small amounts of water on the
boil, thaw deep-frozen food, cook omelettes of 2 or 3 eggs, fruit
and vegetables, and the like.
4
6
To stew meat, fish and vegetables, simmer food, make jams, and
so on.
5
7-8
To roast meat, fish, steaks, and liver; to sauté meat, fish, eggs
and so on.
6
9
To deep-fry potatoes, etc and to quick-boil water.
For best results and energy saving, only use pans suitable for electric cooking:
- The bottom of the pan must be very thick and perfectly flat; before placing on
the cooking hob, make sure that the pan, as well as the cooking hob itself, is
perfectly clean and dry.
- To avoid scratching of the cooking hob, never use cast-iron pans or pans with
a rough bottom.
- To avoid waste of energy, make sure that the diameter of the pan bottom is
the same as that of the circle marked on the hob.
7.4 Holding function “A”
Some models of hob feature a new "standby" function indicated by the appearance of the letter "A"
on the display (which normally indicates the zone power level).
This function allows a lower temperature to be obtained on the ceramic hob surface in the selected
zone, enabling foods that have already been cooked (e.g. soups, meat after slicing, fish, sauces, etc.)
to be kept at the required temperature.
7.4.1 Activating the holding function “A”
key. The display will show the
After switching on the zone with the display showing 0, press the
letter “A”, indicating that this holding function has been activated. Pressing the
key again switches
to power level 9, as is the case on hobs with normal zones. Returning to level 0 and pressing the
key again does not reactivate the “A” function; to activate it, the zone must be switched off and back
on.
The holding function must not be activated on a hotplate that is still “hot” since this could activate one of the
overheating safety mechanisms with which the electronic hob control is equipped.
27
Instructions for the user
8. CLEANING AND MAINTENANCE
Before any intervention, disconnect the power supply of the device.
8.1 Cleaning the ceramic hob
The hob should be regularly cleaned; preferably after every use, once the residual heat warning lights
have gone off.
Smudges from aluminium-bottom pans can be easily cleaned off with a cloth
dampened in vinegar.
Remove any burnt residues after cooking with the scraper provided; rinse with water
and wipe dry with a clean cloth. Regular use of the scraper considerably reduces
the need for chemical detergents for the daily cleaning of the hob.
Never use abrasive or corrosive detergents (e.g. cleaning powders, oven sprays,
spot-removers, wire sponges).
NEVER USE A STEAM JET TO CLEAN THE APPLIANCE.
9. SOMETHING WRONG?
PROBLEM
POSSIBLE CAUSES
The hob doesn’t work
-
The hob is not wired in or switche on at the wall.
There is a power failure
-
Switch on at the wall
Consult cooking tips
-
Temperature is too high or too low
Wrong shelf position
Wrong type of dish
Cooking time is incorrect
-
The hob is dirty
-
-
Food has spilled over
-
Clean the hob once cooking
is finished. Let it cool first.
Use a larger pan
Timed cooking programming error
Check the instructions for
timer
The results of
unsatisfactory
The hob smokes
cooking
are -
The cooking zones do not come on during timed cooking
28
WHAT TO DO?
Check power supply
Instructions for the installer
10. INSTALLATION
10.1 Technical information
Hob type
Electrical connections
HOB RATING
Maximum electrical power
DIMENSIONS OF THE HOB
Width (mm)
Depth (mm)
See rating plate
220-240V~ 50/60Hz / 380-415V 2N∼ 50/60Hz / 380-415V 3N∼ 50/60Hz
Electric
See rating plate
290
510
595
510
720
510
900
510
10.2 The rating plate
Make sure that the voltage and capacity of the power
line conform to the data shown on the plate located
under the casing. Do not remove this plate for any
reason..
MODEL
Serial
N°
10.3 Electrical connection
IT IS OBLIGATORY FOR THE ELECTRICAL SYSTEM TO BE GROUNDED ACCORDING TO THE
METHODS REQUIRED BY SAFETY RULES.
WHEN LINKING UP TO MAINS BY PLUG AND SOCKET, MAKE SURE THAT BOTH ARE
COMPATIBLE AND CONNECT BY MEANS OF A POWER CABLE COMPLYING WITH
APPLICABLE REGULATIONS.
THE SOCKET MUST BE ACCESSIBLE AFTER THE APPLIANCE HAS BEEN BUILT IN.
NEVER UNPLUG BY PULLING ON THE CABLE.
IMMEDIATELY AFTER INSTALLATION CARRY OUT A BRIEF INSPECTION TEST OF THE HOB,
FOLLOWING THE INSTRUCTIONS. IF THE HOB FAILS TO OPERATE, AFTER CHECKING THAT
YOU HAVE CARRIED OUT THE INSTRUCTIONS CORRECTLY, DISCONNECT THE APPLIANCE
FROM THE ELECTRICAL MAINS AND CONTACT YOUR NEAREST SERVICE CENTRE.
NEVER ATTEMPT TO REPAIR THE APPLIANCE.
IF A PLUG AND SOCKET CONNECTION IS BEING USED MAKE SURE THAT THE PLUG AND
SOCKET ARE COMPATIBLE. AVOID USE OF ADAPTERS AND SHUNTS AS THESE COULD
CAUSE OVERHEATING AND RISK OF BURNS.
IF A FIXED CONNECTION IS BEING USED FIT POWER LINE WITH AN OMNIPOLAR CIRCUIT
BREAKER WITH A CONTACT OPENING GAP EQUAL TO OR GREATER THAN 3 MM IN AN
EASILY ACCESSIBLE POSITION IN PROXIMITY TO THE HOB.
29
Instructions for the installer
For operation on 380-415 V 3N∼: use an - H05V2V2-F type five-core
cable (5 x 1,5 mm2).
For operation on 380-415 V 2N∼: use an - H05V2V2-F type four-core
cable (4 x 2,5 mm2).
For operation on 220-240 V 3∼: use an - H05V2V2-F type four-core
cable (4 x 2,5 mm2).
For operation on 220-240 V∼: use an - H05V2V2-F type three-core
cable. (3 x 4 mm2 : hob with 5 cooking zones)
The cable end to be connected to the appliance must be provided with
an earth wire (yellow-green) at least 20 mm longer.
READ THE CONNECTION LAYOUT PLATE UNDERNEATH THE APPLIANCE WITH CARE.
If the appliance you have purchased is not fitted with a mains power lead a power lead
resistant to a temperature of at least 90°C must be used.
Otherwise, the electrical safety of the appliance may be put at risk.
The manufacturer declines all responsibility for damage to persons or things caused by nonobservance of the above prescriptions or by interference with any part of the appliance.
30
Warning: pass the power cable through hole “A” and fit
the cable clamp plate after making the electrical
connection.
To fit the plate, simply use the provided bolts to secure it
under the casing as shown in the figure.
TYPE 1 TERMINAL BOARD
Warning: close the cable clamp after making the
electrical connection. Close the terminal board cover by
twisting it down.
TYPE 2 TERMINAL BOARD
Instructions for the installer
10.4 POSITIONING OF THE HOB
The following operation requires building and/or carpentry work so must be carried out by a competent
tradesman.
Installation can be carried out on various materials such as masonry, metal, solid wood or plastic
laminated wood as long as they are heat resistant (T 90°C).
Create an opening with the dimensions shown in the figure in the top surface of the counter, keeping a
minimum distance of 50 mm from the rear edge.
This appliance can be mounted against walls higher than the work surface on condition that a certain
distance “X” be kept between the appliance and the wall as shown in the figure so as to avoid damage
from overheating.
Make sure there is a minimum of 750 mm between the hob and any shelf that may be installed directly
above them.
10.5 Mounting
Before mounting the device to the unit, lay the provided adhesive sponge onto
the glass surface to separate it from the unit.
After fixing the provided adhesive sponge (B) to the glass, mount the device to
the unit with the mounting brackets (A) provided with the device itself, as
shown in the figure.
When fixing the hob to the cabinet, use only the holes provided, illustrated here.
This appliance must not be built-in above a dishwasher.
Installation of an oven without cooling fan underneath the hob is forbidden.
Pass the power supply cable through the back of the unit, taking care that it does not touch the bottom
casing of the hob or the oven (if any) installed underneath it.
IMPORTANT: when installing the appliance above
a cupboard, a dividing shelf, as shown above,
must be installed.
If installed above an under-bench oven, this is not
required.
Installation of an oven without cooking fan
underneath the hob is forbidden.
31
Instructions for the installer
The diagrams illustrate the cutting sizes and additional shaping required for the installation hole if you
decide to install the hob flush with the work-top surface. The work-top hole and shaping dimensions
are purely guideline; it is essential to refer to your actual ceramic hob before making any cuts.
After you have attached the adhesive strip supplied with the hob to the underside of the glass (A)
position the hob precisely and centrally in the cut out, and mount it with the mounting brackets. Fill any
small gaps between the top of the worktop and the underside of the hob with silicone (B) to create a
waterproof seal. Take care to clean any excess silicone from the surfaces before it sets. If it is
necessary to remove the hob, cut the silicone with a small sharp blade (C) before trying to remove it.
32