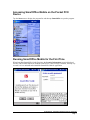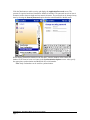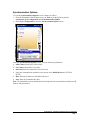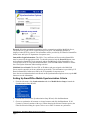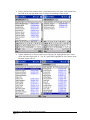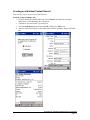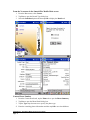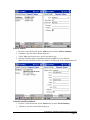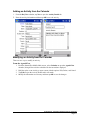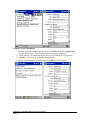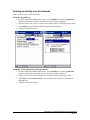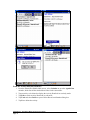
1
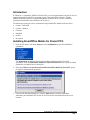
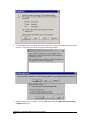
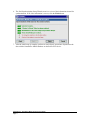
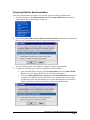
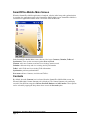
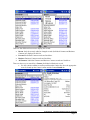
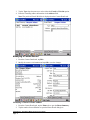
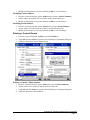
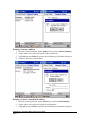
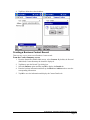
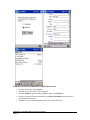
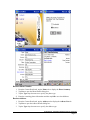
SmartOffice
Mobile for
Pocket PC
User Guide
SmartOffice® – SmartOffice Mobile Pocket PC User Guide
Revised: 8/26/2005
Copyright 1998-2004, E-Z Data, Inc.
All Rights Reserved.
No part of this documentation may be copied, reproduced, or translated in any form
without the prior written consent of E-Z Data, Inc.
All product names are trademarks of their respective manufacturers or organizations.
918 E. Green Street
Pasadena, CA 91106
Web: http://www.ez-data.com
Telephone: (626) 585-3505
Fax: (626) 440-9097
U.S. toll-free fax: (800) 779-3123
Revised: 7/29/2004
SmartOffice® – SmartOffice Mobile Pocket PC User Guide
Revised: 8/26/2005
Table of Contents
Introduction ..................................................................................................................................... 1
Installing SmartOffice Mobile for Pocket PC® .............................................................................. 1
Accessing SmartOffice Mobile on the Pocket PC® Device ........................................................... 3
Running SmartOffice Mobile for the First Time............................................................................. 3
Synchronization Options............................................................................................................. 5
Setting Up SmartOffice Mobile Synchronization Criteria.......................................................... 6
Preparing Data for Synchronization............................................................................................ 9
SmartOffice Mobile Main Screen ................................................................................................. 10
Contacts ......................................................................................................................................... 10
Creating an Individual Contact Record..................................................................................... 13
Modifying a Contact Record................................................................................................. 16
Deleting a Contact Record .................................................................................................... 17
Creating a Business Contact Record ......................................................................................... 19
Modifying a Business Record............................................................................................... 22
Deleting a Business Record .................................................................................................. 22
Calendar......................................................................................................................................... 23
AgendaView ............................................................................................................................. 23
DayView ................................................................................................................................... 23
WeekView................................................................................................................................. 24
MonthView ............................................................................................................................... 24
Adding an Activity from the Calendar...................................................................................... 25
Modifying an Activity from the Calendar................................................................................. 25
Deleting an Activity from the Calendar .................................................................................... 27
ToDo.............................................................................................................................................. 29
Adding a ToDo Item ............................................................................................................. 29
Modifying a ToDo Item........................................................................................................ 30
Deleting a ToDo.................................................................................................................... 31
Activity Log .................................................................................................................................. 33
Adding a Timed Activity from the Activity Log .................................................................. 33
Adding an Non-timed Activity from ToDo .......................................................................... 34
SmartPad ....................................................................................................................................... 34
Policies .......................................................................................................................................... 36
Investments.................................................................................................................................... 37
SmartOffice® – SmartOffice Mobile Pocket PC User Guide
Revised: 8/26/2005
SmartOffice® – SmartOffice Mobile Pocket PC User Guide
Revised: 8/26/2005
Introduction
E-Z Data Inc.’s SmartOffice Mobile for Pocket PC® is a robust application developed for devices
running Microsoft’s Pocket PC® operating system. Using iAnywhere Solutions’ Ultralite
database with MobiLink Server, SmartOffice Mobile for Pocket PC® is used to seamlessly
synchronize SmartOffice data with Pocket PC® devices.
The following record types can be synchronized using SmartOffice Mobile for Pocket PC®:
• Contact – Individual
• Contact – Business
• Calendar
• SmartPad
• Policies
• Investment
Installing SmartOffice Mobile for Pocket PC®
1. From the side menu, click User Setup and select Installations to open the Installations
spreadsheet.
The Installations spreadsheet displays all available installation options. From this
spreadsheet, click the SmartOffice Mobile for Palm and Pocket PC link to open the Install
SmartOffice for Mobile devices dialog box.
2. Select the Click here to download and install SmartOffice Mobile for Pocket PC option
to begin the installation file download.
3. From the File Download dialog box, click the Open button to start the installation.
Alternately, the installation file can also be saved to the PC and installed from the saved
location.
SmartOffice® – SmartOffice Mobile Pocket PC User Guide
Page: 1
4. Click the Yes button to install the SmartOffice application using the default application install
directory. The progress bar shows the application being installed.
5. Once the progress bar is complete, click the OK button from the Application Downloading
Complete dialog box.
SmartOffice® – SmartOffice Mobile Pocket PC User Guide
Page: 2
Accessing SmartOffice Mobile on the Pocket PC®
Device
Tap the Start menu to display the program list and then tap SmartOffice to open the program.
Running SmartOffice Mobile for the First Time
When launching SmartOffice for the first time, the Security Information screen is displayed.
Security can be either enabled or disabled for the device. Once security is enabled, the only way
to remove it is to uninstall and reinstall the SmartOffice Mobile application
SmartOffice® – SmartOffice Mobile Pocket PC User Guide
Page: 3
Click the Yes button to enable security and display the Application Password screen. The
password is required each time SmartOffice Mobile is launched. The password must be at least 6
characters with at least one alpha and one numeric character. The password can be changed at any
time by selecting the Security Password option from the main SmartOffice Mobile menu.
When running SmartOffice Mobile for the first time, enter the database Office Name and
database User Name in lower case letters in the Synchronization Options screen. Also, specify
the appropriate synchronization and MobiLink Server information.
Note: Only one database can be used for synchronization.
SmartOffice® – SmartOffice Mobile Pocket PC User Guide
Page: 4
Synchronization Options
To open the Synchronization Options screen, continue as follows:
1. From the SmartOffice Mobile Main screen, tap Tools to list the following options:
Synchronize Sync Configuration and About SmartOffice Mobile.
2. Select Sync Configuration to open the Synchronization Options screen.
From the Synchronization Options screen, enter the following information:
• Office Name: SmartOffice Office Name
• User Name: SmartOffice User Name
• Password: Enter the SmartOffice User Password
• Select the communication method used to connect to the MobiLink Server (TCP/IP or
HTTP)
• Host: Enter the IP address of the MobiLink Server
• Port: Enter the Communication Port
Note: The SmartOffice System Administrator should provide the communication method, host IP
address, and port number.
SmartOffice® – SmartOffice Mobile Pocket PC User Guide
Page: 5
Protocol: Select the communication protocol used to communicate with the MobiLink Server.
The options are TCP/IP, HTTP, or HTTP using a web server. An additional checkbox is
displayed when HTTP is selected. This information will be provided by E-Z Data for SmartOffice
Online users and by the IT department of corporate users.
SmartOffice Login Information: The Office, User, and Password for accessing SmartOffice
must be entered in the appropriate fields. To enter the password, tap the Password button, enter
and confirm the SmartOffice login password, and tap the OK button. If the SmartOffice One
Card System (eOCS) is being used with SmartOffice, select the eOCS User checkbox to enable
One Card System Outcomes when tracking activities.
MobiLink Server Details: The host URL or IP address and port assigned to the MobiLink
Server must be entered in order to synchronize successfully. This information is provided by E-Z
Data for SmartOffice Online users and by the IT department of corporate users.
Once the correct information has been entered on the Synchronization Options screen, tap the OK
button to save the information.
Setting Up SmartOffice Mobile Synchronization Criteria
1. From the side menu, click Synchronization and select Mobile Device Setup to launch the
Synchronization Setup Wizard.
2. From the first screen of the Synchronization Setup Wizard, click the Next button.
3. Choose to synchronize all contacts or selected contacts and click the Next button. If All
Contacts is selected, continue with step 4. When choosing the Selected Contacts option, the
Filter/Set Selection dialog box opens. Select a set or filter of contacts to synchronize.
SmartOffice® – SmartOffice Mobile Pocket PC User Guide
Page: 6
4. Select a date range of future and past activities for synchronization. Click the OK button to
continue. There are two different ways to download the activities. Select the All option to
download all types of activities or select the Timed option to download only the timed
activities and click the Next button.
5. From the SmartPad Selection screen, set the number of SmartPad entries to synchronize.
Alternately, a range in months or just SmartPad entries manually added as notes can be
synchronized. Click the Next button.
SmartOffice® – SmartOffice Mobile Pocket PC User Guide
Page: 7
6. The final Synchronization Setup Wizard screen is a review of the information selected for
synchronization. If all of the information is correct, click the Finish button.
7. After the initial setup is complete, perform an ActiveSync® operation to Synchronize the
data with the SmartOffice Mobile database on the Pocket PC® device.
SmartOffice® – SmartOffice Mobile Pocket PC User Guide
Page: 8
Preparing Data for Synchronization
After the synchronization criteria have been selected, perform an initial synchronization.
1. From the side menu, click Synchronization and select Update Mobile Device to open the
Update Mobile Device with Changes dialog box.
2. Select the Perform a full refresh of the data from SmartOffice radio button to transfer data
that meets the synchronization criteria to appropriate database tables.
3. Perform Synchronization with the PDA to complete the initial synchronization.
4. Complete the following steps to add new information from SmartOffice:
• From the SmartOffice side menu, click Synchronization and select Update Mobile
Device to open the Update Mobile Device with Changes dialog box.
• Select the Update Mobile Device with new records and modifications radio button
to populate any additions made in SmartOffice to the database table so they will be
synchronized on the next Synchronization. Any data added/modified in SmartOffice
Mobile on the PDA is added to SmartOffice on the next synchronization.
SmartOffice® – SmartOffice Mobile Pocket PC User Guide
Page: 9
SmartOffice Mobile Main Screen
When the SmartOffice Mobile application is launched, after the initial setup and synchronization
is complete, the application opens to the SmartOffice Mobile Main screen. SmartOffice Mobile is
a menu driven application and the menu is accessible from the Main tab.
In the SmartOffice Mobile Main screen, there are four icons: Contacts, Calendar, ToDo and
Synchronize. There are also two menu options New and Tools.
Contacts: add a new Contact record and view existing Contact records
Calendar: add an Activity and view existing Activity information
ToDo’s: add a ToDo and view existing ToDo information
Synchronize: perform synchronization
New menu: add new Contacts, Activities and ToDo’s.
Contacts
By default, when the Contacts icon is selected from the SmartOffice Mobile Main screen, the
Personal (Individual) Contact Summary tab is displayed. The Contact Summary tab can display
records in four different categories: Recent, Personal, Business and All Contacts. These options
can be selected by tapping the drop-down arrow next to the Personal option.
SmartOffice® – SmartOffice Mobile Pocket PC User Guide
Page: 10
There are four different list screens to display the records:
• Recent: Only the recently added or changed records (Individual Contacts and Business
Contacts) are displayed on this list.
• Personal: Individual Contact records are listed here.
• Business: Business Contact records are listed here.
• All Contacts: Individual Contacts and Business Contacts records are listed here.
There are three ways to search for a Contact (Individual or Business) record:
• Use the vertical scrollbar to scroll up and down the Contact list. Once the appropriate
record is found, tap the Contact’s name and the Contact Details tab.
SmartOffice® – SmartOffice Mobile Pocket PC User Guide
Page: 11
•
Enter a portion of the business name or individual contact’s last name in the search field
provided on the top right hand corner to display the matching Contact record.
•
Tap the alphabet tab to find a Contact record. Tapping “ab” highlights the first Contact
whose last name begins with ‘A’. Tap “ab” again and it highlights the first Contact whose
last name begins with ‘B’.
SmartOffice® – SmartOffice Mobile Pocket PC User Guide
Page: 12
Creating an Individual Contact Record
There are two ways to create a new Contact Record:
From the Contact Summary tab
1. From the SmartOffice Mobile Main tab, select Contacts. By default, the Personal
(Individual) Contact Summary tab is displayed.
2. Tap New to open the Record Type dialog box.
3. Select the Individual option and then tap OK to display the Edit screen.
4. Enter the required Individual Contact information and then tap OK to display the Detail
tab.
SmartOffice® – SmartOffice Mobile Pocket PC User Guide
Page: 13
From the New menu in the SmartOffice Mobile Main screen
1. From the New menu, select Contact.
2. Tap New to open the Record Type dialog box.
3. Select the Individual option and then tap OK to display the Details tab.
Contact Phone Number
1. From the Contact Details tab, tap the Phone tab to open the Phone Summary.
2. Tap New to open the Phone Detail dialog box.
3. Tap the Type drop-down arrow to specify the phone type.
4. Enter the remaining phone information and then tap OK to save the additions.
SmartOffice® – SmartOffice Mobile Pocket PC User Guide
Page: 14
Contact Address
1.
2.
3.
4.
From the Contact Details tab, tap the Address tab to open the Address Summary.
Tap New to open the Address Detail dialog box.
Tap the Type drop-down arrow to specify the address type.
Enter the remaining address information and then tap OK to save the additions.
Note: The preferred Phone Number and Address are displayed on the Contact Details tab.
Contact E-mail/Web Address
1. From the Contact Details tab, tap the E-mail tab to open the E-mail Summary.
2. Tap New to open the E-mail Details dialog box.
SmartOffice® – SmartOffice Mobile Pocket PC User Guide
Page: 15
3. Tap the Type drop-down arrow to select either the E-mail or Web Site option.
4. Enter the remaining address information in the Address field.
Note: The preferred E-mail/Web Site is displayed on the Contact Details tab.
Modifying a Contact Record
1. From the Contact Details tab, tap Edit.
2. Modify the contact’s information and tap OK to save the changes.
Modifying a Contact’s Phone Number
1. From the Contact Details tab, tap the Phone tab to open the Phone Summary.
2. Tap the number for modification to open the Phone Detail dialog box.
SmartOffice® – SmartOffice Mobile Pocket PC User Guide
Page: 16
3. Modify the information as necessary and then tap OK to save the changes.
Modifying Contact Address
1. From the Contact Details tab, tap the Address tab to open the Address Summary.
2. Tap the address for modification to open the Address Detail dialog box.
3. Modify the information as necessary and then tap OK to save the changes.
Modifying E-mail Address
1. From the Contact Details tab, tap the E-mail tab to open the E-mail Summary.
2. Tap the address for modification to open the E-mail Detail dialog box.
3. Modify the information as necessary and then tap OK to save the changes.
Deleting a Contact Record
1. From the Contact Details tab, tap Edit to open the Details tab.
2. Tap Tools and select Delete to open the Record Deletion Confirmation dialog box.
3. Tap Yes to delete the selected Contact record.
Deleting a Contact’s Phone Number
1. From the Contact Details tab, tap the Phone tab to open the Phone Summary.
2. Tap the number to be deleted to display the Phone Detail tab.
3. Tap Tools and select Delete to open the Record Deleting Confirmation dialog box.
4. Tap Yes to delete the selected address.
SmartOffice® – SmartOffice Mobile Pocket PC User Guide
Page: 17
Deleting a Contact’s Address
1. From the Contact Details tab, tap the Address tab to open the Address Summary.
2. Tap the address to be deleted to open the Address Detail tab.
3. Tap Tools and select Delete to open the Record Deleting Confirmation dialog box.
4. Tap Yes to delete the selected address.
Deleting a Contact’s E-mail/Web Address
1. From the Contact Details tab, tap the E-mail tab to open the E-mail Summary.
2. Tap the address to be deleted to open the E-mail Detail tab.
3. Tap Tools and select Delete to open the Record Deleting Confirmation dialog box.
SmartOffice® – SmartOffice Mobile Pocket PC User Guide
Page: 18
4. Tap Yes to delete the selected address.
Creating a Business Contact Record
There are two ways to create a new Business Contact record:
From the Contact Summary screen
1. From the SmartOffice Mobile Main screen, select Contacts. By default, the Personal
(Individual) Contact Summary tab should be displayed.
2. Tap New to open the Record Type dialog box.
3. Select the Business option and then tap OK to display the Details tab.
4. Enter the business information and then tap the Phone and Address tabs to enter the
corresponding information.
5. Tap OK to save the information and display the Contact Details tab.
SmartOffice® – SmartOffice Mobile Pocket PC User Guide
Page: 19
From the New menu in SmartOffice Mobile Main screen
1.
2.
3.
4.
From the New menu, select Contact.
Tap New to open the Record Type dialog box.
Select the Business option and then tap OK to display the Details tab.
Enter the business information and then tap the Phone and Address tabs to enter the
corresponding information.
5. Tap OK to save the information and display the Contact Details tab.
SmartOffice® – SmartOffice Mobile Pocket PC User Guide
Page: 20
Business Phone Number
1. From the Contact Details tab, tap the Phone tab to display the Phone Summary.
2. Tap New to open the Phone Details dialog box.
3. Tap the Type drop-down arrow to specify the phone type.
4. Enter the remaining phone information and then tap OK to save the additions.
Business Address
1. From the Contact Details tab, tap the Address tab to display the Address List tab.
2. Tap New to open the Address Details dialog box.
3. Tap the Type drop-down arrow to specify the address type.
SmartOffice® – SmartOffice Mobile Pocket PC User Guide
Page: 21
4. Enter the remaining address information and then tap OK to save the additions.
Note: Both the preferred Phone Number and preferred Address are displayed on the Contact
Details tab of the Contact record.
Business E-mail/Web Address
Adding an e-mail/web address for a Business record is identical to the steps required in adding an
Individual Contact record. Please refer to the Contact E-mail section.
Modifying a Business Record
Modifying a Business record is identical to the steps required in modifying an Individual Contact
record. Please refer to the Modifying a Contact Record section.
Modifying a Business Phone Number
Modifying a Business phone number is identical to the steps required in modifying an Individual
Contact phone number. Please refer to the Modifying a Contact’s Phone Number section.
Modifying a Business Address
1. From the Contact Details tab, tap the Address tab to display the Address Summary.
2. Tap the address for modification to open the Address Details dialog box.
3. Modify the information as necessary and then tap OK to save the changes.
Deleting a Business Record
1. From the Contact Details tab, tap Edit to open the Details tab.
2. Tap Tools and select Delete to display the Record Deletion Confirmation box.
3. Tap Yes to delete the selected Contact record.
Deleting a Business Phone Number
1.
2.
3.
4.
From the Contact Details tab, tap the Phone tab to open the Phone Summary.
Tap the Number to be deleted to open the Phone Detail tab.
Tap Tools and select Delete to display the Record Deleting Confirmation dialog box.
Tap Yes to delete the selected address.
Deleting a Business Address
1. From the Contact Details tab, tap the Address tab to open the Address Summary.
2. Tap the Address to be deleted to open the Address Detail tab.
3. Tap Tools and select Delete to display the Record Deleting Confirmation dialog box.
4. Tap Yes to delete the selected address.
Deleting a Business E-mail/Web Address
1.
2.
3.
4.
From the Contact Details tab, tap the E-mail tab to open the E-mail Summary.
Tap the address to be deleted to open the E-mail Detail tab.
Tap Tools and select Delete to display the Record Deleting Confirmation dialog box.
Tap Yes to delete the selected address.
SmartOffice® – SmartOffice Mobile Pocket PC User Guide
Page: 22
Calendar
The Calendar views are: AgendaView, DayView, WeekView and MonthView.
AgendaView
The AgendaView is used to display a combination of timed and non-timed activities for a
specific day. The AgendaView for a previous or future day is displayed by tapping the left or
right arrows.
DayView
Select Calendar from the SmartOffice Mobile Main screen to open the DayView Calendar. The
DayView is used to display the activities for a specific day. The DayView for a previous or future
days’ activities is displayed by tapping the left or right arrows.
SmartOffice® – SmartOffice Mobile Pocket PC User Guide
Page: 23
WeekView
The WeekView is used to view activities for a specific week. Previous or future weeks’ activities
can be displayed by tapping the left or right arrows.
MonthView
The MonthView is used to display activities for a specific month. The MonthView for previous
or future months’ activities can be displayed by tapping the left or right arrows.
SmartOffice® – SmartOffice Mobile Pocket PC User Guide
Page: 24
Adding an Activity from the Calendar
1. From the DayView calendar, tap New to open the Activity Details tab.
2. Enter the activity information and then tap OK to save the activity.
Modifying an Activity from the Calendar
There are two ways to modify an activity:
From the AgendaView
1. From the SmartOffice Mobile Main screen, select Calendar to open the AgendaView
calendar, listing all the activities scheduled for the current date displayed.
2. Hold the stylus on an Activity to open a menu with the options: Edit, Delete, and Cancel.
3. Tap Edit to open the Activity Details tab in edit mode.
4. Modify the information as necessary and then tap OK to save the changes.
SmartOffice® – SmartOffice Mobile Pocket PC User Guide
Page: 25
From the Activity Details tab
1. From the SmartOffice Mobile Main screen, select Calendar to open the AgendaView
calendar, listing all the activities scheduled for the current date displayed.
2. Tap the Activity to be modified to display the Activity Detail tab in read-only mode.
3. Tap Edit to switch the Activity Details tab to Edit mode.
4. Modify the information as necessary and then tap OK to save the changes.
SmartOffice® – SmartOffice Mobile Pocket PC User Guide
Page: 26
Deleting an Activity from the Calendar
There are three ways to delete an activity:
From the AgendaView
1. From the SmartOffice Mobile Main screen, select Calendar to open the AgendaView
calendar, listing all the activities scheduled for the current date displayed.
2. Hold the stylus on an Activity to open a menu with the options: Edit, Delete and Cancel.
3. Select Delete to open the Delete Record confirmation message box.
4. Tap Yes to delete the activity.
From the Activity Detail tab (read-only mode)
1. From the SmartOffice Mobile Main screen, select Calendar to open the AgendaView
calendar, listing all the scheduled activities for the current date displayed.
2. Tap the activity to be deleted to display the Activity Detail tab in read-only mode.
3. Tap Tools and select Delete Activity to open a Delete Activity Record confirmation
message box.
4. Tap Yes to delete the activity.
SmartOffice® – SmartOffice Mobile Pocket PC User Guide
Page: 27
From the Activity Edit tab (edit mode)
1. From the SmartOffice Mobile Main screen, select Calendar to open the AgendaView
calendar, which lists all the scheduled activities for the current date.
2. Tap an activity to be deleted to display the Activity Detail tab in read-only mode.
3. Tap Edit to switch Activity Details tab to edit mode.
4. Tap Tools and select Delete to open a Delete Record confirmation dialog box.
5. Tap Yes to delete the activity.
SmartOffice® – SmartOffice Mobile Pocket PC User Guide
Page: 28
ToDo
From the SmartOffice Mobile Main screen, select ToDo’s to open the non-timed activities list.
Adding a ToDo Item
1. From the SmartOffice Mobile Main screen, select ToDo’s to open the non-timed
activities list.
2. Tap New to open the Activity Details tab.
3. Enter the non-timed activity information and then tap OK to save the activity.
SmartOffice® – SmartOffice Mobile Pocket PC User Guide
Page: 29
Modifying a ToDo Item
There are two ways to modify a ToDo:
From the ToDo List
1. From the SmartOffice Mobile Main screen, select ToDo’s to open the ToDo List, which
shows all the ToDo’s scheduled for the current date shown.
2. Hold the stylus down on a ToDo to open a menu with Edit, Delete, and Cancel options.
3. Tap Edit to open the Activity Details tab in edit mode.
4. Make the necessary modifications and then tap OK to save the changes.
SmartOffice® – SmartOffice Mobile Pocket PC User Guide
Page: 30
From the Activity Edit tab
1. From the SmartOffice Mobile Main screen, select ToDo’s to open the ToDo List, which
shows all the ToDo’s scheduled for the current date shown.
2. Tap the ToDo to be modified to display the Activity Details tab in read-only mode.
3. Tap Edit to switch the Activity Details tab to edit mode.
4. Make the necessary modifications and then tap OK to save the changes.
Deleting a ToDo
There are two main ways to delete a ToDo:
From the ToDo List tab
1. From the SmartOffice Mobile Main screen, select ToDo’s to open the ToDo List, which
shows all the ToDo’s scheduled for the current date shown.
2. Hold the stylus down on a ToDo to open a menu with Edit, Delete, and Cancel options.
3. Select Delete to open a Delete Record confirmation message.
4. Tap Yes to delete the activity.
SmartOffice® – SmartOffice Mobile Pocket PC User Guide
Page: 31
From the Activity Details tab
1. From the SmartOffice Mobile Main screen, select ToDo’s to open the ToDo List, which
shows all the ToDo’s scheduled for the current date.
2. Tap a ToDo to be deleted, which displays the Activity Details tab in read-only mode.
3. Tap Tools and then select Delete Activity to open a Delete Record confirmation message
box.
4. Tap Yes to delete the activity.
SmartOffice® – SmartOffice Mobile Pocket PC User Guide
Page: 32
Activity Log
The Activity Log is a list of the activities linked to a particular contact that is used to display, add
and modify activities.
Adding a Timed Activity from the Activity Log
Adding an activity from either Calendar or Activity Log is nearly identical. The main difference
is that when adding an activity from the Activity Log, it is linked to a Contact.
1. From the Contact Details tab, tap the Activity Log icon to open the Activity Log tab
listing any existing activities for the selected Contact.
2. Tap New to open the Activity Details tab.
3. Enter the necessary information for the activity and tap OK to see the added activity on
the Activity Log tab.
SmartOffice® – SmartOffice Mobile Pocket PC User Guide
Page: 33
Adding an Non-timed Activity from ToDo
1. From the Contact Details tab, tap the ToDo icon to open the ToDo List tab.
2. Tap New to open the Activity Details tab.
3. Enter the necessary information for the activity and tap OK to see the added activity on
the ToDo List tab.
SmartPad
SmartOffice Mobile is used to view, add, and delete SmartPad records that are synchronized
with the SmartOffice database. Note that only those SmartPad entries that are added with
SmartOffice Mobile for Pocket PC® that are not synchronized with SmartOffice can be modified.
SmartOffice® – SmartOffice Mobile Pocket PC User Guide
Page: 34
Adding a SmartPad Note
1. From the Contact Details tab, tap the SmartPad icon to open the SmartPad Summary
tab listing any existing SmartPad entries for the selected Contact.
2. Tap New to open the SmartPad Detail tab.
3. Enter some notes and tap OK to see the added entry on the SmartPad Summary tab.
Deleting a SmartPad Note
There are two ways to delete SmartPad Notes:
From SmartPad Summary:
1. From the Contact Details tab, tap the SmartPad icon to open the SmartPad Summary
tab listing all the SmartPad entries for the selected Contact.
2. Tap and hold on the SmartPad entry to open a menu with Edit, Delete, and Cancel
options.
3. Select Delete to open the Delete Record confirmation message box.
4. Tap Yes to delete the entry.
From SmartPad Detail screen:
1. From the Contact Details tab, tap the SmartPad icon to open the SmartPad Summary
tab listing all the SmartPad entries for the selected Contact.
2. Tap on the entry to be deleted to open the SmartPad Detail tab.
3. Tap Tools and select Delete to display the Record Deletion Confirmation box.
4. Tap Yes to delete the entry.
SmartOffice® – SmartOffice Mobile Pocket PC User Guide
Page: 35
Policies
SmartOffice Mobile is used to display the Policies, Policy Details, Interested Parties, and
Policy Totals tabs on the PDA. Please note that Policy information displayed here cannot be
added, modified or deleted from the PDA. The information is read-only.
Accessing Policy Information
1. From the Contact Details tab, select the Policy icon to open the Policy Summary tab.
2. Tap the Policy Name to display the Policy Detail tab.
3. Tap Tools and select the Show Interested Parties option to display the Interested
Parties tab.
4. Tap OK twice and then tap Tools to select the Display Totals option to display the
Policy Totals tab.
SmartOffice® – SmartOffice Mobile Pocket PC User Guide
Page: 36
Investments
SmartOffice Mobile can display the Investment Summary, Investment Details, and Investment
Totals tabs on the PDA.
Note: The Investment Details tab is intended to display investments with share and cost
information. The Variable Annuity information is limited due to this restriction. The investment
information is read-only.
Accessing Investment Information
1. From the Contact Details tab, select the Investment icon to open the Investment
Summary tab.
2. Tap the Investment Name to display the Investment Details tab.
SmartOffice® – SmartOffice Mobile Pocket PC User Guide
Page: 37
3. Tap OK and then tap Tools to select the Display Totals option to display the Investment
Totals tab.
SmartOffice® – SmartOffice Mobile Pocket PC User Guide
Page: 38