1
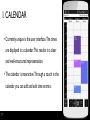
powered by SourceCastle www.sourcecastle.com / [email protected] User Manual Index1/5 I. 2 CALENDAR 1.1 Features calendar view 1.1.1 Categoryview 1.1.2 Stopwatch 1.1.3 New time entry 1.1.4 Monthview 1.1.5 Today 1.1.6 Menu a. Filter b. Days c. Sync d. Help e. Settings 07 08 09 10 11 12 13 14 15 16 17 18 19 Index 2/5 1.2 Calendar context menu 1.2.1 Edit A. Time B. Image C. Location 1.2.2 Delete 1.2.3 Show images 1.2.4 Show way 1.2.5 Speed 1.2.6 Time list 1.2.7 New time entry 3 20 21 22 23 24 25 26 27 28 29 30 Index 3/5 II. CATEGORY 2.1 Features category view 2.1.1 new Uper category 2.1.2 Statistics 2.1.3 Export all 4 31 32 33 34 35 Index 4/5 2.2 Category context menu 2.2.1 Start time tracking 2.2.2 Create sub category 2.2.3 Edit category 2.2.4 Delete category 2.2.5 Show time list 2.2.6 Add time 2.2.7 Export 2.2.8 Break 2.2.8 Info 5 36 37 38 39 40 41 42 43 44 45 Index 5/5 III. WIDGET IV. Others 4.1 Set category as default 4.2 Wifi/Bluetooth connection 4.3 Data import from Free version V. Website 5.1 Sync Setup 5.2 Login 5.3 Create time entries TripTracker – brother of myTime 6 46 47 48 49 50 51 52 53 54 55 I. CALENDAR • Currently unique is the user interface. The times are displayed in a calendar. This results in a clear and well-structured representation. • The calendar is interactive. Through a touch in the calendar you can add and edit time entries. 7 1.1 Features calendar view 1.1.1 Category view 1.1.2 Stopwatch 1.1.3 New time entry 1.1.4 Monthview 1.1.5 Today 1.1.6 Menu 8 1.1.1 Category view Category view – Change from calendar view to category view • Another way to open the category view is by swiping from the left to the right • Here you can add new categories, add time entries, have a look at statistics, export time entries etc. 9 1.1.2 Stopwatch Stopwatch – Start-, and Stopbutton • The stopwatch does not only facilitate the recording of live entries, it also allows the recording of distances. Later in the calendar context-menu you can use "speed" and “show way“. • First of all choose a category where you want myTime to save the entry • Do you set a category as default, the time entry will be saved there • Do you tick „Record distance“, you can choose a GPS-Profil 10 1.1.3 Create New Create new – create a new time entry. • This feature is useful in order to subsequently create time entries. After pressing the button the Time Entry menu opens. • You can also touch in the calendar to add a time entry subsequently. 11 1.1.4 Month view Month view – gives you an overview of spent hours per month • Here you can see your spent hours for every week • By touching a day you can add a new time entry, switch to day view and show time list. • To go back to calendar view use „days“ • You can also filter categories to see only spent hours from a specific category. Therefore open and choose 12 1.1.5 Today Today – the Today button helps to quickly find the present day. • The Today button helps to return to the present day. 13 1.1.6 Menu Menu – opens calendar menu Menü – öffnet das Kalendermenü a. b. c. d. e. 14 Filter Days Sync Help Settings a. Filter Filter – show only time entries of selected Filter – nur Zeiteinträge von ausgewählten categories. Kategorien anzeigen lassen. Sie können • You canKategorien cross categories out und for sie making them „durchstreichen“ so für den invisibleKalender for theunsichtbar calendar. In this way you can, machen. Auf diese Weise for example, separate private from professional können or Sie beispielsweise private vontime and time entries, entries of working beruflichen break times. ThisZeiteinträgen filter onlytrennen filters oder the entries in Arbeitszeiteinträge Pauseneinträgen. Dieser the calendar, NOT thevon entries in the category filtert nurfiltering die Einträge im Kalender, view. ToFilter make the undone you NICHT open the die Einträge in der Kategorieansicht. Um die filter again and touch them. Filterung zu machen öffnen den • This filter alsorückgängig filters categories in theSiemonth Filter erneutelse! und berühren Sie die view. Nowhere „durchgestrichenen“ Einträge um sie wieder frei zu schalten. 15 b. Day view Day view – shows the selected days. • In settings you can choose between a one, three, five or seven day view. • Each additional click on this button, rises the number of days that are displayed. Once you have selected, for example, a 5 day view in the settings and tap on "day," so there will be shown 7 days now. Tap once again on "day" and one day will be displayed. • If you are in Month view, you go through this button again in the calendar view. 16 3 day view c. Sync Sync – enables the transmission of times on the specially programmed website. • On this website, the time entries can be edited, altered.You can also add new time entries. With sync you can resynchronize the website with your mobile devices. 1. www.atimetracker.com Login 2. Login with your Google Account, Facebook Account or create a new one. 3. Let‘s start. Use your PC to create time entries 17 d. Help • The menu item "Help" will show you the version that you have installed on your device • You will also find a link to the PRO version • PRO-Version includes • use myTime without advertisement • use bluetooth and Wifi to make automatic time entries 18 e. Settings Settings • • • • • • • • • • • 19 Fullscreen Show stopwatch on start Days to show Round touched times Calendar size Color theme Define weekstart Automatic location detection GPS Profile Backup and restore your data Sync Setup Context menu calendar 1.2. Time Entry Menu 1.2.1 Edit A. Time B. Image C. Location 1.2.2 Delete 1.2.3 Show images 1.2.4 Show way 1.2.5 Speed 1.2.6 Time list 1.2.7 New time entry By touching any time entry in the calendar the category context menu opens. To show time list and to make new time entries touch on an empty field in the calendar. 20 Trough a touch on a time entry or in the calendar the menu opens. 1.2.1 Edit Edit – opens time menu A. TIME B. IMAGE C. LOCATION The main function of myTime is of course the recording of times. Whenever a time entry is made, the Time menu opens. Here you can not only enter times, but also add photos and locations. 21 A. Time TIME – In the category "TIME“ you can change start and end times, descriptions, and the allocation to a category. • If you want to add a new category you can do this by touching . Afterwards you can touch the white field or select “add new category”. 22 B. Image Image – a unique feature provides the integration of the camera. • With their help, you can add a photo to your time entry • If you made a picture this window will show it. You can also delete and send it here. 23 C. Location Location – the third function of the time menu allows you to track locations by using GPS. • Alternatively, you can also manually enter an address. • If a path is registered, it is displayed here. With “show map” you can look at the route in more detail. In addition, the distance of the travel distance is calculated and displayed. 24 1.2.2 Delete Delete – delete a time entry • Have you synchronized your records, you can load the last 5 backups. • For this you have to • • • • 25 open the Calendar menu Then select "Settings" and the menu item "Backup and Restore“ Choose “restore” and the right backup data to import it 1.2.3 Show images Show images – You made a number of pictures by using the stopwatch? Then you can view or send them here. • To make a series of images open the stopwatch, press Start and create multiple photos. • To add a time entry one picture open context menu (by touch on the time entry), select "Edit" and then the category "PICTURE". 26 1.2.4 Show way Show way – with the stopwatch you have the ability to “record distances". When this feature is selected, “show way” can show you the recorded distance. • To open the map touch the time entry (= opening category context menu) and choose “show way” • Alternatively, you can record a route by using the widget. 27 1.2.5 Speed Speed – the stopwatch offers the ability “track location". • When this function is selected, the speed can be tracked here. • Among other things, it is calculated how fast you go on average. • In addition, the path can be accessed here again. For this use "Map". 28 1.2.6 Time list Time list – shows you all time entries of a day. • To open time list touch in an empty field of the calendar and choose „time list“ • In the monthview you have also the possibility to touch on a day to open the time list. • Or touch a category to open the time list 29 1.2.7 Create New Create new – create a new time entry. • This feature is useful in order to subsequently create time entries. After pressing the button the Time Entry menu opens. • You can also touch in the calendar to add a time entry subsequently. 30 II. CATEGORY • myTime allows you to assign each time entry to a category. These categories can be set up individually. • For example, time entries can be assigned to projects, group activities, travel times or customers. • You decide for yourself how you would like to structure and name the categories. 31 2.1 Features category view 2.1.1 New upper category 2.1.2 Statistics 2.1.3 Export all time entries 32 2.1.1 New upper category Add– create new top-level categories. • Alternatively, touch in the white area to create a new top category. • To add subcategories, click on the desired category and use “create sub category”. • Of course you can add one or more sub categories to sub categories. • Change to "trigger" to add Wifi / Bluetooth device. It automatically starts a time entry once you have selected the Wifi / Bluetooth function. 33 2.1.2 Statistics Statistics – time entries are displayed in a pie and bar chart. • Here you can see in which proportion the time entries stand to each other, how many hours you have spent on each category and how much money you have earned thereby. • Use “Filter” to display only certain categories. This filter applies only to the statistics and has no influence on the Category view or Calendar view 34 2.1.3 Export Export – By using this button you can export the categories you want for a desired period. • The data will then be sent as a EXCEL, HTML and PDF file. Later you can edit the time entries in Excel. • Do you want to export only time entries from ONE category, open the category context menu (by touching on the desired category) and choose "Export". 35 Category context menu 2.2 Category context menu 2.2.1 Start time tracking 2.2.2 Create sub category 2.2.3 Edit category 2.2.4 Delete category 2.2.5 Show time list 2.2.6 Add time 2.2.7 Export 2.2.8 Info The category context menu can be opened by touching on any category. 36 Open the menu by touching on a category 2.2.1 Start/Stop time tracking Start time tracking – Start time tracking allows you to start at any time a live time entry directly to a category. This time entry is equal to the desired category. • To stop the time entry you can either use the stop button of the widget / stopwatch or re-open the Category menu and select "stop time tracking". Stop time tracking – Stop time tracking allows you to stop the time entry at any time. 37 2.2.2 Create sub category Create sub category – Create sub-category allows you to add one or more subcategories to a top category. • You can of course also add subcategories to a subcategory. 38 2.2.3 Edit category Edit category – here the title of the category, the description, the hourly rate and the color can be changed. • You can also set the category as default. All time entries are then stored in this category. This is very useful if you want to make time entries quickly by using the widget. • Change to "trigger" to add Wifi / Bluetooth device. It automatically starts a time entry once you have selected the Wifi / Bluetooth function. 39 2.2.4 Delete category Delete Category – here you can delete a category and it‘s subcategories. • Warning! If you delete an upper category all subcategories will be deleted as well. 40 2.2.5 Show time list Show time list – shows a list of all the times that were created to a category. • In addition, you can see how many hours you have spent on this category and how much money you have earned. • Here you have the possibility to: • Edit and delete time entries by touching the time entry • Add new time entries 41 2.2.6 Add time Add time – Add time allows you directly add a time entry to a category. • To create this new time entry the already known time menu appears. 42 2.2.7 Export Export – export all time entries in this category for a specific period. • The time entries will be sent as CSV, HTML and PDF file and can be edited in Excel. This is a good option for those who need their times in a table or list form • To export all time entries use the Export icon in the category view 43 2.2.8 Break Break – interrupt time entries automatically without finishing the time entry. • First time entry, then the break: Did you create a time entry and want to add a pause retrospectively, open the pause menu and select a time period. To see the break switch to the calendar view, touch on the time entry to account for the break, click edit and in the time menu OK. The time entry has now been divided by the defined break into two parts. • First, the break then the time entry: If you have defined the pause before the time entry, so you can easily create a time entry. By stopping your time entry click OK in the time menu. Then you will be asked whether the breaks should be inserted or not. Reply with Yes if you want to insert the predefined break. 44 2.2.9 Info Info – shows you the spent hours for the selectetd category. • You can move monthly forward and backward for a better comparison. • In addition, you can see if you still have hours available or whether the planned hours have been exceeded. 45 III. WIDGET • Open the widget menu on your device and search for myTime • Tap on the widget and place it on your home screen. Adjust the size as desired, and let’s start. • The widget will allow you to easily and quickly create time entries without opening the App. • It shows you the duration of the time entry • You can also select a category and track distances 46 IV. Others 4.1 Set a category as default 4.2 Wifi/Bluetooth connection 4.3 Data import from Free-Version 47 4.1 Set a category as default You want to set a category as default? • Open the App • Go to category view • Touch on a category and choose edit category • Tick the box „make default“ • If you add a time entry this category myTime will choose this category automatically 48 4.2 Wifi/Bluetooth hinzufügen • You want to start time entries automatically as soon as you device connects to a Wifi / Bluetooth device? • The following steps are necessary: 1. Open myTime 2. Change to Category View 3. Create a new upper or lower category or edit an existing category (by touching on this) 4. Go to "trigger" 5. Select a Wifi or Bluetooth device 49 4.3 Data import from FreeVersion • Do you want to transfer your records from the free version in the Pro version? • Proceed as follows: • 1. Open the Free version • Switch to the settings and "Select Backup and Restore“ • select backup • Remember where the file will be saved • 2. Open the PRO version • Switch to the settings and select "Backup and Restore“ • select restore • Select the backup file 50 V. WEBSITE You can add time entries also on the PC and sync them with your mobile devices. www.atimetracker.com 5.1 Sync Setup 5.2 Login 5.3 Create time entries 51 5.1 Sync Setup • Open myTime on your mobile device. • Open settings and choose „Sync Setup“. • Here you can change the e-mail address for the sync. • If you change your e-mail-address all your time entries get lost • With this e-mail-address you can login at the website 52 5.2 Login • To create or edit time entries on the PC go to http://www.atimetracker.com • Sign in using your Google, Facebook account or create a new account. • Important: Make a note of which e-mail address you are using, so that you can synchronize your data. You can also change the email address in the settings. If you do so, your time entries will be lost. 53 5.3 Create time entries • On the left all categories ar listed • click a category to edit, delete it or to show time list • To add a new category use the + button • With Drag & Drop you can take a category and pull it into the calendar • Click a time entry to edit or delete it • Or use the mouse to shift it 54 Brother TripTracker • You have to travel a lot and need a logbook? • With TripTracker you can easily and fast create trips and send them as PDF documents • more informations here: www.atriptracker.com • Download TripTracker here: https://play.google.com/store/apps/details?id=com.so urcecastle.freelogbook 55 Contact • Are there any questions, suggestions, wishes left? • Tel.: 0660/5756039 • E-Mail: [email protected] • Homepage: www.sourcecastle.com • Homepage: www.atimetracker.com We are looking forward to your message your SourceCastle-Team 56