1
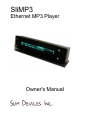
SliMP3
Ethernet MP3 Player
Owner's Manual
Table of Contents
Introduction
Quick Start Guide
Setting up the IP addresses
Using the SliMP3's interface
Remote control quick reference
Remote control details
Troubleshooting guide
3
4
6
7
11
11
14
2
Introduction
Thank you for purchasing the SliMP3 Ethernet MP3 Player!
This owner’s manual includes setup and basic operating instructions for your player. Since we’re
continually adding new software features, some of the more advanced capabilities of the SliMP3
player will not be covered here. At our web site, http://www.slimdevices.com/ , you can find additional
information about the latest SliMP3 features, as well as detailed documentation for developers.
The SliMP3 software is the result of the efforts of software developers around the world, working
together in an open forum. We would like to sincerely thank the following individuals who have helped
to create the SliMP3:
Dean Blackketter
Mark Langston
Scott McIntyre
Richard Smith
Daniel Sully
Amos Hayes
Eric Lyons
Robert Moser
John Tamplin
If you need help installing the SliMP3, please fell free to contact us at [email protected].
We hope you enjoy our product. If you like it, please tell a friend about it!
3
Quickstart Guide
If you already have an Ethernet LAN and a machine to use as the server, setting up the SliMP3 will
take you just a few minutes, and all you will need is this quick start guide - each step is boldfaced,
followed by a brief explanation.
Setting up the player
Connect the Ethernet port to your hub using a standard RJ45 patch cord
Connect the player your Ethernet hub or switch using the included CAT5 patch cord. If you are
connecting it directly to the Ethernet card in your server machine, use a crossover cable.
Connect the player's RCA outputs to the inputs on your receiver
The player has a pair of standard, line level, RCA audio output jacks - connect these to the inputs on
your amplifier, receiver, or powered speakers.
Configure the IR remote: press "S, DVD, 0, 0, 7, ENT, DVD"
A Sony RM-V201 universal remote is supplied with the SliMP3. In addition to controlling the SliMP3,
this remote may be used to operate other A/V components.
The SliMP3 uses the IR codes for a JVC brand DVD player - we chose to use the JVC codes
because we wanted to use an off-the-shelf universal remote, and so we chose a brand of DVD player
that was standard enough to be supported by the remote, but not so common that it would be likely to
conflict with your existing stereo equipment.
See the instruction manual that comes with the remote for more information on its additional features.
Connect the power supply
The SliMP3 comes with a 5V, 1600ma switching power supply. Please be careful to use ONLY this
power supply - connecting a different power supply may damage the player, and such damage is not
covered by warranty.
The player can be left plugged in at all times. When not in use, it enters a "standby" mode, powering
down the display and drawing only a few milliamps.
Enter the IP address information
When the player is first powered up, it asks you if you want to configure it. If your network supports
DHCP, the player can configure itself completely automatically. Otherwise, you can manually enter
static IP addresses. Use the UP/DOWN buttons to choose either DHCP or static, and then press
RIGHT.
4
To enter the static IP addresses, use the UP/DOWN buttons to edit each digit, and LEFT/RIGHT to
go to the next digit, then press OK to complete each entry. Zero out the beginning of each number to
make it three digits - eg "10.5.35.164" would be entered as "010.005.035.164"
Testing your LAN setup
ping the player from your server
On your server, type:
ping your.players.ip.address
If your IP addresses are set up correctly, the player will respond to the pings, and display a message
indicating where it received the ping from.
Installing the server
Download the latest version of the server software from http://www.slimdevices.com . The software
includes installation instructions for Windows, Unix, and MacOSX.
Start the server software
To start the server, run server.pl. Unix users may wish to add the server to their startup script so it
runs automatically. Windows users can find instructions in the README.INSTALL file for how to run
the server as a background service.
To configure the server, type the following URL into your web browser: "http://127.0.0.1:9000". This
will bring up the SliMP3 web interface. Click on the "Server settings" link. On this page, you can
choose your language and set the location of your MP3 files on the hard disk. Once these settings
are made, the server will spend a few minutes scanning your mp3 files and building its index.
That's it!
5
Configuring the IP addresses
Setting up the SliMP3 for your network is much the same as setting up any other kind of computer.
You will need to know the following information:
Does your network support DHCP? If so, then there is no configuration necessary. The SliMP3 will
automatically obtain its IP address and locate your server PC on the network.
If your network does not have DHCP, then you will need to configure the player using static IP
addresses. You will need know the IP address of your computer, and you will need one available IP
address to assign to the SliMP3.
The Setup menu
When the SliMP3 is first powered up, it will ask you if you want to change the network settings.
Use the up and down buttons to select an option. You can choose either to go to the setup menu, or
to skip setup and use the previous settings. Press down once to choose "Yes, go to setup menu", and
then press right.
There are three choices here:
•
•
•
Completely automatic - This is the easiest choice for most networks. The SliMP3 will obtain its IP
address using DHCP and will locate the server automatically using Slim Discovery Protocol.
Specify server manually - DHCP will be used, but the server's IP address will be entered
manually. Use this if your server is not on the same LAN as the player.
Enter everything manually - Static IPs will be used for everything. Choose this option if your
network does not support DHCP.
Using DHCP
To use DHCP, simply choose "Completely automatic", then press right. The player will ask you to
confirm your choice. Press right again to acknowledge. That's it. The player will take a second or two
to locate your DHCP server, and then you will be connected.
Using static IP addresses
To configure the player using static IP addresses, choose "Enter everything manually". This will take
you to a series of four screens, where you can enter the IP address of the player, your netmask, your
router's address, and the IP address of your server. To enter the addresses, use the left and right
6
buttons to select the digit to edit, and up/down to change that digit. Press "ok" to go the next screen
(the 'ok' button is just below and to the right of the arrow buttons).
When you've finished entering all off the addresses, you will see the following message. At this point,
you can either press left to go back and review your changes, or press right to save the changes and
exit the setup menu.
Using the SliMP3’s Interface
The SliMP3's remote control interface uses a system of menus which are navigated using the
remote's cursor keys. There are four ways to locate songs in your music library
• Browse music exactly as it's organized on the hard disk (Music Library)
• Browse index trees built from the ID3 information (Genres, Artists, and Albums)
• Browse through the playlists that you have saved using the web interface.
• Search for songs, artists, or albums
Using this interface, songs, playlists, and directories can be quickly located and added to the current
playlist.
The top level - SliMP3 Home
The SliMP3's main menu is the starting point for browsing music, searching, and editing the current
playlist. You can get back to SliMP3 Home at any time by pressing "menu". the SliMP3 Home menu
looks like this:
the top line of the display always tells you where you are, and the bottom line indicates the item which
is currently selected. So in the example above, we are at the SliMP3 Home menu, and Music Library
is the option selected. Pressing right" would take us into the Music Library browser. Pressing up/down
cycles through the other choices: Genres, Artists, Albums, Search, and Playlist.
7
Browsing the music trees
Pressing right to enter the Music Library will bring up a list of all the items at the top level of the hard
disk heirarchy.
This is saying that we're at the top level of the Music Library, there are ten items here, and the one
currenty selected is "Punk". The arrow in the bottom right corner indicates that this is a directory
which we can enter. Pressing "down" will scroll to the next item in this folder, for example:
Pressing down again to go to the next item:
Pressing right will take us into the "Rock" folder, like so:
Now you're in the Rock folder. There are 33 different folders inside the Rock folder. You could press
up/down to scroll through the artists, or press "right" to choose "Led Zeppelin". If you want to scroll
really fast, you can hold down the button.
Now we're two folders deep, so it shows "Rock/Led Zeppelin". Now you could press up or down to
scroll through the Led Zeppelin albums:
Press right to enter "Houses of the Holy"
Track 6 is selected. When you leave a folder and then come back, it remembers where you were last
time - so this is what track we are on the last time we listened to "Houses of the Holy". Press up a few
times to choose track 3:
8
Now press play, and this track will begin to play. Even as a track is playing, you can continue to
browse around in other folders.
Adding files and directories to the current playlist
The SliMP3 maintains a "current playlist" at all times. Individual tracks, entire albums, even large
directory trees can be added to the playlist. There a two ways to add a items to the playlist. You can
press "play", which will clear out the current queue and play the selected item(s), or you can press
"rec" to append the selected item(s) to the current playlist. For example, suppose we wanted to
create a playlist of all the songs by Sublime. Start at the SliMP3 Home menu, then scroll down to
"Artists", and press "right":
Then press and hold the "down" button until you get to "Sublime":
At this point, you could either press right to browse albums and tracks by Sublime, or you could press
"play" to create a playlist of all the Sublime tracks. To append all of the Sublime tracks to the current
queue, press "rec". The display will briefly display the following:
Then it will go back to the browsing mode, allowing you to add more items to the playlist.
Viewing and editing the playlist
To access the current playlist, choose "Playlist" from the SliMP3 Home menu, or simply press "PIP" at
any time.
This is showing that there are 125 items currently in the playlist, and the one playing at the moment is
the eighth one, "Rivers of Babylon". Pressing "up" and "down" will scroll through the items in the list,
and pressing "rec" will remove an item. To exit the playlist view, press "left".
9
Viewing additional information about a track
From either the playlist view or the browser, you can view additional infromation about an item by
pressing "right" when the item is selected.
Press up/down to view addition information about the track:
and so on...
Searching
The SliMP3 provides an advanced search mechanism to help you locate songs in large collections.
you can search by song title, by artist, or by album. To access the search feature, choose "Search"
from the top level menu, and then select one of "Songs", "Artists", or "Albums". For example:
Use the cursor keys to enter letters.
Press right when finished.
From here, you can browse and select songs just as if you were in a directory.
10
11
Remote Control Details
Configuration
To configure the remote for use with your SliMP3 press "S, DVD, 0, 0, 7, ENT, DVD" You can also
configure the remote to adjust the SliMP3 volume. To configure the remote to adjust the SliMP3
volume press "S, TV, 0, 2, 8, ENT, DVD, S, TV, VOL+, ENT".
Layout
POWER - Press POWER to turn off the SliMP3 player (stopping music and dimming display. Press
again to turn on. While the SliMP3 is in standby mode, you can use CH+/CH- to adjust the brightness
of the alarm clock display, down as far as completely dark.
PIP - Press PIP to view the current song playing in the playlist. Use UP and DOWN to scroll through
the song list. Press PIP again to switch between display of number of minutes and seconds into the
current song, number of minutes and seconds remaining in a song, a bar graph of progress through
the song, or a combination of time and progress.
REW - Press REW to start the currently playing song again. Press REW again immediately to skip to
the previous song.
PLAY - Press PLAY to play the currently displayed item. If the currently displayed item is a directory,
play all songs in that directory recursively. If the currently displayed item is a song that song. If the
currently displayed item is a playlist file, play all songs within that playlist.
FFWD - Press FFWD to skip to the next song.
RECORD - Press RECORD to add the currently displayed item to the list of songs to play. If the
currently displayed item is a directory, add all songs in that directory recursively. If the currently
displayed item is a song, add that song only. If the currently displayed item is a playlist file, play all
songs within that playlist.
STOP - Press STOP to stop playing all songs and clear the current playlist.
PAUSE - Press PAUSE to pause the currently playing song. Press PAUSE again to continue. Press
PLAY to start the currently playing song again.
DISP - Press DISP to toggle between displaying the standard sized characters and extra-large
characters on the display.
UP, DOWN, LEFT, RIGHT - Use these buttons to navigate within the music library. UP displays the
previous item in a directory, DOWN the next item. Press LEFT to go up one level in the directory
structure. Press RIGHT when displaying a directory or playlist file to view the items in that directory or
playlist. Press RIGHT when viewing a song to display additional information about that song.
MENU - Jump to the top level 'SliMP3 Home' directory.
12
OK - Press OK to shuffle the current playlist. Press OK again to put the songs back in the original
order. Each time you shuffle the playlist the order is different.
VOL+, VOL- - Increase or decrease the volume. The remote needs to be configured to send volume
commands to the SliMP3, instead of to a Sony TV, as it is by default. To program the remote to
control the SliMP3's volume, first press the following sequence: "S TV 0 2 8 ENT". Then, to make the
volume also work when in DVD (SliMP3) mode, press "DVD S TV VOL+ ENT".
CH+, CH- - Press CH+ to brighten the display. Press CH- to dim the display.
RECALL - Press RECALL to stop at the end of the currently selected song list. Press RECALL again
to repeat the current list of songs when the end is reached.
SLEEP - Not used (yet)
GUIDE - Not used (yet)
MUTING - Press MUTE to mute the audio on the player. Press MUTE again to return the previous
volume level.
0-9 - Press a number button to jump within a list instead of using the up/down buttons. In lists with
fewer than 10 items, press the number of the item you wish to jump to. Lists that have more than 10
items, use the numbers to jump to the first item that starts with the corresponding letter on a
telephone keypad. Press again to jump to the next letter on the telephone keypad. You can also use
the number buttons to enter text for searching in a fashion similar to entering text with a cell phone.
ENTER - Not used (yet)
TV/VIDEO - Not used. (The Sony Remote doesn't send anything when this key is pressed while it's
using the JVC DVD settings.)
Additional Information
In addition to controlling the SliMP3, this remote may be used to operate the volume controls on your
receiver, or any other equipment you may have. See the instruction manual that comes with the
remote for more information on its additional features.
13
Troubleshooting Guide
I'm having trouble starting the server software under Unix
Your version of Perl may be too old. Type "perl -v" to find out what you have. The SliMP3 requires at
least V5.6.0. This version comes pre-installed in MacOS X and nearly all recent Linux distributions.
If you get errors on a UNIX system about "Time::HiRes", it may be because you are running the
software on an unsupported architecture. This module is included with the SliMP3 software for
FreeBSD, Linux (X86 and PPC), MacOSX, and several other architectures, but may need to be
installed separately on other systems. The Time::HiRes software can be obtained from
ftp://ftp.cpan.com
In MacOSX, how do I figure out the path to my music files?
MacOSX uses a Unix-like file system. Your MP3 files are probably located in
“/users/YourLogin/Music” or “/users/YourLogin/Documents/Itunes/Itunes Music”
The IR remote is not responding, or is functioning erratically
Make sure the remote is in the correct mode - press the "DVD" button
Make sure is it programmed correctly. Press "S", "DVD", "0", "0", "7", "Ent"
Leave the batteries out for a few minutes, and then install fresh batteries.
Make sure the SliMP3 is not located near another source of IR light, such as an optical mouse
The volume is too high or too low
The SliMP3 is capable of slightly higher volume levels than most consumer audio gear, and may
cause "clipping" with some receivers. If you notice clipping, you may wish to reduce the SliMP3's
volume level. If the volume is too low even at the maximum setting, or if it varies between tracks, try
using your encoder's "normalize" setting to ensure that all your tracks use the full range.
The player doesn't get past "Looking for DHCP server..."
Check all your network connections, and make sure that the DHCP server is running. Try a different
Ethernet cable, even if the hub indicates a good link.
The player doesn't get past "Looking for SliMP3 server..."
Ensure that the SliMP3 server software is running, and that you can access it using a web browser.
If you have a Linksys brand DHCP server, try using static IP addresses instead of DHCP. There is a
known problem with certain models of Linksys home gateway defvices, which will be addressed in
firmware version 1.3.
How do I get back to the player's IP address configuration menu?
To return to the initial setup menu, reset the player by removing and then reinserting the power cable.
I'm seeing messages in the server's console window, but the server seems to be running fine.
14
Any such messages may be safely ignored – they’re just for debugging.
Some parts of the web interface are not showing up correctly
The SliMP3's web interface is available in several different "skins". Some skins use Javascript, Java,
CSS, or other other elements which may not be available in all browsers. The "SliMP3's Default look"
skin is very simple, and should render correctly in all web browsers. To change the skin, open the
web interface and click "Server Settings".
The web interface won't come up, even though the SliMP3 player is working.
Try using the following URL: "http://127.0.0.1:9000". Be sure to type the "http://" part, as some
versions of Internet Explorer require it when accessing a URL by IP address.
The web interface is working, but the player isn’t able to communicate with the server.
Make sure that your Ethernet hub or switch supports 10Mbps connections (most do). Also try a
different cable.
Whom may I contact for help?
You may email [email protected] or call us at 408.255.0299.
15
Slim Devices Inc.
7246 Sharon Drive, Suite S
San Jose, California 95129
http://www.slimdevices.com
16