1
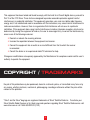
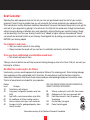
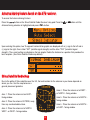
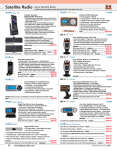
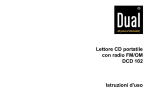
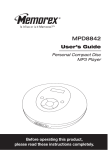
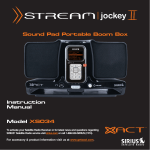
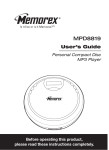
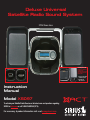
Deluxe Universal
Satellite Radio Sound System
XTR8 Shown Here
Rotating Console
CD player and AM/FM
radio on side Satellite radio receiver
and remote control on
the flip side!
> CD Player with CDRW
and MP3 Playback
> AM/FM Radio
with 10 Presets
Instruction
Manual
Model XS097
To activate your Satellite Radio Receiver or for latest news and questions regarding
SIRIUS at sirius.com or call 1-888-539-SIRIUS (7474).
For accessory & product information visit us at www.getxact.com.
This equipment has been tested and found to comply with the limits for a Class B digital device, pursuant to
Part 15 of the FCC Rules. These limits are designed to provide reasonable protection against harmful
interference in a residential installation. This equipment generates, uses, and can radiate radio frequency
energy and, if not installed and used in accordance with the instructions, may cause harmful interference to
radio communications. However, there is no guarantee that interference will not occur in a particular
installation. If this equipment does cause harmful interference to radio or television reception, which can be
determined by turning the equipment off and on, the user is encouraged to try to correct the interference by
one or more of the following measures:
• Reorient or relocate the receiving antenna.
• Increase the separation between the equipment and receiver.
• Connect the equipment into an outlet on a circuit different from that to which the receiver
is connected.
• Consult the dealer or an experienced radio/TV technician for help.
Changes or modifications not expressly approved by the Manufacturer for compliance could void the user’s
authority to operate the equipment.
COPYRIGHT / TRADEMARKS
No part of this publication may be reproduced, stored in a retrieval system, or transmitted in any form or by
any means, whether electronic, mechanical, photocopying, recording or otherwise without the prior written
consent of the publisher.
"Sirius" and the Sirius® dog logo are registered trademarks of Sirius® Satellite Radio Inc. To activate your
Sirius Satellite Radio Receiver or for latest news and questions regarding Sirius® Satellite Radio service visit
www.sirius.com or call 1-888-539-SIRIUS (7474).
2
SAFETY PRECAUTIONS
Cautions and Warnings
Follow these warnings and safety considerations, serious accidents and/or personal injury can be avoided:
1. Within the home, do not install the Deluxe Universal Satellite Radio Sound System in a position that
obstructs viewing of any home entertainment components, such as a television, stereo system, or its
indicators and displays.
2. Do not install or use the Deluxe Universal Satellite Radio Sound System in locations exposed to direct
sunlight, or in areas subject to extreme temperatures. Do not operate the unit in damp areas, rain, or in
areas adjacent to water such as pools, hot tubs, etc.
3. When outdoors position the Deluxe Universal Satellite Radio Sound System and antenna where there are
no obvious satellite signal obstructions such as high terrain, trees, overhangs, etc.
4. When installed indoors unplug the AC Power Adapter from the wall outlet when the Deluxe Universal
Satellite Radio Sound System is not to be used for an extended period of time. If batteries are installed, set
the Power On/Off- VOL control to the Off position to prevent unintentional battery discharge, or remove the
batteries.
5. To avoid possible damage to the Deluxe Universal Satellite Radio Sound System caused by battery
leakage, it is recommended that the batteries be removed when the Boom Box is not being used for an
extended period of time.
6. Do not install or place the Deluxe Universal Satellite Radio Sound System on an inclined or unstable
surface.
3
SAFETY PRECAUTIONS
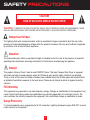
CAUTION
RISK OF ELECTRIC SHOCK DO NOT OPEN
CAUTION:
TO REDUCE THE RISK OF ELECTRIC SHOCK, DO NOT REMOVE COVER (OR DISASSEMBLE). THERE
ARE NO USER SERVICEABLE PARTS INSIDE. REFER SERVICING TO QUALIFIED SERVICE PERSONNEL.
Dangerous Voltage
The lightning flash with arrowhead symbol, within an equilateral triangle is intended to alert the user to the
presence of uninsulated dangerous voltage within the product's enclosure that may be of sufficient magnitude
to constitute a risk of electric shock to persons.
Attention
The exclamation point within an equilateral triangle is intended to alert the user to the presence of important
operating and maintenance (servicing) instructions in the literature accompanying the appliance.
Danger
This product utilizes a Class 1 laser to read COMPACT discs. This laser Compact Disc Player is equipped
with safety switches to avoid exposure when the CD door is open and the safety interlocks are defeated.
There is a risk of harm due to invisible hazardous laser radiation when the CD door open and interlock failed
or defeated. Avoid direct exposure to the laser beam. Please do not attempt to defeat or bypass the safety
switches.
FCC Warning
This equipment may generate or use radio frequency energy. Changes or modifications to this equipment may
cause harmful interference unless the modifications are expressly approved in the instruction manual. The
user could lose the authority to operate this equipment if an unauthorized change or modification is made.
Surge Protectors
It is recommended to use a surge protector for AC connection. Lightning and power surges ARE NOT covered
under warranty for this product.
4
SAFETY PRECAUTIONS
Information
This equipment has been tested and found to comply with the limits for a Class B digital device, pursuant to
Part 15 of the FCC Rules. These limits are designed to provide reasonable protection against harmful
interference in a residential installation. This equipment generates, uses, and can radiate radio frequency
energy and, if not installed and used in accordance with the instructions, may cause harmful interference to
radio communications. However, there is no guarantee that interference will not occur in a particular
installation. If this equipment does cause harmful interference to radio or television reception, which can be
determined by turning the equipment off and on, the user is encouraged to try to correct the interference by
one or more of the following measures:
•
•
•
•
Re-orient or relocate the receiving antenna.
Increase the separation between the equipment and receiver.
Connect the equipment into an outlet on a different circuit than the receiver is connected.
Consult the dealer or an experienced radio/TV technician for help.
Do not open the CD compartment while the CD is rotating.
Always keep the CD compartment closed when not in use.
Keep all foreign objects out of the CD compartment.
Place the unit on a stable surface.
Avoid installing the unit in locations described below:
•
•
•
•
•
Places exposed to direct sunlight or close to heat radiating appliances such as electric heaters.
On top of other stereo equipment that radiate too much heat.
Locations lacking ventilation or dusty places.
Locations subject to constant vibration.
Humid or damp places.
5
Dear Customer
Selecting fine audio equipment such as the unit you have just purchased is only the start of your musical
enjoyment. Now it's time to consider how you can maximize the fun and excitement your equipment offers.
This manufacturer and the Electronic Industries Association's Consumer Electronics Group want you to get the
most out of your equipment by playing it at a safe level. One that lets the sound come through loud and clear
without annoying blaring or distortion and, most importantly, without affecting your sensitive hearing. Sound
can be deceiving. Over time your hearing "comfort level" adapts to higher volumes of sounds and "normal"
can actually be loud and harmful to your hearing. Guard against this by setting your equipment at a safe level
BEFORE your hearing adapts.
To establish a safe level:
• Start your volume control at a low setting.
• Slowly increase the sound until you can hear it comfortably and clearly, and without distortion.
Once you have established a comfortable sound level:
• Set the dial and leave it there.
Taking a minute to do this now will help to prevent hearing damage or loss in the future. After all, we want you
listening for a lifetime.
We Want You Listening For A Lifetime.
Used wisely, your new sound equipment will provide a lifetime of fun and enjoyment. Since hearing damage
from loud noise is often undetectable until it is too late ,this manufacturer and the Electronic Industries
Association's Consumer Electronics Group recommend you avoid prolonged exposure to excessive noise.
This list of sound levels is included for your protection.
Decibel
Level
Example
30
Quiet library, soft whispers
40
Living room, refrigerator, bedroom away from
traffic
50
Light traffic, normal conversation, quiet office
60
Air conditioner at 20 feet, sewing machine
70
Vacuum cleaner, hair dryer, noisy restaurant
80
Average city traffic, garbage disposals, alarm
clock at two feet
THE FOLLOWING NOISES CAN BE DANGEROUS
UNDER CONSTANT EXPOSURE:
C
IND
R
NI
U
TR
EST. 1924
S
N
EIA
S
O
O C I A TI
IES
6
O
A
Information courtesy of the Deafness Research Foundation.
We
Want You
For A Lifetime
S
140
180
Subway, motorcycle, truck traffic, lawn mower
Garbage truck, chain saw, pneumatic drill
Rock band concert in front of speakers,
thunderclap
Gunshot blast, jet engine
LISTENING
Rocket launching pad
ELECT
90
100
120
TABLE OF CONTENTS
Introduction
Product Overview
Package Contents
Components Guide
Boom Box Setup
Configuring your Boom Box
Mounting your Boom Box
Installing Removable Mounting Clip
Installing the Satellite Antenna
Installing the Power Cable
Installing the Batteries (Optional)
Antenna Aiming (XTR8)
Antenna Aiming (XTR7)
SIRIUS® Satellite Map
AM/FM Radio Operation
To Listen to the Radio
Antennas
Auto Scan
To set and Receive a Station into Memory
CD Operation
To Insert and Play a CD
CD Playback Notes
To Pause a CD
To Begin Playback from a Specific Track
Forward/Reverse Skip Track
High-Speed Music Search
Repeat Playback of One Track
Repeat Playback of All Tracks
Repeat Playback of a Folder (MP3 with folders only)
Intro Playback (will play the first 10 seconds of each track)
To Randomly Play Back a CD
To Program the Memory (Up to 24 Tracks)
Notes of Program Playback
MP3 FAQ's - Frequently Asked Questions
Single Session
Multi Session
Specifications
Problem Solving
Care and Maintenance
Warranty
Page
Page
Page
Page
Page
Page
Page
Page
Page
Page
Page
Page
Page
Page
Page
Page
Page
Page
Page
Page
Page
Page
Page
Page
Page
Page
Page
Page
Page
Page
Page
Page
Page
Page
Page
Page
Page
Page
Page
Page
2
2
2
3
5
5
6
8
9
9
10
10
11
11
12
12
12
12
12
13
13
13
14
14
14
15
15
15
16
16
16
16
17
17
18
18
19
20
22
24
INTRODUCTION
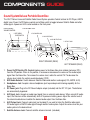
Product Overview
Thank you for purchasing this product! Your XACT Deluxe Universal Satellite Radio Sound System is
compatible with the XTR3, XTR7, and XTR8 Satellite Radio Receivers.
Package Contents
Carefully unpack your kit box and ensure that you have the following items.
•
•
•
•
XACT Deluxe Universal Satellite Radio Sound System
12v DC Power Adapter
Antenna
User’s Guide
In the event that any item is missing or if you find any mismatch or damage, promptly contact your dealer.
The easiest way to activate your Satellite Radio Receiver is to log on to sirius.com.
You may also call 1-888-539-SIRIUS (7474).
2
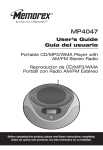
4. DC POWER JACK
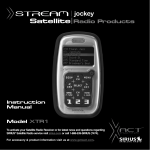
COMPONENTS GUIDE
5. AUX INPUTJACK
6. AUX OUTPUTJACK
Sound System Deluxe Portable Boom Box
The XACT Deluxe Universal Satellite Radio Sound System provides Control buttons for CD Player, AM/FM
digital tuner. Power On/Off-Volume control and a Slide switch to toggle between Satellite Radio and other
audio signal. A power-on LED is also located on the front panel.
1. POWER ON/OFF
VOLUME CONTROL
RIGHT SPEAKER (REAR)
3. HEADPHONE JACK
2. SAT/AUDIO
SLIDE SWITCH
4. DC POWER JACK
5. AUX INPUTJACK
6. AUX OUTPUTJACK
7. SAT ANT JACK
RIGHT SPEAKER (REAR)
1.
2.
3.
4.
5.
6.
7.
LEFT SPEAKER (REAR)
Power On/Off Switch-VOL Control:Applies power to the Boom Box when rotated clockwise (CW)
7. SAT it
ANT
JACK
from the Off position. When in On position,
increases
or decreases the volume of the audio output
signal from the Boom Box. To increase the volume level, rotate the control CW. To decrease the
volume level, rotate the control counterclockwise (CCW).
SAT/Audio Selector: Switch between Satellite Radio and another audio signal( CD, AM/FM, AUX).
Headphones Jack: Accepts a stereo headphone jack to provide private listening capability for the
Boom Box.
DC Power jack: Plug in the DC Power Adapter output (included) into the DC 12V jack. The batteries
are automatically bypassed.
AUX Input Jack: Accepts an audio input signal from an external audio device. When using AUX audio
LEFT SPEAKER (REAR)
input, the Receiver will be automatically shut off to preserve battery power. Adjust the volume level of
the external audio device to obtain the desired audio output from the Boom Box.
AUX Output Jack: Connect audio jack (not included) if you want to listen the Satellite radio signal,
CD audio signal or AM/FM radio signal through another audio system. Adjust the volume level on your
audio system to the desired level.
Satellite Antenna Jack: Connect satellite antenna terminal. (included).
1
3
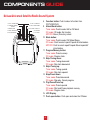
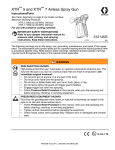
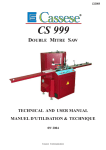
COMPONENTS GUIDE
Deluxe Universal Satellite Radio Sound System
12. SKIP- / TUNNING DOWN
11. PROGRAM / MEMORY
BUTTON
10. MODE BUTTON
13. SKIP+ / TUNNING UP
14. STOP / PRESET DOWN
15. PLAY / PAUSE / PRESET UP
9. ALBUM / BAND BUTTON
16. PUSH OPEN
8. FUNCTION BUTTON
17. LCD DISPAY
Function button: Push to select a function from
CD/TUNER/AUX.
19. RELEASE BUTTON FOR
REMOTE CONTROL
9. Album/Band button:
Tuner mode: Push to select AM or FM band.
CD mode: CD audio: No function.
MP3 CD: Album (Directory) select.
10. Mode button:
Tuner mode: Push to select FM Mono/Stereo,
CD mode: Push to select repeat1/repeat all/intro/random.
MP3 CD: Push to select repeat1/repeat Album/repeat/all/
intro/random.
11. Program/Memory button:
Tuner mode: Preset memory.
CD mode: Program track.
12. Skip-/Tuning down:
Tuner mode: Tuning downward.
20. CD
CONNECTOR
FOR Skip track downward.
mode:
SATELLITE RECEIVER
13. Skip+/Tuning up:
Tuner mode: Tuning upward.
CD mode: Skip track upward.
14. Stop/Preset down:
Tuner mode: Preset downward.
CD mode: Stop play. Cancel program.
15. Play/Pause/Preset up:
Tuner mode: Preset upward.
CD mode: Start and Pause playback memory.
CD mode: Program track.
16. LCD Display.
17. Push open button: Push open and close the CD door.
8.
18. RELEASE BUTTON FOR
SATELLITE RECEIVER
4
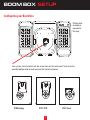
BOOM BOX SETUP
Configuring your Boom Box
Phillips head
screwdriver
required for
this step.
Line up your correct bracket with the screw holes on the center post. Next screw the
provided phillips head screws to secure the bracket into place.
XTR8 Replay
XTR7 XTR
5
XTR3 Visor
BOOMBOX SETUP
Mounting your Visor to the Boom Box
1. Slide the XACT Visor
Sirius Satellite Radio
Receiver onto the mounting
tab of the Boom Box until it
locks into place. (figure 1). To
remove the XACT Visor
Sirius Satellite Radio
Receiver, push the locking
tab on the bottom of the
XACT Visor Sirius Satellite
Radio Receiver inward and
slide forward.
1.
2. Connect the DC Power,
antenna and audio connectors
to the appropriate jacks.
(figure 2).
3. Feed any excess wiring back
into the housing through the
hole in the removable rubber
grommet on your left side.
1.
2.
2.
4
6
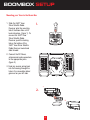
BOOM BOX SETUP
Mounting you XTR7 XTR to the Boom Box
1. Slide the XACT Sirius Satellite
Radio Receiver (figure 1) onto the
mounting tab of the Boom Box until
it engages. (figure 2).
1.
2. Connect the DC Power, antenna
and audio connectors to the
appropriate jacks. (figure 3).
3. Feed any excess wiring back
into the housing through the
holes in the removable rubber
grommet on the appropriate side.
2.
3.
Power In
(12V DC)
Antenna
Input
FM OUT
Audio/
Headphone
Out
5
7
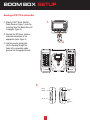
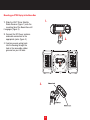
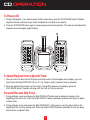
Mounting you XTR8 Replay to the Boom Box
1. Slide the XACT Sirius Satellite
Radio Receiver (figure 1) onto the
mounting tab of the Boom Box until
it engages. (figure 2).
1.
2. Connect the DC Power, antenna
and audio connectors to the
appropriate jacks. (figure 3).
2.
3. Feed any excess wiring back
into the housing through the
hole in the removable rubber
grommet on your left side.
3.
8
6
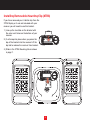
Installing Removable Mounting Clip (XTR8)
If you have removed your U-button clip from the
XTR8 Replay or it was not included with your
receiver you will need to use this bracket.
1.) Line-up the two tabs on the bracket with
the outer vent holes on the bottom of your
receiver.
2.) It will snap into place when you press the
top of the bracket into the receiver.Lift the
top tab to release the receiver from bracket.
3.) Slide in the XTR8 Mounting tab as shown
in page 7.
9
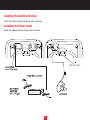
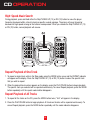
Installing the Satellite Antenna
Install the Antenna into the Antenna Jack as shown.
Installing the Power Cable
Install the adapter into the Power Jack as shown.
SAT ANT JACK
10
8
Installing Batteries (optional)
Your Boom Box can also be used with 8 D-Cell batteries as shown:
1. Push the battery cover latches down and flip up the battery compartment covers to the open position.
2. Insert the 8 D-Cell batteries follow the battery polarity as shown; then close the cover.
Note: The batteries are bypassed automatically whenever the supplied DC Adapter is plugged into the
power jack on the back of the Boom Box.
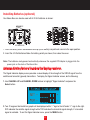
Antenna Aiming feature found on the Replay receiver.
The Signal Indicator display screen provides a visual display of the strength of the SIRIUS signal from the
satellite and terrestrial (ground) transmitters. To display the Signal Indicator screen, do the following:
1. Use CHANNEL UP and CHANNEL DOWN buttons to highlight "Signal Indicator" and press the
Select button.
2. Two 10 segment horizontal bar graphs will be displayed with a "-" sign to the left and a "+" sign to the right.
SAT indicates the satellite signal strength while TER indicates the terrestrial signal strength, if a terrestrial
signal is available. To exit the Signal Indicator menu, press the MENU button.
11
9
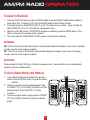
Antenna Aiming feature found on the XTR receiver.
To access the Antenna Aiming Feature:
Press the
button on the Sirius Satellite Radio Receiver’s key pad. Press the
Antenna Aiming selection is highlighted and press
button.
or
button until the
Upon entering this option, two 10-segment horizontal bar graphs are displayed with a (-) sign to the left and a
(+) sign to the right. One is label “SAT” (satellite signal strength) and the other “TER” (terrestrial signal
strength). The current setting is indicated on the bar graphs. Rotate the Antenna to a position that provides the
best reception. (See Sirius Satellite Radio map bellow).
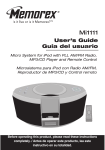
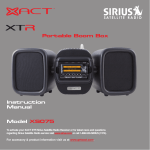
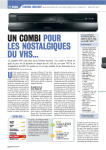
Sirius Satellite Radio Map
Due to the paths of Sirius satellites over the US, the best location for the antenna in your home depends on
where you live. Use the map below as a
general placement guideline.
Area 4 : Place the antenna at a WEST or NORTH - facing window.
Area 1 : Place the antenna at an EAST facing window.
Area 5 : Place the antenna at a NORTH facing window.
Area 2 : Place the antenna OUTSIDE, away
from any overhead obstructions.
Area 6 : Place the antenna at a NORTH or EAST - facing window.
Area 3 : Place the antenna at a NORTH
WEST - or WEST - facing window.
10
12
AM/FM RADIO OPERATION
To Listen To The Radio
1.
2.
3.
4.
Press the FUNCTION button to enter the RADIO Mode. Press the ALBUM / BAND button to Select a
band (AM or FM). If listening to FM, Press the MODE button to select Stereo or Mono.
Press and release the Skip/TUNING DN (12) or UP (13) button to tune a station. Press and hold the
Skip/TUNING DN (12) or UP (13) button for rapid search tuning.
Adjust the VOLUME control. If FM STEREO reception is weak/noisy, press the MODE/ button (10) to
Mono, in this case the reception will be monaural.
To turn the radio off, rotate POWER ON/OFF volume control counter clockwise.
Antennas
AM - This unit has a built-in AM radio antenna, which provides adequate reception in most areas. If reception
is weak, move the unit to improve reception.
FM - This unit has a built-in FM antenna, which provides adequate reception in most areas. If reception
is weak, move the unit to improve reception.
Auto Scan
Press and hold the Skip/TUNING or UP button for approximately 1 second and the unit will automatically
search for the next available station.
To Store a Radio Station into Memory
1.
2.
3.
Tune a desired station as described in the previous
section. Press the PROG. button; the preset numbers
will blink.
Within ten seconds, select the desired preset using
the PRESET UP (14) or DOWN (15) button to set the
desired channel. Press the PROG (11) button
to confirm.
To tune to a preset station, simply press the PRESET
UP (14) or DOWN (15) button to select the desired
preset.
10 12 13
11
11
13
15 14
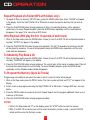
CD OPERATION
To Insert and Play a CD
This CD player is designed to play all kinds of Audio Discs and MP3 CD ROMS, such as CD recordables
(CDR) and rewritables(CDRW). Do not try to play CDI, CDV, DVD or computer CD's in this unit.
1. Rotate the PLAY/PAUSE/POWER ON button (15) clockwise to turn the unit on. Open the CD compartment
lid by pushing the CD Door OPEN. Gently press a disc, label side up, onto the spindle until it locks in
place. Close the CD compartment lid.
2. Press the FUNCTION button to select the CD mode. Press the PLAY/PAUSE to begin playback; the current
track and elapsed playing time. The CD information, or folder information if playing MP3’s, will appear in
the display.
3. Adjust the VOLUME control (1).
4. When the disc has completed playing, it will stop automatically. Press the STOP button to stop the disc
before it is finished.
CD Playback Notes:
• See page 14 for more information on MP3's.
• When recording ("burning") CD's, make sure the session is "finalized" or simply record "burn" only one
session. You can find more information in your recorder's manual.
• This unit is capable of playing standard CD's or 3" singles;
no adapter is required.
12 13 15
• If a disc is inserted incorrectly, dirty, damaged or not
present at all, "No Disc" will appear in the display.
• Playback will stop when you open the CD compartment,
but it is not recommended to open the compartment
before the STOP button is pressed.
• It may take 10 to 30 seconds for the player to read an
MP3 CD and begin playback, depending on the number
of tracks burned on the CD.
14
12
CD OPERATION
To Pause a CD
1. During CD playback, if you wish to pause the disc momentarily, press the PLAY/PAUSE button. Playback
stops but the disc continues to spin and the elapsed time will blink on the display.
2. Press the PLAY/PAUSE button again to release pause and resume playback. The audio is restored and the
elapsed time on the display stops flashing.
12 13 15
To Begin Playback from a Specific Track
1. After you insert the disc into the CD player and total number of tracks appear on the display, you may
press either the Skip/TUNING DN (12) or UP (13) button to select a specific track for playback.
2. When the desired track number (or file number if using MP3) appears in the display, press the
PLAY/PAUSE button. Playback will begin with the track (or file) you selected.
Forward/Reverse Skip Track
1. During playback, press and release the Skip/TUNING UP button once to advance the player to the
beginning of the next track. Press the Skip/TUNING UP button repeatedly to advance the player to higher
number tracks.
2. During playback, press and release the Skip/TUNING DN button once to move the player back to the
beginning of the currently playing track. Press the Skip/TUNING DN button repeatedly to move the player
back to lower numbered tracks.
13
15
CD OPERATION
High-Speed Music Search
During playback, press and hold either the Skip/TUNING UP (13) or DN (12) button to move the player
forward or backward within a track to locate a specific musical passage. The player will move forward or
backward at high speed as long as the buttons are depressed. When you release the Skip/TUNING UP (13)
or DN (12) button, normal playback will resume.
12 13
Repeat Playback of One Track
1. To repeat a single track, while in the Stop mode, press the MODE button once and the REPEAT indicator
will appear on the display. Press the Skip/TUNING UP (13) or DN (12) button to select the specific track
that you wish to repeat.
2. When the desired track number appears on the display, press the PLAY/PAUSE button to begin playback.
The specific track you selected will be repeated continuously. To cancel Repeat playback, press the MODE
button repeatedly until the repeat mode indictor disappears.
Repeat Playback of All Tracks
1. To repeat all the tracks on the CD, press the MODE button twice; "ALL" will appear in the display.
2. Press the PLAY/PAUSE button to begin playback. All tracks on the disc will be repeated continuously. To
cancel Repeat playback, press the MODE button repeatedly until the mode indicator disappears.
16
14
CD OPERATION
Repeat Playback of a Folder (MP3 with folders only)
1. To repeat all files in a directory (MP3 CD only), press the MODE button three times; "ALBUM" will appear
in the display. Press the Skip/TUNING UP or DN button to select the specific directory that you wish to
repeat.
2. Press the PLAY/PAUSE button to begin playback. All files in the selected directory will be repeated
continuously. To cancel Repeat playback, press the MODE button repeatedly until the mode indicator
disappears. See page 16 for more info on MP3 format.
Intro Playback (Will play the first 10 seconds of each track)
1. While in the Stop mode, press the MODE button 3 times (4 times if an MP3 CD with multiple directories is
inserted); "INTRO" will appear in the display.
2. Press the PLAY/PAUSE ON button to begin Intro playback. The first 10 seconds of all tracks on the disc
will be played in sequence. To cancel Intro playback, press the MODE button repeatedly until the intro
mode indicator disappears.
To Randomly Play Back a CD
1. While in the Stop mode, press the MODE button 4 times (5 times if an MP3 CD with multiple directories is
inserted); "RANDOM" will appear in the display.
2. Press the PLAY/PAUSE button to begin playback. The unit will play all the tracks in random order. When all
the tracks have been played, the unit will stop. To cancel Random playback, press the MODE button
repeatedly until the Random mode indicator disappears.
To Program the Memory (Up to 24 Tracks)
Programming is the ability to pre-select the order in which a series of tracks will be played.
1. While in the Stop mode, press the PROG. button. The track number will blink and "P-01" will appear in the
display.
2. Select a track to be programmed using the Skip/TUNING UP or DN button. If using a MP3 disc, see note
below.
3. Press the PROG. button to memorize the track. Repeat steps 2 and 3 to program additional tracks up to a
maximum of 24 tracks.
4. Press the PLAY/PAUSE button to begin program playback.
NOTES:
• While in the Stop mode and "P" on the display, press the "STOP" button to clear the memory.
• MP3: If an MP3 CD is inserted, you will first select the directory number in step 1, press the PROG.
button and then enter the file/track number.
15
17
CD OPERATION
NOTES ON PROGRAM PLAYBACK:
• You can review the program by pressing the PROG. button repeatedly while in the Stop mode.
• To add a track to the program memory, simply press the PROG. Button repeatedly until the track
(directory if using an MP3) appears as "00" in the display, then continue as per the steps 2 and 3 on
the previous page.
• Press the STOP button to stop the program before it is finished (the program memory will be kept).
• Each file may be stored in the program memory as many times as desired (up to 24 files).
• You can scroll through the program while it is playing using the Skip/TUNING DN or UP button.
MP3 FAQ’s - Frequently Asked Questions
Please read before playing an MP3 CD.
• Does the unit support packet write CD - RW?
Yes, it can. You can add or delete MP3 files without reformatting. It appears like a PC hard drive.
• Can the unit read regular music CD's?
Yes, it can. However you can not mix MP3s and WAV files on the same CD. If you do this your
Portable MP3 CD Player will play only the MP3 Files.
• Does the unit have Electronic Skip Protection built-in?
Yes, it has an anti-shock buffer. What it means for the everyday user is that it can withstand road
bumps, shaking, etc. There will be no skipping when you jog or run on a treadmill or drive on a bumpy
road.
• Can I use the MP3 Extension for non-audio data files?
No, this may result in serious malfunction and harmful noise interference.
• Can I mix MP3 files with other file types on the CDR?
Yes, but your Player will ignore those files and read only the MP3 files on the CDR.
• Does the unit support multi-session CDR’s?
If the MP3 CD is not finalized, you can burn a new group of MP3 files until the CD is full.
• Does the unit support subdirectories (sub-folders)?
Yes, the unit can read MP3 files from sub-folders.
18
16
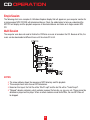
CD OPERATION
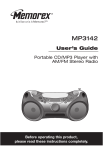
Single Session
The following chart is an example of a Windows Explorer display that will appear on your computer monitor for
a single session MP3 CD ROM with directories/albums. Check the added notes to help you understand the
MP3 CD unit display and the playback sequence of directories/albums and tracks on a single session MP3
CD.
Multi Session
The computer user does not need to finalize the CDR disc as music is burned on the CD. Because of this, the
music can be downloaded at different times until the whole CD is full.
NOTES:
•
•
•
•
The arrow pathway shows the sequence of MP3 directory and file playback.
This example has a total of seven MP3 directories.
Based on this layout, the first file will be "Blur01.mp3" and the last file will be "Twain15.mp3".
"Skipped" denotes a directory which contains improper file formats, e.g. jpg, wav, etc. These cannot be
detected or played on this player. When an album contains mixed format files, the non-MP3 files will
be skipped.
17
19
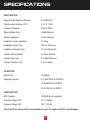
SPECIFICATIONS
AUDIO SECTION
Nominal Output Power per Channel
5.0 Watts Rms
Total Harmonic Distortion (THD)
0.3% at 1 Watt
Signal-to-Noise Ratio
>65dB Maximum
Headphone Output Impedance
32 Ohms
Frequency Response
Speaker Impedance
Headphone Output Level
Headphone Connector Type
Auxiliary Input Impedance
Auxiliary Input Level
Auxiliary Connector Type
CD SECTION
MPEG Rate
Sampling Frequency
TUNER SECTION
30Hz to 20kHz
8 Ohms Nominal
500 mV (Maximum)
3.5 mm Stereo Jack
6K-Ohms Nominal
2.0 Volts (Maximum)
3.5 mm Stereo
32-38Kbps
8/11.025/12KHz for MPEG2.5
15/22.05/24KHz for MPEG2
32/44.1/48 KHz for MPEG1
MP3 Playback
ISO9660 format compatible
Frequency Range (AM)
530 - 1720 kH
Frequency Range (FM)
87.5 - 108MHz
Check the CD burner/recorder's documentation to see if it complies with these specifications.
20
18
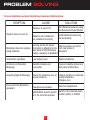
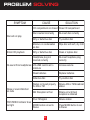
PROBLEM SOLVING
For your assistance, we have listed a few common problems below.
SYMPTOM
System does not turn on
CAUSE
SOLUTION
Receiver is set to off
Turn Receiver power on using
the Receivers Power Button
Batteries not installed or
are installed incorrectly
Install batteries observing
correct polarity
Boombox does not operate
using batteries
As long as the AC power
Remove power connector
connector is attached to the from rear panel of
rear panel of the Boombox Boombox
battery operation is disabled
Intermittent operation
Low battery level
Replace batteries
Antenna not Detected
Message
Satellite antenna not
connected
Connect satellite antenna to
rear panel of Boombox
Acquiring Siginal Message
Check for obstacles over or Change location to eliminate
around antenna
nearby obstacles
(bridges, etc.)
No sound from Boombox
speakers
Headphones installed
Remove headphones
SAT/AUDIO selector switch Switch to the desired audio
position (SAT) or AUDIO
is in the incorrect position
19
21
PROBLEM SOLVING
SYMPTOM
CAUSE
SOLUTION
CD compartment not closed Close CD compartment
Disc will not play
Erratic CD playback
Disc inserted incorrectly
Re-insert disc correctly
Dirty or defective disc
Try another disc
Moisture or condensation
on disc
Wipe disc with soft, dry cloth
Dirty or defective disc
Clean or replace disc
Headphone plug not
inserted correctly
Re-insert heaphone plug
correctly
No sound from headphones VOLUME control set to
minimum
Noise or sound distorted
on radio
Increase volume
Weak batteries
Replace batteries
Defective disc
Try another disc
Station not tuned properly
for AM or FM
Retune AM or FM broadcast
station
AM: Reception is Poor
Rotate unit until best
reception is obtained
Poor FM siginal
FM STEREO indicator does
not light
MODE button not set to
Stereo
22
20
Retune station
Press MODE button to set
to Stereo
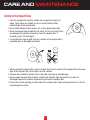
CARE AND MAINTENANCE
Caring for Compact Discs
• Treat the compact disc carefully. Handle the compact disc only by its
edges. Never allow your fingers to come in contact with the shiny,
unprinted side of the compact disc.
• Do not attach adhesive tape, stickers, etc. to the compact disc label.
• Clean the compact disc periodically with a soft, lint-free, dry cloth. Never
use detergents or abrasive cleaners to clean the compact disc. If
necessary, use a CD cleaning kit.
• If a compact disc skips or gets stuck on a section of the compact disc,it
is probably dirty or damaged (scratched).
• When cleaning the compact disc, wipe in straight lines from the center of the compact disc to the outer
edge of the compact disc. Never wipe in circular motions.
• Compact discs should be stored in their cases after each use to avoid damage.
• Do not expose compact discs to direct sunlight, high humidity, high temperatures, or dust, etc.
Prolonged exposure or extreme temperatures can warp the compact disc.
• Do not stick or write anything on either side of the compact disc. Sharp writing instruments, or the ink
may damage the surface.
21
23
CARE AND MAINTENANCE
Periodic Inspection
The Sound System Deluxe Portable Boom Box should be inspected periodically for external damage. At least
once every 30 days of use, perform the following checks:
• Inspect the Receiver connectors for loose, bent or broken pins, misalignment, etc.; make sure the SAT
connectors are intact and exhibit no apparent damage..
• Check the VOL control for freedom of motion without binding of any kind.
• Check that the SAT/Audio Selector operates correctly and that it toggles between the Satellite Radio
output and the Audio output.
• Make sure the antenna connector at the rear of the unit is free from damage of any kind and that the
antenna lead plug mates correctly and securely.
• Make sure the DC 12V connector at the rear of the unit is also free from damage of any kind and that
the AC Adapter plug mates correctly and securely.
• Check the antenna for any physical damage; make sure the antenna lead is secure and not nicked or
frayed.
• Inspect the overall Boom Box case and speaker grills for damage such as nicks, scratches
punctures, etc.
Cleaning the Sound System Deluxe Portable Boom Box
When cleaning the Boom Box, make sure the AC Adapter is unplugged from the power source and the batteries
are removed. Do not use liquid cleaners or aerosol cleaners. Use only a lint-free cloth lightly dampened with
water for cleaning the exterior of the Boom Box.
24
22
WARRANTY
Warranty Information
XACT Communication
One-Year Limited Warranty
This limited warranty sets forth all XACT Communication responsibilities regarding your product. There are no
other expressed or implied warranties from XACT Communication.
Warranty Service Provided
If you purchased the product new from a retail vendor, XACT Communication warrants the equipment against
defects in material and workmanship for a period of one (1) year from the original date of purchase. This
warranty is in lieu of all other express warranties. This warranty begins when you purchase the product and
continues for one (1) year unless you sell or rent the unit, in which case the warranty stops.
XACT Communication disclaims any implied warranty, including the warranty of merchantability and the
warranty of fitness for a particular purpose, as of the date of one year from your original purchase of the product
XACT Communication assumes no responsibility for any special, incidental, or consequential damages.
This warranty gives you specific legal rights and you may have other rights which vary from state to state.
Some states do not allow the exclusion or limitations of special, incidental, or consequential damages or
limitations on how long a warranty lasts, so the above exclusion or limitation may not apply to you.
25
23
WARRANTY
Warranty Service Not Provided
This warranty does not cover damage resulting from accident, misuse, abuse, improper installation or
operation, lack of reasonable care, unauthorized modification, or the affixing of any attachment not provided
by XACT Communication with the equipment, and/or loss of parts. This warranty is voided in the event any
unauthorized person opens, alters, or repairs the product.
All XACT Communication equipment being returned for repair must be suitably packaged.
What To Do for Warranty Service
During the first thirty (30) days, a defective product is eligible for over-the-counter exchange at the retailer from
whom it was purchased. After thirty (30) days, the defective product should be returned to the authorized
service center. Please allow a minimum of 2-3 weeks for the return of your product. For the shipping
address of the authorized service center, call one of the telephone numbers given below.
Your product will be repaired or replaced if examination by the service center determines the product is defective.
Products received damaged as a result of shipping will require you to file a claim with the carrier prior to
repair. A product received with missing parts or with damage due to abuse, inadequate packing or some other
noncompliance with this limited warranty will be returned to you C.O.D., freight collect.
NOTE: A product received which was not made by XACT Communication or which is not defective as
determined by our test procedures will not be repaired and will be returned to you C.O.D., freight collect.
26
24
WARRANTY
To Obtain Warranty Service
• Provide proof of the date of purchase within the package.
• Prepay all shipping costs to the authorized service center.
• Include a return shipping address within the package.
Please retain your sales receipt, the carton, the packing materials, and the printed material. The original
carton is the best shipping container for the Product should you have to return it.
For your reference:
Model Number______________________________
ESN Number______________________________
S/N Number_______________________________
Date of Purchase__________________________
Name of Dealer_____________________________
XACT Communication Customer Service Telephone Number:
1-866-466-XACT (9228)
OUTSIDE THE U.S.A. AND CANADA CALL: 1-212-481-7950
Visit Us on the Web: www.getxact.com
25
27
Notes
28
Notes
29
To activate your Satellite Radio Receiver or for latest news and
questions regarding SIRIUS® Satellite Radio service visit sirius.com
or call 1-888-539-SIRIUS (7474).
Call Toll Free 1-866-466-XACT (9228)
or Visit our Website:
www.getxact.com