1
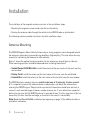
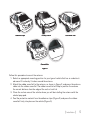
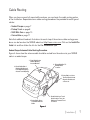
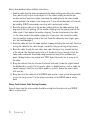
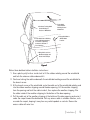
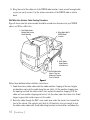
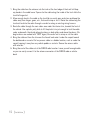
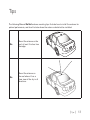
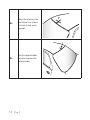
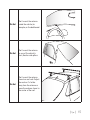
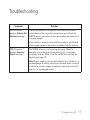
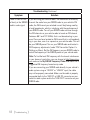
Magnetic Mount Vehicle Antenna
Installation Guide
Warning and Safety Information
Caution
Because adhesive is used in the installation of the rubber cover/tail, it is recommended that
the antenna be installed at or above room temperature (68 degrees). Lower temperatures may
cause the adhesive on the rubber cover/tail to not adhere properly to the vehicle roof. Warmer
temperatures will also allow for easier over all antenna installation, including easier routing of
the antenna cable through the rubber molding around the windows and other areas in the vehicle. Maximum adhesion usually occurs within 72 hours at room temperature, so car washes
as well as other contact with the antenna and rubber cover/tail should be avoided during this
72 hour period.
Warning
Be sure not to cut, damage, or puncture the external jacket of the antenna cable during the
installation procedure. Damage to the antenna cable can cause the SIRIUS signal to be
degraded or unavailable, and can also cause water to intrude via the cable into the antenna
causing the antenna to fail.
Do not lengthen or shorten the antenna cable by cutting it. Doing so will cause the antenna to
not function properly.
[ Warning and Safety Information ]
Package Contents
The following items are included with your purchase of the SIRIUS Magnetic Mount Vehicle
Antenna. Unpack the kit carefully and make sure that everything shown is present. If anything
is missing or damaged, or if the kit fails to operate properly, notify your dealer immediately. It
is recommended that you retain the original carton and packing materials in case you need to
ship your kit in the future.
Magnetic Mount
Vehicle Antenna
Rubber
Cover/Tail
Alcohol Swab
[ Package Contents ]
Installation
The installation of the magnetic antenna consists of two installation steps:
• Mounting the magnetic antenna and cover/tail on the vehicle
• Routing the antenna cable through the vehicle to the SIRIUS radio or vehicle dock
The following sections provide instructions for both installation steps.
Antenna Mounting
The SIRIUS Magnetic Mount Vehicle Antenna has a strong magnetic mount designed to hold
the antenna in place during normal driving conditions (highway/city). This also allows for easy
removal for transferring the antenna to other vehicles.
Figure 1 shows the optimal mounting location for the antenna on several types of vehicles.
These mounting positions should be observed when installing the antenna:
• Sedan/Coupe/SUV/Mini-Van: Install the antenna at the rear center of the roof, near the
rear window.
• Pickup Truck: Install the antenna at the front center of the roof, near the windshield.
• Convertible: Install the antenna at the front center of the trunk lid, near the rear window.
The SIRIUS antenna needs to have an unobstructed area of 3 inches by 3 inches around
it. It is important to mount the antenna where no obstructions will block the antenna from
receiving the SIRIUS signal. Objects which can obstruct the antenna could be a roof rack, a
sunroof, a roof mounted cargo container, another antenna, etc. If your vehicle has a potential
obstruction, be sure that the SIRIUS antenna is mounted at least 3 inches away from it (but no
closer than 3 inches from the roof edge, or trunk lid in the case of a convertible).
Note: Read the Do and Do Not installation tips beginning on page 13 for additional antenna
installation information.
[ Installation ]
Sedan/Coupe
Pickup Truck
SUV/Mini-Van
Convertible
Figure 1
Follow this procedure to mount the antenna:
1. Select an appropriate mounting position for your type of vehicle that has an unobstructed area of 3 inches by 3 inches around the antenna.
2. Attach the rubber cover/tail to the antenna, as shown in Figure 2, and press the antenna
cable into the rubber cover/tail. The rubber cover/tail will help to position the antenna
the correct distance from the edge of the roof or trunk lid.
3. Clean the surface area of the vehicle where you will be installing the antenna with the
alcohol prep pad.
4. Peel the protective material from the adhesive strips (Figure 2) and press the rubber
cover/tail firmly into place on the vehicle (Figure 3).
[ Installation ]
Protective Material
Strain Relief
Adhesive Strips
Rubber Cover/Tail
Antenna Cable
Figure 2
5. Double check that the location of the antenna and rubber cover/tail are correct, and
continue to press firmly down on rubber cover/tail for another 30 seconds. At room
temperature (68 degrees), maximum adhesion usually occurs within 72 hours. During
this period, avoid car washes and other contact with the antenna and rubber antenna
cable cover/tail.
Figure 3
[ Installation ]
Cable Routing
When you have successfully mounted the antenna, you can begin the cable routing portion
of the installation. Separate antenna cable routing procedures are provided for each type of
vehicle:
•
•
•
•
Sedan/Coupe on page 7
Pickup Truck on page 8
SUV/Mini-Van on page 10
Convertible on page 11
Note that additional breakout illustrations for each step of the antenna cable routing procedures can be found on the SIRIUS website at http://www.sirius.com. Click on the Install/Activate link and then follow the link for the Car Installation Tips.
Sedan/Coupe Antenna Cable Routing Procedure
Figure 4 shows how the antenna cable should be routed from the antenna to your SIRIUS
radio in a sedan/coupe.
1. Feed Cable Under
Rubber Molding
Around Window
2. Route Cable Out of
Window Molding and
Into Weatherstripping
Around Trunk Opening
6. Bring Cable Out To
SIRIUS Radio
Location
5. Bring Cable out from
Trim and Route Under
Carpet to Dashboard
or Console.
3. Route Cable Along
Trunk Wall and Into
Cabin
4. Route Cable from Trunk
Under Interior Trim, into
Cabin and Towards Front
of Vehicle
Figure 4
[ Installation ]
Follow these detailed cable installation instructions:
1. Feed the cable from the antenna underneath the rubber molding around the rear window.
Use a plastic putty knife or similar object to lift the rubber molding around the rear
window and tuck the antenna cable underneath the molding. Route the antenna cable
around and down the window to the lowest point. If your rear window does not have rubber molding, SIRIUS recommends consulting with a professional installer.
2. Route the antenna cable out of the window molding and into the rubber weather stripping around the trunk opening. Lift the weather stripping from the opening and tuck the
cable inside it, then replace the weather stripping. To avoid sharp bends in the cable,
run the cable inside of the weather stripping for a few inches, then remove the cable
from the weather stripping inside of the trunk. Keep the cable away from hinges, gears,
etc., that could damage it.
3. Route the cable out from the rubber weather stripping and along the trunk wall. Continue
routing the cable into the cabin through a conduit or along an existing wiring harness.
4. Route the cable through the main cabin area under the interior trim, towards the front
of the vehicle. Use the plastic putty knife to lift the plastic trim just enough to tuck the
cable under underneath. Avoid side airbag locations on back pillars and above the
doors. (Airbag locations are marked with “SRS” logos.) Be careful not to crimp or cut
the cable.
5. Bring the cable out from the trim near the firewall and route it under the carpet toward
the dashboard or console. Coil any excess cable in a hidden location, such as under the
carpet, keeping it away from any vehicle pedals or controls. Secure the excess cable
with wire ties.
6. Bring the end of the cable out at the SIRIUS radio location. Leave yourself enough cable
so you can easily connect it to the antenna connector of the SIRIUS radio or vehicle
dock.
Pickup Truck Antenna Cable Routing Procedure
Figure 5 shows how the antenna cable should be routed from the antenna to your SIRIUS
radio in a pickup truck.
[ Installation ]
2. Continue Tucking Cable
Under Molding To
Bottom of Windshield
3. Route Cable Out of Molding
and Into Weatherstripping
Around Door Opening.
Continue to Bottom of
Door Opening.
1. Route Cable
Under Rubber
Molding Around
Windshield
5. Bring Cable Out to
SIRIUS Radio
Location
4. Bring Cable out from
Weatherstripping and
Route Under Carpet.
Figure 5
Follow these detailed cable installation instructions:
1. Use a plastic putty knife or similar tool to lift the rubber molding around the windshield
and tuck the antenna cable underneath it.
2. Continue tucking the cable underneath the windshield molding around the windshield to
the lowest corner.
3. At the lowest corner of the windshield, route the cable out of the windshield molding and
into the rubber weather stripping around the door opening. Lift the weather stripping
from the opening and tuck the cable inside it, then replace the weather stripping. Run
the cable inside of the weather stripping to the bottom of the door opening.
4. Pull the cable out of the weather stripping at the bottom of the door opening and route it
under the carpet toward the dashboard. Coil any excess cable in a hidden location, such
as under the carpet, keeping it away from any vehicle pedals or controls. Secure the
excess cable with wire ties.
[ Installation ]
5. Bring the end of the cable out at the SIRIUS radio location. Leave yourself enough cable
so you can easily connect it to the antenna connector of the SIRIUS radio or vehicle
dock.
SUV/Mini-Van Antenna Cable Routing Procedure
Figure 6 shows how the antenna cable should be routed from the antenna to your SIRIUS
radio in an SUV or a Mini-Van.
1. Feed Cable Under
Rubber Seal Around
Hatch Opening
4. Bring Cable Out To
SIRIUS Radio
Location
3. Route Cable
Under Carpet
to Dashboard
2. Route Cable Under
Interior Trim, into
Cabin and Towards
Front of Vehicle
Figure 6
Follow these detailed cable installation instructions:
1. Feed the antenna cable underneath the rubber weather stripping of the rear tailgate
window/door and route the cable along the rear hatch. Lift the weather stripping from
the opening and tuck the cable inside it, then replace the weather stripping. Pull the
cable out from weather stripping and route it into the cabin under the interior trim. Avoid
hinges or gears that could crimp or cut the cable.
2. Route the cable through the SUV’s main cabin area under the interior trim, towards the
front of the vehicle. Use a plastic putty knife to lift the plastic trim just enough to tuck
the cable under underneath. Avoid side airbag locations on back pillars and above the
10 [ Installation ]
doors. (Airbag locations are marked with “SRS” logos.) Be careful not to crimp or cut
the cable.
3. Bring the cable out from the trim near the firewall and route it under the carpet toward
the dashboard or console. Coil any excess cable in a hidden location, such as under the
carpet, keeping it away from any vehicle pedals or controls. Secure the excess cable
with wire ties.
4. Bring the end of the cable out at the SIRIUS radio location. Leave yourself enough cable
so you can easily connect it to the antenna connector of the SIRIUS radio or vehicle
cradle/dock.
Convertible Antenna Cable Routing Procedure
Figure 7 shows how the antenna cable should be routed from the antenna to your SIRIUS
radio in a convertible.
6. Bring Cable Out To
SIRIUS Radio
Location
1. Bring Cable from
Antenna Into Inside
of Trunk Lid
5. Bring Cable out from
Trim and Route Under
Carpet to Dashboard
or Console.
4. Route Cable from Trunk
Under Interior Trim, into
Cabin and Towards Front
of Vehicle
2. Tape Cable Along
Inside of Lid to
Hinge Strut
3. Tie Cable to Hinge Strut, Allowing
Slack for Lid to Open and Close.
Route Cable Into Cabin
Through Existing Wire
Channel.
Figure 7
Follow these detailed cable installation instructions:
[ Installation ]
11
1. Bring the cable from the antenna into the trunk at the front edge of the trunk lid. Keep
any bends in the cable loose. Tape or tie the cable along the inside of the trunk lid to the
trunk lid hinge strut.
2. Allow enough slack in the cable so the trunk lid can easily open and close and keep the
cable away from hinges, gears, etc., that could crimp or cut it. Route the cable along the
trunk wall and into the cabin through a conduit or along an existing wiring harness.
3. Route the cable through the main cabin area under the interior trim, towards the front of
the vehicle. Use a plastic putty knife to lift the plastic trim just enough to tuck the cable
under underneath. Avoid side airbag locations on back pillars and above the doors. (Airbag locations are marked with “SRS” logos.) Be careful not to crimp or cut the cable.
4. Bring the cable out from the trim near the firewall and route it under the carpet toward
the dashboard or console. Coil any excess cable in a hidden location, such as under the
carpet, keeping it away from any vehicle pedals or controls. Secure the excess cable
with wire ties.
5. Bring the end of the cable out at the SIRIUS radio location. Leave yourself enough cable
so you can easily connect it to the antenna connector of the SIRIUS radio or vehicle
dock.
12 [ Installation ]
Tips
The following Do and Do Not antenna mounting tips illustrate how to install the antenna for
optimal performance, and also illustrate where the antenna should not be installed.
Do
Mount the antenna on the
roof, at least 3 inches from
the edge.
Do
Mount the antenna on
the roof where it has a
clear view of the sky in all
directions.
[ Tips ]
13
Do
Mount the antenna on the
roof where it has at least
3 inches of clear space
around it.
Do
Use the supplied rubber
tail cover to protect the
antenna cable.
14 [ Tips ]
3”
Do Not
Don’t mount the antenna
inside the vehicle, for
example, on the dashboard.
Do Not
Don’t mount the antenna
on any of the vehicle’s
front, back or side pillars.
Do Not
Don’t mount the antenna
close to a roof rack. Adjust
the rack so it’s further
away from the antenna or
move the antenna closer to
the center of the roof.
[ Tips ]
15
Do Not
Don’t mount the antenna
close to another antenna.
Mount it at least 3 inches
away.
Do Not
Don’t mount the antenna
closer than 3 inches from
the edge of the roof.
Use the supplied rubber
tail/cover as a guide for
judging proper length and
correct positioning.
16 [ Tips ]
Troubleshooting
Symptom
Solution
SIRIUS receiver
displays Antenna Not
Detected message
The SIRIUS antenna is not properly connected to the radio or
vehicle dock, or the connection has become loose. Check the
SIRIUS antenna connection to the radio or dock and make sure it
is a good, snug fit.
If the antenna is properly connected to the radio or vehicle dock,
there may be a break in the cable or a problem with the antenna.
SIRIUS receiver
displays Acquiring
Signal message.
The SIRIUS antenna is not receiving any signal. Check for
obstacles around the antenna and make sure it is mounted in
an optimal location. (Refer to the Do and Do Not mounting tips
beginning on page 13.)
Note: Signal reception can also be hindered if your vehicle is in a
covered garage or parking structure or you drive under structures
or obstacles such as bridges, overpasses, trees with a lot of foliage etc., for a prolonged period.
[ Troubleshooting ]
17
Troubleshooting Continued
Symptom
Solution
There is static or loss
of clarity in the SIRIUS
radio’s audio signal
If you are using your SIRIUS radio’s FM transmitter to wirelessly
transmit the audio from your SIRIUS radio to your vehicle’s FM
radio, the FM channel you selected is most likely being used by
a local broadcaster, which is interfering with the performance of
your SIRIUS radio. Turn off your SIRIUS radio and tune through
the FM channels on your vehicle radio to locate an FM channel
(between 88.1 and 107.9 MHz) that is not broadcasting in your
area. Once you have located an FM channel that is not broadcasting in your area, save it as a preset on your vehicle radio. This will
be your SIRIUS preset. Turn on your SIRIUS radio and locate its
FM Frequency adjustments (under “FM Transmitter Options” in
Settings or Menu). Set the FM frequency on your SIRIUS radio to
match the frequency of the SIRIUS preset on your vehicle radio.
Note: To find the best FM frequency with the lowest interference
in your home or travel cities, you can also go to http://www.sirius.
com and use the My SIRIUS Frequency Finder and search for a
suggested FM frequency based on zip code.
If you are connecting your SIRIUS radio directly to your vehicle’s
audio system using an “AUX IN” or “LINE IN” input, the cable
may not be properly connected. Make sure the cable is properly
connected, both to the “AUX IN” or LINE IN” connector on your
vehicle’s audio system and to the “LINE OUT” connector on your
SIRIUS radio.
18 [ Troubleshooting ]
Copyrights & Trademarks
© 2007 Sirius Satellite Radio Inc. All Rights Reserved.
® “SIRIUS”, the SIRIUS dog logo, channel names and logos are trademarks of Sirius Satellite
Radio Inc. All Rights Reserved.
Hardware, subscription, and activation fee required. For full Terms & Conditions, visit
http://sirius.com. Prices and programming are subject to change. Not available in HI and AK.
Equipment and subscription sold separately. Installation required with some equipment.
SIRIUS Customer Service: 1-888-539-7474
[email protected]
SIRIUS Satellite Radio Inc.
1221 Avenue of the Americas
New York, NY 10020
1-888-539-7474
http://www.sirius.com
[ Copyrights & Trademarks ]
19
SIRIUS Satellite Radio Inc.
1221 Avenue of the Americas
New York, NY 10020
(800) 869-5590
http://sirius.com
SIRIUS Magnetic Mount Vehicle Antenna DOT2 (051707a)
New York, NY 10020
(800) 869-5590
http://sirius.com
New York, NY 10020
(800) 869-5590
http://sirius.com
New York, NY 10020
(800) 869-5590
http://sirius.com