1
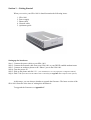
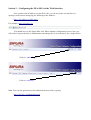
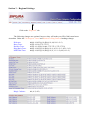
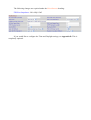
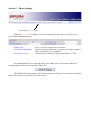
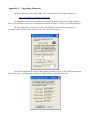
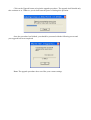
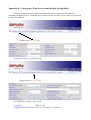
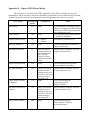
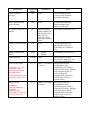
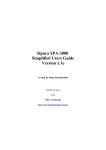
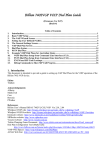
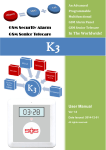
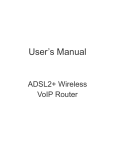
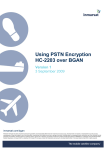
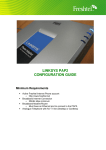
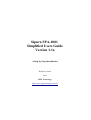
Sipura SPA-1001
Simplified Users Guide
Version 1.1a
A Step by Step Introduction
Written by Jason
from
JMG Technology
http://www.jmgtechnology.com.au
Section 1 – Getting Started
When you receive your SPA-1001 it should contains the following items:
1.
2.
3.
4.
5.
SPA-1001
Power supply
Phone cable
Network cable
Quickstart guide
Setting up the hardware:
Step 1: Connect the power cable to your SPA-1001
Step 2: Connect the network cable from your SPA-1001 to your DHCP enabled modem/router
Step 3: Connect an analogue phone to the “Phone” port in the SPA-1001.
Step 4: Turn the power on
Step 5: Pick up the phone and dial **** (You should hear a voice saying Sipura Configuration Menu)
Step 6: Dial 110# (Write down the IP address that is returned) (See Appendix E for all phone menu options)
At this stage, you can choose whether to upgrade the firmware. The latest version of the
SPA-1001 firmware at the time of writing this document is
To upgrade the firmware see Appendix C.
Section 2 – Configuring the SPA-1001 via the Web Interface
Once you have the IP address of your SPA-1001 you can access the web interface by
opening a web browser and typing the following in the Address :
http://<IP Address of SPA-1001>
For example: http://192.168.1.10
You should now see the Sipura SPA-1001 Phone Adapter Configuration screen. Now you
will need to log into the unit as Administrator and change the view to advanced. See images below.
Click on “Admin Login”
Click on “advanced”
Note: You can also go directly to the admin/advanced section by typing
http://192.168.1.10/admin/advanced
Section 3 – Regional Settings
Click on the “Regional” tab.
The following changes are optional, however they will make your SPA-3000 sound more
Australian. Under the Call Progress Tones and Distinctive Ring Patterns headings change:
Dial tone:
Busy Tone:
Reorder Tone:
Ring Back Tone:
MWI Dial Tone:
400@-19,425@-19,450@-19;10(*/0/1+2+3)
425@-19;10(.375/.375/1)
425@-19, 425@-29;60(.375/.375/1,.375/.375/2)
400@-19,425@-19,450@-19;*(.4/.2/1+2+3,.4/2/1+2+3)
400@-19,425@-19,450@-19;2(.1/.1/1+2);10(*/0/1+2)
Ring1 Cadence:
60(.4/.2,.4/2)
The following changes are required under the Miscellaneous heading :
FXS Port Impedance: 220+820||115nF
If you would like to configure the Time and Daylight savings, see Appendix D. This is
completely optional.
Section 4 – Line 1 or Line 2 Settings
Click on the “Line 1” or “Line 2” tab.
The settings for Line 1 and Line 2 are identical, so for each provider you want to register
follow the instructions below:
The first thing that needs to be changed is under the Proxy and Registration heading. Here
you will need to enter the proxy and registration information given to you by your VoIP provider.
The following image shows the setup for MyTel.
The second thing that needs to be configured is under the Subscriber Information heading.
Here you will need to enter your user id and password for given to you from your VoIP provider.
For some VoIP providers you will also have to enter the Auth ID and set Use Auth ID to
yes, for others you will not.
The next thing that needs to be altered is under the Audio Configuration heading. The
following change is required.
Preferred Codec: G729a
The final item that requires changing is under the Dial Plan heading. The dial plan will vary
from provider to provider. The dial plan show below is an example only, and may require alteration
depending on which VoIP provider you subscribe to. See Appendix A for a detailed description of
how dial plans work.
Dial Plan: (*xx|xx.)
Section 5 – Phone Settings
Click on the “Phone” tab.
Under the Line Section heading, you can set which line (or provider) you wish to use as
your default outbound provider.
Default Line:
Alt Dial Tone Multiplier:
Line 2 Select Code:
Line 1 or Line 2 (which ever you choose)
Used to convert the dial tone, so you know you have switched
lines. A multiplier of 1.1 sounds ok.
The character or characters used to switch to the 2nd line.
Everything should now be setup and ready to use. Make sure you press the Submit All
Changes button to save the settings to the SPA-1001.
The Submit All Changes button will save the changes on all pages. You can however hit that
button at the end of each section if you wish to do so.
Appendix A – Dial Plans
Dial plans can be very confusing at first glance. However they are invaluable feature of the
SPA-1001 so you should at least learn the basics of how they work. The following dial plans are to
show how to use the various features of dial plans. You should play around with them to suit your
needs.
Dial Plan Syntax
()
- The entire dial plan must be surrounded by an open and close bracket.
|
- Each individual dial plan must be separated by a pipe | character.
0-9
- Treated as normal digits
x
- Treated as any normal digit 0-9 on phone
*
- Treated as normal * character on phone
#
- Treated as normal # character on phone
.
- Repetition
<:>
S0
- Replacement, eg <02:612> means replace 02 with 612
- Dial Immediately
!
- Barring a number, place this at the end of the number to bar it
,
- Provides a dial tone
[]
- Limiting choices, eg [24] means either 2 or 4, [2-5] means 2,3,4 and 5, [24-68]
means 2,4,5,6,8
Example Dial Plans
Dial Plan 1: (<*1:0123456789>)
Description: This plan demonstrates replacement. If you dial a * followed by a 1 then the
number 0123456789 would be dialed.
Dial Plan 2: (<0:61>[2-9]xxxxxxxxS0)
Description: This plan demonstrates replacement and limiting choices. When you dial an 0
followed by a 2,3,4,5,6,7,8 or 9 and then nine of any other digit (0-9) it will
prepend 61 and remove the 0. So if you rang 02 123456789 the actual number
that would be called would be 61 2 123456789.
Dial Plan 3: (1900xxxxxx!)
Description: This plan demonstrates number barring. If you enter a 1900 followed by 6
more digits (0-9) you call will not be placed.
Appendix B - Factory Reset
To perform a factory reset on your SPA-1001 dial **** on the phone. You should hear a
Sipura message asking you to enter your selection. . Then dial 73738#.
WARNING: This will restore your unit back to factory defaults, all your information will
be lost.
See Appendix E for all Phone Menu Options.
Appendix C – Upgrading Firmware
The latest firmware for the Sipura SPA-1001 can be located on the Sipura support site.
http://www.sipura.com/support/index.htm
To upgrade the firmware in your SPA-1001 download the latest firmware, unzip it and run
the exe file provided. At the time of writing this document version 3.1.8(SEc) is the latest firmware,
The first thing that you need to do is enter the IP address of your SPA into the spaces
provided. In the example below the SPA-1001 is located at 192.168.1.35.
Click on the OK button to begin so the program can find your SPA-1001. When the program
locates the SPA, it will interrogate it and you will be shown a confirmation screen.
Click on the Upgrade button to begin the upgrade procedure. The upgrade itself should only
take a minute or so. Whatever you do don't turn the power of during this operation.
Once the procedure has finished, you should be presented with the following screen and
your upgrade has been completed.
Note: The upgrade procedure does not effect your current settings.
Appendix D – Setting up a Time Server and Daylight Saving Rules
You can configure the SPA-3000 to automatically retrieve the current date and time.
(Including daylight savings). To do this you will need to enter in a NTP server. Some providers will
provide you with one.
Change to the “System” tab
Primary NTP Server: au.pool.ntp.org
Change to the “Regional” tab
For NSW these settings seem to work:
Time Zone:
GMT+11:00
Daylight Saving Time Rule: start=3/-1/7/3;end=10/-1/7/2;save=-1
Appendix E – Sipura IVR (Phone Menu)
The Interactive Voice Response (IVR) capabilities of the SPA are designed to give the
administrator and/or user basic read/write capabilities such that the unit can attain basic IP network
connectivity and the more advanced browser-based configuration menu may be accessed.
IVR Action
IVR Menu
Choice
Parameters
Notes
Enter Menu
****
None
You should hear a message saying
“Sipura Configuration Menu. Please
enter option followed by the pound
key or hang up to exit”
Check DHCP
100
None
IVR will announce whether DHCP
is enabled or disabled
Enable/Disable DHCP
101
1 = Enable
0 = Disable
Will require password if set
Check IP Address
110
None
IVR will announce the current IP
address of the SPA
Set Static IP Address
111
Enter IP address
using numbers on
the telephone key
pad. Use the *
(star) key when
entering a decimal
point.
DHCP must be disabled; will will
require password if set
Check Network Mask
120
None
IVR will announce the current
Network Mask of the SPA
Set Network Mask
121
Enter value using
numbers on the
telephone key pad.
Use the * (star) key
when entering a
decimal point.
DHCP must be disabled; will will
require password if set
Check Static Gateway
IP Address
130
None
IVR will announce the
current gateway IP
address of SPA.
Set Static Gateway IP
Address
131
Enter value using
numbers on the
telephone key pad.
Use the * (star) key
when entering a
decimal point.
DHCP must be disabled; will will
require password if set
Check MAC Address
140
None
IVR will announce the
MAC address of SPA in
hex string format.
IVR Action
IVR Menu
Choice
Parameters
Notes
Check Firmware
Version
150
None
IVR will announce the
version of the firmware
running on the SPA.
Check Primary DNS
Server Setting
160
None
IVR will announce the
current setting in the
Primary DNS field.
Set Primary DNS Server
Setting
161
Enter IP address
using numbers on
the telephone key
pad. Use the *
(star) key when
entering a decimal
point.
Will require password if set.
Check Web Server Port
170
None
IVR will announce the
port that the web server
is listening on. (Default is
80)
Enable/Disable Web
Server
7932
1 = Enable
0 = Disable
Will require password if set
After you hear “Option
Successful,” hang-up. Unit
will reboot automatically.
Manual Reboot
732668
None
User Factory Reset
877778
Enter 1 to confirm * SPA will prompt for
to cancel
confirmation. After
confirming, you will hear
“Option Successful.” Hangup.
Unit will reboot and all
“User Changeable”
configuration parameters
will be reset to factory
default values.
73738
Enter 1 to confirm * SPA will prompt for
to cancel
confirmation. After
confirming, you will hear
“Option Successful.” Hangup.
Unit will reboot and all
configuration parameters
will be reset to factory
default values.
WARNING: ALL “UserChangeable” NON
DEFAULT SETTINGS
WILL BE LOST!
This might include network
and service provider data
Factory Reset
WARNING:
ALL NON-DEFAULT
SETTINGS
WILL BE LOST!
This includes network and
service provider data.
Appendix F – Sipbroker
Sipbroker is a free service that allows you to dial between certain VoIP providers. To use
sipbroker you will need to add the following entry to your dial plan.
<**,:>[x*][x*].<:@sipbroker.com>
Please see http://www.sipbroker.com to read all about the great service provided my
sipbroker.
To test that Sipbroker is working for you, you first dial ** and then try one of the numbers
below.
*266-300 monkey sounds
*266-301 echo test
*266-303 Ireland speaking clock
*266-305 music
Sipbroker uses SIP-codes to communicate between the various providers that are supported.
Some common codes are shown below.
Astratel
Pennytel
Sipme
*269
*234
*320
So to dial someone on Astratel, you would dial **, followed by *269, followed by the
Astratel number you are trying to reach.
You can setup another dial plan to dial Astratel numbers by adding a new dial plan,
something like.
<#1:*269>8888xxxx<:@sipbroker.com>
This means that when you dial #1 you can then dial an Astratel 8888 number and it will use
sipbroker to negotiate the connection.
To view the complete list of SIP-codes please visit the following site location.
http://www.sipbroker.com/sipbroker/action/providerWhitePages