1
7285Q
INSTRUCTION MANUAL
MANUEL D’INSTRUCTION
MANUAL DE INSTRUCCIONES
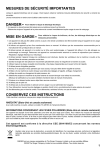
“IMPORTANT SAFETY INSTRUCTIONS”
“When using an electrical appliance, basic safety precautions should always be followed, including the following.”
“Read all instructions before using this sewing machine.”
“DANGER--To reduce the risk of electric shock:”
1. “This sewing machine should never be left unattended when plugged in. Always unplug this sewing machine from the electric
outlet immediately after using and before cleaning.”
“WARNING- 7RUHGXFHWKHULVNRIEXUQV¿UHHOHFWULFVKRFNRULQMXU\WRSHUVRQV´
1. “Do not allow to be used as a toy. Close attention is necessary when this sewing machine is used by or near children.”
2. “This appliance is not intended for use by persons (including children) with reduced physical, sensory or mental capabilities,
or lack of experience and knowledge, unless they have been given supervision or instruction concerning use of the appliance
by a person responsible for their safety. Children should be supervised to ensure that they do not play with the appliance.”
3. “Use this sewing machine only for its intended use as described in this manual. Use only attachments recommended by the
manufacturer as contained in this manual.”
4. “Never operate this sewing machine if it has a damaged cord or plug, if it is not working properly, if it has been dropped
or damaged, or dropped into water. Return the sewing machine to the nearest authorized dealer or service center for
examination, repair, electrical or mechanical adjustment.”
³,I WKH VXSSO\ FRUG LV GDPDJHG LW PXVW EH UHSODFHG E\ WKH PDQXIDFWXUHU LWV VHUYLFH DJHQW RU VLPLODUO\ TXDOL¿HG SHUVRQV LQ
order to avoid a hazard.”
6. “Never operate the sewing machine with any air openings blocked. Keep ventilation openings of the sewing machine and foot
control free from the accumulation of lint, dust, and loose cloth.”
7. “Never drop or insert any object into any opening.”
8. “Indoors use only.”
9. “Do not operate where aerosol (spray) products are being used or where oxygen is being administered.”
10. “To disconnect, turn switch to the off („0“) position, then remove plug from outlet.”
11. “Switch off or unplug the appliance when leaving it unattended, unplug the appliance before carrying out maintenance or
replacing lamps.”
12. “Do not unplug by pulling on cord. To unplug, grasp the plug, not the cord.”
³.HHS¿QJHUVDZD\IURPDOOPRYLQJSDUWV6SHFLDOFDUHLVUHTXLUHGDURXQGWKHVHZLQJPDFKLQHQHHGOH´
14. “Never sew with a damaged needle plate as this can cause needle to break.”
15. “Do not use bent needles.”
³'RQRWSXOORUSXVKIDEULFZKLOHVWLWFKLQJ,WPD\GHÀHFWWKHQHHGOHFDXVLQJLWWREUHDN´
17. “Switch the sewing machine off (“0”) when making any adjustments in the needle area, such as threading needle, changing
needle, threading bobbin, or changing presser foot, etc.”
18. “Always unplug sewing machine from the electrical outlet when removing covers, lubricating, or when making any other user
servicing adjustments mentioned in the instruction manual.”
19. “To avoid electrical shock never put the machine nor the mains cable or mains plug into water or other liquids.”
20. “The LED lamp maximum power is 0.3w, maximum voltage is DC 5v, if the LED lamp is damaged, you should not use the
product and send it to the manufacture or service agent to repair or replace at once.”
21. “Attention the following to avoid injury:
- Unplug the foot controller of the appliance when leaving it unattended:
- Unplug the foot controller of the appliance before carrying out any maintenance.”
SDUWV7R UHGXFH ULVN RI LQMXU\ VZLWFK RII EHIRUH VHUYLFLQJ &ORVH FRYHU EHIRUH RSHUDWLQJ
“CAUTION-- 0RYLQJ
machine.”
“SAVE THESE INSTRUCTIONS”
“This product is for household use, or equivalent.”
FOOT CONTROL (USA & Canada only)
Use Model YC-485 EC or Model JF-1000 with this sewing machine.
POLARIZED PLUGS CAUTION (USA & Canada only)
This appliance has a polarized plug (one blade wider than the other). To reduce the risk of electric shock, this plug is intended
WR¿WLQDSRODUL]HGRXWOHWRQO\RQHZD\,IWKHSOXJGRHVQRW¿WIXOO\LQWKHRXWOHWUHYHUVHWKHSOXJ,ILWVWLOOGRHVQRW¿WFRQWDFWD
TXDOL¿HGHOHFWULFLDQWRLQVWDOOWKHSURSHURXWOHW'RQRWPRGLI\WKHSOXJLQDQ\ZD\
This appliance complies with EEC Directive 2004/108/EC covering the electromagnetic compatibility.
Please note that on disposal, this product must be safely recycled in accordance with relevant National legislation
relating to electrical/ electronic products. If in doubt please contact your retailer for guidance.
6,1*(5LVWKHH[FOXVLYHWUDGHPDUNRI7KH6LQJHU&RPSDQ\/LPLWHG6jUORULWV$I¿OLDWHV
7KH6LQJHU&RPSDQ\/LPLWHG6jUORULWV$I¿OLDWHV$OOULJKWVUHVHUYHG
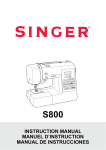
MESURES DE SÉCURITÉ IMPORTANTES
Lorsqu’un appareil électrique est en usage, il faut toujours observer certaines mesures élémentaires de sécurité y compris les suivantes.
Lire les instructions en entier avant d’utiliser cette machine à coudre.
DANGER-
Pour réduire le risque de décharge électrique:
1. Un appareil ne devrait jamais être laissé sans surveillance lorsqu’il est branché.
Débranchez toujours l’appareil de la prise externe de courant immédiatement après usage et avant le nettoyage.
MISE EN GARDE-
Pour réduire le risque de brûlures, de feu, de décharge électrique ou de
blessures personnelles:
1. “Cet appareil ne doit pas être utilisé comme un jouet. Une stricte surveillance doit être exercée lorsque l’appareil est en usage
par ou près des entants.”
2. “Cet appareil n’est pas destiné à être utilisé par des personnes (enfants compris) avec réduction des handicaps physiques,
sensoriels ou mentaux de capacités ou de manque d’expérience et des connaissances, à moins qu’ils n’aient été donnée de
surveillance ou d’instructions concernant l’utilisation de l’appareil par une personne responsable de leur sécurité. Les enfants
GRLYHQWrWUHVXUYHLOOpVD¿QGHV¶DVVXUHUTX¶LOVQHMRXHQWSDVDYHFO¶DSSDUHLO´
3. “N’utilisez cet appareil qu’aux fins mentionnées dans ce manuel. N’utilisez que les accessoires recommandés par le
manufacturier tel qu’indiqué dans ce manuel.”
4. “N’utilisez jamais cet appareil si le cordon ou la fiche sont endommagés, si l’appareil fait défaut, s’il a été échappé ou
endommagé ou immergé. Retournez cet appareil au concessionnaire autorisé ou centre de réparations pour examen.
Réparation réglage électrique ou mécanique.”
5. “Si le cordon d’alimentation est endommagé, il doit être remplacé par le constructeur, les personnes de son agent de service
RXGHPrPHTXDOL¿FDWLRQD¿QG¶pYLWHUXQGDQJHU´
6. “N’utilisez jamais l’appareil lorsque les ventilateurs sont obstrués. Gardez les ventilateurs de la machine à coudre et du
rhéostat libres de mousse, poussière ou de tissu.”
7. “Gardez les doigts loin des pièces en mouvement spécialement autour de l’aiguille de la machine à coudre.”
8. “Usage intérieur seulement.”
9. “N’utilisez jamais d’aiguilles gauchies.”
10. “Ne tirez ni ne poussez le tissu pendant que vous cousez. Ceci peut faire dévier l’aiguille et la briser.”
11. “Éteignez ou débranchez l’appareil quand il laisse sans surveillance, débranchez l’appareil avant d’effectuer l’entretien ou le
remplacement des lampes.”
³$UUrWH]³´ODPDFKLQHjFRXGUHORUVTXHYRXVIDLWHVGHVUpJODJHVjO¶DLJXLOOHHQ¿ODJHFKDQJHPHQW
HQ¿ODJHGHFDQHWWHRXFKDQJHPHQWGHSLHGSUHVVHXUHWF´
13. “Débranchez toujours la machine de la prise externe de courant lorsque vous retirez les couvercles,
HIIHFWXH]ODOXEUL¿FDWLRQRXWRXWDXWUHHQWUHWLHQPHQWLRQQpGDQVOHPDQXHOG¶LQVWUXFWLRQV´
14. “N’insérez ni ne laissez tomber aucun objet dans aucune ouverture.”
15. “N’utilisez pas en plein air.”
16. “N’utilisez pas où des produits en aérosol sont en usage ni où est administré de l’oxygene.”
17. “Pour débrancher, tournez tous les réglages en position d’arrêt (“0”), puis débranchez la prise externe de courant.”
³1HGpEUDQFKH]SDVHQWLUDQWOHFRUGRQ3RXUGpEUDQFKHUVDLVLVVH]OD¿FKHQRQSDVOHFRUGRQ´
19. “Pour éviter un choc électrique ne jamais mettre la machine ou le câble d’alimentation ou prise d’alimentation en eau ou autres liquides.”
20. “Le voyant d’alimentation maximale de la lampe est 0,3 W, tension maximale est de DC 5V, si la lampe LED est endommagée,
vous ne devriez pas utiliser le produit et l’envoyer à la fabrication ou l’agent de service pour réparer ou remplacer à la fois.”
21. “Attention ce qui suit pour éviter les blessures:
- Débranchez le contrôleur de pied de l’appareil lorsque vous le laissez sans surveillance:
- Débranchez le contrôleur de pied de l’appareil avant d’effectuer l’entretien.”
cable électrique avant d’éffectuer toute intervention de maintenance sur la machine.
“PRECAUTION- leFermez
le carter avant d’utiliser la machine.”
3LqFHV HQ PRXYHPHQW $¿Q GH UpGXLUH WRXW ULVTXH GH EOHVVXUH pWHLJQH] HW GpEUDQFKH]
CONSERVEZ CES INSTRUCTIONS
Cette machine à coudre est couçue pour usage domestique seulement.
RHÉOSTAT (Etats-Unis et canada seulement)
Avec cette machine à coudre, utilisez le modèle YC-485 EC ou JF-1000.
INFORMATIONS CONCERNANT LES FICHES POLARISÉES (Etats-Unis et canada seulement)
Cet appareil est équipé d'une fiche polarisée (une lame est plus large que I’autre). Pour réduire les risques de décharge
pOHFWULTXHFHWWH¿FKHQHSHXWrWUHEUDQFKpHGDQVODSULVHTXHG¶XQHVHXOHIDoRQ6LOD¿FKHQHSHXWSDVrWUHLQVpUpHHQWLqUHPHQW
GDQVODSULVHWRXUQH]OD¿FKH6LOD¿FKHQHSHXWWRXMRXUVSDVHQWUHUGDQVODSULVHYHXLOOH]FRQWDFWHUXQpOHFWULFLHQTXDOL¿pD¿Q
TX
LOYRXVLQVWDOOHODSULVHPXUDOHDSSURSULpH1HPRGL¿H]OD¿FKHHQDXFXQFDV
Cet appareil est conforme à la directive CEE 2004/108/EC c oncernant l es n ormes
électromagnétiques.
9HXLOOH]QRWHUTX¶HQFDVGHGHVWUXFWLRQFHSURGXLWGRLWEpQp¿FLHUG¶XQUHF\FODJHVpFXULVpFRQIRUPHjODOpJLVODWLRQ
nationale applicable aux produits électriques/électroniques. En cas de doute, veuillez contacter votre distributeur
agréé.
6,1*(5HVWXQHPDUTXHH[FOXVLYHGH7KH6LQJHU&RPSDQ\/LPLWHG6jUORXGHVHV$I¿OLpV
7KH6LQJHU&RPSDQ\/LPLWHG6jUORXGHVHV$I¿OLpV7RXVGURLWVUpVHUYpV
1
IMPORTANTES INSTRUCCIONES DE SEGURIDAD
Cuando se usa un aparato eléctrico, debe seguirse unas precauciones básicas y que vienen incluidas a continuación.
“Leer las instrucciones antes de usar la máquina de coser.”
PELIGRO - Para reducir el riesgo de una descarga eléctrica.-
1. La máquina no debe dejarse nunca desatendida mientras esté conectada. Desconectar la máquina de la red eléctrica
inmediatamente después de su uso y antes de limpiarla.
CUIDADO - Para reducir el riesgo de quemaduras, fuego, descargas eléctricas o causar daños a personas.
1. “No usar la máquina como un juguete.”
Prestar atención si fuese necesario cuando la máquina está siendo usada por niños o cerca de ellos.
2. “Este aparato no está destinado al uso por personas (incluyendo niños) con una reducción de física, sensorial o mental,
capacidad, o falta de experiencia y el conocimiento, a menos que se les ha dado la supervisión o las instrucciones de
utilización del aparato por una persona responsable de su seguridad. Los niños deben ser supervisados para asegurarse de
que no juegan con el aparato.”
3. “Usar la máquina de coser solamente como se describe en este manual.
8VDU~QLFDPHQWHORVDFFHVRULRVUHFRPHQGDGRVSRUHOIDEULFDQWH\TXHYLHQHQHVSHFL¿FDGRVHQHVWHPDQXDO´
4. “No trabajar nunca con la máquina en caso de que tenga el cable o el enchufe en malas condiciones, si no cose
correctamente, en caso de que se haya caído, haya sido dañada o se haya mojado.”
5. “Si se daña el cable de suministro, debe ser sustituido por el fabricante, su agente de servicio o similares a personas
FDOL¿FDGDVD¿QGHHYLWDUXQSHOLJUR´
³1RXVDUODPiTXLQDFRQORVRUL¿FLRVGHYHQWLODFLyQEORTXHDGRV0DQWHQHUORVRUL¿FLRVGHYHQWLODFLyQGHODPiTXLQDGHFRVHU
y el pedal sin acumulación de polvo, suciedad y restos de tejido.”
³1RLQWURGXFLUQRLQVHUWDUREMHWRVHQORVRUL¿FLRVGHYHQWLODFLyQ´
8. “Adentro uso solamente.”
9. “No usar mientras se estén utilizando productos aerosoles (spray) o en lugares donde se esté administrando oxigeno.”
10. “Para desconectar, girar el interruptor hasta la posición Off ( “0” ), luego desconectar el enchufe de la red.”
11. “Apague o desconecte el aparato cuando no lo use, desconecte el aparato antes de llevar a cabo el mantenimiento o
sustitución de las lámparas.”
12. “No desconectar el enchufe tirando del cable. Para desconectar, tirar de la clavija, no del cable.”
³0DQWHQHUORVGHGRVDOHMDGRVGHWRGDVODVSDUWHVPRYLEOHVGHODPiTXLQD7HQHUXQFXLGDGRHVSHFLDOFRQODDJXMD´
14. “Usar siempre la placa de agujas apropiada. Una placa de agujas impropia puede producir la rotura de la aguja.”
15. “No usar agujas despuntadas.”
16. “No presionar ni tirar del tejido mientras se está cosiendo. Esto podría doblar la aguja y romperla.”
17. “Situar el interruptor principal de la máquina en posición Off ( “0” ) cuando se realice algún ajuste en el área de la aguja como
enhebrar la aguja, cambiar la aguja, cambiar la canilla, cambiar el pie prensatelas y similares.”
18. “Desconectar siempre la máquina de la red eléctrica cuando se retiren las tapas, para lubricar, o cuando se realice algún otro
tipo de ajuste mecánico mencionado en el manual de instrucciones.”
19. “Para evitar descargas eléctricas, no ponga la máquina ni el cable o enchufe en agua u otros líquidos.”
20. “La lámpara LED de potencia máxima es 0,3 W, la tensión máxima es de DC 5V, si se daña la lámpara LED, que no debe
usar el producto y enviarlo a la fabricación o el agente de servicio para reparar o reemplazar a la vez.”
21. “Atención los siguientes campos para evitar lesiones:
- Desconecte el pedal del aparato cuando no lo use:
- Desconecte el pedal del aparato antes de realizar cualquier tipo de mantenimiento.”
reducir el riesgo de daños personales, apague y desconecte antes de
PARTES MÓVILES- Para
cualquier mantenimiento. Cierre la tapa antes de utilizar la máquina.
CONSERVE ESTE MANUAL DE INSTRUCCIONES
Esta máquina de coser es para uso doméstico
PEDAL (sólo EE.UU. y Canadá)
Use el modelo YC-485 EC o JF-1000 con esta máquina de coser.
INFORMACIÓN REFERENTE AL ENCHUFE POLARIZADO (sólo EE.UU. y Canadá)
Este electrodoméstico está equipado con un enchufe polarizado (note que una patita es más ancha que la otra). Para reducir el
riesgo de choques eléctricos, este enchufe solamente puede ser usado en una toma de corriente polarizada. Si no puede insertar el
enchufe completamente en la toma de corriente, déle la vuelta e inténtelo de nuevo. Si el enchufe no entra todavía correctamente,
FRQWUDWHDXQHOHFWULFLVWDFDOL¿FDGRSDUDTXHOHLQVWDOHODWRPDGHFRUULHQWHDGHFXDGD1RLQWHQWHPRGL¿FDUHOHQFKXIH
Este instrumento se conforma con directivo de CEE 2004/108/EC cubriendo supresión contra
interferencia de radio.
Por favor, recuerde que estos productos deben ser reciclados de acuerdo con la legislación nacional
referente a productos eléctricos y electrónicos. Si tiene alguna duda al respecto, por favor contacte con el
distribuidor.
2
6,1*(5HVXQDPDUFDUHJLVWUDGDGH³7KH6LQJHU&RPSDQ\/LPLWHG6jUO´RVXV$¿OLDGDV
7KH6LQJHU&RPSDQ\/LPLWHG6jUORVXV$¿OLDGDV7RGRVORVGHUHFKRVUHVHUYDGRV
TABLE OF CONTENTS
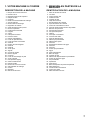
1. KNOWING YOUR SEWING MACHINE
0DFKLQHLGHQWL¿FDWLRQ ------------------------------------------------6 - 7
Accessories -------------------------------------------------------------8 - 9
Setting up your machine -----------------------------------------10 - 11
Spool pins, Presser foot lifter ---------------------------------- 12 - 13
Darning plate ------------------------------------------------------- 12 - 13
Converting to free-arm sewing -------------------------------- 14 - 15
Large extension table -------------------------------------------- 14 - 15
Winding the bobbin ----------------------------------------------- 16 - 17
Threading the bobbin thread ----------------------------------- 18 - 19
Threading the top thread ---------------------------------------- 20 - 23
Using automatic needle threader
Picking up bobbin thread ---------------------------------------- 24 - 25
Needle, thread and fabric chart ------------------------------- 26 - 27
Adjusting top thread tension ----------------------------------- 28 - 29
Changing presser foot ------------------------------------------- 28 - 29
Functions of control panel -------------------------------------- 30 - 33
Operation buttons ------------------------------------------------- 34 - 37
2. STARTING TO SEW
Quick reference table of stitch length and width ---------- 38 - 41
Straight stitching -------------------------------------------------- 42 - 45
Keeping seams straight
Straight stitch with auto tie-off function ---------------------- 44 - 45
Inserting zippers and piping
Zigzag stitching ---------------------------------------------------- 46 - 47
Adjusting stitch width and length, Satin stitch
Placement of patterns
Blindhem stitch ---------------------------------------------------- 48 - 49
0XOWLVWLWFK]LJ]DJ6KHOOVWLWFK --------------------------------- 50 - 51
Sewing on a button ----------------------------------------------- 50 - 51
Decorative and stretch stitches -------------------------------- 52 - 61
Straight stretch stitch, Honeycomb stitch, Overedge stitch,
Feather stitch, Ric-rac stitch, Double overlock stitch,
Criss-cross stitch, Entredeux stitch, Ladder stitch,
Pin stitch, Blanket stitch, Slant pin stitch,
Slant overedge stitch, Crossed stitch, Chevron stitch,
Greek key stitch, Edge-joining stitch,
Fishbone stitch, Thorn stitch,
Reinforced overedge stitch, Wizard stitch
0RUHGHFRUDWLYHVWLWFKHVLGHDVIRU
decorative machine stitching ----------------------------------- 62 - 63
Buttonhole making ------------------------------------------------ 64 - 69
Automatic buttonhole, Corded buttonholes,
0DQXDOEXWWRQKROH
3. CARING FOR YOUR MACHINE
Cleaning hook area and feed dogs --------------------------- 70 - 71
4. OTHER INFORMATION
Satin stitch foot, Twin needle ----------------------------------- 72 - 73
Straight stitch needle position --------------------------------- 74 - 75
5. SPECIAL ACCESSORIES ------------------------------ 76 - 79
1/4” Foot, Overcasting foot,
'DUQLQJHPEURLGHU\IRRW*DWKHULQJIRRW
Rolled hem foot
6. PERFORMANCE CHECKLIST ----------------------- 80 - 81
For European version
Dimensions: 376 mm × 197 mm × 301 mm
0DVVRIWKHHTXLSPHQWNJ
Rated Voltage: 230 V ~
Rated Frequency: 50 Hz
Rated input: 65 W
Using ambient temperature: Normal temperature
Acoustic noise level: less than 70 db(A)
3
TABLE DES MATIÈRES
1. VOTRE MACHINE À COUDRE
Description de la machine ------------------------------------------6 - 7
Accessoires -------------------------------------------------------------8 - 9
Préparation de la machine ---------------------------------------10 - 11
Porte-bobine, Levier du pied presseur ----------------------- 12 - 13
Plaque de reprisage ---------------------------------------------- 12 - 13
Utilisation du bras libre ------------------------------------------ 14 - 15
Plateau de rallonge ----------------------------------------------- 14 - 15
Préparation de la canette --------------------------------------- 16 - 17
(Q¿ODJHGX¿OGHFDQHWWH ---------------------------------------- 18 - 19
(Q¿ODJHGX¿OVXSpULHXU ----------------------------------------- 20 - 23
8WLOLVDWLRQGHO¶HQ¿OHXUGHFKDVG¶DLJXLOOH
5DSSHOGX¿OLQIpULHXU -------------------------------------------- 24 - 25
7DEOHDXGHVDLJXLOOHV¿OVHWWLVVXV ---------------------------- 26 - 27
5pJODJHGHODWHQVLRQGX¿OVXSpULHXU ----------------------- 28 - 29
Remplacement du pied presseur ----------------------------- 28 - 29
Fonctions du panneau de commande ----------------------- 30 - 33
Boutons de fonctionnement ------------------------------------ 34 - 37
Zigzag multi-point, Point de lingerie -------------------------- 50 - 51
Pose de boutons -------------------------------------------------- 50 - 51
Point décoratifs et points extensibles ------------------------ 52 - 61
Point droit extensible, Point nid d’abeille,
Point surjet extensible, Point plume, Point ric rac,
Point surjet double, Point entrecroisé, Point entredeux,
Point d’échelle, Point épingle, Point languette,
Point épingle oblique, Surjet oblique, Point croisé,
Point chevron, Point grec, Point d’assemblage des rebords,
Point d’arrête, Point d’épine, Point surjet renforcé,
Point sorcier
3OXVGHSRLQWGpFRUDWLIVLGpHVSRXUODFRXWXUH
décorative à la machine ----------------------------------------- 62 - 63
Confection des boutonnières ---------------------------------- 64 - 69
Boutonnière automatique
Boutonnieres gansées (renforcées),
Boutonnière manuelle
3. ENTRETIEN DE VOTRE MACHINE
Nettoyage des griffes et du crochet -------------------------- 70 - 71
2. COMMENCEZ À COUDRE
Tableau de référence rapide des
longueurs et largeurs de points --------------------------- 38 - 41
Point droit ------------------------------------------------------------ 42 - 45
Pour garder la couture droite
Point droit avec fonction de nouage automatique --------- 44 - 45
Inserér une fermeture à glissière ou un biais (galonner)
Point zigzag -------------------------------------------------------- 46 - 47
Réglage de la largeur et de la longueur de point,
Point bourdon, Positionnement des motifs
Point invisible ------------------------------------------------------ 48 - 49
4. RENSEIGNEMENTS AUTRES
Pied pour point bourdon, Aiguille jumelée ------------------ 72 - 73
Réglage de la position d’aiguille pour le point droit ------ 74 - 75
5. ACCESORIOS ESPECIALES ------------------------- 76 - 79
Pied d’un quart de pouce, Pied de surjet,
Pied à repriser et à broder, Pied fronceur,
Pied de Nervures
6. VÉRIFICATION DES PETITS
PROBLÈMES DE COUTURE ------------------------- 80 - 81
Version pour l’Europe
Dimensions: 376 mm × 197 mm × 301 mm
Poids de l’équipement: 6,7 kg
Tension nominale: 230 V ~
Fréquence nominale: 50 Hz
Entrée nominale: 65 W
Utilisation de la
température ambiante: température normale
Niveau de bruit acoustique: moins de 70 db(A)
4
INDICE DE CONTENIDOS
1. PRINCIPALES PARTES DE LA MAQUINA
,GHQWL¿FDFRyQGHODPiTXLQD --------------------------------------6 - 7
Accesorios --------------------------------------------------------------8 - 9
Preparación de la máquina --------------------------------------10 - 11
Porta carretes, Palanca pie prensatelas -------------------- 12 - 13
Placa transparente ----------------------------------------------- 12 - 13
Utilización del brazo libre --------------------------------------- 14 - 15
Base de extension ------------------------------------------------ 14 - 15
Devanado de la bobina ------------------------------------------ 16 - 17
Enhebrado del hilo de la bobina ------------------------------ 18 - 19
Enhebrado del hilo superior ------------------------------------ 20 - 23
Empleo del ensartador automático de aguja
Extracción del hilo de la bobina ------------------------------- 24 - 25
Tabla de hilo, aguja y material --------------------------------- 26 - 27
Ajuste de la tensión del hilo superior ------------------------ 28 - 29
Cambio del pie prensatelas ------------------------------------ 28 - 29
Funciones de panel de control -------------------------------- 30 - 33
Interruptores de funcionamiento ------------------------------ 34 - 37
Zig-zag de tres puntadas, Puntada de lencería ----------- 50 - 51
Cosido de botones ------------------------------------------------ 50 - 51
Puntadas decorativas y elásticas ----------------------------- 52 - 61
Puntada recta triple, Puntada panal, Puntada sobre-orillado,
Puntada pluma, Puntada ric rac, Puntada obrlock doble,
Puntada entrecruz, Puntada “Entredos”,
Puntada en escalera, Puntada de broche, Puntada de ribete,
3XQWDGDDO¿OHULQFOLQDGR3XQWDGDRYHUORFNLQFOLQDGR
Puntada cruzada, Puntada chevron, Puntada llave griega,
Puntada une-orillas, Puntada raspa, Puntada “Herringbone”,
Puntada sobre-borde reforzado, Puntada mago
0DVSXQWDGDVGHFRUDWLYDVHLGHDVSDUDGHFRUDUVXV
manualidades ------------------------------------------------------ 62 - 63
Confección de ojales --------------------------------------------- 64 - 69
Ojales automaticos, Ojales con cordón,
Ojal manual
3. CUIDE SU MAQUINA
Limpiar el area del transportador y la lanzadera ---------- 70 - 71
2. EMPEZER A COSER
Cuadro de referencia rápida de largo y ancho
de puntada ------------------------------------------------------ 38 - 41
Puntada recta ------------------------------------------------------- 42 - 45
0DQWHQLHQGRODSXQWDGDGHUHFKD
Puntada recta con función de remate automático -------- 44 - 45
Colocación de cierres y vivo
Puntada zig-zag --------------------------------------------------- 46 - 47
Ajuste del ancho y largo de puntada, Puntada de relleno,
Ubicacion de los patrones
Puntada invisible -------------------------------------------------- 48 - 49
4. INFORMACIÓN ADICIONAL
Pie prensatelas para coser en satén ------------------------- 72 - 73
Aplicacion de dos aguja doble --------------------------------- 72 - 73
Ajuste de posición de aguja para puntada recta ---------- 74 - 75
5. ACCESORIOS ESPECIALES ------------------------- 76 - 79
Pie de 1/4 de pulgada, Pie para sobrehilado,
Pie para bordado y zurcido, Pie para Fruncidos,
Pie para dobladillo angosto
6. CUADRO DE VERIFICACION DE
RENDIMIENTO ---------------------------------------------- 84 - 85
Para versión europea
Dimensiones: 376 mm × 197 mm × 301 mm
Peso del equipo: 6,7 kg
Voltaje nominal: 230 V ~
Frecuencia nominal: 50 Hz
Consumo nominal: 65 W
Uso de temperatura ambiente: temperatura normal
Nivel de ruido acústico: menos de 70 db(A)
5
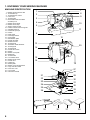
1. KNOWING YOUR SEWING MACHINE
MACHINE IDENTIFICATION
1.
2.
3.
4.
5.
6.
7.
8.
9.
10.
11.
12.
13.
14.
15.
16.
18.
19.
20.
21.
22.
23.
24.
25.
26.
27.
28.
29.
30.
31.
32.
33.
34.
35.
36.
37.
38.
Bobbin winding tension disk
Thread take-up
Thread tension control
Face cover
Thread cutter
Removable extension table/
Accessory box
Bobbin winder shaft
Bobbin winder stop
Sewing speed control
Pattern number reference guide
Operation buttons
Horizontal spool pin
Handle
Hand wheel
Power/light switch
Cord socket
,GHQWL¿FDWLRQSODWH
Presser foot lifter
Buttonhole lever
Thread guide
Automatic needle threader
Thread guide
Thread guide
Presser foot screw
Needle
Bobbin cover plate
Needle bar
Thread cutter
Foot release lever
Needle clamp screw
Presser foot
Feed dogs
Needle plate
Bobbin cover release button
Large extension table
Power line cord
Foot control
Instruction manual
7
8
1
2
9
3
4
10
5
11
6
12
13
20
14
15
16
17
18
19
27
28
21
29
22
23
24
30
31
32
25
33
26
34
35
6
36
37
38
1. VOTRE MACHINE À COUDRE
DESCRIPTION DE LA MACHINE
1.
4.
6.
7.
8.
9.
10.
11.
12.
13.
14.
15.
16.
18.
19.
24.
25.
26.
27.
29.
30.
31.
32.
33.
34.
35.
36.
37.
Disque de tension du bobineur
5HOHYHXUGH¿O
5pJODJHWHQVLRQGX¿OVXSpULHXU
Plaque frontale
&RXSH¿O
Boîte à accessoires/Table de rallonge
Axe du bobineur
Butée d’arrêt du bobinage
Régulateur de vitesse
Guide de référence des points
Bouton d’opération
Porte-bobine horizontal
Poignée
Volant
Interrupteur/Lumière
Prise de cordon
3ODTXHG¶LGHQWL¿FDWLRQ
Levier du pied de biche
Levier-poussoir boutonnière
*XLGH¿O
(Q¿OHXUGHFKDVG¶DLJXLOOH
*XLGH¿O
*XLGH¿O
Vis du pied
Aiguille
Couvercle canette
Barre à aiguille
&RXSH¿O
Levier de verrouillage du pied
Vis de l’aiguille
Pied presseur zigzag
Griffe d’entraînement
Plaque-aiguille
Bouton du couvercle canette
Grand plateau de rallonge
Cordon
Rhéostat
0DQXHOG¶LQVWUXFWLRQ
1. PRINCIPALES PARTES DE LA
MAQUINA
IDENTIFICACOÓN DE LA MÁQUINA
1. Disco de tensión de bobina
2. Tira hilos
3. Control tensión hilo
4. Cubierta frontal
5. Cortador de hilo
6. Caja de accesorios
7. Eje devanador de la bobina
8. Tope devanador de la bobina
9. Control de velocidad de costura
10. Guía de referencia del número de puntada
11. Botones de Operación
12. Portacarrete horizontal
13. Asa para transportar
14. Volante
15. Interruptor corriente/luz
16. Conector del cable
3ODFDGHLGHQWL¿FDFLyQ
18. Palanca pie prensatelas
19. Palanca para ojales
20. Guía hilo
21. Ensartador automático de aguja
22. Guía hilo
23. Guía hilo
24. Tornillo pie prensatelas
25. Aguja
26. Placa transparente
27. Barra de aguja
28. Cortador de hilo
29. Palanca de desprendimiento prensatelas
30. Tornillo de sujeción aguja
31. Pie prensatelas
32. Impelentes
33. Placa aguja
34. Botón de apertura de placa transparente
0HVD([WHQVRUD
36. Cordón de la linea eléctrica
37. Control por pedal
0DQXDOGHLQVWUXFFLRQHV
7
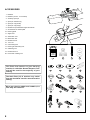
ACCESSORIES
1. Needles
2. Bobbins (4 total - 1 in machine)
3. Auxiliary spool pin
4. Spool pin felt discs (2)
6. Spool pin cap (small)
7. Spool pin cap (large)
8. Buttonhole opener/Seam Ripper and Brush
9. Screwdriver for needle plate
10. Darning plate
11. Zipper foot
12. Satin stitch foot
13. Blind stitch foot
14. Buttonhole foot
15. 1/4” Foot
16. Overcasting foot
'DUQLQJHPEURLGHU\IRRW
18. Gathering foot
19. Rolled hem foot
20. Even feed / walking foot
1
The Foot that comes on your Sewing
machine is called the General Purpose Foot
and will be used for the majority of your
sewing.
The Satin Foot (12) is another very useful
foot and should be used for most decorative
sewing.
2
3
4
5
6
7
8
9
10
11
12
13
14
When pur chasing a dditional bobbins, be
sure they are Class I5 J.
17
8
18
15
19
16
20
ACCESSOIRES
ACCESORIOS
1. Aiguilles
1. Agujas
2. Canettes (total 4 - 1 dans la machine)
2. Bobinas (4 total – 1 en máquina)
3. Porte-bobine auxiliaire
3. Porta carrete adicional
4. Rondelle feutre
4. Fieltros
5. Chapeau pour mini bobine
5. Sujetador de hilo (mini)
6. Chapeau pour petite bobine
6. Sujetador de hilo (pequeño)
7. Chapeau pour grande bobine
7. Sujetador de hilo (grande)
8. Ouverture de boutonnière/Pinceau/Déchire-surjet
8. Descocedor y brocha
9. Tournevis pour plaque aiguille
9. Desarmador para placa de aguja
10. Plaque de reprisage
10. Placa transparente
11. Pied fermeture glissière
11. Prensatelas para cierres
12. Pied pour point bourdon
12. Pie prensatelas para coser en satén
13. Pied point invisible
13. Prensatelas de puntada invisible
14. Pied boutonnière
14. Prensatelas de ojales
15. Pied d’un quart de pouce
15. Pie de 1/4 de pulgada
16. Pied de surjet
16. Pie para sobrehilado
17. Pied à repriser et à broder
17. Pie para bordado y zurcido
18. Pied fronceur
18. Pie para Fruncidos
19. Pied de Nervures
19. Pie para dobladillo angosto
20. Pied double entraînement
20. Prensatelas de avance simultáneo
Le pied qui accompagne votre machine à
coudre est appelé le pied universel et est
utilisé pour la plus grande partie de vos
travaux de couture.
El prensatelas que viene con la máquina de
coser se llama pie prensatelas universal y
será usado para la mayoría de sus costuras.
Le pied pour point bourdon (12) est un autre
pied fort utile, et doit être utilisé pour la
plupart des points décoratifs.
El prensatelas para coser en satén (12) es
otro prensatelas muy útil y debe ser usado
para costura de puntadas decorativas.
Si vous achetez des canettes, chercher que
la classe 15 J.
Cuándo compre bobinas adicionales este
segura que sean clase 15 J.
9
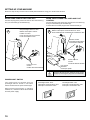
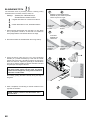
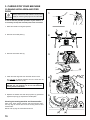
SETTING UP YOUR MACHINE
%HVXUHWRZLSHRIIDQ\H[FHVVRLOIURPQHHGOHSODWHDUHDEHIRUHXVLQJ\RXUPDFKLQHWKH¿UVWWLPH
NOTE: This machine can be used either with or without foot control.
WHEN USING POWER LINE CORD ONLY
Connect the plug of the power line cord into the cord socket (1)
and your wall outlet (2) as illustrated (A).
WHEN USING POWER LINE CORD AND FOOT
CONTROL
Connect the plug of the power line cord into the cord socket (1)
and your wall outlet (2) as illustrated (B).
Connect the foot control plug into the machine socket (3).
Set power/light switch at “OFF”
A
B
0HWWH]O¶LQWHUUXSWHXUPRWHXU
lumière sur “OFF”
Set power/light switch at “OFF”
0HWWH]O¶LQWHUUXSWHXUPRWHXUOXPLqUHVXU³2))´
Poner el Interruptor de corriente/luz de velocidad en “OFF”
Poner el Interruptor de corriente/
luz de velocidad en “OFF”
0achine socket
Connecteur de la machine
Conector de la máquina
2
2
1
Pin plug
Butée
Pasador
1
3
Power line cord
Cordon
Cordón de la linea eléctrica
Power line cord
Cordon
Cordón de la linea eléctrica
Foot control
Rhéostat
Control por pedal
Always disconnect the machine from power
supply by removing the plug from the wall-outlet.
POWER/LIGHT SWITCH
Your machine will not operate until the
power/light switch is turned on. The same
switch controls both the power and the light.
When servicing the machine, or changing
needles, etc., machine must be disconnected
from the power supply.
10
Power/light switch “OFF”
Interrupteur moteur/lumière “OFF”
Interruptor corriente/luz “OFF”
Power/light switch “ON”
Interrupteur moteur/lumière “ON”
Interruptor corriente/luz “ON”
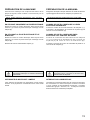
PRÉPARATION DE LA MACHINE
PRÉPARACION DE LA MÁQUINA
Assurez-vous d’essuyer tout surplus d’huile autour de la
plaque à aiguille, avant d’utiliser votre machine pour la
première fois.
Asegúrese de limpiar cualquier sobrante de aceite del área de
la placa aguja antes de usar su máquina por primera vez.
Note: Cette machine fonctionne avec ou sans
rhéostat.
EN UTILISANT UNIQUEMENT LA FICHE ÉLECTRIQUE.
Brancher la fiche du cordon électrique dans la prise de la
machine (1) et dans la prise électrique murale(2) comme
indiqué (A).
NOTA: Esta máquina puede usarse con o sin pedal.
CUANDO SE USE EL CORDÓN DE LA LÍNEA
ELÉCTRICA SOLAMENTE
Conecte el cordón de la línea eléctrica a la máquina (1) y
el enchufe a la alimentación de corriente en la pared (2) tal
como se ve en la ilustración (A).
EN UTILISANT LA FICHE ÉLECTRIQUE ET LE
RHÉOSTAT.
CUANDO SE USE EL CORDÓN DE LÍNEA
ELÉCTRICA Y EL CONTROL DE PEDAL
Brancher la fiche du cordon électrique dans la prise de la
machine (1) et dans la prise électrique murale(2) comme
indiqué (B).
Conecte el cordón de la línea eléctrica a la máquina
(1) y el enchufe a la alimentación de corriente en
la pared (2) tal como se ve en la ilustración (B).
%UDQFKHUOD¿FKHGXUKpRVWDWGDQVODSULVH
Conectar el enchufe del control de velocidad de pedal en el
conector de la máquina (3).
Débranchez toujours. La machine de
O¶DOLPHQWDWLRQpOHFWULTXHHQUHWLUDQWOD¿FKHGHOD
prise murale.
Siempre desconecte la máquina de la fuente
de alimentación retirando el enchufe del
tomacorriente de la pared.
INTERRUPTEUR MOTEUR ET LUMIÈRE
INTERRUPTOR CORRIENTE/LUZ
Votre machine est équipée d’un interrupteur unique moteur/
lumière. Vous piquez donc constamment avec votre travail
éclairé.
La máquina no funcionará hasta que se conecte el interruptor
de corriente/luz. El mismo interruptor controla la corriente
y la luz. Cuando se está utilizando la máquina, o se están
cambiando agujas o bobinas, etc., la máquina se debe
desconectar de los suministros principales.
11
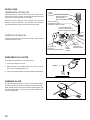
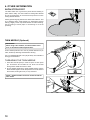
SPOOL PINS
HORIZONTAL SPOOL PIN
Place thread spool on the pin and secure with a spool cap to
HQVXUHVPRRWKÀRZRIWKUHDG,IWKHWKUHDGVSRROKDVDWKUHDG
retaining slit, it should be placed to the right.
Select the correct spool pin cap according to the type and
diameter of spool being used. The diameter of the spool pin
cap should always be larger than that of the spool itself.
Spool
Bobine
Carrete
Spool pin felt discs
Rondelle feutre
Disco del pasador carrete
Vertical spool pin
Porte-bobine vertical
Pasador de carrete vertical
Thread retaining slot
)HQWHGHUHWHQXHGH¿O
Ranura de retención de hilo
VERTICAL SPOOL PIN
Attach the spool pin and place a felt disc over it. Place a spool
of thread on the spool pin.
Spool pin cap
&RXYUH¿O
Tapa del pasador carrete
PRESSER FOOT LIFTER
There are three positions for your presser foot.
1. Lower the presser foot to sew.
2. Raise the lifter to the middle position to insert or remove
fabric, and to change presser foot.
3. Lift it to its highest position to accommodate thicker fabrics.
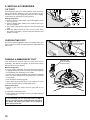
DARNING PLATE
Use the darning plate when you need to control fabric feeding
for button sewing, free motion work and free motion darning.
Raise needle and presser foot, and position darning plate onto
the needle plate with the two pins on the back inserted to the
holes of needle plate.
12
Spool
Bobine
Carrete
Spool pin
Porte-bobine
Pasador carrete
PORTE-BOBINE
PORTA CARRETES
PORTE-BOBINE HORIZONTAL
PORTA CARRETE HORIZONTAL
Placez la bobine sur la tige et fixez-y un couvre-fil pour
DVVXUHUXQGpELWGH¿OELHQUpJXOLHU6LODERELQHHVWGRWpHG¶XQH
IHQWHGHUHWHQXHGH¿OHOOHGRLWrWUHSODFpHjODGURLWH
Coloque el carrete de hilo en el porta carrete y asegúrelo con
el sujetador de hilo para asegurarse que el hilo se mueve
suavemente. El carrete de hilo tiene una ranura de retención
de hilo, que debe quedar hacia la derecha.
6pOHFWLRQQHU OH FRXYUH¿O FRUUHFWH HQ IRQFWLRQ GX W\SH HW GX
GLDPqWUH GH OD ERELQH XWLOLVpH /H GLDPqWUH GX FRXYUH¿O GRLW
toujours être supérieur à celui de la bobine elle-même.
Seleccione la tapa de pasador de carrete de acuerdo al tipo y
diámetro del carrete usado. El diámetro de la tapa de pasador
de carrete debe ser siempre mayor que la del mismo carrete.
PORTE-BOBINE VERTICAL
PORTA CARRETE VERTICAL
Fixer le porte-bobine et la rondelle feutre sur le capot
supérieur. Placer la bobine sur le porte-bobine.
&RORFDUHOSRUWDFDUUHWH\SRQHUHOGLVFRGH¿HOWUR&RORFDUXQ
carrete de hilo en el portacarretes.
LEVIER DU PIED PRESSEUR
PALANCA PIE PRENSATELAS
Il y a 3 positions:
Su prensatelas tiene tres posiciones.
1. Abaisser le levier pour coudre.
1. Bajar el prensatelas para coser.
2. Soulever le levier en position moyenne pour insérer ou
enlever le tissu, et changer le pied.
2. Levantar la palanca a la posición media para insertar o
mover la tela.
3. Soulever le levier à sa position la plus haute, pour
accommoder les tissus épais.
3. Levantar a la posición más alta para acomodar telas mas
gruesas.
PLAQUE DE REPRISAGE
PLACA TRANSPARENTE
Utilisez la plaque de reprisage lorsque vous devez contrôler
vous-même l’entraînement du tissu pour coudre des boutons,
pour les travaux à mouvements libres et pour effectuer du
reprisage par vous-même.
Use la placa transparente cuando deba controlar la
alimentación del tejido para costura de botones, trabajo de
bordado libre y zurcido.
0HWWUH O
DLJXLOOH j VD SRVLWLRQ OD SOXV KDXWH HW UHOHYHU OH SLHG
presseur. Placer la plaque à reprisage sur la plaque aiguille
en veillant à ce que les deux tiges s'introduisent correctement
dans les trous.
Alzar la aguja y el pie prensatelas y montar la placa
transparente en la plancha de agujas, con los dos pasadores
de la parte posterior introducidos en los agujeros de la placa
aguja.
13
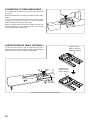
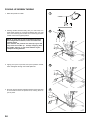
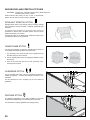
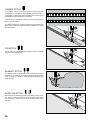
CONVERTING TO FREE-ARM SEWING
<RXUPDFKLQHFDQEHXVHGHLWKHUDVDÀDWEHGRUDVDIUHH
arm model.
With the extension table in position, it provides a large working
surface.
7R UHPRYH WKH H[WHQVLRQ WDEOH KROG LW ¿UPO\ ZLWK ERWK KDQGV
and pull it off to the left as shown. To replace, slide the
extension table back into place until it clicks.
With the extension table removed the machine converts into
a free-arm model for sewing children’s clothes, cuffs, trouser
legs, and other hard-to-reach places.
LARGE EXTENSION TABLE (OPTIONAL)
Extension table
Base de extensión
Plateau de rallonge
To place onto the machine, lift the supporting leg of the
H[WHQVLRQWDEOHDQGVOLGHWKHWDEOHLQWRSODFHZKLOH¿WWLQJWKH
guide pins A, B, C and D into machine as illustrated.
Supporting leg
Pata de soporte
Pied de support
A
C
D
14
B
UTILISATION DU BRAS LIBRE
UTILIZACIÓN DEL BRAZO LIBRE
Cette machine peut s’utiliser aussi bien sous la forme d’une
base plane que celle d’un bras libre.
La máquina tanto se puede utilizar como base plana o una
máquina de brazo libre.
En conservant la table de rallonge en place, vous obtiendrai
une plus grande surface de travaille.
&RQODEDVHGHH[WHQVLyQLQVWDODGDVHREWLHQHXQDVXSHU¿FLH
de trabajo más amplia.
Pour retirer la table de rallonge, tenez-la fermement avec
les deux mains et tirez-la à gauche vers l’extérieur, comme
indiqué sur l’illustration. Pour la remettre en place, faites
glisser la table de rallonge à sa place jusqu’à ce qu’elle
s’enclenche.
3DUD UHWLUDU OD H[WHQVLyQ GH OD FDPD VRVWpQJDOD ¿UPHPHQWH
con ambas manos y sáquela hacia la izquierda tal como se
indica. Para volver a colocarla, deslice la extensión de la
cama nuevamente a su lugar hasta que haga clic.
En retirant la table de rallonge, la machine sera converti
en bras-libre pour confectionner des vêtements d’enfants,
SRLJQHWVSDQWDORQVDLQVLTXHWRXWHQGURLWGLI¿FLOHG¶DFFqV
Sin la base de extensión, la máquina se convierte en un
modelo de brazo libre para costura de ropa de niños, puños,
piernas de pantalones, y otros lugares complicados.
PLATEAU DE RALLONGE (OPTIONNEL)
BASE DE EXTENSION (OPCIONAL)
3RXU¿[HUjODPDFKLQHUHOHYHUODSDWWHGHVXSSRUWGXSODWHDX
de rallonge, et faite le glisser en positionnant les tiges A, B, C
et D comme indiqués.
Para colocarla en la máquina, levante el soporte de la mesa
de extensión para liberarla y deslícela en su lugar, ajustándola
a la guías A, B, C y D en la máquina tal como se ilustra.
15
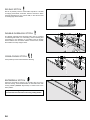
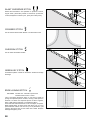
WINDING THE BOBBIN
Be sure to use Class 15 J bobbins.
1. Place a spool of thread on the spool pin, and secure it with
the spool pin cap. Pull the thread out from the spool and
place it through thread guides as shown in illustration.
Be sure to pull thread securely into the bobbin winding
tension disk.
1
2. Put end of thread through the hole in bobbin as shown.
Push bobbin winder shaft to far left position, if it is not
already there.
3. Place bobbin onto shaft with end of thread coming from
top of bobbin. Push bobbin winder shaft to the right until it
clicks. Hold the end of thread.
4. Start machine and the bobbin starts to wind. Bobbin will
automatically stop turning when completely filled. Push
shaft to the left to remove bobbin and cut thread.
16
2
3
4
PRÉPARATION DE LA CANETTE
Utilisez que la canette 15 J.
3ODFH]XQHERELQHGH¿OVXUXQSRUWHERELQHHW¿[H]ODELHQ
jO¶DLGHGXFRXYUH¿O7LUH]OH¿OKRUVGHODERELQHHWIDLWHV
OHSDVVHUSDUOHJXLGH¿OFRPPHLQGLTXpGDQVO¶LOOXVWUDWLRQ
Assurez-vous de bien insérer le fil dans les disques de
tension du bobineur.
DEVANADO DE LA BOBINA
Este seguro de usar clase 15 J bobinas.
1. Coloque el carrete de hilo en el porta carrete y asegúrelo
con la tapa de pasador de carrete. Tire del hilo hacia
afuera del carrete y páselo a través de las guías de hilo tal
FRPRVHLQGLFDHQOD¿JXUD
Asegúrese de jalar el hilo con firmeza en los discos de
tensión del devanador de bobina.
2. Faites passer l’extrémité du fil par le trou de la canette,
comme indiqué.
Pousser l’axe du dévidoir vers la gauche, placer la canette
sur cet axe.
2. Pase el extremo del hilo a través del agujero en la bobina
tal como se indica.
Empujar el eje del devanador bobina hacia la posición
maxima izquierda, si no está ya ahi.
3. Pousser le tout vers la droite jusqu’au déclic. Tenir le bout
GH¿OjODYHUWLFDOH
3. Colocar la bobina en el eje, con el extremo del hilo
saliendo por la parte superior de la bobina. Empujar hacia
la derecha el eje del devanador, hasta que se sienta un
golpe seco. Retener el extremo del hilo.
0HWWUHODPDFKLQHHQPDUFKH/DFDQHWWHYDVHUHPSOLU
Des que la canette est pleine, elle s’arrêtera de tourner.
$UUrWHU OD PDFKLQH &RXSHU OH ¿O 3RXVVHU O¶HQVHPEOH D[H
canette vers la gauche pour pouvoir enlever la canette
pleine de l’axe. Pendant la couture, l’axe doit toujours
rester à gauche.
4. Poner en marcha la máquina. El hilo que está retenido se
soltará. La bobina cesará de girar cuando se haya llenado
por completo. Empujar hacia la izquierda el eje para sacar
la bobina.
17
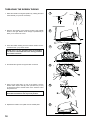
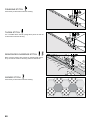
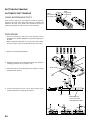
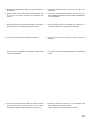
THREADING THE BOBBIN THREAD
1. Raise the needle to its highest position by rotating the hand
wheel toward you (counter-clockwise).
2. Remove the bobbin cover plate by pushing the release
EXWWRQWRWKHULJKW%REELQFRYHUZLOOSRSXSVXI¿FLHQWO\WR
allow you to remove the cover.
3. Insert the bobbin making sure the bobbin rotates counterclockwise when you pull the thread.
1
2
3
NOTE: This is a very important step as the bobbin
can become unthreaded and cause sewing problems
if it rotates clockwise.
4. Pull thread through the slot (A) and then to the left.
4
A
5. With a finger held gently on top of the bobbin, pull the
thread until it stops in slot (B). Then pull about 6" (15 cm)
of thread and lead it towards back of the machine under
the presser foot.
5
NOTE: This is also a very important step to assure
the bobbin thread does not slip out of position.
B
A
6. Replace the bobbin cover plate onto the needle plate.
18
6
ENFILAGE DU FIL DE CANETTE
ENHEBRADO DEL HILO DE LA BOBINA
1. Tourner le volant vers vous jusqu’a ce que l’aiguille soit
dans la position la plus haute.
1. Levante la aguja a su posición más alta girando el volante
hacia usted (en sentido contrario a las manecillas del reloj).
2. Retirez la plaque de canette en poussant le bouton de
libération vers la droite. Le couvercle de la canette se
UHOqYHVXI¿VDPPHQWSRXUYRXVSHUPHWWUHGHOHUHWLUHU
2. Retire la placa transparente empujando el botón de
apertura hacia la derecha. La placa transparente saldrá lo
VX¿FLHQWHSDUDSHUPLWLUOHGHVPRQWDUODSRUFRPSOHWR
,QVpUH]ODFDQHWWHHQYRXVDVVXUDQWTXHOH¿OWRXUQHGDQV
le sens inverse des aiguilles d’une montre lorsque vous
WLUH]VXUOH¿O
3. Inserte la bobina asegurándose que la bobina gire hacia la
izquierda cuando se tira del hilo.
REMARQUE: Cette étape est très importante car
la canette risque de se désenfiler et causer des
problèmes de couture si elle tourne dans le sens des
aiguilles d’une montre.
NOTA: Este es un paso muy importante pues la
bobina se puede desenrollar y causar problemas de
costura si se gira hacia la derecha.
7LUH]OH¿OjWUDYHUVODIHQWH$SXLVYHUVODJDXFKH
4. Lleve el hilo por la abertura (A) y después hacia la
izquierda.
5. Avec un doigt tenant doucement le haut de la canette,
WLUH] VXU OH ¿O MXVTX¶j FH TX¶LO V¶DUUrWH j OD IHQWH % 3XLV
WLUH] HQYLURQ FP GH ¿O HW GLULJH]OH YHUV O¶DUULqUH GH OD
machine au-dessus du pied presseur.
5. Con un dedo suavemente sobre la bobina, tire del
hilo hasta que pare en la ranura (B). Luego tire
aproximadamente 6" (15 cm) del hilo y hágalo pasar por
detrás de la máquina debajo del pie prensatelas.
REMARQUE: ceci est également une étape très
impRrtante p Rur assurer Tue le ¿l Ge la canette ne
glisse pas hors de sa position.
NOTA: Este también es un paso muy importante
para asegurarse que el hilo del carrete no se salga
de la posición.
6. Replacez le couvercle de canette sur la plaque aiguille.
6. Vuelva a cerrar la tapa.
19
THREADING THE TOP THREAD
A. Raise the presser foot lifter. Always be sure to raise the
presser foot lifter before threading the top thread. (If the
presser foot lifter is not raised, correct thread tension
cannot be obtained.)
B. Turn the hand wheel toward you until the needle is in its
highest position.
&7KUHDGWKHPDFKLQHZLWK\RXUOHIWKDQGZKLOH¿UPO\JULSSLQJ
the thread with your right hand in the following order as
illustrated.
* Guide the thread through thread guide (1), and then pull
it into the pre-tension guide (2).
* Pull the thread into the tension discs (which are located
LQVLGHWKHPDFKLQHE\¿UVWSDVVLQJWKHWKUHDGWRWKHOHIW
of plate (2). Then guide the thread to the bottom of the
groove.
* Do a U-turn around the inside of the tab (3).
4
* Pass the thread through the thread take-up (4) from right
to left.
* Pull the thread into the inside of the take-up lever until it
reaches the eye of the lever.
* Guide the thread into the thread guide (5).
* Pass the thread through the eye of the needle (6) from
front to back. (See following page for instructions on
operation of the Automatic Needle Threader.)
IMPORTANT:
To verify that the machine is threaded
properly in the tension discs, do this simple
check:
1.) With the presser foot raised and the
needle unthreaded, pull the thread. You
should detect only a slight resistance
and little or no deÀection of the needle.
2.) Now lower the presser foot and again
pull the thread towards the the back
of the machine. This time you should
detect a considerable amount of
resistance and much more deflection
of the needle. If you do not detect the
resistance, this means you have not
threaded the machine correctly and
need to rethread it.
20
3
ENFILAGE DU FIL SUPÉRIEUR
ENHEBRADO DEL HILO SUPERIOR
A. Elevez le pied presseur. Veillez à toujours élever le
releveur de pied presseur avant d’enfiler le fil supérieur.
(Si le releveur de pied presseur n’est pas élevé, vous ne
SRXUUH]SDVREWHQLUXQHWHQVLRQGH¿OFRUUHFWH
A. Levante el prensatelas. Siempre asegúrese de levantar
el prensatelas antes de enhebrar el hilo superior. (Si no
se levanta el prensatelas, no se podrá lograr la tensión
correcta del hilo.)
B. Tournez le volant vers vous jusqu’à ce que l’aiguille soit en
SRVLWLRQKDXWHHWTXHOHUHOHYHXUGH¿OVRLWYLVLEOH
B. Gire el volante hasta que la aguja se encuentre en su
posición más alta y el tirahilos quede a la vista.
C. Enfilez le fil de la machine avec votre main gauche tout
en tenant le fil fermement de la main droite dans l’ordre
suivant comme montré dans l’illustration.
C. Enhebre la máquina con su mano izquierda mientras
WRPD¿UPHPHQWHHOKLORFRQVXPDQRGHUHFKDHQHORUGHQ
siguiente tal como está ilustrado.
)DLWHVSDVVHUOH¿OSDUOHJXLGH¿OSXLVWLUH]OHGDQVOH
guide de prétension (2).
* Guíe el hilo a través de la guía de hilo (1), y luego páselo
por la guía de tensión preliminar (2).
* Passer le fil du coté gauche de la plaque (2) et tirer
HQVXLWHOH¿OHQWUHOHVGLVTXHVGHWHQVLRQ3XLVJXLGH]OH
¿ODXIRQGGHODUDLQXUH
* Lleve el hilo a los discos de tensión, primero pasando el
hilo a la izquierda de la cubierta (2). Luego guíe el hilo
hasta el fondo de la ranura.
)DLWHVIDLUHXQGHPLWRXUDX¿ODXWRXUGHO¶LQWpULHXUGHOD
languette (3).
* Dé una vuelta en U alrededor del interior de la lengüeta (3).
)DLWHV SDVVHU OH ¿O SDU OH UHOHYHXU GH ¿O GH OD GURLWH
vers la gauche.
7LUH]OH¿OjO¶LQWpULHXUGXOHYLHUGHUHOHYHXUGH¿OMXVTX¶j
FHTX¶LODWWHLJQHO¶RUL¿FHGXOHYLHU
*XLGH]OH¿OGDQVOHJXLGH¿O
)DLWHVSDVVHUOH¿OSDUO¶RUL¿FHGHO¶DLJXLOOHGHO¶DYDQW
vers l’arrière. (Reportez-vous à la page suivante pour les
LQVWUXFWLRQVFRQFHUQDQWOHIRQFWLRQQHPHQWGHO¶HQ¿OHXUGH
chas d’aiguille automatique.)
* Pase el hilo a través del tirahilos (4) de derecha a
izquierda.
* Pase el hilo por el interior de la palanca de tirahilos hasta
que llegue al ojo de la palanca.
* Guíe el hilo por la guía de hilo (5).
* Pase el hilo a través del ojo de la aguja (6) de adelante
hacia atrás. (Continúe con la página siguiente por
instrucciones sobre el funcionamiento del ensartador
automático de agujas.)
IMPORTANT:
IMPORTANTE:
Pour vous assurer que la machine est correctement
Sourvue Ge ¿l Gans les Gisques Ge tension eIIectue] cette
simSle vpri¿cation:
Para veri¿car que la m iquina ha sido bien enhebrada en
los discos de tensiyn, realice esta veri¿caciyn sencilla:
1 A vec le SieG Sresseur relevp et l ¶aiJuille nonen¿lpe
tirer sur le ¿l 9ous ne Gevrie] sentir qu ¶une l pJqre
résistance ainsi qu’une faible ou aucune déflexion
de l’aiguille.
2.) Ensuite, abaisser le pied presseur et tirez de
nouveau le ¿l vers l’arriqre de la machine. &ette fois,
vous devriez sentir une forte résistance et beaucoup
plus de déÀexion de l’aiguille. Si vous ne sentez pas
de résistance, le ¿l a été mal en ¿lé et vous devez le
réen¿ler.
1.) Con el prensatelas levantado y la aguja sin enhebrar,
jalar el hilo. Deberá detectar solo una ligera
resistencia y una peque xa o ninguna de Àexiyn de la
aguja.
2.) Ahora vuelva a bajar el pie prensatelas y vuelva
a tirar del hilo hacia atrás de la máquina. En ese
momento deberá detectar una cantidad considerable
de resistencia y mucha más deflexión de la aguja.
Si no detecta la resistencia ha enhebrado mal la
máquina y deberá volver a enhebrarla.
21
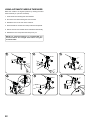
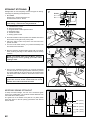
USING AUTOMATIC NEEDLE THREADER
Raise the needle to its highest position by rotating the hand
wheel towards you (counter-clockwise).
1. Hook thread into thread guide as illustrated.
2. Pull down lever while holding the end of thread.
3. Rotate the lever to the rear of the machine.
4. Guide thread into hooked end and pull the thread upward.
5. Return the lever and needle will be threaded automatically.
6. Release the lever and pull thread away from you.
NOTE: For smooth threading it is recommended you
set the machine for straight stitch when using the
needle threader.
1
2
3
4
5
6
22
UTILISATION DE L’ENFILEUR DE CHAS
D’AIGUILLE
EMPLEO DEL ENSARTADOR
AUTOMÁTICO DE AGUJA
Amener l’aiguille en position haute en toumant le volant vers
vous (sens contraire).
Levantar la aguja a la posición más elevada girando el
volante de la máquina hacia usted (en sentido contrario a las
manecillas del reloj).
$FFURFKHUOH¿ODXJXLGH¿OFRPPHLQGLTXpGDQVO¶LOOXVWUDWLRQ
1. Enganche el hilo en el guía hilo como la indica la ilustración.
$EDLVVHUOHOHYLHUWRXWHQWHQDQWO¶H[WUpPLWpGX¿O
3. Tourner le levier vers l’arrière.
*XLGHUOH¿OGDQVODIRXUFKHWWHG¶DFFURFKDJHHWOHWLUHUYHUV
le haut.
5. Ramener le levier à sa position d’origine, et l’aiguille sera
DORUVDXWRPDWLTXHPHQWHQ¿OpH
5HOkFKHUOHOHYLHUHWWLUHUOH¿OYHUVO¶H[WpULHXU
2. Empuje hacia abajo la palanca mientras detiene la punta
del hilo.
*LUDUODSDODQFDKDVWDHO¿QDO
4. Colocar el hilo en la horquilla de enganche y estirarlo hacia
arriba.
5. Retornar la palanca a su posición y la aguja será
enhebrada automáticamente.
6. Soltar la palanca y tirar del hilo hacia usted.
NOTE A¿Q GH IDFLOLWHU O’HQ¿ODJH LO HVW UHFRPPDQGp
de régler votre machine au point droit lors de
l’utilisation de l’en¿leur d’aiguille
NOTA: Para un mejor enhebrado con el ensartador
automático de aguja, se recomienda colocar el
selector de la máquina en puntada recta.
23
PICKING UP BOBBIN THREAD
1. Raise the presser foot lifter.
2. Holding needle thread loosely with your left hand, turn
hand wheel toward you (counter-clockwise) with your right
hand, first lowering the needle and continuing until the
needle comes to its highest position.
1
2
NOTE: A quick way to pick up the bobbin thread is,
with straight stitch selected, touch and release the
reverse switch.
Your machine will perform one down-up cycle and
stop with the needle up. Always stopping with
the needle “fully up” is one of the features of your
computer sewing machine.
3. Lightly pull up the top thread, and pick up bobbin thread,
which will appear through the needle plate slot.
4. Pull both top and bobbin threads together toward the back
of the machine under the presser foot, leaving about 6”
(15 cm) clear.
24
3
4
RAPPEL DU FIL INFÉRIEUR
EXTRACCIÓN DEL HILO DE LA BOBINA
1. Relever le pied presseur.
1. Alzar la palanca del pie prensatelas.
2. Tenir le fil de l’aiguille et tourner le volant vers vous en
faisant remonter l’aiguille à sa position la plus haute.
0DQWHQLHQGRÀRMRHOKLORGHODDJXMDFRQODPDQRL]TXLHUGD
girar hacia usted el volante con la mano derecha, hasta
que la aguja alcance su posición más alta.
RE0AR4UE SRXU IDLUH UHPRQWHU UDSLGHPHQW OH ¿O GH
la canette, avec le point droit sélectionné, touchez et
relâchez l’interrupteur de couture arrière.
La machine exécute un cycle et s’arrête avec l’aiguille
relevée. Le fait qu’elle s’arrête toujours avec l’aiguille
“complètement relevée” est l’une des caractéristiques
de votre machine à coudre avec ordinateur.
NOTA: Una manera rápida de extraer el hilo de la
bobina es, con la puntada recta seleccionada, pulse
levemente el botón de costura hacia atrás.
Su máquina realizará un ciclo hacia abajoarriba y se detendrá con la aguja levantada. Una
de las características de su máquina de coser
computarizada es que siempre se detiene con la
aguja “completamente arriba”.
)DLUHUHPRQWHUOH¿OLQIpULHXUHQWLUDQWOpJqUHPHQWVXUOH¿O
supérieur.
3. Tirar ligeramente del hilo superior y recoger el hilo de la
bobina, que aparecerá a través de la abertura de la placa
aguja.
3ODFHUOHVGHX[¿OVVRXVOHSLHGSUHVVHXUYHUVO¶DUULqUHHQ
ODLVVDQWHQYLURQFP¿OGpSDVVHU
4. Tirar de ambos hilos juntos, hacia atrás de la máquina, por
debajo del pie prensatelas, dejando alrededor de 15 cm.
de hilo.
25
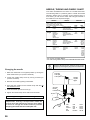
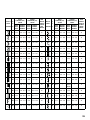
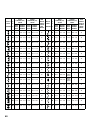
NEEDLE, THREAD AND FABRIC CHART
Your fabric will determine the choice of a needle and thread.
The following table is a practical guide to needle and thread
selection. Always refer to it before a new sewing project. In
most cases, you will use the same size and type of thread in
the bobbin as in the top thread supply.
FABRICS
THREAD
The fabrics below can be of any
¿EHUFRWWRQOLQHQVLONZRRO
synthetic, rayon, blends. They
are listed as examples of weight.
Cotton-wrapped
LightBatiste
Polyester
Weight
Chiffon
100% Polyester
Crepe
0HUFHUL]HG6L]H
Cotton-wrapped
Medium- Corduroy
Polyester
Weight
Flannel
100% Polyester
Gabardine
0HUFHUL]HG6L]H
Gingham
Nylon
Linen
0XVOLQ
Wool Crepe
Medium- Bonded Wovens
Cotton-wrapped
Heavy
Canvas
Polyester
Coating
100% Polyester
Denim
0HUFHUL]HG6L]H
Duck
* "Heavy Duty"
Sailcloth
Knits
Bonded Knits
Double Knit
Jersey
Tricot
Cotton-wrapped
Polyester
Polyester
Nylon
NEEDLES
TYPE
2020
red
shank
SIZE
11/80
orange
band
2020
red
shank
14/90
blue
band
2020
red
shank
16/100
purple
band
2045
yellow
shank
18/110
yellow
band
11/80
orange
band
14/90
blue
band
16/100
purple
band
* Do not use on stretch fabrics.
* For best sewing results, always use a SINGER branded needle.
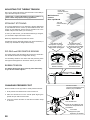
Always disconnect the machine from power
supply by removing the plug from the wall-outlet.
Changing the needle
1. Raise the needle bar to its highest position by turning the
hand wheel toward you (counter-clockwise).
2. Loosen the needle clamp screw by turning it toward you
(counter-clockwise).
Flat side
Côté plat
Lado plano
Needle
Aiguille
Aguja
3. Remove the needle by pulling it downward.
4. Insert the new needle into the needle clamp with the ÀDW
side toward the back.
5. Push the needle up as far as it can go.
Stop pin
Butée
Pasador
6. Tighten the needle clamp screw with the screw driver.
NOTE: Tighten snugly, but do not over tighten.
Helpful Hint: Placing a scrap of fabric under the
presser foot and lowering the presser foot makes
it easier to change the needle and will preclude
dropping the needle into the needle plate slot.
26
Flat
side
toward
the
back
Côté
plat
orienté
vers
l’arrière
Lado
plano
hacia
fuera
de Vd.
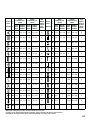
TABLEAU DES AIGUILLES, FIILS ET TISSUS
TABLA DE HILO, AGUJA Y MATERIAL
/HFKRL[G¶XQHDLJXLOOHHWGX¿OFRUUHVSRQGDQWjYRWUHWLVVXHVW
très important. Le tableau suivant vous aidera à faire le choix,
avant d’entreprendre votre ouvrage. Normalement vous
GHYULH]XWLOLVHUODPrPHJURVVHXUHWW\SHGH¿OGDQVODERELQH
HWFRPPH¿OVXSpULHXUH
Su material determinará la selección de aguja e hilo. Esta tabla
es una guía práctica para la selección de aguja e hilo. Siempre
buscar una referencia antes de coser el material nuevo. En la
mayoría de los casos se deberá usar el mismo tamaño y tipo de
hilo tanto en la bobina como en el abastecedor de hilo superior.
TISSUS
FIL
AIGUILLES
Les tissus ci-dessous peuvent être de n’importe
TXHOOH¿EUHFRWRQOLQVRLHODLQH
synthétique,rayonne, composite. Ils sont
TYPE CALIBRE
énumérés en fonction de leur poids.
11/80
2020
LÉGERS
Batiste
Polyester-coton
bague
tige
Gaze
100% polyester
Crêpe
0HUFHULVpFDOLEUH rouge orange
MOYENS
MOYENSLOURDS
MAILLES
Velours côtelé
Flanelle
Gabardine
Guigan
Toile de lin
0RXVVHOLQH
Crêpe de laine
Tissus apprêtés
Toile forte
Tissu de manteau
Toile de jean
Coutil
Toile à voiles
0DLOOHVDSSUrWpV
0DLOOHGRXEOH
Jersey
Tricot
Polyester-coton
100% polyester
0HUFHULVpFDOLEUH
Nylon
2020
tige
rouge
14/90
bague
bleue
Polyester-coton
100%polyester
0HUFHULVpFDOLEUH
*Fil fort
2020
tige
rouge
16/100
bague
pourpre
2045
tige
jaune
18/110
bague
jaune
11/80
bague
orange
Polyester-coton
Polyester
Nylon
14/90
bague
bleue
MATERIAL
HILO
Los materiales abajos pueden
VHUGHFXDOTXLHUD¿EUD
algodón, lino, seda, lana,
sintetico, rayón, mezclas. Están
listados como ejemplos de
peso.
Batista
Algodón sobre mecha polyester
Peso
Gasa
100% Polyester
ligero Crepé
0HUFHUL]DGRQ~PHUR
Pana
Algodón sobre mecha polyester
Peso
Franela
100% Polyester
medio Gabardina 0HUFHUL]DGRQ~PHUR
Guinga
Lino
0XVHOLQD
Crepé de lana
Medio Tejido
Algodón sobre mecha polyester
pesado aglomerado 100% Polyester
Lona
0HUFHUL]DGRQ~PHUR
Abrigos
Denim
Loneta
0DWHULDOSDUD
Velamen
Puntos Punto
Algodón sobre mecha
aglomerado polyester Polyester
Punto doble
Jersey
Tricot
16/100
bague
pourpre
* Non recommandés pour les tissus extensibles.
* Pour obtenir les meilleurs résultats de couture, utilisez
toujours une aiguille de marque SINGER.
Débranchez toujours. La machine de
O¶DOLPHQWDWLRQpOHFWULTXHHQUHWLUDQWOD¿FKHGHOD
prise murale.
AGUJAS
TYPO
2020
Vastago
rojo
2020
Vastago
rojo
TAMAÑO
11/80
banda
narranja
14/90
banda
azúl
2020 16/100
Vastago banda
rojo
púrpula
2045
11/80
amarilla banda
rojo narranja
14/90
banda
azúl
16/100
banda
púrpula
* No usar sobre el material estirado.
* Para los mejores resultados de costura, use siempre agujas
marca SINGER.
Siempre desconecte la máquina de la fuente
de alimentación retirando el enchufe del
tomacorriente de la pared.
Changement d’aiguille
Cambio de la aguja
1. Relever la barre à aiguille à sa position la plus haute en
tournant le volant vers vous (sens contraire).
1. Levantar la barra de la aguja a la posición más alta girando
el volante hacia Ud (en sentido contrario a las manecillas del
reloj).
2. Desserrer la vis du serre-aiguille (sens contraire).
3. Enlever l’aiguille en la tirant vers le bas.
4. Insérer la nouvelle aiguille dans le serre- aiguille, avec le
côté plat à l’arrière.
5. Pousser l’aiguille vers le haut, jusqu’ à la butée.
6. Resserrez la vis de l’aiguille à l’aide du tournevis.
$ÀRMDU HO WRUQLOOR TXH VXMHWD OD DJXMD JLUiQGROR KDFLD 8G HQ
sentido contrario a las manecillas del reloj).
3. Quitar la aguja sacándola hacia abajo.
4. Insertar la aguja nueva en la barra aguja con el lado plano
hacia la parte posterior.
5. Empujar la aguja lo más arriba posible.
6. Apriete el tornillo de sujeción de aguja con el destornillador.
REMARQUE: Resserrez-la bien, mais pas trop.
Suggestion utile: En plaçant un morceau de tissu
sous le pied presseur et en abaissant le pied
presseur, vous faciliterez l’opération de remplacement
de l’aiguille, et ceci évitera toute chute de l’aiguille
dans la fente de la plaque-aiguille.
127A: Apriete ¿rmemente, pero no sobreapriete.
Consejo útil: Colocar un resto de material debajo del
prensatelas y bajar el prensatelas facilita el cambio de
aguja y evita que la aguja baje en la ranura de placa de
aguja.
27
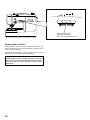
ADJUSTING TOP THREAD TENSION
Under side
Côté de dessous
Reverso
90% of your sewing will be done with the tension control dial (on
top of the machine) set at “AUTO” .
Helpful Hint: A slight adjustment to a higher number or a
lower number may improve sewing appearance.
Well balanced
Correct
Bien equilibrada
Top side
Côté de dessus
Cara
STRAIGHT STITCHING
The correct appearance of your stitching is largely determined
by the balanced tension of both top and bobbin threads. The
tension is well balanced when these two threads ‘lock’ in the
middle of layers of the fabric you are sewing.
,IZKHQ\RXVWDUWWRVHZ\RX¿QGWKDWWKHVWLWFKLQJLVLUUHJXODU
you will need to adjust the tension control.
0DNHDQ\DGMXVWPHQWVZLWKSUHVVHUIRRWµGRZQ
A balanced tension (identical stitches both top and bottom) is
usually only desirable for straight stitch sewing.
Top stitch too tight
Fil supérieur trop tendu
Puntada superior
demasiado apretada
Top stitch too loose
Fil supérieur trop lâche
Puntada superior
GHPDVLDGRÀRMD
ZIG ZAG and DECORATIVE SEWING
For zigzag sewing and decorative stitch functions, thread tension should be less than for straight stitch sewing.
You will always obtain a nicer stitch and less puckering when
the upper thread appears on the bottom side of your fabric.
BOBBIN TENSION
Decrease tension
Diminuer la tension
Disminuir tensión
Increase tension
Augmenter la tension
Aumentar tensión
The bobbin tension has been correctly set at the factory ,
so you do not need to adjust it.
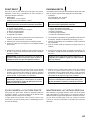
CHANGING PRESSER FOOT
Presser foot lifter
Levier de verrouillage du pied
Palanca pie prensatelas
Be sure needle is in the up position. Raise presser foot lifter.
1. Push presser foot release lever to remove the foot.
3
2. Place the desired foot on the needle plate aligning the
presser foot pin with the foot holder.
1
3. Lower the presser foot lifter so that the foot holder snaps
on the foot.
Foot release lever
2
Levier de verrouillage du pied
Palanca de desprendimiento
prensatelas
Foot holder
Support du pied
Sujetador prensatelas
28
RÉGLAGE DE LA TENSION DU FIL
SUPÉRIEUR
AJUSTE DE LA TENSION DEL HILO
SUPERIOR
90% de votre couture sera accomplie avec le cadran de
réglage de tension (en haut de la machine) réglé à “Auto” .
El 90% de tu costura se hará con el control de tensión
establecido en “AUTO” (arriba de la máquina).
Suggestion utile: Un léger ajustement sur le côté + ou
– de AUTO améliorera l’apparence de la couture.
Consejo útil: Un pequeño ajuste para el lado + o – de
AUTO mejorará la apariencia de la costura.
POINT DROIT
COSTURA RECTA
8QHEHOOHDSSDUHQFHGHYRWUHSRLQWHVWJUDQGHPHQWLQÀXHQFp
par le bon équilibre entre le fil de la bobine et le fil de la
tension supérieur. Elle est parfaite lorsque les deux fils se
nouent entre les deux épaisseurs de tissu.
La apariencia correcta de tu costura es ampliamente
determinada por la tensión equilibrada de ambos hilos, el
superior y el de la bobina.
Vous pouvez régler la tension supérieure avec le cadran de
réglage de tension. Si la tension supérieure est trop lâche,
tourner le cadran vers le haut pour l’augmenter. Si elle est trop
forte, tournez-la vers l’autre côté pour la diminuer.
Une tension équilibrée (points supérieurs et inférieurs
identiques) n’est généralement désirable que pour la couture
de points droits.
Si se encuentra que la costura es irregular, se necesitará
ajustar el control de la tensión.
Cualquier ajuste se ha de realizar con el pie prensatelas
abajo.
Una tensión balanceada (puntadas idénticas arriba y abajo)
normalmente es lo deseado para costura de puntadas rectas.
COUTURE ZIGZAG ET DÉCORATIVE
COSTURA ZIG ZAG y DECORATIVA
Pour les fonctions de couture zigzag et décorative, la tension
GX¿OGRLWrWUHLQIpULHXUHjFHOOHSRXUODFRXWXUHGHSRLQWVGURLWV
Para las funciones de costura zigzag y decorativa, la tensión
de hilo debe ser menor que para costura de puntadas rectas.
Les points seront toujours meilleurs avec moins de fronces
ORUVTXHOH¿OVXSpULHXUDSSDUDvWGXF{WpLQIpULHXUGXWLVVX
Siempre deberá obtener una costura bonita y menos arrugas
cuando el hilo superior aparece del lado de debajo de su
tejido.
TENSION DE LA CANETTE
TENSIÓN BOBINA
La tension de la canette a été correctement réglée à
l'usine, il est inutile de la corriger.
Esta ha sido ajustada correctamente en fábrica por lo que
no es necesario realizar ningún ajuste.
REMPLACEMENT DU PIED PRESSEUR
CAMBIO DEL PIE PRENSATELAS
Relevez l’aiguille au maximum, ainsi que le levier du pied
presseur.
Asegurarse de que la aguja está en la posición más alta.
Alzar la palanca del pie prensatelas.
1. Poussez le levier de verrouillage et enlever le pied.
1. Oprimir la palanca de desprendimiento del prensatelas
para sacar el prensatelas.
2. Placez le pied choisie sur la plaque-aiguille comme illustré.
3. Rabaissez le levier du pied presseur de façon à ce que le
pied s’enclenche de lui-même sur son support.
2. Colocar el prensatelas deseado sobre la placa aguja,
alineando los agujeros aguja.
3. Bajar la palanca pie prensatelas, de manera que el
sujetador prensatelas se cierre de golpe en el prensatelas.
29
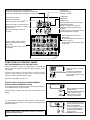
Stitch width/needle position of straight stitch
Largeur du point/position de l’aiguille sur le point droit
Ancho de puntada/posición de aguja en costura recta
Stitch pattern number
Numéro du point motif
Número de patrón de puntada
Buttons for pattern number selection
Boutons pour sélectionner le numéro
du point motif
Botones para elegir número de
puntada
Pattern number reference guide
Guide de référence du numéro
des motifs
Guía de referencia del número
de puntada
Stitch length
Longueur du point
Largo de puntada
LCD display
Écrans ECL
Pantalla LCD
0DQXDODGMXVWPHQWEXWWRQVIRUVWLWFK
width/needle position
Boutons d’ajustement manuel de
la largeur du point et de la position
d’aiguille
Ajuste manual de botones para ancho
de puntada/posición de aguja
0DQXDODGMXVWPHQWEXWWRQVIRU
stitch length
Boutons d’ajustement manuel de la
longueur du point
Ajuste manual botones para largo
de puntada
FUNCTIONS OF CONTROL PANEL
PATTERN NUMBER SELECTION BUTTONS
When the machine is turned on, straight stitch is selected and
pop-up screen for individual preference settings appears on the
LCD display.
To select stitch patterns, use left button for pattern number
selection to select left digit and right button to select right digit
referring to pattern number reference guide.
Buttons for pattern number
selection
Boutons pour sélectionner
le numéro du point motif
Botones para elegir número
de puntada
Both left and right digits scroll up to 9.
STITCH LENGTH AND STITCH WIDTH/NEEDLE
POSITION ADJUSTMENT BUTTONS
Your sewing machine will produce your stitching requirements at
an Auto/Default stitch Length and Width.
Default settings of stitch length and width are underlined on the
display.
You can manually change the length, width or needle position
for straight stitch according to your preference pushing manual
adjustment buttons.
NOTE: Some patterns offer more options for manual
adjustments than others.
30
0DQXDODGMXVWPHQWEXWWRQV
for stitch length
Boutons d’ajustement manuel
de la longueur du point
Ajuste manual botones
para largo de puntada
0DQXDODGMXVWPHQWEXWWRQV
for stitch width/needle position
Boutons d’ajustement
manuel de la largeur du point
et de la position d’aiguille
Ajuste manual de botones
para ancho de
puntada/posición de aguja
FONCTIONS DU PANNEAU DE
COMMANDE
FUNCIONES DE PANEL DE CONTROL
BOUTON DE SÉLECTION DES NUMÉROS DES
MOTIFS
Cuando la máquina está encendida, se selecciona costura
recta y aparecen en la pantalla de LCD los ajustes para
personalizar las opciones.
Lorsque la machine est mise en fonction, le point droit est
sélectionné et les réglages individuel sont illustrés sur l’écran ECL.
Pour sélectionner les motifs, utilisé le bouton du coté gauche
pour sélectionner le chiffre de gauche et le bouton du coté
droit pour sélectionner le chiffre de droite, en vous référant au
guide de référence des motifs.
/HVFKLIIUHVGHJDXFKHVHWGHGURLWHVGp¿OHQWMXVTX¶j
BOTONES PARA ELEGIR NUMERO DE PUNTADA
Para elegir patrones de puntada, usar el botón izquierdo para
seleccionar el número de patrón para elegir el dígito izquierdo,
y botón derecho para elegir el dígito derecho referente al
número de guía de patrón.
Ambos dígitos (izquierda y derecha) recorren hasta el 9.
BOUTONS D’AJUSTEMENT DE LA LONGEUR ET
DE LA LARGEUR DU POINT/POSITION D’AIGUILLE
BOTONES DE AJUSTE DE LARGO Y ANCHO DE
PUNTADA/POSICIÓN DE AGUJA
Votre machine à coudre exécutera un motif sélectionner à une
longueur et une largeur Automatique/par Défaut.
Su máquina ajustará Automáticamente/Por Omisión, sus
requerimientos de Largo y Ancho de Puntada.
Les réglages automatiques par défaut de la longueur et de la
largeur du point apparaissant sur l’écran sont souligner.
Los ajustes pre-establecidos de largo y ancho de puntada
están subrayados en pantalla.
Vous pouvez changer manuellement la longueur et la largeur
du point ou la position de l’aiguille, du point droit, selon vos
préférences en appuyant sur les boutons d’ajustement manuel.
Usted puede cambiar manualmente el largo y ancho de
puntada o posición de la aguja para la puntada recta de
acuerdo a su preferencia, oprimiendo los botones de ajuste
manual.
NOTE: Certains motifs offrent plus d’options de
modi¿Fation Tue d’autres
NOTA: Algunas puntadas ofrecen mayores opciones
que otras para hacer ajustes manuales.
31
HELPFUL MESSAGES
If an incorrect operation is made, a helpful message will be displayed. When
a helpful message is displayed, fix the problem following the instructions
below.
Bobbin winder is moved to right (operating position) during sewing.
ÎCheck bobbin winder and move it to left.
Buttonhole lever is not lowered or raised.
ÎLower buttonhole lever when sewing buttonholes.
ÎRaise buttonhole lever when sewing stitch patterns.
Foot control plug is pulled out, while operating foot control.
ÎPush in foot control plug.
0DFKLQH LV ORFNHG XS GXH WR WKUHDG HQWDQJOHG ZLWK EREELQ FDVH RU URWDWLRQ
interrupted forcibly.
ÎTurn off power switch and eliminate the problem that caused the machine
to stop.
Reverse/tacking stitch button is pushed, while buttonhole stitch is selected.
ÎTacking stitch is made automatically after buttonhole stitch is completed.
It is not necessary to push the reverse/tacking stitch button.
Bobbin winder is in operation.
Î0RYHEREELQZLQGHUWROHIWZKHQLWLVQRWXVHG
32
MESSAGES D’AIDES
MENSAJES DE AYUDA
Si une opération ne sait pas faite correctement, un message
d’aide apparaitra. Lorsque le message d’aide apparait,
résoudre le problème en suivant les instructions ci-dessous.
Si se hace alguna operación incorrecta, aparecerá un
mensaje de ayuda en pantalla. Cuando aparezca un mensaje
de ayuda, Arregle el problema siguiendo las instrucciones de
abajo.
Le Bobineur est déplacé vers la droite (position activée)
durant la couture.
Î9pUL¿HUOHERELQHXUHWGpSODFHUOHYHUVODJDXFKH
El devanador de bobina se movió a la derecha (posición de
operación) durante la costura.
ÎR evisar el devanador de bobina y moverlo hacia la
izquierda.
Le Levier de la boutonnière n’est pas abaisser ou soulever.
ÎA baisser le levier de boutonnière pour coudre une
boutonnière.
ÎSoulever le levier de boutonnière pour coudre les autres
motifs.
La palanca del ojalador no está abajo o arriba.
Î B a j a r l a p a l a n c a d e o j a l a d o r a l h a c e r o j a l e s .
ÎLevantar la palanca del ojalador al coser patrones de
puntada.
Le rhéostat est débranché, lorsque vous l’utilisez.
ÎPousser sur la connexion du rhéostat.
El Control de pedal se desconectó al estarlo operando.
ÎConectar el control de pedal.
/D0DFKLQHQHWRXUQHSOXVVXLWHjXQHQFKHYrWUHPHQWGX¿O
dans la canette.
ÎDébrancher la machine et éliminer le problème qui à
causer l’arrêt de la machine.
La máquina se detuvo porque el hilo se enredó con
la bobina o se interrumpió abruptamente la rotación.
ÎApague la máquina y arregle el problema que causó
que se detuviera la máquina.
Le bouton de marche arrière/points d’arrêt a été activer
après que le point de boutonnière a été sélectionnée.
ÎL e point d’arrêt se fera automatiquement lorsque la
boutonnière sera terminée. Il ne sera donc pas nécessaire
d’appuyer sur le bouton de marche arrière/ points d’arrêt.
Se oprimió el botón de Puntada hacia Atrás/
H i l v a n a d o m i e n t r a s s e s e l e c c i o n ó e l o j a l a d o r.
ÎL a Puntada de Hilvanado (o de seguridad) se hace
automáticamente después de que se termina el ojal. No
es necesario oprimir el botón.
Bobineur en position activer.
ÎDéplacer le bobineur vers la gauche lorsque vous ne
l’utilisez pas.
El eje del devanador de bobina está funcionando.
Î0XHYD HO HMH GHO GHYDQDGRU KDFLD OD L]TXLHUGD FXDQGR
no se use.
33
OPERATION BUTTONS
Reverse stitch button
Bouton du point de marche arrière
Botón de puntada hacia atrás
Programmable needle up/down button
Touche de position d’arrêt d’aiguille
Nterruptor de posicion de aguja parada
Start/stop button
Bouton de marche/arrêt
Botón inicio/parada
START/STOP BUTTON (
)
When sewing without having the foot controller connected, the machine starts slowly when the start/stop button is pushed. When
it is pushed again, needle moves and stops at its highest position.
When using foot control, simply press foot pedal with your foot until you reach a slow even speed. The harder you push, the faster
the machine will sew. Release pressure on foot pedal to stop the machine.
NOTE: When foot control is connected, start/stop button cannot be used.
PROGRAMMABLE NEEDLE UP/DOWN BUTTON (
)
Push the switch and LED lamp will be lit red and needle will stop at down position whenever you stop sewing.
Push it again to stop needle at up position.
DUAL PURPOSE REVERSE/TACKING STITCH
BUTTON
* Reverse stitch function for straight and zigzag stitches ( )
Reverse sewing is carried out while the reverse stitch button
is pushed.
The machine will continue to sew in reverse as long as the
reverse button is pressed.
* Tacking stitch function for tie-off of other stitches ( )
The sewing machine makes 4 tiny tacking stitches to tie
off the sewing on all patterns except straight, zigzag and
buttonhole stitches. The position of the tacking stitches will
be at the exact spot in the pattern where the reverse/tacking
stitch button is pushed.
NOTE: This function is very useful for tying off the
sewing pattern to avoid raveling at the start and end
of sewing.
34
BOUTONS DE FONCTIONNEMENT
INTERRUPTORES DE FUNCIONAMIENTO
BOUTON DE MARCHE/ARRÊT (
BOTÓN INICIO/PARADA (
)
)
La machine démarre lentement lorsque vous ne vous servez
pas du rhéostat mais que vous activez le bouton marche/arrêt.
Lorsque vous le pressez une seconde fois, l’aiguille s’arrête à
la position la plus haute.
Al coser sin estar conectado el pedal, la máquina empieza
a moverse lentamente al oprimir el botón inicio/parada. Al
volverlo a oprimir, la aguja se mueve y detiene en su posición
más alta.
Lorsque vous utilisez le rhéostat, appuyé légèrement sur le
dessus de la pédale pour obtenir une vitesse lente et égale.
Plus la pression appliquée sera forte plus la vitesse de la
machine sera grande. Relâcher la pression sur le rhéostat
pour arrêter la machine.
Cuando uso el pedal, simplemente presione el pedal con
su pie hasta alcanzar una velocidad continua. Cuanto más
presione, más rápido coserá la máquina. Dejar de presionar
el pedal para detener la máquina.
NOTE: Quand le rhéostat est brancher le bouton
marche/arrêt ne peut être utilisé.
TOUCHE DE POSITION D’ARRÊT D’AIGUILLE (
NOTA: Cuando el pedal está conectado, no se puede
usar el botón Inicio/Parada.
)
INTERRUPTOR DE POSICION DE AGUJA PARADA (
)
Quand vous toucher cette touche et la lumière LED est rouge,
l’aiguille s’arrête à la position basse quand vous arrêtez de
coudre.
Presione el interruptor y el Led de iluminación se prenderá en
color rojo, con esto la aguja parará en posición inferior cuando
usted deje de coser.
Toucher encore une fois pour arrêter l’aiguille en position
haute.
Presione nuevamente para parar la aguja en posición
superior.
INTERRUPTEUR DE COUTURE ARRIÈRE/NOUAGE
INTERRUPTOR DE COSTURA HACIA ATRÁS/
REMATE
* Fonction de point noué pour la jonction avec d’autres
)
points ( La couture arrière avance lorsque l’interrupteur couture
arrière reste appuyé.
* Función de costura hacia atrás para costuras rectas y
)
zigzag ( La costura hacia atrás se realiza mientras se presiona el
interruptor de costura hacia atrás.
La machine continue la couture en arrière tant que
l’interrupteur de couture en arrière est appuyé.
La máquina continuará cosiendo hacia atrás tanto como
presione el interruptor de costura hacia atrás.
* Fonction de point de Iau¿lage
pour la jonction avec d’autres points ( )
La machine à coudre exécute 4 petits points pour terminer
la couture de tous les motifs sauf pour les points droits et
zigzag.
La position des points de nouage est à l’ endroit exacte du
motif ou la touche de couture arrière/nouage est appuyée.
* Función de remate para
terminación de otras puntadas ( )
La máquina de coser realiza 4 puntadas de remate
pequeñas para terminar la costura en todos los patrones
excepto para puntadas rectas y en zigzag.
La posición de las puntadas de remate será en el punto
exacto en donde se presiona el interruptor de costura hacia
atrás/remate.
REMARQUE: Cette fonction est très utile pour
terminer le motif de couture et pour éviter
l’ef¿lochage au déEut et j la ¿n de la couture
NOTA: Esta función es muy útil para terminación
de patrones de costura de manera de que no se
deshilache el comienzo y ¿nal de la costura
35
Sewing speed control
Régulateur de vitesse
Control de velocidad de costura
SEWING SPEED CONTROL
Sewing speed is set by using the sewing speed control. The
sewing speed control is moved horizontally to determine the
amount of speed required.
Regardless of the setting, maximum speed may be limited
depending on which pattern has been selected.
NOTE: When using the foot control, if the sewing
speed control is set on the lower setting, the machine
will not sew faster than the speed at which the speed
control is set, even when the foot control is fully
depressed.
36
RÉGULATEUR DE VITESSE
CONTROL DE VELOCIDAD DE COSTURA
La vitesse de couture est contrôlée en utilisant le régulateur de
vitesse. Le régulateur de vitesse se déplace horizontalement
pour obtenir la vitesse désirée.
La velocidad de la costura se aplica al usar el control de
velocidad. El control de velocidad se mueve horizontalmente
para determinar la cantidad de velocidad requerida.
Peux importe le réglage, la vitesse maximum peut être limitée
dépendant du motif sélectionné. sur le rhéostat.
Sin considerar los ajustes, la velocidad se puede limitar
dependiendo del patrón de puntada elegido.
NOTE: Lorsque vous utiliser le rhéostat, si le
régulateur de vitesse est réglez sur la vitesse la plus
basse, la vitesse de la machine ne pourra être plus
grande que celle sélectionnée sur le régulateur de
vitesse, même si on appui au maximum sur le rhéostat.
NOTA: Al usar el pedal, si el control de velocidad se
¿Ma en un valor baMo, la miquina no coseri mis ripido
del valor ¿Mado, aun cuando el pedal esté totalmente
presionado.
37
2. STARTING TO SEW 2. COMMENCEZ À COUDRE 2. EMPEZER A COSER
QUICK REFERENCE
TABLE OF STITCH
LENGTH AND WIDTH
STITCH
No.
POINT
No.
TABLEAU DE RÉFÉRENCE
RAPIDE DES LONGUEURS ET
LARGEURS DE POINTS
NEEDLE POSITION
POSITION D’AIGUILLE
AGUJA POSICIONADA
PUNTADA No.
00
LENGTH
LONGUEUR (mm)
LARGO
AUTO
AUTO
AUTO
MANUAL
MANUEL
MANUAL
AUTO
AUTO
AUTO
MANUAL
MANUEL
MANUAL
TWIN
NEEDLE*
AIGUILLE
DOUBLE*
AGUJA
DOBLE*
CENTER
CENTRE
CENTRO
LEFT - RIGHT
GAUCHE - DROIT
IZQUIERDA - DERECHA
2.5
0.5 - 4.8
|
2.5
1.5 - 3.0
|
2.5
2.0 - 4.0
|
01
02
STITCH
No.
POINT
No.
38
-
WIDTH
LARGEUR (mm)
ANCHO
LENGTH
LONGUEUR (mm)
LARGO
TWIN
NEEDLE* STITCH No.
AIGUILLE
POINT No.
DOUBLE*
DOS
PUNTADA No.
AGUJAS*
WIDTH
LARGEUR (mm)
ANCHO
LENGTH
LONGUEUR (mm)
LARGO
AUTO
AUTO
AUTO
MANUAL
MANUEL
MANUAL
AUTO
AUTO
AUTO
MANUAL
MANUEL
MANUAL
TWIN
NEEDLE*
AIGUILLE
DOUBLE*
AGUJA
DOBLE*
07
3.0
1.0 - 6.0
2.0
1.0 - 3.0
|
|
08
3.0
1.0 - 6.0
2.0
1.0 - 3.0
|
1.0 - 3.0
|
09
6.0
3.0 - 6.0
2.0
1.5 - 3.0
|
0 - 2.5
|
10
5.5
3.5 - 7.0
2.5
1.5 - 3.0
|
AUTO
AUTO
AUTO
MANUAL
MANUEL
MANUAL
AUTO
AUTO
AUTO
MANUAL
MANUEL
MANUAL
03
5.0
0 - 6.0
2.0
0 - 3.0
|
04
3.0
2.0 - 7.0
2.0
1.0 - 3.0
05
3.0
2.0 - 7.0
2.0
06
6.0
2.5 - 6.0
1.5
PUNTADA No.
CUADRO DE REFERENCIA
RÁPIDA DE LARGO Y
ANCHO DE PUNTADA
WIDTH
LARGEUR (mm)
ANCHO
LENGTH
LONGUEUR (mm)
LARGO
LENGTH
LONGUEUR (mm)
LARGO
AUTO
AUTO
AUTO
MANUAL
MANUEL
MANUAL
AUTO
AUTO
AUTO
MANUAL
MANUEL
MANUAL
26
6.0
3.5 - 7.0
2.5
1.5 - 2.5
|
|
27
6.0
2.0 - 6.0
2.5
1.0 - 3.0
|
1.5 - 3.0
|
28
6.0
2.0 - 7.0
2.5
1.0 - 2.5
|
2.5
1.5 - 3.0
|
29
7.0
3.5 - 7.0
2.5
1.3 - 3.0
|
3.0 - 6.0
2.0
1.5 - 3.0
|
30
7.0
3.0 - 7.0
1.8
1.5 - 2.5
|
5.0
2.0 - 7.0
2.5
1.5 - 3.0
|
31
1.0
-
2.5
1.5 - 3.0
|
17
5.0
1.0 - 7.0
2.5
1.5 - 3.0
|
32
5.0
5.0, 6.0
3.0
-
±
18
5.0
1.0 - 7.0
2.5
1.5 - 3.0
|
33
6.5
3.5 - 7.0
2.5
1.5 - 2.5
|
19
5.0
1.0 - 7.0
2.5
1.5 - 3.0
|
34
5.5
3.0 - 7.0
2.5
1.5 - 2.5
|
20
7.0
1.0 - 7.0
2.5
1.5 - 3.0
|
35
5.0
1.0 - 7.0
2.5
0.8 - 2.5
|
21
7.0
1.0 - 7.0
2.5
1.5 - 3.0
|
36
6.0
-
Varied
Variées
Variado
-
±
22
5.0
1.0 - 6.0
2.0
0.8 - 2.5
|
37
7.0
3.5 - 7.0
0.8
0.5 - 1.5
|
23
5.0
1.0 - 6.0
2.0
0.8 - 2.5
|
38
7.0
3.5 - 7.0
0.8
0.5 - 1.5
|
24
5.0
1.0 - 7.0
2.0
1.0 - 3.0
|
39
7.0
3.5 - 7.0
0.5
0.3 - 1.5
|
25
5.0
1.0 - 7.0
2.0
1.0 - 3.0
|
40
7.0
3.5 - 7.0
0.5
0.3 - 1.5
|
No.
POINT
No.
TWIN
NEEDLE* STITCH No.
AIGUILLE
POINT No.
DOUBLE*
DOS
PUNTADA No.
AGUJAS*
WIDTH
LARGEUR (mm)
ANCHO
TWIN
NEEDLE*
AIGUILLE
DOUBLE*
AGUJA
DOBLE*
STITCH
AUTO
AUTO
AUTO
MANUAL
MANUEL
MANUAL
AUTO
AUTO
AUTO
MANUAL
MANUEL
MANUAL
11
5.5
3.5 - 7.0
2.5
1.5 - 3.0
|
12
6.0
3.0 - 6.0
2.0
1.0 - 3.0
13
5.0
2.0 - 6.0
2.5
14
5.5
3.5 - 7.0
15
6.0
16
PUNTADA No.
39
LENGTH
LONGUEUR (mm)
LARGO
LENGTH
LONGUEUR (mm)
LARGO
MANUAL
MANUEL
MANUAL
AUTO
AUTO
AUTO
MANUAL
MANUEL
MANUAL
56
7.0
3.5 - 7.0
0.5
0.3 - 1.5
|
|
57
7.0
3.0 - 7.0
0.5
0.3 - 1.5
|
0.3 - 1.5
|
58
6.0
3.0 - 6.0
0.5
0.3 - 1.3
|
0.5
0.3 - 1.5
|
59
5.0
2.0 - 6.0
0.5
0.5 - 1.0
|
3.5 - 7.0
0.5
0.3 - 1.5
|
60
5.0
2.0 - 7.0
0.5
0.5, 0.8
|
7.0
3.5 - 7.0
0.5
0.3 - 1.5
|
61
7.0
3.5, 7.0
2.0
1.5 - 2.5
|
47
7.0
3.0 - 7.0
0.5
0.3 - 1.5
|
62
7.0
3.5 - 7.0
2.5
1.5 - 2.5
|
48
7.0
3.0 - 7.0
0.5
0.3 - 1.5
|
63
7.0
3.5, 7.0
1.8
0.8 - 2.5
|
49
7.0
3.0 - 7.0
0.5
0.3 - 1.5
|
64
6.0
3.5, 6.0
Varied
Variées
Variado
-
|
50
7.0
3.0 - 7.0
0.5
0.3 - 1.5
|
65
6.0
3.5, 6.0
Varied
Variées
Variado
-
|
51
7.0
3.0 - 7.0
0.5
0.3 - 1.5
|
66
7.0
3.5 - 7.0
1.3
0.8 - 4.0
|
52
7.0
3.5 - 7.0
0.5
0.3 - 1.5
|
67
7.0
3.5 - 7.0
1.3
0.8 - 4.0
|
53
7.0
3.0 - 7.0
0.5
0.3 - 3.0
|
68
7.0
3.5 - 7.0
1.8
1.0 - 4.0
|
54
7.0
3.0 - 7.0
0.5
0.3 - 3.0
|
69
7.0
3.5 - 7.0
1.8
1.0 - 4.0
|
55
7.0
3.5 - 7.0
0.5
0.3 - 2.5
|
70
7.0
3.0 - 7.0
2.5
1.0 - 2.5
|
POINT
No.
TWIN
NEEDLE* STITCH No.
AIGUILLE
POINT No.
DOUBLE*
DOS
PUNTADA No.
AGUJAS*
WIDTH
LARGEUR (mm)
ANCHO
AUTO
AUTO
AUTO
No.
AUTO
AUTO
AUTO
MANUAL
MANUEL
MANUAL
AUTO
AUTO
AUTO
MANUAL
MANUEL
MANUAL
41
7.0
3.5 - 7.0
0.5
0.3 - 1.5
|
42
7.0
3.5 - 7.0
0.5
0.3 - 1.5
43
7.0
3.5 - 7.0
0.5
44
7.0
3.5 - 7.0
45
7.0
46
PUNTADA No.
40
WIDTH
LARGEUR (mm)
ANCHO
TWIN
NEEDLE*
AIGUILLE
DOUBLE*
AGUJA
DOBLE*
STITCH
WIDTH
LARGEUR (mm)
ANCHO
LENGTH
LONGUEUR (mm)
LARGO
LENGTH
LONGUEUR (mm)
LARGO
AUTO
AUTO
AUTO
MANUAL
MANUEL
MANUAL
AUTO
AUTO
AUTO
MANUAL
MANUEL
MANUAL
86
7.0
3.0 - 7.0
2.5
1.5 - 2.5
|
|
87
7.0
4.0 - 7.0
2.5
1.5 - 2.5
±
1.5 - 2.5
|
88
6.0
2.0 - 7.0
1.5
0.5 - 2.0
|
2.5
1.5 - 2.5
|
89
3.5
-
2.0
2.0 - 4.0
±
3.0 - 6.0
2.5
1.5 - 2.5
|
90
3.0
2.0 - 4.5
0
-
±
7.0
3.5 - 7.0
2.5
1.5 - 2.5
|
91
6.0
-
0.5
0.5, 0.8
±
77
7.0
3.5 - 7.0
2.5
1.5 - 2.5
|
92
-
-
-
-
±
78
5.0
3.0 - 7.0
2.5
1.5 - 2.5
|
93
6.0
-
0.5
0.5, 0.8
±
79
5.0
3.0 - 7.0
2.5
1.5 - 2.5
|
94
5.5
-
0.5
0.5, 0.8
±
80
6.0
3.0 - 7.0
2.0
1.0 - 2.5
|
95
3.5
-
0.5
0.5, 0.8
±
81
5.0
3.5 - 7.0
2.5
1.5 - 2.5
|
96
5.5
-
0.5
0.5, 0.8
±
82
6.0
3.0 - 6.0
2.5
1.5 - 2.5
|
97
3.5
-
0.5
0.5, 0.8
±
83
7.0
3.5 - 7.0
2.5
1.5 - 2.5
|
98
5.5
-
0.5
0.5, 0.8
±
84
7.0
3.5 - 7.0
2.5
1.5 - 2.5
|
99
3.5
-
0.5
0.5, 0.8
±
85
6.3
3.8 - 6.3
1.3
1.0 - 2.0
±
No.
POINT
No.
TWIN
NEEDLE* STITCH No.
AIGUILLE
POINT No.
DOUBLE*
DOS
PUNTADA No.
AGUJAS*
WIDTH
LARGEUR (mm)
ANCHO
TWIN
NEEDLE*
AIGUILLE
DOUBLE*
AGUJA
DOBLE*
STITCH
AUTO
AUTO
AUTO
MANUAL
MANUEL
MANUAL
AUTO
AUTO
AUTO
MANUAL
MANUEL
MANUAL
71
7.0
3.0 - 7.0
2.5
1.0 - 2.5
|
72
6.0
3.0 - 6.0
2.5
1.5 - 2.5
73
6.0
3.0 - 6.0
2.5
74
6.0
3.0 - 6.0
75
6.0
76
PUNTADA No.
* Whenever using twin needle, set stitch width at 3.5 or less.
* Lorsque vous utilisez des aiguilles jumelées, régler la largeur du point à 3.5 ou moins.
* &uando se use aguja doEle, ¿je el ancho de puntada a un valor 3.5 o menor.
41
STRAIGHT STITCHING
Straight stitch is most frequently used for all types of sewing.
Let’s begin by following the steps below.
A
1
1. SETTINGS
Presser foot - General Purpose Foot
Thread tension control - AUTO
B
C
D
NOTE: Based upon the weight of the fabric, slight
³¿ne tuning´ of the tension may be desired.
E
A. Thread tension control
B. Reverse stitch button
C. Programmable needle up/down button
D. Start/stop button
E. Presser foot lifter
F. Sewing speed control
2
2. Pull both threads under the presser foot toward the back of
the machine, leaving about 6” (15cm) clear.
5. Start the machine. Guide the fabric gently with your hands.
When reaching the edge of the material, stop the sewing
machine.
4
3
3. Place the fabric under the presser foot and lower the
presser foot lifter.
4. Turn the hand wheel toward you (counter-clockwise) until
the needle enters the fabric.
F
5
NOTE: The Needle Plate has both Metric and Inch
Markings as an aid for guiding your fabric when
sewing a seam.
6. First turn the handwheel toward you (counter-clockwise)
until the needle is at its highest position. Raise the presser
foot, draw materials to the rear and cut off excess thread
with the thread cutter located on the bottom of face cover
as shown.
6
NOTE: T o secure the stitching and avoid raveling,
press the reverse stitch switch and sew a few
stitches at the start and end of the seam.
.((3,1*6($06675$,*+7
To keep the seam straight, use one of the numbered guide
lines on the needle plate. The numbers indicate distance from
the needle at its center position.
The guide line on the bobbin cover plate is 1/4" (6mm) seam
guide line which is used for piecing quilt blocks and also for
narrow seams.
3/4" (19 mm)
5/8" (16 mm)
1/2" (13 mm)
3/8" ( 9 mm)
1/4" ( 6 mm)
42
POINT DROIT
PUNTADA RECTA
Ceci est le point le plus utilisé pour toute genre de couture.
Apprenez à vous servir correctement de votre machine, en
suivant les étapes ci-dessous.
La puntada recta se usa más frecuentemente para coser todo
tipos de costura. Comencemos siguiendo los pasos abajo.
1. RÉGLAGES
Pied de biche - Pied universel
5pJODJHWHQVLRQGX¿OVXSpULHXU$872
REMARQUE: en fonction du poids du tissu, une légère
³Pise Du point ¿ne´ de lD tension peut rtre nécessDire
$5pJODJHWHQVLRQGX¿OVXSpULHXU
B. Touche couture arrière
C. Bouton d’arrêt de la position d’aiguille
D. Bouton de marche/arrêt
E. Levier du pied presseur
F. Régulateur de vitesse
1. AJUSTES
Pie prensatelas - Pie universal
Control tensión hilo - AUTO
NOTA: De acuerdo con el peso del tejido, puede ser
necesario ajustar ligeramente la tensión.
A. Control tensión hilo
B. Botón de puntadas hacia atrás
C. Botón de posición de aguja detenida
D. Botón inicio/parada
E. Palanca pie prensatelas
F. Control de velocidad de costura
7LUH]OHVGHX[¿OVVRXVOHSLHGSUHVVHXUYHUVO¶DUULqUHGHOD
PDFKLQHHQODLVVDQWHQYLURQFPGH¿O
2. Tire de ambos hilos debajo del prensatelas hacia atrás de
la máquina, dejando una separación de 6 pulg. (15 cm).
3. Placer le tissu sous le pied presseur et abaisser le pied.
3. Colocar la tela debajo del prensatelas y bajar la palanca
del prensatelas.
4. Tourner le volant vers vous jusqu’à ce que l’aiguille pénètre
dans le tissu.
4. Girar el volante hacia Ud. hasta que la aguja entre en el
material.
5. Démarrez la machine. Guidez le tissu légèrement avec
la main. Lorsque vous arrivez au bord du tissu, arrêtez la
machine à coudre.
5. Arranque la máquina. Guíe el material suavemente con
sus manos. Al llegar al borde del material, pare la máquina
de coser.
REMARQUE: la plaque d’aiguille est dotée de
marques métriques et en pouces pour faciliter le
guidage du tissu lors que vous piquez la couture.
NOTA: La placa aguja tiene marcas métricas y de
pulgadas para ayudarle a guiar su tejido cuando
cose una costura.
6. Tourner d’abord le volant vers soi jusqu’à ce que l’aiguille
arrive à sa position la plus haute, puis relever le pied
presseur, tirer le tissu vers l’arrière et couper la longueur
GH¿OH[FHVVLYHDXPR\HQGXFRXSH¿OSODFpDXEDVGHOD
plaque frontale, comme indiqué sur l’illustration.
6. Primero girar el volante hacia usted, hasta que la aguja
esté en el punto máximo superior. Levantar el pie
prensatelas, llevar el tejido hacia atrás y cortar el exceso
de hilo con el cortador de hilo que está colocado en la
parte lateral de la máquina, según está mostrado.
REMARQUE: pour sécuriser la couture et éviter les
ef¿locKages, appu \ez sur l’interrupteur de couture
arrière et effectuez la couture de quelques points au
déEut et j la ¿n de la couture.
NOTA: Para asegurar la costura y evitar deshilaches,
presione el interruptor de costura hacia atrás y cosa
algunas puntadas al comienzo y al ¿nal de la costura.
POUR GARDER LA COUTURE DROITE
0$17(1,(1'2/$3817$'$'(5(&+$
Pour piquer une ligne droite, utiliser les lignes de guide sur
la plaque à aiguille. Le numéro indiqué est la distance entre
l’aiguille au centre et la ligne sur la plaque.
Para mantener la puntada derecha, utilice una de las líneas
guía numeradas en la placa aguja. Los números indican la
distancia desde la aguja hacia la posición central de la misma.
La ligne guide sur la plaque couvre bobine est pour une
couture de ¼ de pouce (6mm), pour le matelassage et pour
les coutures étroites.
La guía sobre la placa aguja es de 1/4” (6mm) de costura
la cual se usa para acolchados y también para costuras
estrechas.
43
STRAIGHT STITCH WITH AUTO
TIE-OFF FUNCTION
1. Press the foot control and the machine will sew 4 stitches
in forward and then 4 stitches in reverse and continue to
sew in forward until the foot control is released.
2. Push the reverse switch and the machine will sew 4
stitches in reverse and then 4 stitches in forward and stop.
INSERTING ZIPPERS AND PIPING
Use zipper foot to sew to the right or left of the zipper or close
to the cording.
INSERTING ZIPPERS
To sew down the right side, attach left side of zipper foot to
presser foot holder so that the needle passes through the
opening on the left side of the foot.
To sew down the left side, attach right side of foot to foot
holder.
PIPING
To pipe soft furnishings, cover cord with a bias strip of fabric
and pin or tack it to the main piece of fabric.
Attach left side of zipper foot to foot holder so that needle
passes through the opening on the left side of the foot.
Helpful Hint: Slight adjusting of the needle position to
sew closer to the piping may be accomplished with
the Stitch Width Control.
44
Needle to left of foot
Aiguille à gauche du pied presseur
Needle to right of foot
Aiguille à droite du pied presseur
Aguja a la izquierda del
prensatelas
Aguja a la derecha del
prensatelas
POINT DROIT AVEC FONCTION DE
NOUAGE AUTOMATIQUE
PUNTADA RECTA CON FUNCION
DE REMATE AUTOMATICO
1. Appuyer sur le rhéostat ; la machine coudra alors 4 points
en marche avant puis 4 points en marche arrière, et vous
continuera a coudre en marche avant jusqu’à ce que vous
relâchez le rhéostat.
1. Pise el pedal y la máquina coserá 4 puntadas hacia
delante y luego 4 pun