1
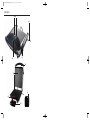
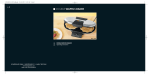
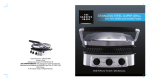
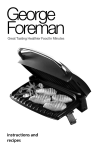
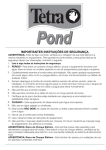
CV_63854_SPM2000A1_LB6.qxd
24.02.2011
9:03 Uhr
Seite 1
KITCHEN TOOLS
Panini Grill SPM 2000 A1
6
Panini Grill
Operating instructions
KOMPERNASS GMBH
BURGSTRASSE 21 · D-44867 BOCHUM
www.kompernass.com
ID-Nr.: SPM 2000 A1-01/11-V1
IAN: 63854
CV_63854_SPM2000A1_LB6.qxd
24.02.2011
9:03 Uhr
Seite 4
SPM 2000 A1
1
2
3
4
5
6
9
0
8
7
IB_63854_SPM2000A1_LB6
02.03.2011
10:18 Uhr
CONTENT
Seite 1
PAGE
Intended Use
2
Safety instructions
2
Technical data
3
Items supplied
3
Description of the appliance
3
Commissioning
3
Operation
3
Tips and Tricks
4
Cleaning and Care
5
Storage
5
Recipes
5
Spinach & Cheese Panini ................................................................................................................5
Chickenbreast Panini ........................................................................................................................6
Mustard Baguette .............................................................................................................................6
Disposal
7
Warranty and Service
7
Importer
8
Read these operating instructions carefully before using the appliance for the first time and preserve this
maual for later reference. Pass this manual on to whoever might acquire the appliance at a future date.
-1-
IB_63854_SPM2000A1_LB6
02.03.2011
10:18 Uhr
PANINI GRILL
Seite 2
• Arrange for defective power plugs and/or cables
to be replaced at once by qualified technicians
or our Customer Service Department.
• Repairs may only be carried out by experienced
specialists or workshops authorised to do so by
the manufacturer.
Intended Use
This Panini Grill is intended for toasting small bread
rolls and sandwiches or for grilling other foodstuffs.
It is intended for domestic use only, it is not intended
for use in commercial applications.
How to avoid the risk of fire and
injury
• Place your Panini Maker on a flat, non-slip and
heat-resistant surface and not on or close to other
appliances that could emit a significant level of
heat (e.g. toasters, kitchen ovens).
• Do not operate the appliance close to easily
flammable objects, such as curtains or next to
rolls of paper towels.
Safety instructions
How to avoid the risks of an
electrical shock
• The Panini Maker may only be used in dry rooms
indoors. Protect the appliance from spray water
– even when it is switched off.
• Use the appliance only if the local mains voltage
complies with the rated voltage of the appliance.
• Do not connect the appliance to a multiple connection power socket on which other electrical
devices are operating at the same time; this could
lead to an overload of the power circuit.
• Switch the appliance off after every use.
Additionally, disconnect the power plug.
• When cleaning, ensure that water cannot permeate
into the appliance. NEVER clean the appliance
under running water.
Even when used properly, some parts of the
appliance become very hot (such as the top
and bottom housing plates). After switching the
appliance off, take care not to touch these surfaces until they have cooled down completely.
• To avoid a dangerous overheating, ALWAYS
unwind the full length of the power cable.
• During use, the Panini Maker can be opened and
closed without risk by using the heat-insulated grip.
• This appliance is not intended for use by individuals (including children) with restricted physical,
physiological or intellectual abilities or deficiences
in experience and/or knowledge unless they are
supervised by a person responsible for their safety
or receive from this person instruction in how the
appliance is to be used.
• Children should be supervised to ensure that
they do not play with the appliance.
NEVER submerse the appliance in water or
other liquids.
• Protect the power cable from damage. Be careful
not to pinch/squeeze it, and keep it away from
hot objects. Do not allow the power cable to
hang freely from a table or workcounter.
• NEVER open the housing of the appliance.
-2-
IB_63854_SPM2000A1_LB6
02.03.2011
10:18 Uhr
Commissioning
• Do not operate this appliance by means of an
external time switch or a separate remote control
system.
• After switching it off, allow the appliance to cool
completely before cleaning and storing it.
1. Take the appliance out of the packaging. Remove
all additional transport packing, e.g. plastic wrap
or cable holders.
2. Before the first usage, check that all items have
been delivered and there are no visible damages.
3. Read these operating instructions carefully.
4. Set up the appliance according to the safety
instructions.
5. Open the safety lock 4
.
6. Clean the appliance with a damp cloth as described in "Cleaning and Care".
7. Close the appliance.
8. Insert the plug into a power socket and allow the
appliance to heat up at its maximum temperature
setting for approx. 5 minutes.
You can thus prevent the appliance
from being damaged
• To avoid damaging the non-stick coating of the
Sandwich Maker, remove your cooked foods
only with a plastic or wooden spatula or some
other suitable, non-metallic implement.
• For the same reason, do not use abrasive cleaners
and sharp objects to clean the appliance.
Technical data
Power rating:
Power consumption :
Note:
220-240 V, ~ 50 Hz
2000 W
Due to manufacturing residues, this initial heating up
could result in a light production of odour and smoke.
This is completely normal and is not dangerous.
Provide for sufficient ventilation, for example, open
a window.
Items supplied
•
•
•
•
Seite 3
Panini Grill
Grease catchment tray
Cleaning scraper
Operating Instructions
9.
After being heated up, remove the plug from
the wall socket and allow the appliance to
cool down.
10. Clean the appliance once more with a damp
cloth.
Description of the appliance
Operation
1 Heat level regulator
2 Red control lamp “Power”
3 Power cable
4 Safety closure
5 Green control lamp “Ready”
6 Handle
7 Grease catchment tray
8 Grease drainage outlet
9 Hotplates
0 Cleaning scraper
1. Close the appliance lid at the grip 6.
2. Push the grease catchment tray 7 into the appliance.
3. Insert the power plug into a wall power socket.
The red control lamp “Power” 2 glows.
-3-
IB_63854_SPM2000A1_LB6
02.03.2011
10:18 Uhr
Seite 4
Warning:
4. Select the desired level with the heating level selector 1. As soon as the selected heating level
has been reached, the green control lamp “Ready” 5 glows.
When the appliance is not in use, always remove
the plug from the power socket. It is not sufficient
to simply place the heat level regulator 1 in the
position “0”!
Note:
The green control lamp „Ready“ 5 also lights up
when the heat level regulator 1 is at position „0“.
As soon as you have set the heat level regulator 1
to the required position, the green control lamp
“Ready” 5 will go off until the desired temperature
has been attained.
Tips and Tricks
• To make meat softer and to speed up grilling, it
can be marinaded beforehand. Suitable as the
basis for this are, for example, sour cream, red
wine, vinegar, buttermilk, or the fresh juice from
papayas or pineapples. Subject to taste, add
herbs and spices. Do not add salt, salt extracts
water from the meat and makes it hard. Place
the meat in the marinade so that it is completely
covered and then close the receptacle. It is best
to let it stand overnight.
• The hotplates 9 are non-stick coated, thus extra
fat is not needed. Should you nonetheless wish
to use extra fat, take note that "light" margarines
and various vegetable oils are not suitable for
grilling. Amongst these are cold-pressed olive oil
and thistle, flax, wheatgerm, maizecorn, sesame,
walnut and hazelnut oils. Use these oils only for
cold dishes. For grilling you can use for example
butter, pork fat, margarine or ghee (butterfat).
• If you are not sure if the foodstuff is cooked in
the middle, use a standard commercial meat
thermometer.
Note:
The green control lamp “Ready” 5 can repeatedly
switch itself off. This means that the programmed
temperature has fallen, and the appliance is automatically heating itself up again!
5. Open the appliance lid and place the foodstuff
to be toasted/grilled on the lower hotplate 9.
6. Close the appliance lid. Due to the positioning of
the upper hotplate 9 being variable, even with
thick items it is always parallel to the lower hotplate 9. This ensures an optimal cooking result.
7. After a short period check the browning of the
foodstuff. To do this, open the appliance lid.
Note:
Start with short cooking times and expand on them
until you have discovered the ideal duration.
8. When you are satisfied with the browning, open
the lid and remove the foodstuff.
Warning:
Do not use sharp or pointed objects to remove the
foodstuff. They could damage the surfaces of the
hotplates 9!
9. Turn the heat level regulator 1 to “0” and
remove the plug from the power socket.
-4-
IB_63854_SPM2000A1_LB6
02.03.2011
10:18 Uhr
Cleaning and Care
Seite 5
Recipes
A Panini is a warm sandwich prepared with fresh
white bread. It is freshly toasted and then served.
Important!
Before cleaning, remove the plug from the wall socket
and wait until the appliance has cooled down completely. Risk of injury!
Spinach & Cheese Panini
250 g Spinach leaves
1 Onion
1 Garlic clove
1 tbsp. oil
2 tbsp Lemon juice
1 Pinch of salt (and pepper)
4 Slices of white bread
40 g Herb butter
75 g Mozzarella
20 g Pine nuts
Important!
Never clean the appliance under running water,
and never submerge it in water. The appliance
could be irreparably damaged!
• Draw the cleaning scraper 0, after the hotplates 9 have cooled, over the hot plates 9 so
that the fat and other residues are gathered together so that you can better remove it.
• Wipe the hotplates 9 with a moist cloth. For
stubborn soiling use a mild detergent on the
cloth. To avoid destroying the non-stick coating,
do not use aggressive detergents, rough sponges or sharp objects.
• It is best to lay a wet dish cloth on encrusted residues in order to soften them.
• Sort and wash the spinach leaves.
• Peel and finely hack the onion and garlic clove,
then steam them in hot oil until glassy. Add the
spinach. Flavour with lemon juice, salt and pepper.
• Spread herb butter on the bread.
• Cut the mozzarella into slices, spread them over
the two bread slices with the drained spinach.
Bestrew with pine nuts.
• Cover the Panini with a second slice of white
bread.
• Carefully place the Panini on the Panini Maker,
already pre-heated to a middle heat level, and
close the lid.
• Wait until the Panini is toasted to a golden-brown.
Then take it from the Panini Maker.
A damp cloth is also sufficient for cleaning the outer
surfaces of the appliance.
Be sure to allow all parts to dry completely before
using the Panini Maker again.
Wipe the cleaning scraper 0 with a moist cloth.
For stubborn soiling, apply a mild detergent to the
cloth.
Storage
Store the cleaned appliance at a dry location.
Close the safety lock 4
.
Wrap the power cable 3 around the cable retainers
on the underside of the appliance.
-5-
IB_63854_SPM2000A1_LB6
02.03.2011
10:18 Uhr
Seite 6
Chickenbreast Panini
Mustard Baguette
400 g chicken breast fillet
20 g butter
Pepper, salt, paprika powder
120 g Bacon, in strips
6 Slices of white bread
3 Tbsp Salad dressing (Yoghurt)
30 g Lettuce
2 Tomatoes
1 Avocado
1 Tsp Lemon juice
50 g Cucumber
1 Baguette
1 Garlic clove
50 g Gherkin in piccalilli
40 g Pecorino Romano
1 Tbsp Mustard
2 Tbsp Sweet mustard
50 g Butter
2 Tbsp Chive rolls
Salt, pepper
• Cut, but do not separate into pieces, the baguette
laterally at distances of approx. 2-3 centimeters.
• Peel and crush the garlic, cube the gherkin very
finely and grate the Pecorino Romano.
• Blend the sharp and sweet mustards with the soft
butter, garlic, gherkin cubes, Pecorino Romano
and chives, flavour with salt and pepper.
• Fill the mustard butter into the baguette cuts and
wrap in aluminium foil.
• Pre-heat the Panini Maker to a medium level, place
the baguettes on it and close the lid. The baguette
should be golden-brown.
• Rinse the chicken breast fillets under running water
then pat them dry with kitchen paper. Heat some
butter in a non-stick pan and then roast the chicken
breast fillets well on both sides. Turn the cooker
down to a medium heat and then roast the chicken
breast fillets thoroughly for approx. 10 minutes.
After roasting, flavour with salt, pepper and paprika, take them from the pan and place them to
the side.
• Heat the fat up in the pan once again and then
fry the bacon strips until crispy.
• Spread the salad dressing onto 3 slices of white
bread, garnish with lettuce, cut the tomatoes into
slices, spice them and place them on the lettuce.
• Slice the chicken breast fillets along their length
and lay them on the tomatoes.
• Cut the avocado along its length all around and,
with a twist, detach it from its core. Peel it and slice
it into strips. Spread the lemon juice over the avocado so that it does not turn brown. Lay the
strips on the Panini.
• Cut the cucumber into slices and lay them on the
avocado.
• Cover the Panini with a second slice of white
bread.
• Carefully place the Panini on the Panini Maker,
already pre-heated to a middle heat level, and
close the lid.
• Wait until the Panini is toasted golden-brown and
then carefully remove it from the Panini-Maker.
-6-
IB_63854_SPM2000A1_LB6
02.03.2011
10:18 Uhr
Disposal
Seite 7
Warranty and Service
The warranty for this appliance is for 3 years from
the date of purchase. The appliance has been manufactured with care and meticulously examined before delivery. Please retain your receipt as proof of
purchase. In the event of a warranty claim, please
make contact by telephone with our Service Department. Only in this way can a post-free despatch for
your goods be assured.
The warranty covers only claims for material and
maufacturing defects, but not for transport damage,
for wearing parts or for damage to fragile components, e.g. buttons or batteries. This product is for
private use only and is not intended for commercial
use. The warranty is void in the case of abusive and
improper handling, use of force and internal tampering not carried out by our authorized service
branch. Your statutory rights are not restricted in
any way by this warranty.
The warranty period will not be extended by repairs
made under warranty. This applies also to replaced
and repaired parts. Any damage and defects extant
on purchase must be reported immediately after unpacking the appliance, at the latest, two days after
the purchase date. Repairs made after the expiration of the warranty period are subject to payment.
Do not dispose of the appliance in your
normal domestic waste. This product is
subject to the European directive
2002/96/EC.
Dispose of the appliance through an approved disposal centre or at your community waste facility.
Observe the currently applicable regulations.
In case of doubt, please contact your waste disposal
centre.
Dispose of all packaging materials in an
environmentally friendly manner.
Service Great Britain
Tel.: 0871 5000 720 (0.10 £/Min.)
E-Mail: [email protected]
Service Ireland
Tel.: 1890 930 034
(0,082 EUR/Min., (peak))
(0,064 EUR/Min., (off peak))
E-Mail: [email protected]
-7-
IB_63854_SPM2000A1_LB6
02.03.2011
10:18 Uhr
Importer
KOMPERNASS GMBH
BURGSTRASSE 21
44867 BOCHUM, GERMANY
www.kompernass.com
-8-
Seite 8