1
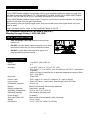
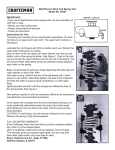
Owner's Manual
Non-Contact InfraRed (IR) Thermometer
MODEL 50455
CAUTION: Read, understand and
follow Safety Rules and Operating
Instructions in this manual before
using this product.
• Safety
• Operation
• Maintenance
• Español
© Sears, Roebuck and Co., Hoffman Estates, IL 60179 U.S.A.
www.sears.com/craftsman
081611
TABLE OF CONTENTS
Warranty
Page 3
Safety Instructions
3
Specifications
3
Controls
4
Display Description
4
Battery Installation
4
Operating Instructions
5
Power
5
Non-Contact (IR) Temperature Measurements
5
Temperature Units
5
Backlight and Laser Pointer
5
IR Measurement Notes
5
Field Of View
6
Troubleshooting
6
Service and Parts
6
2
FULL ONE YEAR WARRANTY
FULL ONE YEAR WARRANTY ON CRAFTSMAN InfraRed Thermometer
If this CRAFTSMAN InfraRed Thermometer fails to give complete satisfaction within one year from
the date of purchase, RETURN IT TO THE NEAREST SEARS STORE OR OTHER CRAFTSMAN
OUTLET IN THE UNITED STATES, and Sears will replace it, free of charge.
If this CRAFTSMAN InfraRed Thermometer is used for commercial or rental purposes, this warranty
applies for 90 days from the date of purchase.
This warranty gives you specific legal rights, and you may also have other rights which vary from
state to state
Sears, Roebuck and Co., Dept. 817WA, Hoffman Estates, IL 60179
For Customer Assistance Call 9am-5 PM (EST)
Monday through Friday 1-888-326-1006
SAFETY INSTRUCTIONS
•
USE EXTREME CAUTION when the laser pointer
beam is on
•
DO NOT point the beam toward anyone's eye or allow
the beam to strike the eye from a reflective surface
•
DO NOT use the laser near explosive gases or in
other potentially explosive areas
SPECIFICATIONS
Range
Resolution
Accuracy
Emissivity
Field of View
Laser pointer
IR Spectral response
Display
Display update rate
Operating Temperature
Operating Humidity
Power Supply
Automatic Power Off
Weight
Dimensions
-4 to 500°F (-20 to 260°C)
0.1°
-4 to 20°F (-20°C to -7°C): ±7.5°F (4°C)
20 to 500°F (-7°C to 260°C): ±3% of reading or ±5°F/2.5°C (whichever
is greater)
Note: Accuracy is specified for an ambient temperature range of 64 to
82°F (18 to 28°C)
Fixed 0.95
D/S = Approx. 6:1 ratio (D = distance; S = spot or target)
Class 2(II) laser < 1mW power; Wavelength is 630 to 670nm
8 to 14 µm
Backlit LCD display with function indicators
Less than 1 second
32°F to 122°F (0°C to 50°C)
80% Relative Humidity max.
9V battery
Meter shuts off automatically after 8 seconds
4.4 oz (125g)
3.15 x 1.25 x 5.4” (80x31.7x137mm)
3
CONTROLS
Meter Description
1.
Laser pointer
2.
IR sensor
3.
Measurement trigger
4.
LCD display
5.
Function buttons*
6.
Battery compartment
Function Buttons
•
Max/Min: Select Max or Minimum display.
•
°C/°F: Select temperature units
•
Backlight / Laser Pointer: For turning the LCD backlight or the Laser pointer ON/OFF
DISPLAY DESCRIPTION
1.
Displays SCAN when trigger is depressed;
2.
Displays HOLD when trigger is released
3.
Laser pointer ON
4.
Emmisivity setting (0.95)
5.
Temperature units
6.
Low battery
7.
Max/Min display
8.
Temperature display
BATTERY INSTALLATION
When the low battery symbol appears on the LCD, replace the meter’s
battery (9V). The battery compartment is located in the rear of the handle.
Open the compartment by carefully pulling the panel down. The panel is
hinged at the bottom and does not completely disconnect from the meter.
Replace the 9V battery and close the battery compartment cover.
4
OPERATING INSTRUCTIONS
Power
1. The meter is powered by one (1) 9V battery.
IR Measurements
1. Hold the meter by its handle and point it toward the surface to be measured.
2. Pull and hold the trigger to turn the meter on and begin testing. The temperature reading, the
flashing ‘SCAN’ icon, the emissivity, the unit of measure and other icons as shown in the
Display Description will appear. Note: Replace the meter’s 9V battery if the display does not
switch on.
3. Release the Trigger and the reading will hold for approximately 8 seconds (HOLD will appear on
the LCD) after which the meter will automatically shut off.
Temperature units
With the trigger pressed, press the ºF/ºC button to select the temperature units.
Backlight/Laser Pointer
With the trigger pressed:
1. Press the
button once to change the state of the backlight (On or Off). When the laser is
on the laser icon will appear in the display.
2.
Press the
button again to change the state of the backlight (On or Off).
IR Measurement Notes
1. The object under test should be larger than the spot (target) size calculated by the field of view
diagram (printed on the side of the meter and in this guide).
2. Before measuring, be sure to clean surfaces that are covered with frost, oil, grime, etc.
3. If an object's surface is highly reflective, apply masking tape or flat black paint to the surface
before measuring. Allow time for the paint or tape to adjust to the temperature of the surface it is
covering.
4. Measurements through transparent surfaces such as glass may not be accurate.
5. Steam, dust, smoke, etc. can obscure measurements.
6. The meter automatically compensates for deviations in ambient temperature. However, it can
take up to 30 minutes for the meter to adjust to extremely wide changes.
7. To find a hot spot, aim the meter outside the area of interest then scan across (in an up and
down motion) until the hot spot is located.
5
Field of View
As the distance from the object increases, the spot size of the area measured becomes larger. The
meter’s field of view is 6:1; in other words if the meter is 6 inches from the target (spot), the diameter
of the target must be at least 1 inch. Note that measurements should normally be made as close as
possible to the device under test. The meter can measure from moderate distances but the
measurement may be affected by external sources of light. In addition, the spot size may be so
large that it encompasses surface areas not intended to be measured.
TROUBLESHOOTING
There may be times when your meter does not operate properly. Here are some common problems
that you may have and some easy solutions to them.
Meter Does Not Operate:
1. Always read all the instructions in this manual before use.
2. Check to be sure the battery is properly installed.
3. Check to be sure the battery is good.
If You Do Not Understand How the Meter Works:
Call our Customer Service Line 1-888-326-1006.
SERVICE AND PARTS
For replacement parts shipped directly to your home
Call 9 am – 5 pm Eastern Time, M - F
1-888-326-1006
6