1
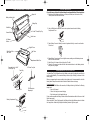
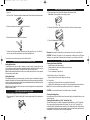
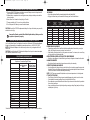
VS125(428-1250) V.qxd
1/10/05
16:25
Page 1
Vacuum Food Sealer
SERVICE INSTRUCTIONS
Cord/Cordless
®
1.
2.
3.
Do NOT attempt to repair or adjust any electrical or mechanical functions on this unit. Doing so will void the Warranty.
If you need to exchange the unit, please return it in its original carton, with a sales receipt, to the store where you purchased it. If you are
returning the unit more than 30 days after the date of purchase, please see the enclosed Warranty.
If you have any questions or comments regarding this unit’s operation or believe any repair is necessary, please write to our Consumer Service
Department or visit our website at www.rivalproducts.com
™
RIVAL
c/o THE HOLMES GROUP, INC.
CONSUMER SERVICE DEPARTMENT
32 B SPUR DRIVE
EL PASO, TX 79906
ONE (1) YEAR LIMITED WARRANTY TERMS AND CONDITIONS
SAVE THIS WARRANTY INFORMATION
A.
B.
C.
D.
E.
F.
G.
®
This Warranty applies only to the original purchaser of this product.
This Warranty applies ONLY to repair or replacement of any supplied or manufactured parts of this product that, upon inspection by The
Holmes Group, Inc. authorized personnel, is shown to have failed in normal use due to defects in material or workmanship. The Holmes
Group, Inc. will determine whether to repair or replace the unit. This Warranty does not apply to installation expenses.
Operating this unit under conditions other than those recommended or at voltages other than the voltage indicated on the unit, or attempting
to service or modify the unit, will render this WARRANTY VOID.
Unless otherwise proscribed by law, The Holmes Group, Inc. shall not be liable for any personal injury, property or any incidental or
consequential damage of any kind resulting from malfunctions, defects, misuse, improper installation or alteration of this product.
All parts of this product are guaranteed for a period of 1 year as follows:
1. Within the first 30 days from date of purchase, the store from which you purchased your product should replace this product if it is defective
in material or workmanship (provided the store has in-stock replacement.) * If you intend to assert any claim in connection with the
product, please follow the instructions in paragraph F.
2. Within the first twelve months from date of purchase, The Holmes Group, Inc. will repair or replace the product if it is defective in material
or workmanship, subject to the conditions in paragraph G.
If you have any other problem or claim in connection with this product, please write to our Consumer Service Department.
IMPORTANT RETURN INSTRUCTIONS. Your Warranty depends on your following these instructions if you are returning the unit to The
Holmes Group, Inc.:
1. Carefully pack the item in its original carton or other suitable box to avoid damage in shipping.
2. Before packing your unit for return, be sure to enclose:
a)
Your name, full address with zip code and telephone number,
b)
A dated sales receipt or PROOF OF PURCHASE,
c)
A check for return prepaid shipping and handling, and
d)
The model number of the unit and the problem you are having. (Enclose in an envelope and tape directly to the unit before the box is
sealed.)
3. The Holmes Group, Inc. recommends you ship the package U.P.S ground service for tracking purposes.
4. All shipping charges must be prepaid by you.
5. Mark the outside of your package:
Vacuum Food Storage System
Reference Guide
RIVAL
c/o THE HOLMES GROUP, INC.
32 B SPUR DRIVE
EL PASO, TX 79906
This Warranty gives you specific legal rights, and you may have other rights which vary from state to state. The provisions of this Warranty are in
addition to, and not a modification of, or subtraction from, the statutory warranties and other rights and remedies contained in any applicable
legislation. To the extent that any provision of this Warranty is inconsistent with any applicable law, such provision shall be deemed voided or
amended, as necessary, to comply with such law.
®
®
™
Preserves the taste and
nutritional value of stored foods!
www.seal-a-meal.com
www.seal-a-meal.com
©2005 The Rival Company
A Division of The Holmes Group, Inc.
RIVAL®, the RIVAL Logo®, Seal-a-Meal®, the Seal-a-Meal Logo™, Lock ‘n Seal™, Minute Marinating Canister™ and Air Out. Freshness In.™ are
trademarks of The Holmes Group, Inc. or its subsidiary.
READ AND SAVE THESE INSTRUCTIONS
MICROBAN® is a registered trademark of Microban Products Company.
Printed in China
VS125/-BL/S/W/428-1250
VS125 / VS125-BL / VS125-S / VS125-W
VS125(428-1250) V.qxd
1/10/05
16:25
Page 3
IMPORTANT SAFEGUARDS
When using electrical appliances, basic safety precautions should always be followed, including the
following:
1. Read the instructions carefully.
2. Do not use the Vacuum Food Sealer on wet or hot surfaces, or near a heat source.
3. Do not operate the Vacuum Food Sealer from the wall mounted storage position.
4. Always use the Vacuum Food Sealer on a level flat surface.
5. Do not immerse any part of the Vacuum Food Sealer, power cord or plug into water or other liquid.
6. To disconnect, unplug the power cord from the electrical outlet. Do not disconnect by pulling
on the cord. Always unplug the Vacuum Food Sealer before cleaning.
7. Do not operate the Vacuum Food Sealer with a damaged power cord or plug.
8. Do not operate the Vacuum Food Sealer if it malfunctions or is in any way damaged. If the cord
or the machine is damaged, it must be returned to an authorized service center. See warranty
for more information.
9. Use only Seal-a-Meal® accessories or attachments.
10. Use the Vacuum Food Sealer only for its intended use.
11. Close supervision is required when this product is used near children.
12. This appliance should not be operated by children.
13. Do not allow the Vacuum Food Sealer to be used as a toy.
14. The Vacuum Food Sealer is not for commercial use.
15. Do not operate until batteries are installed and charged per Battery Installation instructions.
16. Use only Rival SC3000 battery. Use of any other battery may cause fire, electrical shock or injury.
SAVE THESE INSTRUCTIONS
Vacuum Food Sealer contains Nickel-Metal Hydride Battery.
Battery must be recycled or disposed of properly.
This appliance is for HOUSEHOLD USE ONLY.
Do not attempt to service this product. Servicing other than battery and cutting blade
replacement should be performed by an authorized service representative. Refer to section on
Battery Installation, Care and Disposal for information on battery replacement.
POLARIZED PLUG
This appliance has a polarized plug (one blade is wider than the other). To reduce
the risk of electric shock, this plug is intended to fit into a polarized outlet only
one way. If the plug does not fit fully into the outlet, reverse the plug. If it still
does not fit, contact a qualified electrician.
Do not attempt to modify the plug in any way. If the plug fits loosely into the AC outlet or if
the AC outlet feels warm do not use that outlet.
START ENJOYING THE BENEFITS OF YOUR
SEAL-A-MEAL® VACUUM FOOD STORAGE SYSTEM…
No more creative packaging to protect your food – stop double wrapping, squeezing or rolling air
out of the bag… with one-touch operation it’s easy to protect your food from air and moisture loss,
the enemies of fresh food. Vacuum sealing locks air out and seals freshness in, preserving the taste
and nutritional value of stored foods.
•
•
•
Save Money – Protect against freezer burn and reduce waste
Save Time – Prepare and store meals in advance
Keep food fresh up to 5 times longer
The Seal-a-Meal® Vacuum Food Storage System is a quick and easy way for you to save time and
money, while serving healthy food that tastes great!
SEAL-A-MEAL® CORD/CORDLESS VACUUM FOOD SEALER
The Seal-a-Meal® Cord/Cordless Vacuum Food Sealer allows you to seal anywhere – plugged in or
on the go.
• Free up valuable counter space – seal bulk purchases anywhere in your kitchen or leftovers right
at the dining room table.
• Use on the go - perfect for camping, fishing, hunting, tailgating parties and more.
Cord/Cordless Vacuum Food Sealer includes the following:
• Cord/Cordless Vacuum Food Sealer
• Rechargeable Battery
• Removable Power Cord
• Starter Bag Kit
Visit our fresh new website www.seal-a-meal.com to learn more about how to fully enjoy the benefits
of your new Seal-a-Meal® Vacuum Food Storage System:
• New product information and special offers
• Helpful hints and tips
• Seal-a-Meal® recipes
• Purchase bags and accessories
Seal-a-Meal® Vacuum Food Storage System
A.
B.
C.
D.
E.
Vacuum Storage Canister Set
Vacuum Bottle Stoppers
Minute Marinating CanisterTM
Bag Roll Holder and Cutter
Multi-layer Vacuum Storage Bags and Rolls
Look for these products at your local retailer or visit www.seal-a-meal.com
-2-
-3-
VS125(428-1250) V.qxd
1/10/05
16:25
Page 5
KNOW YOUR SEAL-A-MEAL® VACUUM FOOD SEALER
Upper Lid
Battery Indicator Light
BATTERY INSTALLATION
Prior to first use you will need to install and charge the rechargeable battery. Follow steps below:
1. Place Vacuum Food Sealer upside down on a clean, soft surface (such as a towel or cloth).
This will protect the finish from scratches.
Sealing Strip
Seal Button
l
Sea
um
u
Vac
Lock ’n Seal™ Nozzle/Drip Tray
Vacuum Button
2. Using a Phillips head screwdriver, remove two captured screws located on Battery
Compartment Door.
Nozzle Lever
Lid Release
Buttons
3. Plug in Battery Connector. Battery Connector is keyed and will only connect in one direction.
Do not force.
Bag Roll Cover
Built-in Bag Roller
and Cutter
Bag Cutter
Seal
Vacuum
Replacement Blade Door
Removable Lock ’n Seal™
Nozzle/Drip Tray
AC Power Cord Jack
4. Replace Battery Compartment Door and tighten screws, making sure that battery wires are
clear of the door and screws.
5. Attach Power Cord at rear of unit and plug into AC outlet.
6. Charge for 12 or more hours before first use. See instructions below to check battery status to
verify when fully charged.
Drain Plug
UNDERSTANDING BATTERY INDICATOR LIGHT
Your Seal-a-Meal Cord/Cordless Vacuum Food Sealer can be used both plugged in and without a
cord for added flexibility. The convenient Battery Indicator Light will keep you informed of the
battery charge.
Before you prepare bags for vacuum sealing in the cordless mode, it is recommended to check the
battery status. Battery status should also be checked if Sealer has been in storage.
To check the status:
Press the Vacuum and Seal Buttons at the same time, the Battery Indicator Light will show the following
battery levels:
• Green = fully charged
• Yellow = low charge, recommend charging
• Red = battery needs to be charged before use
®
12V Automotive
Adapter Jack
Accessory Port
During cordless operation the Battery Indicator will also illuminate when either the Vacuum or Seal
Buttons are pressed.
When using with AC Power Cord plugged in, the Battery Indicator Light will always be on to indicate
the charge status. Sealer is fully charged when Battery Indicator Light turns green.
Battery Compartment Door
-4-
-5-
VS125(428-1250) V.qxd
1/10/05
16:25
Page 7
Your Seal-a-Meal® Vacuum Food Sealer can be used with pre-cut bags, bag rolls and
accessories.
Seal-a-Meal® multi-layer bags can be frozen, refrigerated, boiled, are microwave safe and reusable.
NOTE: DO NOT reuse bags if they have been used to store raw meats, fish, oily foods or have been
boiled or microwaved.
HOW TO VACUUM SEAL WITH SEAL-A-MEAL® BAGS (CONT.)
3. Insert Nozzle into bag. Align left edge of bag with Nozzle edge.
Sea
l
Vac
uum
HOW TO MAKE A CUSTOM SIZED BAG
1. Open the Bag Roll Cover.
4. Push down Nozzle to secure bag. Make sure bag is straight (with no wrinkles).
Seal
Vacuum
Seal
2. Pull out desired bag length (leaving at least 3 inches of extra room, to allow for bag
contraction). Hold bag in place and slide Cutting Blade to left or right.
5. Firmly press down on both sides of lid making sure both sides are locked.
Note: Sealer will not operate if Lid is not properly closed.
3. Open Lid. Place one end of cut bag on Sealing Strip at least 1/2” above the Sealing Strip.
Sea
6. Press and hold Vacuum Button. Red Vacuum Indicator Light will turn on. Once all of the air is
removed, the unit will automatically switch to the seal mode. When both the Vacuum and Seal
Indicator Lights turn off, the bag is vacuum sealed.
l
uum
Vac
4. Close Lid. Firmly press down on both sides of lid making sure both sides are locked.
Note: Sealer will not operate if Lid is not properly closed.
Seal
um
Vacu
7. Push in Lid Release Buttons to open Lid.
Seal
um
Vacu
5. Press and hold Seal Button. Red indicator light will turn off when seal is complete.
6. Push in Lid Release Buttons to open Lid.
8. Pull Lock ‘n Seal™ Nozzle Lever forward to release sealed bag.
Seal
um
Vacu
The custom sized bag is ready for vacuum sealing. Follow the steps below for vacuum sealing.
HOW TO VACUUM SEAL WITH SEAL-A-MEAL® BAGS
1. Place item to be sealed in pre-cut or custom sized bag, leaving at least 3 inches between
contents and top of bag to allow for contraction.
2. Pull Lock ‘n Seal™ Nozzle Lever forward to elevate.
To stop the vacuum process at any time, press the Vacuum Button. To instantly seal and avoid
crushing delicate foods or drawing liquid from the bag, press the Vacuum Button immediately
followed by the Seal Button. This will stop air from being drawn from the bag and seal the bag.
Warning: Even though the Sealing Strip is not powered when Lid is open, it may still be hot.
Note: The unit has a 30 second cool down period between vacuuming cycles. Unit will not operate
during this time.
CAUTION: This Vacuum Food Sealer is not for commercial use. If sealing more than 30 bags
or canisters in a row, wait at least 25 minutes before continuing to use your Vacuum Food Sealer.
-6-
-7-
VS125(428-1250) V.qxd
1/10/05
16:25
Page 9
HOW TO VACUUM SEAL WITH SEAL-A-MEAL® ACCESSORIES
1. Open Lid
2. Pull Lock ‘n Seal™ Nozzle Lever forward to release nozzle. Remove Nozzle and carefully set aside.
3. Firmly insert male end of accessory hose into Accessory Port.
HOW TO SEAL BAGS WITHOUT VACUUMING (CONT.)
3. Firmly press down on both sides of lid making sure both sides are locked.
Note: Sealer will not operate if Lid is not properly closed.
4. Press and hold Seal Button. Red Indicator Light will turn off when the seal is complete.
Seal
um
Vacu
4. Attach other end of hose to Seal-a-Meal® accessory.
5. Push in Lid Release Buttons to open Lid.
Seal
um
Vacu
5. Press and hold the Vacuum Button. Red Vacuum Indicator Light will turn on. Once all of the
air is removed, the Sealer and Indicator Light will automatically turn off.
To stop the vacuum process at any time, press the Vacuum Button.
HOW TO VACUUM SEAL DELICATE OR MOIST FOODS
Sealing Delicate Foods:
To seal delicate foods such as muffins or pastries, you have the option to bypass the auto-seal
function. Simply press the Vacuum Button immdeiately followed by the Seal Button and the vacuum
pump will stop as the bag is sealed. This will prevent soft foods from being crushed.
Hint: For best results freeze foods that are soft, such as muffins, cakes and pies etc. so they maintain
their shape when vacuum sealed.
Sealing Moist Foods:
When sealing moist foods, such as sauces or stews, you have the option to instantly seal the bag and
bypass the auto-seal function if you see any liquid being drawn from the bag or whenever you believe the
process is complete. Simply press the Vacuum Button immediately followed by the Seal Button and the
vacuum pump will stop as the bag is sealed.
Hint: For best results liquids should be frozen prior to vacuum sealing. Remove excess juices before
sealing whenever possible.
HOW TO SEAL BAGS WITHOUT VACUUMING
1. Place item to be sealed in pre-cut or custom sized bag.
2. Place bag at least 1/2" above the Sealing Strip. Make sure bag is straight (with no wrinkles) and
close Lid.
l
Sea
uum
Vac
-8-
Warning: Even though the Sealing Strip is not powered when Lid is open, it may still be hot.
CAUTION: This Vacuum Food Sealer is not for commercial use. If sealing more than 30 bags or
canisters in a row, wait at least 25 minutes before continuing to use your Vacuum Food Sealer.
CARE AND CLEANING
Cleaning your Vacuum Food Sealer
• Always unplug the unit before cleaning.
• Always remove from wall mounted position prior to cleaning.
• Do not immerse in water
• Do not use abrasives to clean the unit.
For White, Black or other non-Chrome finishes:
• Wipe the outside of the unit with a damp cloth and soap.
For Chrome finish:
• Lightly spray a soft, clean cloth with a no wax formula furniture polish.
• Lightly rub the outside surfaces (such as the lid) to remove fingerprints and restore the finish.
Note: Do not use no wax formula furniture polish on inside of unit or on plastic parts.
CAUTION: Do not immerse the Vacuum Food Sealer in water or other liquid.
Cleaning the Sealing Foam
Use a warm damp cloth with mild dish soap to remove any liquid or food particles that are on the
surface of the foam.
Cleaning the Removable Lock ‘n Seal™ Nozzle/Drip Tray
The Seal-a-Meal® Vacuum Food Sealer is equipped with a Removable Lock ‘n Seal™ Nozzle/Drip
Tray to trap any liquid that may be drawn from the bag. The Lock ‘n Seal™ Nozzle/Drip Tray
contains Microban® antimicrobial product protection, which inhibits the growth of stain and odor
causing bacteria and keeps the unit cleaner between cleanings. Normal cleaning practices should
be maintained. Does not protect user from food borne illnesses.
-9-
VS125(428-1250) V.qxd
1/10/05
16:25
Page 11
CARE AND CLEANING (CONT.)
1. Pull Lever forward to release Nozzle/Drip Tray.
2. Carefully remove as not to spill any contents.
3. Over sink, open rubber Drain Plug located under the tray at the far end (Do NOT remove the
recessed plug) and flush, or soak in warm soapy water (with a mild dish detergent).
REPLACING THE BAG CUTTER BLADE
Replacement parts available at www.seal-a-meal.com or Call: 1-800-557-4825.
1. Open bag roll cover.
Seal
Vacuum
2. With a Phillips head screwdriver, unscrew the Replacement Blade door.
4. Rinse thoroughly and allow to dry.
5. Replace Lock ‘n Seal™ Nozzle.
Cleaning the Bags
• Wash bags in warm, soapy water.
• Bags can be washed in the dishwasher if desired. Turn bags inside out and spread them over the top rack.
• Allow bags to dry completely before using.
NOTE: DO NOT reuse bags if they have been used to store raw meats, fish, oily foods or have been
boiled or microwaved.
WALL MOUNTING FOR STORAGE
Follow the steps below to wall mount your Seal-a-Meal® Vacuum Food Sealer. This is for storage only;
do not operate the Vacuum Food Sealer from the wall. Anchors and screws included.
1. Bore two 1/4” holes ( 12" apart) along a straight line on the wall, either vertically or horizontally.
2. Hammer one screw anchor into each hole.
3. Screw the provided screws into the anchors leaving 3/8” head outside of the wall.
4. Hang Sealer on the screw heads.
3. Remove the blade door.
4. Replace the old knife blade with the new one.
5. Replace the door.
6. Tightly secure the screw.
CAUTION: Sharp blade.
BATTERY REPLACEMENT AND RECYCLING INFORMATION
Replacement parts available at www.seal-a-meal.com or Call: 1-800-557-4825.
Should your Vacuum Food Sealer Battery need to be replaced, follow the steps below:
1. Place Sealer upside down on a clean, soft surface (such as a towel or cloth). This will protect
the finish from scratches.
2. Using a Phillips head screwdriver remove two captured screws located on Battery
Compartment Door.
NOTE: Mounting is for storage only. Always clean the Removable Nozzle/Drip Tray prior to storing in
the wall mounted position. The Vacuum Food Sealer should not be used while mounted on the wall.
REFILLING THE BAG ROLL
1.
2.
3.
4.
3. Squeeze battery connector to release latch and remove.
Pull out one end of spring loaded bag roll holder.
Remove cardboard from empty roll.
Slide replacement roll onto holder. Make sure roll is positioned to dispense from the bottom.
Place end of holder back into slot.
-10-
-11-
VS125(428-1250) V.qxd
1/10/05
16:25
Page 13
BATTERY REPLACEMENT AND RECYCLING INFORMATION (CONT.)
4. Plug new Rival SC3000 battery into battery connector. Battery connector is keyed and will
only connect in one direction. Do not force.
5. Replace battery compartment door and tighten screws, making sure battery wires clear the
door and screws.
6. Attach Power Cord at rear of unit and plug in AC outlet.
7. Charge new battery for 12 or more hours before first use.
8. Do not dispose of old battery in normal household waste.
®
CAUTION: Use only Rival® SC3000 replacement battery. Use of any other battery may cause fire,
electrical shock or injury.
Vacuum Food Sealer contains Nickel-Metal Hydride battery. Battery must be
recycled or disposed of properly.
OPERATING VACUUM FOOD SEALER WITH 12V AUTOMOTIVE ADAPTER
Your Cord/Cordless Vacuum Food Sealer can be used on a Rival model 12V Automotive Adapter,
Adapter (sold separately) and is available at www.seal-a-meal.com or Call 1-800-557-4825.
NOTE: 12V Automotive Adapter is for vehicle use only and can only be charged with the AC
Power Cord.
CAUTION: Use only Rival model 12V Automotive Adapter. Use of any other automotive adapter
may cause fire, electrical shock or injury.
FOOD STORAGE COMPARISON CHART
Seal-a-Meal® Vacuum Food Storage System
Outperforms Conventional Bags & Wraps
Storage Time with
Conventional Bags &
Wraps
Freezer
Beef (Steaks, Roasts)
Beef (Ground, Stew Meat)
Lean Fish (Cod, Haddock)
Fatty Fish (Salmon, Sea Trout)
Pork Chops
Poultry
Soups and Sauces
Vegetables
Refrigerator
Cheese
Deli Meats
Fruits (Berries)
Vegetables
Pantry
Cereal
Coffee (Ground)
Cookies (Homemade)
Flour
Nuts
Storage Time with
Seal-a-Meal® Vacuum
Food Storage System*
6 – 12 months
3 - 4 months
4 - 6 months
2- 3 months
4 – 6 months
6 – 12 months
2 - 4 months
6 – 9 months
2 – 3 years
1 year
2 years
1 year
2 – 3 years
2 – 3 years
1 – 2 years
2 – 3 years
2- 4 weeks
3 – 4 days
1 – 5 days
2 – 7 days
4 – 8 months
7 – 10 days
7 - 14 days
7 – 14 days
2 -3 months
2 weeks
1 -2 weeks
6 - 8 months
6 - 8 months
6 – 12 months
1 – 2 years
3 – 6 weeks
1 – 2 years
1 - 2 years
HELPFUL HINTS & TIPS
BUY IN BULK
• Buy in bulk and keep it fresh for extended periods of time with Seal-a-Meal®.
• Buying in bulk can save you thousands of dollars per year. See this chart below…
BULK FOOD COMPARISON CHART
ITEM
APPROXIMATE
STANDARD
PKG PRICE /LB
APPROXIMATE
BULK
PKG PRICE/LB
%
SAVINGS
PER LB
$
SAVINGS
PER LB
APPROXIMATE
POUNDS PURCHASED
PER YEAR (4 people)
TOTAL FOOD
SAVINGS
Beef(USDA Choice)
$5.99
$4.49
25 %
$1.50
225
$336.94
Poultry(Chicken Breasts)
$4.49
$3.37
25 %
$1.12
225
$252.56
Pork
$4.69
$3.52
25 %
$1.17
100
$117.25
Fish
$6.99
$5.59
20 %
$1.40
50
$69.90
Cheeses
$4.49
$3.14
30 %
$1.35
125
$168.38
Fruits
$4.99
$3.74
25 %
$1.25
500
$623.75
Vegetables
$1.99
$1.49
25 %
$0.50
1,000
$497.50
Coffee(Beans)
$8.99
$5.99
33 %
$3.00
15
PREPARE MEALS IN ADVANCE
• Prepare large quantities of food, and then divide into smaller portions that work for you and your
family. Seal in bags for tomorrow, next week, next month, etc.
• Easily reheat by placing bag directly in boiling water or microwave. To microwave, cut corner of bag
to vent, and place on microwave safe dish.
KEEP LEFTOVERS AS FRESH AS THE DAY THEY WERE PREPARED
• After dinner, store leftovers in a Seal-a-Meal® bag, and keep in refrigerator or freezer for a later date.
MARINATE IN MINUTES
• Place food and favorite marinade in bag and vacuum seal for quick marinating.
PERFECT FOR FISHING AND HUNTING
• Use when fishing and hunting to keep your catch fresh until you’re ready to prepare them as a meal.
Seal-a-Meal® Vacuum Food Sealer prevents freezer burn during extended periods of time in the freezer.
Store fish and meats in the freezer immediately after sealing.
NOTE: DO NOT store vacuum sealed fish (smoked or raw) at room temperature or in the refrigerator.
IT’S NOT JUST FOR FOOD
• Store clothing in Seal-a-Meal® bags to prevent potential damage when stored in an attic or closet.
• Protect valuable documents by sealing them in an airtight Seal-a-Meal® bag.
• Place cardboard or some stiff material on both sides of your documents to ensure that they maintain
their continuity and shape.
• Keep your belongings clean and dry during boating or camping outings. Simply seal your clothing or
materials prior to your trip.
* Seal-a-Meal® storage time estimates depend on preparation, quality of food and storage conditions.
-12-
$45.00
$2,111.28
-13-
VS125(428-1250) V.qxd
1/10/05
16:25
Page 15
TROUBLESHOOTING
NOTHING HAPPENS WHEN I PRESS THE VACUUM BUTTON
1) Make sure the power cord is correctly plugged into the electrical outlet.
2) Make sure the battery is connected. Prior to first use, you will need to install and charge the
rechargeable battery. Refer to the Battery Installation Section.
3) Make sure the battery is charged or the power cord is correctly plugged into the electrical outlet.
4) Make sure the power cord is not damaged in any way.
5) Make sure the electrical outlet is operative by plugging in another appliance. If it is not, please
check the circuit breakers or fuses in your home.
6) The unit is equipped with a cool down period between vacuum cycles. Please wait 30 seconds
and try again.
AIR IS NOT REMOVED FROM THE BAG
1) Make sure the NOZZLE is completely inside the bag (refer to the "How to Vacuum Seal with
Seal-a-Meal® Bags" section of the manual to determine if you are doing it correctly).
2) Check that the bag is sealed at one end and has no holes. Seal the bag with air in it and put it
in water. Apply pressure to the bag. If there are bubbles present there is a leak, and a new bag
should be used.
3) Verify that the Lock ‘n Seal™ Nozzle/Drip Tray is in the drip tray compartment and seated
properly (check to make sure the rubber drain plug is properly installed).
4) Make sure lid is completely latched into place on both sides.
MINUTE MARINATING RECIPES
Save time – reduce marinating time from hours to minutes using Seal-a-Meal® Vacuum Food
Storage Bags or Minute Marinating Canister™ (sold separately). Marinating in Seal-a-Meal®
bags and canisters is a quick and easy way to infuse food with flavor.
ZESTY LIME MARINADE
⁄2 cup of fresh lime juice
2 tbs. grated lime peel
1
⁄2 cup of olive oil
Salt & pepper to taste
1
In a bowl, stir all ingredients until well blended. This is enough marinade for 2 pounds and works well with
chicken, beef, fish or shrimp.
JERK MARINADE
1 white onion, chopped
3
⁄4 cup of scallions, chopped
2 tsp. of thyme
3 tsp. of brown sugar
1 tsp. of allspice
1
⁄4 tsp. of ground nutmeg
GARLIC ROSEMARY MARINADE
⁄4 cup of fresh rosemary, chopped
5 cloves of garlic, chopped
1
⁄2 cup of fresh lemon juice
THE BAG WILL NOT SEAL
See "Air Was Initially Removed from Bag" section above. Make sure no liquids were drawn to the
sealing strip region.
Note: In the event the bag does not seal, the seal button can be manually pressed during the
vacuum process at any time by pressing the seal button to seal the bag.
⁄2 cup of extra virgin olive oil
Salt & pepper to taste
1
Combine all ingredients in a food processor using the pulse button or the low speed or mix ingredients in a bowl.
Do not over process; visible pieces of rosemary should remain. Works best with lamb, chicken or pork.
CITRUS MARINADE
Zest of 1 lemon – reserve the juice
Zest of 1 orange – reserve the juice
1
⁄4 cup of Soy sauce
2 tbs. Ginger root – chopped
4 garlic cloves
1
⁄4 cup of honey
Combine the juice of the orange and lemon with the soy sauce in a bowl. Add the remaining ingredients into the
bowl. Use a whisk to mix all of the ingredients. This is enough marinade for 2 pounds and works best with pork or
chicken.
BOURBON MARINADE
THE BAG MELTS
The sealing strip may have been too hot during the sealing process. Allow the unit to cool for 30
seconds between uses. If the bag continues to melt, allow unit to cool with the lid in the upright
position for 1-2 minutes before using.
1 tsp. black pepper
2 tsp. of red pepper flakes
⁄4 cup of light soy sauce
1
⁄4 cup of vegetable oil
3 tbs. of balsamic vinegar
1
⁄4 tsp. of hot sauce
1
Combine all ingredients in a food processor. Using the pulse switch or low speed mix ingredients until completely
blended. This is enough marinade for 2 pounds and excellent with all food, especially chicken and beef.
1
AIR WAS INITIALLY REMOVED FROM THE BAG, BUT SOME HAS
SINCE ENTERED THE BAG
1) Check the seal of the bag. There may be a hole or wrinkle that is allowing air to re-enter the
bag. Carefully cut the bag open and re-seal it, or use an entirely new bag.
2) Make sure there is no moisture or juices from the food present within the bag. You may need
to cut open the bag and re-seal it, or use an entirely new bag. Foods with excess liquids should
be frozen prior to vacuum sealing. Please refer to the "How to Seal Delicate or Moist Foods"
section.
3) Make sure there were no food items with sharp edges that may have punctured the bag. If you
find a puncture hole seal the item in an entirely new bag.
4) Make sure no liquids were drawn to the sealing strip region.
2 cloves of garlic- minced
1
⁄4 cup of cilantro – chopped fresh
2 tsp. of red pepper flakes
⁄2 cup sugar, brown
⁄2 cup Dijon mustard
⁄2 cup bourbon
1
⁄3 cup soy sauce
1
1
1
1 clove of garlic chopped
2 tbs. Worcestershire sauce
1 medium onion chopped
Pepper to taste
In a bowl whisk the sugar, mustard, bourbon and soy sauce. When well blended stir the remaining ingredients in.
This is enough marinade for 2 pounds and can be used for any beef, chicken, pork or shellfish.
SPICY RUM MARINADE
2 Jalapeno pepper- stems and seeds removed
3
⁄4 cup of dark rum
1
⁄2 cup of lime juice
3
⁄4 cup of vegetable oil
⁄4 cup tbs. of cilantro, chopped
4 cloves of garlic minced
1 tsp. of red pepper flakes
1
In a food processor or blender puree the pepper, rum and lime juice. Then add the remaining ingredients. This is
enough marinade for 2 pounds and works best with shrimp, chicken or beef.
-14-
-15-